用 Creator 模式开发 DeepSeek Harness 自定义插件:从 0 到可调用
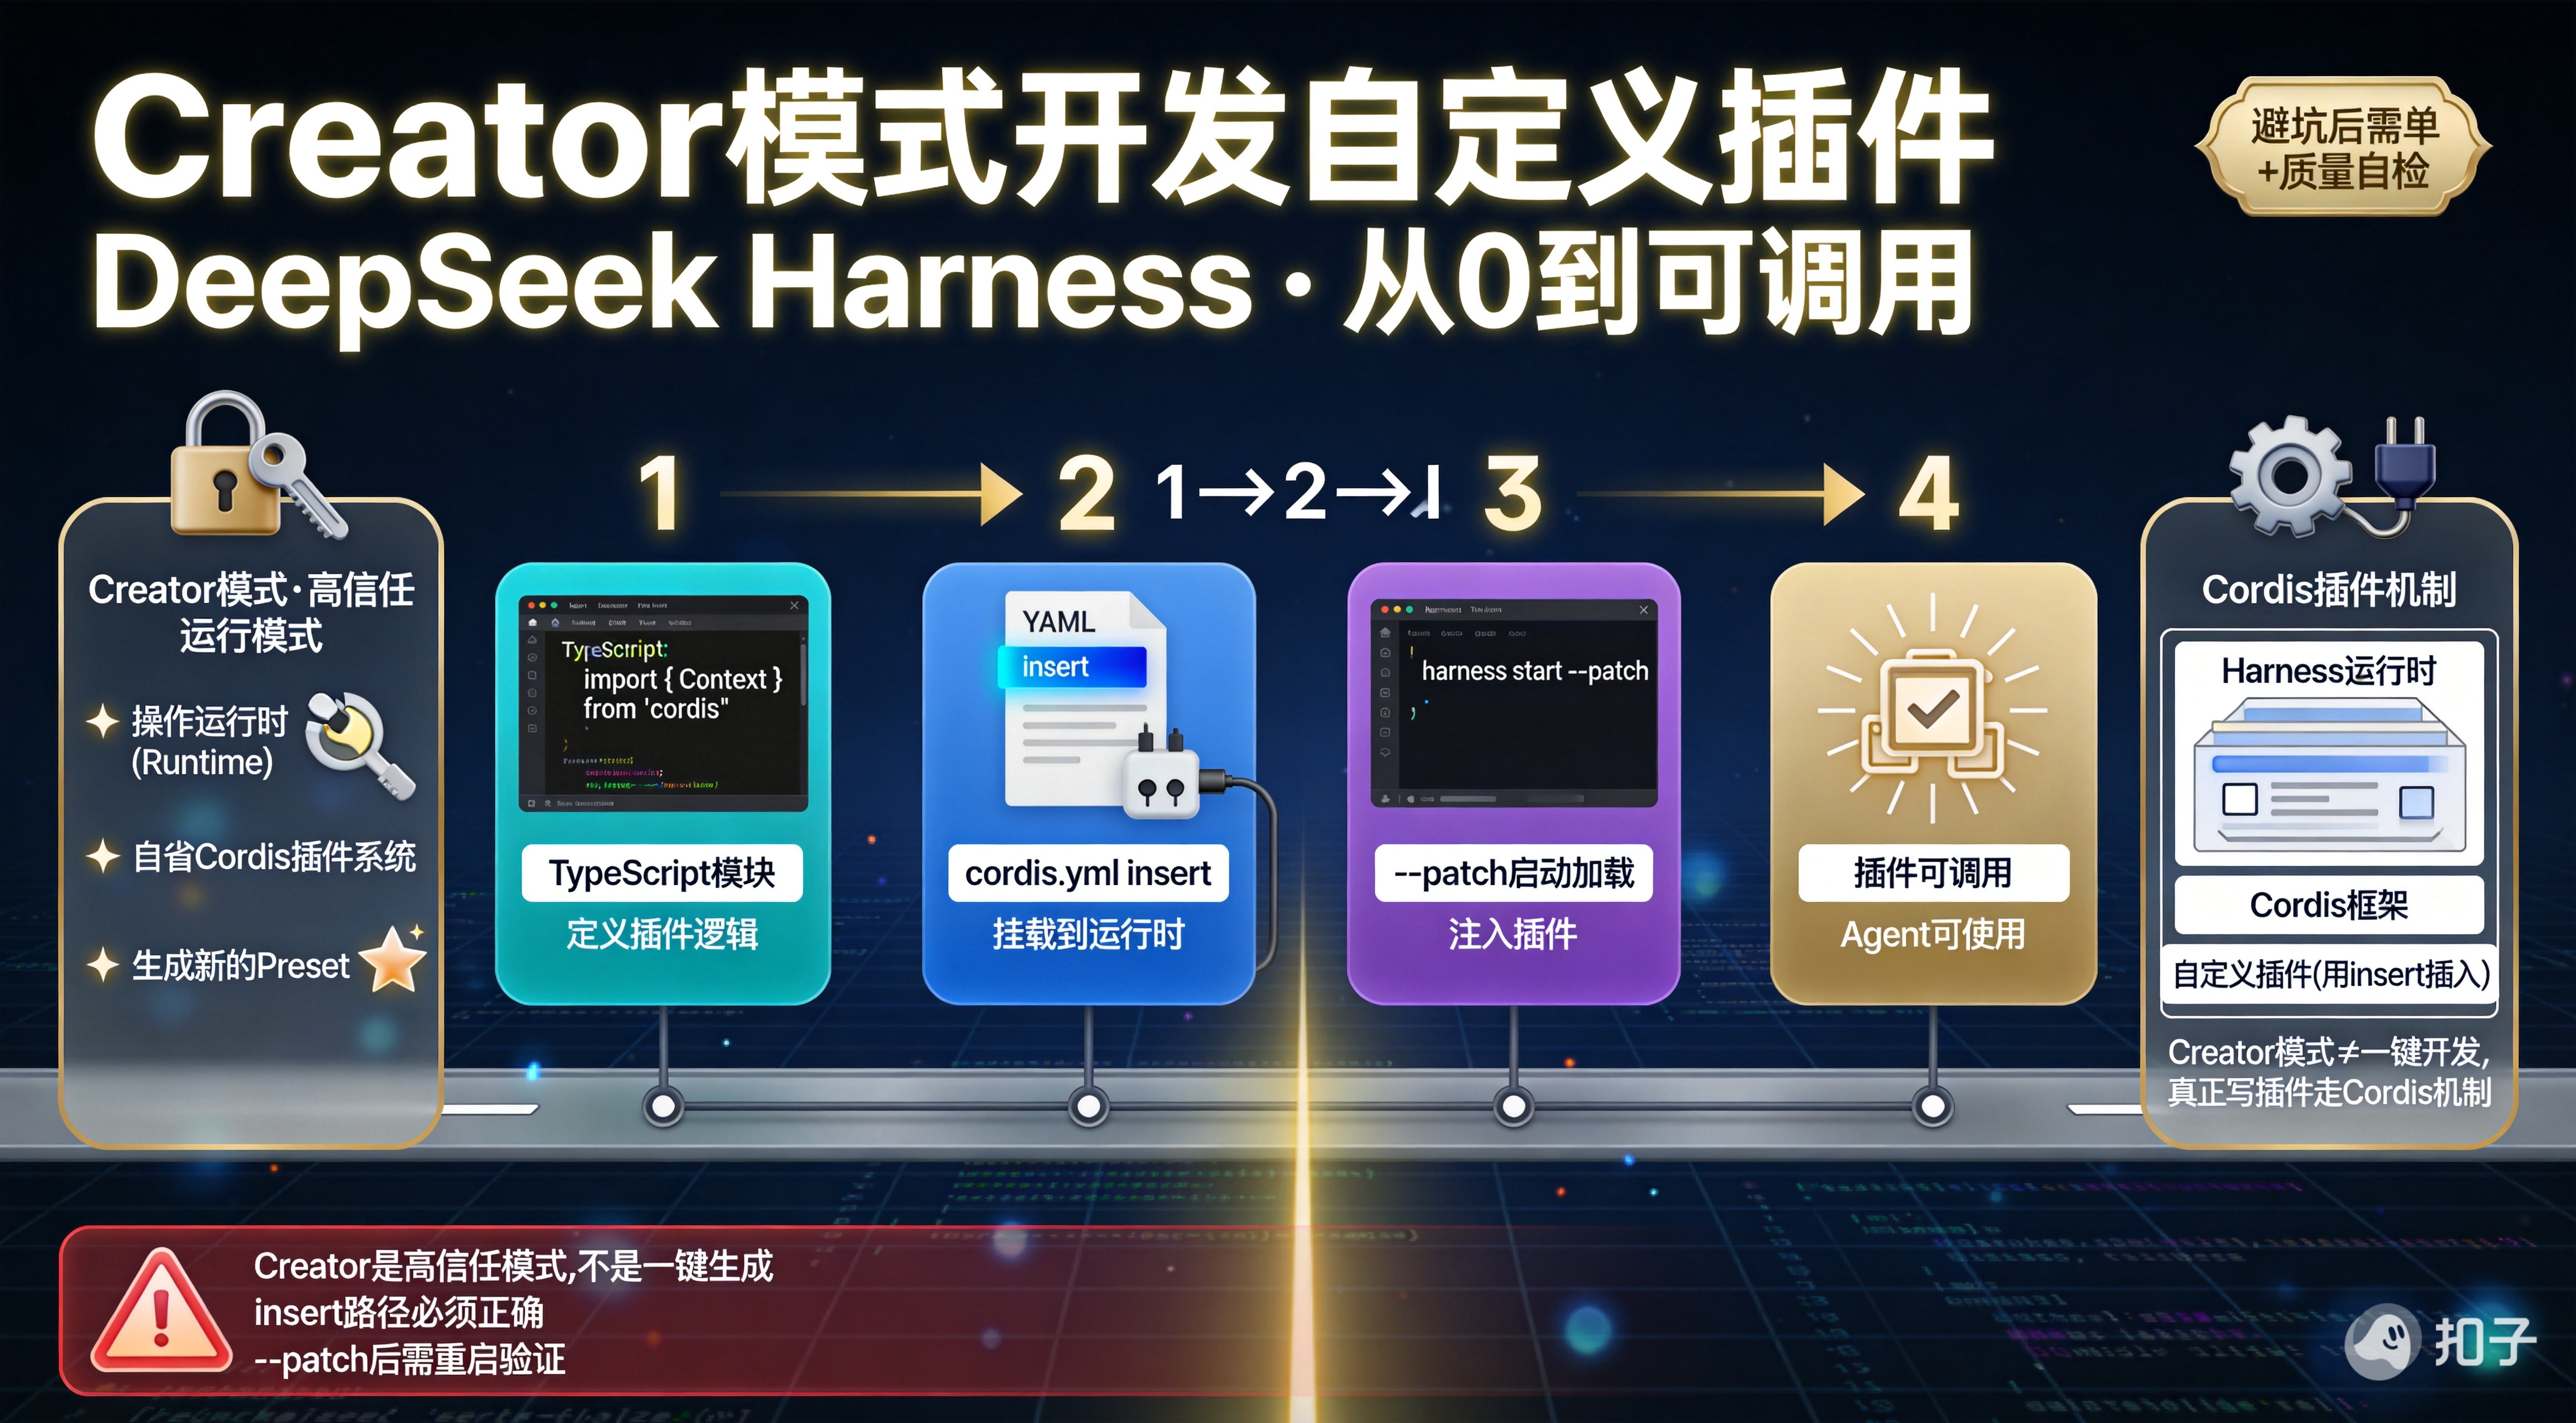
💡 摘要:很多同学以为"Creator 模式 = 一键开发插件",其实不准确。Creator 模式是 DeepSeek Harness 的高信任运行模式 ,它允许 Agent 操作运行时、自省 Cordis 插件系统、生成新的 Preset;而真正写一个插件 ,走的还是 Cordis 插件机制:写一个 TypeScript 模块 → 用
cordis.yml的insert把它挂进运行时 → 通过--patch启动加载。本文以"做一个翻译工具插件"为完整示例,带你跑通"Creator 模式 + 自定义插件"的全链路,并附上避坑清单与质量自检。
文章目录
- [用 Creator 模式开发 DeepSeek Harness 自定义插件:从 0 到可调用](#用 Creator 模式开发 DeepSeek Harness 自定义插件:从 0 到可调用)
-
- [一、先把概念勘误:Creator 模式 ≠ 插件开发按钮](#一、先把概念勘误:Creator 模式 ≠ 插件开发按钮)
- 二、环境准备:从源码开始
- 三、最小插件:先证明"它能加载"
-
- [用 Patch 把它挂进去](#用 Patch 把它挂进去)
- 启动并验证
- [四、升级为工具插件:让 Agent 真正能调用](#四、升级为工具插件:让 Agent 真正能调用)
- 五、插件生命周期:为什么不需要手动清理?
- [六、在 Creator 模式下开发:让 Agent 帮你造插件](#六、在 Creator 模式下开发:让 Agent 帮你造插件)
-
- [步骤 1:用 Creator 模式启动 Web UI](#步骤 1:用 Creator 模式启动 Web UI)
- [步骤 2:用自然语言描述你想要的插件](#步骤 2:用自然语言描述你想要的插件)
- [步骤 3:加载并验证](#步骤 3:加载并验证)
- [七、把插件固化进自定义 Preset(进阶)](#七、把插件固化进自定义 Preset(进阶))
- 八、插件开发避坑清单
- 九、一个完整的"生产级插件"目录结构
- 结语
一、先把概念勘误:Creator 模式 ≠ 插件开发按钮
DeepSeek Harness 目前内置四种模式:Standard / PTC(Code) / Minimal / Creator。它们的关系是同一套 Cordis 内核 + 不同的会话级插件组合(Preset) ,切换模式切换的是"这台 Agent 被允许拥有什么手脚",模型还是你配置的那个模型。
Creator 模式的特殊之处 :它在 Standard 全套能力的基础上,额外开放了一组用于操作 Cordis 插件系统的专属工具,让 Agent 可以:
- 检查当前运行时有哪些插件在跑
- 在内存里试验新的插件组合
- 直接创作出一个全新的模式预设(生成
agent.cordis.yml)
所以 Creator 模式在插件开发中扮演的角色是:提供一个高信任的本地试验场 ------你可以在 Creator 模式下让 Agent 帮你生成插件骨架、调试 Preset,但插件本身的写法遵循的是 Cordis 的统一规范,跟用哪种模式启动 Web UI 加载它关系不大。
⚠️ 安全红线 :Creator 模式允许 Agent 操作运行时,只在可信本地环境使用,禁止公网部署开启。下面的所有操作都默认你在本地可信环境进行。
二、环境准备:从源码开始
开发插件建议直接克隆源码,而不是用 npx @deepseek-ai/dsh web 体验版------因为官方插件教程本身就是建立在源码仓库之上的。
bash
# 1. 克隆仓库
git clone https://github.com/deepseek-ai/deepseek-harness.git
cd deepseek-harness

# 2. 安装依赖(需要 Node.js 22.19+ 或 24+,Corepack 提供的 pnpm)
corepack enable
pnpm install
pnpm run build

# 3. 第一次 typecheck,确认依赖与 TypeScript 项目引用处于可用状态
pnpm run typecheck
📌 项目目前仍处于 Developer Preview(开发者预览) 阶段,官方明确提醒可能存在兼容性破坏性变化。今天能跑的插件,未来版本可能需要微调。
三、最小插件:先证明"它能加载"
在仓库根目录建一个临时插件目录:
bash
mkdir -p scratch-plugin/src创建 scratch-plugin/src/my-plugin.ts:
typescript
import type { Context } from '@deepseek-ai/cordis'

export const name = 'hello-plugin'

export function apply(ctx: Context) {
  console.log('[hello-plugin] plugin loaded!')
}
这就是 DeepSeek Harness 插件的最小形态------导出 name + 导出 apply 函数 。Cordis 加载插件时会调用 apply,并把运行时上下文 ctx 传入。
用 Patch 把它挂进去
在 scratch-plugin/ 下创建 cordis.yml:
yaml
- insert:
  - id: hello
    name: '/ABSOLUTE_PATH_TO/deepseek-harness/scratch-plugin/src/my-plugin.ts'
⚠️ 最容易踩的坑 :插件路径必须是绝对路径 。官方文档特别强调了这一点。不要写
./scratch-plugin/...,而要写/Users/你的用户名/deepseek-harness/scratch-plugin/...(Windows 下类似C:/workspace/deepseek-harness/scratch-plugin/...,建议用正斜杠减少转义问题)。
启动并验证
bash
pnpm dsh web --patch ./scratch-plugin/cordis.yml打开 http://127.0.0.1:3080,如果终端打印出 [hello-plugin] plugin loaded!,恭喜------你的第一个插件已经进入了 Harness 运行时。
💡
--patch是命令行传入的覆盖层,优先级高于 Profile 里的 Bundle 和$DSH_HOME/cordis.patch.yml。本地试验插件时用它最方便;长期使用的插件再合并进自己的 Profile 层。
四、升级为工具插件:让 Agent 真正能调用
光打印日志不够,我们要让 Agent 能主动调用我们的能力。这就要用到 defineTool + ctx.tools.register。
把 scratch-plugin/src/my-plugin.ts 替换为下面这个完整的翻译工具插件:
typescript
import type { Context } from '@deepseek-ai/cordis'
import { defineTool } from '@deepseek-ai/dsh-tools'

export const name = 'tool-translate'

// 声明依赖:需要 tools 服务(注册工具)和 llm 服务(翻译时调用模型)
export const inject = ['tools', 'llm'] as const

export function apply(ctx: Context) {
  ctx.tools.register(defineTool({
    name: 'translate',
    description: 'Translate text to a specified language. Use this when the user asks you to translate content.',

    // 1. 参数 schema(JSON Schema 格式):Agent 靠它知道怎么调用
    parameters: {
      type: 'object',
      properties: {
        text: {
          type: 'string',
          description: 'The text to translate',
        },
        targetLanguage: {
          type: 'string',
          description: 'Target language (e.g., "English", "Chinese", "Japanese")',
        },
        sourceLanguage: {
          type: 'string',
          description: 'Source language. If omitted, auto-detected.',
        },
      },
      required: ['text', 'targetLanguage'],
      additionalProperties: false,
    },

    // 2. 输出 schema + 渲染函数
    output: {
      schema: {
        type: 'object',
        properties: {
          translatedText: { type: 'string' },
          detectedLanguage: { type: 'string' },
        },
        required: ['translatedText', 'detectedLanguage'],
        additionalProperties: false,
      },
      render(value) {
        return [{
          type: 'text',
          text: `[${value.detectedLanguage} → ${value.targetLanguage}]\n${value.translatedText}`,
        }]
      },
    },

    // 3. 执行函数:通过能力接缝调用 LLM,而非硬编码 API
    async execute(args, exec) {
      const systemPrompt = `You are a professional translator. Translate the following text to ${args.targetLanguage}. Output only the translation, nothing else.`

      const messages = [{
        role: 'user' as const,
        content: [{ type: 'text' as const, text: args.text }],
        source: 'plugin' as const,
      }]

      // 通过 resolveCallConfig 获取当前配置的默认模型,而不是写死
      const callConfig = await ctx.llm.resolveCallConfig({ purpose: 'primary' })

      const stream = ctx.llm.stream({
        provider: callConfig.provider,
        model: callConfig.model,
        messages,
        system: systemPrompt,
        temperature: 0.3,
        signal: exec.signal,   // 支持取消
        purpose: 'primary',
      })

      let translatedText = ''
      for await (const chunk of stream) {
        if (chunk.type === 'text-delta') {
          translatedText += chunk.text
        }
      }

      return {
        translatedText,
        detectedLanguage: args.sourceLanguage ?? 'auto-detected',
        targetLanguage: args.targetLanguage,
      }
    },

    // 4. 展示函数:纯函数,不做 I/O
    presentCall(args) {
      return {
        kind: 'generic',
        data: { text: args.text?.slice(0, 100), target: args.targetLanguage },
      }
    },
    presentResult(_args, content) {
      return {
        kind: 'generic',
        data: { preview: content.map(c => c.text || '').join('').slice(0, 200) },
      }
    },
  }))
}
这段代码的关键点
inject = ['tools', 'llm']:声明依赖。只有tools和llm服务就绪,Harness 才会调用apply。不要假设ctx上所有服务都已存在 ,依赖关系必须通过inject声明,让运行时负责排序和生命周期。defineTool:参数parameters使用标准 JSON Schema 格式,包含type: 'object'、properties、required、additionalProperties: false。这是注册工具时的强制要求。- 通过
ctx.llm调用模型 :不直接调用 API,走"能力接缝";使用resolveCallConfig获取配置的模型而非硬编码。 exec.signal传递:支持 AbortSignal,让工具调用可以被取消。- 具名导出 :必须用
export const name+export function apply,千万别写export default------否则inject元数据会被 Loader 悄悄丢掉,表现为"装上了但不依赖、行为诡异"。
重新启动并验证
bash
pnpm dsh web --patch ./scratch-plugin/cordis.yml在 Web UI 里输入:"请把'你好世界'翻译成英文"。如果配置正常,Agent 会调用 translate 工具,返回:
[auto-detected → English]
Hello world
插件闭环跑通!
五、插件生命周期:为什么不需要手动清理?
DeepSeek Harness 的一个核心设计:通过 ctx 注册的事件、工具、定时器,会在插件卸载时自动清理。
如果你的插件创建了额外资源(如网络连接、轮询定时器),通过 ctx.effect 提供释放函数:
typescript
import type { Context } from '@deepseek-ai/cordis'

export const name = 'heartbeat-plugin'

export function apply(ctx: Context) {
  ctx.effect(() => {
    const timer = setInterval(() => {
      console.log('[heartbeat] alive')
    }, 5000)
    // 返回清理函数,插件卸载时执行
    return () => clearInterval(timer)
  })
}
这比手动维护全局数组更可靠------每项副作用都跟着插件实例绑定,配置变化或热更新时不会把旧监听器留在运行时里。
六、在 Creator 模式下开发:让 Agent 帮你造插件
前面我们手动写了插件。现在来到 Creator 模式的真正价值------让 Agent 辅助生成插件骨架。
步骤 1:用 Creator 模式启动 Web UI
bash
# 在 Web UI 设置里选择 Creator 模式,或在新建会话时选 Creator
pnpm dsh web
步骤 2:用自然语言描述你想要的插件
在 Creator 模式的会话里输入:
请在 scratch-plugin/src/ 下为我生成一个自定义插件,要求:
1、插件名叫做 jira-ticket-fetcher
2、inject 依赖 tools 服务
3、注册一个工具叫 fetch_jira_ticket,参数 ticket_id(必填字符串)
4、工具内部调用 https://your-jira-instance/rest/api/2/issue/{ticket_id}
5、返回 issue 的 key、summary、status、assignee
6、API Token 从环境变量 JIRA_TOKEN 读取,不要硬编码
7、同时生成 scratch-plugin/cordis.yml,用绝对路径 insert 这个插件
Agent 会直接生成:
scratch-plugin/src/jira-ticket-fetcher.tsscratch-plugin/cordis.yml
步骤 3:加载并验证
bash
pnpm dsh web --patch ./scratch-plugin/cordis.yml新开会话(任意模式),让 Agent "用 fetch_jira_ticket 工具查一下 PROJ-123",插件即生效。
💡 Creator 模式的优势:把"插件开发"这件需要熟悉 Cordis API 的事,降级为"用自然语言描述需求"。Agent 本身运行在 Standard 全套能力之上,能读文档、能写代码、能生成符合规范的
cordis.yml。但生成的代码你仍要 review------尤其是权限、凭据、网络访问这些安全敏感点。
七、把插件固化进自定义 Preset(进阶)
当你发现自己反复做某一类任务时,就该考虑自定义 Preset 了。Creator 模式可以帮你生成 agent.cordis.yml:
请为我生成一个自定义 Agent 预设,名字叫 translator-expert。需求:
1、继承 standard 基础能力;
2、默认加载我刚刚写的 tool-translate 插件;
3、角色 persona 设定:你是一名资深翻译专家,优先考虑语境与习语;
4、输出完整 agent.cordis.yml,保存到 ~/.dsh/.agent-presets/translator-expert/ 下面。
Agent 会直接生成完整的 agent.cordis.yml 配置,保存到 .agent-presets 目录,立刻可以选用。
核心价值:把"翻译专家"的工作 SOP 固化成专属 Agent,新会话里不用每次从头解释一遍。Creator 模式真正省掉的,是重复任务里的沟通成本。
八、插件开发避坑清单
⚠️ 这些都是社区踩过的真实坑,开发前看一遍能省 2 小时:
- 路径必须绝对 :
cordis.yml里name字段必须是绝对路径,相对路径会找不到模块。 - 具名导出,禁用 default :
export const name+export function apply,写export default会导致inject丢失。 inject声明要全 :插件用到的服务(tools、llm、logger等)都要在inject数组里声明,否则apply执行时ctx.xxx可能是 undefined。- 对象类型输出必须
additionalProperties: false:output.schema如果用type: 'object',必须显式声明additionalProperties: false,否则注册直接失败。 - 异步执行用
exec.signal:execute(args, exec)第二个参数里的signal要传给下游调用,支持取消。 - 凭据走环境变量:API Key、Token 通过环境变量注入,别写死在代码或截图里。
- 本地试验用
--patch,长期使用合并进 Profile :--patch是覆盖层,适合快速验证;稳定后的插件应该合并进自己的 Profile 或 Bundle。 - 预设切换必须新开会话:已经在对话框里打开了会话,再去设置里改 Preset,当前会话不会变。必须新开会话才能应用新的 Preset。
九、一个完整的"生产级插件"目录结构
如果你想把插件做得规范(参考官方 packages/ 下的插件包结构):
scratch-plugin/
├── src/
│   ├── index.ts          # 插件入口,export name / inject / apply
│   └── invariant.ts      # 运行时不变式声明
├── tests/
│   └── translate.spec.ts # 单元测试(vitest)
├── cordis.yml            # 本地 patch 配置
├── package.json          # name: "@deepseek-ai/dsh-tool-translate"
├── tsconfig.json         # extends 仓库 tsconfig.base.json
└── README.md             # 含 Model Experience 部分
invariant.ts 的最小写法(每个包必须有):
typescript
import { registerPackageInvariant } from '@deepseek-ai/dsh-invariants'

registerPackageInvariant(
  '@deepseek-ai/dsh-tool-translate',
  'No runtime invariant: leaf tool plugin with no owned state.',
)
测试约定:单元测试放 tests/ 目录(不放 src/__tests__/),产品可见的插件还需要 REAL-composition 测试(通过 Loader 加载,而不是手动 ctx.plugin)。
如果要让插件出现在 dsh 的 Bundle 里(而不只是 --patch 临时加载),需要在 Bundle 的 cordis.patch.yml 添加:
yaml
- id: tool-translate
  name: '@deepseek-ai/dsh-tool-translate'
同时在 Bundle 的 package.json 声明依赖:"@deepseek-ai/dsh-tool-translate": "workspace:*".
结语
回到"如何用 Creator 模式开发自定义插件"这个问题,答案其实分成两层:
表层:Creator 模式是 DeepSeek Harness 的高信任运行模式,开放了运行时自省与 Preset 创作能力。你可以在 Creator 模式下让 Agent 帮你生成插件骨架、调试配置、固化工作流------把"插件开发"降级为"自然语言描述"。
底层 :插件本身的写法是统一的 Cordis 规范------一个导出 name 和 apply 的 TypeScript 模块,通过 ctx.tools.register(defineTool(...)) 注册工具,用 cordis.yml 的 insert 挂载,通过 pnpm dsh web --patch 加载进运行时。这套机制跟你用 Standard / PTC / Minimal / Creator 哪种模式启动 Web UI 加载插件无关。
所以正确的工作流是:
- 用 Creator 模式 在可信本地环境试验、让 Agent 辅助生成插件代码
- 按 Cordis 插件规范 写好
apply+defineTool,处理依赖注入与副作用清理 - 用
--patch快速加载验证,稳定后合并进自定义 Preset 或 Bundle - 遵守 安全红线:Creator 模式禁公网部署,API Key 走环境变量,工作区要窄
DeepSeek Harness 的关键不是"它已经内置了多少功能",而是:你能不能把自己的工作方式写成一个可加载、可替换、可清理的插件。当一个重复任务需要固定步骤时,写 Plugin;当一个能力要被其他模块复用时,拆成 Service;当一个版本需要组合多个能力时,使用 Profile 和 Patch。
📌 由于项目迭代极快,Star 数、版本号、插件 API 细节请以 GitHub 仓库实页与官方文档(deepseek-harness.github.io)为准。本文基于 2026 年 8 月的公开资料整理,部分细节可能已在最新版本中变化。
参考资料
- DeepSeek Harness 官方仓库:github.com/deepseek-ai/deepseek-harness
- DeepSeek Harness 官方文档:deepseek-harness.github.io
- CSDN DeepSeek 技术社区相关实践指南
- Cordis 插件框架与《A Programming Paradigm for Spatiotemporal Composability》论文