**摘要:**本文系统讲解基于 LlamaIndex 构建 RAG 知识库问答系统的完整实现。文章从前端聊天逻辑入手,详细拆解 ChatView.vue 与 ChatInput.vue 的交互流程、chat.ts 中消息发送与接口调用机制,并给出完整可运行的 Vue 代码;随后深入后端,介绍 RAGService 的初始化、文档摄取流水线、向量索引构建、混合检索(向量检索与 BM25 融合)以及语义重排等核心环节,最终实现支持知识库问答、流式输出与多会话记忆的完整应用。
内容参考于:图灵AI大模型全栈
首先是前端逻辑,聊天都是在chat.ts里实现的
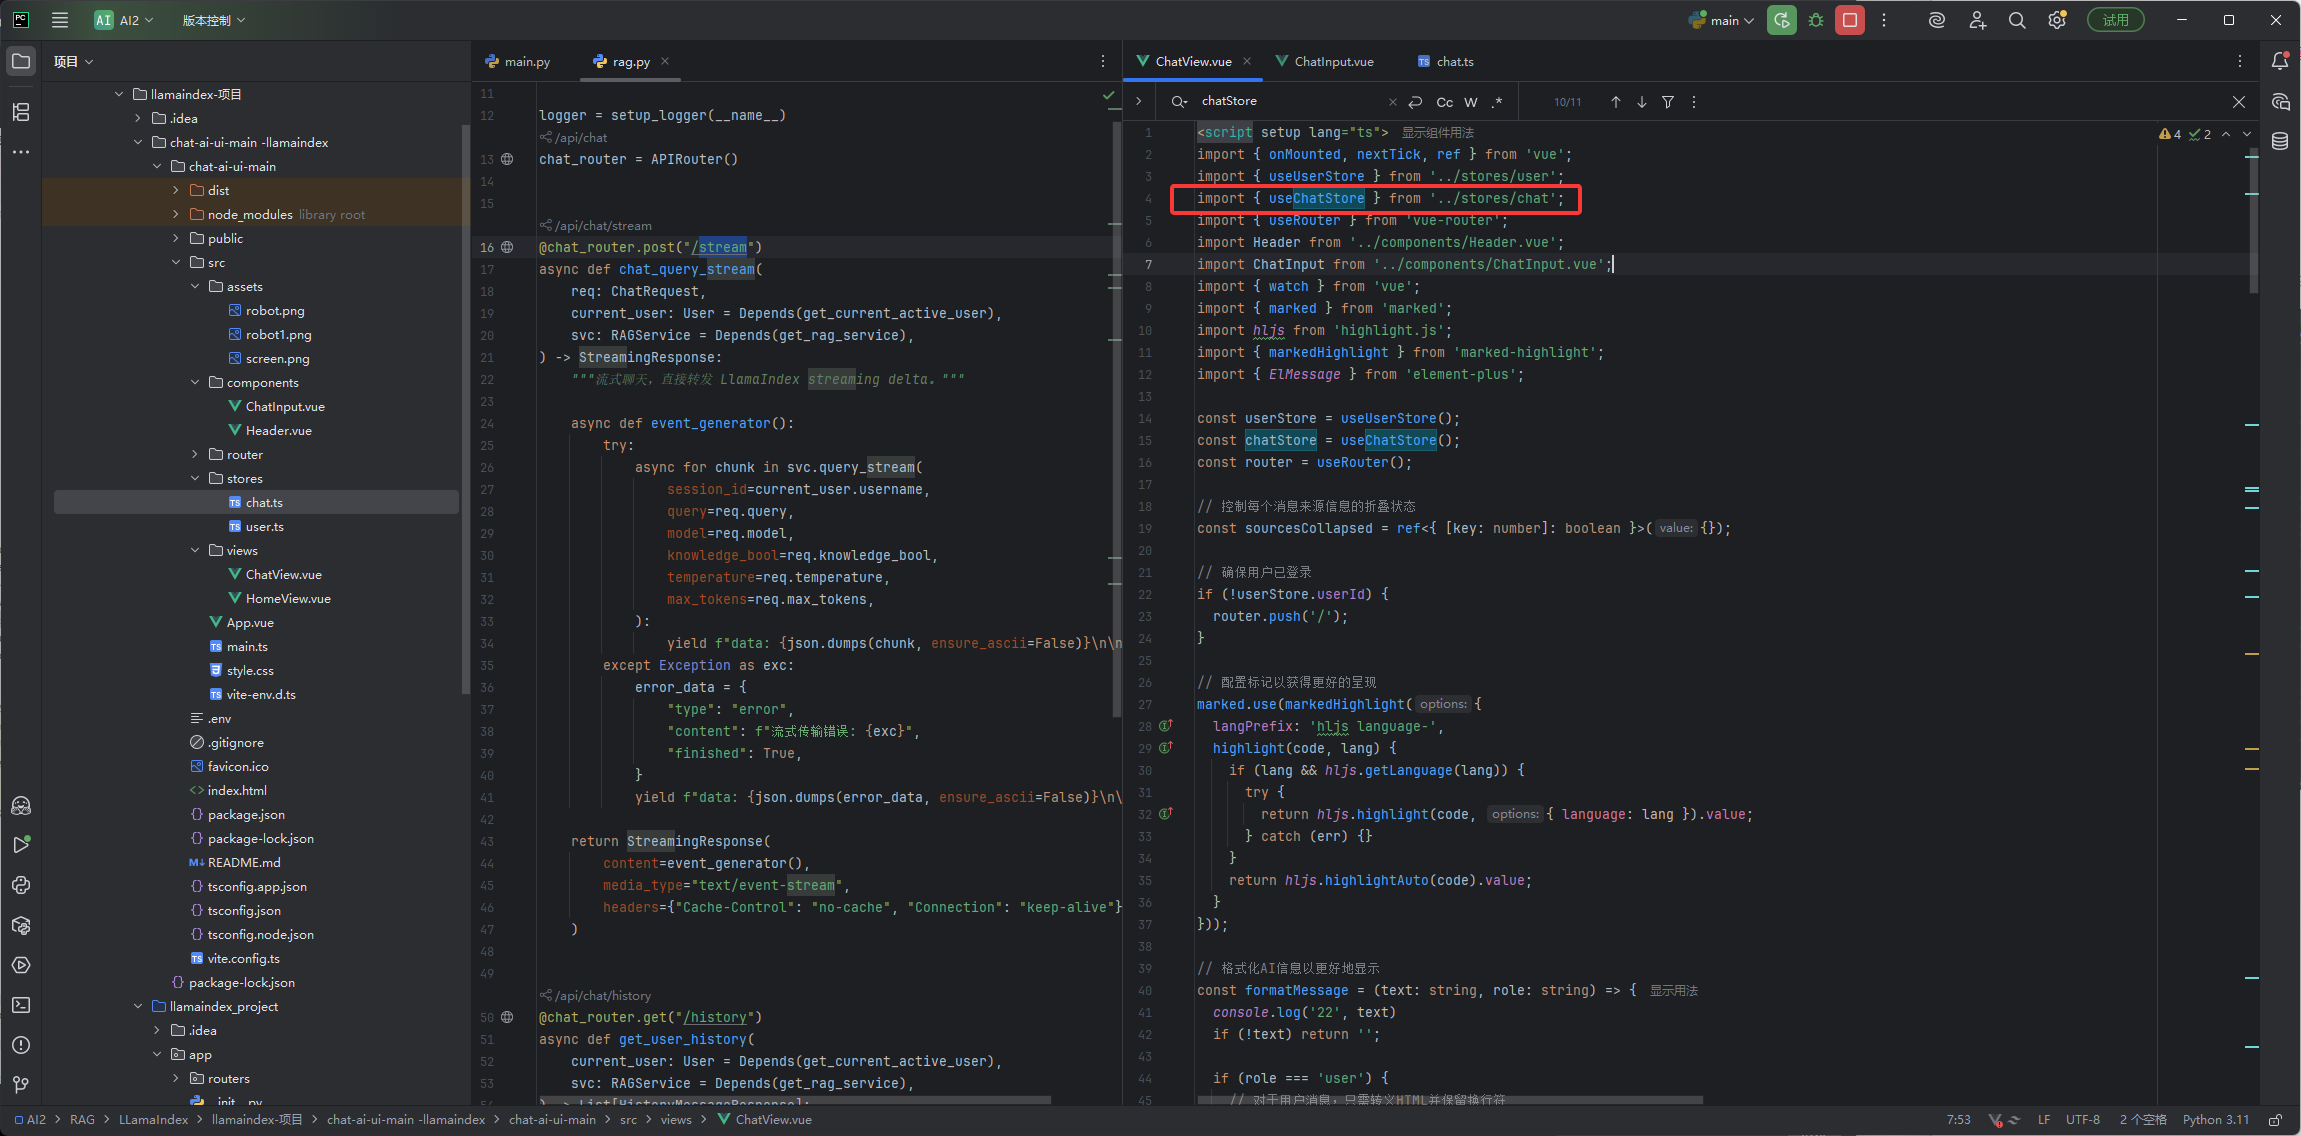
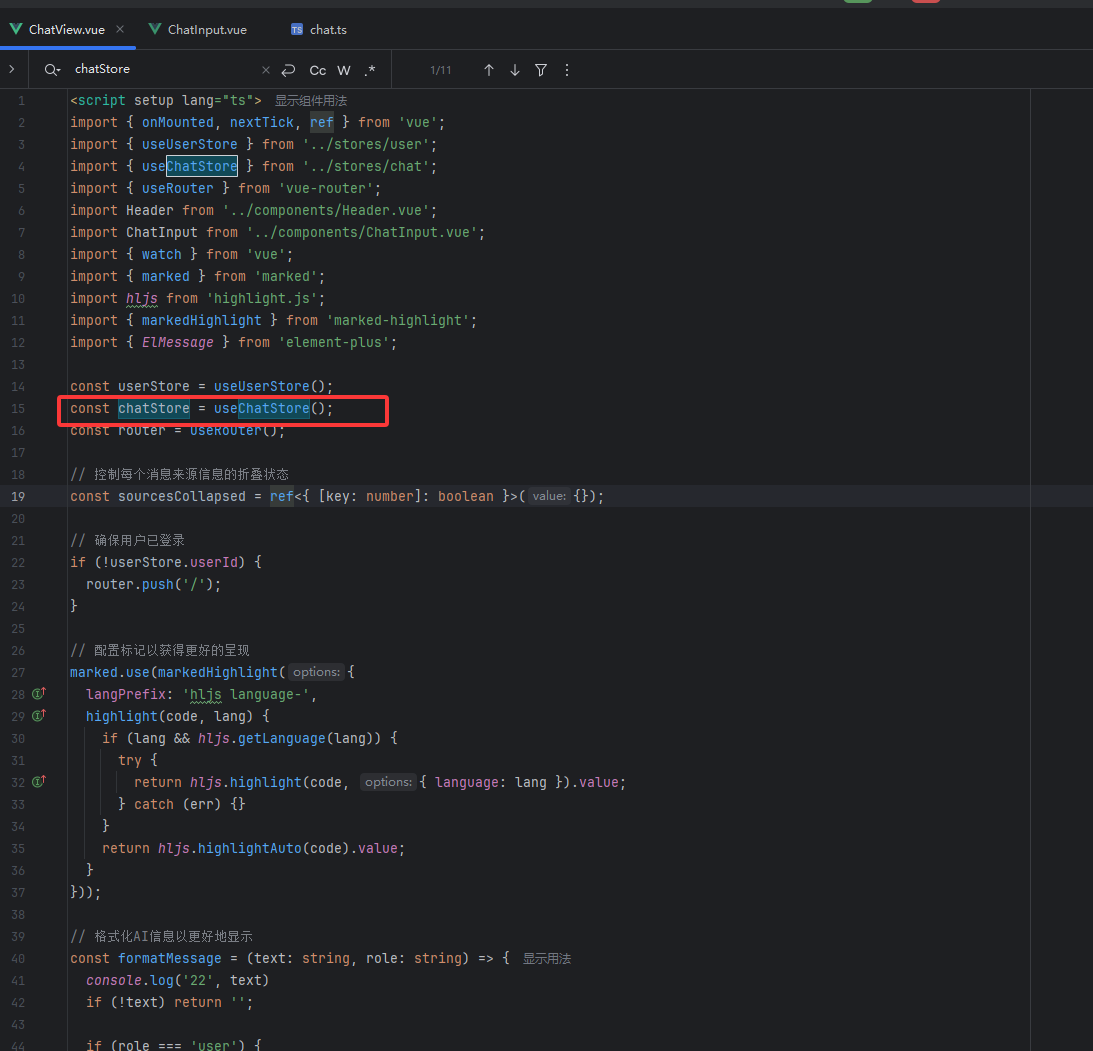
首先在下图红框进行引用chat.ts,chat.ts文件中返回了一个叫useChatStore标识(它就代表了整个chat.ts文件里的代码)
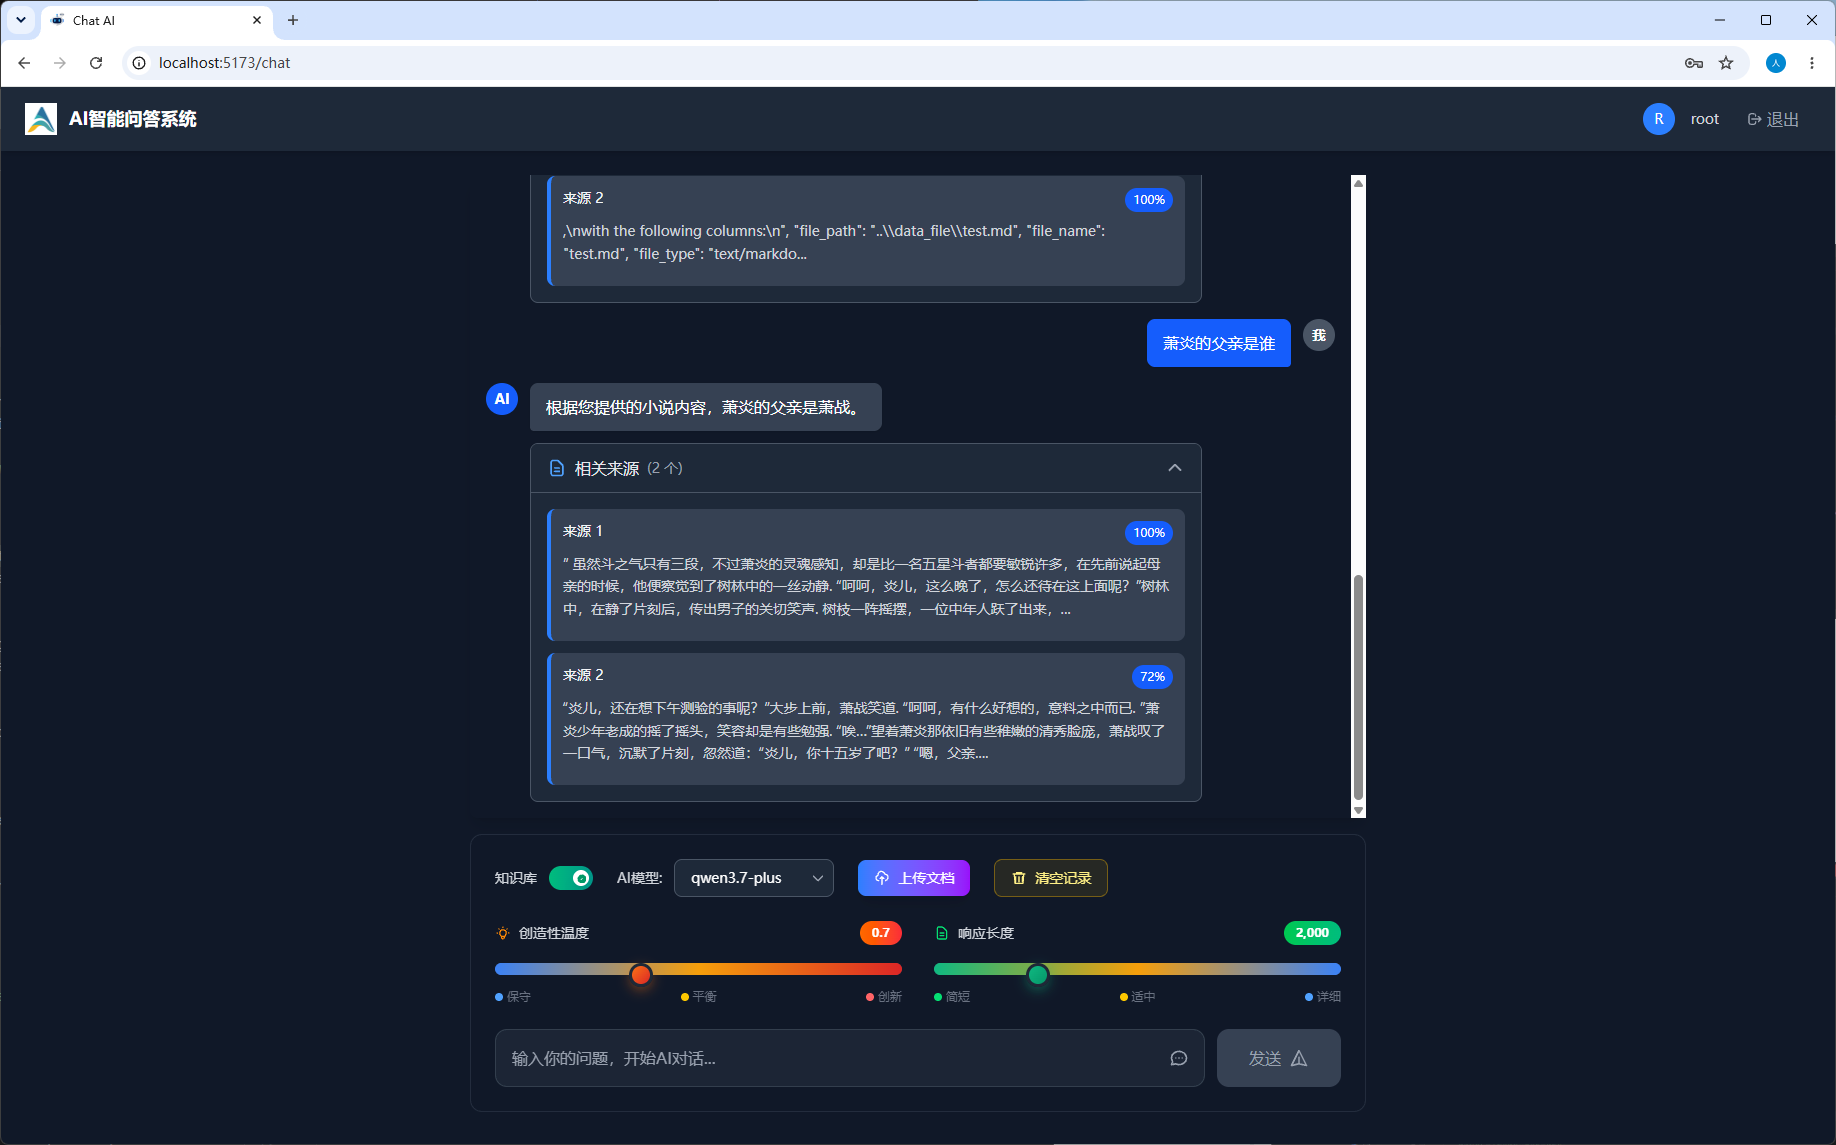
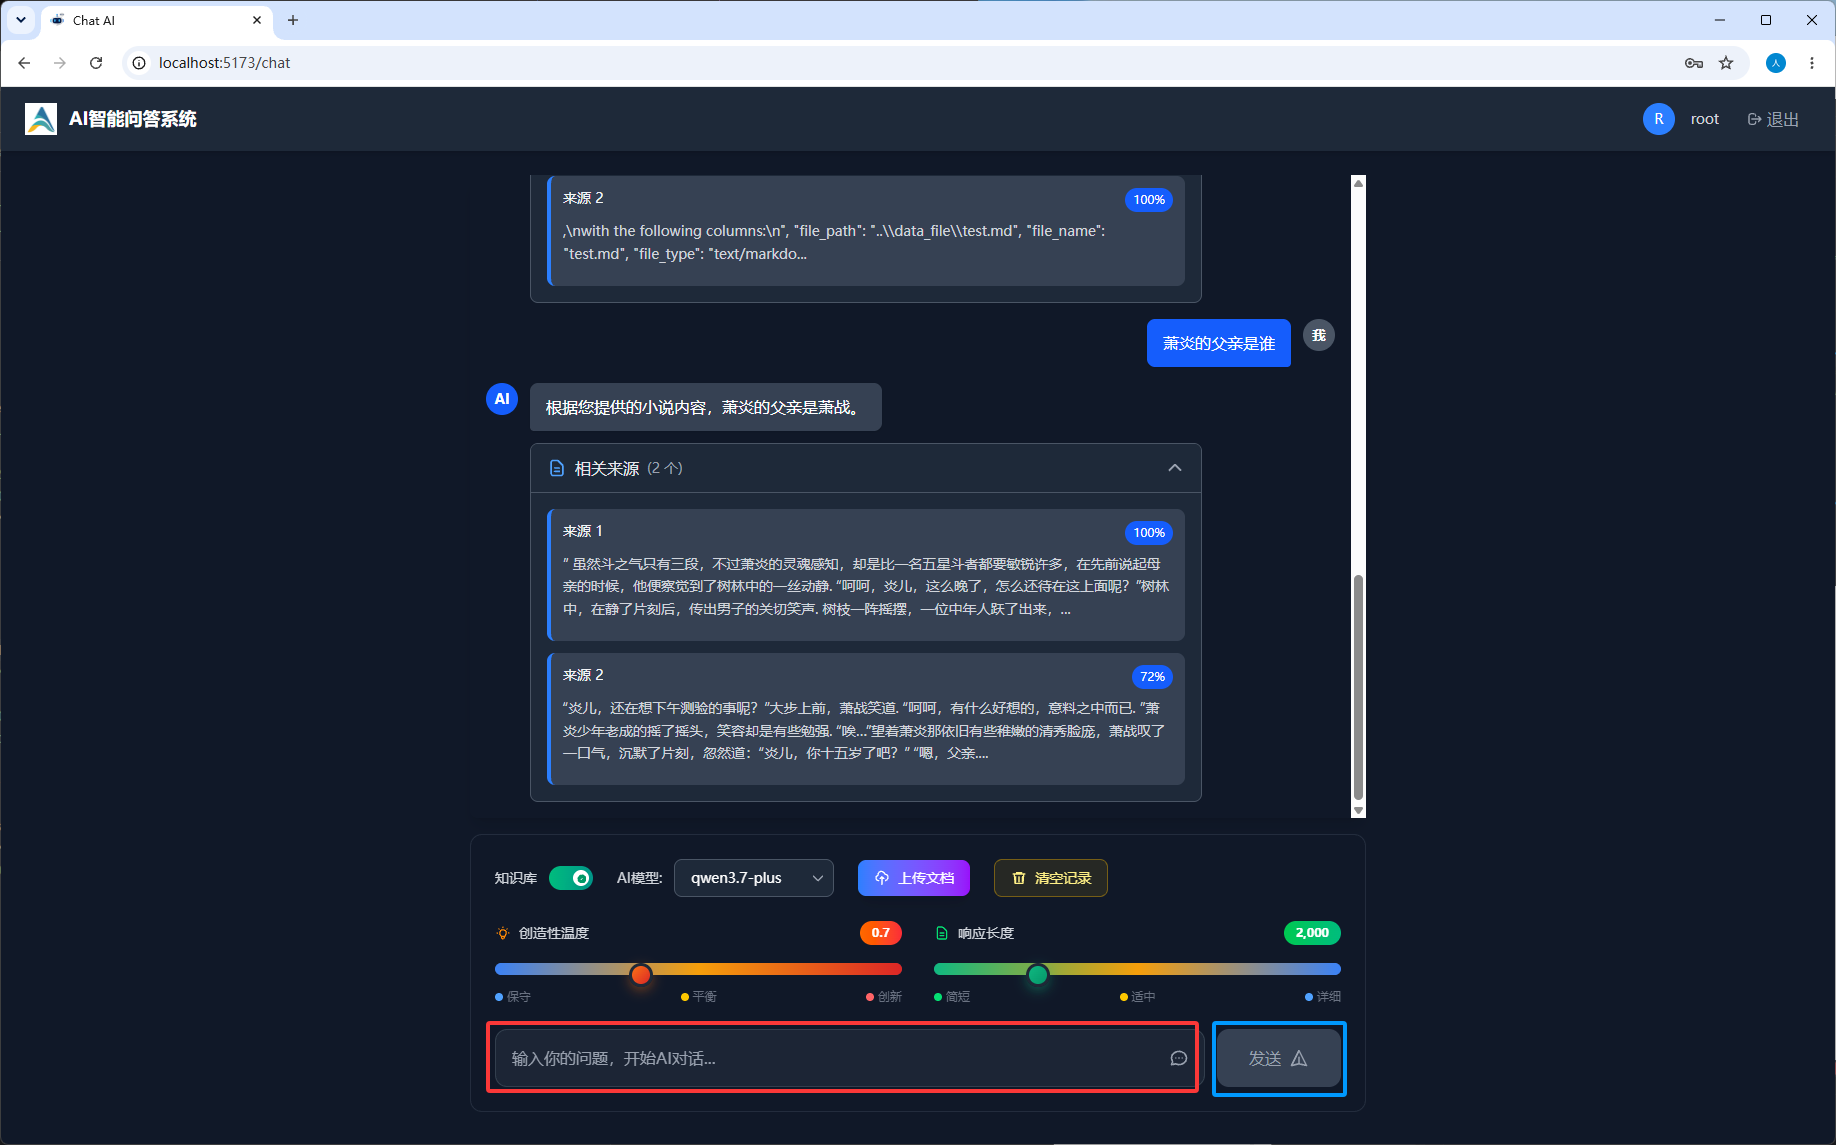
上图ChatView.vue文件是下图的页面
然后在下图红框位置创建chat.ts实例
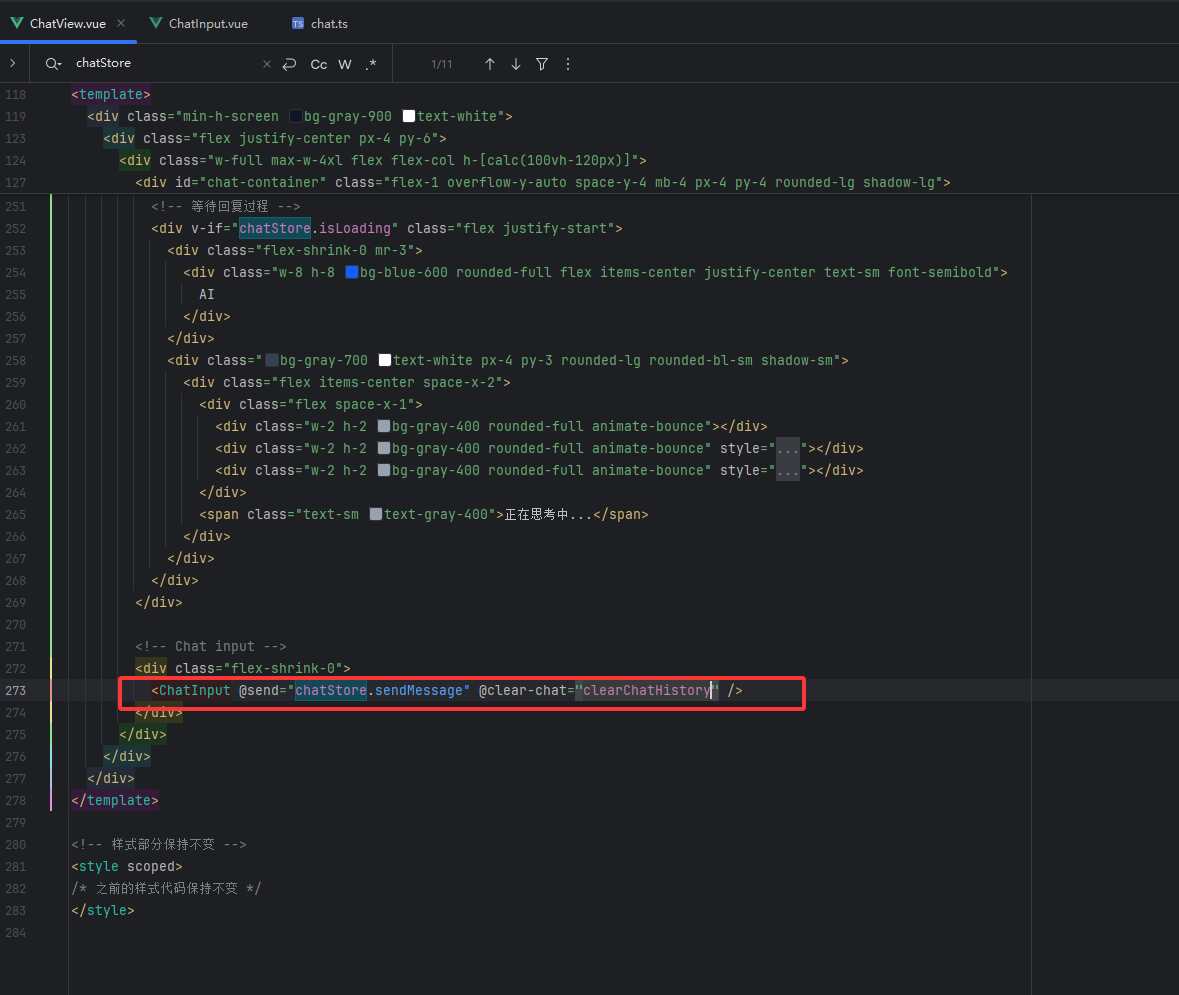
然后在下图红框位置创建了一个send的消息事件,它会监听子组件发送的send事件,子组件就是ChatInput.vue
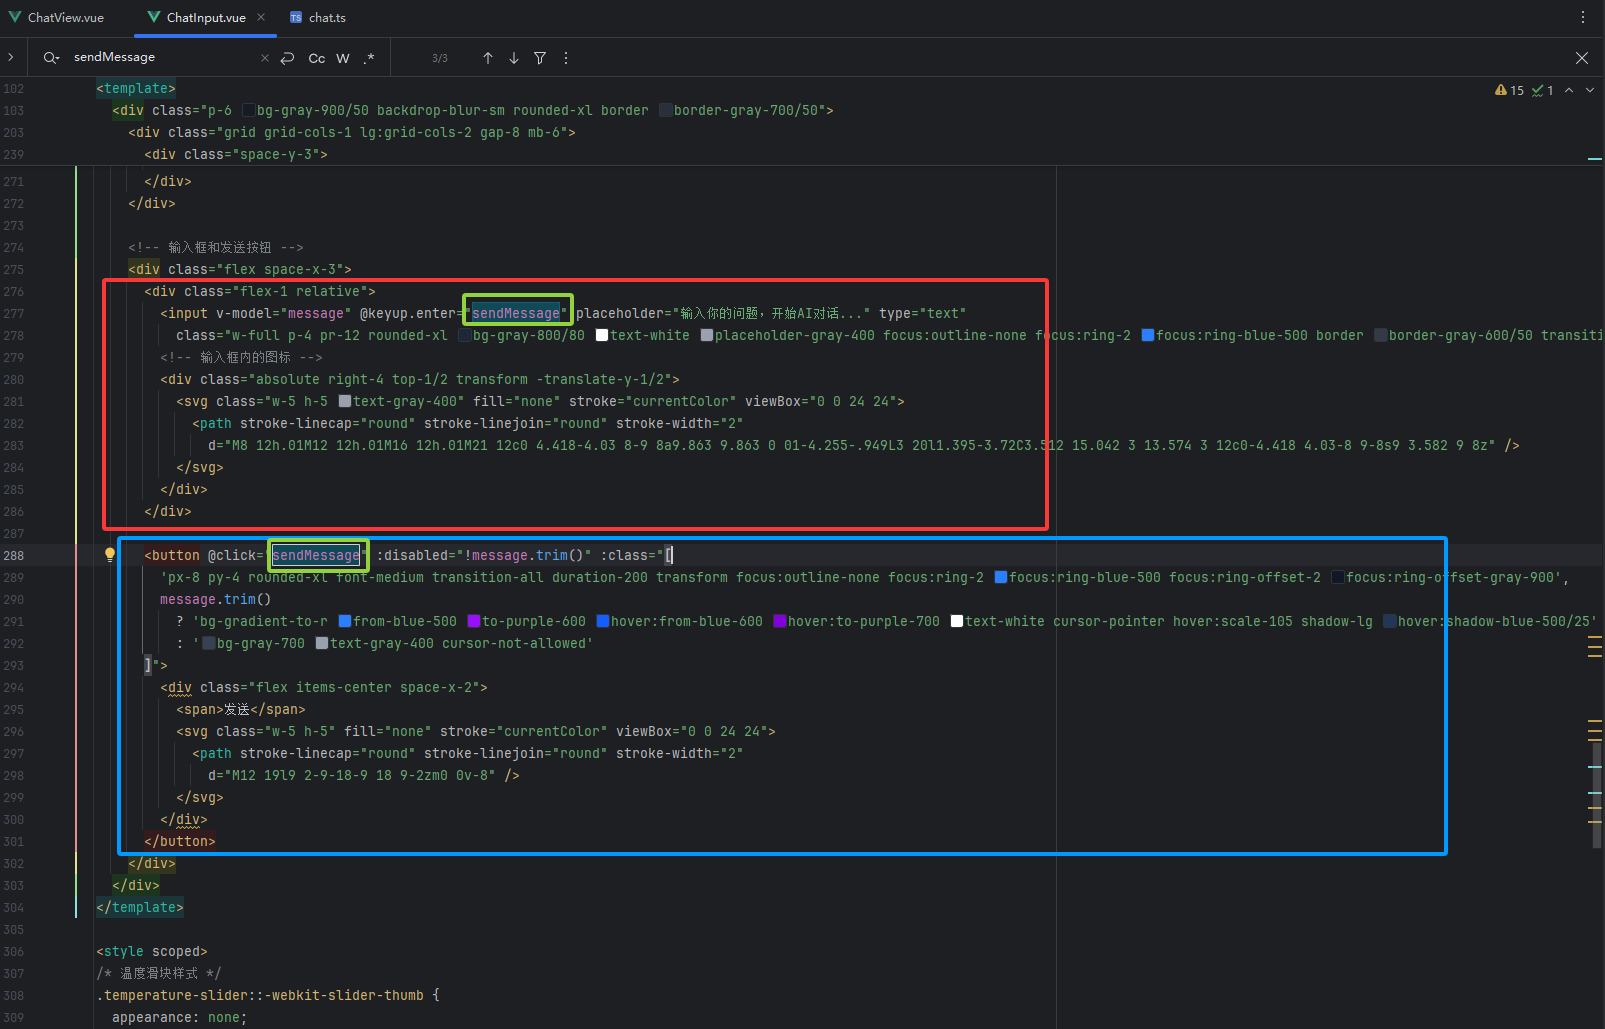
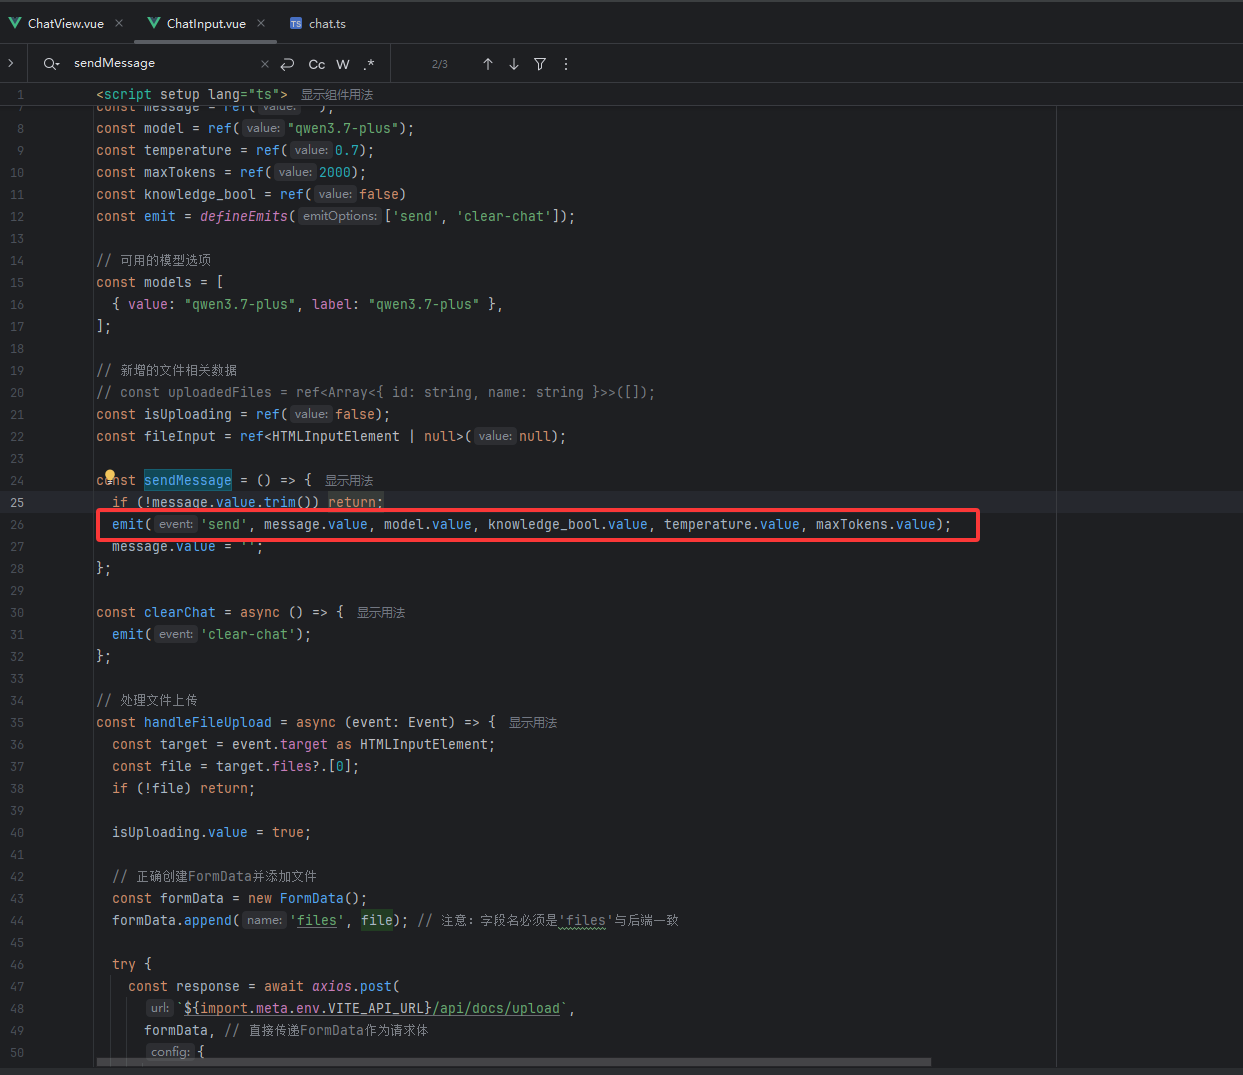
在ChatInput.vue中它会调用sendMessage函数
上图红框和蓝框里的内容是页面上的输入框和发送按钮,如下图,上图红框的对应下图红框的输入框,上图蓝框的对应下图蓝框的发送按钮,在输入框中按下回车键(Enter)会触发sendMessage函数,鼠标点击下图蓝框的发送按钮会触发sendMessage函数
然后如下图红框,sendMessage函数中会给父组件也就是ChatView.vue发送一个send事件
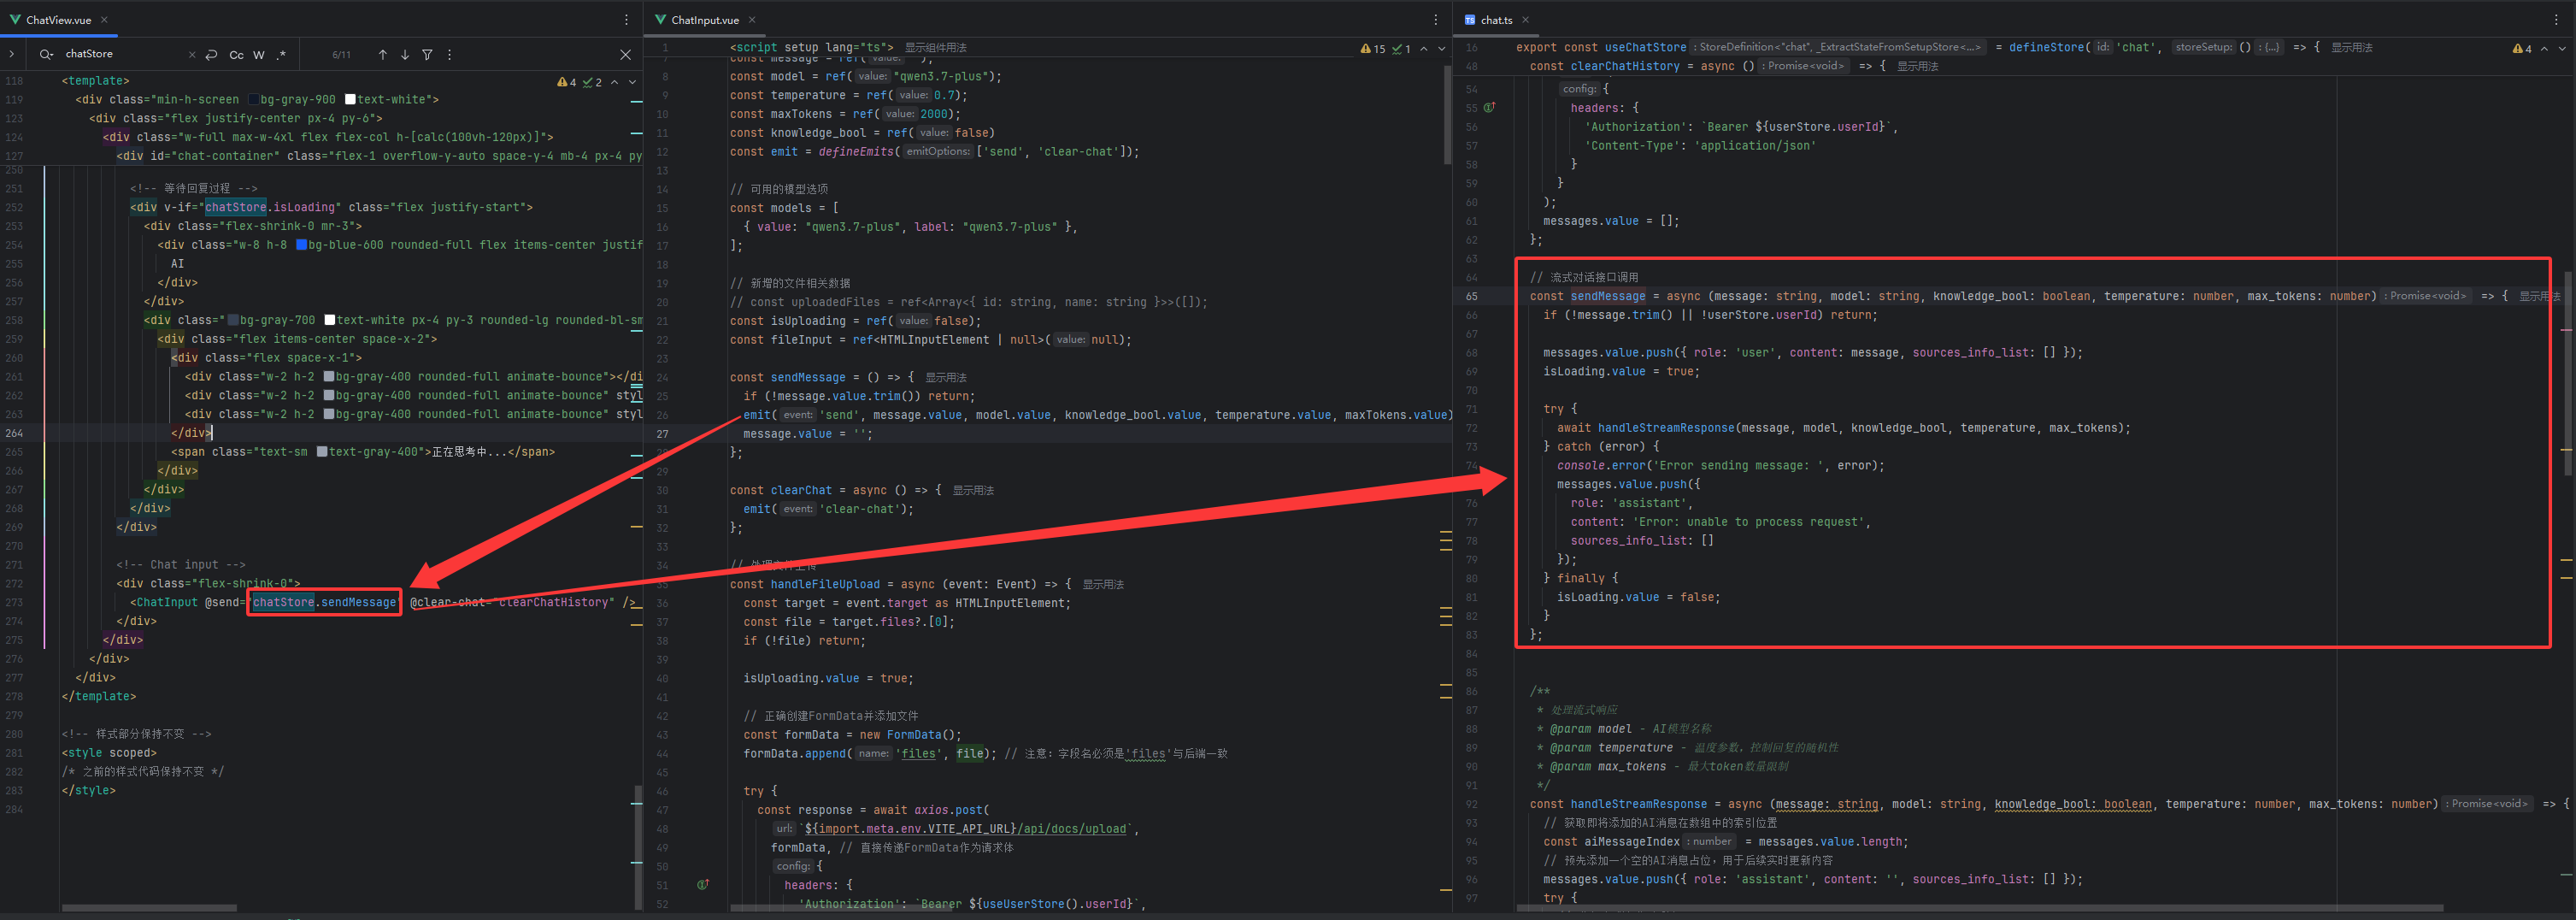
如下图,它会通过 ChatView.vue 触发chatStore.sendMessage这个函数,也就是会执行到chat.ts文件中
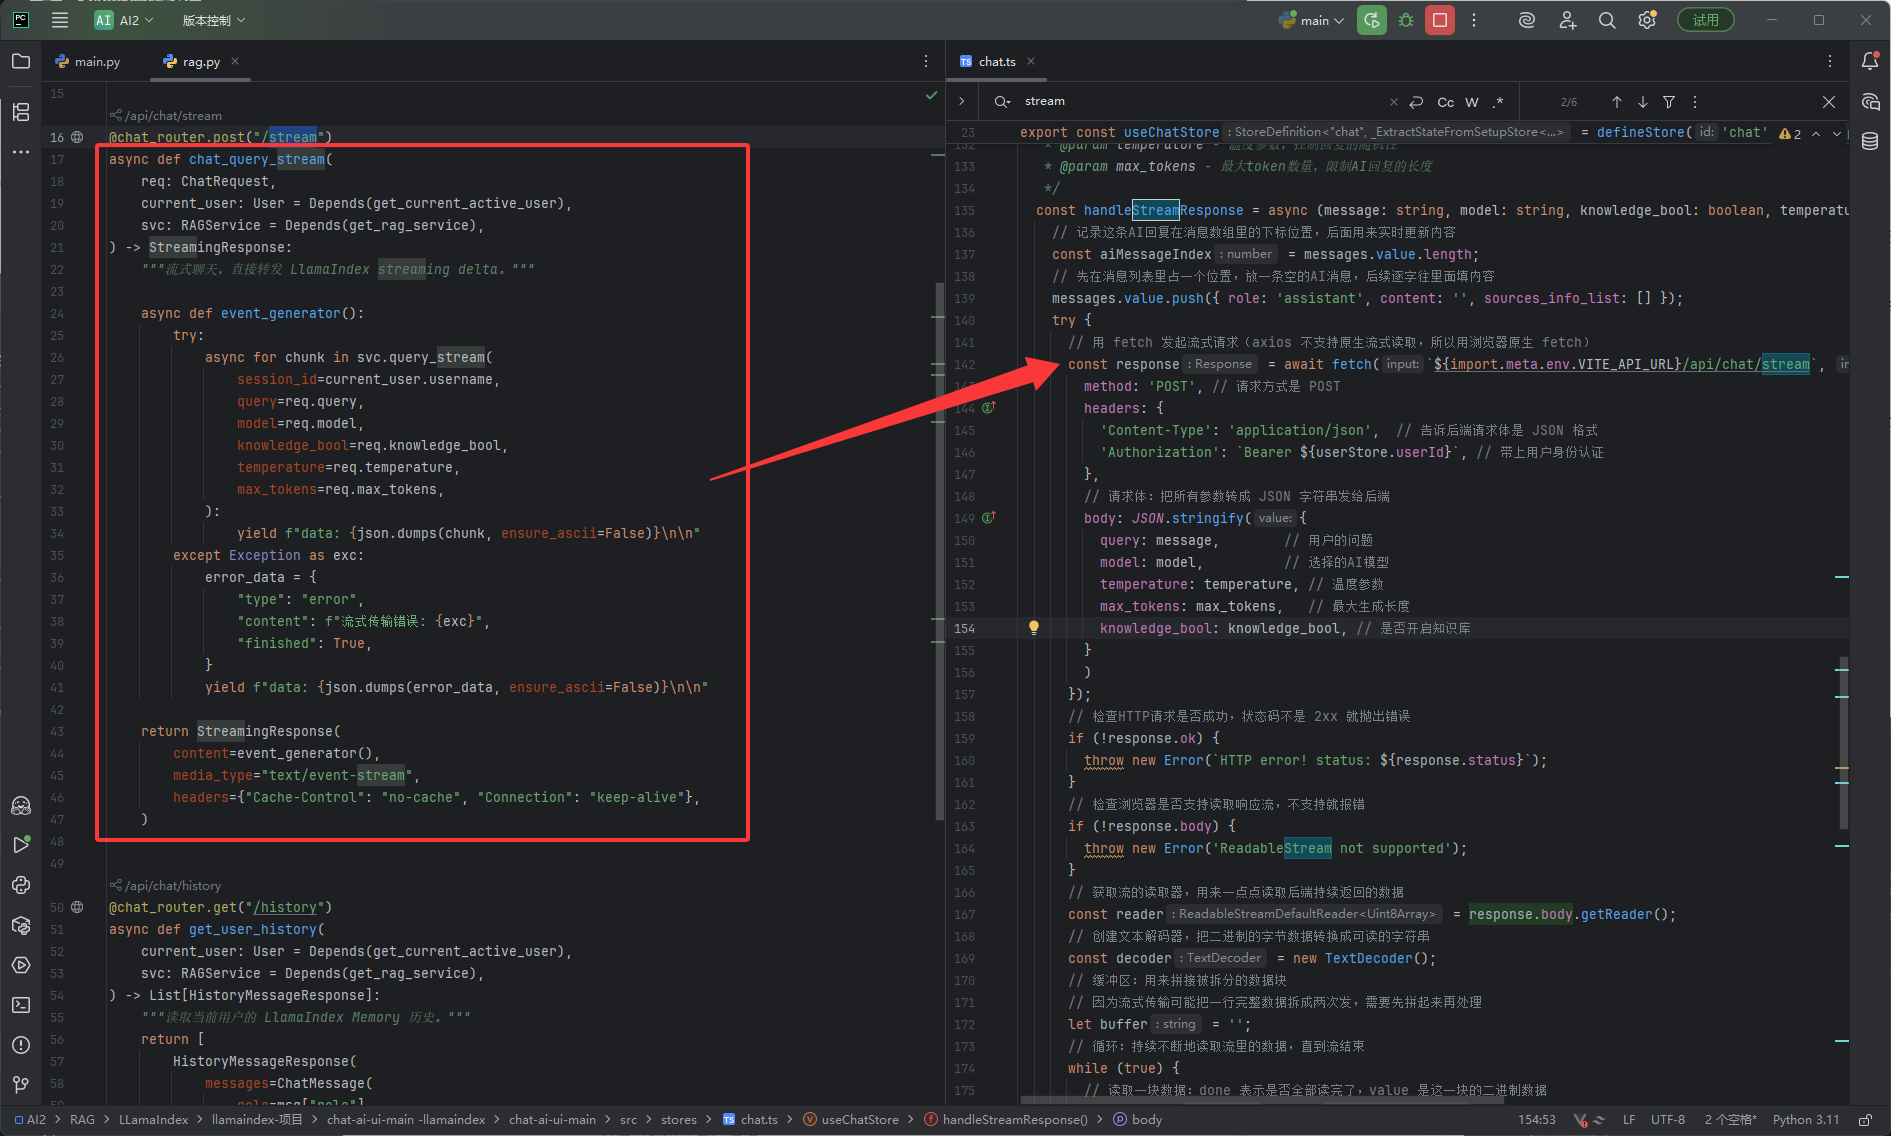
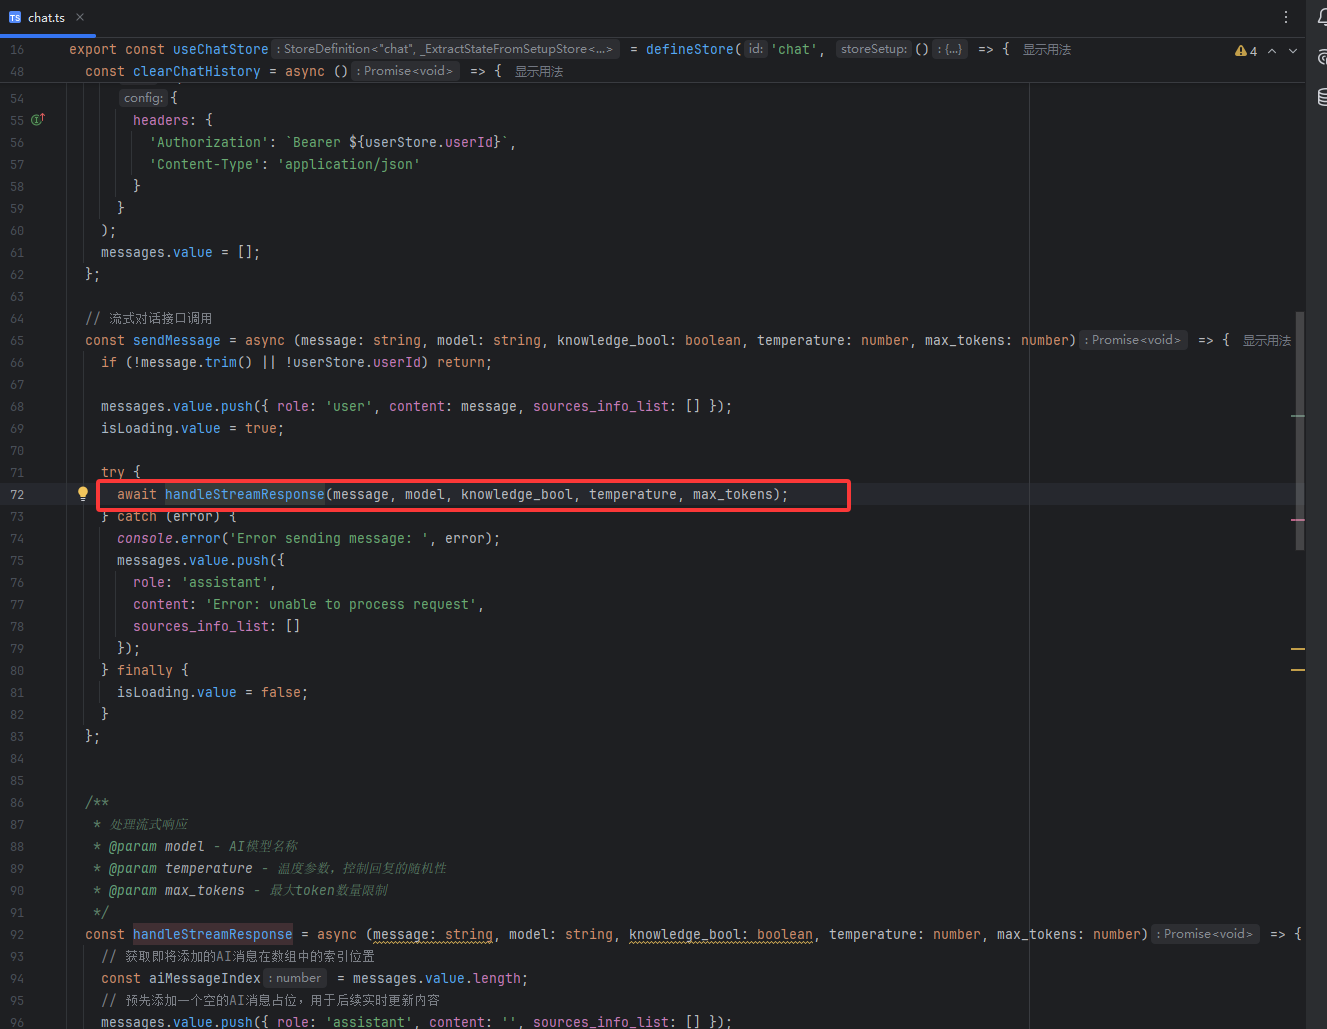
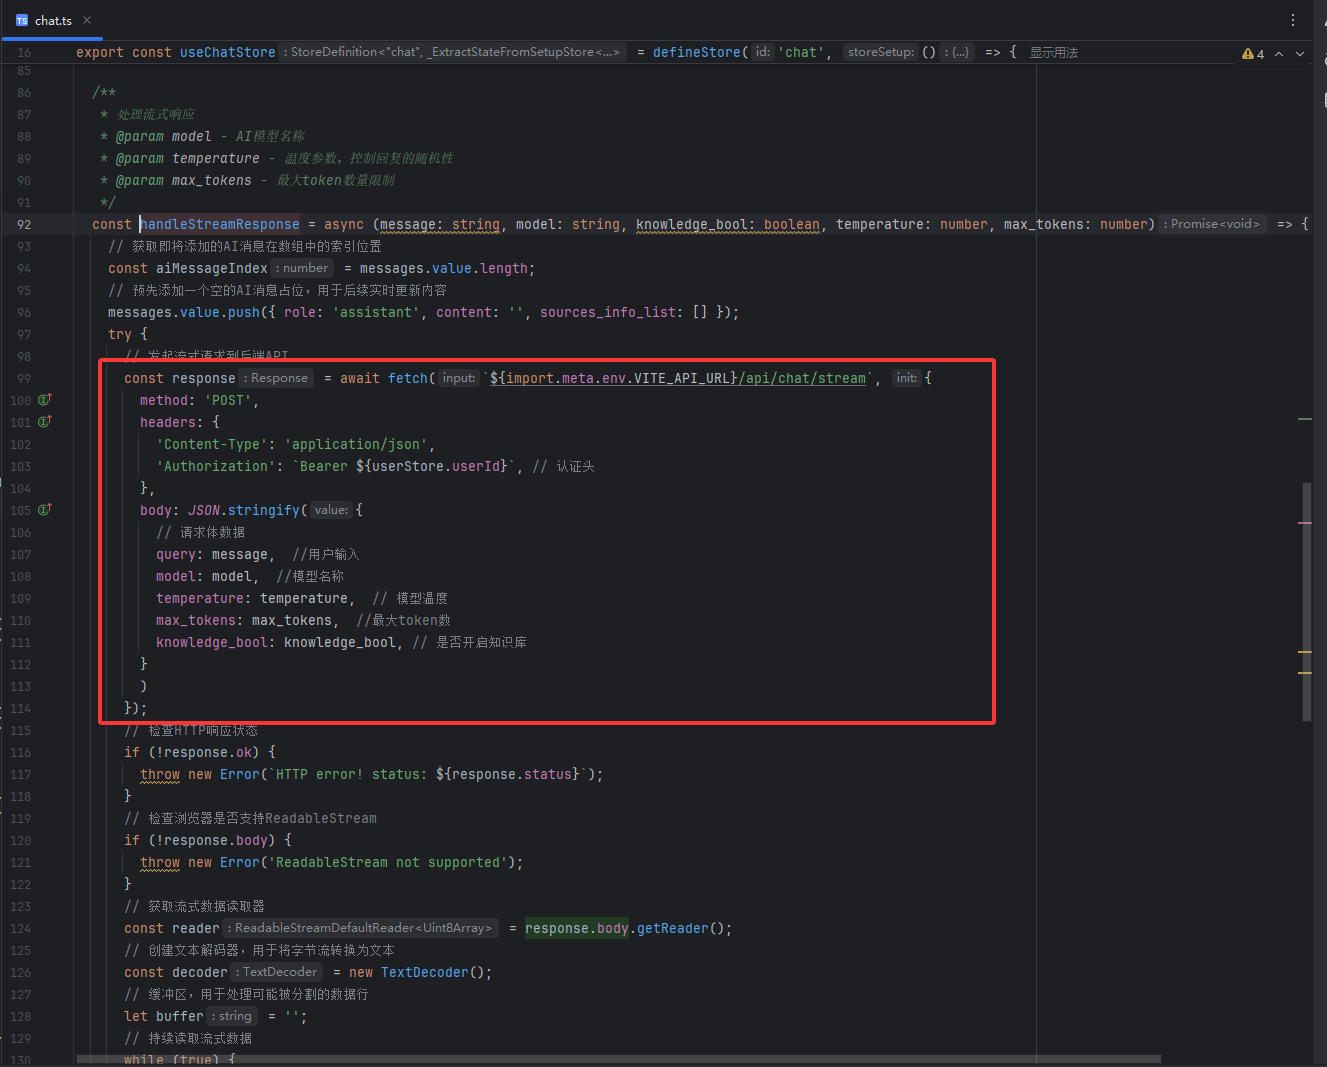
然后在下图红框的函数中调用了聊天接口
如下图红框聊天接口
完整代码
ChatView.vue
TypeScript<!-- ChatView.vue 聊天主页面 作用:展示聊天对话气泡、历史消息;引入ChatInput输入子组件;监听子组件事件;调用pinia聊天仓库;渲染markdown消息;滚动控制 --> <script setup lang="ts"> // 导入vue内置API // onMounted:组件挂载完成之后执行的钩子函数;nextTick:DOM更新完成后执行;ref:创建响应式基础变量 import { onMounted, nextTick, ref } from 'vue'; // 导入pinia仓库 // userStore 用户状态仓库,存用户id登录信息 import { useUserStore } from '../stores/user'; // chatStore 聊天仓库,存放消息数组、发送消息、清空历史、加载历史消息业务函数 import { useChatStore } from '../stores/chat'; // vue-router路由,用于页面跳转 import { useRouter } from 'vue-router'; // 导入子组件:聊天输入控制面板组件 import Header from '../components/Header.vue'; import ChatInput from '../components/ChatInput.vue'; // watch:监听响应式数据变化 import { watch } from 'vue'; // marked:markdown解析库,把AI返回markdown文本转为html import { marked } from 'marked'; // highlight.js:代码高亮库,渲染代码块颜色 import hljs from 'highlight.js'; // marked-highlight:marked插件,集成hljs代码高亮 import { markedHighlight } from 'marked-highlight'; // element-plus消息提示组件,弹出成功/失败提示框 import { ElMessage } from 'element-plus'; // 获取pinia仓库实例 const userStore = useUserStore(); const chatStore = useChatStore(); // 获取路由实例 const router = useRouter(); // 响应式对象:记录每一条知识库来源面板是折叠还是展开 // key:消息的index索引;value:true折叠 false展开 const sourcesCollapsed = ref<{ [key: number]: boolean }>({}); // 页面刚加载,判断用户是否登录,如果没有userId,跳转到首页登录 if (!userStore.userId) { router.push('/'); } // 配置marked markdown渲染插件,实现代码块高亮 marked.use(markedHighlight({ // css类名前缀,配合highlight.js样式 langPrefix: 'hljs language-', // 对代码块进行高亮处理 highlight(code, lang) { // 如果识别到代码语言,并且hljs支持该语言 if (lang && hljs.getLanguage(lang)) { try { // 使用指定语言高亮代码,返回html字符串 return hljs.highlight(code, { language: lang }).value; } catch (err) {} } // 识别不出语言,自动猜测语言进行高亮 return hljs.highlightAuto(code).value; } })); /** @description 格式化消息内容,用户消息转义html;AI消息渲染markdown @param text 原始消息文本 @param role 消息角色 user用户 / assistant AI @returns 处理完成的html字符串 */ const formatMessage = (text: string, role: string) => { console.log('22', text) // 如果文本为空,直接返回空字符串 if (!text) return ''; if (role === 'user') { // 用户消息:不能渲染html,防止XSS攻击;把特殊符号转义;换行符替换成br换行标签 return text .replace(/&/g, '&') .replace(/</g, '<') .replace(/>/g, '>') .replace(/\n/g, '<br>'); } else { // AI消息:将markdown文本转为html return marked(text); } }; /** @description 切换知识库来源面板折叠/展开状态 @param messageIndex 当前消息数组的下标索引 */ const toggleSources = (messageIndex: number) => { // 取反布尔值,true变false,false变true sourcesCollapsed.value[messageIndex] = !sourcesCollapsed.value[messageIndex]; }; /** @description 初始化单条消息的折叠状态,如果没有设置过,默认折叠 true @param messageIndex 消息下标 */ const initSourcesCollapsed = (messageIndex: number) => { // 判断这个下标在对象里是否不存在 if (sourcesCollapsed.value[messageIndex] === undefined) { sourcesCollapsed.value[messageIndex] = true; // 默认折叠 } }; /** @description 文本截断,太长的来源内容做预览,超出部分显示省略号 @param text 原始文本 @param maxLength 最大允许字符 @returns 截断后的字符串 */ const truncateText = (text: string, maxLength: number = 150) => { if (!text) return ''; return text.length > maxLength ? text.substring(0, maxLength) + '...' : text; }; /** @description 聊天容器滚动到底部,查看最新消息 nextTick:等待DOM页面渲染完成之后再执行滚动操作 */ const scrollToBottom = () => { nextTick(() => { // 获取聊天容器dom元素 const chatContainer = document.getElementById('chat-container'); if (chatContainer) chatContainer.scrollTop = chatContainer.scrollHeight; }); }; /** @description 清空聊天记录,调用pinia仓库方法,同时重置本地折叠状态 */ const clearChatHistory = async () => { try { // 调用pinia store清空聊天记录异步函数 await chatStore.clearChatHistory(); // 清空所有来源面板折叠状态 sourcesCollapsed.value = {}; // element plus弹出成功提示 ElMessage({ message: '聊天记录已清空', type: 'success', duration: 2000, }); } catch (error) { console.error('清空聊天记录失败:', error); ElMessage({ message: '清空聊天记录失败,请重试', type: 'error', duration: 3000, }); } }; /** @description onMounted:组件挂载完毕(页面DOM已经渲染完成)执行 页面打开加载历史聊天记录 */ onMounted(() => { console.log(chatStore.loadChatHistory().then((aa) => console.log(aa))) // 调用pinia加载历史消息,加载完成滚动到底部 chatStore.loadChatHistory().then(() => scrollToBottom()); }); /** @description watch监听器 监听chatStore.messages聊天消息数组变化;deep:true深度监听数组内部修改 只要消息数组新增/修改消息,自动滚动页面到底部 */ watch( () => chatStore.messages, // 监听目标:pinia仓库里面messages () => { scrollToBottom(); // 回调函数,每次 messages 变化就滚动到底 }, { deep: true } ); </script> <template> <!-- 页面最外层容器,深色背景,全屏高度 --> <div class="min-h-screen bg-gray-900 text-white"> <!-- 顶部头部组件 --> <Header /> <!-- 页面主体容器,水平居中 --> <div class="flex justify-center px-4 py-6"> <!-- 最大宽度容器,弹性布局,高度扣除顶部高度 --> <div class="w-full max-w-4xl flex flex-col h-[calc(100vh-120px)]"> <!-- 聊天消息容器,id给js获取dom;overflow-y-auto内容超出出现滚动条 --> <div id="chat-container" class="flex-1 overflow-y-auto space-y-4 mb-4 px-4 py-4 rounded-lg shadow-lg"> <!-- v-if:消息数组为空,显示欢迎开始对话提示 --> <div v-if="chatStore.messages.length === 0" class="flex flex-col items-center justify-center h-full text-gray-400"> <div class="text-6xl mb-4">💬</div> <h2 class="text-2xl font-semibold mb-2">开始对话</h2> <p class="text-center">向我提问任何问题,我会尽力为你解答</p> </div> <!-- v-for循环渲染每一条聊天消息;key作为列表唯一标识 --> <div v-for="(msg, index) in chatStore.messages" :key="index" class="flex flex-col" :class="msg.role === 'user' ? 'items-end' : 'items-start'" > <!-- 消息气泡外层容器,用户居右,AI居左 --> <div class="flex items-start" :class="msg.role === 'user' ? 'justify-end' : 'justify-start'"> <!-- AI头像:AI消息才显示 --> <div v-if="msg.role !== 'user'" class="flex-shrink-0 mr-3"> <div class="w-8 h-8 bg-blue-600 rounded-full flex items-center justify-center text-sm font-semibold"> AI </div> </div> <!-- v-html:渲染html字符串,展示格式化后的消息内容 --> <div v-html="formatMessage(msg.content, msg.role)" class="max-w-2xl px-4 py-3 rounded-lg shadow-sm prose prose-invert max-w-none" :class=" msg.role === 'user' ? 'bg-blue-600 text-white rounded-br-sm prose-headings:text-white prose-p:text-white prose-strong:text-white prose-em:text-white' : 'bg-gray-700 text-white rounded-bl-sm prose-headings:text-gray-100 prose-p:text-gray-100 prose-strong:text-gray-100 prose-em:text-gray-100 prose-code:text-blue-300 prose-code:bg-gray-800 prose-pre:bg-gray-800 prose-blockquote:border-blue-500' " ></div> <!-- 用户头像:用户消息才显示 --> <div v-if="msg.role === 'user'" class="flex-shrink-0 ml-3"> <div class="w-8 h-8 bg-gray-600 rounded-full flex items-center justify-center text-sm font-semibold"> 我 </div> </div> </div> <!-- AI回复并且存在知识库来源信息,渲染来源折叠面板 --> <div v-if="msg.role === 'assistant' && msg.sources_info_list && msg.sources_info_list.length > 0" class="w-full max-w-2xl mt-3 ml-11" > {{ initSourcesCollapsed(index) }} <!-- 来源信息折叠面板外层盒子 --> <div class="bg-gray-800 rounded-lg border border-gray-600 overflow-hidden"> <!-- 折叠面板头部按钮,点击切换展开折叠 --> <button @click="toggleSources(index)" class="w-full px-4 py-3 bg-gray-800 hover:bg-gray-750 transition-colors duration-200 flex items-center justify-between text-left" > <div class="flex items-center space-x-2"> <svg class="w-5 h-5 text-blue-400" fill="none" stroke="currentColor" viewBox="0 0 24 24"> <path stroke-linecap="round" stroke-linejoin="round" stroke-width="2" d="M9 12h6m-6 4h6m2 5H7a2 2 0 01-2-2V5a2 2 0 012-2h5.586a1 1 0 01.707.293l5.414 5.414a1 1 0 01.293.707V19a2 2 0 01-2 2z"></path> </svg> <span class="font-medium text-gray-200">相关来源</span> <span class="text-sm text-gray-400">({{ msg.sources_info_list.length }} 个)</span> </div> <!-- 箭头图标,展开旋转180度 --> <svg class="w-5 h-5 text-gray-400 transform transition-transform duration-200" :class="{ 'rotate-180': !sourcesCollapsed[index] }" fill="none" stroke="currentColor" viewBox="0 0 24 24" > <path stroke-linecap="round" stroke-linejoin="round" stroke-width="2" d="M19 9l-7 7-7-7"></path> </svg> </button> <!-- v-show控制面板内容显示隐藏,true显示 false隐藏 --> <div v-show="!sourcesCollapsed[index]" class="border-t border-gray-600 bg-gray-750" > <div class="p-4 space-y-3 max-h-96 overflow-y-auto"> <!-- 循环渲染每一条知识库来源片段 --> <div v-for="(source, sourceIndex) in msg.sources_info_list" :key="sourceIndex" class="bg-gray-700 rounded-lg p-3 border-l-4 border-blue-500" > <div class="flex items-start justify-between mb-2"> <h4 class="font-medium text-gray-100 text-sm line-clamp-2"> {{ `来源 ${sourceIndex + 1}` }} </h4> <!-- 相似度分数百分比 --> <span v-if="source" class="ml-2 px-2 py-1 bg-blue-600 text-white text-xs rounded-full flex-shrink-0" > {{ Math.round(source.score * 100) }}% </span> </div> <!-- 来源片段预览文本 --> <p class="text-gray-300 text-sm leading-relaxed mb-2"> {{ truncateText(source.content) }} </p> <!-- 如果存在url,渲染原文链接,新标签页打开 --> <div v-if="source.url" class="flex items-center justify-between"> <a :href="source.url" target="_blank" rel="noopener noreferrer" class="text-blue-400 hover:text-blue-300 text-xs flex items-center space-x-1 transition-colors" > <svg class="w-3 h-3" fill="none" stroke="currentColor" viewBox="0 0 24 24"> <path stroke-linecap="round" stroke-linejoin="round" stroke-width="2" d="M10 6H6a2 2 0 00-2 2v10a2 2 0 002 2h10a2 2 0 002-2v-4M14 4h6m0 0v6m0-6L10 14"></path> </svg> <span>查看原文</span> </a> </div> </div> </div> </div> </div> </div> </div> <!-- isLoading为true,显示AI加载中动画 --> <div v-if="chatStore.isLoading" class="flex justify-start"> <div class="flex-shrink-0 mr-3"> <div class="w-8 h-8 bg-blue-600 rounded-full flex items-center justify-center text-sm font-semibold"> AI </div> </div> <div class="bg-gray-700 text-white px-4 py-3 rounded-lg rounded-bl-sm shadow-sm"> <div class="flex items-center space-x-2"> <!-- 三个跳动圆点动画 --> <div class="flex space-x-1"> <div class="w-2 h-2 bg-gray-400 rounded-full animate-bounce"></div> <div class="w-2 h-2 bg-gray-400 rounded-full animate-bounce" style="animation-delay: 0.1s"></div> <div class="w-2 h-2 bg-gray-400 rounded-full animate-bounce" style="animation-delay: 0.2s"></div> </div> <span class="text-sm text-gray-400">正在思考中...</span> </div> </div> </div> </div> <!-- ChatInput子组件:输入、参数控制面板 --> <!-- @send:监听子组件抛出send自定义事件,触发chatStore.sendMessage,子组件emit参数自动传入函数 --> <!-- @clear-chat:监听子组件清空聊天事件,触发父组件clearChatHistory方法 --> <div class="flex-shrink-0"> <ChatInput @send="chatStore.sendMessage" @clear-chat="clearChatHistory" /> </div> </div> </div> </div> </template> <style scoped> /* 样式 scoped代表只作用于当前组件,不污染其他组件 / / 之前的样式代码保持不变 */ </style>ChatInput.vue
TypeScript<!-- ChatInput.vue 子组件:聊天输入框、模型选择、知识库开关、温度滑块、文件上传按钮 职责:收集用户输入、参数;向外抛出自定义事件 send / clear‑chat;不维护聊天消息状态 --> <script setup lang="ts"> // ref 创建响应式变量 import { ref } from 'vue'; // axios http请求库,用于上传文件 import axios from 'axios'; // element-plus消息提示框 import { ElMessage } from 'element-plus' // pinia 用户仓库 import { useUserStore } from '../stores/user'; // 用户输入框内容 const message = ref(''); // 当前选中大模型 const model = ref("qwen3.7-plus"); // temperature 温度参数,控制AI创造性 const temperature = ref(0.7); // maxTokens AI最大输出token const maxTokens = ref(2000); // knowledge_bool 是否开启知识库RAG检索 const knowledge_bool = ref(false) // defineEmits:定义当前组件向外抛出的自定义事件 // send:发送消息事件;clear‑chat:清空聊天事件 const emit = defineEmits(['send', 'clear-chat']); // 模型下拉选择框选项数组 const models = [ { value: "qwen3.7-plus", label: "qwen3.7-plus" }, ]; // 文件是否正在上传中 const isUploading = ref(false); // 获取隐藏的file文件选择dom标签 const fileInput = ref<HTMLInputElement | null>(null); /** @description 发送消息按钮 / 回车按下执行函数 */ const sendMessage = () => { // 如果输入框全是空格,直接return,不发送 if (!message.value.trim()) return; // emit向外触发 send事件,把所有收集到的参数全部传给父组件 ChatView emit('send', message.value, model.value, knowledge_bool.value, temperature.value, maxTokens.value); // 发送完成清空输入框内容 message.value = ''; }; /** @description 点击清空记录按钮,抛出clear‑chat事件,通知父组件清空聊天 */ const clearChat = async () => { emit('clear-chat'); }; /** @description 文件选择框选择文件之后触发的回调,上传文档到后端接口 @param event change事件对象 */ const handleFileUpload = async (event: Event) => { // 获取事件目标,就是file input dom const target = event.target as HTMLInputElement; // 获取选中第一个文件 const file = target.files?.[0]; if (!file) return; // 修改状态:正在上传 isUploading.value = true; // FormData表单对象,用于传递二进制文件,文件上传必须使用FormData const formData = new FormData(); // 添加文件,字段名files,后端接口约定接收字段名 formData.append('files', file); try { // http post上传请求 const response = await axios.post( ${import.meta.env.VITE_API_URL}/api/docs/upload, formData, { headers: { // 请求头携带登录身份凭证 'Authorization': Bearer ${useUserStore().userId}, // ⚠️不要手动写Content-Type:multipart/form-data,浏览器会自动带上并且填充boundary分隔符,手动写会上传失败 } } ); // 判断后端返回状态成功 if (response.data.status === "success") { const result = response.data.processed_files; console.log('文件上传成功:', result); ElMessage({ message: `文件上传成功!共处理了 ${result.length} 个文件`, type: 'success', duration: 3000 }); } else { console.error('文件上传失败'); ElMessage({ message: '文件上传失败,请重试', type: 'error', duration: 3000 }); } } catch (error) { // 请求异常捕获,网络错误、后端报错会走到这里 console.error('上传错误:', error); } finally { // 无论成功失败,都会执行;关闭上传loading状态;清空file input的值,允许重复选择同一个文件 isUploading.value = false; if (target) target.value = ''; } }; /** @description 点击上传文档按钮,调用隐藏原生文件选择框点击,唤起选择文件弹窗 */ const triggerFileUpload = () => { fileInput.value?.click(); }; </script> <template> <!-- 当前ChatInput组件整体UI容器 --> <div class="p-6 bg-gray-900/50 backdrop-blur-sm rounded-xl border border-gray-700/50"> <!-- 第一行:各种控制按钮 知识库开关、模型下拉、上传文件、清空记录 --> <div class="flex flex-wrap items-center gap-6 mb-6"> <!-- 知识库开关按钮 --> <div class="flex items-center space-x-3"> <span class="text-sm font-medium text-gray-300">知识库</span> <!-- @click点击切换布尔值true/false --> <button @click="knowledge_bool = !knowledge_bool" :class="[ 'relative inline-flex h-6 w-11 items-center rounded-full transition-all duration-300 ease-in-out focus:outline-none focus:ring-2 focus:ring-emerald-500 focus:ring-offset-2 focus:ring-offset-gray-900', knowledge_bool ? 'bg-gradient-to-r from-emerald-500 to-teal-600' : 'bg-gray-600' ]"> <span :class="[ 'inline-flex h-4 w-4 items-center justify-center transform rounded-full bg-white transition-all duration-300 ease-in-out shadow-lg', knowledge_bool ? 'translate-x-6' : 'translate-x-1' ]"> <svg :class="[ 'h-2.5 w-2.5 transition-colors duration-200', knowledge_bool ? 'text-emerald-600' : 'text-gray-400' ]" fill="currentColor" viewBox="0 0 20 20"> <path d="M9 12l2 2 4-4m6 2a9 9 0 11-18 0 9 9 0 0118 0z" /> </svg> </span> </button> </div> <!-- AI模型下拉选择框 --> <div class="flex items-center space-x-3"> <label class="text-sm font-medium text-gray-300">AI模型:</label> <div class="relative"> <!-- v-model双向绑定model响应式变量,下拉选择自动修改变量 --> <select v-model="model" class="appearance-none bg-gray-800 text-white text-sm rounded-lg border border-gray-600 px-4 py-2 pr-8 focus:outline-none focus:ring-2 focus:ring-blue-500 focus:border-blue-500 min-w-[160px] transition-all duration-200 hover:bg-gray-700"> <!-- v-for循环渲染下拉选项 --> <option v-for="modelOption in models" :key="modelOption.value" :value="modelOption.value" class="bg-gray-800"> {{ modelOption.label }} </option> </select> <!-- 下拉箭头装饰图标 --> <div class="absolute inset-y-0 right-0 flex items-center px-2 pointer-events-none"> <svg class="w-4 h-4 text-gray-400" fill="none" stroke="currentColor" viewBox="0 0 24 24"> <path stroke-linecap="round" stroke-linejoin="round" stroke-width="2" d="M19 9l-7 7-7-7" /> </svg> </div> </div> </div> <!-- 上传文档按钮,点击唤起文件选择 --> <button @click="triggerFileUpload" :disabled="isUploading" :class="[ 'flex items-center gap-2 px-4 py-2 text-sm font-medium rounded-lg transition-all duration-200 transform hover:scale-105 focus:outline-none focus:ring-2 focus:ring-blue-500 focus:ring-offset-2 focus:ring-offset-gray-900', isUploading ? 'bg-gray-600 text-gray-400 cursor-not-allowed' : 'bg-gradient-to-r from-blue-500 to-purple-600 hover:from-blue-600 hover:to-purple-700 text-white shadow-lg hover:shadow-blue-500/25' ]"> <svg :class="[ 'w-4 h-4', isUploading ? 'animate-spin' : '' ]" fill="none" stroke="currentColor" viewBox="0 0 24 24"> <path v-if="!isUploading" stroke-linecap="round" stroke-linejoin="round" stroke-width="2" d="M7 16a4 4 0 01-.88-7.903A5 5 0 1115.9 6L16 6a5 5 0 011 9.9M15 13l-3-3m0 0l-3 3m3-3v12" /> <path v-else stroke-linecap="round" stroke-linejoin="round" stroke-width="2" d="M4 4v5h.582m15.356 2A8.001 8.001 0 004.582 9m0 0H9m11 11v-5h-.581m0 0a8.003 8.003 0 01-15.357-2m15.357 2H15" /> </svg> <span>{{ isUploading ? '上传中...' : '上传文档' }}</span> </button> <!-- 清空聊天记录按钮,点击抛出clear‑chat事件 --> <button @click="clearChat" class="flex items-center gap-2 px-4 py-2 text-sm font-medium rounded-lg border border-yellow-500/40 bg-yellow-500/10 text-yellow-200 hover:bg-yellow-500/20 hover:text-yellow-100 transition-all duration-200 focus:outline-none focus:ring-2 focus:ring-yellow-500 focus:ring-offset-2 focus:ring-offset-gray-900" > <svg class="w-4 h-4" fill="none" stroke="currentColor" viewBox="0 0 24 24"> <path stroke-linecap="round" stroke-linejoin="round" stroke-width="2" d="M3 6h18M8 6V4h8v2m-9 4v8m5-8v8m5-8v8M5 6l1 14h12l1-14" /> </svg> <span>清空记录</span> </button> <!-- 原生隐藏文件选择框,accept限定允许选择文件后缀;@change选中文件后触发上传函数 --> <input ref="fileInput" type="file" @change="handleFileUpload" class="hidden" accept=".txt,.pdf,.doc,.docx,.md" /> </div> <!-- 第二行,两个滑块:创造性温度、最大响应长度 --> <div class="grid grid-cols-1 lg:grid-cols-2 gap-8 mb-6"> <!-- temperature温度滑块 --> <div class="space-y-3"> <div class="flex items-center justify-between"> <label class="text-sm font-medium text-gray-300 flex items-center space-x-2"> <svg class="w-4 h-4 text-orange-400" fill="none" stroke="currentColor" viewBox="0 0 24 24"> <path stroke-linecap="round" stroke-linejoin="round" stroke-width="2" d="M9.663 17h4.673M12 3v1m6.364 1.636l-.707.707M21 12h-1M4 12H3m3.343-5.657l-.707-.707m2.828 9.9a5 5 0 117.072 0l-.548.547A3.374 3.374 0 0014 18.469V19a2 2 0 11-4 0v-.531c0-.895-.356-1.754-.988-2.386l-.548-.547z" /> </svg> <span>创造性温度</span> </label> <!-- toFixed(1)保留一位小数展示 --> <div class="bg-gradient-to-r from-orange-500 to-red-500 text-white text-xs font-bold px-3 py-1 rounded-full"> {{ temperature.toFixed(1) }} </div> </div> <div class="relative"> <!-- v-model.number 数字双向绑定;range滑块 min最小值 max最大值 step步长 --> <input v-model.number="temperature" type="range" min="0" max="2" step="0.1" class="w-full h-3 bg-gray-700 rounded-lg appearance-none cursor-pointer temperature-slider" /> <div class="flex justify-between text-xs text-gray-500 mt-2"> <span class="flex items-center space-x-1"> <div class="w-2 h-2 bg-blue-400 rounded-full"></div> <span>保守</span> </span> <span class="flex items-center space-x-1"> <div class="w-2 h-2 bg-yellow-400 rounded-full"></div> <span>平衡</span> </span> <span class="flex items-center space-x-1"> <div class="w-2 h-2 bg-red-400 rounded-full"></div> <span>创新</span> </span> </div> </div> </div> <!-- maxTokens最大输出长度滑块 --> <div class="space-y-3"> <div class="flex items-center justify-between"> <label class="text-sm font-medium text-gray-300 flex items-center space-x-2"> <svg class="w-4 h-4 text-green-400" fill="none" stroke="currentColor" viewBox="0 0 24 24"> <path stroke-linecap="round" stroke-linejoin="round" stroke-width="2" d="M9 12h6m-6 4h6m2 5H7a2 2 0 01-2-2V5a2 2 0 012-2h5.586a1 1 0 01.707.293l5.414 5.414a1 1 0 01.293.707V19a2 2 0 01-2 2z" /> </svg> <span>响应长度</span> </label> <div class="bg-gradient-to-r from-green-500 to-emerald-500 text-white text-xs font-bold px-3 py-1 rounded-full"> {{ maxTokens.toLocaleString() }} </div> </div> <div class="relative"> <input v-model.number="maxTokens" type="range" min="100" max="8000" step="100" class="w-full h-3 bg-gray-700 rounded-lg appearance-none cursor-pointer tokens-slider" /> <div class="flex justify-between text-xs text-gray-500 mt-2"> <span class="flex items-center space-x-1"> <div class="w-2 h-2 bg-green-400 rounded-full"></div> <span>简短</span> </span> <span class="flex items-center space-x-1"> <div class="w-2 h-2 bg-yellow-400 rounded-full"></div> <span>适中</span> </span> <span class="flex items-center space-x-1"> <div class="w-2 h-2 bg-blue-400 rounded-full"></div> <span>详细</span> </span> </div> </div> </div> </div> <!-- 输入框和发送按钮 --> <div class="flex space-x-3"> <div class="flex-1 relative"> <!-- v-model双向绑定message;@keyup.enter 按下回车键触发sendMessage发送消息 --> <input v-model="message" @keyup.enter="sendMessage" placeholder="输入你的问题,开始AI对话..." type="text" class="w-full p-4 pr-12 rounded-xl bg-gray-800/80 text-white placeholder-gray-400 focus:outline-none focus:ring-2 focus:ring-blue-500 border border-gray-600/50 transition-all duration-200 hover:bg-gray-800 focus:bg-gray-800" /> <div class="absolute right-4 top-1/2 transform -translate-y-1/2"> <svg class="w-5 h-5 text-gray-400" fill="none" stroke="currentColor" viewBox="0 0 24 24"> <path stroke-linecap="round" stroke-linejoin="round" stroke-width="2" d="M8 12h.01M12 12h.01M16 12h.01M21 12c0 4.418-4.03 8-9 8a9.863 9.863 0 01-4.255-.949L3 20l1.395-3.72C3.512 15.042 3 13.574 3 12c0-4.418 4.03-8 9-8s9 3.582 9 8z" /> </svg> </div> </div> <!-- 发送按钮 @click点击触发sendMessage;:disabled输入为空禁止点击 --> <button @click="sendMessage" :disabled="!message.trim()" :class="[ 'px-8 py-4 rounded-xl font-medium transition-all duration-200 transform focus:outline-none focus:ring-2 focus:ring-blue-500 focus:ring-offset-2 focus:ring-offset-gray-900', message.trim() ? 'bg-gradient-to-r from-blue-500 to-purple-600 hover:from-blue-600 hover:to-purple-700 text-white cursor-pointer hover:scale-105 shadow-lg hover:shadow-blue-500/25' : 'bg-gray-700 text-gray-400 cursor-not-allowed' ]"> <div class="flex items-center space-x-2"> <span>发送</span> <svg class="w-5 h-5" fill="none" stroke="currentColor" viewBox="0 0 24 24"> <path stroke-linecap="round" stroke-linejoin="round" stroke-width="2" d="M12 19l9 2-9-18-9 18 9-2zm0 0v-8" /> </svg> </div> </button> </div> </div> </template> <style scoped> /* 滑块样式,只作用当前组件 / / 温度滑块样式 */ .temperature-slider::-webkit-slider-thumb { appearance: none; height: 24px; width: 24px; border-radius: 50%; background: linear-gradient(135deg, #f97316, #dc2626); cursor: pointer; border: 3px solid #1f2937; box-shadow: 0 4px 12px rgba(249, 115, 22, 0.4); transition: all 0.3s ease; } .temperature-slider::-webkit-slider-thumb:hover { transform: scale(1.2); box-shadow: 0 6px 20px rgba(249, 115, 22, 0.6); } .temperature-slider::-webkit-slider-runnable-track { height: 12px; background: linear-gradient(to right, #3b82f6 0%, #f59e0b 50%, #dc2626 100%); border-radius: 6px; } /* Token滑块样式 */ .tokens-slider::-webkit-slider-thumb { appearance: none; height: 24px; width: 24px; border-radius: 50%; background: linear-gradient(135deg, #10b981, #059669); cursor: pointer; border: 3px solid #1f2937; box-shadow: 0 4px 12px rgba(16, 185, 129, 0.4); transition: all 0.3s ease; } .tokens-slider::-webkit-slider-thumb:hover { transform: scale(1.2); box-shadow: 0 6px 20px rgba(16, 185, 129, 0.6); } .tokens-slider::-webkit-slider-runnable-track { height: 12px; background: linear-gradient(to right, #10b981 0%, #f59e0b 50%, #3b82f6 100%); border-radius: 6px; } /* Firefox 滑块样式 */ .temperature-slider::-moz-range-thumb, .tokens-slider::-moz-range-thumb { height: 24px; width: 24px; border-radius: 50%; cursor: pointer; border: 3px solid #1f2937; transition: all 0.3s ease; } .temperature-slider::-moz-range-thumb { background: linear-gradient(135deg, #f97316, #dc2626); box-shadow: 0 4px 12px rgba(249, 115, 22, 0.4); } .tokens-slider::-moz-range-thumb { background: linear-gradient(135deg, #10b981, #059669); box-shadow: 0 4px 12px rgba(16, 185, 129, 0.4); } /* 动画效果 */ @keyframes pulse { 0%, 100% { opacity: 1; } 50% { opacity: 0.5; } } .animate-pulse { animation: pulse 2s cubic-bezier(0.4, 0, 0.6, 1) infinite; } </style>chat.ts
TypeScript// 从 Pinia 中导入「创建状态仓库」的核心方法 defineStore import { defineStore } from 'pinia'; // 从 Vue 中导入 ref,用于创建响应式数据(基础类型/数组推荐用 ref) import { ref } from 'vue'; // 导入 axios,用于发送普通的 HTTP 请求(历史记录、清空记录接口用) import axios from 'axios'; // 导入用户状态仓库,用来获取用户ID、做接口身份认证 import { useUserStore } from './user'; // TypeScript 接口:约定「单条聊天消息」的数据结构,让代码有类型提示、更安全 interface ChatMessage { role: string; // 消息角色,比如 user(用户发的)、assistant(AI回复的) content: string; // 消息的文本内容 sources: any[]; // 这条消息关联的参考来源数据数组(比如知识库引用的文档) } // TypeScript 接口:约定「后端返回的历史消息」的数据结构 interface HistoryMessageResponse { messages: ChatMessage; // 后端返回的消息字段,里面是标准的聊天消息结构 } // 创建并导出名为 chat 的状态仓库(Pinia 组合式写法) export const useChatStore = defineStore('chat', () => { // 响应式数组:存放所有聊天消息 // 每条消息包含 3 个字段:角色、文本内容、参考来源列表 const messages = ref<{ role: string; content: string, sources_info_list: any }[]>([]); // 响应式布尔值:标记当前是否正在加载/请求中,用于页面显示加载动画 const isLoading = ref(false); // 获取用户仓库实例,后续用它拿用户ID做接口认证 const userStore = useUserStore(); // ------------------------------ // 方法1:加载聊天历史记录 // ------------------------------ const loadChatHistory = async () => { // 守卫判断:如果没有用户ID(未登录),直接不执行后续逻辑 if (!userStore.userId) return; try { // 发送 GET 请求,从后端获取历史聊天记录 // import.meta.env.VITE_API_URL 是环境变量里配置的接口基础地址 const { data } = await axios.get( `${import.meta.env.VITE_API_URL}/api/chat/history`, { // 请求头配置 headers: { 'Authorization': `Bearer ${userStore.userId}`, // 身份认证:把用户ID放在 Bearer 令牌里传给后端 'Content-Type': 'application/json' // 告诉后端请求体是 JSON 格式 } } ); // 处理后端返回的数据: // 1. filter:过滤掉没有内容的无效消息 // 2. map:把后端格式转换成前端页面需要的格式,赋值给本地消息列表 messages.value = data .filter((msg: HistoryMessageResponse) => msg.messages.content) .map((msg: HistoryMessageResponse) => ({ role: msg.messages.role, content: msg.messages.content, sources_info_list: msg.messages.sources || [], // 没有来源数据就给空数组兜底 })); } catch (error) { // 请求出错时,在控制台打印错误信息,方便调试 console.error('Error loading chat history: ', error); } }; // ------------------------------ // 方法2:清空聊天历史记录 // ------------------------------ const clearChatHistory = async () => { // 守卫判断:没有用户ID就不执行 if (!userStore.userId) return; // 发送 POST 请求,通知后端把当前用户的聊天历史清空 await axios.post( `${import.meta.env.VITE_API_URL}/api/chat/clear`, {}, // POST 请求体为空(不需要传额外参数) { headers: { 'Authorization': `Bearer ${userStore.userId}`, // 带上用户身份认证 'Content-Type': 'application/json' } } ); // 后端清空成功后,把本地前端的消息列表也清空,保持页面同步 messages.value = []; }; // ------------------------------ // 方法3:发送用户消息 + 接收AI流式回复 // ------------------------------ // 参数说明: // message 用户输入的问题内容 // model 选用的AI模型名称 // knowledge_bool 是否开启知识库问答 // temperature 模型温度(控制回复随机性,值越高越发散) // max_tokens 最大token数量(限制AI回复的长度) const sendMessage = async (message: string, model: string, knowledge_bool: boolean, temperature: number, max_tokens: number) => { // 守卫判断:消息是空的 / 没有用户ID,直接不执行 if (!message.trim() || !userStore.userId) return; // 先把用户发的消息加到聊天列表里,让页面立刻显示用户的提问 messages.value.push({ role: 'user', content: message, sources_info_list: [] }); // 开启加载状态,页面可以显示"AI正在思考/回复中"的效果 isLoading.value = true; try { // 调用流式响应处理方法,把所有参数传进去,接收AI的逐字回复 await handleStreamResponse(message, model, knowledge_bool, temperature, max_tokens); } catch (error) { // 请求出错时,在聊天列表里加一条错误提示,让用户知道失败了 console.error('Error sending message: ', error); messages.value.push({ role: 'assistant', content: 'Error: unable to process request', sources_info_list: [] }); } finally { // 无论成功还是失败,最后都关闭加载状态 isLoading.value = false; } }; /** 内部方法:处理流式响应(SSE 服务器推送事件,实现打字机效果) @param message - 用户输入的问题内容 @param model - AI模型名称 @param knowledge_bool - 是否开启知识库问答 @param temperature - 温度参数,控制回复的随机性 @param max_tokens - 最大token数量,限制AI回复的长度 */ const handleStreamResponse = async (message: string, model: string, knowledge_bool: boolean, temperature: number, max_tokens: number) => { // 记录这条AI回复在消息数组里的下标位置,后面用来实时更新内容 const aiMessageIndex = messages.value.length; // 先在消息列表里占一个位置,放一条空的AI消息,后续逐字往里面填内容 messages.value.push({ role: 'assistant', content: '', sources_info_list: [] }); try { // 用 fetch 发起流式请求(axios 不支持原生流式读取,所以用浏览器原生 fetch) const response = await fetch(${import.meta.env.VITE_API_URL}/api/chat/stream, { method: 'POST', // 请求方式是 POST headers: { 'Content-Type': 'application/json', // 告诉后端请求体是 JSON 格式 'Authorization': Bearer ${userStore.userId}, // 带上用户身份认证 }, // 请求体:把所有参数转成 JSON 字符串发给后端 body: JSON.stringify({ query: message, // 用户的问题 model: model, // 选择的AI模型 temperature: temperature, // 温度参数 max_tokens: max_tokens, // 最大生成长度 knowledge_bool: knowledge_bool, // 是否开启知识库 } ) }); // 检查HTTP请求是否成功,状态码不是 2xx 就抛出错误 if (!response.ok) { throw new Error(HTTP error! status: ${response.status}); } // 检查浏览器是否支持读取响应流,不支持就报错 if (!response.body) { throw new Error('ReadableStream not supported'); } // 获取流的读取器,用来一点点读取后端持续返回的数据 const reader = response.body.getReader(); // 创建文本解码器,把二进制的字节数据转换成可读的字符串 const decoder = new TextDecoder(); // 缓冲区:用来拼接被拆分的数据块 // 因为流式传输可能把一行完整数据拆成两次发,需要先拼起来再处理 let buffer = ''; // 循环:持续不断地读取流里的数据,直到流结束 while (true) { // 读取一块数据:done 表示是否全部读完了,value 是这一块的二进制数据 const { done, value } = await reader.read(); // 如果流结束了,跳出循环 if (done) break; // 把这块二进制数据解码成字符串,追加到缓冲区末尾 buffer += decoder.decode(value, { stream: true }); // 按换行符把缓冲区拆成一行一行的(SSE 协议规定按行传输数据) const lines = buffer.split('\n'); // 把最后一行拿出来放回缓冲区 // 因为最后一行大概率是不完整的,等下一块数据过来拼起来再处理 buffer = lines.pop() || ''; // 遍历每一行完整的数据,逐个解析处理 for (const line of lines) { const trimmedLine = line.trim(); // SSE 协议规定数据行以 "data: " 开头,只处理这种有效数据行 if (trimmedLine.startsWith('data: ')) { // 去掉开头的 "data: " 前缀,拿到里面的 JSON 字符串 const jsonStr = trimmedLine.slice(6); // 跳过空行,或者 SSE 标准的结束标记 [DONE] if (jsonStr.trim() === '' || jsonStr.trim() === '[DONE]') continue; try { // 把 JSON 字符串解析成 JS 对象,方便读取字段 const data = JSON.parse(jsonStr); // 如果后端返回结束信号(finished 为 true),就跳出数据处理循环 if (data.finished) { break; } // 根据后端返回的数据类型,做不同的处理 if (data.type === "sources") { // 类型是 sources:处理参考来源数据,更新到这条AI消息的来源列表里 if (data.content && Array.isArray(data.content)) { messages.value[aiMessageIndex].sources_info_list = data.content; } } else if (data.type === "content" || data.type === "text") { // 类型是 content/text:处理AI回复的文本 // 把新返回的文本追加到消息内容后面,实现逐字显示的打字机效果 if (data.content) { messages.value[aiMessageIndex].content += data.content; } } } catch (e) { // 某一行解析失败不影响整体流程,在控制台打印警告方便调试 console.warn('Failed to parse JSON:', jsonStr, e); } } } } // 读取完成后,释放读取器的锁,释放浏览器资源 reader.releaseLock(); } catch (error) { // 流式请求出错时,把之前占位的那条空AI消息删掉(避免页面留一条空消息) console.error('Stream error:', error); messages.value.splice(aiMessageIndex, 1); // 把错误抛出去,让外层的 sendMessage 捕获并做后续处理 throw error; } }; // 把状态和方法暴露出去,组件里导入仓库后就可以调用这些数据和方法 return { messages, isLoading, loadChatHistory, sendMessage, clearChatHistory }; });
聊天接口
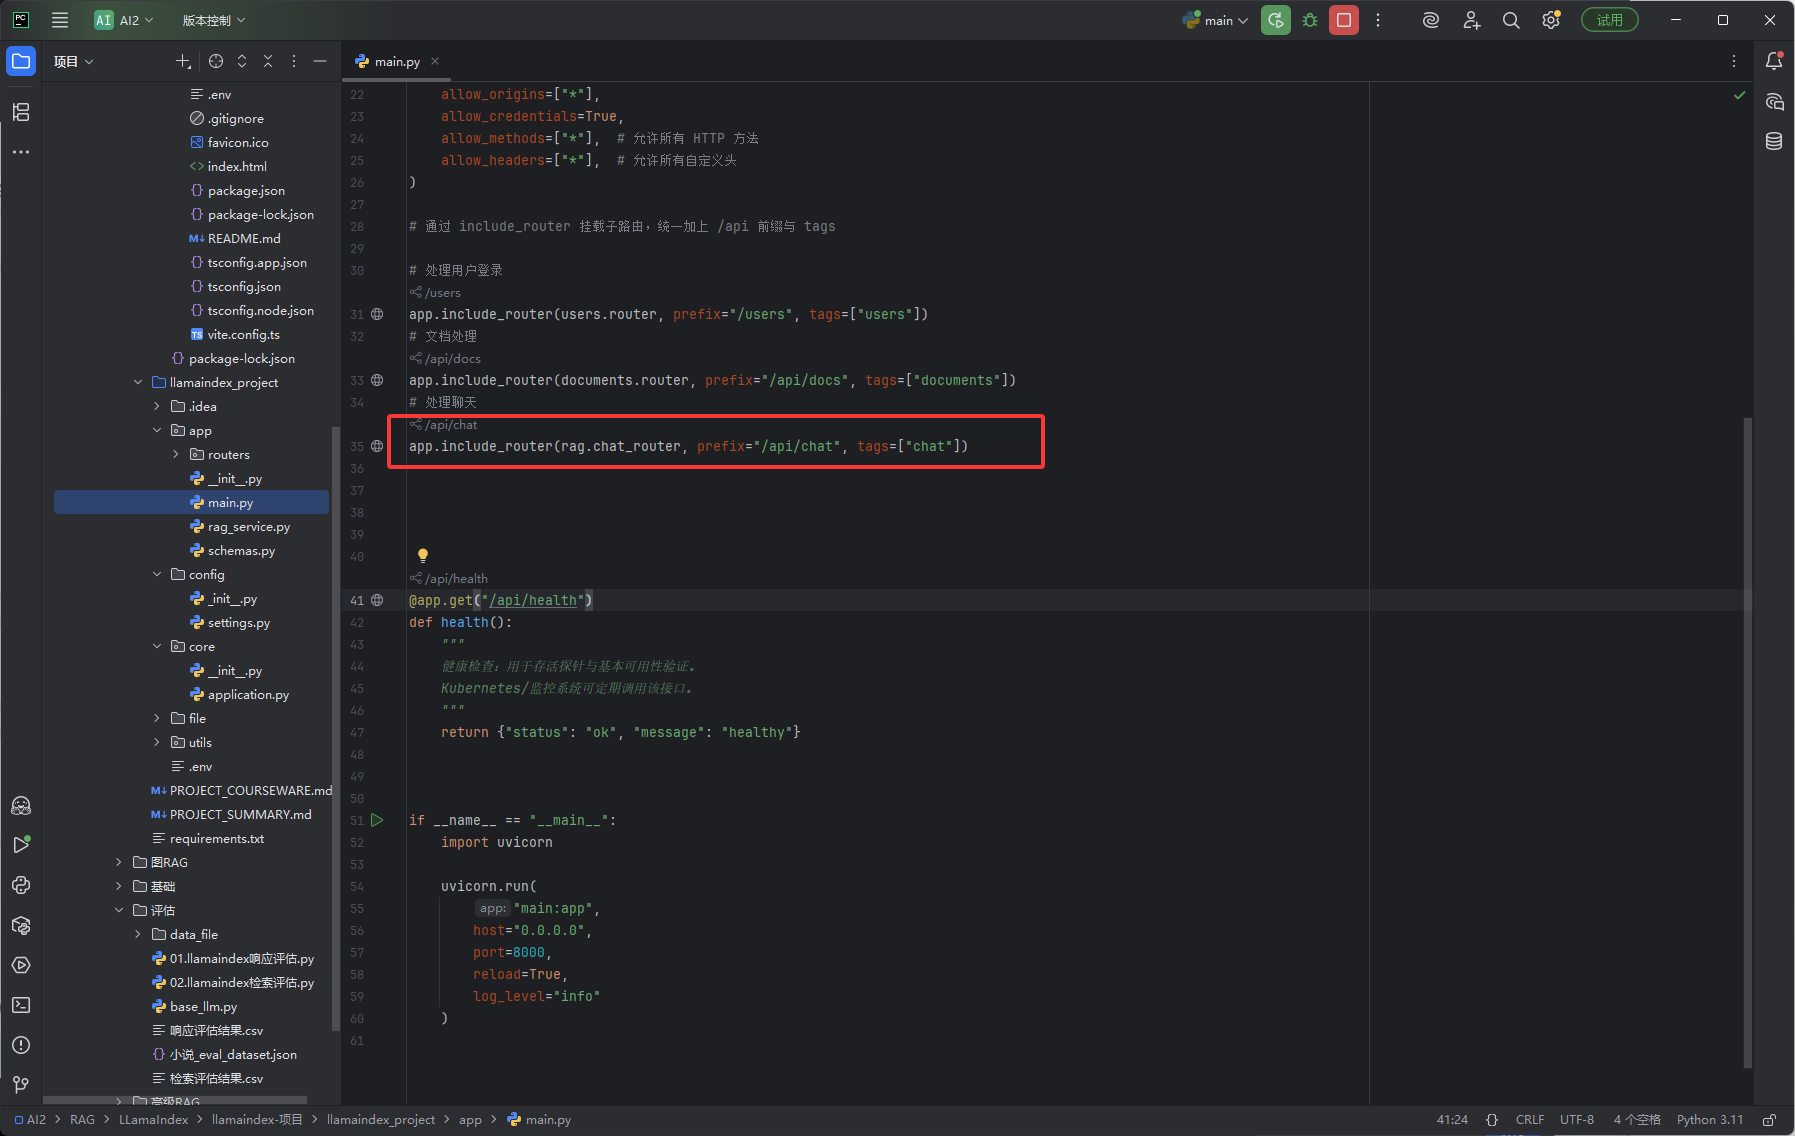
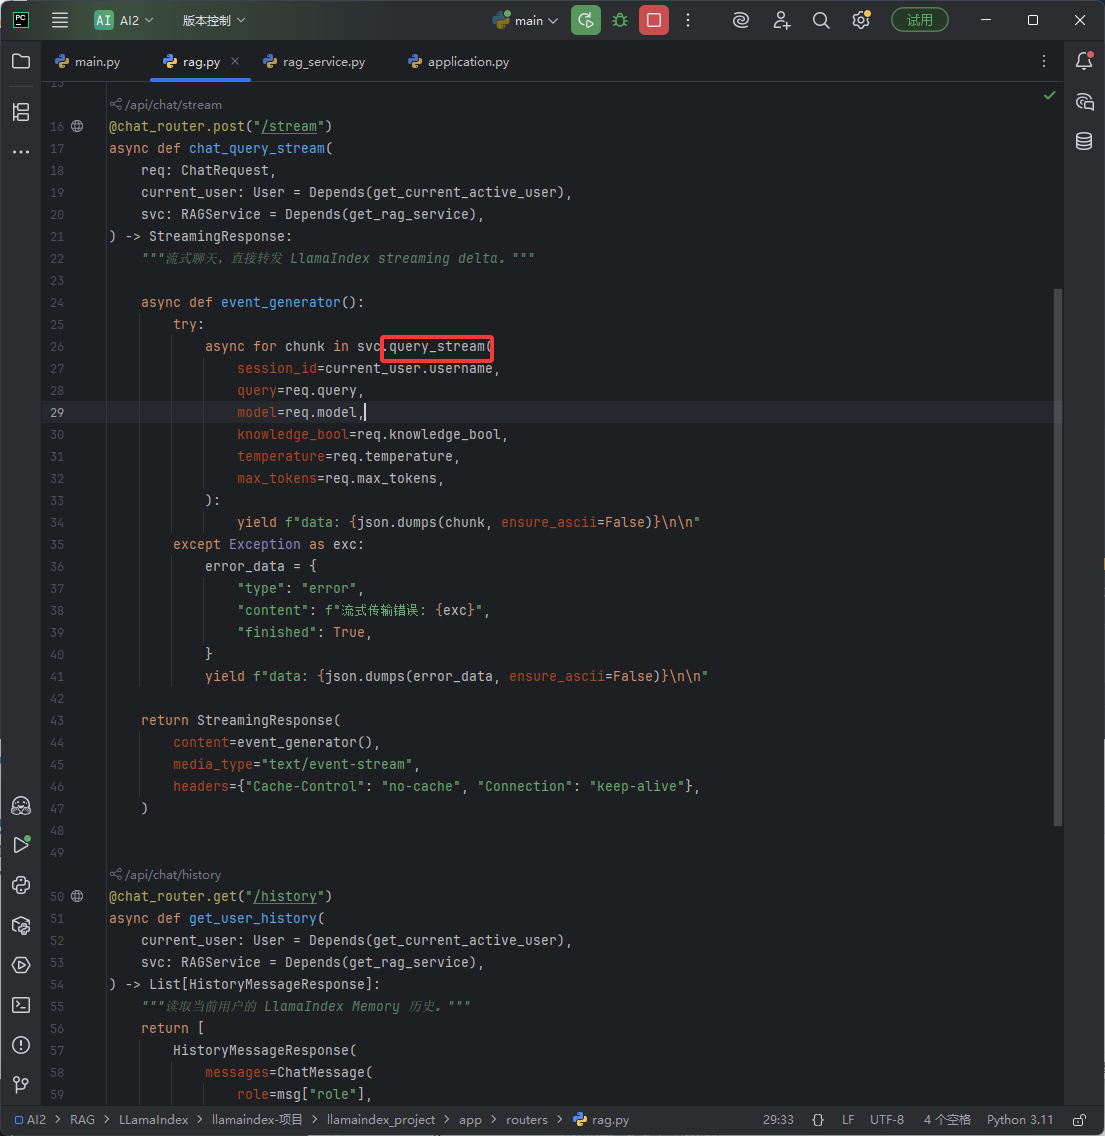
如下图红框,它是聊天的接口
如下图红框处理聊天的接口
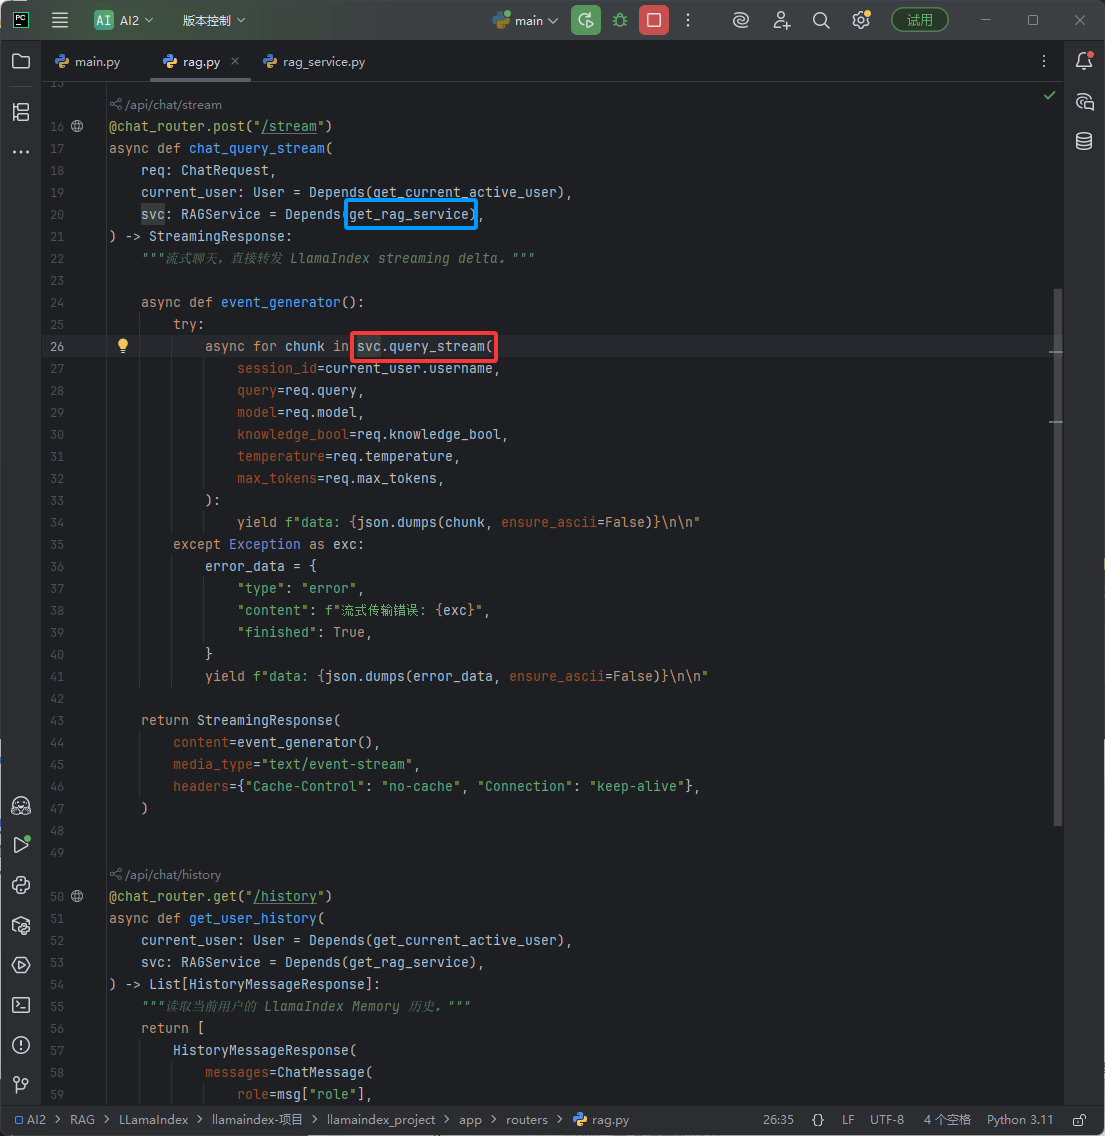
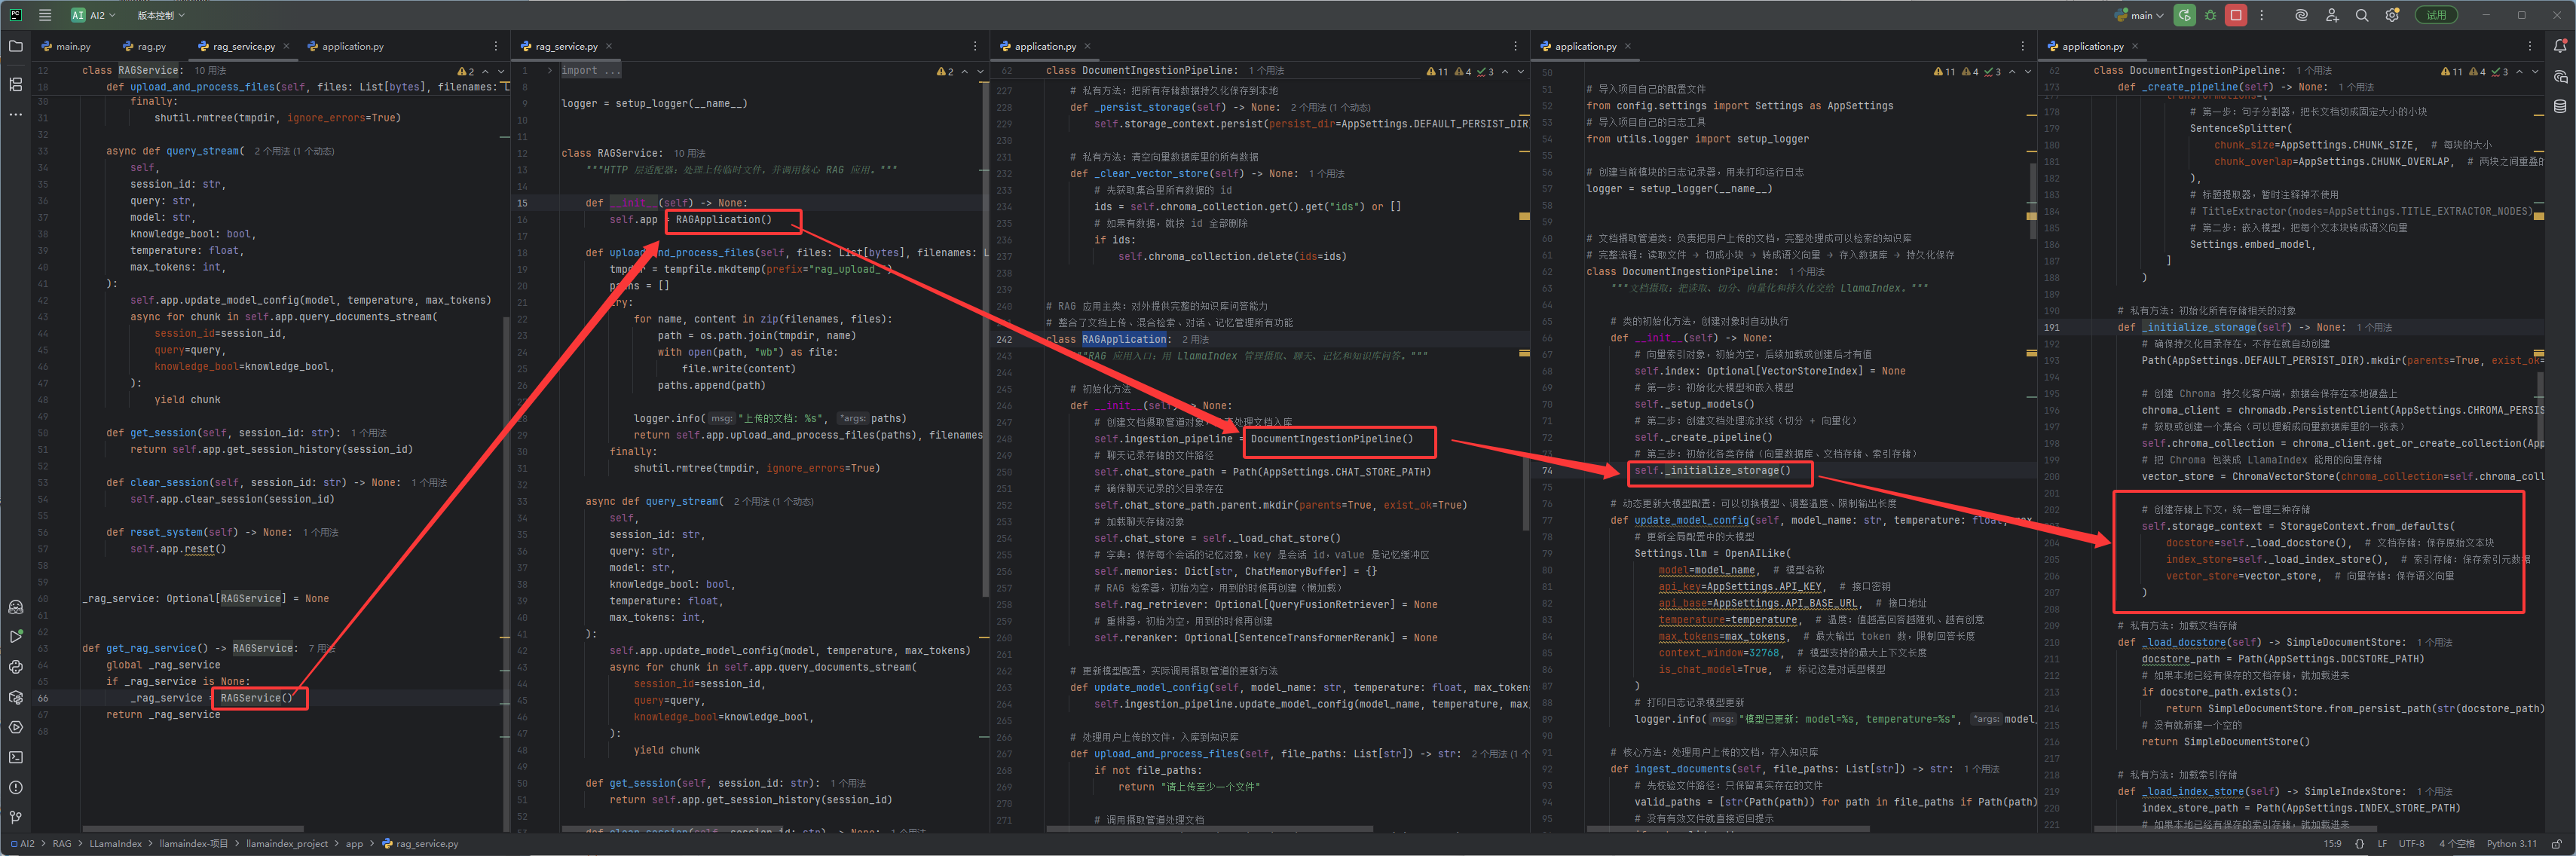
如下图红框,它调用了svc里的函数,然后svc是通过下图蓝框创建的
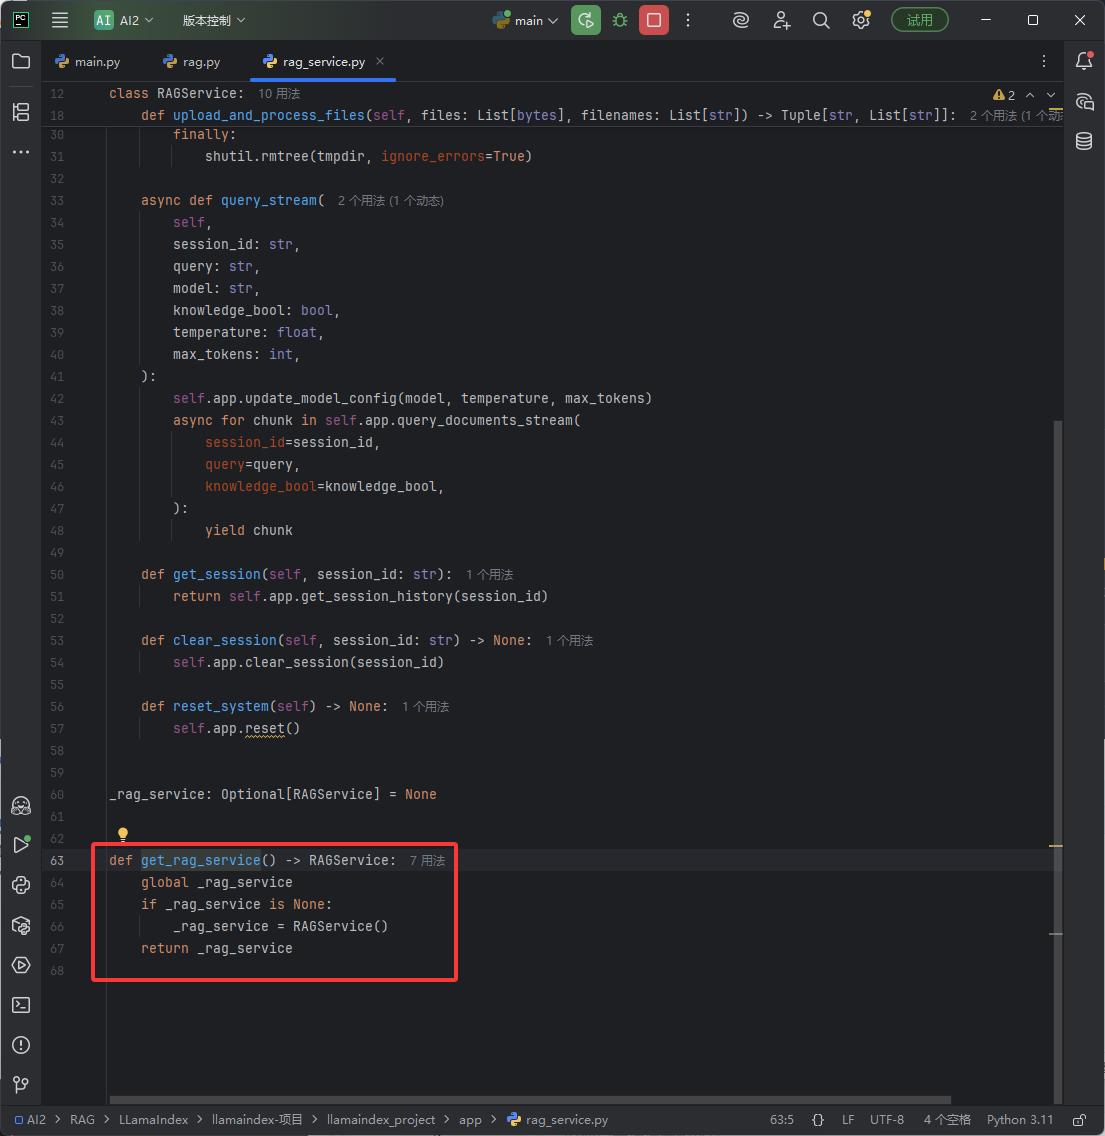
如下图红框 get_rag_service 的逻辑,它是创建一个RAGService,这个RAGService的逻辑上一节中写过了,就是初始化llamaindex构建rag的流程
主要就是下图红框里面的逻辑
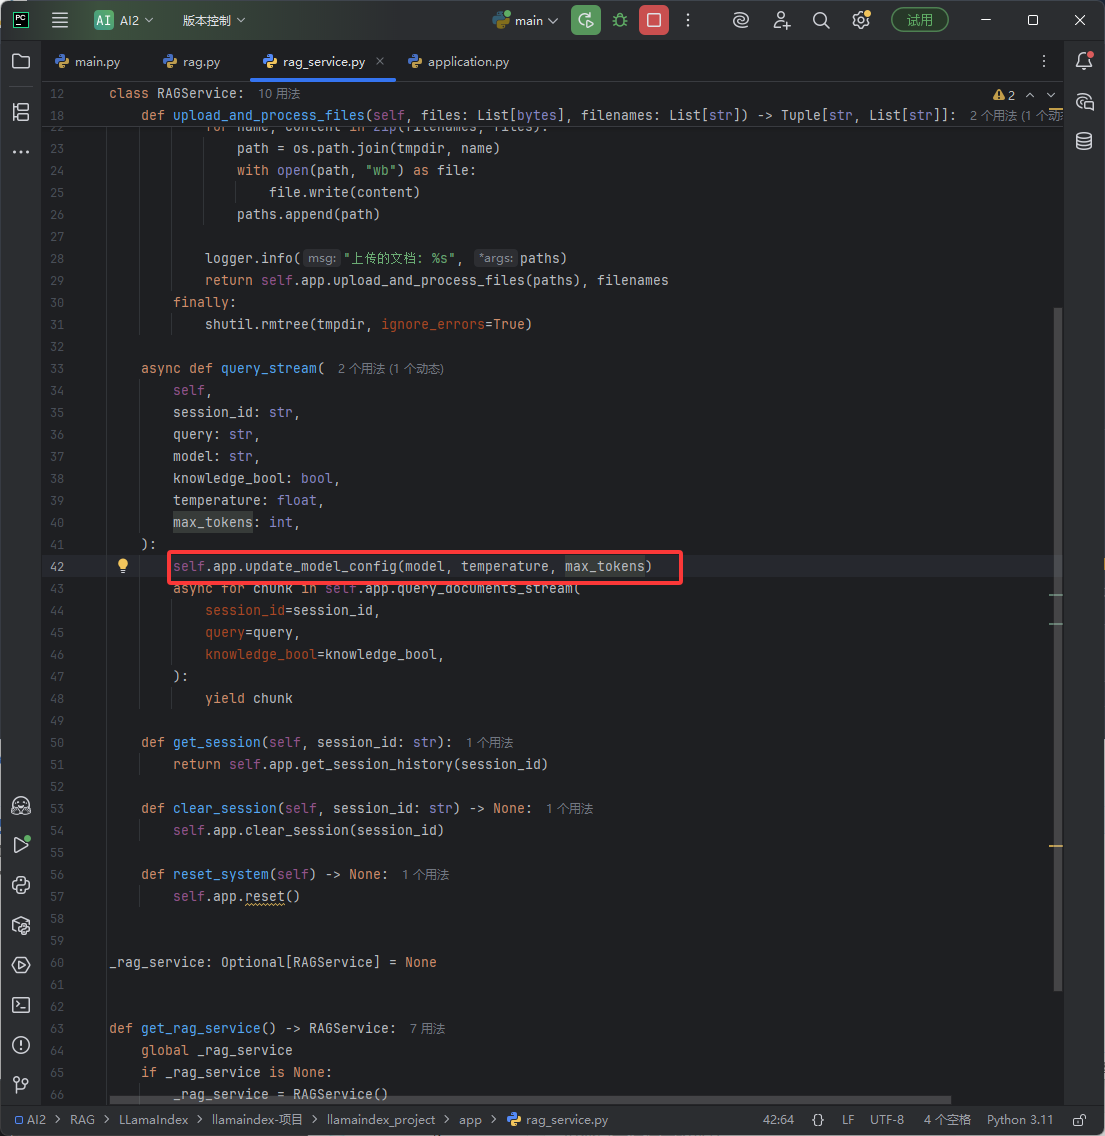
首先他更新了一下模型信息
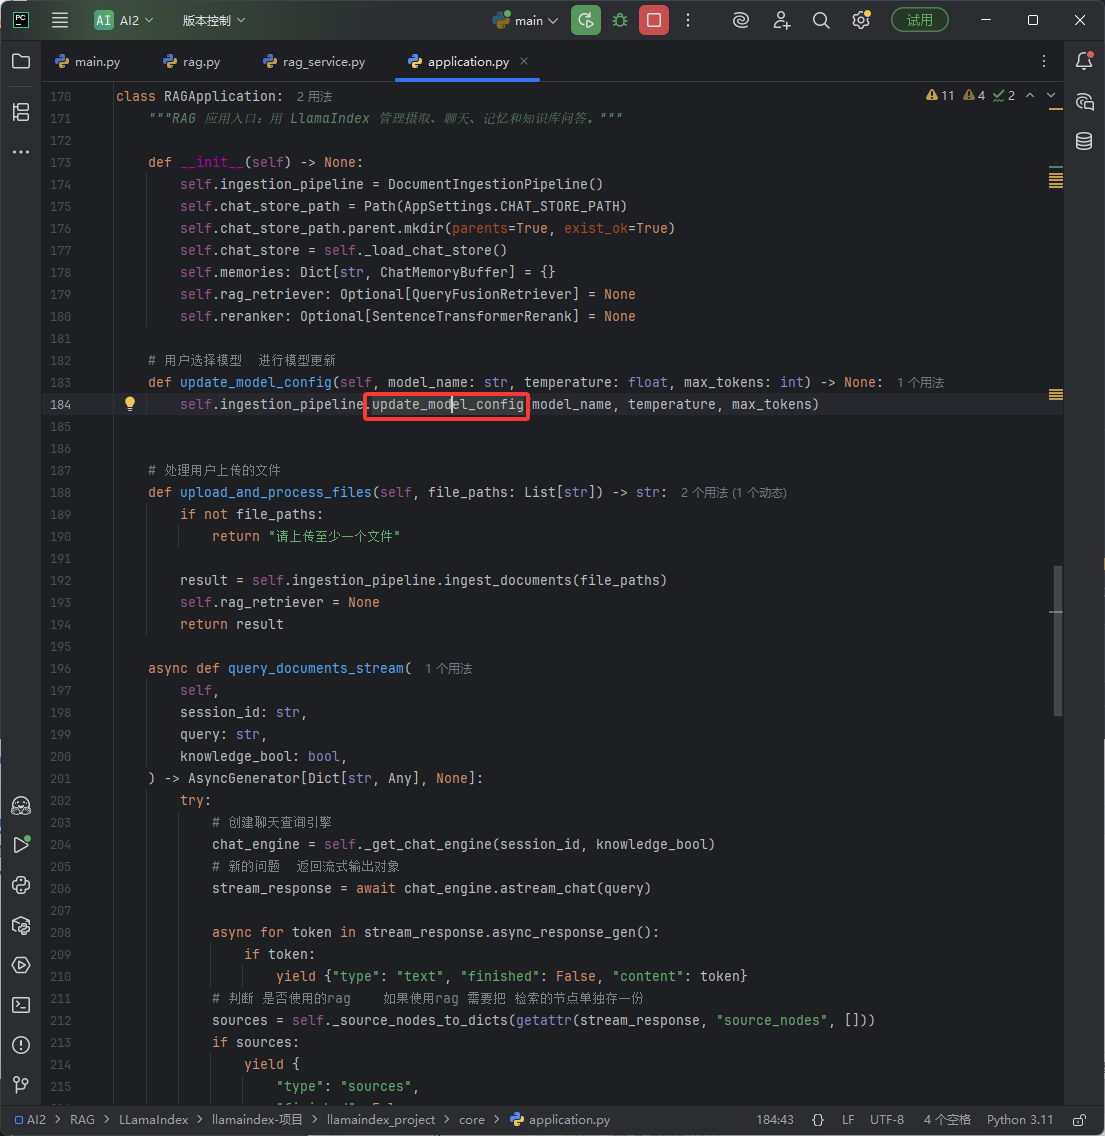
如下图红框update_model_config里调用的ingestion_pipeline的update_model_config
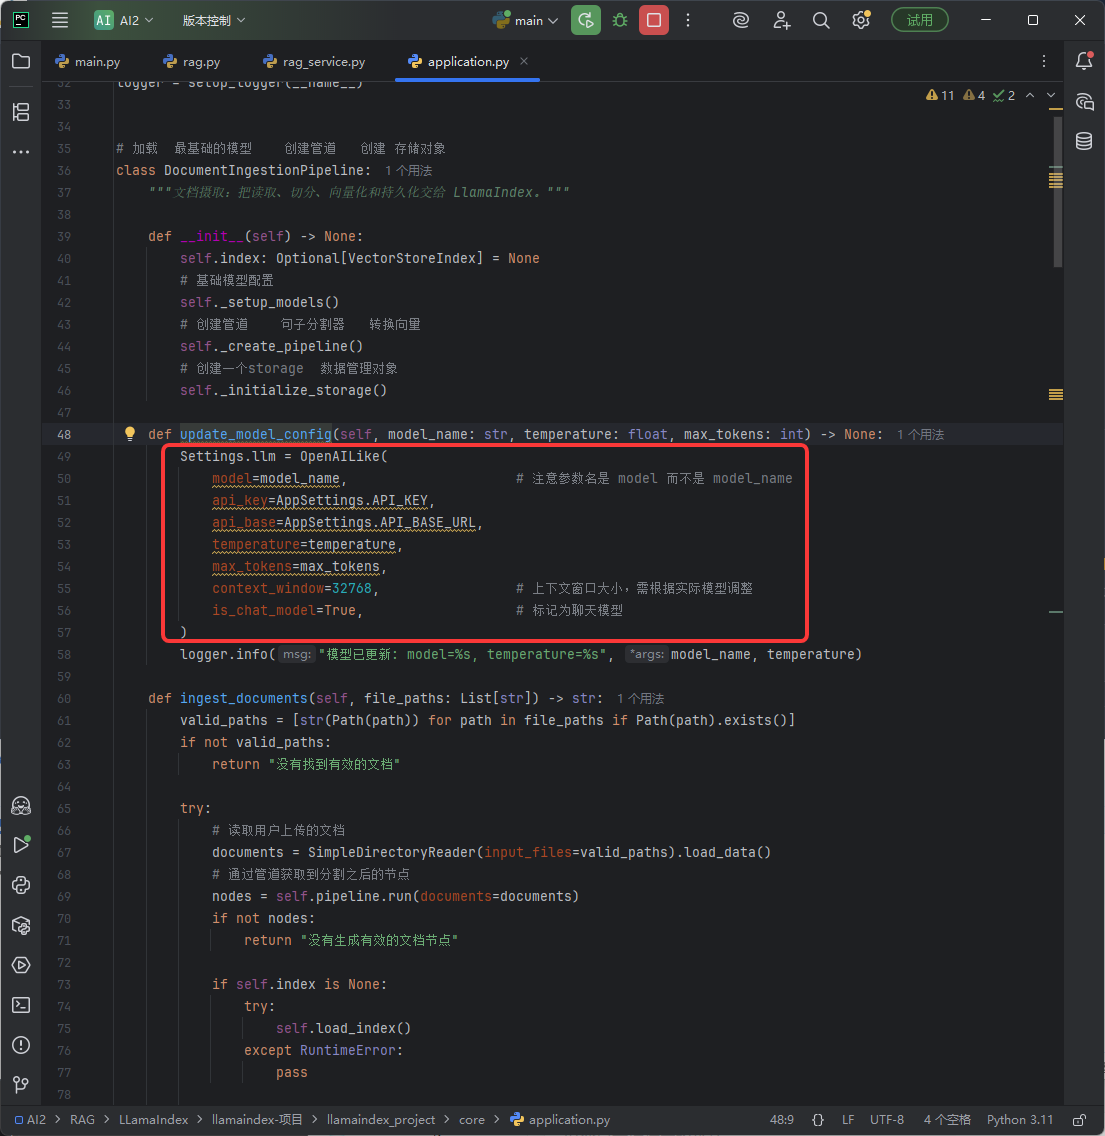
然后如下图红框 ingestion_pipeline里的update_model_config就是设置一下全局的大语言模型
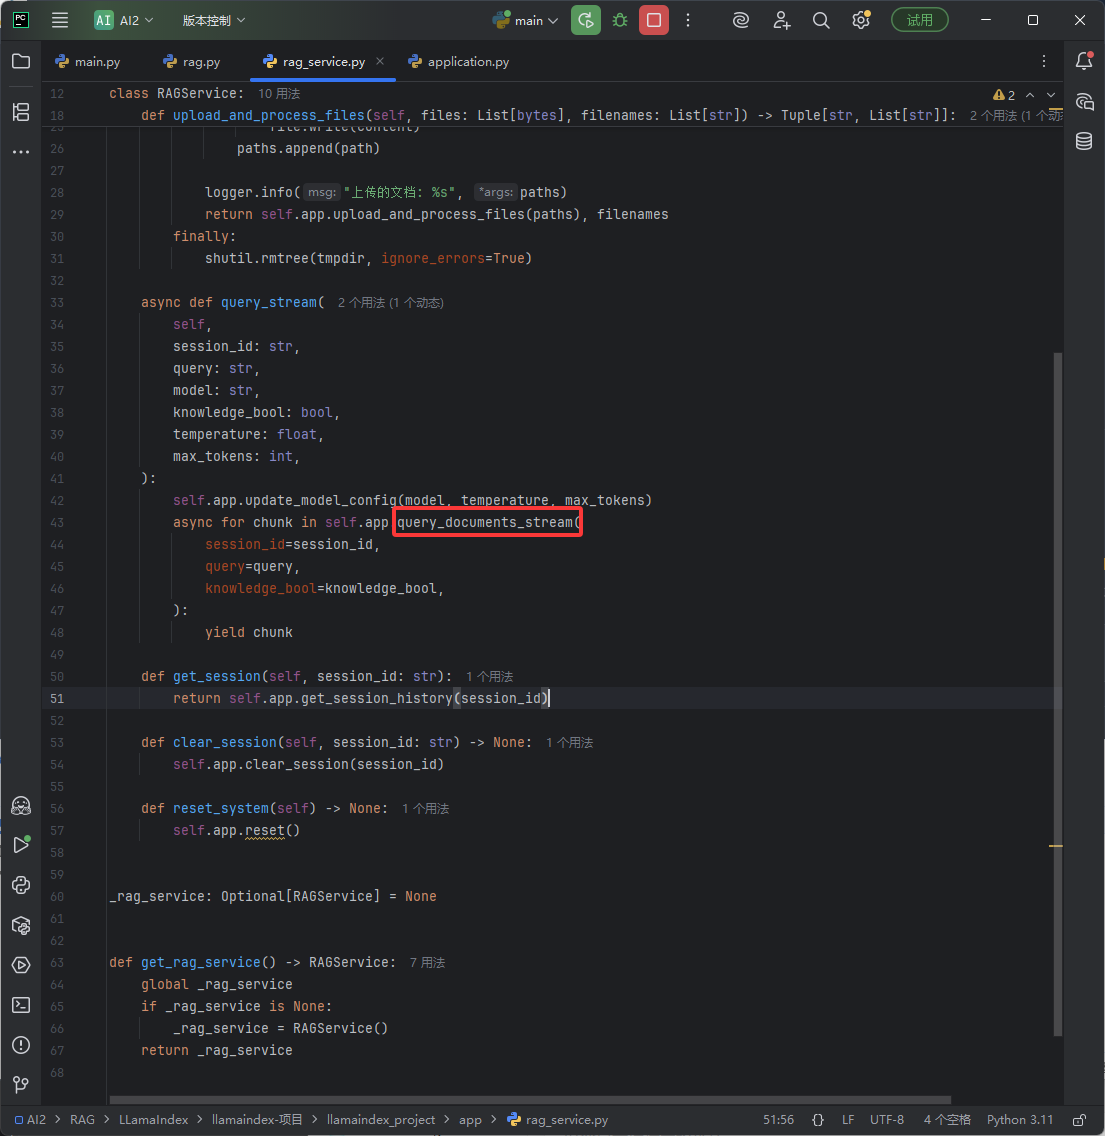
然后update_model_config看完了,接下来是下图红框的 query_documents_stream
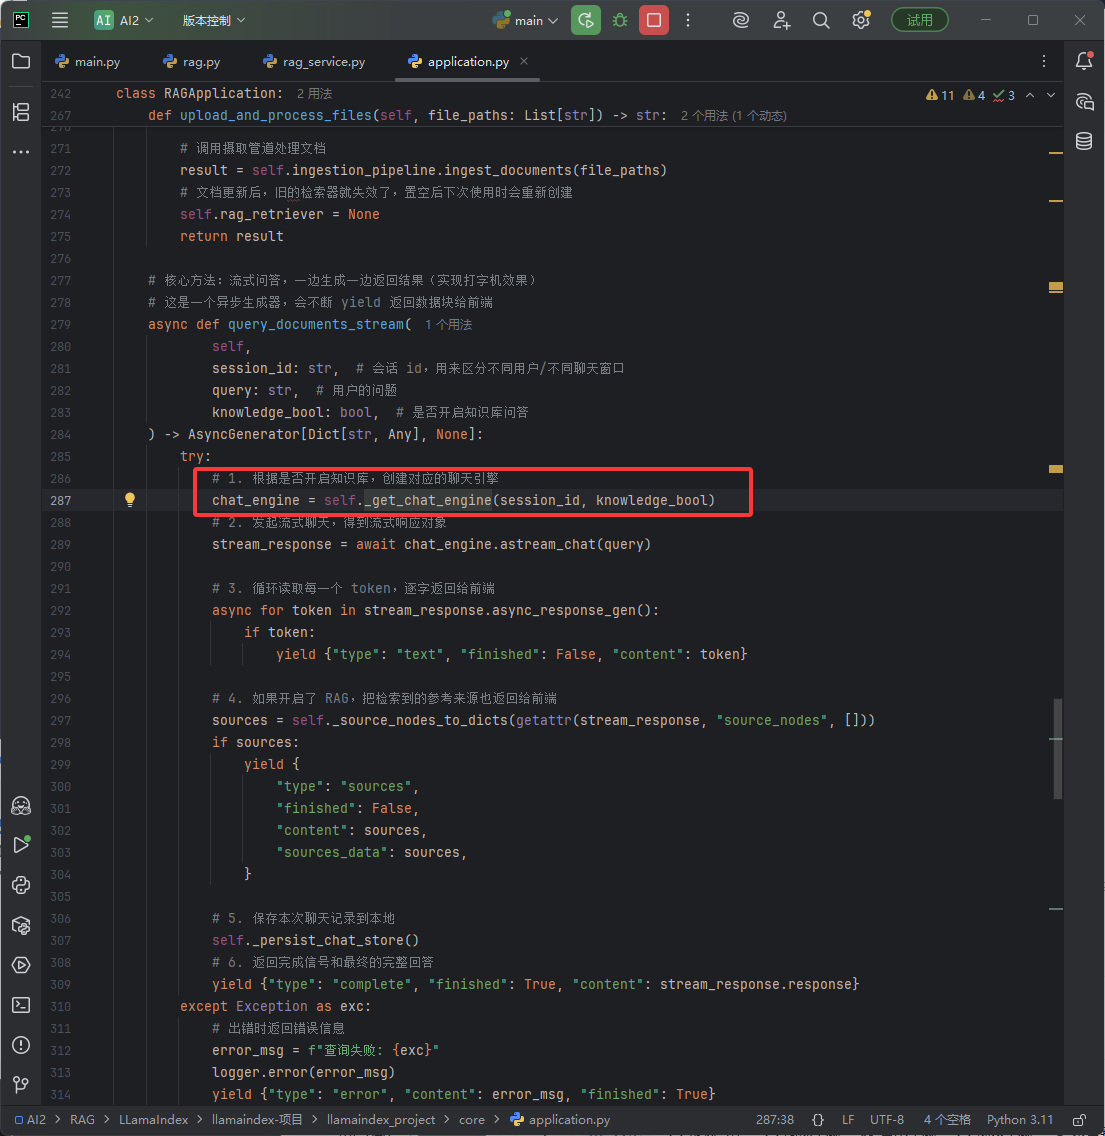
如下图红框它首先会获取聊天引擎
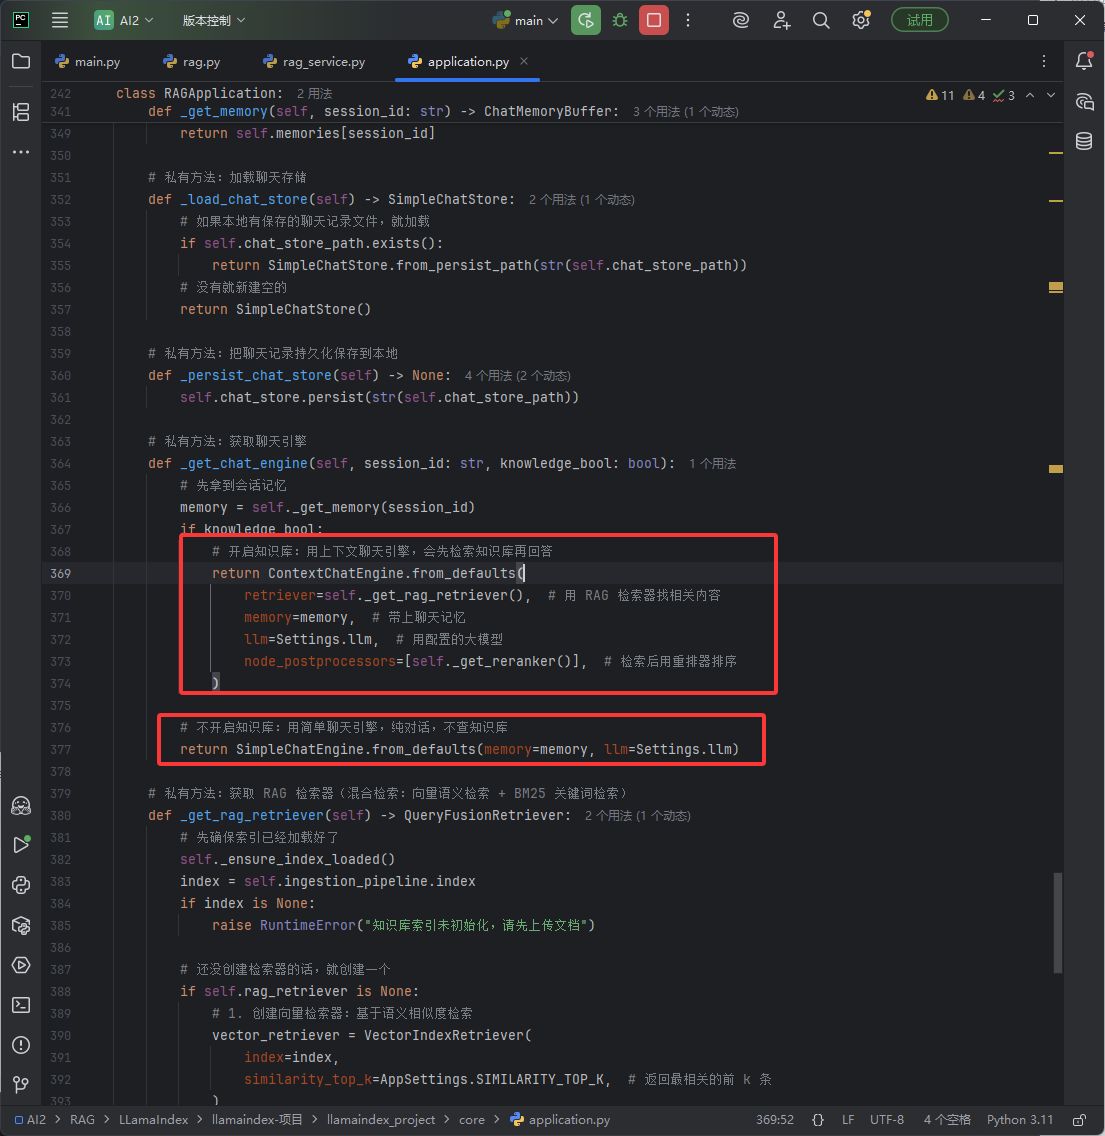
这里通过前端传来的标记来判断创建带知识库的聊天引擎,还是不带知识库的聊天引擎
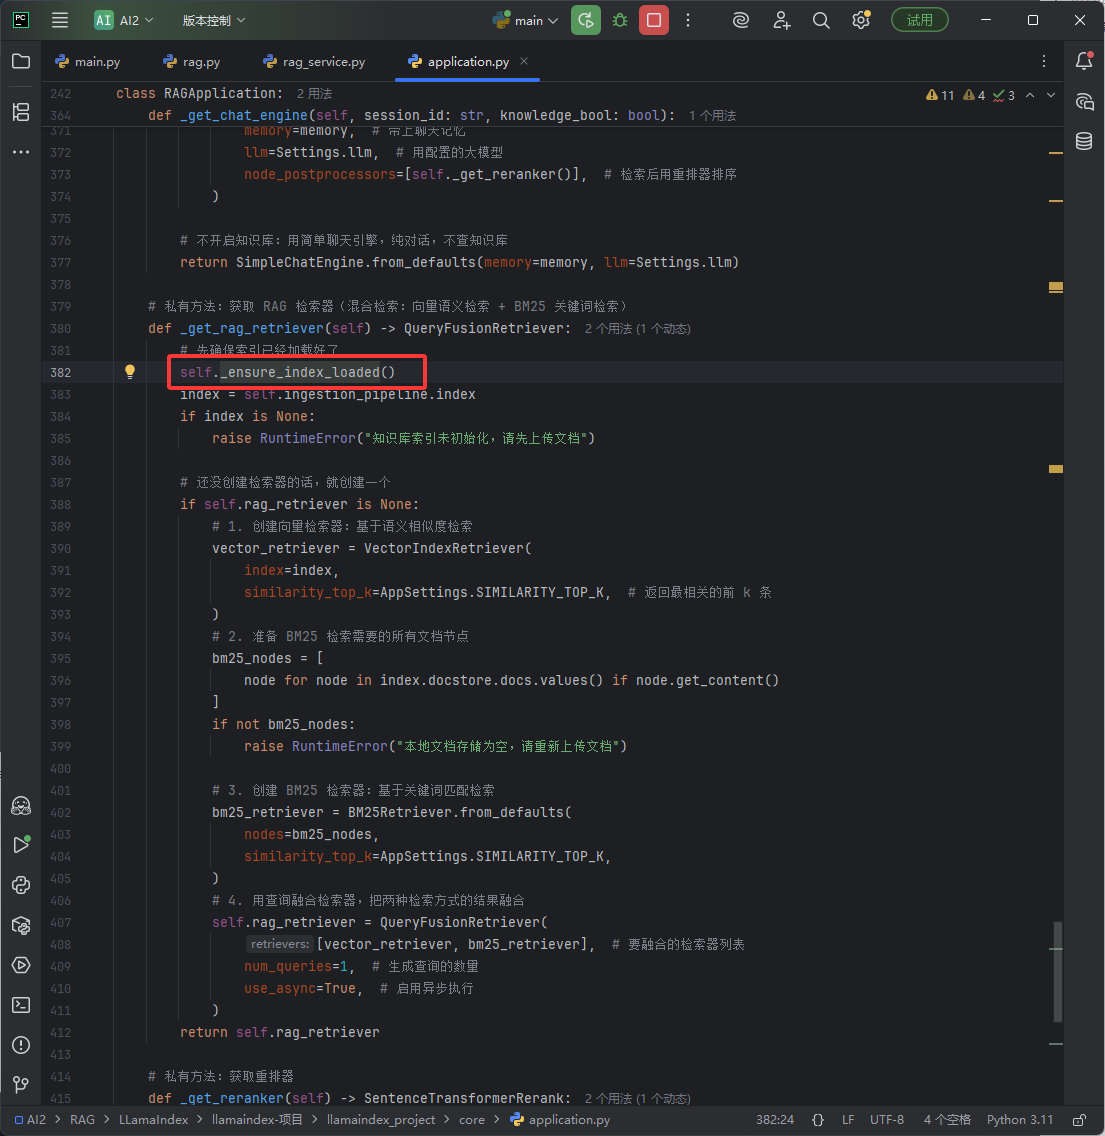
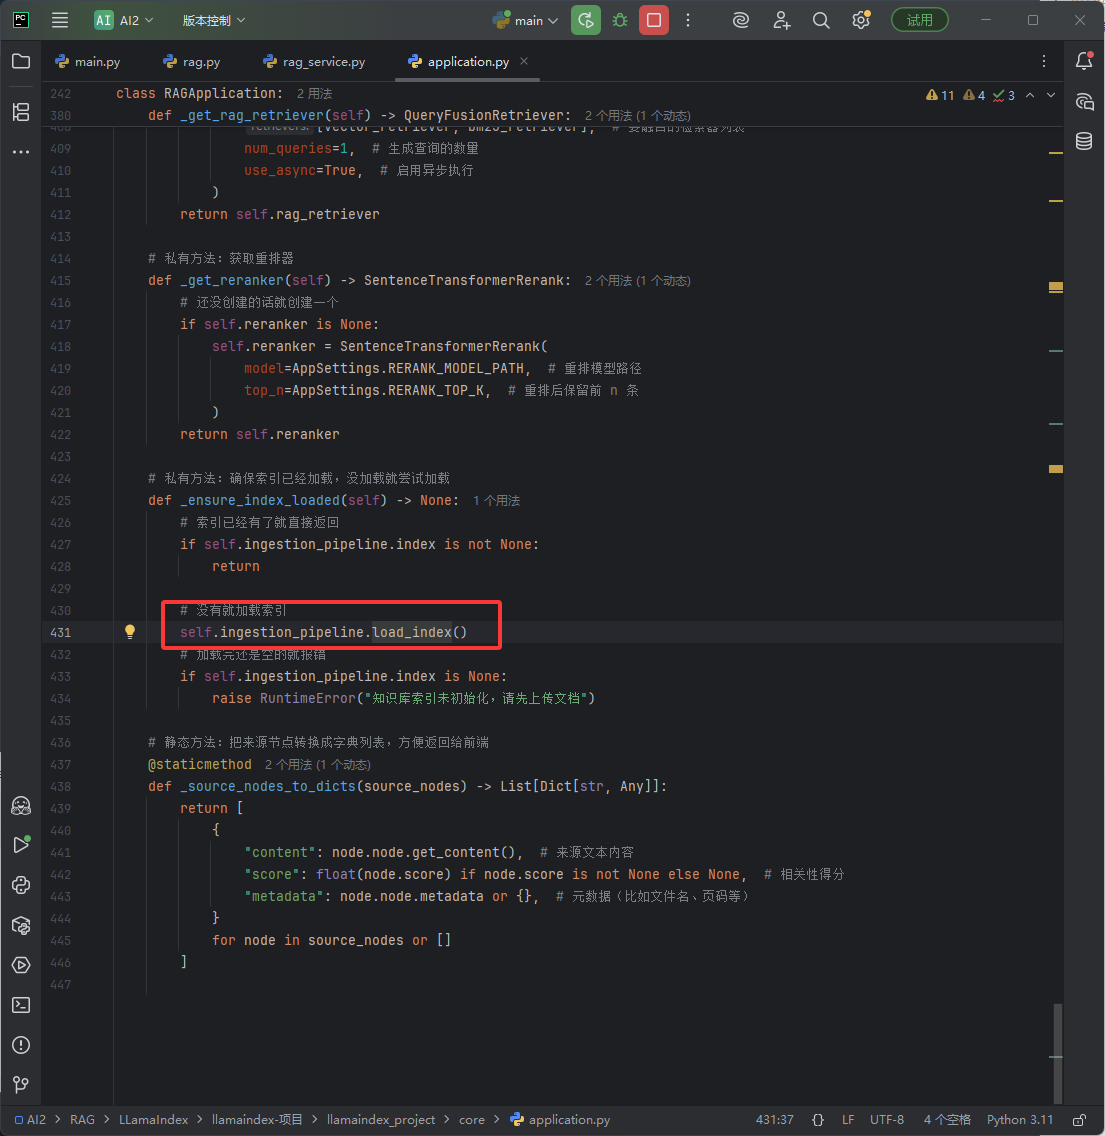
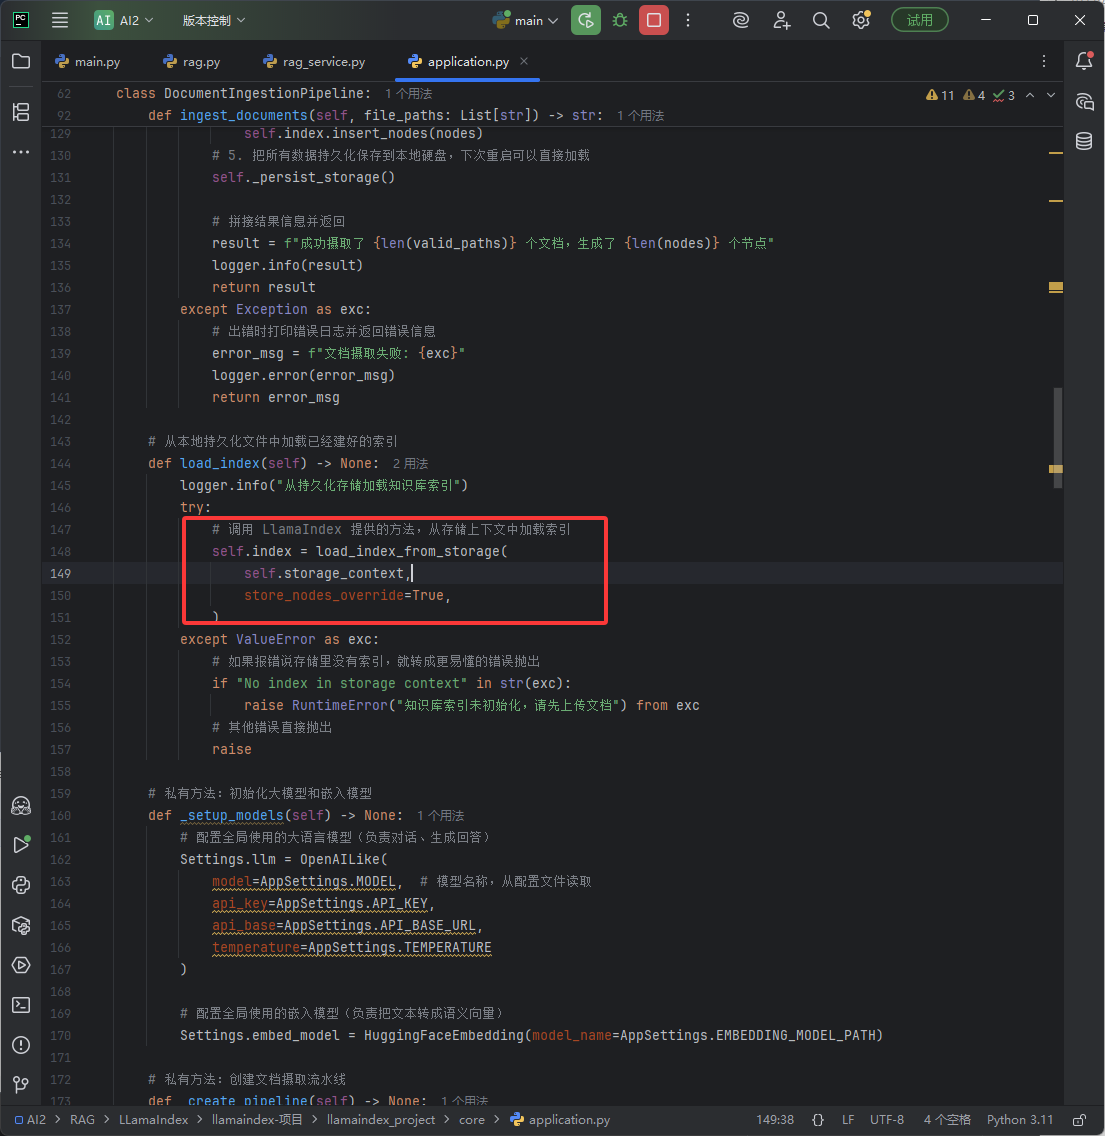
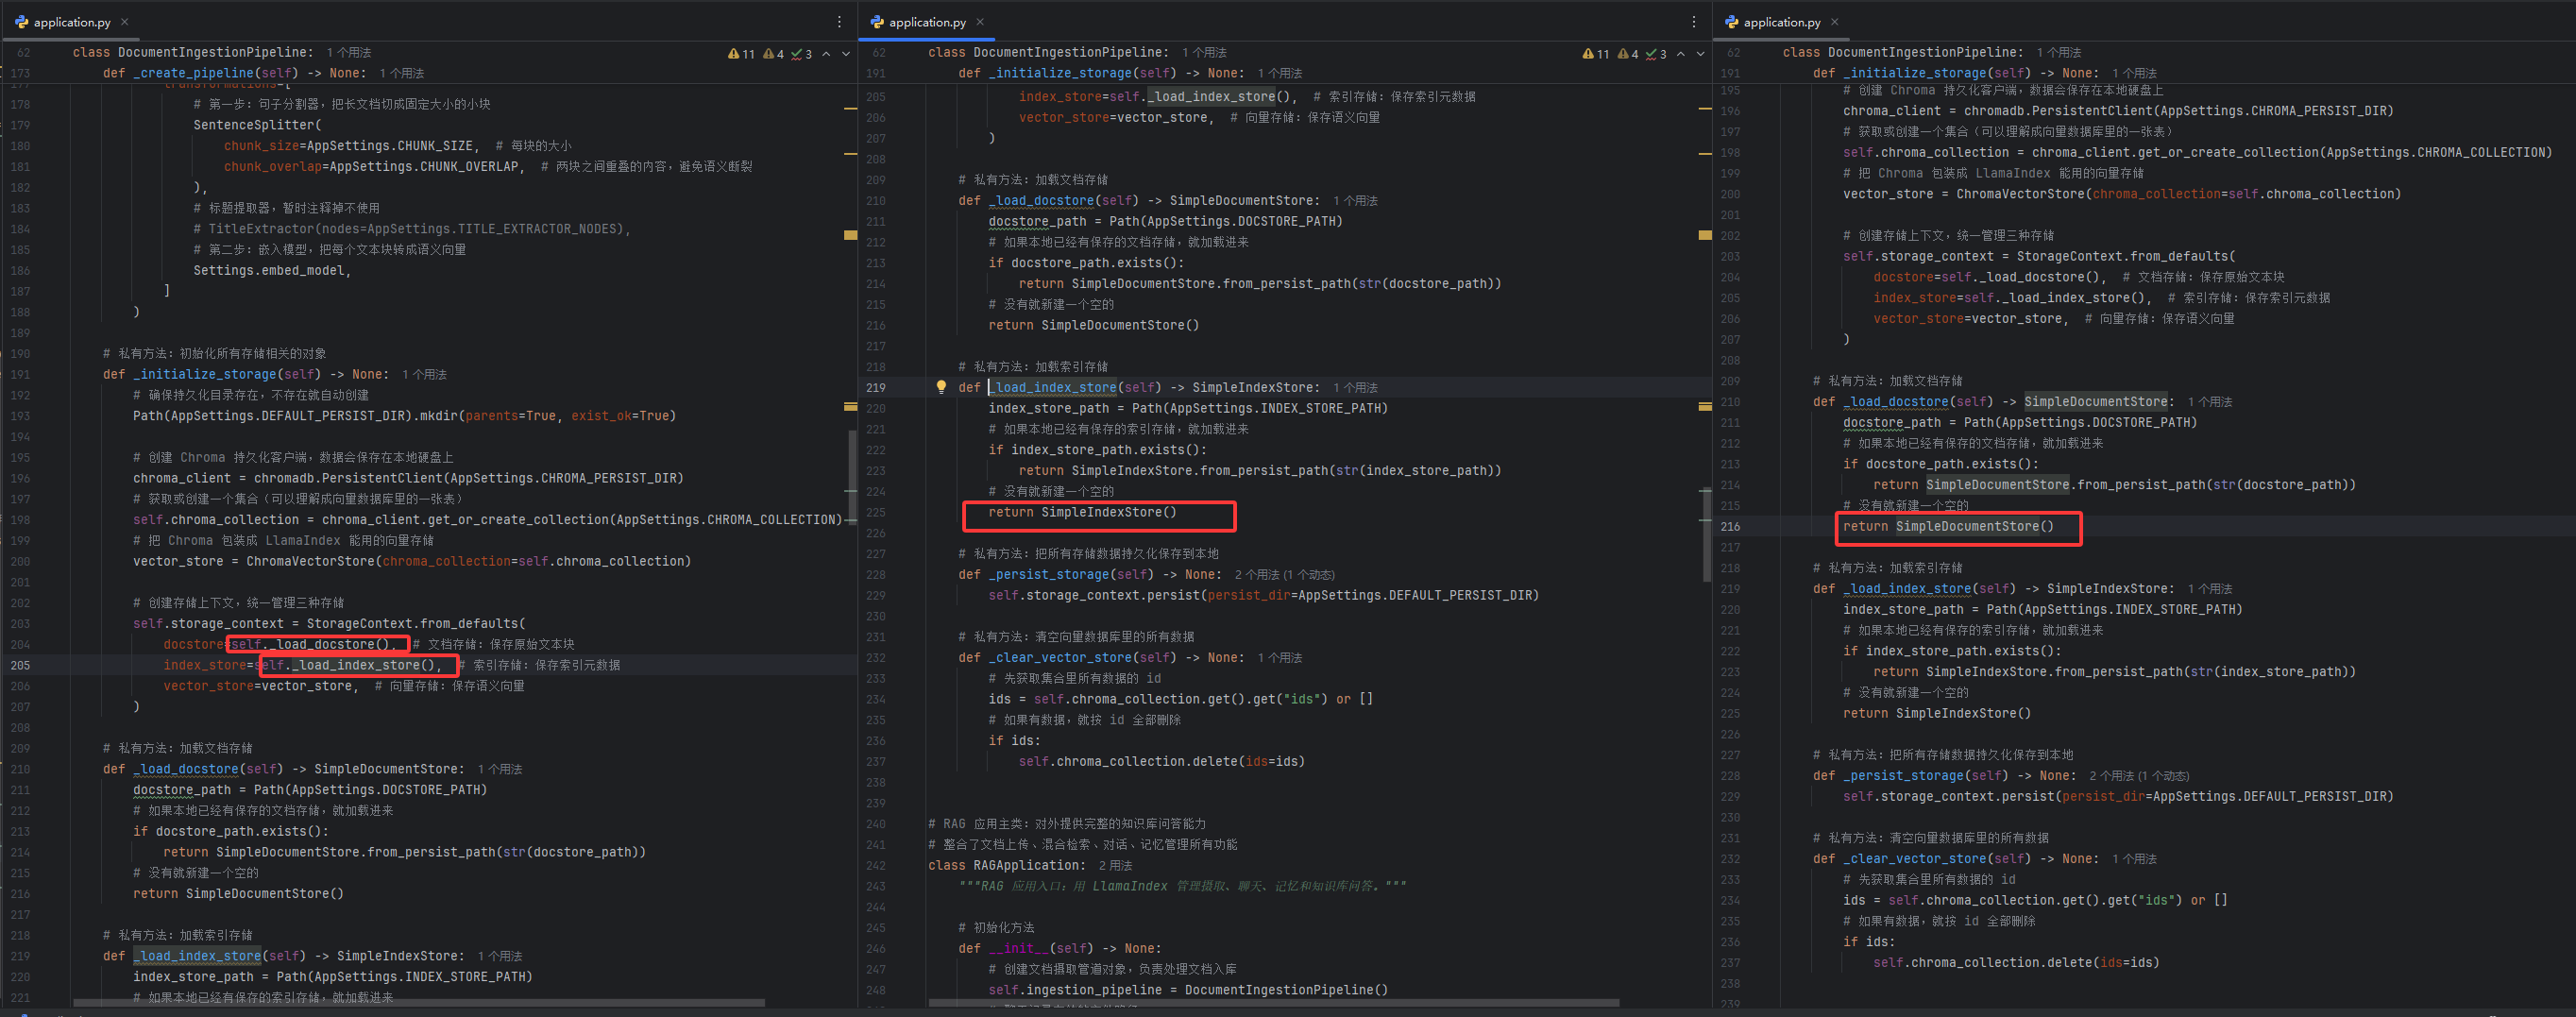
索引的创建,上一节中写的索引默认是空的,这里就来看看如何创建的索引
获取索引
获取索引
这里通过存储管理器创建索引
上图这个存储管理器是在 RAGService 构造方法中创建的如下图
如果之前创建过知识库,并且本地已经有过知识的内容(索引)了,它才会创建,否则会创建一个空的
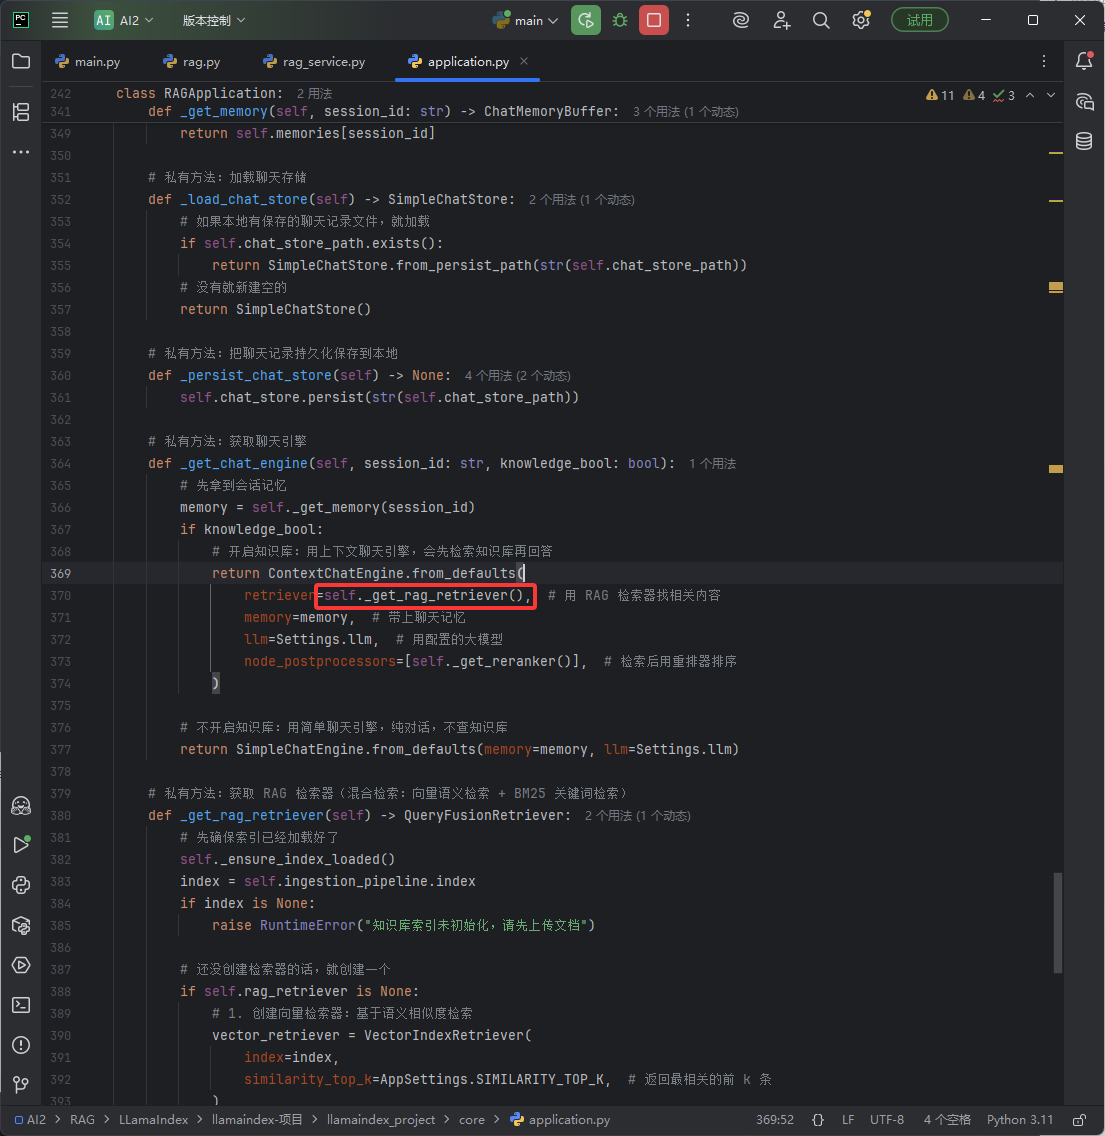
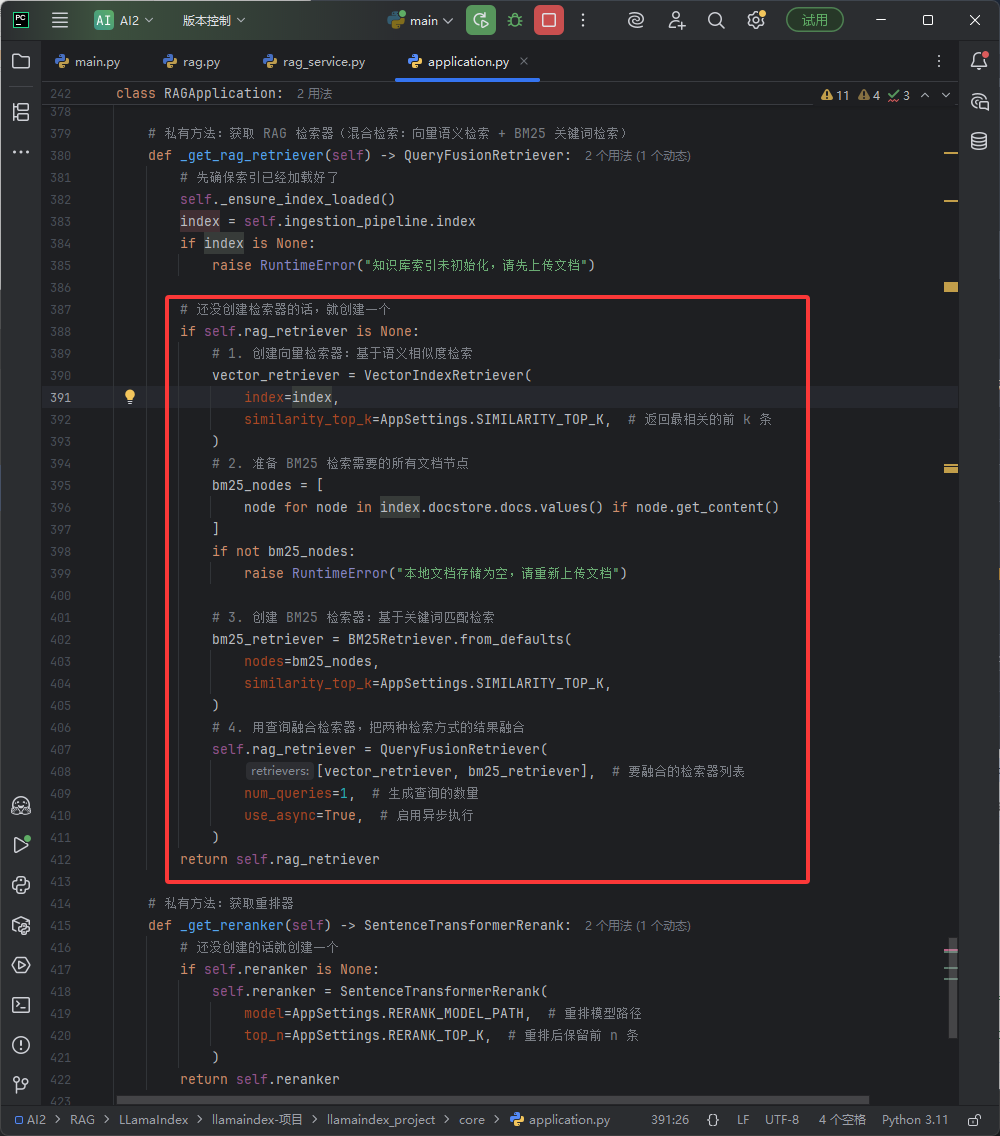
到这llamaindex索引的创建就完成了,然后创建一个检索器,这里使用融合检索器,BM25和向量检索
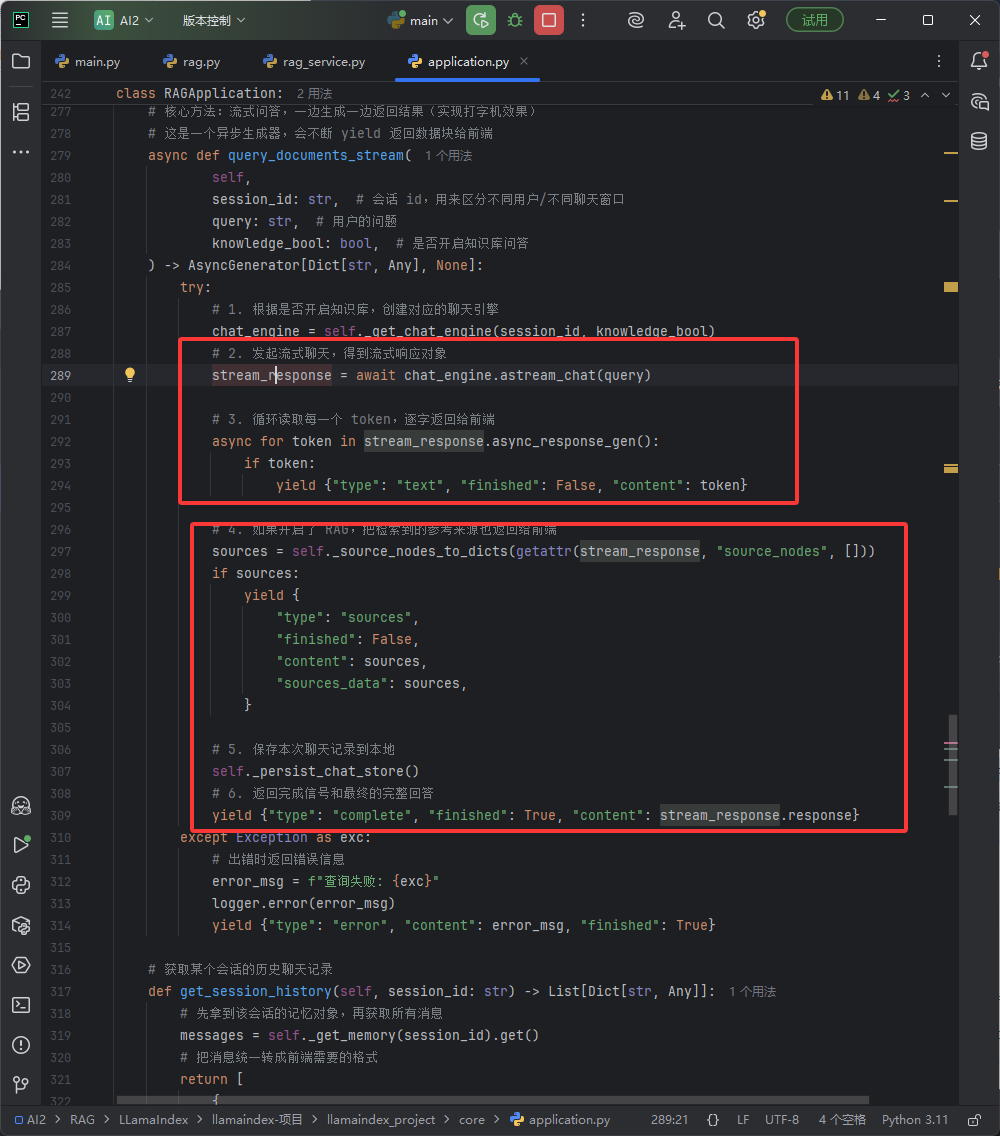
到这聊天引擎就完成了,然后就是下图红框的 查询、保存聊天记录、RAG检索的信息返回给前端了,然后就结束了
完整代码
代码中用了很多yield,它是使用实例
python# 第一种用法 def count(): yield 1 yield 2 # 函数执行到这里,没有更多代码了 gen = count() next(gen) # 1 next(gen) # 2 next(gen) # 抛出 StopIteration,代表生成完了 第二种用法 def count(): yield 1 yield 2 yield 3 for num in count(): print(num) #第三种用法 gen = count() while True: try: num = next(gen) # 手动调用 next 取下一个值 print(num) except StopIteration: # 捕获到结束异常 break # 退出循环rag.py,下方我们把 event_generator 函数给到了 StreamingResponse里,StreamingResponse里面会有上方第二种for循环写法的代码
python# 导入json标准库,用于将Python字典转成JSON字符串,满足SSE流式传输的数据格式要求 import json # 导入类型提示List,用来标注列表类型的返回值,提升代码可读性和编辑器的补全校验能力 from typing import List 从FastAPI导入路由管理器APIRouter和依赖注入工具Depends APIRouter:用来分组管理一组相关的接口,方便模块化拆分 Depends:依赖注入工具,自动帮我们获取/创建对象,不用手动实例化 from fastapi import APIRouter, Depends 导入流式响应类,专门用于返回SSE服务器推送事件的流式数据,实现前端打字机效果 from fastapi.responses import StreamingResponse 导入RAG服务类和获取服务单例的函数,负责处理聊天、上传等核心业务逻辑 from app.rag_service import RAGService, get_rag_service 导入用户模型和获取当前登录用户的函数,用于接口的身份校验 from app.routers.users import User, get_current_active_user 导入接口的数据模型(schema),用来规范请求和响应的数据格式 from app.schemas import ChatMessage, ChatRequest, CommonResponse, HistoryMessageResponse 导入日志工具函数,用于创建当前模块的日志记录器 from utils.logger import setup_logger 创建当前模块的日志记录器,用来打印接口调用过程中的信息、错误等日志 logger = setup_logger(name) 创建聊天模块的路由实例,所有聊天相关的接口都挂载在这个路由上 chat_router = APIRouter() 装饰器:注册一个POST类型的接口,路径为/stream,挂载在chat_router路由下 @chat_router.post("/stream") 异步接口函数:流式聊天接口,接收用户的聊天请求,返回SSE流式响应 async def chat_query_stream( # 请求体参数:前端传过来的聊天请求,包含问题、模型名称、是否开知识库、温度等字段 req: ChatRequest, # 依赖注入:自动获取当前登录的活跃用户 # 会自动执行get_current_active_user函数校验用户token,校验失败直接返回错误,不用自己写校验逻辑 current_user: User = Depends(get_current_active_user), # 依赖注入:自动获取RAG服务的单例实例,全局只有一个服务对象 svc: RAGService = Depends(get_rag_service), 函数返回值类型是流式响应 ) -> StreamingResponse: """流式聊天,直接转发 LlamaIndex streaming delta。""" # 定义内部异步生成器函数,用来生成符合SSE协议格式的流式数据 async def event_generator(): # 异常捕获:处理流式传输过程中可能出现的所有错误 try: # 异步遍历RAG服务返回的每一块流式数据(文本片段、来源、完成信号等) async for chunk in svc.query_stream( # 用用户名作为会话ID,每个用户独立保存自己的聊天记录 session_id=current_user.username, # 用户的问题文本 query=req.query, # 选择的AI模型名称 model=req.model, # 是否开启知识库问答 knowledge_bool=req.knowledge_bool, # 模型温度参数 temperature=req.temperature, # 最大输出token数 max_tokens=req.max_tokens, ): # 将数据块转成SSE协议规定的格式 # 格式规则:以 data: 开头,后面跟JSON字符串,最后加两个换行(空行分隔不同事件,前端才能正确解析) # ensure_ascii=False 保证中文正常显示,不会转成Unicode编码 yield f"data: {json.dumps(chunk, ensure_ascii=False)}\n\n" # 捕获所有类型的异常 except Exception as exc: # 构造统一格式的错误数据 error_data = { "type": "error", "content": f"流式传输错误: {exc}", "finished": True, } # 同样以SSE格式返回错误信息,标记对话结束 yield f"data: {json.dumps(error_data, ensure_ascii=False)}\n\n" # 返回流式响应对象,把生成器作为内容源,一边生成一边传输给前端 return StreamingResponse( # 流式内容源:就是上面定义的生成器函数 content=event_generator(), # 指定响应的媒体类型为SSE事件流,这是SSE协议的标准类型 media_type="text/event-stream", # 设置响应头,保证长连接和实时性 headers={"Cache-Control": "no-cache", "Connection": "keep-alive"}, ) 装饰器:注册一个GET类型的接口,路径为/history,获取用户聊天历史 @chat_router.get("/history") 异步接口函数:获取当前登录用户的所有聊天历史记录 async def get_user_history( # 依赖注入:校验并获取当前登录用户 current_user: User = Depends(get_current_active_user), # 依赖注入:获取RAG服务单例 svc: RAGService = Depends(get_rag_service), 返回值是历史消息响应对象的列表 ) -> List[HistoryMessageResponse]: """读取当前用户的 LlamaIndex Memory 历史。""" # 列表推导式:遍历用户的会话历史,转换成前端需要的标准响应格式 return [ # 用schema定义的历史消息模型包装每条消息,保证数据格式统一 HistoryMessageResponse( # 内层用聊天消息模型包装具体消息内容 messages=ChatMessage( # 消息角色:user(用户)或assistant(AI助手) role=msg["role"], # 消息的文本内容 content=msg["content"], # 消息关联的参考来源列表,没有就返回空数组兜底 sources=msg.get("sources") or [], ) ) # 从服务层获取当前用户的所有会话消息,用用户名作为会话ID for msg in svc.get_session(current_user.username) # 过滤条件:只保留有内容的消息,跳过空消息 if msg.get("content") ] 装饰器:注册一个POST类型的接口,路径为/clear,同时指定响应数据模型为通用响应格式 @chat_router.post("/clear", response_model=CommonResponse) 异步接口函数:清空当前用户的聊天记录和记忆 async def chat_clear( # 依赖注入:校验并获取当前登录用户 current_user: User = Depends(get_current_active_user), # 依赖注入:获取RAG服务单例 svc: RAGService = Depends(get_rag_service), 返回值是通用响应对象 ) -> CommonResponse: """清空当前用户的聊天记忆。""" # 调用服务层的清空方法,传入当前用户名(会话ID),清空对应的聊天记录和记忆 svc.clear_session(current_user.username) # 返回统一格式的成功响应 return CommonResponse(status="success", message="会话已清空")rag_service.py
python# 导入os标准库,提供操作系统级别的文件路径拼接、文件操作等基础功能 import os # 导入shutil标准库,提供高级文件操作,比如递归删除整个目录 import shutil # 导入tempfile标准库,用于创建临时文件和临时目录,用完可自动清理 import tempfile # 导入类型提示工具,用来标注变量、函数参数和返回值的类型,提升代码可读性和编辑器校验能力 from typing import Dict, List, Optional, Tuple 导入核心业务层的RAG应用类,所有知识库问答的核心逻辑都在这个类里 from core.application import RAGApplication 导入项目自定义的日志工具函数,用于创建当前模块的日志记录器 from utils.logger import setup_logger 创建当前模块的日志记录器,用来打印程序运行中的信息、错误等日志 logger = setup_logger(name) 定义RAG服务类:作为HTTP接口层的适配器,对接上层的HTTP请求,处理文件上传的临时存储逻辑,再调用核心RAG功能 class RAGService: """HTTP 层适配器:处理上传临时文件,并调用核心 RAG 应用。""" # 类的构造初始化方法,创建RAGService实例时自动执行 def __init__(self) -> None: # 实例化核心RAG应用对象,所有业务逻辑都委托给这个app对象处理 self.app = RAGApplication() # 处理上传文件的方法:接收文件二进制内容和文件名,保存为临时文件后交给核心应用处理 # 返回值是一个元组:(处理结果字符串, 文件名列表) def upload_and_process_files(self, files: List[bytes], filenames: List[str]) -> Tuple[str, List[str]]: # 创建一个临时目录,目录名前缀为rag_upload_,用来临时存放上传的文件 tmpdir = tempfile.mkdtemp(prefix="rag_upload_") # 定义空列表,用来保存每个临时文件的完整路径 paths = [] # try代码块:包裹可能出错的业务逻辑 try: # 同时遍历文件名列表和文件二进制内容列表,一一对应处理 for name, content in zip(filenames, files): # 拼接临时目录和文件名,得到临时文件的完整路径 path = os.path.join(tmpdir, name) # 以二进制写入模式打开这个临时文件,with语法会自动关闭文件 with open(path, "wb") as file: # 把上传的二进制文件内容写入到临时文件中 file.write(content) # 将这个临时文件的路径添加到路径列表中 paths.append(path) # 打印信息日志,记录本次上传的所有文件路径 logger.info("上传的文档: %s", paths) # 调用核心RAG应用的上传处理方法,传入文件路径列表,同时返回处理结果和原文件名 return self.app.upload_and_process_files(paths), filenames # finally代码块:无论上面的代码成功执行还是报错,都会执行这里的代码 finally: # 递归删除整个临时目录和里面的所有文件,ignore_errors=True表示删除失败也不抛出错误 shutil.rmtree(tmpdir, ignore_errors=True) # 异步方法:流式问答接口,接收查询参数,转发给核心应用,再流式返回结果给上层 async def query_stream( self, session_id: str, # 会话ID,用来区分不同的用户或者不同的聊天窗口 query: str, # 用户输入的问题文本 model: str, # 选择使用的AI模型名称 knowledge_bool: bool, # 是否开启知识库问答的开关 temperature: float, # 模型温度参数,控制回答的随机性 max_tokens: int, # 模型最大输出token数,限制回答长度 ): # 先调用核心应用的方法,更新模型的配置参数 self.app.update_model_config(model, temperature, max_tokens) # 异步遍历核心应用返回的流式数据块 async for chunk in self.app.query_documents_stream( session_id=session_id, query=query, knowledge_bool=knowledge_bool, ): # 将每一个数据块原样yield返回给上层调用者(也就是HTTP接口层),实现流式传输 yield chunk # 获取指定会话的历史聊天记录 def get_session(self, session_id: str): # 直接调用核心应用的获取历史方法,返回结果 return self.app.get_session_history(session_id) # 清空指定会话的聊天记录和记忆 def clear_session(self, session_id: str) -> None: # 直接调用核心应用的清空方法 self.app.clear_session(session_id) # 重置整个RAG系统 def reset_system(self) -> None: # 调用核心应用的重置方法 self.app.reset() 全局变量:存储RAGService的单例实例,初始值为None,类型是可选的RAGService _rag_service: Optional[RAGService] = None 全局函数:获取RAGService的单例实例,保证整个程序中只有一个RAGService实例 def get_rag_service() -> RAGService: # 声明要使用全局作用域的_rag_service变量 global _rag_service # 判断全局实例是否还没有被创建 if _rag_service is None: # 没有创建的话,就新建一个RAGService实例,赋值给全局变量 _rag_service = RAGService() # 返回全局的单例实例 return _rag_service
python# 导入Python标准库的Path类,用于安全、跨平台地处理文件和目录路径,避免字符串拼接路径的兼容性问题 from pathlib import Path # 导入Python类型提示工具集,用于标注变量、函数参数和返回值的类型,提升代码可读性和编辑器的补全校验能力 from typing import Any, AsyncGenerator, Dict, List, Optional 导入ChromaDB向量数据库,专门用于存储文本的语义向量,支持快速相似度检索,是RAG系统的核心存储组件 import chromadb 从LlamaIndex核心库导入多个核心组件,LlamaIndex是构建知识库问答(RAG)系统的主流开发框架 from llama_index.core import ( Settings, # Settings:LlamaIndex全局配置对象,统一管理整个项目的大模型、嵌入模型等全局配置 SimpleDirectoryReader, # SimpleDirectoryReader:文档读取工具,自动识别并读取多种格式的文档文件,转换为程序可处理的文档对象 StorageContext, # StorageContext:存储上下文,统一封装管理向量存储、文档存储、索引存储三类数据存储 VectorStoreIndex, # VectorStoreIndex:向量索引,基于文本向量构建的检索索引,用于实现语义相似度搜索 load_index_from_storage, # load_index_from_storage:工具函数,用于从本地持久化文件中加载已构建好的向量索引 ) 导入上下文聊天引擎,开启RAG知识库时使用,回答问题前会先检索知识库,再结合检索内容生成答案 from llama_index.core.chat_engine.context import ContextChatEngine 导入简单聊天引擎,纯对话模式使用,不检索知识库,直接和大模型进行对话 from llama_index.core.chat_engine.simple import SimpleChatEngine 导入标题提取器,可自动为每个文本块提取标题,本代码中暂时注释禁用 from llama_index.core.extractors import TitleExtractor 导入文档摄取流水线,可将多个文档处理步骤按顺序串联成自动化流水线 from llama_index.core.ingestion import IngestionPipeline 导入聊天记忆缓冲区,用于保存每个会话的聊天历史,让AI具备上下文记忆能力 from llama_index.core.memory import ChatMemoryBuffer 导入句子分割器,用于将长文档切分为固定大小的文本块(chunk),适配检索和向量化的要求 from llama_index.core.node_parser import SentenceSplitter 导入语义重排器,对初步检索的结果按语义相关性重新排序,提升检索准确率 from llama_index.core.postprocessor import SentenceTransformerRerank 导入查询融合检索器,可将多种不同检索方式的结果融合在一起,提升检索效果 from llama_index.core.retrievers import QueryFusionRetriever 导入向量索引检索器,专门负责从向量索引中执行语义相似度检索 from llama_index.core.retrievers import VectorIndexRetriever 导入简单文档存储,用于持久化保存原始的文档节点(文本块)数据 from llama_index.core.storage.docstore import SimpleDocumentStore 导入简单聊天存储,用于持久化保存所有会话的聊天记录数据 from llama_index.core.storage.chat_store import SimpleChatStore 导入简单索引存储,用于持久化保存向量索引的元数据信息 from llama_index.core.storage.index_store import SimpleIndexStore 导入HuggingFace嵌入模型,负责将文本转换为语义向量,是实现语义搜索的核心模型 from llama_index.embeddings.huggingface import HuggingFaceEmbedding 导入DashScope(阿里云通义千问)大模型适配器,本代码实际使用OpenAI兼容模式,此导入暂未直接使用 from llama_index.llms.dashscope import DashScope 导入BM25检索器,基于传统关键词匹配的检索方式,和向量检索形成互补 from llama_index.retrievers.bm25 import BM25Retriever 导入Chroma向量存储适配器,让LlamaIndex可以对接ChromaDB向量数据库 from llama_index.vector_stores.chroma import ChromaVectorStore 导入OpenAI兼容大模型适配器,只要接口符合OpenAI规范的大模型都可以用它对接 from llama_index.llms.openai_like import OpenAILike 导入项目自定义的配置类,并重命名为AppSettings,避免和LlamaIndex的Settings重名 from config.settings import Settings as AppSettings 导入项目自定义的日志工具函数,用于创建日志记录器 from utils.logger import setup_logger 创建当前模块的日志记录器,用于打印程序运行过程中的信息和错误日志 logger = setup_logger(name) 定义文档摄取管道类,负责完整的文档入库全流程:读取文档→切分文本→向量化→存入数据库→持久化保存 class DocumentIngestionPipeline: """文档摄取:把读取、切分、向量化和持久化交给 LlamaIndex。""" # 类的构造初始化方法,创建类实例时自动执行,返回值类型为None def __init__(self) -> None: # 实例属性:向量索引对象,类型为可选的VectorStoreIndex,初始值设为None,后续加载或创建后才会赋值 self.index: Optional[VectorStoreIndex] = None # 调用私有方法,初始化大语言模型和嵌入模型的全局配置 self._setup_models() # 调用私有方法,创建文档摄取流水线,串联文档切分、向量化等处理步骤 self._create_pipeline() # 调用私有方法,初始化各类存储组件(向量数据库、文档存储、索引存储) self._initialize_storage() # 定义更新模型配置的方法,支持动态切换模型、调整温度参数和最大输出长度 def update_model_config(self, model_name: str, temperature: float, max_tokens: int) -> None: # 更新LlamaIndex全局配置中的大语言模型,使用OpenAI兼容格式对接 Settings.llm = OpenAILike( model=model_name, # 注意参数名是 model 而不是 model_name api_key=AppSettings.API_KEY, # 大模型接口的认证密钥,从项目配置文件中读取 api_base=AppSettings.API_BASE_URL, # 大模型接口的基础访问地址,从项目配置文件中读取 temperature=temperature, # 温度参数,控制回答的随机性:值越高越发散有创意,值越低越稳定严谨 max_tokens=max_tokens, # 最大输出token数,限制AI回答的内容长度 context_window=32768, # 模型支持的最大上下文窗口大小,决定能处理的最长上下文 is_chat_model=True, # 标记该模型是对话型模型,适配聊天场景 ) # 打印信息日志,记录模型更新的参数 logger.info("模型已更新: model=%s, temperature=%s", model_name, temperature) # 定义文档摄取的核心方法,接收文件路径列表,返回处理结果字符串 def ingest_documents(self, file_paths: List[str]) -> str: # 校验所有传入的文件路径,只保留真实存在的文件,转换为字符串格式的有效路径列表 valid_paths = [str(Path(path)) for path in file_paths if Path(path).exists()] # 判断有效路径列表是否为空 if not valid_paths: # 没有有效文件时,直接返回提示信息 return "没有找到有效的文档" # 开始异常捕获,处理文档摄取过程中可能出现的所有错误 try: # 使用文档读取器加载所有有效文件,转换为LlamaIndex可处理的Document对象列表 documents = SimpleDirectoryReader(input_files=valid_paths).load_data() # 将文档送入摄取流水线,自动完成文本切分、向量化,得到处理后的文档节点列表 nodes = self.pipeline.run(documents=documents) # 判断生成的文档节点是否为空 if not nodes: # 没有生成有效节点时返回提示信息 return "没有生成有效的文档节点" # 判断当前向量索引是否为空(还没创建或加载) if self.index is None: # 尝试加载本地已有的索引 try: # 调用加载索引的方法,从本地持久化文件加载索引 self.load_index() # 捕获加载失败的运行时错误 except RuntimeError: # 加载失败则跳过,后续会新建索引 pass # 再次判断索引是否仍为空(加载失败或本来就没有索引) if self.index is None: # 调用私有方法,清空向量数据库中的旧数据,避免数据冲突 self._clear_vector_store() # 使用处理好的文档节点创建全新的向量索引 self.index = VectorStoreIndex( nodes, # 使用初始化好的存储上下文来管理数据存储 storage_context=self.storage_context, store_nodes_override=True, # 开启节点存储覆盖,确保节点数据完整存入文档存储 ) # 索引已经存在的情况 else: # 将新的文档节点追加到已有的向量索引中 self.index.insert_nodes(nodes) # 调用私有方法,将所有存储数据持久化保存到本地硬盘 self._persist_storage() # 拼接处理成功的结果信息,包含文档数量和节点数量 result = f"成功摄取了 {len(valid_paths)} 个文档,生成了 {len(nodes)} 个节点" # 打印信息日志,记录文档摄取成功 logger.info(result) # 返回成功结果信息 return result # 捕获所有类型的异常 except Exception as exc: # 拼接错误信息,包含异常详情 error_msg = f"文档摄取失败: {exc}" # 打印错误日志,记录失败原因 logger.error(error_msg) # 返回错误信息 return error_msg # 定义加载索引的方法,从本地持久化存储中加载已构建的向量索引 def load_index(self) -> None: # 打印日志,提示开始加载知识库索引 logger.info("从持久化存储加载知识库索引") # 异常捕获,处理加载过程中的错误 try: # 调用LlamaIndex提供的函数,从存储上下文中加载向量索引 self.index = load_index_from_storage( self.storage_context, store_nodes_override=True, # 开启节点存储覆盖,保证加载的节点数据完整 ) # 捕获值错误异常 except ValueError as exc: # 判断错误是否是"存储中没有索引"导致的 if "No index in storage context" in str(exc): # 转换为更易懂的运行时错误抛出,同时保留原始异常链 raise RuntimeError("知识库索引未初始化,请先上传文档") from exc # 其他类型的值错误直接抛出 raise # 私有方法:初始化全局模型配置 def _setup_models(self) -> None: # 配置全局使用的大语言模型,采用OpenAI兼容协议对接 Settings.llm = OpenAILike( model=AppSettings.MODEL, # 注意参数名是 model 而不是 model_name api_key=AppSettings.API_KEY, # 接口认证密钥,从配置文件读取 api_base=AppSettings.API_BASE_URL, # 接口基础地址,从配置文件读取 temperature=AppSettings.TEMPERATURE # 默认温度参数,从配置文件读取 ) # 配置全局使用的嵌入模型,基于HuggingFace的模型,负责将文本转换为语义向量 Settings.embed_model = HuggingFaceEmbedding(model_name=AppSettings.EMBEDDING_MODEL_PATH) # 私有方法:创建文档摄取流水线 def _create_pipeline(self) -> None: # 创建摄取流水线实例,将多个处理步骤按顺序串联 self.pipeline = IngestionPipeline( # 流水线的转换步骤列表,文档会按顺序经过每个步骤处理 transformations=[ # 第一步:句子分割器,将长文档切分为固定大小的文本块(chunk) SentenceSplitter( chunk_size=AppSettings.CHUNK_SIZE, # 每个文本块的大小,从配置文件读取 chunk_overlap=AppSettings.CHUNK_OVERLAP, # 相邻文本块的重叠内容大小,避免语义被截断 ), # TitleExtractor(nodes=AppSettings.TITLE_EXTRACTOR_NODES), # 标题提取器,暂时注释禁用 # 第二步:嵌入模型,将每个文本块转换为对应的语义向量 Settings.embed_model, ] ) # 私有方法:初始化所有存储组件 def _initialize_storage(self) -> None: # 创建持久化根目录,parents=True表示自动创建所有父目录,exist_ok=True表示目录已存在也不报错 Path(AppSettings.DEFAULT_PERSIST_DIR).mkdir(parents=True, exist_ok=True) # 创建ChromaDB持久化客户端,数据会永久保存在指定目录的本地硬盘 chroma_client = chromadb.PersistentClient(AppSettings.CHROMA_PERSIST_DIR) # 获取或创建ChromaDB的集合(相当于数据库中的表),用于存储向量数据 self.chroma_collection = chroma_client.get_or_create_collection(AppSettings.CHROMA_COLLECTION) # 将ChromaDB集合包装为LlamaIndex兼容的向量存储对象 vector_store = ChromaVectorStore(chroma_collection=self.chroma_collection) # 创建存储上下文,统一管理三类存储 self.storage_context = StorageContext.from_defaults( docstore=self._load_docstore(), # 传入文档存储实例,保存原始文本节点 index_store=self._load_index_store(),# 传入索引存储实例,保存索引的元数据 vector_store=vector_store, # 传入向量存储实例,保存语义向量 ) # 私有方法:加载文档存储,返回SimpleDocumentStore实例 def _load_docstore(self) -> SimpleDocumentStore: # 获取文档存储的本地文件路径 docstore_path = Path(AppSettings.DOCSTORE_PATH) # 判断本地是否已有保存的文档存储文件 if docstore_path.exists(): # 从本地路径加载已有的文档存储 return SimpleDocumentStore.from_persist_path(str(docstore_path)) # 没有本地文件则返回一个全新的空文档存储 return SimpleDocumentStore() # 私有方法:加载索引存储,返回SimpleIndexStore实例 def _load_index_store(self) -> SimpleIndexStore: # 获取索引存储的本地文件路径 index_store_path = Path(AppSettings.INDEX_STORE_PATH) # 判断本地是否已有保存的索引存储文件 if index_store_path.exists(): # 从本地路径加载已有的索引存储 return SimpleIndexStore.from_persist_path(str(index_store_path)) # 没有本地文件则返回一个全新的空索引存储 return SimpleIndexStore() # 私有方法:将所有存储数据持久化到本地硬盘 def _persist_storage(self) -> None: # 调用存储上下文的持久化方法,将所有数据保存到指定目录 self.storage_context.persist(persist_dir=AppSettings.DEFAULT_PERSIST_DIR) # 私有方法:清空向量数据库中的所有数据 def _clear_vector_store(self) -> None: # 获取集合中所有向量数据的ID列表,没有数据则返回空列表 ids = self.chroma_collection.get().get("ids") or [] # 判断ID列表是否不为空 if ids: # 根据ID列表删除集合中的所有向量数据 self.chroma_collection.delete(ids=ids) 定义RAG应用主类,是整个知识库问答系统的对外入口,整合文档管理、检索、聊天、记忆等所有功能 class RAGApplication: """RAG 应用入口:用 LlamaIndex 管理摄取、聊天、记忆和知识库问答。""" # 构造初始化方法,创建类实例时自动执行 def __init__(self) -> None: # 实例化文档摄取管道,负责文档入库的全流程处理 self.ingestion_pipeline = DocumentIngestionPipeline() # 获取聊天记录持久化存储的文件路径 self.chat_store_path = Path(AppSettings.CHAT_STORE_PATH) # 确保聊天记录文件的父目录存在,不存在则自动创建 self.chat_store_path.parent.mkdir(parents=True, exist_ok=True) # 加载聊天存储实例,用于持久化保存所有会话的聊天记录 self.chat_store = self._load_chat_store() # 字典,存储每个会话的记忆缓冲区,key是会话ID,value是对应的记忆对象 self.memories: Dict[str, ChatMemoryBuffer] = {} # RAG混合检索器,初始为None,采用懒加载模式,用到时再创建 self.rag_retriever: Optional[QueryFusionRetriever] = None # 语义重排器,初始为None,懒加载模式,用于对检索结果重新排序提升准确率 self.reranker: Optional[SentenceTransformerRerank] = None # 更新模型配置的对外方法,同步更新文档管道的模型配置 def update_model_config(self, model_name: str, temperature: float, max_tokens: int) -> None: # 调用文档摄取管道的更新方法,同步更新模型配置 self.ingestion_pipeline.update_model_config(model_name, temperature, max_tokens) # 处理用户上传文件的对外方法,接收文件路径列表,返回处理结果 def upload_and_process_files(self, file_paths: List[str]) -> str: # 判断文件路径列表是否为空 if not file_paths: # 为空则返回提示信息 return "请上传至少一个文件" # 调用摄取管道处理文档,完成知识库入库 result = self.ingestion_pipeline.ingest_documents(file_paths) # 文档更新后,旧的检索器不再适用,置空后下次使用会自动重新创建 self.rag_retriever = None # 返回处理结果 return result # 异步方法:流式问答,以异步生成器形式逐块返回数据,实现前端打字机效果 async def query_documents_stream( self, session_id: str, # 会话ID,用于区分不同的用户或不同的聊天窗口 query: str, # 用户输入的问题文本 knowledge_bool: bool, # 是否开启知识库问答的开关 ) -> AsyncGenerator[Dict[str, Any], None]: # 异常捕获,处理查询过程中的所有错误 try: # 根据是否开启知识库,创建对应的聊天引擎 chat_engine = self._get_chat_engine(session_id, knowledge_bool) # 异步发起流式聊天请求,得到流式响应对象 stream_response = await chat_engine.astream_chat(query) # 异步遍历流式响应的每个token(文本片段) async for token in stream_response.async_response_gen(): # 判断当前token不为空 if token: # 产出文本类型的数据块,标记未完成,内容是当前token yield {"type": "text", "finished": False, "content": token} # 从响应中获取检索到的来源节点,转换为字典列表,没有则返回空列表 sources = self._source_nodes_to_dicts(getattr(stream_response, "source_nodes", [])) # 判断是否有来源数据 if sources: # 产出来源类型的数据块,包含检索到的参考文档信息 yield { "type": "sources", "finished": False, "content": sources, "sources_data": sources, } # 将本次聊天记录持久化保存到本地 self._persist_chat_store() # 产出完成信号,标记对话结束,附带完整的回答内容 yield {"type": "complete", "finished": True, "content": stream_response.response} # 捕获所有类型的异常 except Exception as exc: # 拼接错误信息,包含异常详情 error_msg = f"查询失败: {exc}" # 打印错误日志,记录失败原因 logger.error(error_msg) # 产出错误类型的数据块,标记对话结束 yield {"type": "error", "content": error_msg, "finished": True} # 获取指定会话的历史聊天记录,返回字典列表格式 def get_session_history(self, session_id: str) -> List[Dict[str, Any]]: # 获取该会话的记忆对象,再取出所有历史消息 messages = self._get_memory(session_id).get() # 遍历所有消息,转换为前端需要的格式返回 return [ { # 消息角色,兼容枚举类型和字符串类型两种情况 "role": message.role.value if hasattr(message.role, "value") else str(message.role), # 消息内容,为空则返回空字符串 "content": message.content or "", # 来源列表,历史消息默认返回空 "sources": [], } for message in messages ] # 清空指定会话的聊天记录和记忆 def clear_session(self, session_id: str) -> None: # 判断内存中是否存在该会话的记忆 if session_id in self.memories: # 重置该会话的记忆缓冲区,清空内存中的历史 self.memories[session_id].reset() # 从持久化的聊天存储中删除该会话的所有消息 self.chat_store.delete_messages(session_id) # 保存修改后的聊天存储到本地 self._persist_chat_store() # 私有方法:获取指定会话的记忆对象,不存在则创建新的 def _get_memory(self, session_id: str) -> ChatMemoryBuffer: # 判断该会话ID不在记忆字典中 if session_id not in self.memories: # 为该会话创建新的记忆缓冲区 self.memories[session_id] = ChatMemoryBuffer.from_defaults( llm=Settings.llm, # 使用全局配置的大模型 chat_store=self.chat_store, # 使用全局的聊天存储做持久化 chat_store_key=session_id, # 用会话ID作为存储的键,区分不同会话 ) # 返回该会话的记忆对象 return self.memories[session_id] # 私有方法:加载聊天存储实例 def _load_chat_store(self) -> SimpleChatStore: # 判断本地是否有保存的聊天记录文件 if self.chat_store_path.exists(): # 从本地路径加载已有的聊天存储 return SimpleChatStore.from_persist_path(str(self.chat_store_path)) # 没有本地文件则返回全新的空聊天存储 return SimpleChatStore() # 私有方法:将聊天存储持久化到本地硬盘 def _persist_chat_store(self) -> None: # 调用聊天存储的持久化方法,保存到指定的文件路径 self.chat_store.persist(str(self.chat_store_path)) # 私有方法:根据知识库开关获取对应的聊天引擎 def _get_chat_engine(self, session_id: str, knowledge_bool: bool): # 先获取会话的记忆对象 memory = self._get_memory(session_id) # 开启知识库的情况 if knowledge_bool: # 创建上下文聊天引擎,支持RAG知识库问答 return ContextChatEngine.from_defaults( retriever=self._get_rag_retriever(), # 传入RAG检索器,用于检索知识库 memory=memory, # 传入会话记忆,支持上下文对话 llm=Settings.llm, # 使用全局大模型生成答案 node_postprocessors=[self._get_reranker()], # 传入重排器,对检索结果做重排序优化 ) # 不开启知识库,返回简单聊天引擎,纯对话不检索知识库 return SimpleChatEngine.from_defaults(memory=memory, llm=Settings.llm) # 私有方法:获取RAG混合检索器,采用懒加载模式 def _get_rag_retriever(self) -> QueryFusionRetriever: # 先确保向量索引已经加载完成 self._ensure_index_loaded() # 获取索引对象 index = self.ingestion_pipeline.index # 索引为空则抛出运行时错误 if index is None: raise RuntimeError("知识库索引未初始化,请先上传文档") # 检索器还没创建则进行创建 if self.rag_retriever is None: # 创建向量检索器,基于语义相似度做检索 vector_retriever = VectorIndexRetriever( index=index, similarity_top_k=AppSettings.SIMILARITY_TOP_K, # 返回最相关的前K条结果 ) # 收集所有有内容的文档节点,用于BM25关键词检索 bm25_nodes = [ node for node in index.docstore.docs.values() if node.get_content() ] # 没有可用的文档节点则抛出错误 if not bm25_nodes: raise RuntimeError("本地文档存储为空,请重新上传文档") # 创建BM25检索器,基于关键词匹配做检索 bm25_retriever = BM25Retriever.from_defaults( nodes=bm25_nodes, similarity_top_k=AppSettings.SIMILARITY_TOP_K, # 返回最相关的前K条结果 ) # 创建查询融合检索器,融合向量检索和BM25检索的结果 self.rag_retriever = QueryFusionRetriever( [vector_retriever, bm25_retriever], # 要融合的两个检索器:向量检索+BM25检索 num_queries=1, # 生成的查询数量,1表示用原查询直接融合 use_async=True, # 启用异步执行,提升检索速度 ) # 返回检索器实例 return self.rag_retriever # 私有方法:获取语义重排器,懒加载模式 def _get_reranker(self) -> SentenceTransformerRerank: # 重排器还没创建则进行创建 if self.reranker is None: # 创建重排器实例 self.reranker = SentenceTransformerRerank( model=AppSettings.RERANK_MODEL_PATH, # 重排模型的本地路径,从配置文件读取 top_n=AppSettings.RERANK_TOP_K, # 重排后保留的结果数量 ) # 返回重排器实例 return self.reranker # 私有方法:确保索引已经加载,没加载则尝试加载 def _ensure_index_loaded(self) -> None: # 索引已存在则直接返回,不做任何操作 if self.ingestion_pipeline.index is not None: return # 调用摄取管道的加载方法,从本地加载索引 self.ingestion_pipeline.load_index() # 加载后索引仍为空则抛出运行时错误 if self.ingestion_pipeline.index is None: raise RuntimeError("知识库索引未初始化,请先上传文档") # 静态方法,不需要实例也能调用,不依赖类的实例属性 @staticmethod # 静态方法:将来源节点对象转换为字典列表,方便返回给前端使用 def _source_nodes_to_dicts(source_nodes) -> List[Dict[str, Any]]: # 遍历所有来源节点,转换为指定格式的字典 return [ { "content": node.node.get_content(), # 来源节点的文本内容 "score": float(node.score) if node.score is not None else None, # 相关性得分,转为浮点数,没有则为None "metadata": node.node.metadata or {}, # 来源节点的元数据(如文件名、页码等),没有则为空字典 } for node in source_nodes or [] ]