写在前面的话:
对论文《Building extraction with vision transformer》 在WHU 数据集进行复现。
一、项目地址
github:https://github.com/WangLibo1995/BuildFormer
二、环境配置
conda create -n airs python=3.8

conda activate airs

conda install pytorch==1.10.0 torchvision==0.11.0 torchaudio==0.10.0 cudatoolkit=11.3 -c pytorch -c conda-forge

pip install -r BuildFormer/requirements.txt
三、数据处理
1.whubuilding_mask_convert.py
该程序是将标签转为训练的单通道灰度标签
2.数据集结构
├──whu_Aerial   # 数据集名称
│   ├── train
│   │   ├──images
│   │   	├──0001.tif
│   │  		 ...
│   │   ├──masks
│   │   	├──0001.png
│   │  		 ...
│   ├── test
│   │   ├──images
│   │   	├──0001.tif
│   │  		 ...
│   │   ├──masks
│   │   	├──0001.png
│   │  		 ...
│   ├── val
│   │   ├──images
│   │   	├──0001.tif
│   │  		 ...
│   │   ├──masks
│   │   	├──0001.png
│   │  		 ...
四、模型训练
1.BuildFormer-main/geoseg/datasets/whubuilding_dataset.py
修改原图、输入、测试图片尺寸
2.BuildFormer-main/config/whubuilding/buildformer.py
训练配置文件,修改相关参数:训练轮数、batch_size等
3.BuildFormer-main/train_supervision.py
训练主程序
训练命令:
python train_supervision.py -c config/whubuilding/buildformer.py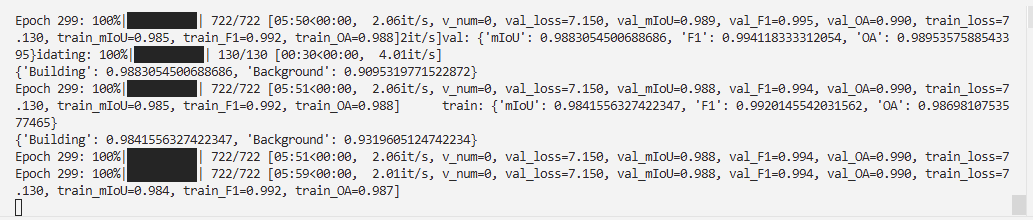
注*:输入为512×512,batch_size=8时,占用显存约17G
五、模型测试
1.BuildFormer-main/building_seg_test.py
测试程序
运行命令:
# 官方运行命令
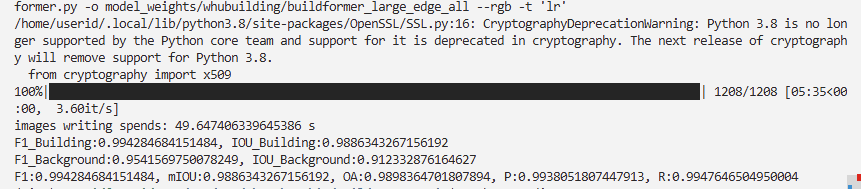
python building_seg_test.py -c config/whubuilding/buildformer.py -o fig_results/whubuilding/buildformer --rgb -t 'lr'

# 实际运行命令:
python building_seg_test.py -c config/whubuilding/buildformer.py -o model_weights/whubuilding/buildformer_large_edge_all --rgb -t 'lr'
参数说明:
-c config/whubuilding/buildformer.py 配置文件路径,指定模型、数据集等参数
-o fig_results/whubuilding/buildformer 输出目录,保存预测结果
--rgb 输出 RGB 彩色图像(白色=建筑,黑色=背景)
-t 'lr' 使用 TTA 增强(水平翻转+垂直翻转)
TTA 模式说明
lr 模式会对每张图片进行 3 次预测取平均:原图、水平翻转、垂直翻转
这样可以提高预测的稳定性,但推理时间约为 3 倍。
六、模型预测
新建predict.py程序内容如下:
"""
使用训练好的 BuildFormer 模型对文件夹中的图片进行批量预测。

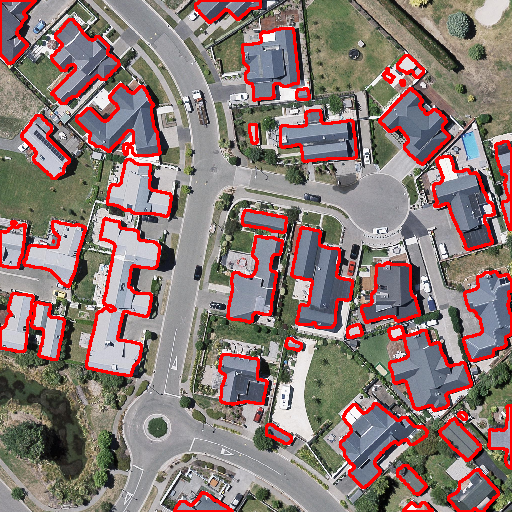
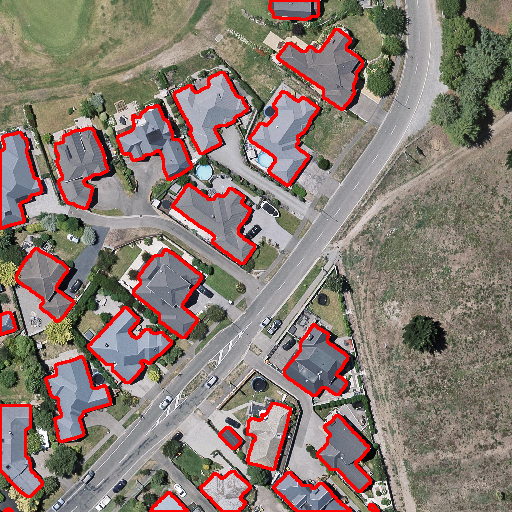
输出:原图上将建筑区域标注为红色,背景保持原图内容。

用法:
    python predict.py

修改下方 CONFIG 区域的路径和选项即可运行。
"""

import os
import time
from pathlib import Path

import cv2
import numpy as np
import torch
import torch.nn.functional as F
import albumentations as albu
from PIL import Image
from tqdm import tqdm

from tools.cfg import py2cfg
from train_supervision import Supervision_Train

# ══════════════════════════════════════════════════════════════════════════
# CONFIG --- 修改这里的路径和选项
# ══════════════════════════════════════════════════════════════════════════

# 输入图片文件夹
INPUT_DIR = 'test'

# 输出结果文件夹
OUTPUT_DIR = 'test_results'

# 模型配置文件
CONFIG_PATH = 'config/whubuilding/buildformer.py'

# 模型权重文件 (.ckpt),设为 None 则使用配置文件中的默认权重
WEIGHTS_PATH = 'model_weights/whubuilding/buildformer_large_edge_all/buildformer_large_edge_all.ckpt'

# ══════════════════════════════════════════════════════════════════════════

# ── 常量 ──────────────────────────────────────────────────────────────────
IMG_EXTENSIONS = {'.tif', '.tiff', '.png', '.jpg', '.jpeg', '.bmp'}

# ── 图像 I/O ──────────────────────────────────────────────────────────────
def load_image(path: str) -> np.ndarray:
    """加载图片并转为 RGB numpy 数组 (H, W, 3),uint8。"""
    img = Image.open(path).convert('RGB')
    return np.array(img)

def save_overlay(img: np.ndarray, mask: np.ndarray, path: str):
    """
    在原图上绘制建筑的外轮廓(红色),内部保留原图内容。
    mask: 0=Building, 1=Background
    """
    overlay = img.copy()
    building_mask = (mask == 1).astype(np.uint8) * 255
    contours, _ = cv2.findContours(building_mask, cv2.RETR_EXTERNAL, cv2.CHAIN_APPROX_SIMPLE)
    cv2.drawContours(overlay, contours, -1, (255, 0, 0), 2)
    cv2.imwrite(path, cv2.cvtColor(overlay, cv2.COLOR_RGB2BGR))

# ── 预处理 ────────────────────────────────────────────────────────────────
def preprocess(img: np.ndarray) -> torch.Tensor:
    """
    预处理:ImageNet 归一化 → 转为 (1, 3, H, W) tensor。
    模型支持任意尺寸输入(内部通过 window padding 处理)。
    """
    aug = albu.Normalize()(image=img)
    tensor = torch.from_numpy(aug['image']).permute(2, 0, 1).float().unsqueeze(0)
    return tensor

# ── 推理 ──────────────────────────────────────────────────────────────────
@torch.no_grad()
def predict_single(model, img: np.ndarray) -> np.ndarray:
    """
    对单张图片进行推理,返回预测掩码 (H, W),值域 {0, 1}。
    0=Building, 1=Background
    """
    h, w = img.shape[:2]
    tensor = preprocess(img).cuda()
    logits = model(tensor)                         # (1, C, H, W)
    probs = F.softmax(logits, dim=1)               # (1, C, H, W)
    pred = probs.argmax(dim=1).squeeze(0)          # (H, W)
    mask = pred.cpu().numpy()
    if mask.shape != (h, w):
        mask = cv2.resize(mask, (w, h), interpolation=cv2.INTER_NEAREST)
    return mask

# ── 收集图片路径 ──────────────────────────────────────────────────────────
def collect_images(folder: str) -> list:
    """递归收集文件夹中所有支持格式的图片路径。"""
    images = []
    for root, _, files in os.walk(folder):
        for f in sorted(files):
            if Path(f).suffix.lower() in IMG_EXTENSIONS:
                images.append(os.path.join(root, f))
    return images

# ── 主流程 ────────────────────────────────────────────────────────────────
def main():
    image_paths = collect_images(INPUT_DIR)
    if not image_paths:
        print(f'[ERROR] 在 {INPUT_DIR} 中未找到图片文件')
        return
    print(f'找到 {len(image_paths)} 张图片')

    output_dir = Path(OUTPUT_DIR)
    output_dir.mkdir(parents=True, exist_ok=True)

    print('加载模型...')
    config = py2cfg(CONFIG_PATH)
    ckpt_path = WEIGHTS_PATH or os.path.join(
        config.weights_path, config.test_weights_name + '.ckpt')
    model = Supervision_Train.load_from_checkpoint(ckpt_path, config=config)
    model.cuda()
    model.eval()
    print(f'模型已加载: {ckpt_path}')

    t_start = time.time()
    for img_path in tqdm(image_paths, desc='预测中'):
        stem = Path(img_path).stem
        img = load_image(img_path)
        mask = predict_single(model, img)
        save_overlay(img, mask, str(output_dir / f'{stem}.png'))

    elapsed = time.time() - t_start
    print(f'完成! 共处理 {len(image_paths)} 张图片,耗时 {elapsed:.1f}s')
    print(f'平均速度: {len(image_paths) / elapsed:.2f} 张/秒')
    print(f'结果保存至: {output_dir}')

if __name__ == '__main__':
    main()
预测结果如下图:
写在后面的话:
你内心的微光不会消逝,永远不会。