第十六节:递归组件实现无限层级折叠侧边栏菜单
🎯本节目标
基于已经写好的动态路由、v‑perm 权限指令,实现无限层级侧边栏菜单,支持二级、三级甚至更多层级菜单展开折叠;点击菜单跳转完整路由地址,杜绝 404 报错;完全贴合你现有项目目录结构。
📂文件对应关系(你的项目真实目录)
- 递归子组件本体:
src/layout/components/SidebarMenuItem.vue - 使用递归组件的父组件:
src/layout/components/SidebarMenu.vue
重要:
SidebarMenuItem.vue属于局部组件,不需要在 main.js 全局注册,只在 SidebarMenu.vue 内部导入使用。
步骤 1:编写递归菜单组件 SidebarMenuItem.vue
路径:src/layout/components/SidebarMenuItem.vue
<template>
  <!-- 判断当前菜单是否存在子菜单 -->
  <template v-if="hasChildren">
    <!-- 有子菜单:渲染可折叠父菜单 el‑sub‑menu -->
    <!-- index必须绑定完整path,el-menu的router模式下index就是跳转路径 -->
    <el-sub-menu :index="menuItem.path">
      <template #title>
        <!-- 渲染菜单图标 -->
        <el-icon v-if="menuItem.meta?.icon">
          <component :is="menuItem.meta.icon"/>
        </el-icon>
        <!-- 菜单标题 -->
        <span>{{ menuItem.meta.title }}</span>
      </template>
      <!-- ✅递归核心:组件自己调用自己,把子菜单继续向下传递,实现无限层级 -->
      <SidebarMenuItem
        v-for="subItem in menuItem.children"
        :key="subItem.path"
        :menu-item="subItem"
      />
    </el-sub-menu>
  </template>

  <!-- 没有子菜单:普通点击菜单项 -->
  <el-menu-item v-else :index="menuItem.path">
    <el-icon v-if="menuItem.meta?.icon">
      <component :is="menuItem.meta.icon"/>
    </el-icon>
    <span>{{ menuItem.meta.title }}</span>
  </el-menu-item>
</template>

<script setup>
import { computed } from 'vue'
// 接收父组件传递过来的单条菜单对象
const props = defineProps({
  menuItem: {
    type: Object,
    required: true
  }
})

// 计算属性:判断当前菜单是否拥有有效子菜单
const hasChildren = computed(() => {
  return props.menuItem.children && props.menuItem.children.length > 0
})
</script>
💡核心要点
- 组件内部调用自身标签
<SidebarMenuItem />就完成递归,不管多少层子菜单都可以自动渲染。 :index="menuItem.path"必须是完整绝对路由路径 ,例/system/user/list,如果只写片段list,点击会直接 404。
步骤 2:在侧边栏主组件 SidebarMenu.vue 引入并使用递归组件
打开文件:src/layout/components/SidebarMenu.vue
(1)script 部分导入组件
<script setup>
import { computed } from 'vue'
import { useRoute } from 'vue-router'
import { useUserStore } from '@/stores/user'

// ✅同目录相对路径导入递归组件,不要写@/components,目录不对会报找不到文件
import SidebarMenuItem from './SidebarMenuItem.vue'

const route = useRoute()
const userStore = useUserStore()

// 接收layout/index.vue传过来的侧边栏折叠状态
const props = defineProps({
  isCollapse: {
    type: Boolean,
    default: false
  }
})

// 菜单数据源:取自pinia中经过filterAsyncRoutes处理完成的动态路由
const menuList = computed(() => userStore.addRoutes || [])
// 当前页面路由,用来做菜单高亮
const activeMenu = computed(() => route.path)
</script>
(2)template 模板循环渲染菜单
<template>
  <div class="sidebar-container" :class="{ collapse: isCollapse }">
    <div class="logo">
      <span v-if="!isCollapse">数字智能管理平台</span>
    </div>

    <!-- ⚠️router属性必须写!开启index作为路由跳转功能,不写点击菜单不会跳转 -->
    <el-menu
      :default-active="activeMenu"
      :collapse="isCollapse"
      router
      class="sidebar-el-menu"
    >
      <!-- 遍历顶层菜单,每一项交给递归组件处理 -->
      <SidebarMenuItem
        v-for="item in menuList"
        :key="item.path"
        :menu-item="item"
      />
    </el-menu>
  </div>
</template>
(3)侧边栏主组件 SidebarMenu.vue 完成代码
c
<template>
  <el-menu
    :collapse="appStore.sidebarCollapse"
    mode="vertical"
    router
    background-color="#304156"
    text-color="#bfcbd9"
    :default-active="$route.path"
    active-text-color="#409eff">
    <!-- 循环顶层菜单,每一项交给递归组件处理 -->
    <SidebarMenuItem
      v-for="route in menuList"
      :key="route.path"
      :menu-item="route" />
  </el-menu>
</template>

<script setup>
  import { computed } from 'vue'
  import { useUserStore } from '@/stores/user'
  import { useAppStore } from '@/stores/app'
  // 同目录导入递归组件
  import SidebarMenuItem from './SidebarMenuItem.vue'
  // 手动导入用到的图标
  import { House, Setting, Menu } from '@element-plus/icons-vue'

  const userStore = useUserStore()
  const appStore = useAppStore()

  // 图标映射
  const iconMap = { House, Setting, Menu }

  // 从 store 读取动态路由,把图标字符串转成组件对象
  const menuList = computed(() => {
    return userStore.addRoutes.map((route) => ({
      ...route,
      meta: {
        ...route.meta,
        icon: iconMap[route.meta?.icon] || Menu
      }
    }))
  })
</script>
步骤 3:确认动态路由转换工具 filterAsyncRoutes.js
必须保证路由工具会拼接完整 path,给到侧边栏的每一条菜单都是完整路径,否则 index 绑定的值不对,点击 404。
import { markRaw } from 'vue'
const viewsModules = import.meta.glob('@/views/**/*.vue')
import Layout from '@/layout/index.vue'

export function filterAsyncRoutes(asyncRoutes, parentPath = '') {
  return asyncRoutes.map((route) => {
    const tempRoute = { ...route }
    // 拼接完整路由path
    if (parentPath === '') {
      tempRoute.path = route.path
    } else {
      tempRoute.path = `${parentPath}/${route.path}`.replace(/\/+/g, '/')
    }

    if (tempRoute.component === 'Layout') {
      tempRoute.component = markRaw(Layout)
    } else if (route.component) {
      const filePath = `/src/views/${route.component}.vue`
      tempRoute.component = viewsModules[filePath]
    }

    // 递归处理子路由,把当前完整path传递给子节点
    if (tempRoute.children && tempRoute.children.length > 0) {
      tempRoute.children = filterAsyncRoutes(tempRoute.children, tempRoute.path)
    }
    return tempRoute
  })
}
步骤 4:mock 配置多级菜单测试数据
src/mock/index.js中getUserInfo接口内的 routes,编写嵌套菜单用于测试:
routes: [
  {
    path: '/dashboard',
    component: 'Layout',
    meta: { title: '首页', icon: 'House' },
    children: [
      {
        path: 'index',
        component: 'dashboard/index',
        meta: { title: '工作台' }
      }
    ]
  },
  {
    path: '/system',
    component: 'Layout',
    meta: { title: '系统管理', icon: 'Setting' },
    children: [
      {
        path: 'user',
        meta: { title: '用户管理', icon: 'User' },
        children: [
          {
            path: 'list',
            component: 'system/user/index',
            meta: { title: '用户列表' }
          }
        ]
      }
    ]
  }
]
✅测试流程
- 全部文件保存,关闭 vite 服务,重新执行
pnpm dev - 浏览器清除 localStorage,清空 token,刷新页面重新登录
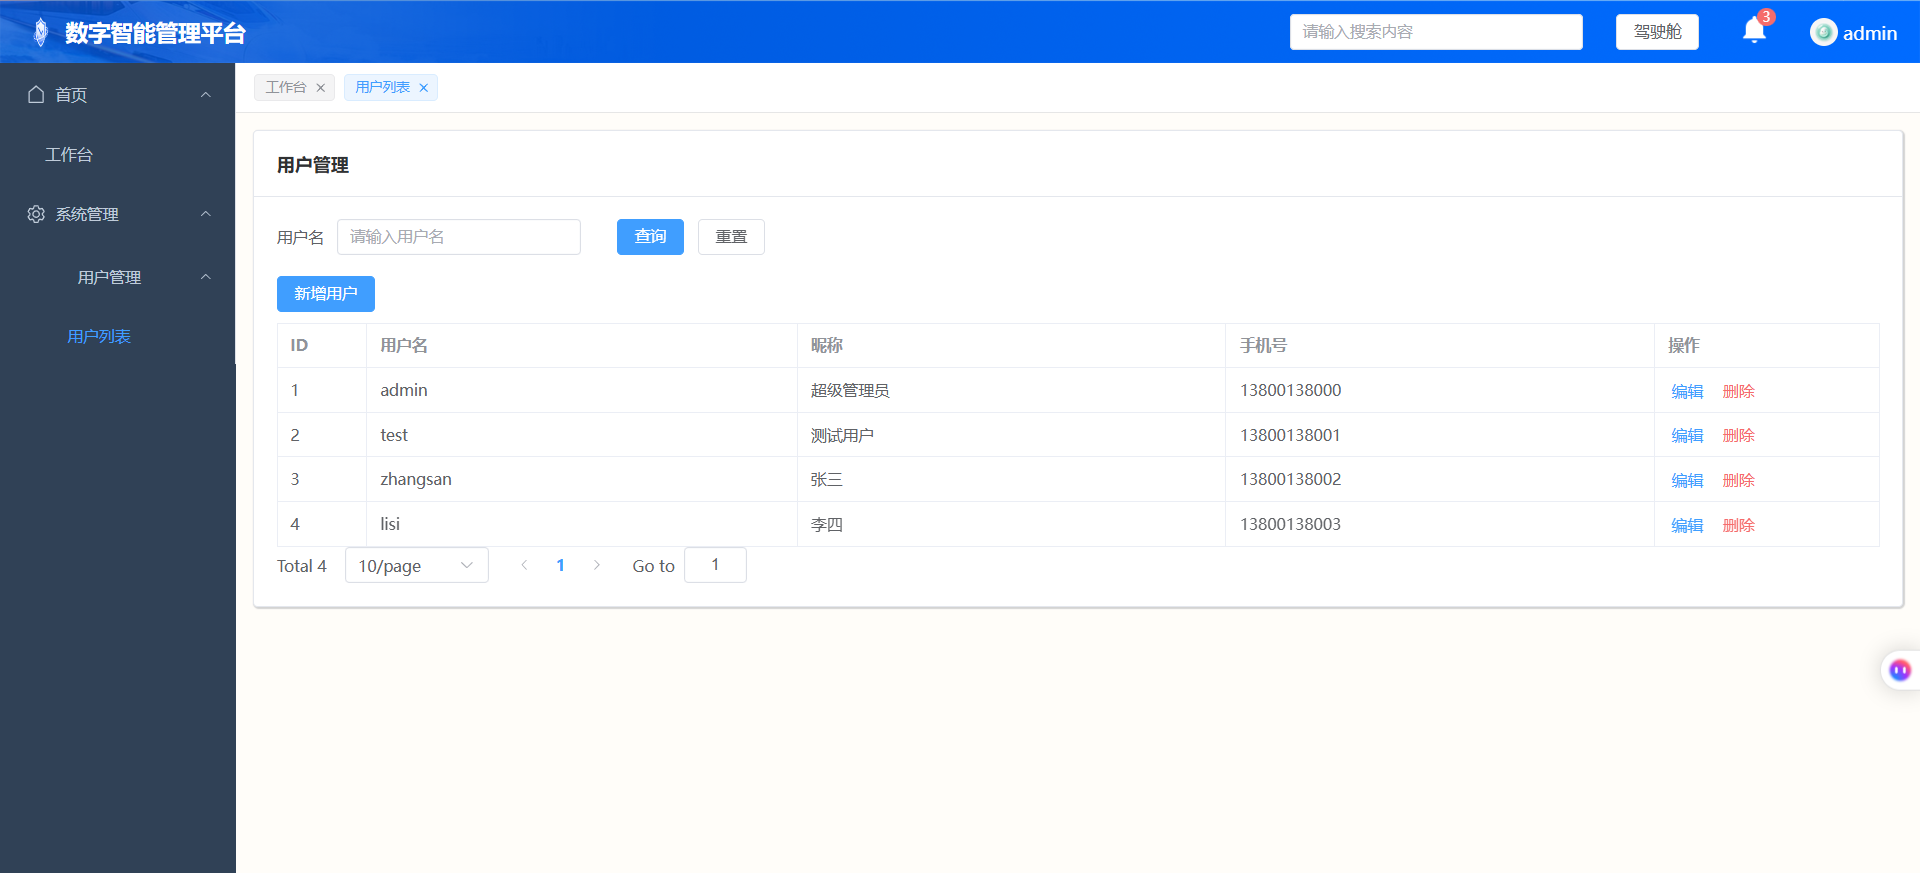
- 侧边栏查看效果:系统管理可以展开,用户管理可以展开,看到用户列表子菜单
- 点击【用户列表】,浏览器地址栏出现完整路径
/system/user/list,页面正常加载,无 404 报错
❗高频踩坑汇总
- 导入路径错误:
import SidebarMenuItem from '@/components/SidebarMenuItem.vue',你的组件在 layout/components,必须使用./SidebarMenuItem.vue相对导入。 <el-menu>忘记写router属性,点击菜单没有任何跳转效果。- filterAsyncRoutes 没有拼接完整 path,index 绑定片段路径,点击跳转 404。
- 修改
import.meta.glob相关代码之后,没有重启 pnpm dev,修改不会生效。
测试正常后回复
继续下一节,我们改造面包屑导航组件,适配多级嵌套路由。