专栏 :Python 自动化测试从入门到实战 · 第 4 篇
上接 :[第 3 篇《pytest 参数化与 Mark 标记》](#第 3 篇《pytest 参数化与 Mark 标记》)
下接 :第 5 篇《pytest 插件生态与 Allure 报告》(预告)
适读人群:已掌握 Fixture 基础(scope / yield)的 pytest 使用者
前言:为什么第 2 篇不够用?
第 2 篇里,我们学会了用 @pytest.fixture 把 setup/teardown 写进一个函数。那时的 fixture 和测试写在同一个文件里,像这样:
python
# test_calc.py
import pytest

@pytest.fixture
def calc():
    from calculator import Calculator
    return Calculator()

def test_add(calc):
    assert calc.add(1, 2) == 3
这在单文件 demo 里没问题。但真实项目的目录长这样:
project/
├── src/calculator.py
├── tests/
│   ├── test_add.py
│   ├── test_sub.py
│   ├── test_mul.py
│   └── test_div.py
问题来了 :如果每个测试文件都 copy 一份 calc fixture,改一个逻辑就要改四处------这违反了 DRY,也不是"进阶"该有的样子。
这一篇要解决的就是:fixture 如何跨文件共享、如何分层组织、如何像搭积木一样组合依赖。 三个关键词:
- conftest.py ------ fixture 的"公共仓库"
- Fixture 分层与作用域链 ------ 项目级 / 模块级 / 用例级各司其职
- 依赖注入(DI) ------ pytest 的"声明即注入"哲学
一、conftest.py:Fixture 的共享层
1.1 它是什么
conftest.py是 pytest 自动识别的配置文件 ,用于存放多个测试模块共用的 fixture 和 hook 。它不需要
import------pytest 会在测试收集阶段自动发现并加载。
核心规则:一个目录一个 conftest,作用范围向下递归。
project/
├── conftest.py            ← ① 全局级(整个 project)
├── src/calculator.py
└── tests/
    ├── conftest.py        ← ② 模块级(仅 tests/ 下生效)
    ├── test_add.py
    └── api/
        ├── conftest.py    ← ③ 子模块级(仅 api/ 下生效)
        └── test_api.py
就近原则 :test_api.py 请求一个 fixture 时,pytest 的查找顺序是:
tests/api/conftest.py → tests/conftest.py → project/conftest.py → 内置离请求最近的先匹配,这跟 Python 的变量作用域(LEGB)一个道理。
1.2 第一原则:共享的放 conftest,私有的留本地
| 放哪里 | 例子 | 理由 |
|---|---|---|
✅ conftest.py |
数据库连接、浏览器实例、登录态、配置加载 | 多文件共用,改一处全局生效 |
| ✅ 测试文件内 | 某个用例专属的临时数据 | 只有这一个文件用,别污染全局 |
❌ 别放 __init__.py |
------ | pytest 不自动加载,且污染业务包 |
💡 经验法则 :当你发现自己在第三个文件里 copy 同一个 fixture 时,就是把它搬进
conftest.py的信号。
1.3 动手:把计算器 fixture 搬进 conftest
沿用专栏一贯的项目结构:
pytest_series/
├── src/
│   └── calculator.py
├── tests/
│   ├── conftest.py        ← 🆕 本篇核心
│   ├── test_add.py
│   ├── test_sub.py
│   └── test_mul.py
└── pytest.inisrc/calculator.py(与第 1~3 篇保持一致):
python
class Calculator:
    def add(self, a, b): return a + b
    def sub(self, a, b): return a - b
    def mul(self, a, b): return a * b
    def div(self, a, b):
        if b == 0:
            raise ValueError("除数不能为 0")
return a / btests/conftest.py(共享 fixture):
python
import sys, os
import pytest

# 让 tests/ 能 import src/(小型项目常用技巧,大项目建议用 pip install -e .)
sys.path.insert(0, os.path.abspath(os.path.join(os.path.dirname(__file__), "..", "src")))

@pytest.fixture(scope="function")
def calc():
    """每个测试用例一个全新的 Calculator 实例"""
    print("\n[setup] 创建 Calculator")
    c = __import__("calculator").Calculator()
    yield c
print("\n[teardown] 销毁 Calculator")tests/test_add.py(干干净净,不再定义 fixture):
python
def test_add_int(calc):
    assert calc.add(1, 2) == 3

def test_add_negative(calc):
assert calc.add(-1, -2) == -3tests/test_mul.py:
python
def test_mul(calc):
    assert calc.mul(2, 3) == 6
运行:
bash
$ pytest tests/ -v -s输出(关键部分):
tests/test_add.py::test_add_int
[setup] 创建 Calculator
PASSED
[teardown] 销毁 Calculator

tests/test_add.py::test_add_negative
[setup] 创建 Calculator
PASSED
[teardown] 销毁 Calculator

tests/test_mul.py::test_mul
[setup] 创建 Calculator
PASSED
[teardown] 销毁 Calculator
✅ 3 个用例各自拿到独立的 calc ,setup/teardown 清晰可见(-s 让 print 输出到终端)。
看到这里你已经验证了第一句话:fixture 从 conftest 里"自动出现"在测试函数参数里,无需 import。
二、Fixture 分层:项目级 vs 模块级
2.1 三层 conftest 的职责划分
| 层级 | 位置 | 适合放什么 | scope 建议 |
|---|---|---|---|
| 全局级 | 项目根 conftest.py |
配置加载、日志、浏览器/Appium 驱动、数据库引擎 | session |
| 模块级 | tests/ 下 conftest.py |
业务通用的测试数据、共享 mock | module / function |
| 子模块级 | tests/api/conftest.py |
API 专属的 client、token、fixture 组合 | 按需要 |
2.2 示例:配置 → 数据库 → 业务数据,逐级依赖
project/
├── conftest.py                 ← 全局:加载配置 + 启动 DB
├── tests/
│   ├── conftest.py             ← 模块:基于 DB 构造业务数据
│   └── users/
│       ├── conftest.py         ← 子模块:用户相关的 fixture
│       └── test_user.py
python
# 项目根 conftest.py
@pytest.fixture(scope="session")
def config():
    return {"db_url": "sqlite:///:memory:", "env": "test"}

@pytest.fixture(scope="session")
def db_engine(config):
    from sqlalchemy import create_engine
    eng = create_engine(config["db_url"])
    yield eng
    eng.dispose()
python
# tests/conftest.py
@pytest.fixture(scope="module")
def db_session(db_engine):      # ← 直接"注入"上层 fixture
    conn = db_engine.connect()
    tx = conn.begin()
    yield conn
    tx.rollback()
    conn.close()
python
# tests/users/conftest.py
@pytest.fixture
def user_factory(db_session):
    def _make(name):
        # ...插入一条用户记录...
        return {"id": 1, "name": name}
    return _make
这就是分层的核心价值 :db_session 依赖 db_engine,user_factory 依赖 db_session------每一层只关心"我要用什么",不关心"它从哪来、怎么造"。
三、依赖注入(DI):pytest 的核心哲学
3.1 什么是依赖注入
依赖注入(Dependency Injection) :一个对象所需要的依赖,由外部(框架)在运行时"注入"进来,而不是自己在内部 hard-code 创建。
对比两种写法:
python
# ❌ 不用 DI:测试自己 new 依赖(紧耦合、难替换)
def test_order():
    db = MySQLConnection(...)       # 真实数据库,慢且不稳定
    service = OrderService(db)
    ...

# ✅ 用 DI:依赖由 fixture 提供(松耦合、可替换)
def test_order(db_session):         # ← db_session 从哪来?不用管
    service = OrderService(db_session)
    ...
pytest 的 DI 是"声明式"的 :你只要在参数里写 def test_xxx(db_session):,pytest 就会:
- 查 fixture 定义(按参数名匹配)
- 递归解析它的依赖(
db_session→db_engine→config) - 按 scope 缓存 / 新建实例
- 调用你的测试函数,把实例作为参数传入
你只声明"我需要什么",不写"怎么造"。 这就是 pytest 被称为"依赖注入框架"的原因。
3.2 自动发现 + 类型无关
注意一个细节:pytest 不要求 fixture 有类型注解 ,完全靠名字匹配。这既是优点(灵活)也是坑点(名字打错就收集不到)。
python
def test_foo(calc): ...        # ✅ 参数名 = fixture 名,自动注入
def test_bar(calculator): ...   # ❌ 名字对不上 → fixture 'calculator' not found
💡 名字打错是最常见的 conftest 报错。记住:参数名必须 == fixture 函数名。
3.3 依赖注入的实战好处
① 测试即文档:看参数列表就知道这个用例依赖哪些资源。
② 轻松替换实现(Mock):
python
# tests/conftest.py
@pytest.fixture
def payment_gateway():
    # 真实环境用支付宝,测试环境用一个假实现
    return FakePaymentGateway()   # 永远返回成功

def test_checkout(payment_gateway):   # ← 用的是 Fake,不扣真钱
    assert checkout(100, payment_gateway).ok
③ 并行安全的基础:因为每个 worker 拿到的是自己 scope 内的实例,彼此隔离。
四、Fixture 依赖图:看清谁依赖谁
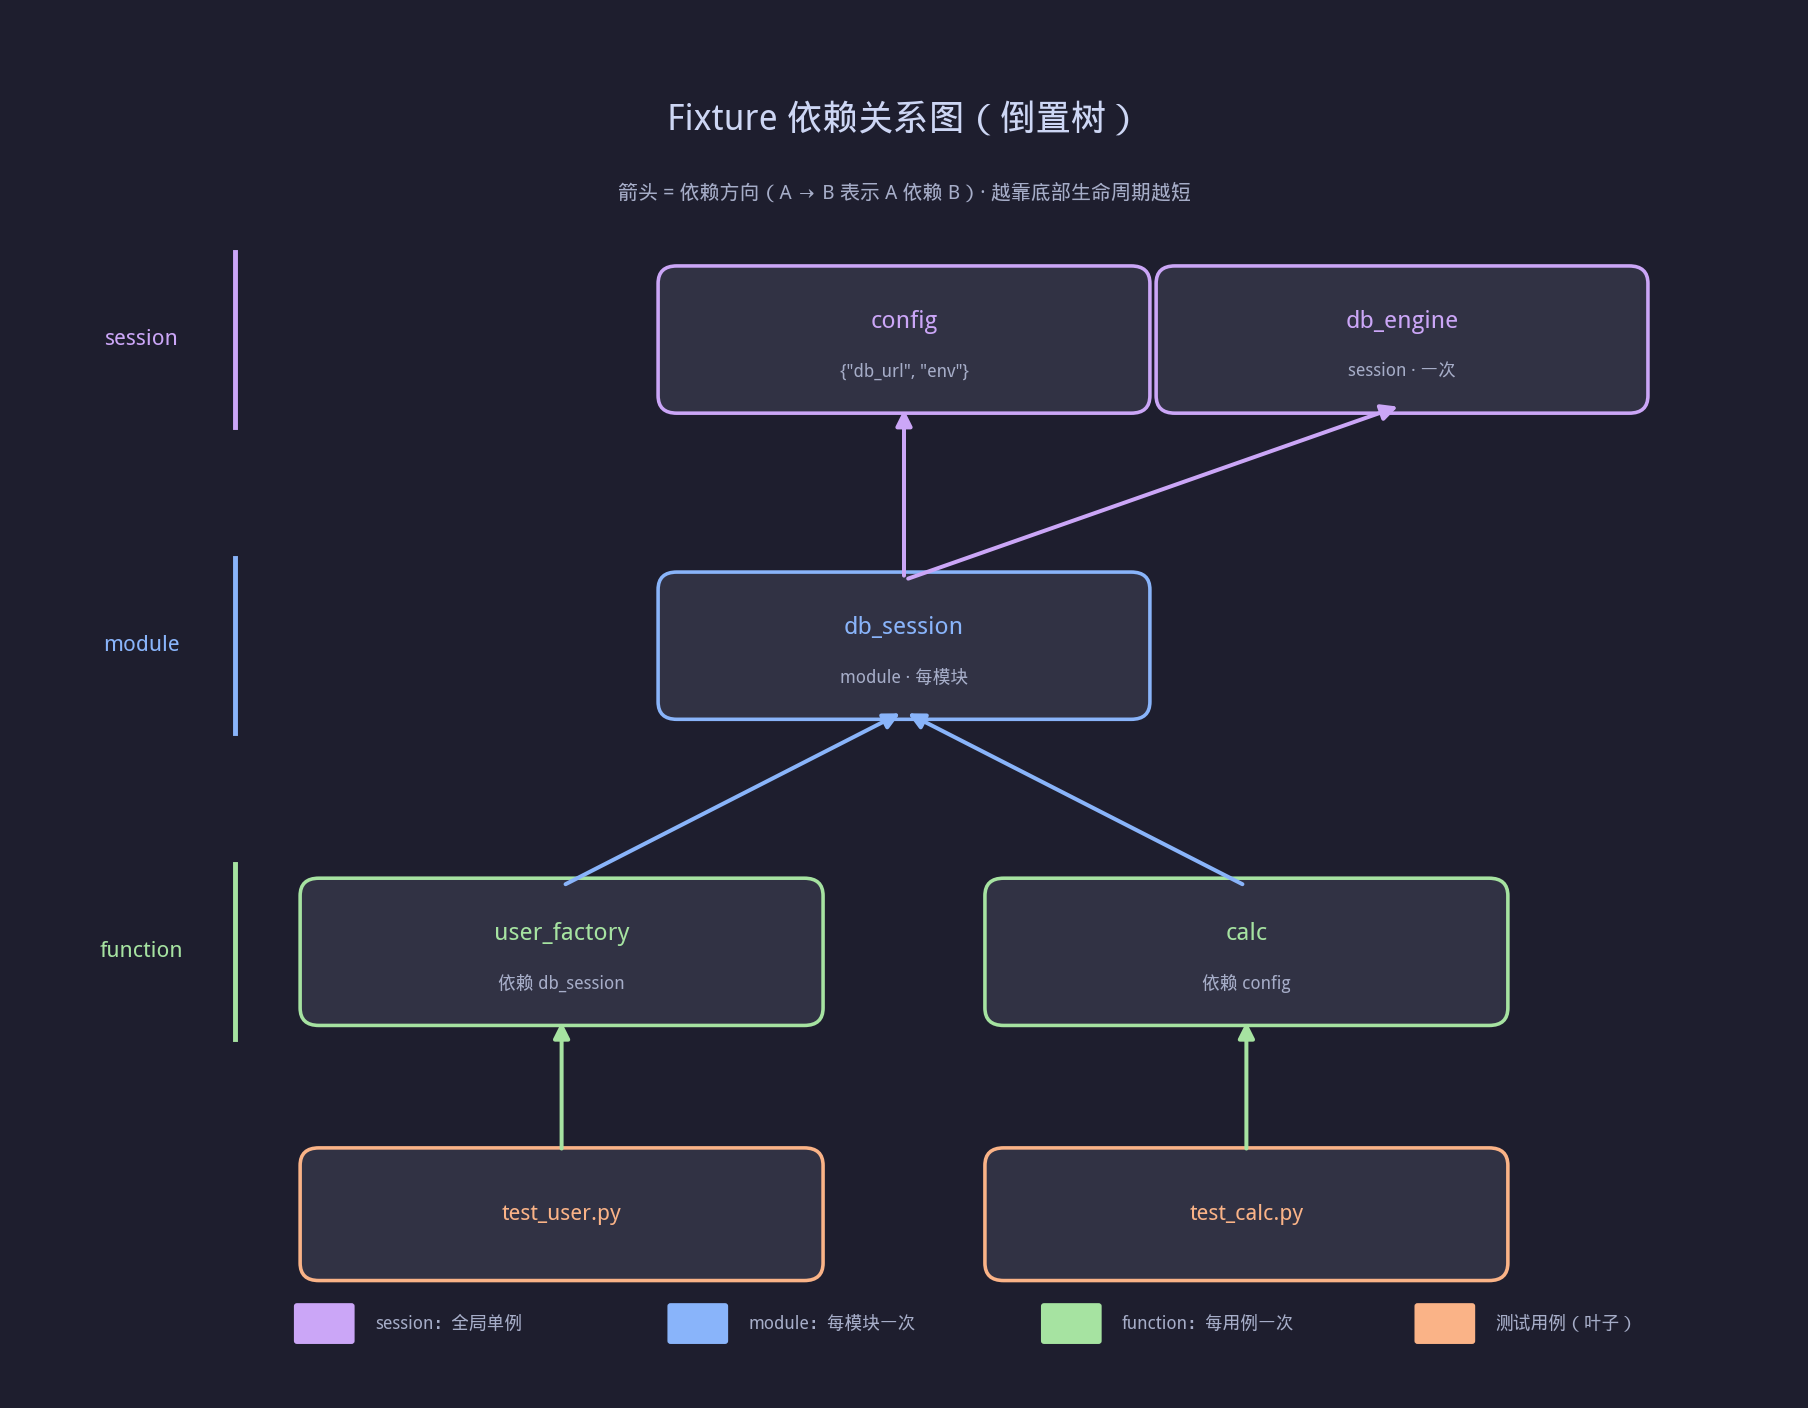
▲ Fixture 依赖关系(倒置树):config → db_engine → db_session → user_factory,calc 依赖 config,箭头指向被依赖方。
上图展示了第 2~4 篇 fixture 体系的完整依赖关系:
config(session)→db_engine(session)→db_session(module)→user_factory(function)- 箭头方向 = 依赖方向(A → B 表示 A 依赖 B)
- 越靠近底部,scope 越短、生命周期越短
这张图要记住一句话:fixture 的依赖图,就是一棵"倒置的树",根是配置,叶是测试用例。
五、conftest 进阶用法
5.1 fixture 重命名:@pytest.fixture(name=...)
python
@pytest.fixture(name="db")     # ← 测试里用 db,而不是长长的 fixture 名
def database_connection():
    ...

def test_xxx(db): ...          # ✅ 用别名
5.2 带参数的 fixture:params + ids
python
@pytest.fixture(params=["chrome", "firefox", "edge"], ids=lambda b: f"browser={b}")
def browser(request):
    yield request.param

def test_ui(browser):
    assert browser in ("chrome", "firefox", "edge")
运行会产生 3 个用例:test_ui[browser=chrome] / [browser=firefox] / [browser=edge]。
5.3 autouse=True:自动生效的 fixture
python
@pytest.fixture(autouse=True, scope="function")
def log_case_start():
    print(">>> 用例开始")
    yield
    print("<<< 用例结束")
每个用例自动套用,无需写在参数里。 慎用------它会隐式影响所有测试,适合做日志、计时、清理临时状态。
5.4 动态切换实现:结合 @pytest.mark.parametrize
python
@pytest.fixture
def gateway(request):
    if request.config.getoption("--real"):
        return RealGateway()
    return FakeGateway()
命令行 --real 时切真实实现,否则用假实现------一套测试跑两种环境。
六、常见踩坑与排错
| 问题 | 原因 | 解决 |
|---|---|---|
fixture 'xxx' not found |
参数名 ≠ fixture 名 / 不在 conftest 链上 | 检查拼写、conftest 位置 |
| fixture 没被复用(每次都新建) | scope 设成了 function |
按需改为 module/session |
session fixture 状态串味 |
跨用例共享可变对象 | session 级只用不可变/连接池,数据用 module/function |
| conftest 里改了不生效 | pytest 缓存 / IDE 没识别根目录 | 删除 __pycache__、设为 pytest rootdir |
| 循环依赖 | A 依赖 B,B 又依赖 A | 拆分公共部分到第三个 fixture |
⚠️ 最重要的提醒 :
session级 fixture 是"全局单例",千万不要在里面存可变测试数据------否则用例间会互相污染,调试起来极其痛苦。
七、完整运行效果示例
$ pytest tests/ -v
================================== test session starts ==================================
collected 5 items

tests/test_add.py::test_add_int PASSED                                        [ 20%]
tests/test_add.py::test_add_negative PASSED                                    [ 40%]
tests/test_sub.py::test_sub PASSED                                             [ 60%]
tests/test_mul.py::test_mul PASSED                                             [ 80%]
tests/test_div.py::test_div_by_zero PASSED                                     [100%]

================================== 5 passed in 0.08s ===================================
✅ 5 个用例全部通过,fixture 从 conftest 自动注入------测试文件里没有任何 setup 代码。
八、本篇小结
- ✅ conftest.py 是 fixture 的共享层,就近覆盖、自动发现、无需 import
- ✅ Fixture 分三层:全局(session)→ 模块(module)→ 子模块,职责清晰
- ✅ 依赖注入 :测试只声明"要什么",pytest 负责"怎么造",靠名字匹配
- ✅ 进阶技巧:
name重命名、params参数化、autouse自动生效 - ✅ 避坑:session 级不存可变状态,参数名必须 == fixture 名
九、动手练习
- 在
tests/conftest.py加一个tmp_dbfixture(tmp_path+ 内存数据库),让所有用例共享 - 新增
tests/api/conftest.py,定义一个只给 API 测试用的clientfixture - 写一个依赖
client的用例,验证子模块 conftest 的就近原则 - 把
calc的 scope 改成module,观察 setup/teardown 次数变化
十、思考题(欢迎评论区讨论)
- 什么时候该把 fixture 放 conftest,什么时候留在测试文件内?
sessionscope 的 fixture 为什么"危险"?如何安全使用?- pytest 的 DI 和你用过的其他框架(Spring / Dagger)有何异同?
下一篇预告
👉 第 5 篇《pytest 插件生态与 Allure 测试报告》
你将学到:
- 常用插件(
pytest-cov/pytest-xdist/pytest-html) - 如何用
pytest --plugins管理插件 - Allure 报告生成与美化
- CI 中集成测试报告