上一篇《升级啦!纯前端打包下载离线地图》介绍了个下载瓦片底图的工具,有些小伙伴想要改底图样式,简简单单给大家分享一下。
1. 步骤
- 下载瓦片底图:建议下载天地图的矢量瓦片和标注瓦片,因为天地图的矢量瓦片没有字,方便改色。
- 使用node.js的
sharp库处理图片 - 将改色后的瓦片与标注瓦片合并成新的瓦片
天地图矢量瓦片地址
js
http://t0.tianditu.gov.cn/vec_w/wmts?SERVICE=WMTS&REQUEST=GetTile&VERSION=1.0.0&LAYER=vec&STYLE=default&TILEMATRIXSET=w&FORMAT=tiles&TILEMATRIX={z}&TILEROW={y}&TILECOL={x}&tk=<你的key>天地图标注瓦片地址
js
https://t0.tianditu.gov.cn/DataServer?T=cva_w&x={x}&y={y}&l={z}&tk=<你的key>2. 使用sharp改色
遍历文件夹的所有瓦片图片,替换颜色,并写入另一个文件夹的相同索引地址
js
const fs = require("fs");
const path = require("path");
const fromPath = "矢量底图"; //底图来源文件夹
const toPath = "换色底图"; //底图目标新文件夹
const travelPath = (filePath) => {
  const dirs = fs.readdirSync(filePath);
  dirs.forEach((d) => {
    const targetPath = path.join(filePath, d);
    const stats = fs.statSync(targetPath);
    if (stats.isFile()) {
      const newPath = filePath.replace(fromPath, toPath);
      //级联生成目录
      fs.mkdirSync(newPath, {recursive: true});
      //替换颜色
      replaceColor(targetPath, path.join(newPath, d));
    } else if (stats.isDirectory()) {
      travelPath(targetPath);
    }
  });
};
travelPath("./" + fromPath);
替换配置,需要自己到地图底图进行取色,并配置替换颜色,下面是将天地图底图改色成灰白色风格的颜色配置。
js
//需替换的颜色值
const targetColors = [
  //橙色
  {target: [254, 205, 120], newColor: [255, 255, 255]},
  //绿色
  {target: [206, 234, 214], newColor: [234, 239, 239]},
  //蓝色
  {target: [171, 198, 239], newColor: [204, 214, 215]},
  //底色
  {target: [245, 244, 238], newColor: [242, 242, 242]},
  //黄色
  {target: [254, 240, 158], newColor: [255, 255, 255]},
  //黄色
  {target: [254, 243, 175], newColor: [255, 255, 255]},
  //紫色
  {target: [186, 160, 241], newColor: [255, 255, 255]}
];
//颜色最小距离
const MIN = 5;- 获取图片的像素数据,然后遍历每个像素,这里的
图片像素数据跟canvas的imageData一致,可进行对应的图像处理 - 判断像素是否与需替换的颜色相近
- 如果与需替换的颜色颜色距离小于最小值,找出颜色距离最小的那个替换颜色,并进行替换
- 否则另外处理其他颜色,如我这个是将地图改成灰白色风格的,会将其他颜色去色,取三色值的平均值,整体灰白色。
js
const sharp = require("sharp");
//inputPath输入图片地址,outputPath输出图片地址
async function replaceColor(inputPath, outputPath) {
  try {
    // 获取图片数据
    const {data, info} = await sharp(inputPath)
      .ensureAlpha() //有透明度
      .raw()
      .toBuffer({resolveWithObject: true});

    const {width, height, channels} = info;

    // 遍历每一个像素
    for (let i = 0; i < data.length; i += channels) {
      const r = data[i]; // 红色
      const g = data[i + 1]; // 绿色
      const b = data[i + 2]; // 蓝色
      // const a = data[i + 3]; //透明度

      let tag = false;
      let minD = 255,
        newC = [255, 255, 255];

      //找到与替换颜色最小距离那个颜色
      for (let i = 0; i < targetColors.length; i++) {
        const {target, newColor} = targetColors[i];
        //计算距离
        const distance = Math.sqrt(
          Math.pow(r - target[0], 2) + Math.pow(g - target[1], 2) + Math.pow(b - target[2], 2)
        );
        if (distance <= MIN) {
          minD = Math.min(minD, distance);
          if (minD === distance) {
            newC = newColor;
          }
          tag = true;
          //   break;
        }
      }
      if (!tag) {
        //没找到替换颜色,默认取平均值,处理成灰色

        //颜色与灰色相近不处理
        if (Math.abs(r - g) < MIN && Math.abs(r - b) < MIN && Math.abs(b - g) < MIN) {
          continue;
        }

        const v = Math.round((r + g + b) / 3);
        data[i] = v; // 替换 R
        data[i + 1] = v; // 替换 G
        data[i + 2] = v; // 替换 B
      } else {
        //替换成新颜色
        data[i] = newC[0]; // 替换 R
        data[i + 1] = newC[1]; // 替换 G
        data[i + 2] = newC[2]; // 替换 B
      }
    }

    // 5. 修改后的颜色数据保存成新图片
    await sharp(data, {
      raw: {
        width,
        height,
        channels
      }
    })
      .toFormat("png")
      .toFile(outputPath);
  } catch (error) {
    console.error(outputPath, "颜色替换失败:", error.message);
  }
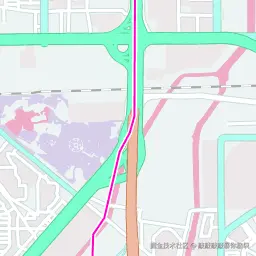
}/14/6504/13367.png的矢量瓦片原图与替换结果
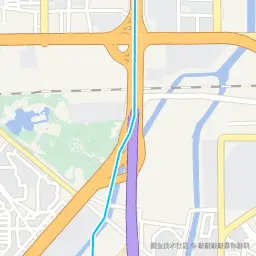
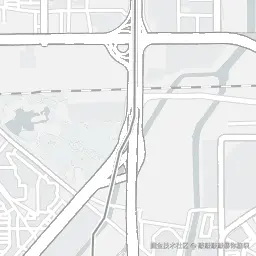
以上参考高德地图灰色风格
注意:
MIN颜色最小距离不要设置得太大,否则会出现许多不符合的颜色也被替换- 可能会出现相近颜色或边缘没替换的情况,这时候需要多配置几个替换颜色,这样可以尽量覆盖。
3. 叠加两张瓦片底图
天地图的标注瓦片与矢量瓦片是分开的,天地图的标注字比较小会好看一些,但天地图需要将标注和矢量底图进行叠加,生成新的瓦片。
- 因为我的瓦片底图的风格是灰白色,标注瓦片也有颜色,需要去色一下
js
//代码与上的替换颜色的差不多,只不过像素换色部分简单一些
// 遍历每一个像素
    for (let i = 0; i < data.length; i += channels) {
      const r = data[i]; // 红色
      const g = data[i + 1]; // 绿色
      const b = data[i + 2]; // 蓝色
      const a = data[i + 3]; // 透明度

      if (a === 0) continue; //透明不处理
      //去色,变成灰白色
      const v = Math.round((r + g + b) / 3);
      data[i] = v; // 替换 R
      data[i + 1] = v; // 替换 G
      data[i + 2] = v; // 替换 B
}- 遍历文件夹图片,将对应的矢量瓦片和标注瓦片合并成一张图片
js
// 底图imagePath,上方叠加图imageoverPath,目标新地址distPath
async function mergeImages(imagePath, imageoverPath, distPath) {
  await sharp(imagePath)
    .composite([
      {
        input: imageoverPath,
        top: 0, // 距离顶部的像素
        left: 0, // 距离左侧的像素
        blend: "over" // 混合模式 over覆盖
      }
    ])
    .toFile(distPath);
}

const basePath = "换色底图"; //底图来源文件夹
const overPath = "换色标注"; //底图目标新文件夹
const toPath = "叠加瓦片";
const travelPath = (filePath) => {
  const dirs = fs.readdirSync(filePath);
  dirs.forEach((d) => {
    const targetPath = path.join(filePath, d);
    const stats = fs.statSync(targetPath);
    if (stats.isFile()) {
      const textPath = targetPath.replace(basePath, overPath);
      const newPath = filePath.replace(basePath, toPath);
      //级联生成目录
      fs.mkdirSync(newPath, {recursive: true});
      //合并图片
      mergeImages(targetPath, textPath, path.join(newPath, d));
    } else if (stats.isDirectory()) {
      travelPath(targetPath);
    }
  });
};
travelPath("./" + basePath);/14/6504/13367.png最终瓦片结果
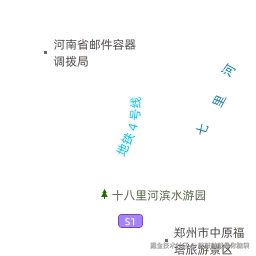
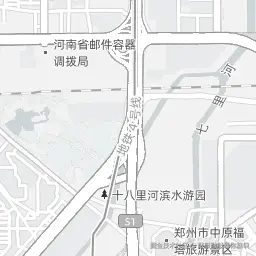
4. 一些常用的像素处理方法
sharp的像素操作与canvas的imageData一样逻辑,以下是一些常用的像素处理方法
- 调整对比度
js
const contrast = 1.2;//饱和度值
const changeContrast = (color) => {
  color.forEach((a, i) => {
    let c = contrast * (a - 128) + 128;
    if (c < 0) {
      c = 0;
    } else if (c > 255) {
      c = 255;
    }
    color[i] = c;
  });
  return color;
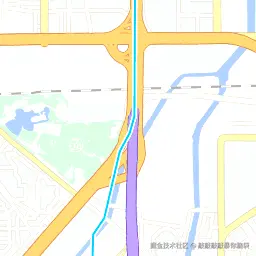
};/14/6504/13367.png原图与修改对比度
- 调整亮度
js
const light = 1.2;
const addLight = (light - 1) * 255;
const changeLight = (color) => {
  color.forEach((a, i) => {
    let c = addLight + a;
    if (c < 0) {
      c = 0;
    } else if (c > 255) {
      c = 255;
    }
    color[i] = c;
  });
  return color;
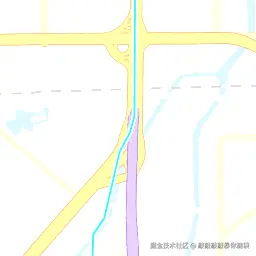
};/14/6504/13367.png原图与修改亮度
- 反色
js
const invertColor = (color) => {
  color.forEach((a, i) => {
    let c = 255 - a ;
    if (c < 0) {
      c = 0;
    } else if (c > 255) {
      c = 255;
    }
    color[i] = c;
  });
  return color;
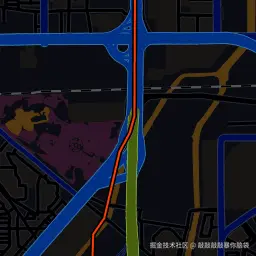
};/14/6504/13367.png原图与反色
- 调整饱和度
js
const saturate = 3;
const changeSaturate = (color) => {
  const [h, s, l] = rgbToHsl(color[0], color[1], color[2]);
  let c = s * saturate;
  if (c < 0) {
    c = 0;
  } else if (c > 1) {
    c = 1;
  }
  return hslToRgb(h, c, l);
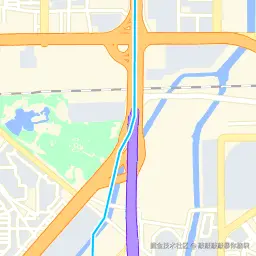
};/14/6504/13367.png原图与修改饱和度
- 调整色相
js
const hue = 120;
const changeHue = (color) => {
  const [h, s, l] = rgbToHsl(color[0], color[1], color[2]);
  return hslToRgb((h + hue) % 360, s, l);
};/14/6504/13367.png原图与修改色相
5. github地址
其他来源的瓦片也是一样换色逻辑的,建议瓦片换色不要直接覆盖原文件,因为颜色配置可能需要一点点调整的。
github地址:https://github.com/xiaolidan00/offline-map-download
参考
- sharp-
https://github.com/lovell/sharp