一、效果演示
对于带有注释的HTML文件,比较好的阅读体验是支持点击注释引用跳转到对应的注释,在注释处点击注释编号也可以重新跳转回对应的注释引用,如果不愿意在页面上跳转,只需将鼠标悬停在注释引用上即可跳出注释框显示注释内容,并且注释框的位置尽量显示在视口范围之内而无需滚动页面,如下动图所示(可以看到上部空间不够时注释框会显示在下部,右边空间不够时注释框会左移):
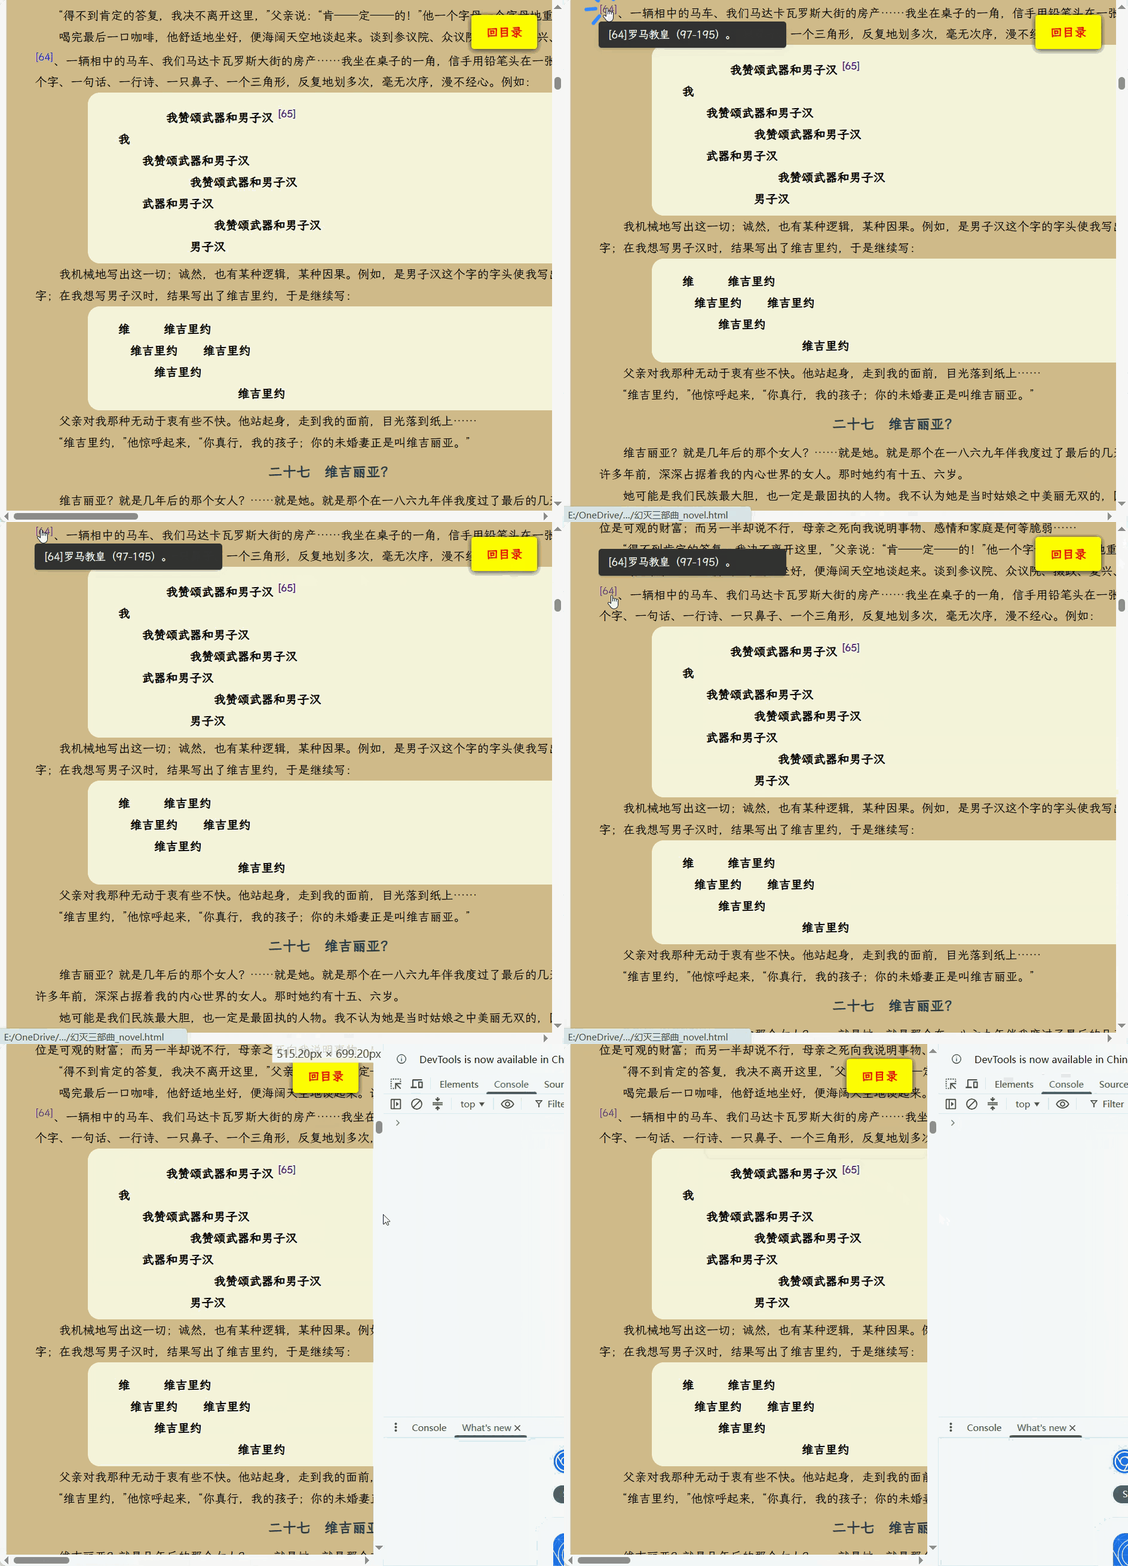
这个效果需要结合HTML、CSS以及JS共同完成。HTML中,以如下结构的结点定义注释引用和注释内容:
注释引用:
html
<p>喝完最后一口咖啡,他舒适地坐好,便海阔天空地谈起来。谈到参议院、众议院、摄政、
复兴、埃瓦里斯托 <a id="w64" href="#m64"><sup class="noteref">[64]</sup></a>、
一辆相中的马车、我们马达卡瓦罗斯大街的房产......我坐在桌子的一角,信手用铅笔头在一张纸
上划着。一个字、一句话、一行诗、一只鼻子、一个三角形,反复地划多次,毫无次序,
漫不经心。例如:</p>
其中, <a id="w64" href="#m64"><sup class="noteref">64</sup></a>定义了一个注释引用,它使用一个A标签定义一个锚点以及到目标注释的链接,用一个CSS类名为"noteref"的sup结点显示一个注释编号。
注释:
html
<div class="note"><a id="m65" href="#w65">[65]</a>维吉尔的史诗《伊尼特》的第一句。</div>它用一个div作为注释内容的容器,并且包含一个子节点A定义了锚点以及到对应注释引用的链接。
注释引用及注释中的A标签定义就实现了交叉链接。注释框的实现有很多方式,我个人认为使用伪元素的方式最为简单且高效,主要是其显示和隐藏无需用JavaScript控制。可以通过下面的CSS定义一个注释框,并处理其显示和隐藏。
CSS定义注释提示框:
css
/************************注释框*********************************/
.noteref {
	/* 为伪元素提供定位基准 */
	position: relative;
	/* 可选:将光标改为手形,提示可交互 */
	cursor: pointer;
	/* 确保伪元素定位正确 */
	display: inline-block;
	margin: 0;
	padding: 0;
	text-indent: 0;
	text-align: left;
}
.noteref::after {

/* 读取data-note属性的值作为内容 /
content: attr(data-note);
position: absolute;
top: var(--note-top);
left: var(--note-left);
/transform: translateX(-50%);/
background-color: #333;
color: white;
padding: 8px 12px;
border-radius: 4px;
font-size: 14px;
line-height: 1.4;
white-space: pre-wrap;
width: var(--note-width);
z-index: 1000;
/ 初始完全透明 /
opacity: 0;
/ 初始隐藏,不占空间 /
visibility: hidden;
/ 添加淡入淡出效果 /
transition: opacity 0.2s ease, visibility 0.2s ease;
/ 防止提示框干扰鼠标事件 */
pointer-events: none;
box-shadow: 0 2px 5px rgba(0, 0, 0, 0.2);
}
/* 鼠标悬停时显示提示框 */
.noteref:hover::after {
opacity: 1;
visibility: visible;
}
在上面的CSS定义中,通过元素的属性"data-note"属性填充注释内容,通过动态读取变量值设置CSS属性top、lef和width来决定注释框显示的大小和位置。只需要用如下JavaScript代码处理注释引用的鼠标悬停事件,读取对应的注释内容并根据视口空间的状况设置注释框的left、top和width即可。
JavaScript向CSS传值:
javascript
/*********************显示注释相关,配合CSS使用***********************/
function displayNote() {
    const noteElements = document.querySelectorAll('.noteref');
    Array.from(noteElements).forEach(noteElement => {
        noteElement.addEventListener('mouseenter', function () {
            const linkElement = this.parentNode;  // 注意用 this
            const href = linkElement.getAttribute('href');

            if (!href || !href.includes('#')) return;

            const anchorId = href.split('#')[1];
            const anchorElement = document.getElementById(anchorId)?.parentNode;

            if (anchorElement) {
                let note = anchorElement.textContent.trim();
				// note = note.replace(/\[\d+\]/, "").trim();  // 替换掉注释内容前面的序号,可选
				note = note.replace(/(\[\d+\])[\r\n\s]+/, "$1 "); // 替换掉序号与注释内容之间过多的空白(可选)
				// 对于CSS的content属性,因为attr函数支持非常好,适宜设置自定义HTML属性,可以避免用var函数取值时各种转义方面的麻烦
				this.setAttribute('data-note', note);
				setNotePos(this, note);
            }
        });
    });
}

function setNotePos(noteref, content){
	// 取注释引用在页面渲染出的矩形供读取其位置信息
	const noterefRect = noteref.getBoundingClientRect();
	const noterefStyle = getComputedStyle(noteref);
	const emWidth = parseFloat(noterefStyle.fontSize);
	const noteWidth = content.length > 20 ? emWidth * 20 :
					emWidth * content.length;
	// 假定HTML文件里将主体内容放在id为content的容器中,如不使用容器,可以直接用document.body替代contentDiv
	const contentDiv = document.getElementById('content');
	const contentRect = contentDiv.getBoundingClientRect();
	const rightLimit = Math.min(Math.floor(contentRect.left + contentRect.width),
							window.innerWidth) - 30;

	// CSS中使用了var函数读取CSS样式变量设置width和left等属性值,所以这里使用element.style.setProperty传值
	// 当然,也可以在CSS中用attr读取自定义属性data-XXX,然后这里像data-note一样使用element.setAttribute传值
	noteref.style.setProperty('--note-width', noteWidth + 'px');
	const threshold = noterefRect.left + noteWidth;
	if (threshold > rightLimit) {
		let offset = rightLimit - threshold - emWidth;
		// 如果视口过窄,优先突破视口右边
		if((noterefRect.left + offset) < 0) offset = 0;
		noteref.style.setProperty('--note-left', offset + 'px');
	} else {
		noteref.style.setProperty('--note-left', '0px');
	}
	// 获取注释框高度
	const noteStyle = window.getComputedStyle(noteref, '::after');
	const noteHeight = parseFloat(noteStyle.height);
	if((noterefRect.top - noteHeight) < (noteHeight + 5)) {	// 如果视口上方空间不够,注释框显示到注释引用下方5px处
		noteref.style.setProperty('--note-top',  (noterefRect.height + 5) + 'px');
	} else { // 注释框优先显示在注释引用上方
		noteref.style.setProperty('--note-top',  -noteHeight - noterefRect.height + 'px');
	}
}

// 等待页面内容加载完成
document.addEventListener('DOMContentLoaded', function () {
	displayNote();
});
注意上述JavaScript代码中的CSS变量名(--note-width、--note-left、--note-top)、注释引用元素自定义属性名(data-note)均与CSS耦合,二者必须保持一致。
二、CSS var()与CSS attr()适用性比较
上面采用了两种方式从JavaScript中向CSS传值:对于伪元素的content属性,使用了element.setAttibute设置HTML自定义属性的方式传值,CSS中使用attr()函数读取;对于伪元素的left、top、width属性,使用了element.style.setProperty设置CSS变量的方式传值,CSS中使用var()函数读取。这两种方式的区别如下:
1. 浏览器支持与适用范围(核心差异)
- CSS
var():作为 CSS 自定义属性,var()几乎可以在所有现代 CSS 属性中使用(如color,width,background等),并且支持动态更新,是现代前端实现动态样式的标准首选方案。 - CSS
attr():目前attr()的浏览器支持非常有限。除了content属性(常用于伪元素生成内容)外,它在其他 CSS 属性(如尺寸、颜色)中的使用均处于实验性阶段,几乎不被主流浏览器支持。
2. 渲染与计算性能
var()的解析机制 :CSS 变量在样式计算阶段(Style Recalc)被批量解析。当通过setProperty更新变量时,浏览器原生引擎会高度优化这一过程,延迟通常在亚毫秒级。attr()的性能损耗 :频繁使用attr()可能会影响页面的渲染性能,尤其是在复杂的动态页面中。此外,attr()提取的值默认是纯字符串,无法直接在 CSS 中参与数学运算,这进一步限制了其在复杂样式计算中的效率。
3.伪元素的 content 属性
- 在专门针对伪元素 content 属性进行动态传值时,使用 setAttribute 配合 CSS attr() 函数不仅被广泛接受,而且是非常标准和推荐的做法。此时虽然修改 DOM 属性会触发重绘(Repaint),但伪元素
content属性的变更通常不涉及复杂的页面布局重排(Reflow),性能损耗极小。
三、attr() 与 var() 在处理值方面的比较
1. 数据类型处理的区别
attr()函数 :- 目前主流浏览器中,
attr()提取的值始终是纯字符串(raw-string)。 - 它无法直接在 CSS 中参与数学运算。例如,即使
data-width="100",你也无法直接使用width: attr(data-width)px;(尽管最新的 CSS Values and Units Module Level 5 草案引入了类型解析,但目前尚未被主流浏览器广泛支持)。
- 目前主流浏览器中,
var()函数 :var()读取的是 CSS 自定义属性,其值可以是任何有效的 CSS 值(如颜色、尺寸、数字、甚至包含逗号的字体列表等)。- 如果
var()的值是纯数字,不能直接与单位拼接(如var(--size)px无效),必须使用calc()函数(如calc(var(--size) * 1px))。
2. 对换行符的处理区别
attr()函数 :attr()会原样输出属性值中的换行符。如果 HTML 属性中包含回车或换行,它会被当作普通字符插入,可能会破坏行高或触发意外折行。- 如果在 CSS 的
content属性中手动拼接换行,需要使用 CSS 转义字符\A(或\00000a),并且必须配合white-space: pre;(或pre-wrap)才能让换行生效。
var()函数 :- 在 CSS 变量的回退值(fallback value)中,不允许包含换行符。如果包含换行符,会导致语法无效。
3. 对 HTML 特殊字符的处理区别
attr()函数 :attr()不会 对 HTML 实体进行解码。例如,如果 HTML 属性值为data-desc="前端 & 后端",attr()提取出来的就是字面量字符串前端 & 后端,而不是前端 & 后端。
var()函数 :- CSS 变量存储的是计算后的 CSS 值,不存在 HTML 实体解码的概念。
- 在定义变量时,不能给包含逗号、空格的值加外层引号(例如
--font: "Helvetica Neue", Arial;是错误的),否则引号会被当作字面量存入,导致后续使用时解析失败。
4. 其他特殊字符与语法限制
attr()函数 :- 属性名必须严格匹配(大小写、连字符等),浏览器不会做任何转换或容错,否则返回空字符串。
var()函数 :- 回退值中允许使用逗号,但逗号之后的所有内容都会被浏览器视为回退值的一部分(例如
var(--foo, red, blue)的回退值是red, blue)。 - 回退值中不能包含未匹配的右括号(如
),],})、顶层分号或感叹号等特殊字符。
- 回退值中允许使用逗号,但逗号之后的所有内容都会被浏览器视为回退值的一部分(例如
如果在制作本文效果的HTML文档时像处理width等属性一样,也使用element.style.setProperty结合var()函数向伪元素的content属性传值,为了满足**"不能给包含逗号、空格的值加外层引号"** 和**"不允许包含换行符"**的要求,可以在传值前先作如下处理:
javascript
const escaped = note.replace(/\\/g, '\\\\')    // 先转义反斜杠
    .replace(/"/g, '\\"')      // 转义双引号
    .replace(/\n/g, '\\A ')    // 换行符 → \A
    .replace(/\r/g, '');       // 去掉回车
读取伪元素的CSS属性的方法也值得注意:
javascript
    // 获取注释框高度
	const noteStyle = window.getComputedStyle(noteref, '::after');
	const noteHeight = parseFloat(noteStyle.height);
即通过宿主元素的样式来访问。
四、完整示例页面
下面给出实现本文效果的HTML+CSS+JavaScript整合示例,实际使用时可以将CSS和JavaScript抽出为独立文件,并保持HTML文件的整体DOM结构:
html
<!DOCTYPE html>
<html lang="zh-CN">
<head>
	<meta charset="UTF-8">
	<title>注释引用与提示框完整示例</title>
	<style>
		/* ========== 注释引用样式 ========== */
		.noteref {
			position: relative;      /* 为伪元素提供定位基准 */
			cursor: pointer;         /* 手形光标提示可交互 */
			display: inline-block;
			margin: 0;
			padding: 0;
			text-indent: 0;
			text-align: left;
		}
		/* ========== 注释提示框(伪元素实现) ========== */
		.noteref::after {
		content: attr(data-note);   /* 读取data-note属性作为注释内容 */
		position: absolute;
		top: var(--note-top);       /* 由JavaScript动态设置 */
		left: var(--note-left);     /* 由JavaScript动态设置 */
		background-color: #333;
		color: white;
		padding: 8px 12px;
		border-radius: 4px;
		font-size: 14px;
		line-height: 1.4;
		white-space: pre-wrap;
		width: var(--note-width);   /* 由JavaScript动态设置 */
		z-index: 1000;
		opacity: 0;                 /* 初始完全透明 */
		visibility: hidden;         /* 初始隐藏 */
		transition: opacity 0.2s ease, visibility 0.2s ease;
		pointer-events: none;       /* 防止提示框干扰鼠标事件 */
		box-shadow: 0 2px 5px rgba(0, 0, 0, 0.2);
		}

		/* 鼠标悬停时显示提示框 */
		.noteref:hover::after {
		opacity: 1;
		visibility: visible;
		}
	</style>
</head>
<body>
	<div id="content"><!-- 内容容器 -->
		<!-- 正文中的注释引用 -->
		<p>这是一段包含注释引用的文字,例如:<a id="w1" href="#m1"><sup class="noteref">[1]</sup></a>,将鼠标悬停即可查看注释。</p>
	</div>
	<div id="notes">
		<!-- 注释内容定义(通过锚点与注释引用交叉链接) -->
		<div class="note">
			<a id="m1" href="#w1">[1]</a>这是第一条注释的具体内容,用于演示提示框的显示效果。
		</div>
	</div>

	<script>
		// ========== 显示注释提示框的核心逻辑 ==========
		function displayNote() {
			// 1. 获取所有注释引用元素
			const noteElements = document.querySelectorAll('.noteref');

			Array.from(noteElements).forEach(noteElement => {
				// 2. 为每个注释引用绑定鼠标悬停事件
				noteElement.addEventListener('mouseenter', function () {
					// 3. 通过父级A标签的href找到对应注释的锚点id
					const linkElement = this.parentNode;
					const href = linkElement.getAttribute('href');
					if (!href || !href.includes('#')) return;

					const anchorId = href.split('#')[1];
					const anchorElement = document.getElementById(anchorId)?.parentNode;

					if (anchorElement) {
						// 4. 提取注释内容并设置到data-note属性
						let note = anchorElement.textContent.trim();
				        note = note.replace(/(\[\d+\])[\r\n\s]+/, "$1 "); // 替换掉序号与注释内容之间过多的空白(可选)
						this.setAttribute('data-note', note);

						// 5. 计算并设置提示框的位置和宽度
						setNotePos(this, note);
					}
				});
			});
		}

		function setNotePos(noteref, content) {
			// 6. 获取注释引用的位置信息
			const noterefRect = noteref.getBoundingClientRect();
			const noterefStyle = getComputedStyle(noteref);
			const emWidth = parseFloat(noterefStyle.fontSize);

			// 7. 根据内容长度估算提示框宽度
			const noteWidth = content.length > 20 ? emWidth * 20 : emWidth * content.length;

			// 8. 计算视口右侧边界限制
			const contentDiv = document.getElementById('content');
			const contentRect = contentDiv.getBoundingClientRect();
			const rightLimit = Math.min(
				Math.floor(contentRect.left + contentRect.width),
				window.innerWidth
			) - 30;

			// 9. 通过CSS变量向CSS传递宽度和水平位置
			noteref.style.setProperty('--note-width', noteWidth + 'px');
			const threshold = noterefRect.left + noteWidth;
			if (threshold > rightLimit) {
				let offset = rightLimit - threshold - emWidth;
				if ((noterefRect.left + offset) < 0) offset = 0;
				noteref.style.setProperty('--note-left', offset + 'px');
			} else {
				noteref.style.setProperty('--note-left', '0px');
			}

			// 10. 获取提示框高度,决定显示在上方还是下方
			const noteStyle = window.getComputedStyle(noteref, '::after');
			const noteHeight = parseFloat(noteStyle.height);

			if ((noterefRect.top - noteHeight) < (noteHeight + 5)) {
				// 上方空间不足,显示在下方5px处
				noteref.style.setProperty('--note-top', (noterefRect.height + 5) + 'px');
			} else {
				// 优先显示在注释引用上方
				noteref.style.setProperty('--note-top', -noteHeight - noterefRect.height + 'px');
			}
		}

		// 11. 页面加载完成后初始化
		document.addEventListener('DOMContentLoaded', function () {
			displayNote();
		});
	</script>
</body>
</html>
五、将书籍打包成单文件html
有时候我们想将HTML文件及其中引用的CSS、JavaScript和图片等资源打包为单个文件(类似于微软的mhtml文件),从而可以在任意设备上离线阅读,可以使用下面的脚本:
python
import os
import base64
import mimetypes
import chardet
import urllib.request
from bs4 import BeautifulSoup


def get_file_encoding(file_path):
    """自动检测文件编码"""
    with open(file_path, 'rb') as f:
        raw_data = f.read()
    detected = chardet.detect(raw_data)
    if detected['encoding'] and detected['confidence'] > 0.7:
        return detected['encoding']
    return 'utf-8'


def read_file_safe(file_path):
    """安全地读取文本文件,自动处理编码"""
    try:
        with open(file_path, 'r', encoding='utf-8') as f:
            return f.read()
    except UnicodeDecodeError:
        encoding = get_file_encoding(file_path)
        with open(file_path, 'r', encoding=encoding, errors='replace') as f:
            return f.read()


def image_to_base64(url):
    """将本地或网络图片转换为 base64 data URI 字符串"""
    try:
        # 1. 处理网络图片
        if url.startswith(('http://', 'https://')):
            req = urllib.request.Request(url, headers={'User-Agent': 'Mozilla/5.0'})
            with urllib.request.urlopen(req) as response:
                image_data = response.read()
            content_type = response.headers.get('Content-Type', 'image/png')
        # 2. 处理本地图片
        else:
            if not os.path.exists(url):
                print(f"警告:本地图片未找到 -> {url}")
                return None
            with open(url, 'rb') as f:
                image_data = f.read()
            content_type, _ = mimetypes.guess_type(url)
            if not content_type:
                content_type = 'image/png'  # 兜底默认类型

        # 3. 生成 base64 data URI
        b64_data = base64.b64encode(image_data).decode('utf-8')
        return f"data:{content_type};base64,{b64_data}"

    except Exception as e:
        print(f"警告:图片处理失败 ({url}) -> {e}")
        return None


def pack_html(html_file_path, output_file_path):
    """整合 HTML、CSS、JS 并转换所有图片为 Base64 内联"""
    # 获取 HTML 文件所在目录作为相对路径基准
    base_dir = os.path.dirname(os.path.abspath(html_file_path))

    html_content = read_file_safe(html_file_path)
    soup = BeautifulSoup(html_content, 'html.parser')

    # --- 处理 CSS ---
    for link_tag in soup.find_all('link', rel='stylesheet'):
        css_path = link_tag.get('href')
        if css_path and not css_path.startswith(('http://', 'https://')):
            abs_css_path = os.path.join(base_dir, css_path)
            if os.path.exists(abs_css_path):
                css_content = read_file_safe(abs_css_path)
                new_style = soup.new_tag('style')
                new_style.string = css_content
                link_tag.replace_with(new_style)
            else:
                print(f"警告:CSS 文件未找到 -> {abs_css_path}")

    # --- 处理 JS ---
    for script_tag in soup.find_all('script'):
        src = script_tag.get('src')
        if src and not src.startswith(('http://', 'https://')):
            abs_js_path = os.path.join(base_dir, src)
            if os.path.exists(abs_js_path):
                js_content = read_file_safe(abs_js_path)
                script_tag.string = js_content
                del script_tag['src']
            else:
                print(f"警告:JS 文件未找到 -> {abs_js_path}")

    # --- 处理所有图片 (本地 + 网络) ---
    for img_tag in soup.find_all('img'):
        src = img_tag.get('src')
        if src:
            b64_str = image_to_base64(src)
            if b64_str:
                img_tag['src'] = b64_str
                # 移除可能导致图片重新发起网络请求的属性
                if img_tag.has_attr('data-src'):
                    del img_tag['data-src']

    # 保存结果
    with open(output_file_path, 'w', encoding='utf-8') as f:
        f.write(str(soup.prettify()))

    print(f"成功!已生成单文件网页:{output_file_path}")


# ========== 在这里修改你的文件路径 ==========
if __name__ == "__main__":
    input_html = r"幻灭三部曲.html"  # 你的 HTML 文件名
    output_html = r"幻灭三部曲_单文件.html"  # 输出的文件名

    pack_html(input_html, output_html)