module、chunk、bundle 的区别是什么?
举个🌰,webpack 的配置如下:
JavaScript
{
    entry: {
        index: "../src/index.js",
        utils: '../src/utils.js',
    },
    output: {
        filename: "[name].bundle.js", // 输出 index.js 和 utils.js
    },
    module: {
        rules: [
            {
                test: /\.css$/,
                use: [
                    MiniCssExtractPlugin.loader, // 创建一个 link 标签
                    'css-loader', // css-loader 负责解析 CSS 代码, 处理 CSS 中的依赖
                ],
            },
        ]
    }
    plugins: [
        // 用 MiniCssExtractPlugin 抽离出 css 文件,以 link 标签的形式引入样式文件
        new MiniCssExtractPlugin({
            filename: 'index.bundle.css' // 输出的 css 文件名为 index.css
        }),
    ]
}
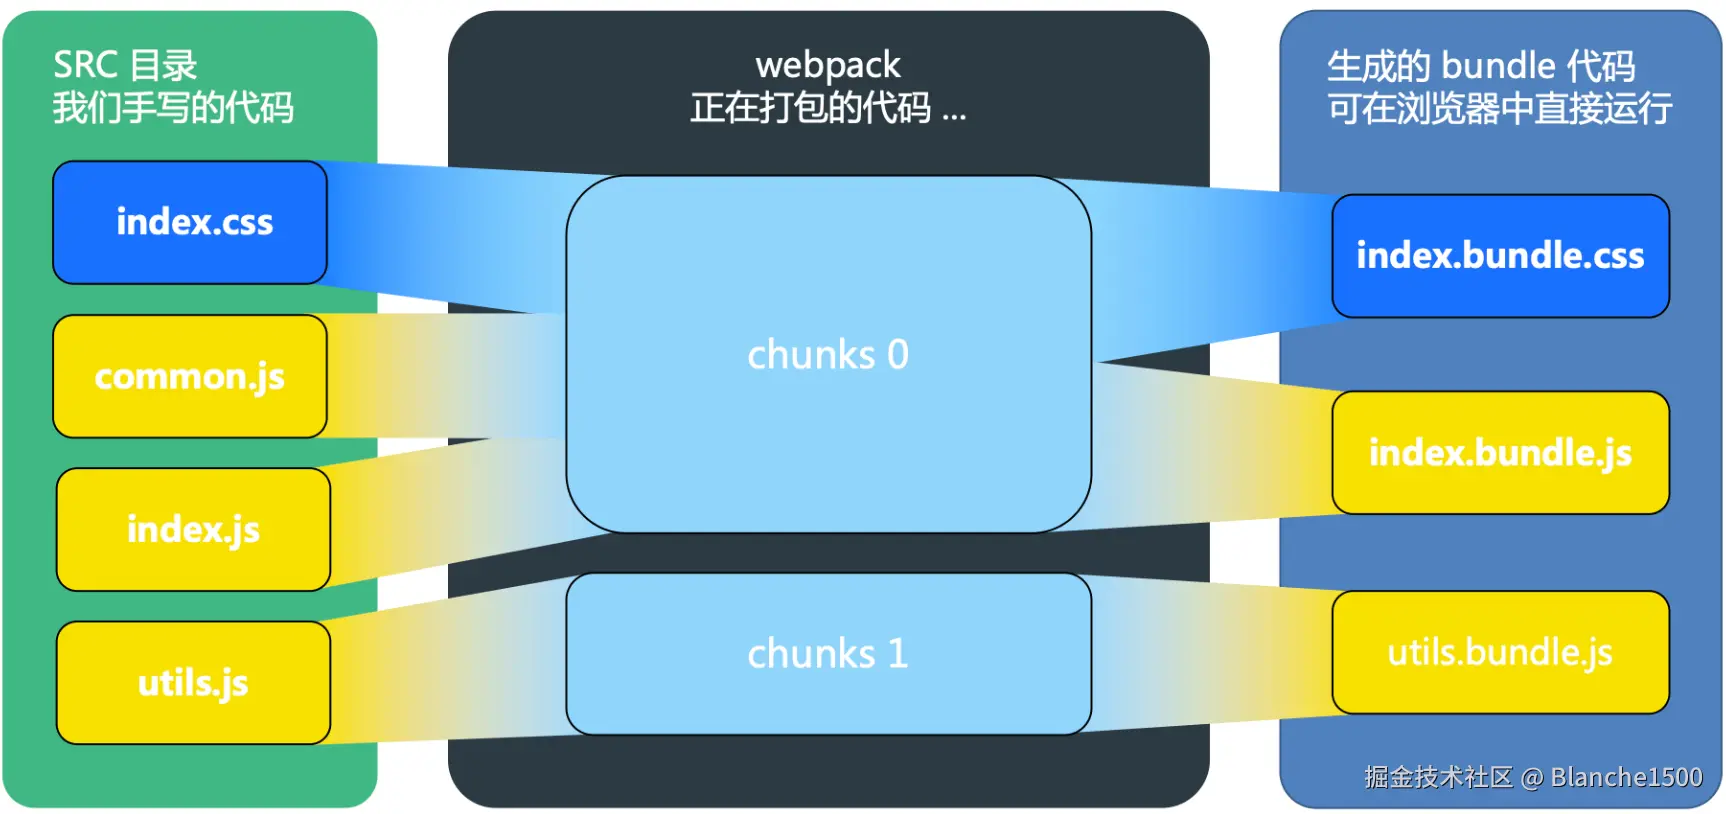
文件引用关系如下:
-
从图中可以看出,我们手写的一个个文件,他们都是 module;
-
当我们写的 module 源文件传到 webpack 进行打包时,webpack 会根据文件引用关系生成 chunk 文件,webpack 会对这个 chunk 文件进行一些操作;
-
webpack 处理好 chunk 文件后,最后会输出 bundle 文件,这个 bundle 文件包含了经过加载和编译的最终源文件,所以它可以直接在浏览器中运行。
一般来说一个 chunk 对应一个 bundle,比如上图中的 utils.js -> chunks 1 -> utils.bundle.js;但也有例外,比如说上图中,我就用 MiniCssExtractPlugin 从 chunks 0 中抽离出了 index.bundle.css 文件。
总结
module,chunk 和 bundle 其实就是同一份逻辑代码在不同转换场景下的取了三个名字:
我们直接写出来的是 module,webpack 处理时是 chunk,最后生成浏览器可以直接运行的 bundle。
compiler、compilation
JavaScript
// /lib/webpack.js
const webpack = (options, callback) => {
    // 创建 Compiler 类的实例
    const compiler = new Compiler(options.context);
      compiler.options = options;
      // 注册所有自定义插件
      if (Array.isArray(options.plugins)) {
          // 遍历传入的 webpack 配置中的实例化插件数组
          for (const plugin of options.plugins) {
              if (typeof plugin === "function") {
                  // 在compiler对象的作用域下调用plugin构造函数,即this指向compiler;同时把compiler对象当作参数传过去。并且compiler对象会继承plugin的所有属性、方法
                  plugin.call(compiler, compiler);
              } else {
                  // 如果 plugin 是其他类型,就执行plugin对象的apply方法。
                  // plugins 数组的内容一般都是一个个插件实例化对象,也就是 object。
                  plugin.apply(compiler);
              }
          }
      }
      applyWebpackOptionsDefaults(options);
      // 触发 compiler 的 两个 hook: environment,afterEnvironment
      compiler.hooks.environment.call();
      compiler.hooks.afterEnvironment.call();
      // 根据 options 的配置不同,注册激活一些默认自带的插件和 resolverFactory.hooks
      // 大部分插件的作用是往 compiler.hooks:compilation,thisCompilation 里注册一些事件
      new WebpackOptionsApply().process(options, compiler);
      compiler.hooks.initialize.call();
      // 获取是否以watch监听模式启动的 webpack 以及 监听相关配置
      let watch = options.watch || false;
      let watchOptions = options.watchOptions || {};
      if (callback) {
          // 如果传递了回调
          if (watch) {
              // 配置传了 watch 则调用监听模式启动 webpack
              compiler.watch(watchOptions, callback);
          } else {
              // 启动 compiler.run,即开启编译工作, webpack 的核心构建流程
              compiler.run((err, stats) => {
              // stats 对象是编译过程中的有用信息, 包括:
              //*   错误和警告(如果有的话)
              //*   计时信息
              //*   module 和 chunk 信息
              // webpack CLI 正是基于这些信息在控制台 展示友好的格式输出。
                  compiler.close(err2 => {
                      callback(err || err2, stats);
                  });
              });
          }
          return compiler;
      } else {
          if (watch) {
              util.deprecate(() => {}, "watch模式必须提供callback回调函数!", "DEP_WEBPACK_WATCH_WITHOUT_CALLBACK")();
          }
          return compiler;
      }
    }
}


module.exports = webpack;
Compiler 部分源码:
JavaScript
// /lib/Compiler.js
const {
    SyncHook,
    SyncBailHook,
    AsyncParallelHook,
    AsyncSeriesHook
} = require("tapable");
class Compiler {
    constructor(context) {
        // 定义一堆hook,done,beforeRun,run,emit等等
        this.hooks = Object.freeze({
            /** @type {SyncBailHook<[Compilation], boolean>} */
            run: new AsyncSeriesHook(["compiler"]), // 在开始读取records之前调用/** @type {SyncHook<[Compilation, CompilationParams]>} */
            thisCompilation: new SyncHook(["compilation", "params"]), // 初始化 compilation 时调用,在触发 compilation 事件之前调用/** @type {AsyncSeriesHook<[Compilation]>} */
            emit: new AsyncSeriesHook(["compilation"]), // 输出 asset 到 output 目录之前执行/** @type {AsyncSeriesHook<[Compilation]>} */
            afterEmit: new AsyncSeriesHook(["compilation"]), // 输出 asset 到 output 目录之后执行/** @type {AsyncSeriesHook<[Stats]>} */
            done: new AsyncSeriesHook(["stats"]), // 在 compilation 完成时执行
        })
    }
    watch(watchOptions, handler) {} // 以监听模式执行 webpack 打包的方法
    run(callback) {
        // run 即为执行 webpack 打包的主流程函数
        const onCompiled = (err, compilation) => {})
        const run = () => {
            this.hooks.beforeRun.callAsync(this, err => {
                this.hooks.run.callAsync(this, err => {
                    if (err) return finalCallback(err);
                    this.readRecords(err => {
                        // 读取之前的 records
                        if (err) return finalCallback(err);
                        this.compile(onCompiled);
                        //  在 compile 过程后调用 onCompiled,主要用于输出构建资源
                    });
                });
            });
      };
    }
    compile(callback) { // compile 是真正进行编译的方法,最终会把所有原始资源编译为目标资源。
        const params = this.newCompilationParams();
        this.hooks.beforeCompile.callAsync(params, err => {
            if (err) return callback(err);
            this.hooks.compile.call(params);// createCompilation方法主要就是清除之前的compilation,重新实例化一个Compilation
            const compilation = this.createCompilation();
            compilation.name = this.name;
            compilation.records = this.records;
            // 触发compiler.hooks:thisCompilation 和 compilation
            // thisCompilation在创建新的 Compilation 对象时,该钩子将被调用。
            // compilation在编译时,每当 Webpack 生成一个新的 Compilation 对象时,该钩子将被调用。
            // 注册plugins阶段在这两个钩子注册的事件在拿到compilation对象后开始执行
            this.hooks.thisCompilation.call(compilation, params);
            this.hooks.compilation.call(compilation, params);
            return compilation;
        }
    }
}-
Compiler类(./lib/Compiler.js):webpack的主要引擎,扩展自Tapable。webpack 从执行到结束,Compiler只会实例化一次。生成的 compiler 对象记录了 webpack 当前运行环境的完整的信息,该对象是全局唯一的,插件可以通过它获取到 webpack config 信息,如entry、output、loaders等配置。
-
Compilation类(./lib/Compilation.js):扩展自Tapable,也提供了很多关键点回调供插件做自定义处理时选择使用拓展。一个 compilation 对象代表了一次单一的版本构建和生成资源,它储存了当前的模块资源、编译生成的资源、变化的文件、以及被跟踪依赖的状态信息。简单来说,Compilation的职责就是对所有 require 图(graph)中对象的字面上的编译,构建 module 和 chunk,并利用插件优化构建过程,同时把本次打包编译的内容全存到内存里。compilation 编译可以多次执行,如在watch模式下启动 webpack,每次监测到源文件发生变化,都会重新实例化一个compilation对象,从而生成一组新的编译资源。这个对象可以访问所有的模块和它们的依赖(大部分是循环依赖)。
总结
compiler 对象代表的是构建过程中不变的 webpack 环境,整个 webpack 从启动到关闭的生命周期。针对的是webpack。 compilation 对象只代表一次新的编译,只要项目文件有改动,compilation 就会被重新创建。针对的是随时可变的项目文件。
构建生命周期
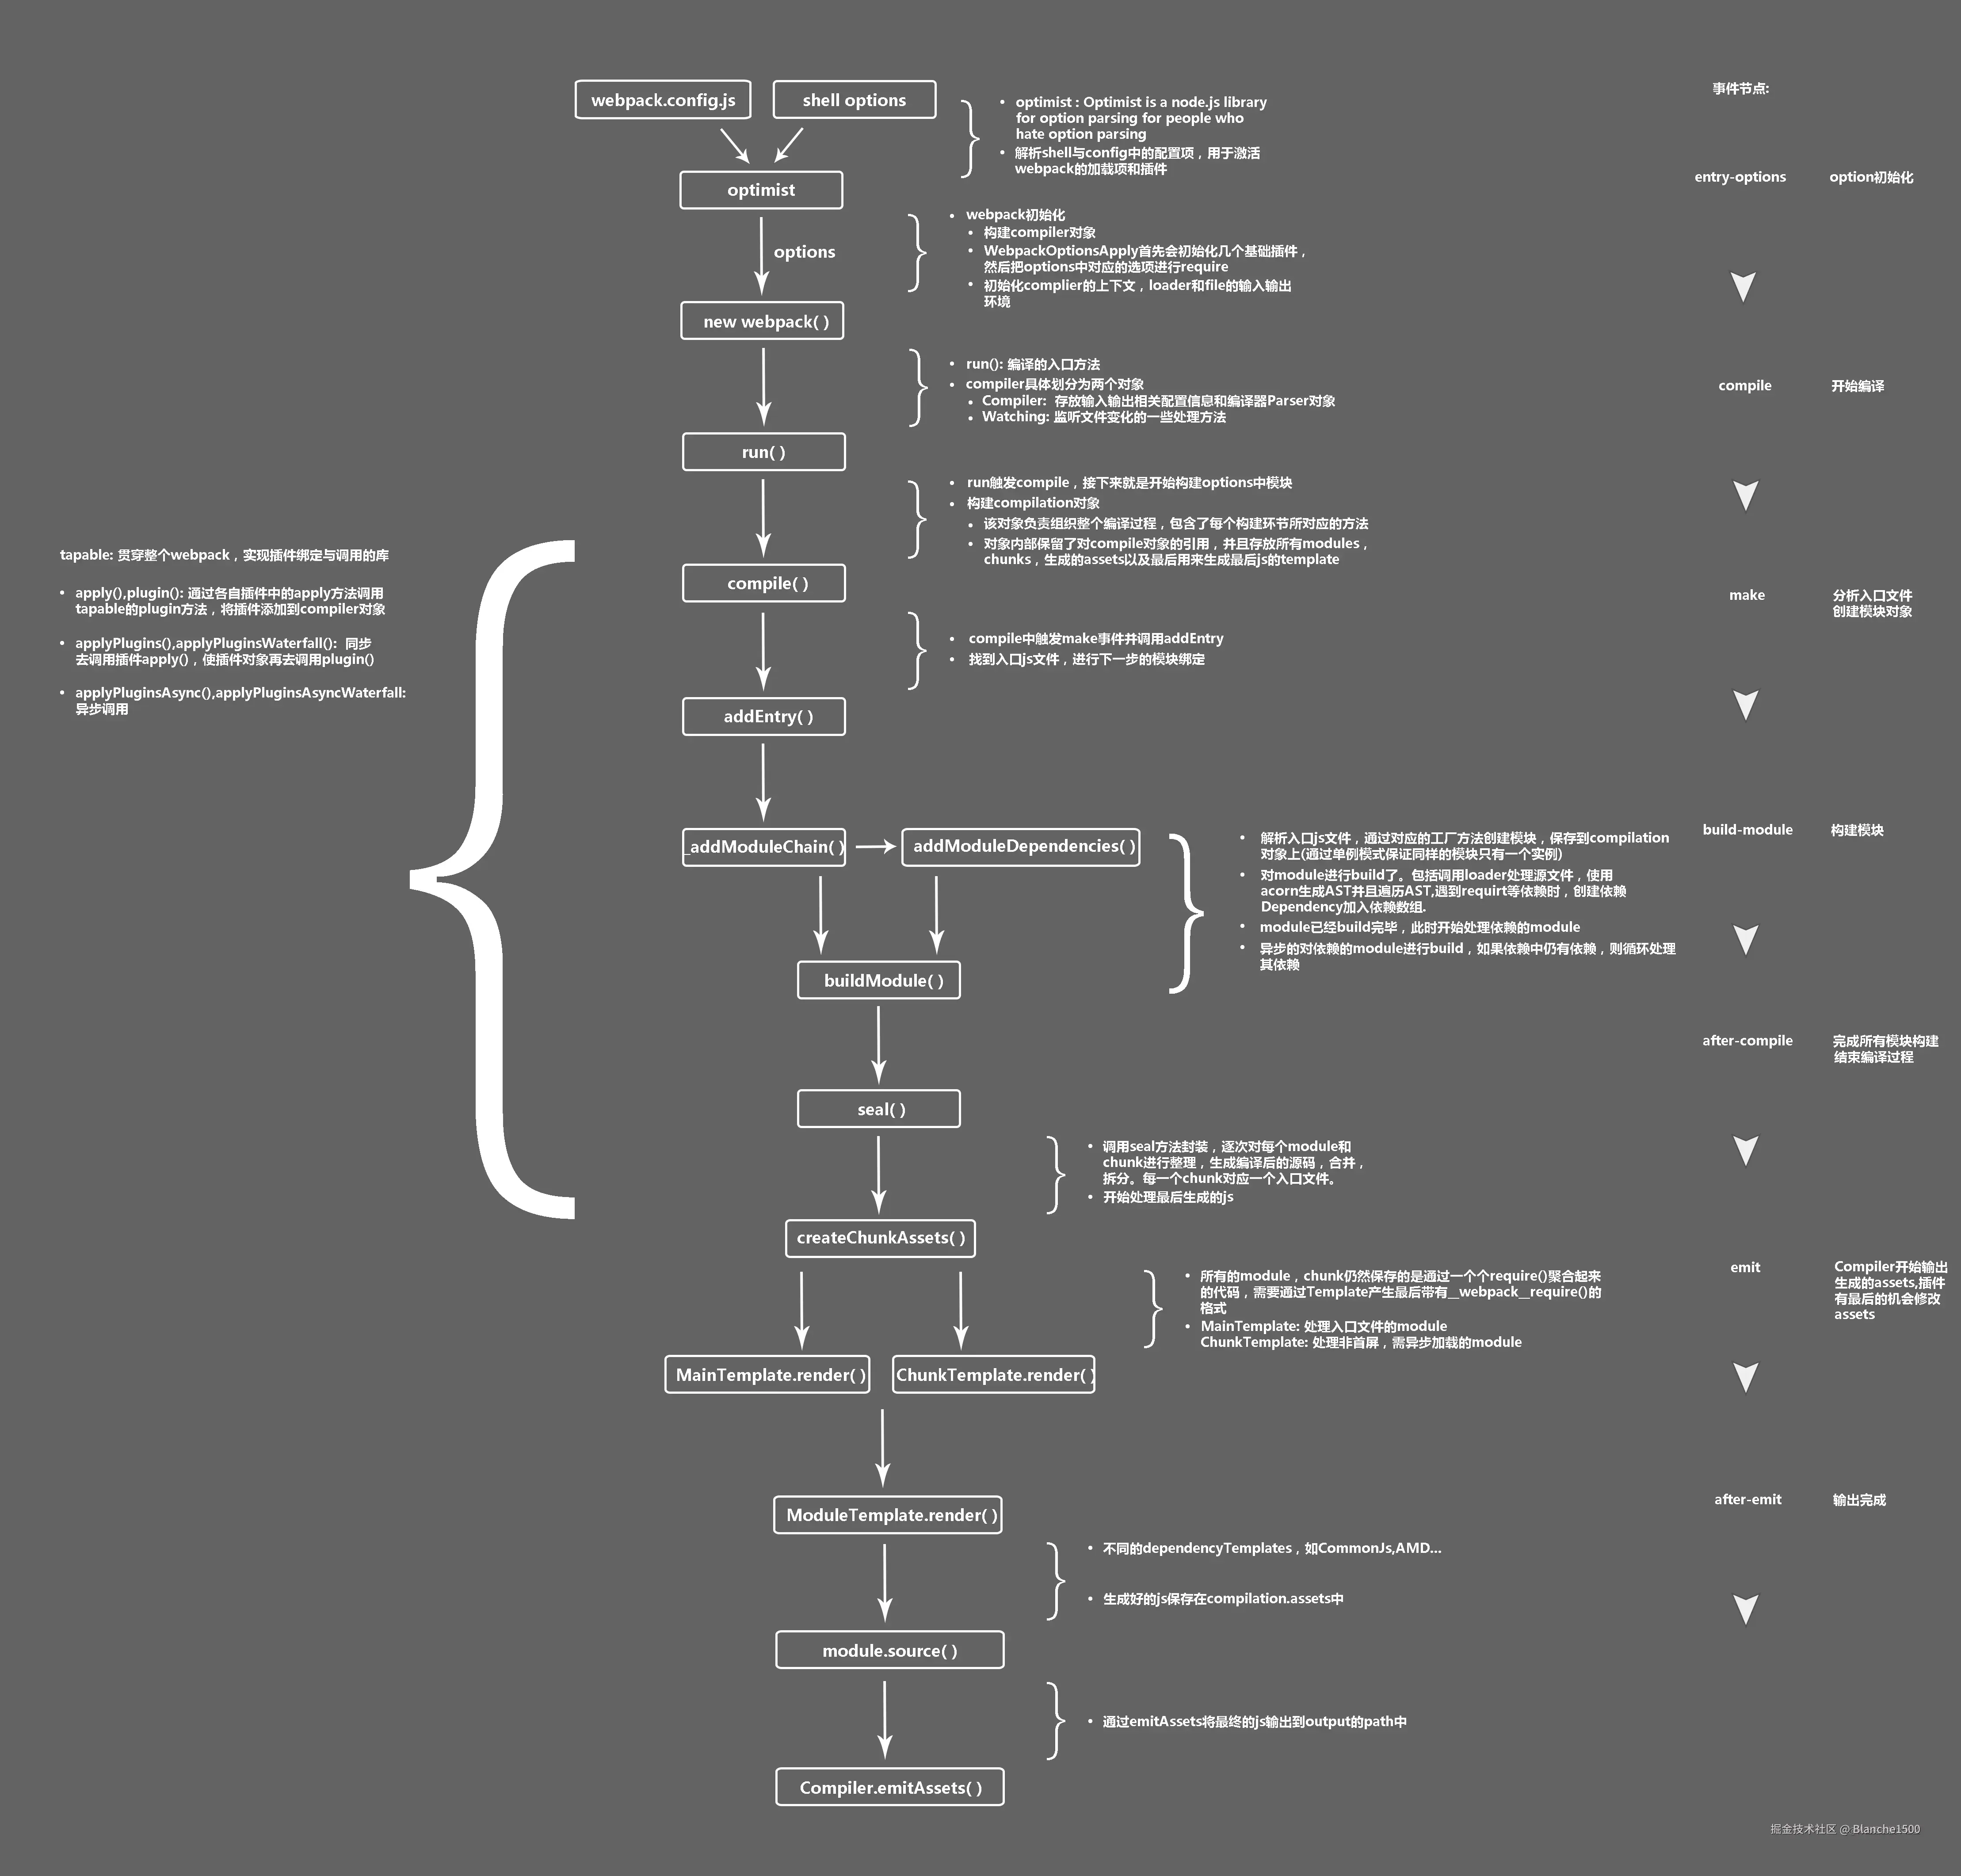
Webpack 的基本流程可以分为三个阶段:
-
准备阶段:主要是创建
compiler和Compilation对象 -
编译阶段:这个阶段主要是完成
modules解析,并且生成相应的chunks -
产出阶段:这个阶段的主要任务是根据
chunks生成最终文件,主要有三个步骤:模板 Hash 更新,模板渲染 chunk,生成文件。
准备阶段
首先 webapck 会初始化参数,从配置文件和命令行中读取并合并参数,得到 webpack 最终的配置参数。(shell 中的参数的优先级高于配置文件)。
接着根据上面得到的配置参数,实例化一个 compiler 类,并且注册所有的插件,给对应的 webpack 构建生命周期绑上相应的 hook。
JavaScript
// webpack 4.41.5
// lib/webpack.js

options = new WebpackOptionsDefaulter().process(options);

compiler = new Compiler(options.context);
compiler.options = options;

// 绑定 NodeEnvironmentPlugin
new NodeEnvironmentPlugin({
  infrastructureLogging: options.infrastructureLogging
}).apply(compiler);

// 绑定配置文件中的 plugins
if (options.plugins && Array.isArray(options.plugins)) {
  for (const plugin of options.plugins) {
    if (typeof plugin === "function") {
      plugin.call(compiler, compiler);
    } else {
      plugin.apply(compiler);
    }
  }
}
// 触发 compiler 环境 的 hook
compiler.hooks.environment.call();
compiler.hooks.afterEnvironment.call();
// 注册 webpack 内置插件
compiler.options = new WebpackOptionsApply().process(options, compiler);
其中上面 WebpackOptionsApply 用于将所有的配置 options 参数转换成 webpack 内置插件。
在 WebpackOptionsApply 跟构建流程相关性比较大的是 EntryOptionPlugin:
JavaScript
// webpack 4.41.5
// lib/WebpackOptionsApply.js

const EntryOptionPlugin = require("./EntryOptionPlugin");

new EntryOptionPlugin().apply(compiler);
compiler.hooks.entryOption.call(options.context, options.entry);
它会解析传递 Webpack 的配置中的 entry。这里不同类型的 entry包括:SingleEntryPlugin、 MultiEntryPlugin、DynamicEntryPlugin 三类,分别对应着单文件入口、多文件入口和动态文件入口(函数):
JavaScript
// webpack 4.41.5
// lib/EntryOptionPlugin.js
const itemToPlugin = (context, item, name) => {
        if (Array.isArray(item)) {
                return new MultiEntryPlugin(context, item, name);
        }
        return new SingleEntryPlugin(context, item, name);
};

module.exports = class EntryOptionPlugin {
        /**
         * @param {Compiler} compiler the compiler instance one is tapping into
         * @returns {void}
         */
        apply(compiler) {
                compiler.hooks.entryOption.tap("EntryOptionPlugin", (context, entry) => {
                        if (typeof entry === "string" || Array.isArray(entry)) {
                                itemToPlugin(context, entry, "main").apply(compiler);
                        } else if (typeof entry === "object") {
                                for (const name of Object.keys(entry)) {
                                        itemToPlugin(context, entry[name], name).apply(compiler);
                                }
                        } else if (typeof entry === "function") {
                                new DynamicEntryPlugin(context, entry).apply(compiler);
                        }
                        return true;
                });
        }
};
除了 EntryOptionPlugin,其他的内置插件也会有特定的钩子在特定的任务点来完成特定的逻辑,当 Compiler 实例加载完内置插件之后,下一步就会直接调用 compiler.run 方法来启动构建。
JavaScript
// webpack 4.41.5
// lib/Compiler.js

run(callback) {
  const onCompiled = (err, compilation) => {
    if (this.hooks.shouldEmit.call(compilation) === false) {
      // ...
    }

    this.emitAssets(compilation, err => {
      //...
    });
  };

  // 执行 beforeRun 钩子
  this.hooks.beforeRun.callAsync(this, err => {
    // 执行 run 这个 钩子
    this.hooks.run.callAsync(this, err => {
      if (err) return finalCallback(err);

      this.readRecords(err => {
        // 开始打包编译
        this.compile(onCompiled);
      });
    });
  });
}

// ...
compile(callback) {
  // Compilation类的参数
  const params = this.newCompilationParams();
  // 1. 执行beforeCompile 钩子回调
  this.hooks.beforeCompile.callAsync(params, err => {
    if (err) return callback(err);
    // 2. 执行 Compiler.compile 钩子回调
    this.hooks.compile.call(params);
    // 3. 实例化 Compilation
    const compilation = this.newCompilation(params);

    // 4. 执行 Compiler.make 钩子回调
    // make内实际主要是执行的compilation的addEntry方法(**注意这里**)
    this.hooks.make.callAsync(compilation, err => {
      if (err) return callback(err);

      compilation.finish(err => {
        if (err) return callback(err);

        // seal方法整理构建之后的chunk产出
        // 这里会做一些优化相关的事情,比如压缩代码等
        compilation.seal(err => {
          if (err) return callback(err);

          this.hooks.afterCompile.callAsync(compilation, err => {
            if (err) return callback(err);
            return callback(null, compilation);
          });
        });
      });
    });
  });
}
compilation 是后续构建流程中最核心最重要的对象,它包含了一次构建过程中所有的数据,一次构建过程对应一个 Compilation 实例。当 Compilation 实例创建完成之后,Webpack 的准备阶段已经完成,下一步将开始编译阶段。
编译阶段
从 Compiler 的 make 钩子触发开始,此时内置插件 SingleEntryPlugin、MultiEntryPlugin、DynamicEntryPlugin (根据不同类型 entry)的监听器会开始执行。监听器都会调用 Compilation 实例的 compilation.addEntry() 方法,该方法将会触发第一批 module 的解析,这些 module 就是 entry 中配置的模块。
拿 SingleEntryPlugin.js 举例,我们可以看到 make 钩子上注册的方法:compilation.addEntry,
JavaScript
// webpack 4.41.5
// lib/SingleEntryPlugin.js
apply(compiler) {
        // ...

  compiler.hooks.make.tapAsync(
    "SingleEntryPlugin",
    (compilation, callback) => {
      const { entry, name, context } = this;

      const dep = SingleEntryPlugin.createDependency(entry, name);
      compilation.addEntry(context, dep, name, callback);
    }
  );
}
compilation.addEntry 方法如下:
JavaScript
// webpack 4.41.5
// lib/Compilation.js
addEntry(context, entry, name, callback) {
  // ...
  // 执行内部 _addModuleChain 方法
  this._addModuleChain(
    context,
    entry,
    module => {
      this.entries.push(module);
    },
    (err, module) => {
      // ...
    }
  );
}
一个 module 解析完成之后的操作,webpack 会递归调用它所依赖的 modules 进行解析,所以当解析停止时,我们就能得到项目中所依赖的 modules,他们会存储在 Compilation 实例的 modules 属性中,并触发了 Compilation 的 finishModules 的钩子。
module 对象有 NormalModule、ContextModule、ExternalModule、DelegatedModule、MultiModule、DllModule 等多种类型(分别在对应的 lib/*Module.js 中实现)。
NormalModule:普通模块
ContextModule:./src/a、./src/b
ExternalModule:module.exports =jQuery
DelegatedModule:比如manifest文件
MultiModule:entry: ['a', 'b']
我们以 NormalModule 为例讲解下 module 的解析流程:
NormalModule 的实例化是借助于 NormalModuleFactory.create() 方法,在 _addModuleChain 会有相应的区分,NormalModuleFactory 我们之前也讲过来自于创建 compilation 时传入的参数。
在 NormalModule 执行之前会调用 resolver 来获取一个 modules 的属性,比如解析这个 module 需要用到的 loaders,资源路径 resource 等等:
JavaScript
// webpack 4.41.5
// lib/Compilation.js
buildModule(module, optional, origin, dependencies, thisCallback) {
  // ...
  this.hooks.buildModule.call(module);
  module.build(
    this.options,
    this,
    // 获取一个 modules 的属性
    this.resolverFactory.get("normal", module.resolveOptions),
    this.inputFileSystem,
    error => {
      // ...
      if (error) {
        // build 失败钩子
        this.hooks.failedModule.call(module, error);
        return callback(error);
      }
      // build 成功钩子
      this.hooks.succeedModule.call(module);
      return callback();
    }
  );
}
在创建完 NormalModule 实例之后会调用 NormalModule.build() 方法继续进行内部的构建,NormalModule.build() 会调用 NormalModule.doBuild(),在 doBuild 中执行 loader 并生成 AST 语法树。
JavaScript
// webpack 4.41.5
// lib/NormalModule.js
doBuild(options, compilation, resolver, fs, callback) {
  const loaderContext = this.createLoaderContext(
    resolver,
    options,
    compilation,
    fs
  );

  runLoaders(
    {
      resource: this.resource,
      loaders: this.loaders,
      context: loaderContext,
      readResource: fs.readFile.bind(fs)
    },
    (err, result) => {
      // ...
      if (err) {
        // ...
        return callback(error);
      }

      const resourceBuffer = result.resourceBuffer;
      const source = result.result[0];
      const sourceMap = result.result.length >= 1 ? result.result[1] : null;
      const extraInfo = result.result.length >= 2 ? result.result[2] : null;
                        // ...
      // 这里是处理后的源码
      this._source = this.createSource(
        this.binary ? asBuffer(source) : asString(source),
        resourceBuffer,
        sourceMap
      );
      this._sourceSize = null;

      // 这里是ast
      this._ast =
        typeof extraInfo === "object" &&
        extraInfo !== null &&
        extraInfo.webpackAST !== undefined
        ? extraInfo.webpackAST
                      : null;
      return callback();
    }
  );
}
当一个模块编译成功之后,会根据其 AST 查找依赖,递归整个构建流程,直到整个所有依赖都被处理完毕。得到 所有的 modules 之后,Webpack 会开始生成对应的 chunk。
查找依赖的过程是在 doBuild 的 callback 函数中使用 lib/Parser.js 这个函数来查找 AST 中的依赖,他是基于 acorn 这个工具来进行依赖分析的。
JavaScript
// webpack 4.41.5
// lib/NormalModule.js
build(options, compilation, resolver, fs, callback) {
  // ...
  return this.doBuild(options, compilation, resolver, fs, err => {
    this._cachedSources.clear();

    // if we have an error mark module as failed and exit
    if (err) {
      this.markModuleAsErrored(err);
      this._initBuildHash(compilation);
      return callback();
    }

    // ...
    // 遍历 AST 或者 源码 查找相关依赖
    try {
      const result = this.parser.parse(
        this._ast || this._source.source(),
        {
          current: this,
          module: this,
          compilation: compilation,
          options: options
        },
        (err, result) => {
          if (err) {
            handleParseError(err);
          } else {
            handleParseResult(result);
          }
        }
      );
      if (result !== undefined) {
        // parse is sync
        handleParseResult(result);
      }
    } catch (e) {
      handleParseError(e);
    }
  });
}
chunk 的生成算法如下:
-
Webpack 先将 entry 中对应的 module 都生成一个新的 chunk;
-
遍历 module 的依赖列表,将依赖的 module 也加入到 chunk 中;
-
如果一个依赖 module 是动态引入(import()、require.ensure())的模块,那么就会根据这个module创建一个新的 chunk,继续遍历依赖;
-
重复上面的过程,直至得到所有的 chunks。
得到所有的 chunks 之后,webpack 会进入 Compilation.seal() 阶段,在这个阶段会对 chunks 和 modules 进行一些优化相关的操作,比如分配 id,排序,创建 hash 等,这个时候就会触发 webpack.optimize 配置中的用到的插件。
更多的 seal 阶段的操作,大家可以到 lib/Compilation.js 中去查看。
到这里,编译阶段结束了,到了产出阶段。
产出阶段
在产出阶段,webpack 会根据 chunks 生成最终文件。主要有三个步骤:模板 hash 更新,模板渲染 chunk,生成 bunlde 文件。
Compilation 在实例化的时候,就会同时实例化三个对象:mainTemplate,chunkTemplate ,moduleTemplate , 这三个对象是用来渲染 chunk 对象,得到最终代码的模板。
-
mainTemplate:对应了在 entry 配置的入口 chunk 的渲染模板; -
chunkTemplate:动态引入的非入口 chunk 的渲染模板; -
moduleTemplate:chunk 中的 module 的渲染模板。
在开始渲染之前, Compilation 实例会调用 Compilation.createHash() 方法来生成这次构建的 Hash,在 Webpack 的配置中,我们可以在 output.filename 中配置 [hash] 占位符,最终就会替换成这个 Hash。同样,
Compilation.createHash() 也会为每一个 chunk 也创建一个 Hash,对应 [chunkhash] 占位符。
JavaScript
// webpack 4.41.5
// lib/Compilation.js
seal(callback) {
  this.hooks.seal.call();
  // ...

  this.hooks.beforeHash.call();
  this.createHash();
  this.hooks.afterHash.call();

  // ...
}
当 hash 创建完成之后,下一步就会遍历 Compilation 对象的 chunks 属性,来渲染每一个 chunk。如果一个chunk 是入口 (entry) chunk,那么就会调用 MainTemplate 实例的 render 方法,否则调用 ChunkTemplate 的 render 方法:
JavaScript
// webpack 4.41.5
// lib/Compilation.js
createHash() {
  // ...
  for (let i = 0; i < chunks.length; i++) {
    const chunk = chunks[i];
    const chunkHash = createHash(hashFunction);
    try {
      if (outputOptions.hashSalt) {
        chunkHash.update(outputOptions.hashSalt);
      }
      chunk.updateHash(chunkHash);
      // 根据类型选择模板
      const template = chunk.hasRuntime()
      ? this.mainTemplate
      : this.chunkTemplate;
      template.updateHashForChunk(
        chunkHash,
        chunk,
        this.moduleTemplates.javascript,
        this.dependencyTemplates
      );
      this.hooks.chunkHash.call(chunk, chunkHash);
      chunk.hash = /** @type {string} */ (chunkHash.digest(hashDigest));
      hash.update(chunk.hash);
      chunk.renderedHash = chunk.hash.substr(0, hashDigestLength);
      this.hooks.contentHash.call(chunk);
    } catch (err) {
      this.errors.push(new ChunkRenderError(chunk, "", err));
    }
  }
  // ...
}
当每个 chunk 的源码生成后,就会通过 Compilation.emitAsset 这个方法,添加到 Compilation 的 assets 属性中去
JavaScript
// webpack 4.41.5
// lib/Compilation.js
emitAsset(file, source, assetInfo = {}) {
  if (this.assets[file]) {
    if (!isSourceEqual(this.assets[file], source)) {
      // TODO webpack 5: make this an error instead
      this.warnings.push(
        new WebpackError(
          `Conflict: Multiple assets emit different content to the same filename ${file}`
        )
      );
      this.assets[file] = source;
      this.assetsInfo.set(file, assetInfo);
      return;
    }
    const oldInfo = this.assetsInfo.get(file);
    this.assetsInfo.set(file, Object.assign({}, oldInfo, assetInfo));
    return;
  }
  this.assets[file] = source;
  this.assetsInfo.set(file, assetInfo);
}
当所有的 chunk 都渲染完成之后, assets 就是最终更要生成的文件列表。
完成上面的操作之后,Compilation 的 seal 方法结束,进入到 compiler 的 emitAssets 方法,Compilation 工作到此也全部结束了,这也意味着一次构建过程已经结束,接下来 Webpack 会直接遍历 compilation.assets 生成所有文件,然后触发任务点 done,结束构建流程。
总结
可以简单的总结为,webpack的编译按照钩子调用顺序执行的流程: 初始化EntryOptions,进入Compiler.run开始编译,hooks.make会调用Compilation的addEntry钩子,从entry开始递归的 分析依赖,对每个依赖模块进行build,对模块位置进行解析beforeResolve,然后开始构建模块buildModule,通过normalModuleLoader 将loader加载完成的module进行编译,生成AST抽象语法树,接着遍历AST,对require等一些调用进行依赖收集,最后将所有依赖构建 完成后,执行seal和优化,并回到Compiler.emit执行磁盘输出,完成编译流程。