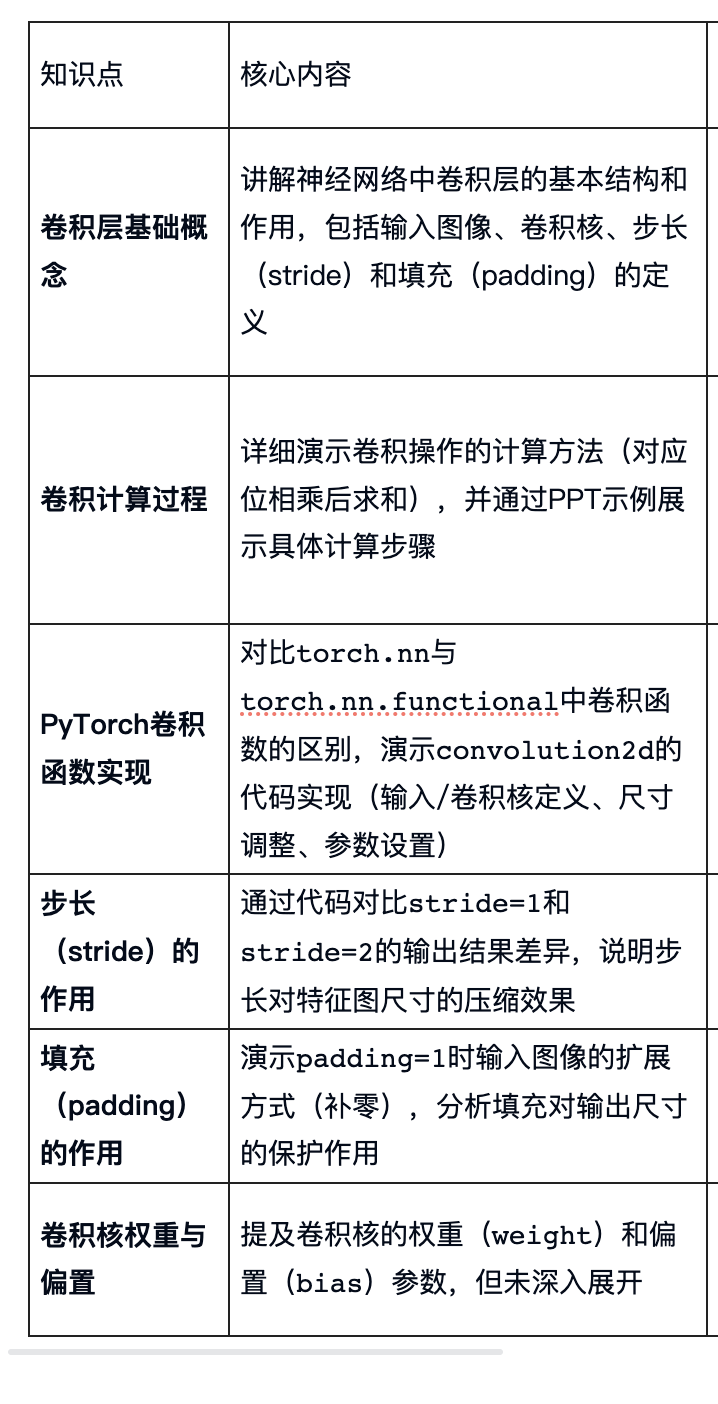
神经网络模块-卷积层:
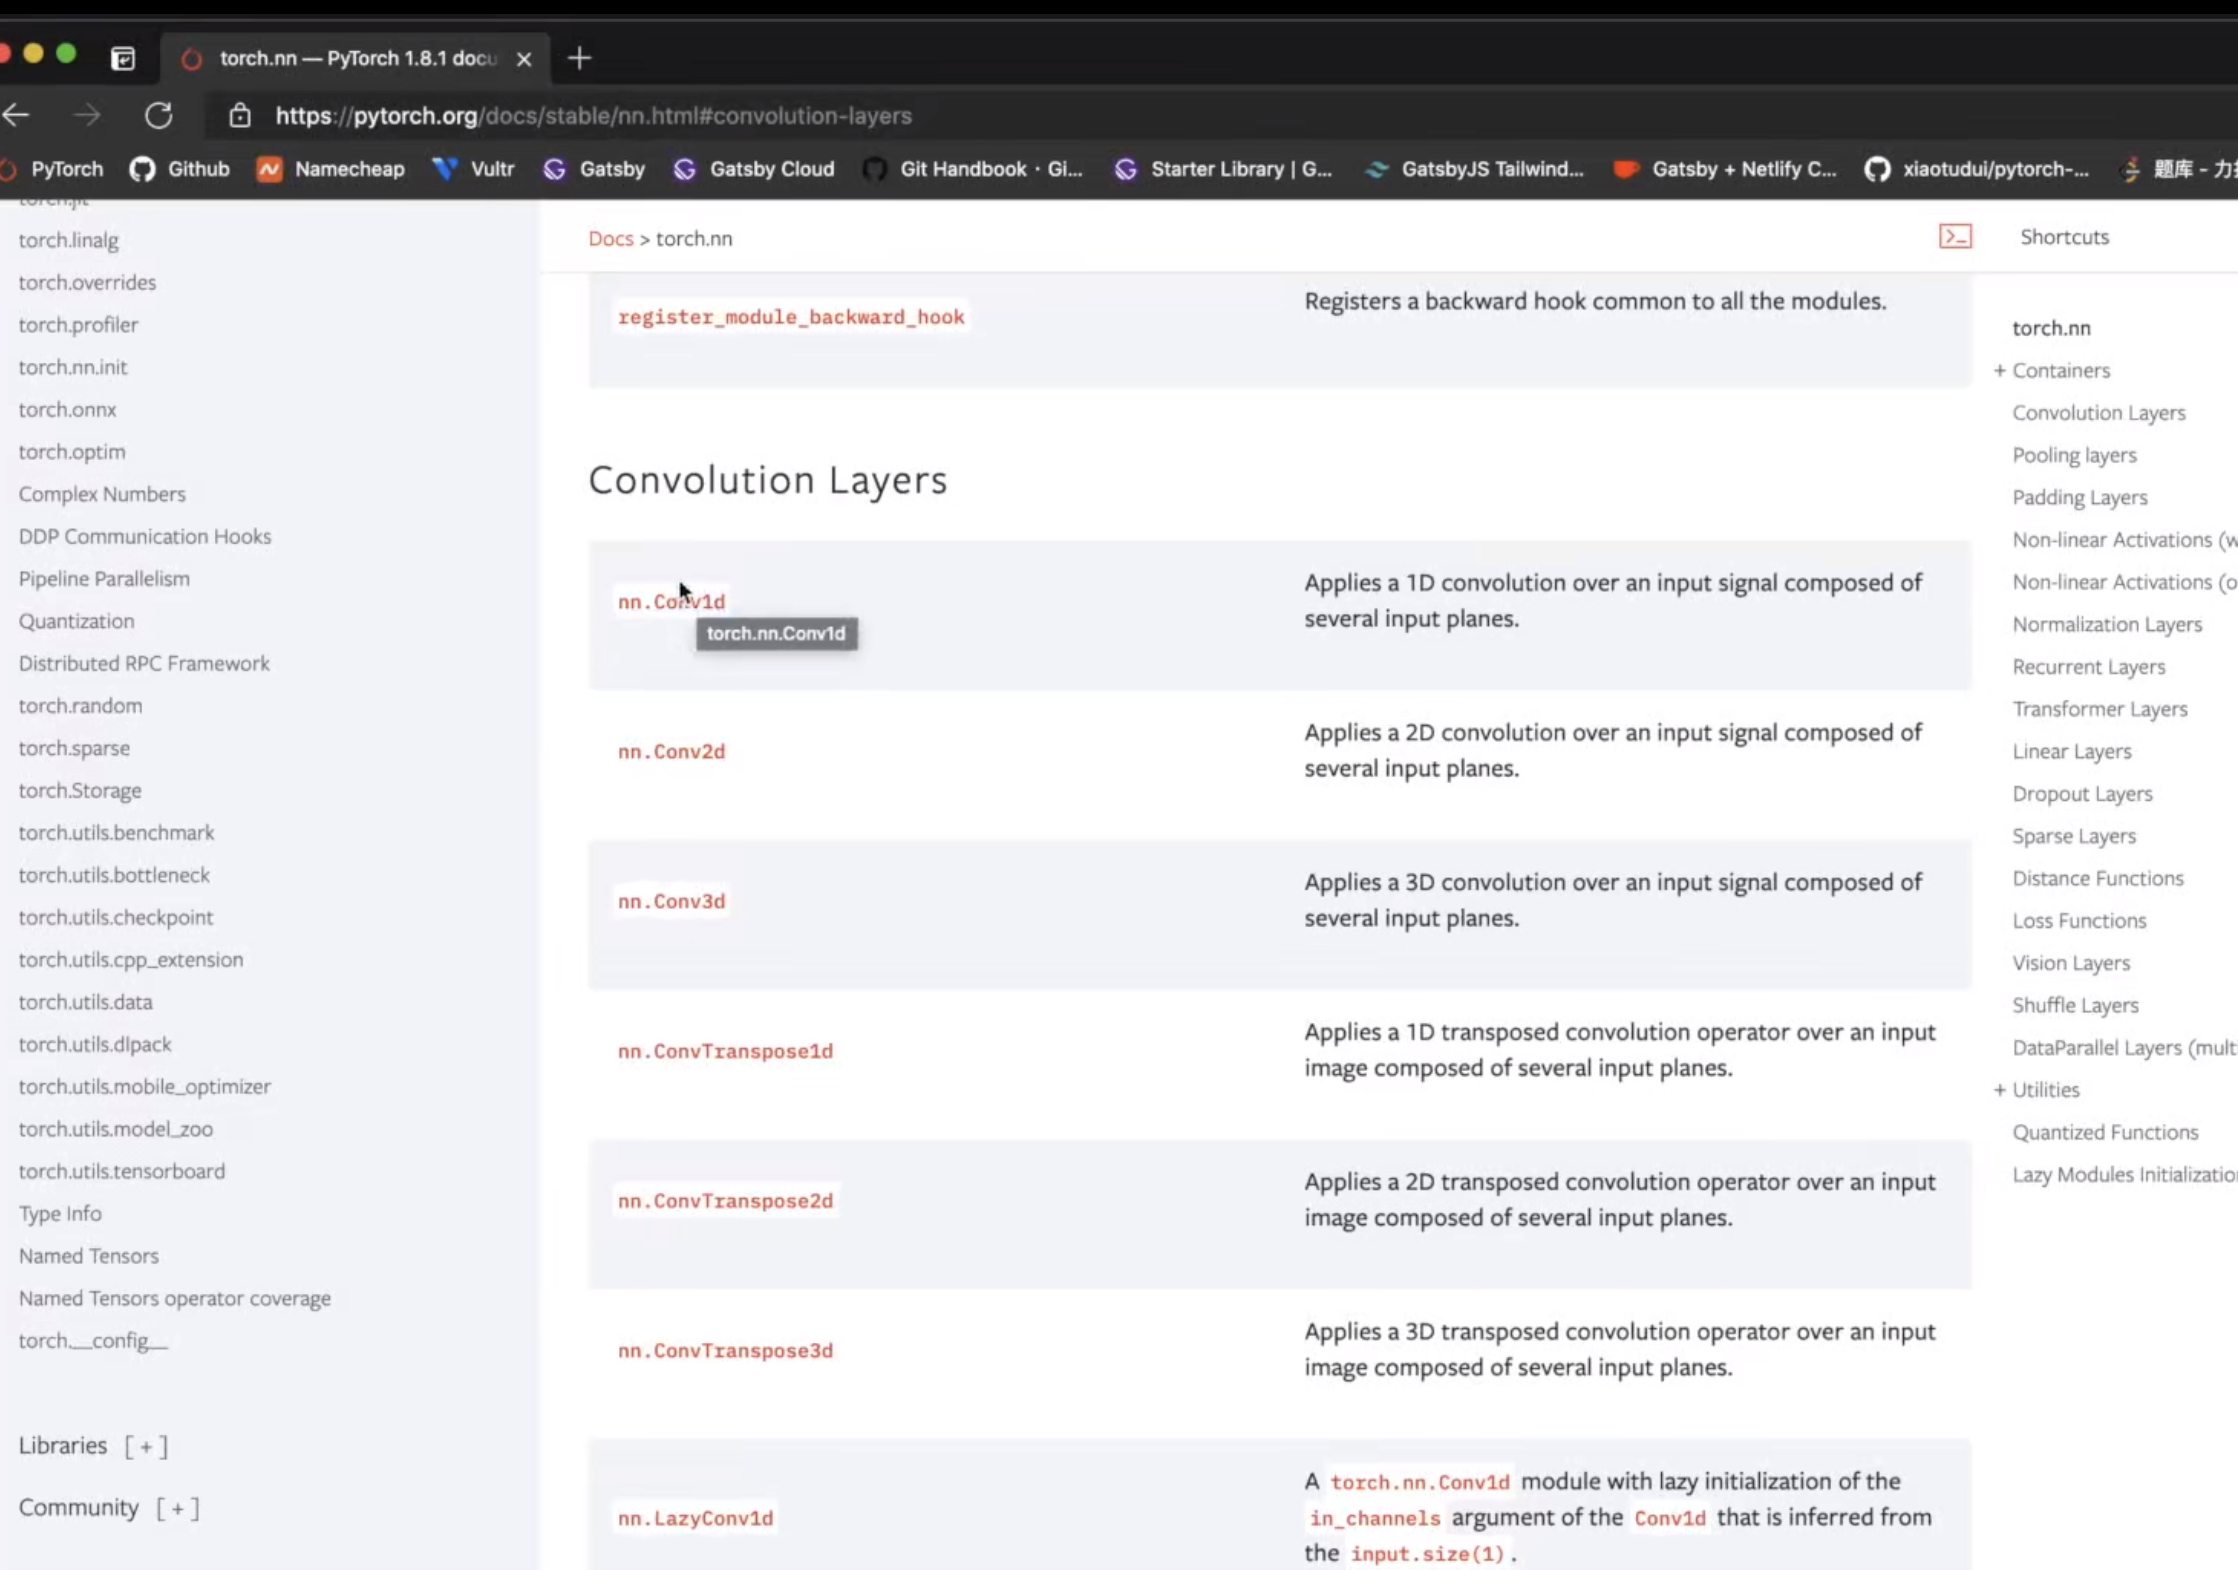
卷积层分类:
Conv1d: 一维卷积,处理信号数据
Conv2d: 二维卷积,处理图像数据(最常用)
Conv3d: 三维卷积,处理视频等体数据
torch.nn vs torch.nn.functional
模块封装:torch.nn是对底层卷积操作的高级封装,提供更友好的API接口
与functional关系:类似于方向盘与齿轮的关系,nn模块封装了functional的底层实现细节
学习建议:日常使用只需掌握torch.nn即可,functional层主要用于底层研究
如下,torch.nn和torch.nn.functional是一一对应的关系。

torch.nn.functional.Conv2d二维卷积
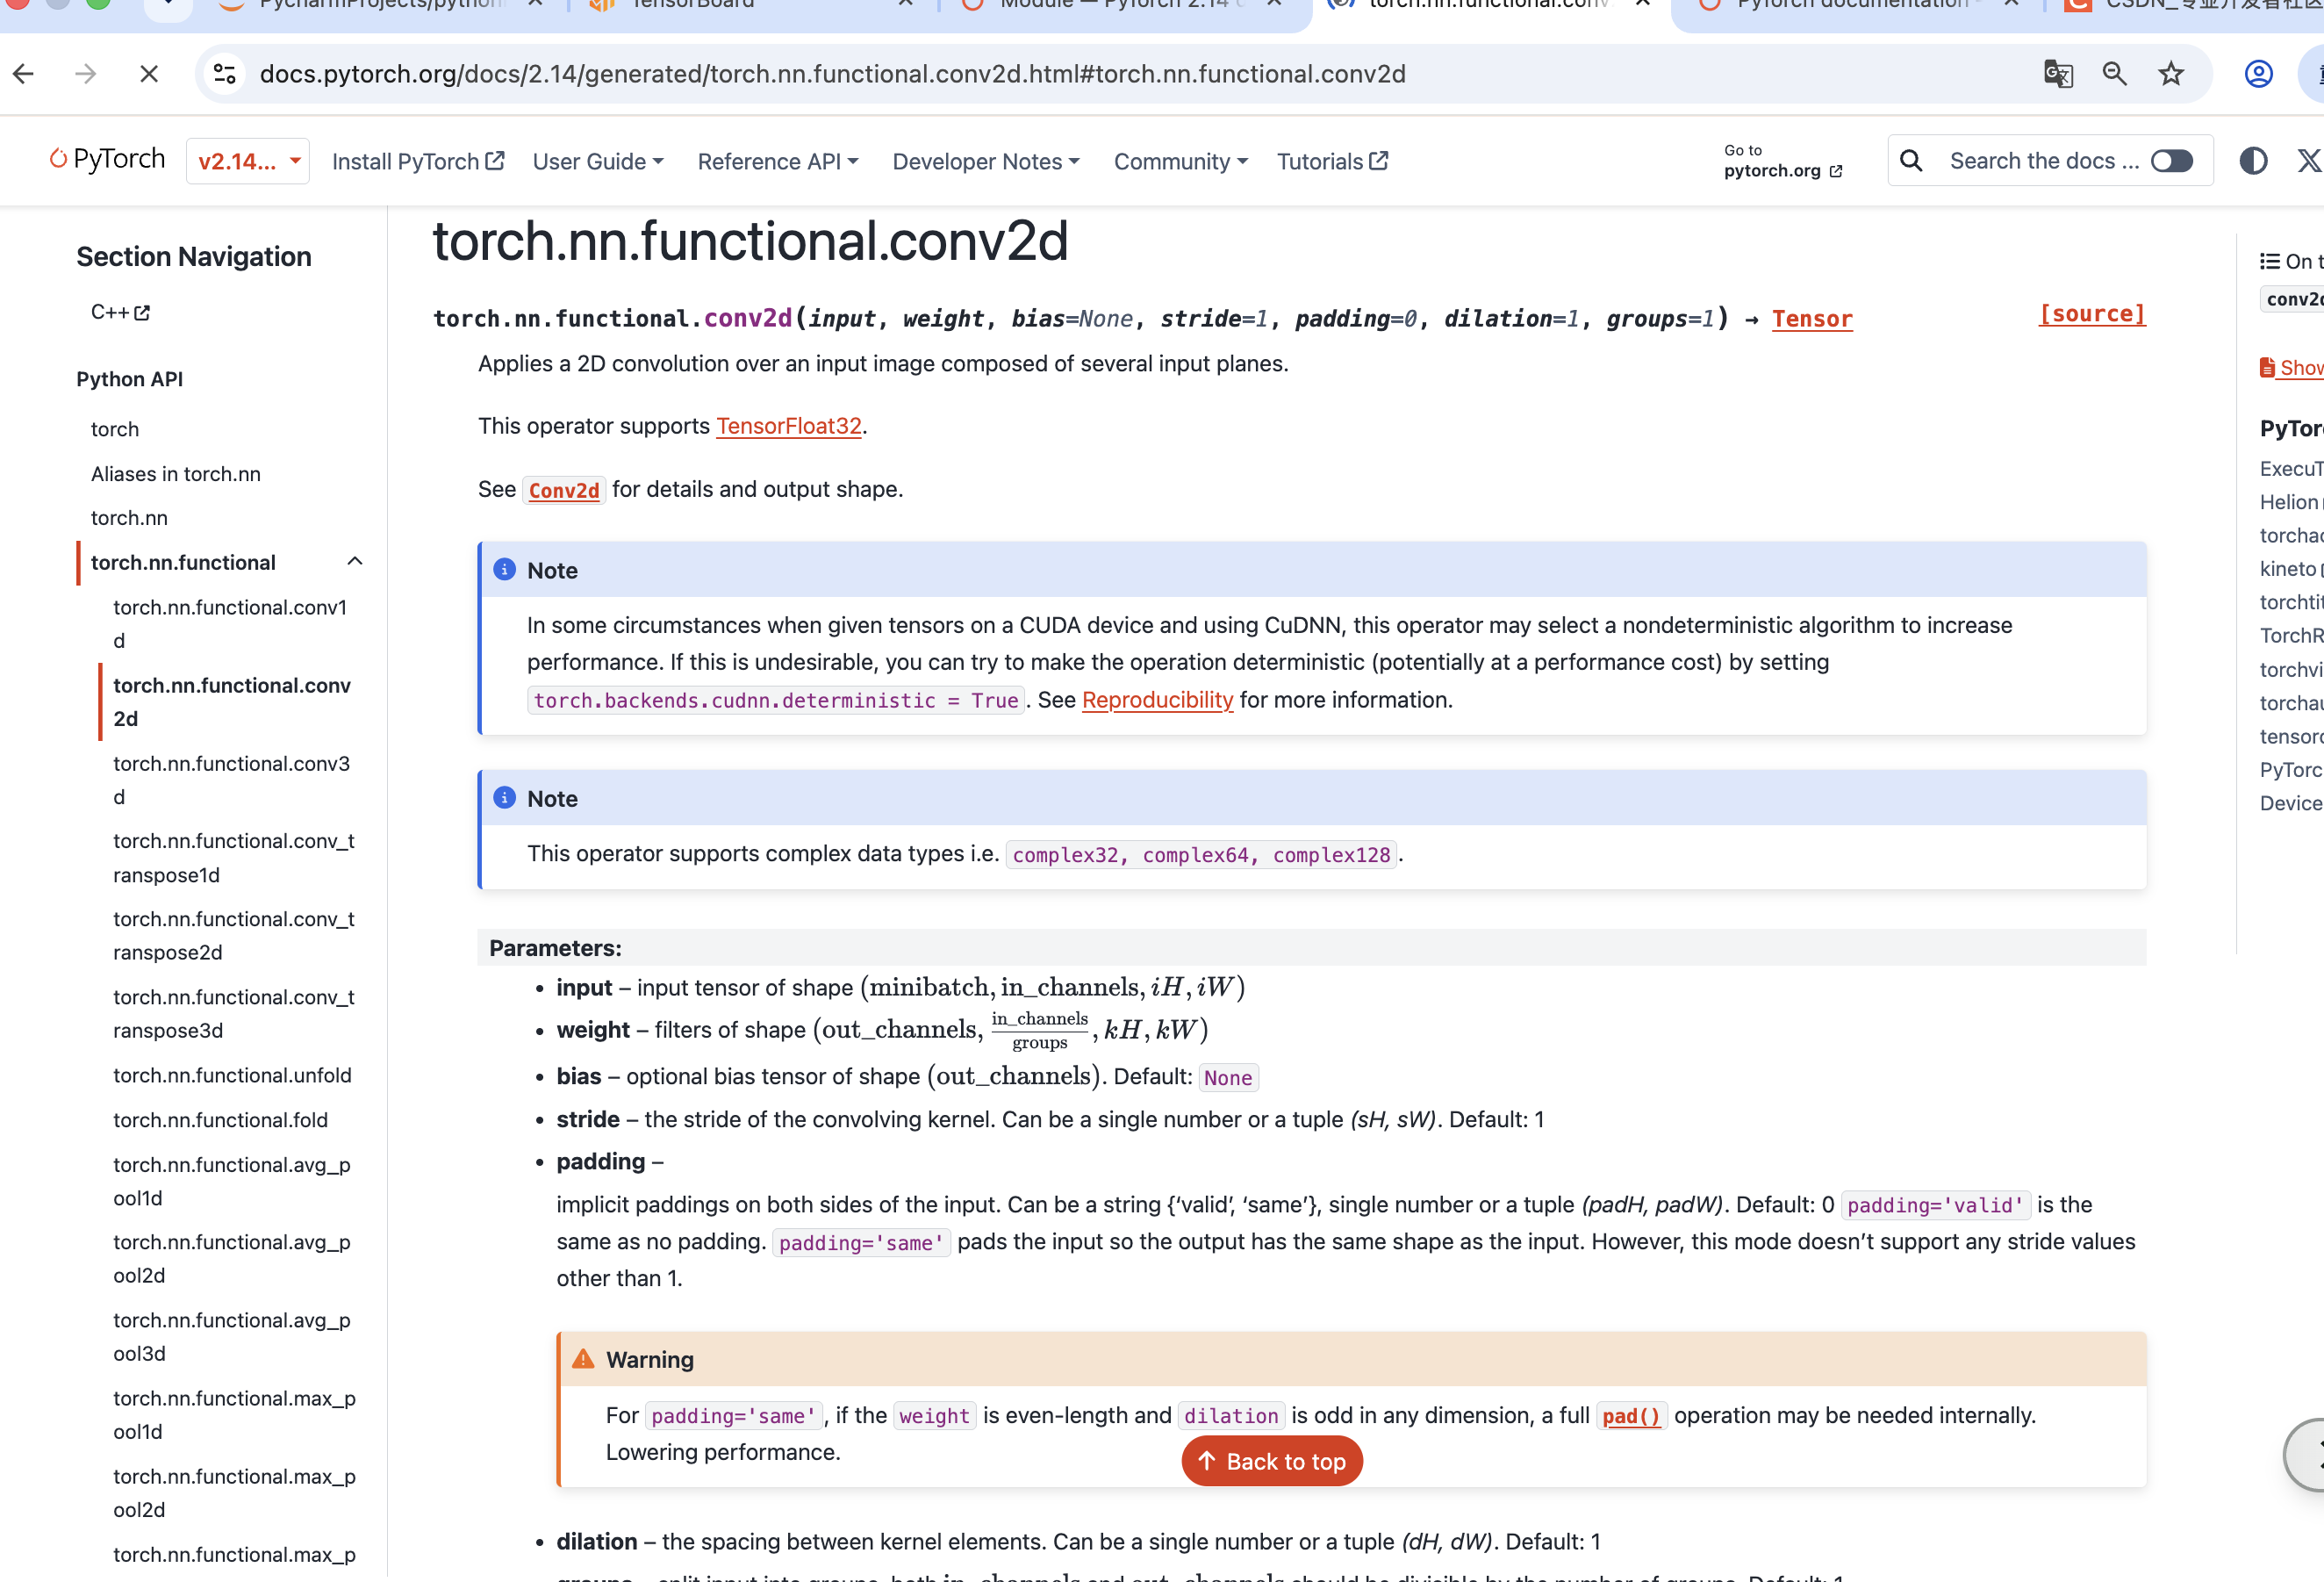
函数参数:
input:输入张量,需满足(minibatch, in_channels, iH, iW)形状
weight:卷积核,形状为(out_channels, in_channels, kH, kW)
stride:卷积步长,默认1
padding:填充,默认0
dilation:膨胀系数,默认1
groups:分组数,默认1
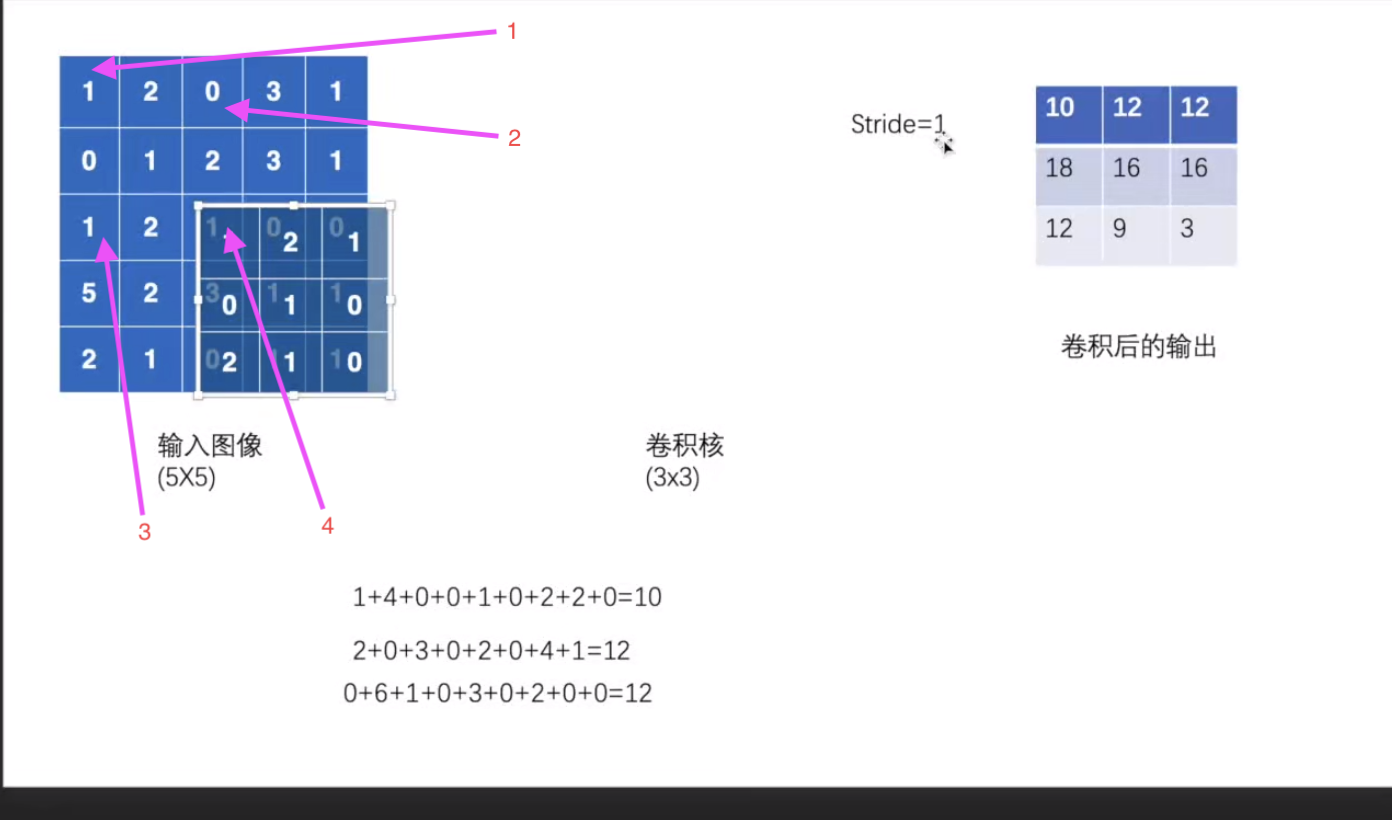
卷积计算演示图像(假设除了输入张量和卷积核,其他参数都是默认值)
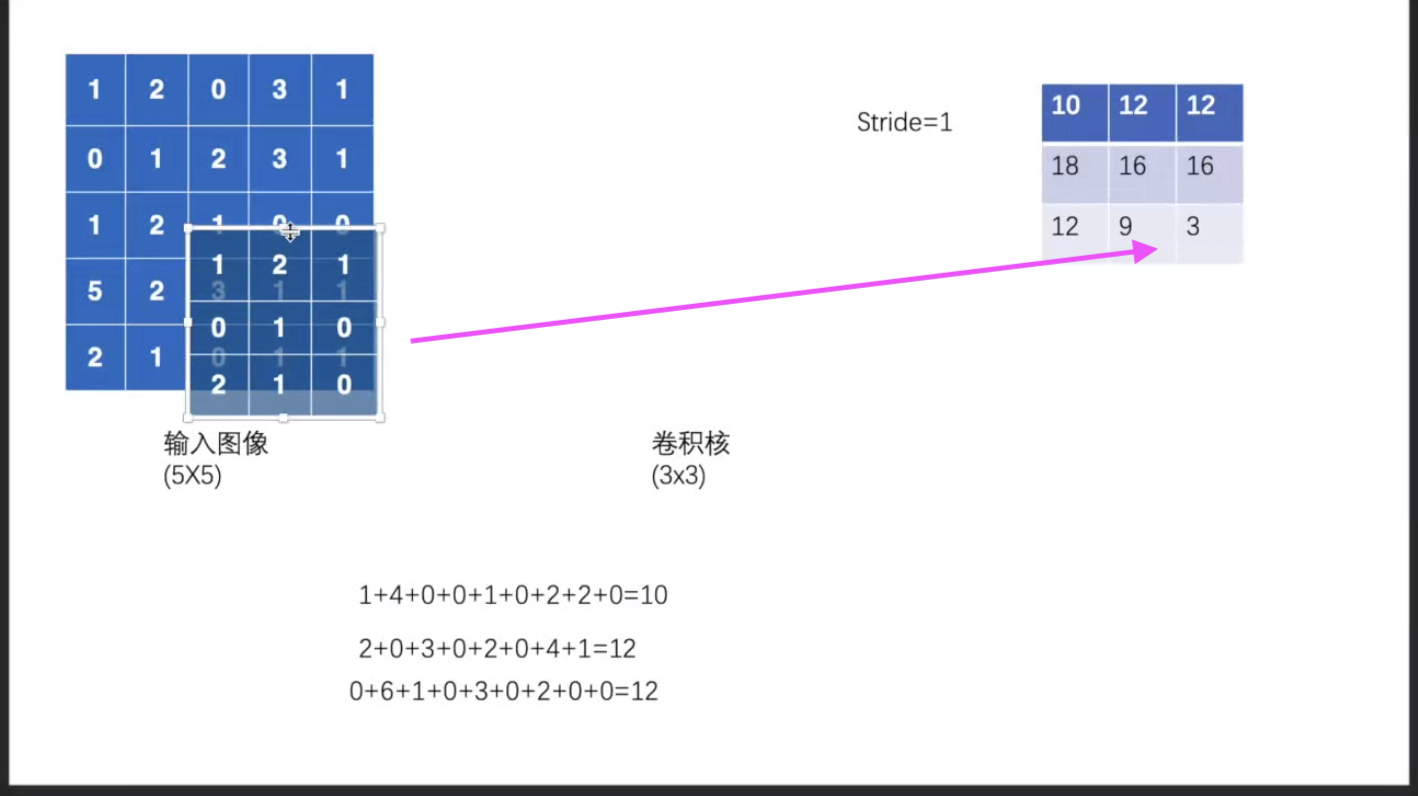
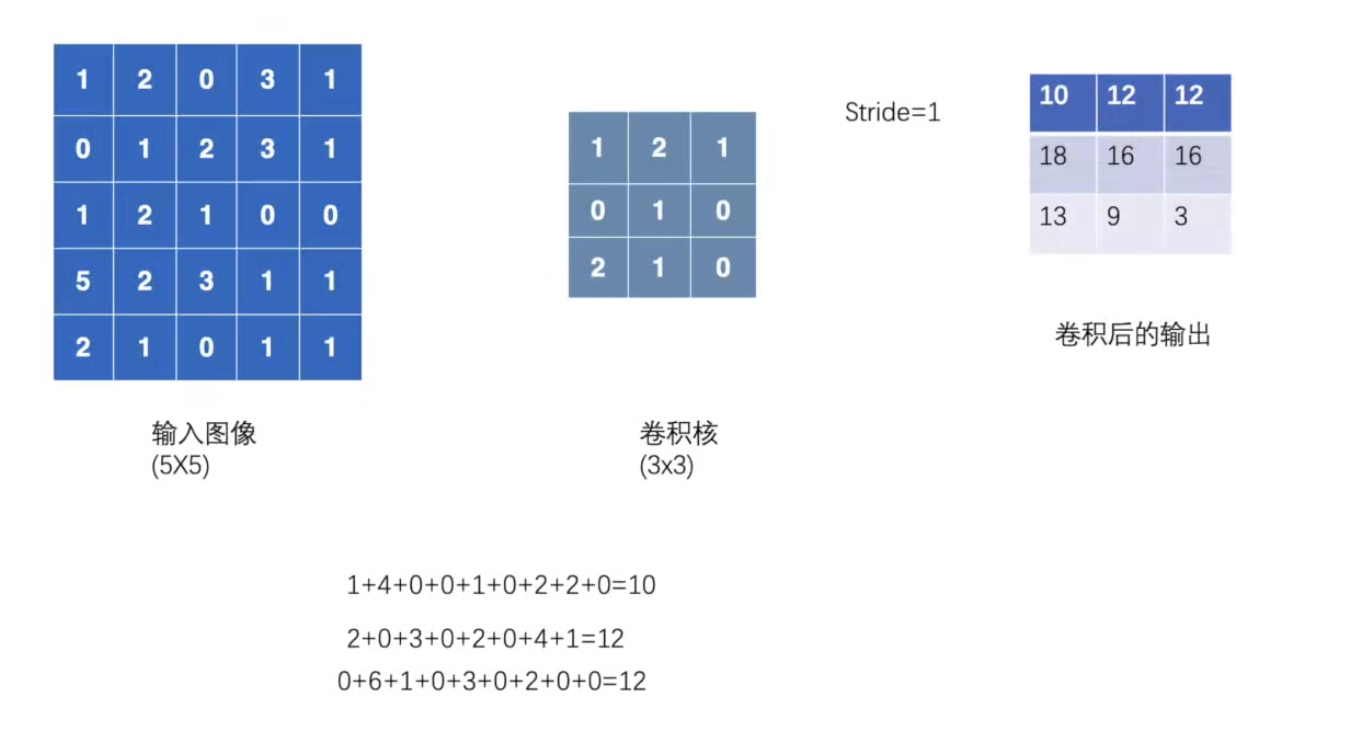
输入图像与卷积核:
输入图像为55矩阵,每个数字代表像素颜色值。
卷积核为3 3矩阵。
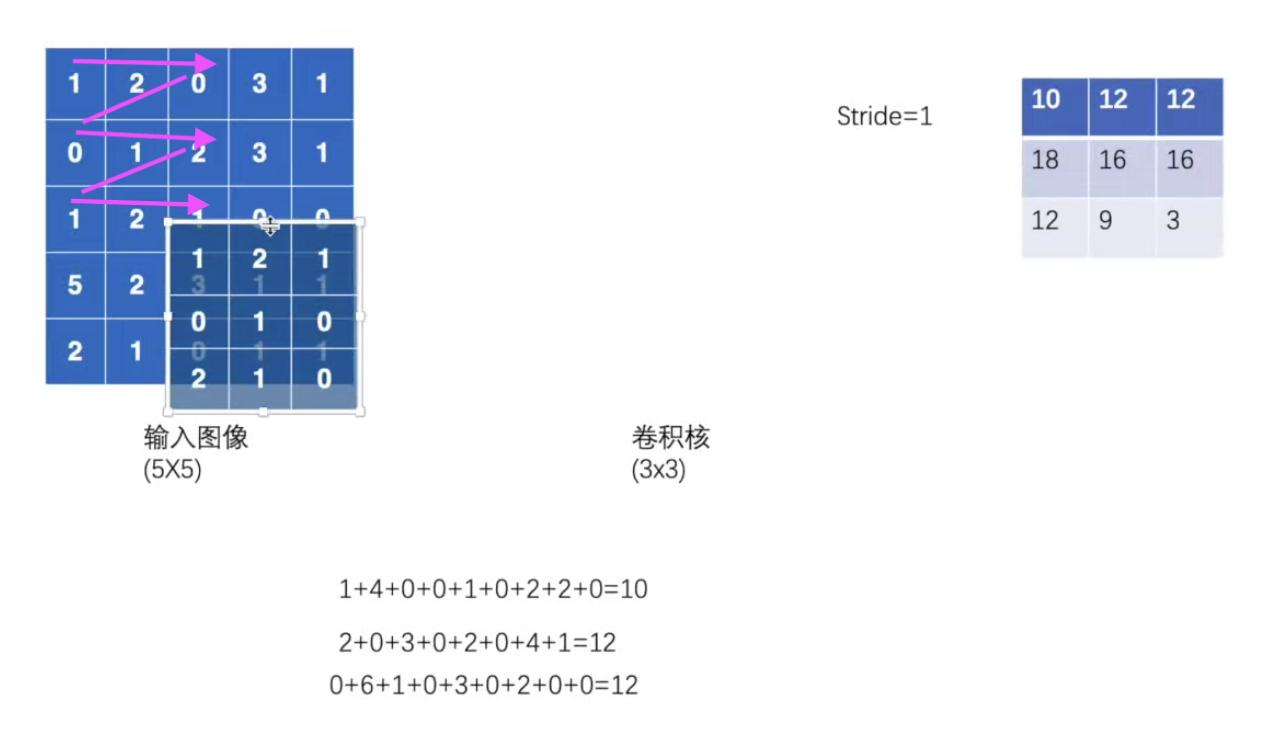
卷积核先叠在输入图像的左上角(两者的左上角对齐),进行对应位相乘后相加,得到一个输出值。然后将卷积核向右横向移动一格,得到下一个输出值,卷积核向右横向一格一格移动到顶后,纵向移动一格,并且是从下一行的最左侧开始,继续计算输出值。
上图,最右边的3*3矩阵是输出矩阵。
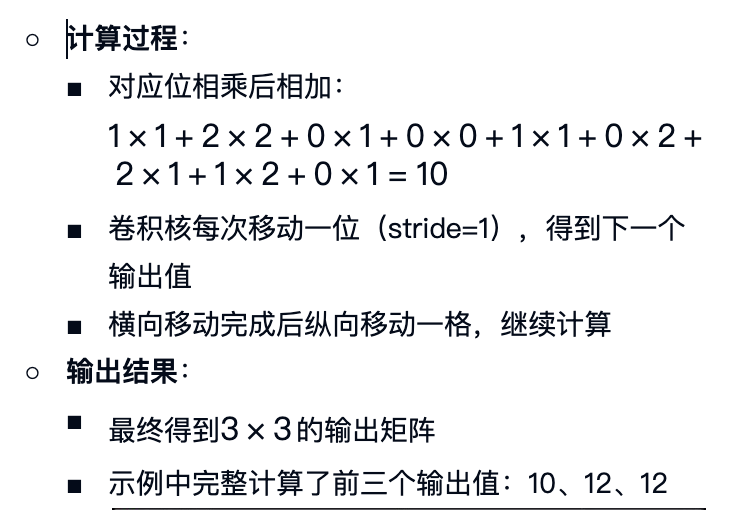
如下红色线条便是卷积核的移动走位。
代码实现
python
# -*- coding: utf-8 -*-
# 作者:小土堆
# 公众号:土堆碎念

import torch
import torch.nn.functional as F

input = torch.tensor([[1, 2, 0, 3, 1],
                      [0, 1, 2, 3, 1],
                      [1, 2, 1, 0, 0],
                      [5, 2, 3, 1, 1],
                      [2, 1, 0, 1, 1]])

kernel = torch.tensor([[1, 2, 1],
                       [0, 1, 0],
                       [2, 1, 0]])

input = torch.reshape(input, (1, 1, 5, 5))
kernel = torch.reshape(kernel, (1, 1, 3, 3))

print(input.shape)
print(kernel.shape)

output = F.conv2d(input, kernel, stride=1)
print(output)
执行如上代码,控制台输出如下。
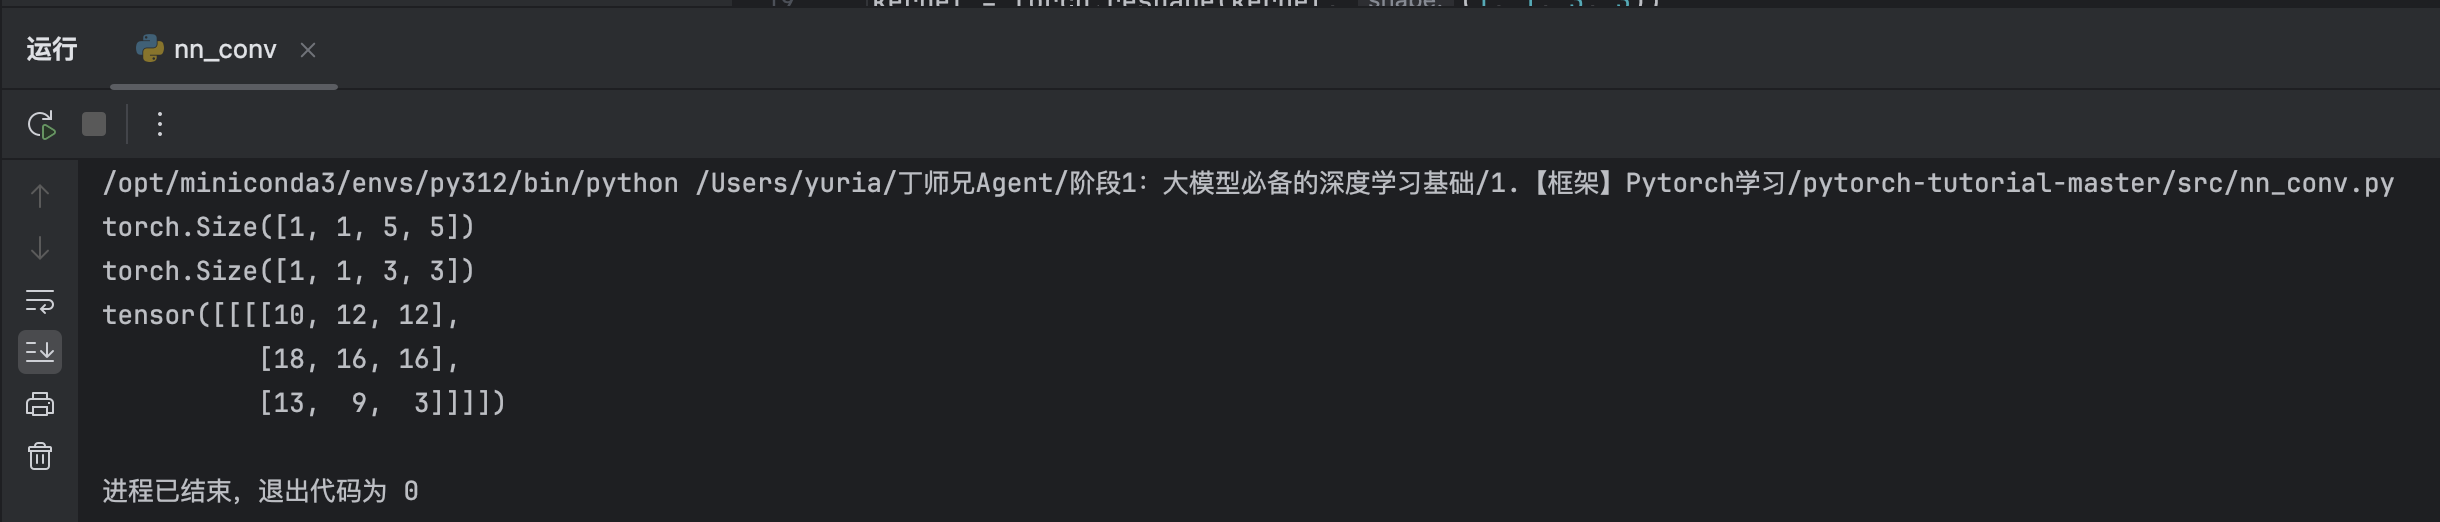
如上输出结果和我们演示中的如下的计算的输出矩阵是一致的
stride参数:
控制卷积核移动步长
可以是单个数或元组(sH, sW)
stride=1时横向和纵向都移动1位
stride=2时横向和纵向都移动2位,输出尺寸变小。
如下如果stride = 2,那么卷积核的走位顺序便是红色标注的1-4步,输出的是2*2的矩阵。
例题:stride=2 卷积操作示例
代码实现:
python
 -*- coding: utf-8 -*-
# 作者:小土堆
# 公众号:土堆碎念

import torch
import torch.nn.functional as F

input = torch.tensor([[1, 2, 0, 3, 1],
                      [0, 1, 2, 3, 1],
                      [1, 2, 1, 0, 0],
                      [5, 2, 3, 1, 1],
                      [2, 1, 0, 1, 1]])

kernel = torch.tensor([[1, 2, 1],
                       [0, 1, 0],
                       [2, 1, 0]])

input = torch.reshape(input, (1, 1, 5, 5))
kernel = torch.reshape(kernel, (1, 1, 3, 3))

print(input.shape)
print(kernel.shape)

output = F.conv2d(input, kernel, stride=1)
print(output)

output2 = F.conv2d(input, kernel, stride=2)
print(output2)
执行如上代码,我们控制台输出如下,我们发现stride=2的时候,输出的尺寸被压缩了:
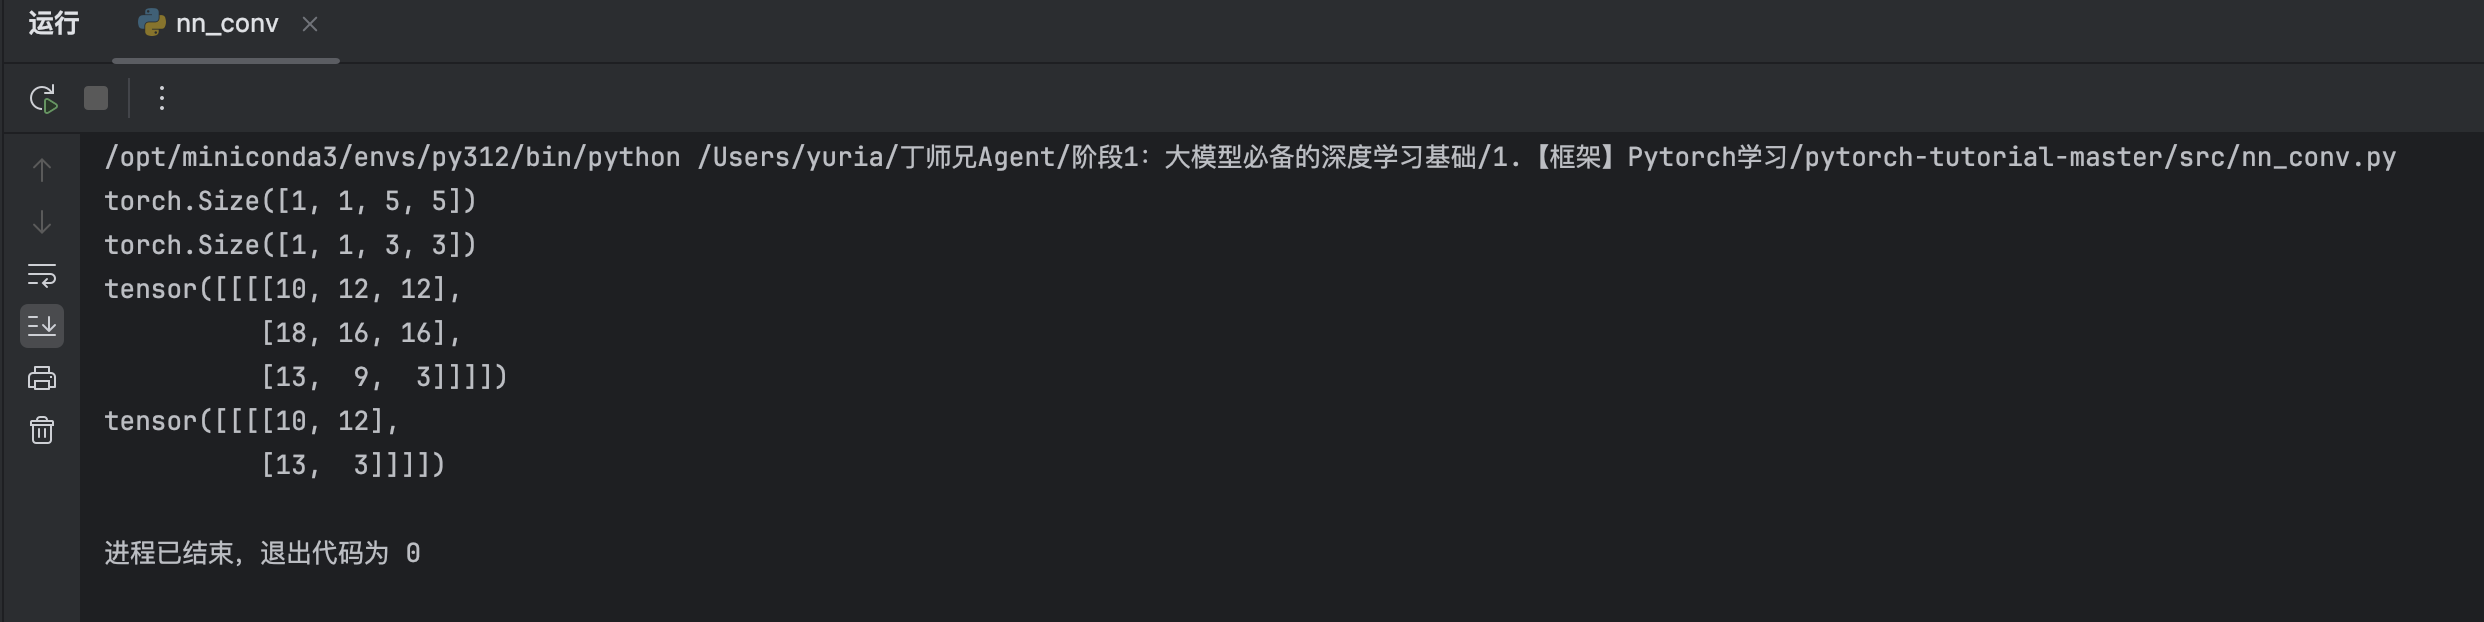
我们注意到,
输入图像和卷积核都转换为torch.tensor
因为我们需要调整张量维度满足conv2d输入要求
我们可以通过print查看张量形状是否符合要求
注意事项:
输入张量需要4维(增加batch和channel维度)
卷积核需要4维(增加output和input channel维度)
下面我们介绍下如何通过reshape改变输入图像和卷积核的张量维度。
reShape尺寸变换
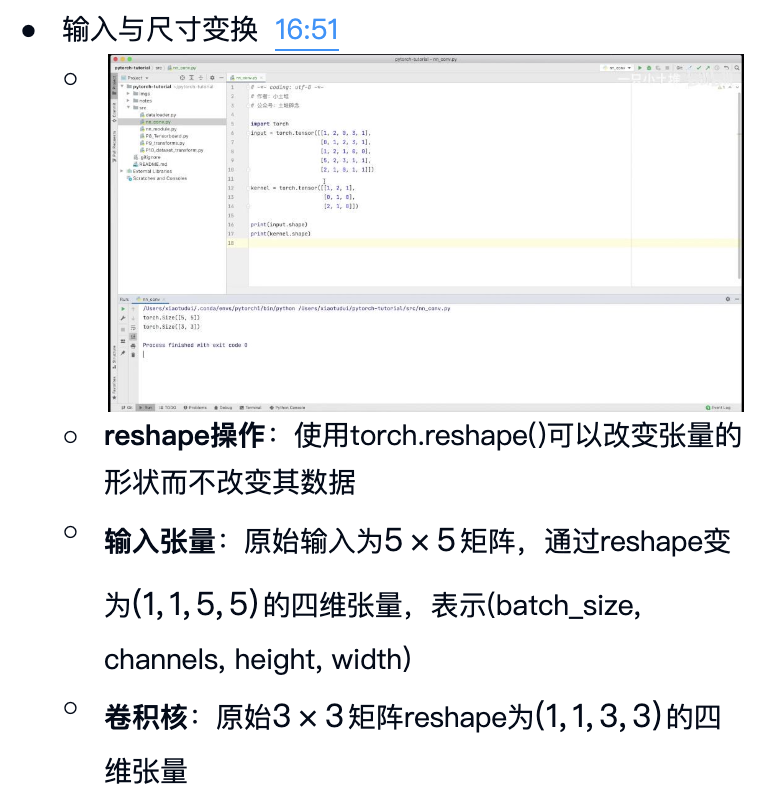
shape代码示例
python
# -*- coding: utf-8 -*-
# 作者:小土堆
# 公众号:土堆碎念

import torch
import torch.nn.functional as F

input = torch.tensor([[1, 2, 0, 3, 1],
                      [0, 1, 2, 3, 1],
                      [1, 2, 1, 0, 0],
                      [5, 2, 3, 1, 1],
                      [2, 1, 0, 1, 1]])

kernel = torch.tensor([[1, 2, 1],
                       [0, 1, 0],
                       [2, 1, 0]])

input = torch.reshape(input, (1, 1, 5, 5))
kernel = torch.reshape(kernel, (1, 1, 3, 3))

print(input.shape)
print(kernel.shape)
如上代码执行后,打印出来如下代码,可以发现,输入矩阵变成了(1,1,5,5)的四维张量。
卷积核变成了(1,1,3,3)的四维张量。

conv2d参数padding
定义:padding是在输入图像的四周进行像素填充的操作
参数形式:可以是一个数值或元组(padH, padW),分别指定高度和宽度方向的填充量
默认值:默认padding=0,即不进行任何填充
填充值:填充区域的像素值通常默认为0
作用:通过填充可以控制输出特征图的尺寸,防止图像边缘信息丢失
计算过程讲解:
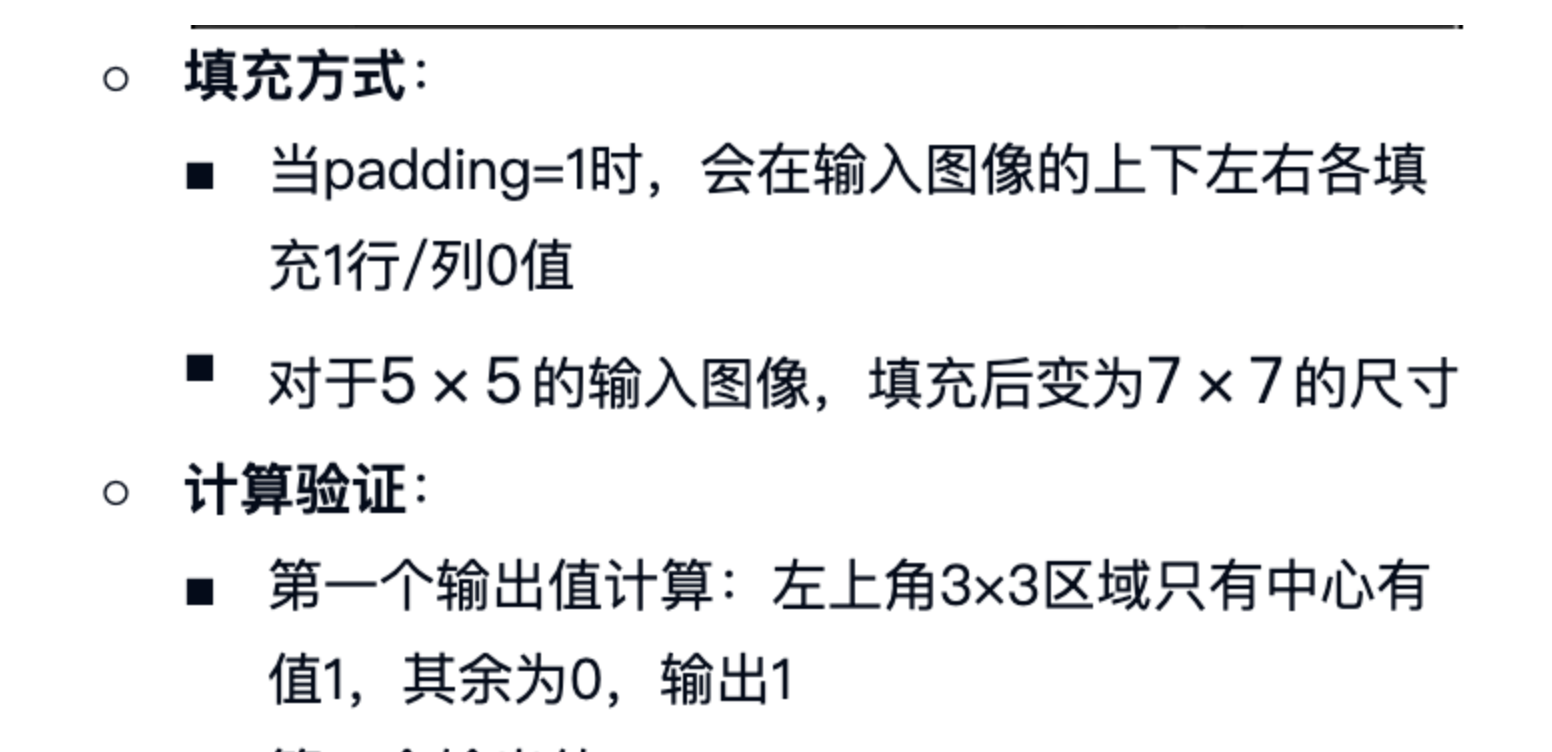
如下图,我们的输入图像,由于padding是1,所以周边多了一层,然后我们的卷积核从放置在输入图像7*7的左上角开始计算输出值,也是先横向移动,横向移动到头后,纵向移动到下一行最左边的格子,以此类推去计算输出值。
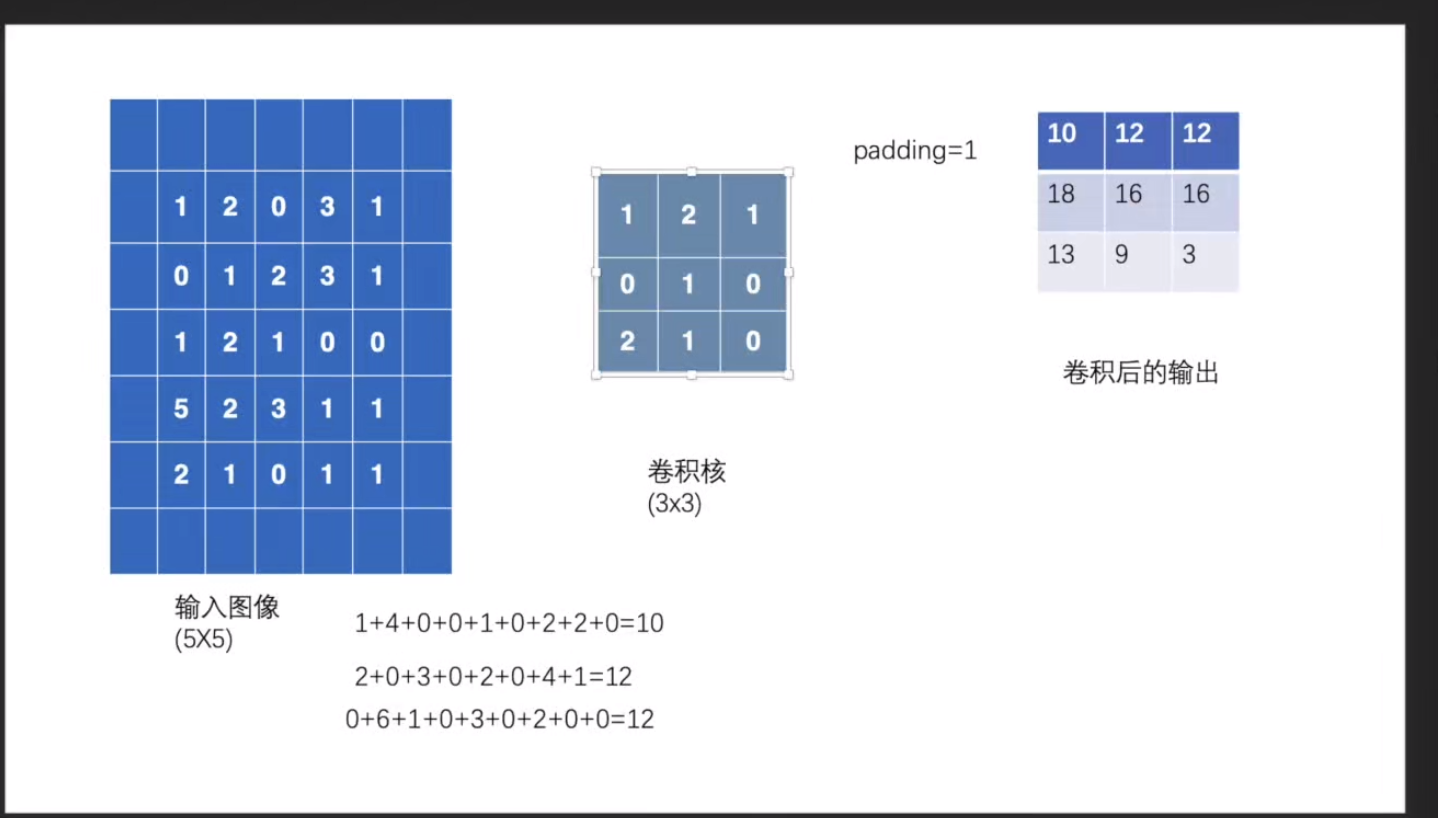
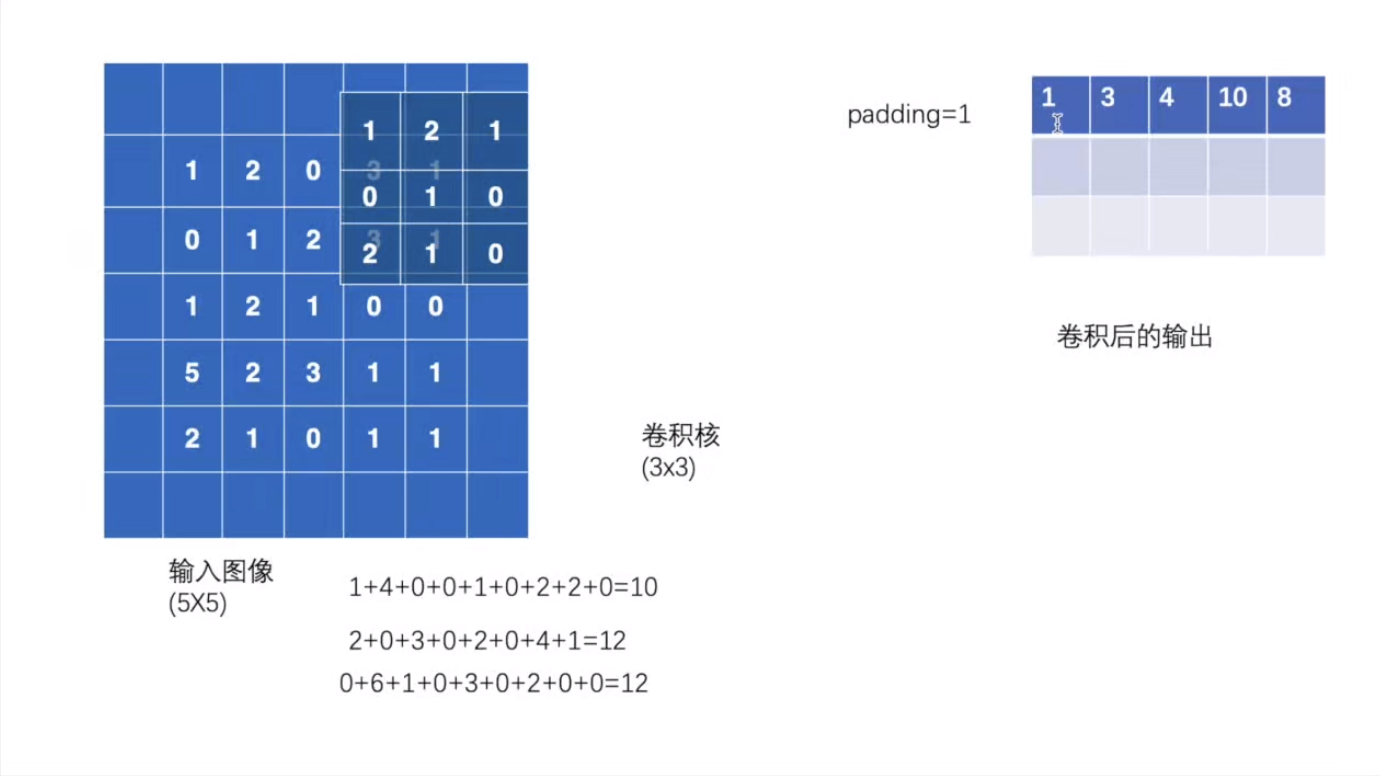
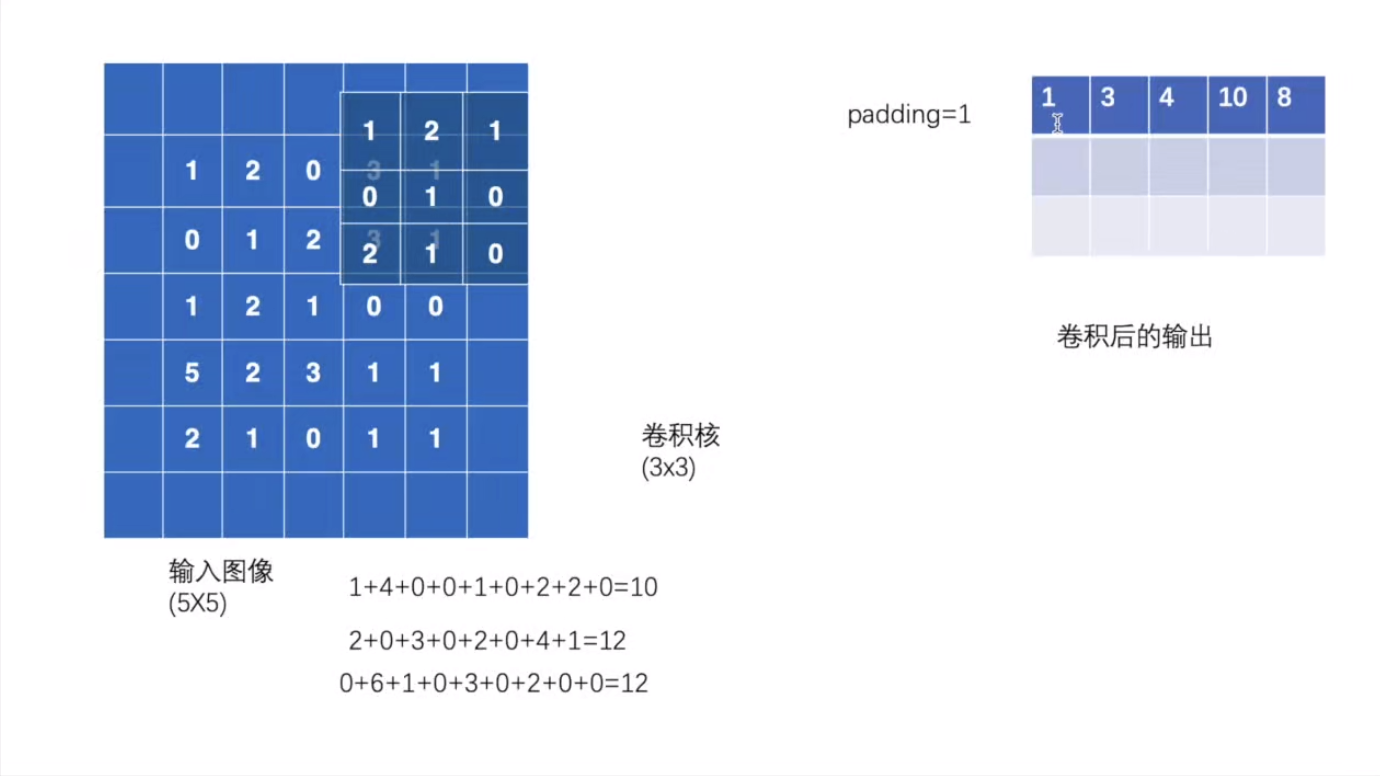
所以最后我们输出的尺寸,比没有padding的时候大一些。
padding=1代码示例
python
# -*- coding: utf-8 -*-
# 作者:小土堆
# 公众号:土堆碎念

import torch
import torch.nn.functional as F

input = torch.tensor([[1, 2, 0, 3, 1],
                      [0, 1, 2, 3, 1],
                      [1, 2, 1, 0, 0],
                      [5, 2, 3, 1, 1],
                      [2, 1, 0, 1, 1]])

kernel = torch.tensor([[1, 2, 1],
                       [0, 1, 0],
                       [2, 1, 0]])

input = torch.reshape(input, (1, 1, 5, 5))
kernel = torch.reshape(kernel, (1, 1, 3, 3))

print(input.shape)
print(kernel.shape)

output3 = F.conv2d(input, kernel, stride=1, padding=1)
print(output3)
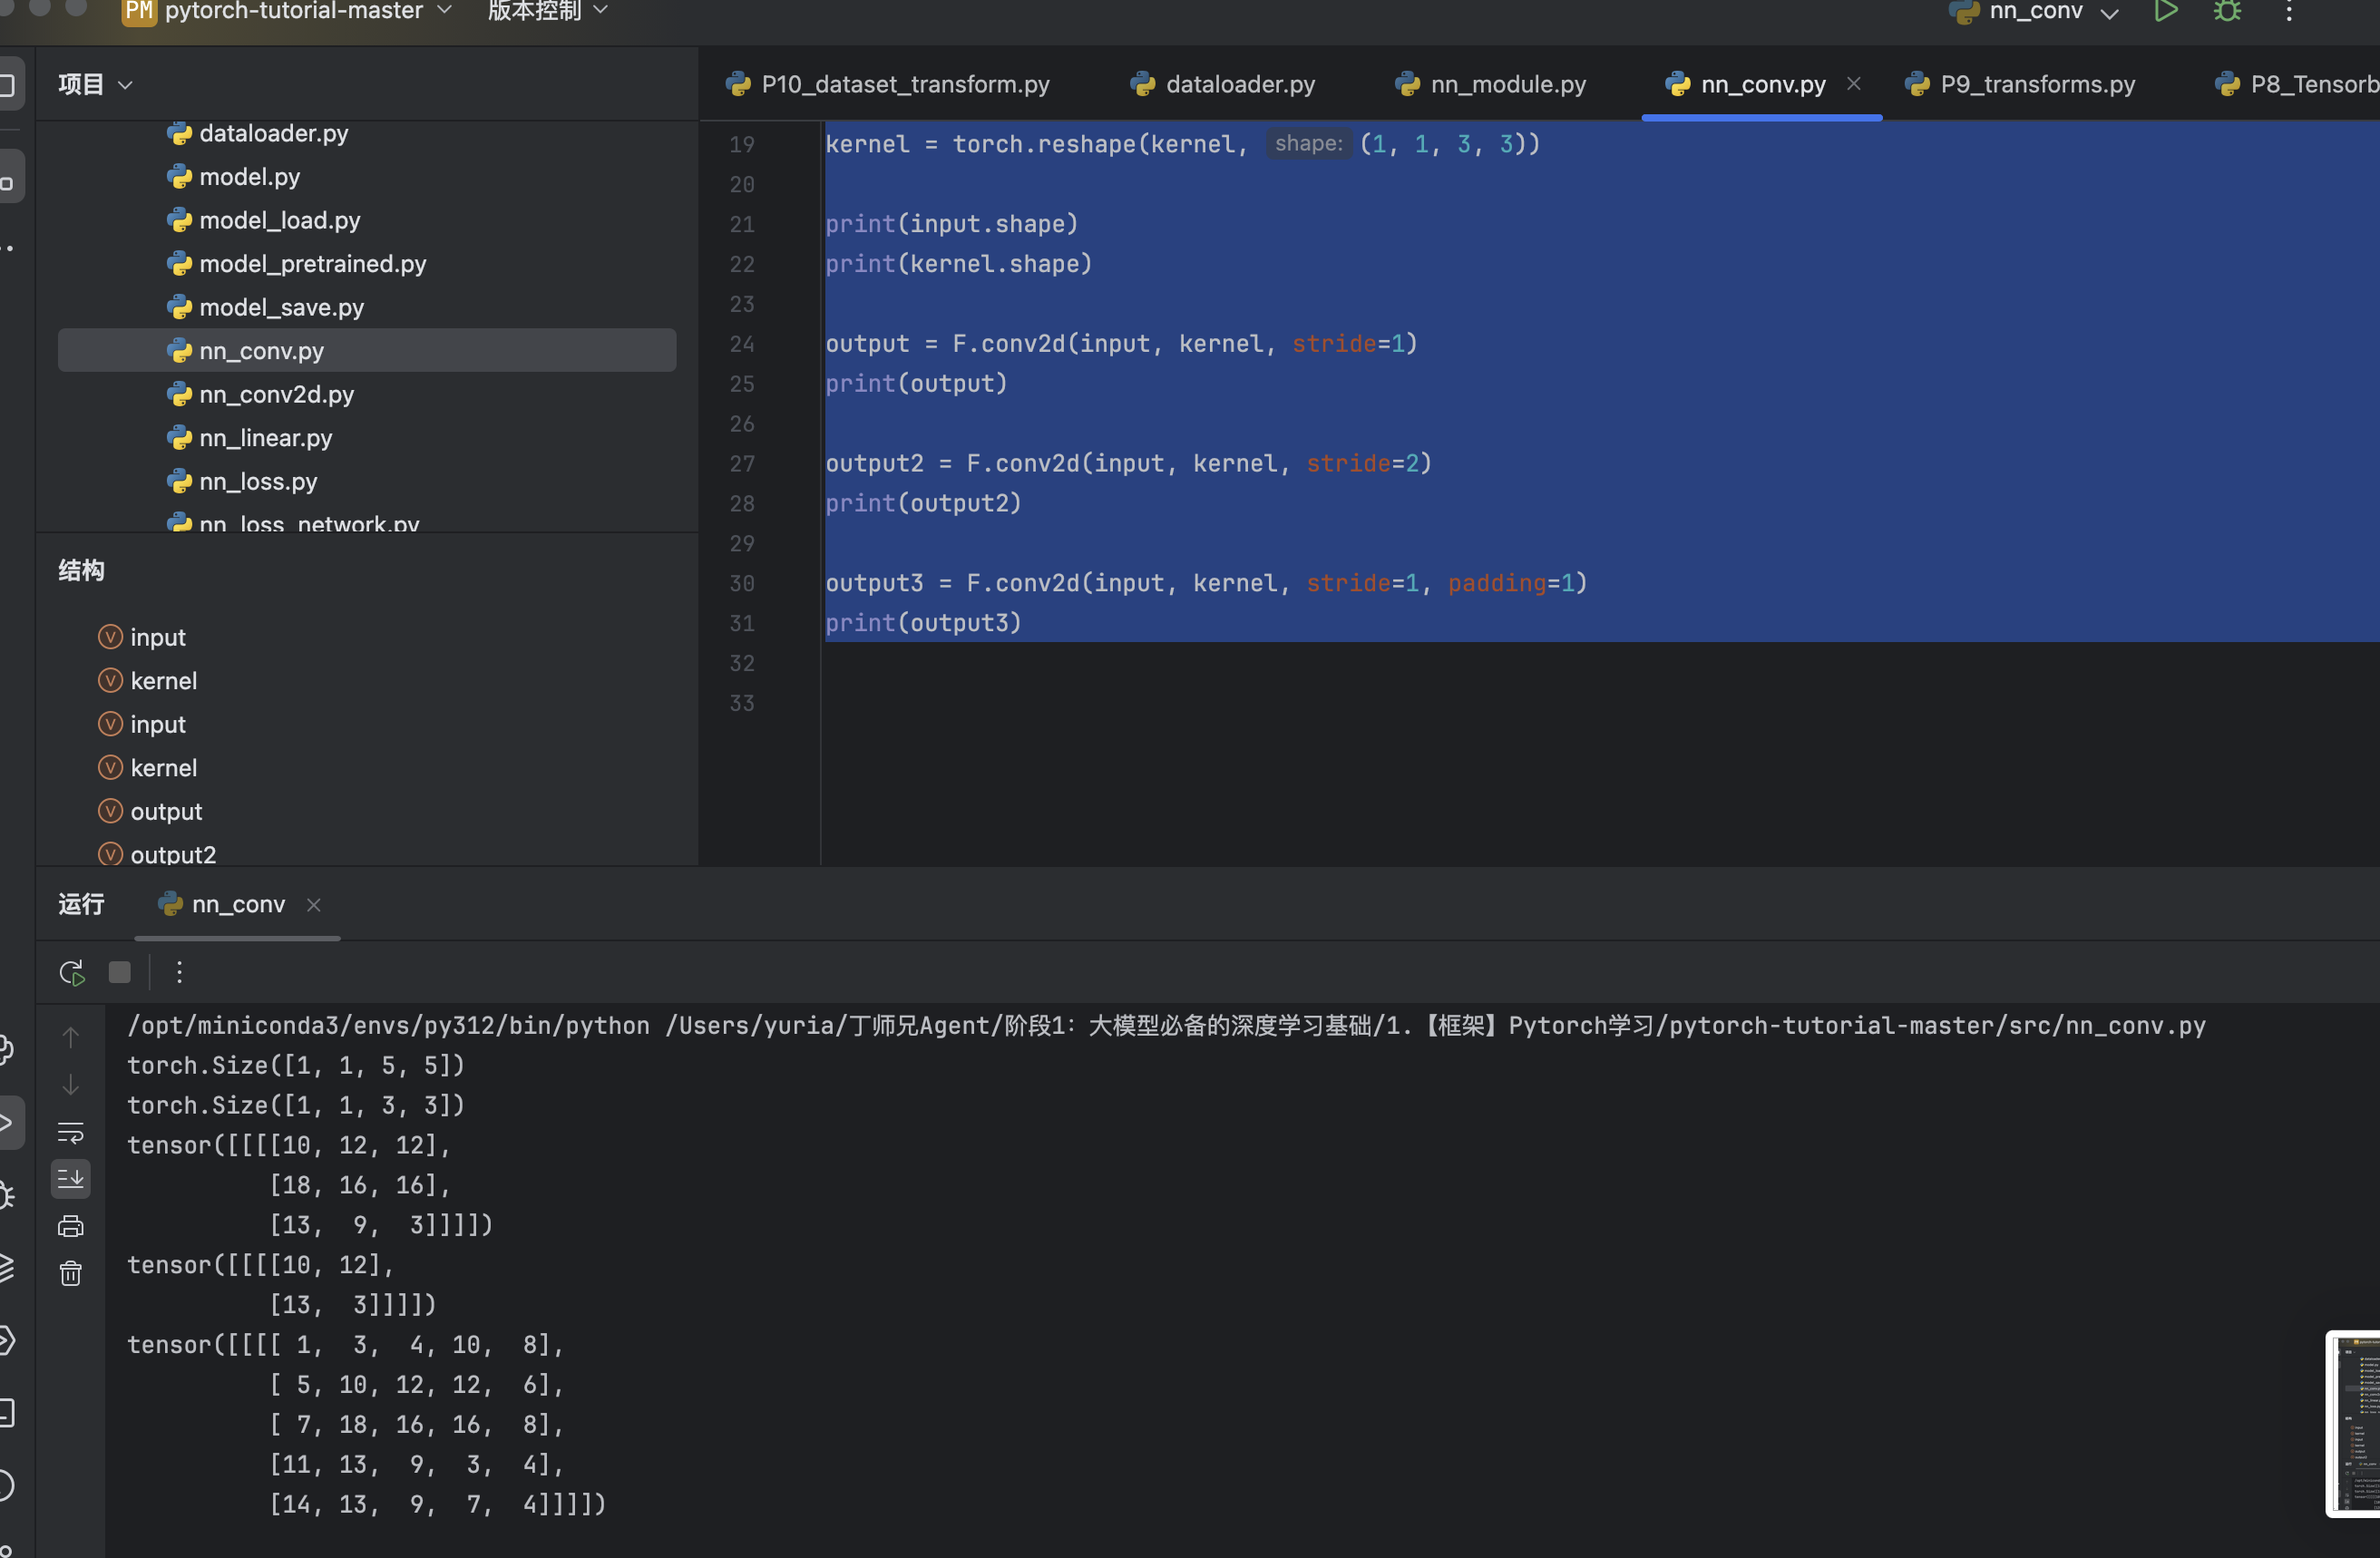
执行如上代码,控制台输出结果如下:
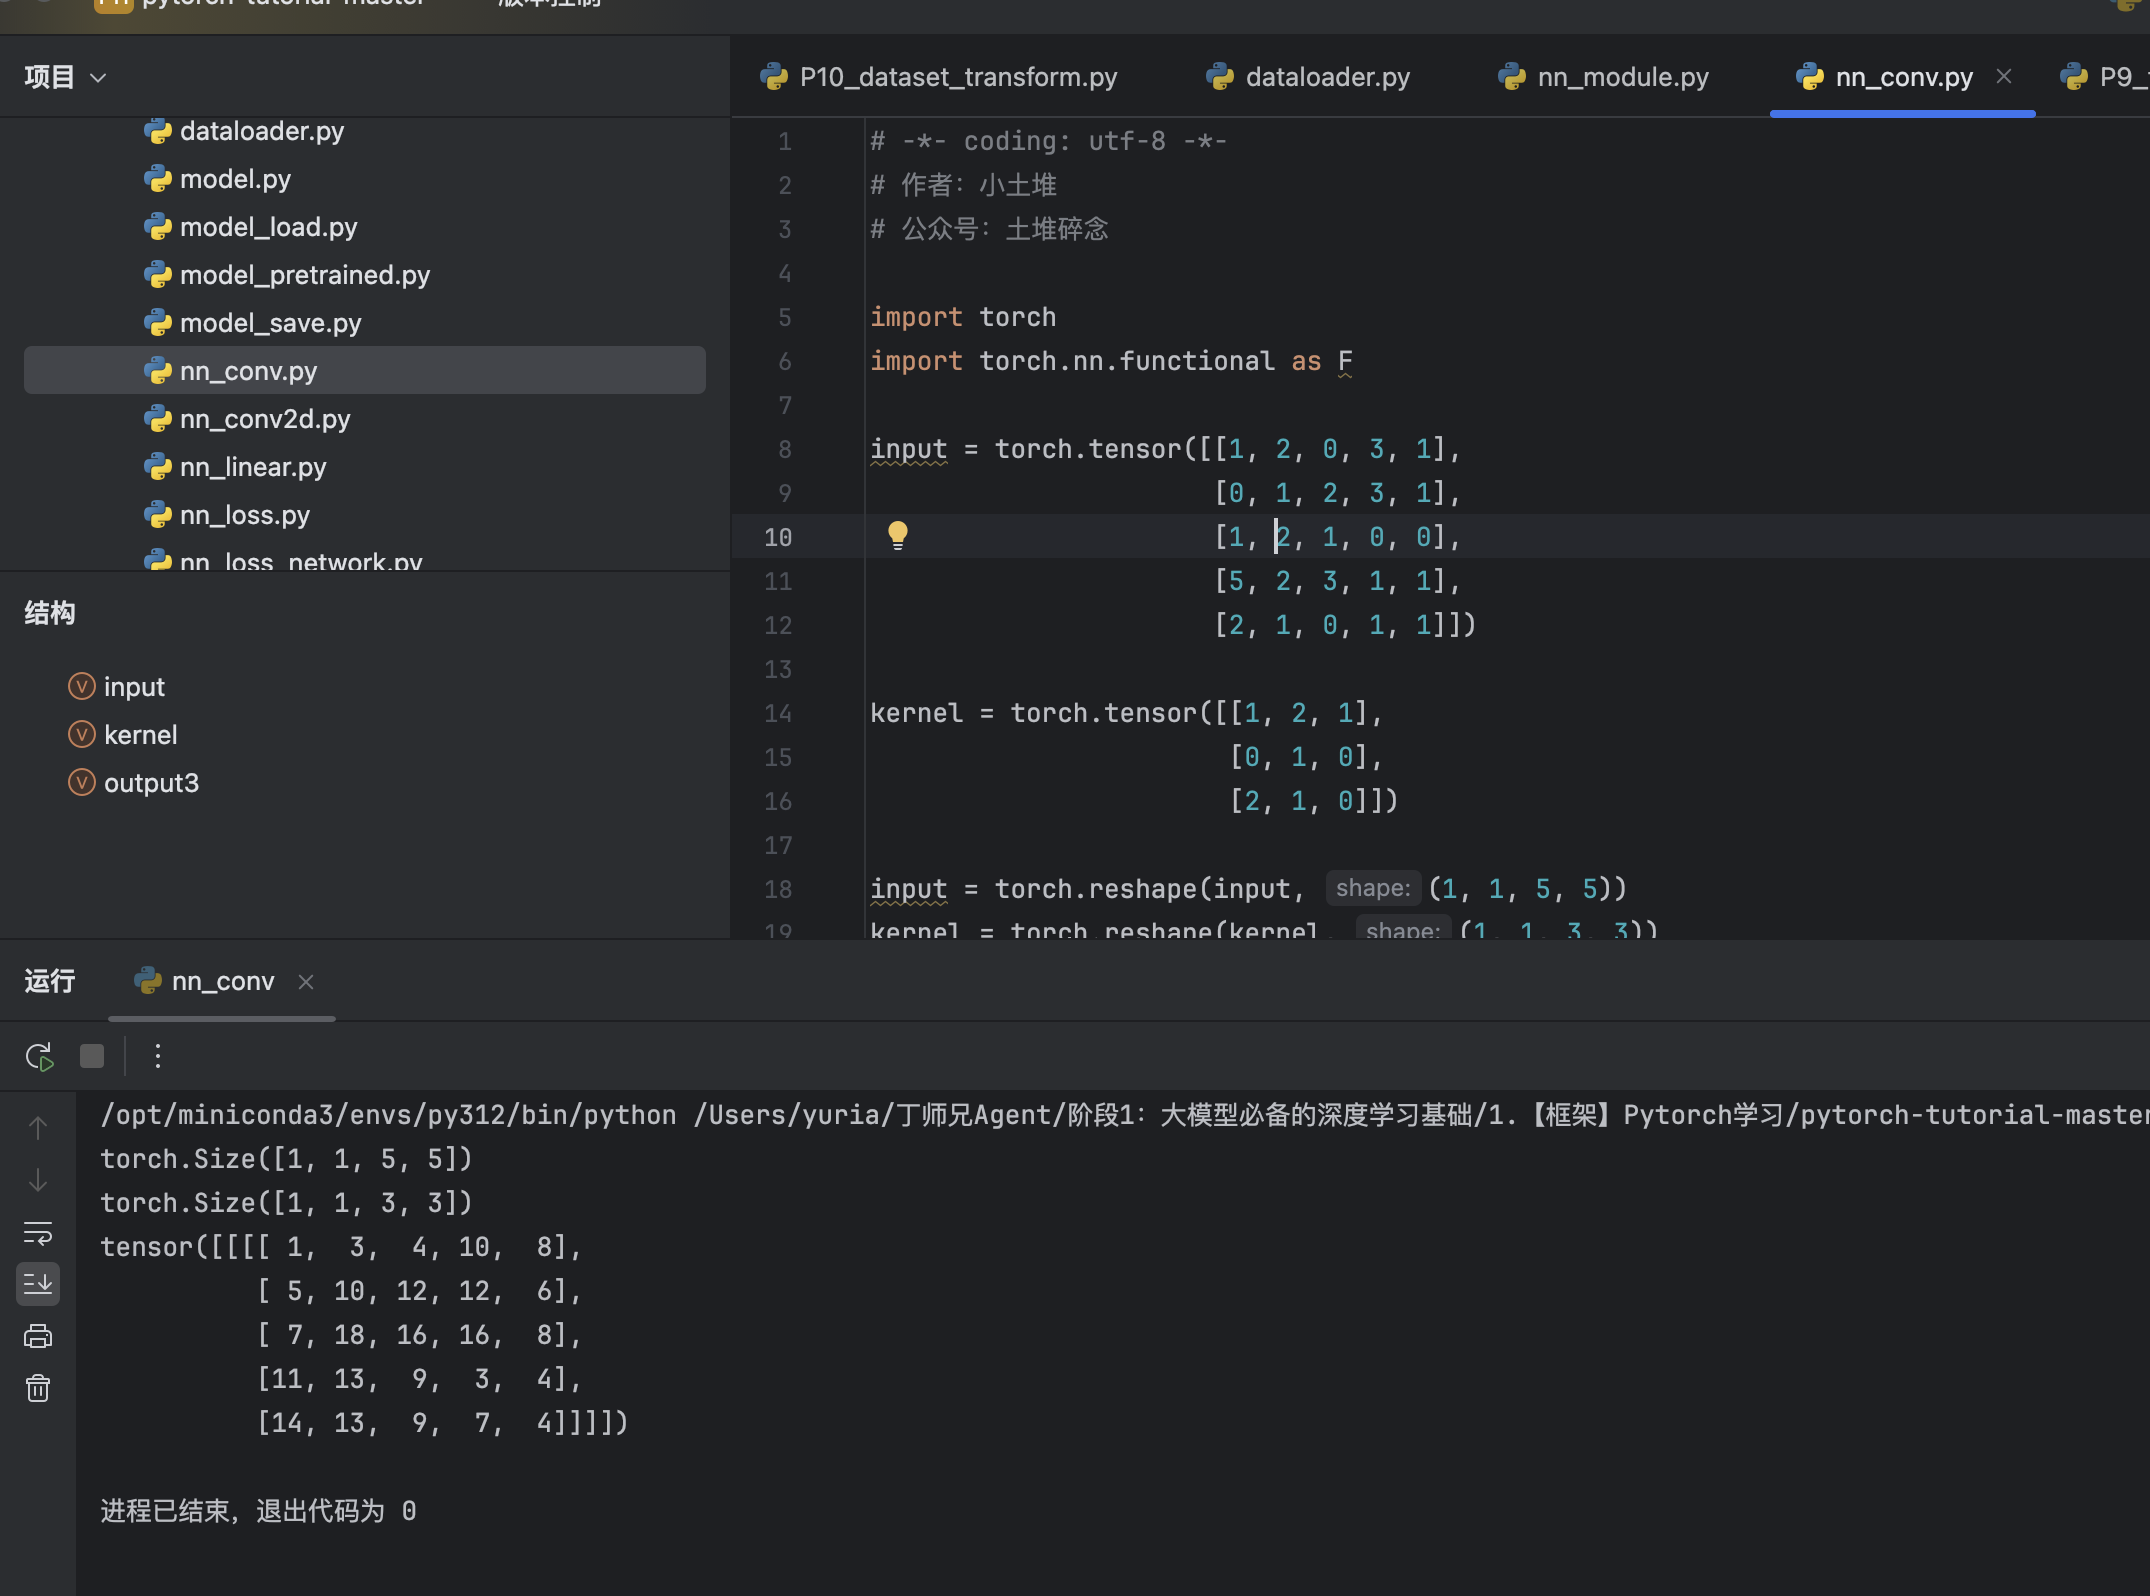
整体代码
python
# -*- coding: utf-8 -*-
# 作者:小土堆
# 公众号:土堆碎念

import torch
import torch.nn.functional as F

input = torch.tensor([[1, 2, 0, 3, 1],
                      [0, 1, 2, 3, 1],
                      [1, 2, 1, 0, 0],
                      [5, 2, 3, 1, 1],
                      [2, 1, 0, 1, 1]])

kernel = torch.tensor([[1, 2, 1],
                       [0, 1, 0],
                       [2, 1, 0]])

input = torch.reshape(input, (1, 1, 5, 5))
kernel = torch.reshape(kernel, (1, 1, 3, 3))

print(input.shape)
print(kernel.shape)

output = F.conv2d(input, kernel, stride=1)
print(output)

output2 = F.conv2d(input, kernel, stride=2)
print(output2)

output3 = F.conv2d(input, kernel, stride=1, padding=1)
print(output3)
执行如上代码,控制台输出如下:
小结