文章目录
- [1. 数据类型](#1. 数据类型)
-
- [1.1 总结](#1.1 总结)
- [1.2 基础例子](#1.2 基础例子)
-
- [1.2.1 BasicTypes](#1.2.1 BasicTypes)
- [1.2.2 Profile](#1.2.2 Profile)
- [1.2.3 exception](#1.2.3 exception)
- [2. 字段校验规则](#2. 字段校验规则)
-
- [2.1 optional](#2.1 optional)
- [2.2 required](#2.2 required)
- [2.3 请求校验](#2.3 请求校验)
- [3. 文件拆分](#3. 文件拆分)
-
- [3.1 介绍](#3.1 介绍)
- [3.2 当前目录结构](#3.2 当前目录结构)
- [3.3 Thrift 文件拆分](#3.3 Thrift 文件拆分)
-
- [3.3.1 公共文件](#3.3.1 公共文件)
- [3.3.2 用户文件](#3.3.2 用户文件)
- [3.3.3 订单文件](#3.3.3 订单文件)
- [3.3.4 根服务文件](#3.3.4 根服务文件)
- [3.4 main 方法示例](#3.4 main 方法示例)
- [4. 小结](#4. 小结)
本系列文章:
- Java 转 go 学习 - 项目管理
- Java 转 go 学习 - 基本语法
- Java 转 go 学习 - 类型转换
- Java 转 go 学习 - 流程控制结构
- Java 转 go 学习 - 数组和切片
- Java 转 go 学习 - map
- Java 转 go 学习 - 函数(1)
- Java 转 go 学习 - 函数(2)
- Java 转 go 学习 - 结构体
- Java 转 go 学习 - 接口
- Java 转 go 学习 - 并发编程(1)
- Java 转 go 学习 - 并发编程(2)
- Java 转 go 学习 - 并发编程(3)
- Java 转 go 学习 - web 编程
- Java 转 go 学习 - Hertz 学习(1)
- Java 转 go 学习 - Hertz 学习(2)
- Java 转 go 学习 - Redis(1)
- Java 转 go 学习 - Redis(2)
- Java 转 go 学习 - MYSQL
- Java 转 go 学习 - GRPC(1)
- Java 转 go 学习 - GRPC(2)
- Java 转 go 学习 - GRPC(3)
- Java 转 go 学习 - GRPC(4)
- Java 转 go 学习 - kitex(1)
1. 数据类型
1.1 总结
下面是使用 codex 做的总结。
| Thrift 类型 | Go 类型 | 说明 |
|---|---|---|
bool |
bool |
布尔值 |
byte |
int8 |
8 位整数 |
i16 |
int16 |
16 位整数 |
i32 |
int32 |
32 位整数 |
i64 |
int64 |
64 位整数 |
double |
float64 |
双精度浮点数 |
string |
string |
字符串 |
binary |
[]byte |
二进制数据 |
list<T> |
[]T |
有序列表 |
set<T> |
[]T |
生成后通常仍是切片,但协议语义是集合 |
map<K, V> |
map[K]V |
键值对 |
enum |
整数类型 + 常量 | 常见生成结果是 type X int64 或类似整数类型 |
struct |
struct |
普通结构体 |
union |
struct |
字段常是指针,且只能设置一个字段 |
exception |
struct |
语义上表示自定义异常,常会实现 error |
typedef i64 UserID |
type UserID = int64 或等价形式 |
取决于生成器实现 |
- 基础类型:
bool、byte、i16、i32、i64、double、string、binary - 容器类型:
list、set、map - 结构类型:
struct、嵌套struct - 其他定义:
enum、typedef、const、union、exception - 字段修饰:
required、optional
1.2 基础例子
下面是 data.thrift 的内容。
go
namespace go data

typedef i64 UserID

const string APP_NAME = "kitex-03"
const i32 DEFAULT_AGE = 18

enum Gender {
  UNKNOWN = 0
  MALE = 1
  FEMALE = 2
}

struct BasicTypes {
  1: bool active
  2: byte level
  3: i16 score_level
  4: i32 age
  5: i64 amount
  6: double price
  7: string name
  8: binary raw_data
}

struct Address {
  1: string city
  2: string detail
}

struct Profile {
  1: required string name
  2: optional i32 age
  3: bool active
  4: double score
  5: list<string> tags
  6: set<i64> friend_ids
  7: map<string, string> attrs
  8: Address address
  9: Gender gender
  10: UserID user_id
}

union Contact {
  1: string email
  2: string phone
}

exception BizException {
  1: i32 code
  2: string message
}
我们现在只是学习字段类型,不需要使用服务端客户端,所以使用下面的命令去生成基础数据的代码即可。
thriftgo -r -g go:package_prefix=example.com/kitex-03/gen/ -o .\gen .\idl\data.thrift。
1.2.1 BasicTypes
下面先来看基本数据类型的生成情况。
go
type BasicTypes struct {
	Active     bool    `thrift:"active,1" json:"active"`
	Level      int8    `thrift:"level,2" json:"level"`
	ScoreLevel int16   `thrift:"score_level,3" json:"score_level"`
	Age        int32   `thrift:"age,4" json:"age"`
	Amount     int64   `thrift:"amount,5" json:"amount"`
	Price      float64 `thrift:"price,6" json:"price"`
	Name       string  `thrift:"name,7" json:"name"`
	RawData    []byte  `thrift:"raw_data,8" json:"raw_data"`
}
其中要注意的就是 binary 生成的是 []byte 数组。
1.2.2 Profile
下面看一下指针、嵌套结构体等的生成情况,当然这里的 required 和 optional 属于字段规则,先不看,只看生成的数据结构。
go
type Profile struct {
	Name      string            `thrift:"name,1,required" json:"name"`
	Age       *int32            `thrift:"age,2,optional" json:"age,omitempty"`
	Active    bool              `thrift:"active,3" json:"active"`
	Score     float64           `thrift:"score,4" json:"score"`
	Tags      []string          `thrift:"tags,5,default,list<string>" json:"tags"`
	FriendIds []int64           `thrift:"friend_ids,6,default,set<i64>" json:"friend_ids"`
	Attrs     map[string]string `thrift:"attrs,7" json:"attrs"`
	Address   *Address          `thrift:"address,8" json:"address"`
	Gender    Gender            `thrift:"gender,9,default,Gender" json:"gender"`
	UserID    UserID            `thrift:"user_id,10" json:"user_id"`
}

// 嵌套结构体
type Address struct {
	City   string `thrift:"city,1" json:"city"`
	Detail string `thrift:"detail,2" json:"detail"`
}

// 枚举类型
type Gender int64

const (
	Gender_UNKNOWN Gender = 0
	Gender_MALE    Gender = 1
	Gender_FEMALE  Gender = 2
)

// 重新定义 type
type UserID = int64
这里要注意,friend_ids 定义的类型是 set<i64>,但是最终生成的代码是 []int64,就是切片类型,所以消息写入的时候是不会防止重复的,但是序列化发送请求的时候就会校验了,也就是下面的方法。
go
func (p *Profile) writeField6(oprot thrift.TProtocol) (err error) {
	if err = oprot.WriteFieldBegin("friend_ids", thrift.SET, 6); err != nil {
		goto WriteFieldBeginError
	}
	if err := oprot.WriteSetBegin(thrift.I64, len(p.FriendIds)); err != nil {
		return err
	}
	for i := 0; i < len(p.FriendIds); i++ {
		for j := i + 1; j < len(p.FriendIds); j++ {
			if reflect.DeepEqual(p.FriendIds[i], p.FriendIds[j]) {
				return thrift.PrependError("", fmt.Errorf("%T error writing set field: slice is not unique", p.FriendIds[i]))
			}
		}
	}
	for _, v := range p.FriendIds {
		if err := oprot.WriteI64(v); err != nil {
			return err
		}
	}
	if err := oprot.WriteSetEnd(); err != nil {
		return err
	}
	if err = oprot.WriteFieldEnd(); err != nil {
		goto WriteFieldEndError
	}
	return nil
WriteFieldBeginError:
	return thrift.PrependError(fmt.Sprintf("%T write field 6 begin error: ", p), err)
WriteFieldEndError:
	return thrift.PrependError(fmt.Sprintf("%T write field 6 end error: ", p), err)
}
1.2.3 exception
最后再来说下 exception,exception 意思是自定义异常,最终生成的 go 代码是一个结构体,只是语义上面表示异常。
go
type BizException struct {
	Code    int32  `thrift:"code,1" json:"code"`
	Message string `thrift:"message,2" json:"message"`
}
同时这个结构体也实现了 Error 方法。
go
func (p *BizException) Error() string {
	return p.String()
}

func (p *BizException) String() string {
	if p == nil {
		return "<nil>"
	}
	return fmt.Sprintf("BizException(%+v)", *p)

}
也就是说生成的结构体是 error 接口的实现类,打印错误就是将里面的字段打印出来。
2. 字段校验规则
2.1 optional
像 Profile.age 这种:
thrift
2: optional i32 age生成到 Go 后通常会是指针字段:
go
Age *int32optional 的意思是可选字段,如果不传就是零值或者空,只是说 go 里面基本数据类型如果传 0 值就没办法区分这个值到底是传了还是没传,比如 int32 零值是 0,那如果用户传了 0,这个字段在接收方看来到底是没传还是传了 0 就区分不了,所以生成的通常是指针,如果没传就是 nil。
我们可以通过下面这些方法判断它有没有设置:
profile.IsSetAge()profile.Age == nilprofile.GetAge()
go
func (p *Profile) IsSetAge() bool {
	return p.Age != nil
}

func (p *Profile) GetAge() (v int32) {
	if !p.IsSetAge() {
		return Profile_Age_DEFAULT
	}
	return *p.Age
}
2.2 required
thrift
1: required string name在这个项目生成出来的代码里,required 最明显的校验点在 Read 时,如果反序列化读到的数据里缺少 name,会返回 required field name is not set,具体可看 func (p *Profile) Read(iprot thrift.TProtocol) (err error) 这个方法。
这个点很容易误解:
required不是说你在 Go 里NewProfile()之后立刻就自动报错,因为string有零值""- 当前这个生成器的校验是发生在 Read 读取数据的时候
2.3 请求校验
Thrift 支持 annotation,不过它本身不执行校验,你可以这样写。
go
struct Profile {
  1: required string name (vt.min_size = "1")
  2: optional i32 age (vt.gt = "0", vt.lt = "151")
}
但是 Thrift 不会在生成代码的时候帮我们去生成校验的代码,也就是说 Thrift 本身不支持校验语法,其实 Protobuf 本身也不支持校验语法,前几篇文章出现的校验语法是 protoc-gen-validate 的功能。
但是有些团队会给 thriftgo 接插件,根据 annotation 自动生成 Validate() 方法,这种就接近 proto validate 的能力,但是还是一样,这种不是 thrift 本身自带的功能。
我们可以使用结构体标签 + kitex 去做校验,这个是最简单的,在之前的文章也就是 go 语言基础中也学习过。
go
type User struct {
    ID   int64  `json:"id" validate:"required,min=1"`
    Name string `validate:"required,min=2,max=32"`
    Age  int32  `validate:"required,gte=1,lte=150"`
}
此外也可以在服务入口统一校验,比如 handler/middleware 里统一做一些字段检测,举个例子,下面我们定义一个 user.thrift。
go
namespace go user

enum Status {
  UNKNOWN = 0
  ACTIVE = 1
  DISABLED = 2
}

struct UserProfile {
  1: required string name
  2: optional i32 age
  3: string email
  4: double balance
  5: list<string> tags
  6: Status status
}然后生成数据结构代码:thriftgo -r -g go:package_prefix=example.com/kitex-04/gen/ -o .\gen .\idl\user.thrift,最后在 main 方法中统一测试。
go
package main

import (
	"fmt"
	"strings"

	"example.com/kitex-04/gen/user"
)

func int32Ptr(v int32) *int32 {
	return &v
}

func ValidateUserProfile(p *user.UserProfile) error {
	if p == nil {
		return fmt.Errorf("profile cannot be nil")
	}
	if strings.TrimSpace(p.Name) == "" {
		return fmt.Errorf("name cannot be empty")
	}
	if len(p.Name) < 2 || len(p.Name) > 20 {
		return fmt.Errorf("name length must be between 2 and 20")
	}
	if p.IsSetAge() && (*p.Age < 1 || *p.Age > 150) {
		return fmt.Errorf("age must be between 1 and 150")
	}
	if !strings.Contains(p.Email, "@") {
		return fmt.Errorf("email must contain @")
	}
	if p.Balance < 0 {
		return fmt.Errorf("balance must be >= 0")
	}
	if len(p.Tags) > 5 {
		return fmt.Errorf("tags count must be <= 5")
	}
	for _, tag := range p.Tags {
		if strings.TrimSpace(tag) == "" {
			return fmt.Errorf("tag cannot be empty")
		}
		if len(tag) > 10 {
			return fmt.Errorf("tag length must be <= 10")
		}
	}
	switch p.Status {
	case user.Status_ACTIVE, user.Status_DISABLED:
	default:
		return fmt.Errorf("status must be ACTIVE or DISABLED")
	}
	return nil
}

func main() {
	ok := user.NewUserProfile()
	ok.Name = "alice"
	ok.Age = int32Ptr(20)
	ok.Email = "alice@example.com"
	ok.Balance = 88.5
	ok.Tags = []string{"go", "thrift"}
	ok.Status = user.Status_ACTIVE

	badAge := user.NewUserProfile()
	badAge.Name = "tom"
	badAge.Age = int32Ptr(200)
	badAge.Email = "tom@example.com"
	badAge.Balance = 10
	badAge.Tags = []string{"dev"}
	badAge.Status = user.Status_ACTIVE

	badName := user.NewUserProfile()
	badName.Name = " "
	badName.Email = "bad@example.com"
	badName.Balance = 10
	badName.Status = user.Status_ACTIVE

	badEmail := user.NewUserProfile()
	badEmail.Name = "jerry"
	badEmail.Email = "jerry.example.com"
	badEmail.Balance = 10
	badEmail.Status = user.Status_DISABLED

	badTags := user.NewUserProfile()
	badTags.Name = "lucy"
	badTags.Email = "lucy@example.com"
	badTags.Balance = 10
	badTags.Tags = []string{"ok", "", "very-long-tag"}
	badTags.Status = user.Status_ACTIVE

	samples := []struct {
		name string
		data *user.UserProfile
	}{
		{"ok", ok},
		{"badAge", badAge},
		{"badName", badName},
		{"badEmail", badEmail},
		{"badTags", badTags},
	}

	for _, sample := range samples {
		err := ValidateUserProfile(sample.data)
		fmt.Printf("%s => err=%v\n", sample.name, err)
	}
	// ok => err=<nil>
	// badAge => err=age must be between 1 and 150
	// badName => err=name cannot be empty
	// badEmail => err=email must contain @
	// badTags => err=tag cannot be empty
}
3. 文件拆分
3.1 介绍
上一篇文章简单演示了下 include 的写法,这里就来详细学习下。
一个真实服务的 IDL 往往不会全写在一个 .thrift 里,更常见的做法是:
- 公共响应单独放
common.thrift - 用户模型单独放
user.thrift - 订单模型单独放
order.thrift - 服务定义放在根文件,比如
demo.thrift
根据自己项目每个模块分工不同来拆分文件会比较好,而不是全塞到一个文件里面,这样生成的代码量比较多,看起来比较乱。
3.2 当前目录结构
本次要演示的例子的项目结构。
text
kitex-06
├── idl
│   ├── common.thrift
│   ├── user.thrift
│   ├── order.thrift
│   └── demo.thrift
├── kitex_gen
├── handler.go
├── main.go
└── cmd/client/main.go
3.3 Thrift 文件拆分
3.3.1 公共文件
common.thrift
go
namespace go common

struct BaseResp {
  1: i32 code
  2: string message
}
3.3.2 用户文件
user.thrift
go
namespace go user

struct User {
  1: i64 id
  2: string name
  3: i32 age
}
3.3.3 订单文件
order.thrift
go
namespace go order

struct Order {
  1: i64 order_id
  2: i64 user_id
  3: double amount
}
3.3.4 根服务文件
demo.thrift
go
include "common.thrift"
include "user.thrift"
include "order.thrift"

namespace go demo

include "common.thrift"
include "user.thrift"
include "order.thrift"

namespace go demo

struct GetUserRequest {
  1: i64 user_id
}

struct GetUserResponse {
  1: user.User user
  2: common.BaseResp base_resp
}

struct CreateOrderRequest {
  1: i64 user_id
  2: double amount
}

struct CreateOrderResponse {
  1: order.Order order
  2: common.BaseResp base_resp
}

service DemoService {
  GetUserResponse GetUser(1: GetUserRequest req)
  CreateOrderResponse CreateOrder(1: CreateOrderRequest req)
}
3.4 main 方法示例
kitex -module example.com/kitex-06 -I .\idl -service DemoService .\idl\demo.thrift
生成代码结构如下:
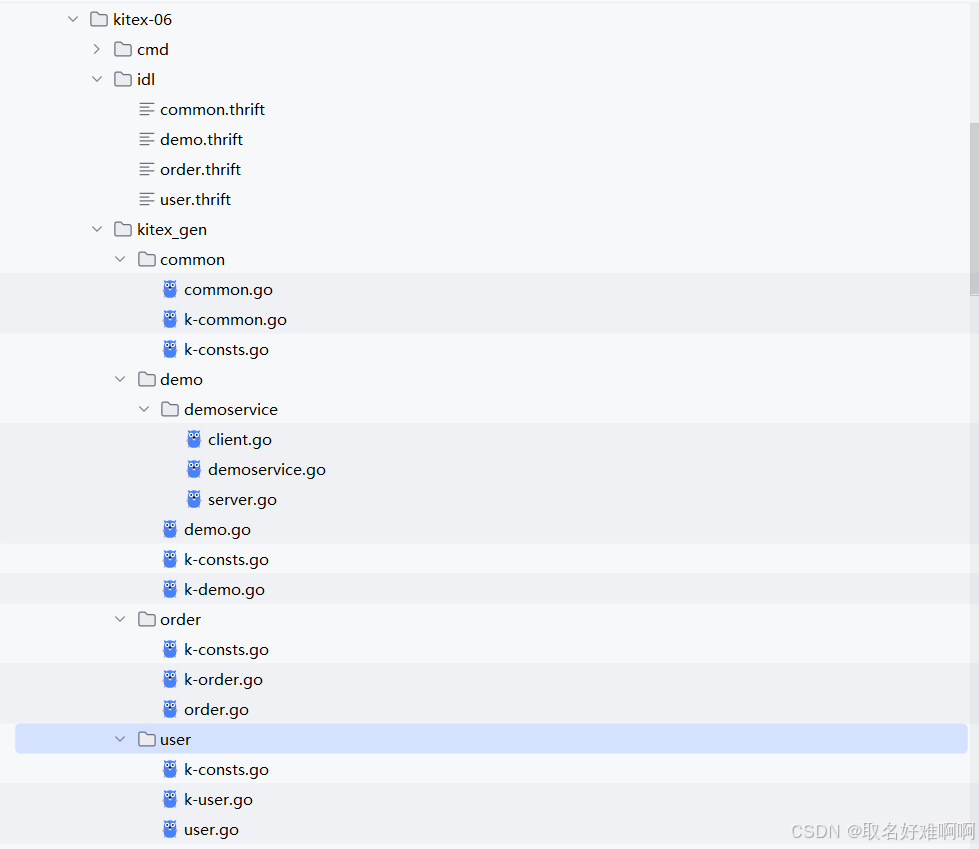
由于生成命令中使用了 -service,所以会生成一个结构体来实现所有接口。
go
package main

import (
	"context"
	common "example.com/kitex-06/kitex_gen/common"
	demo "example.com/kitex-06/kitex_gen/demo"
	order "example.com/kitex-06/kitex_gen/order"
	user "example.com/kitex-06/kitex_gen/user"
)

// DemoServiceImpl implements the last service interface defined in the IDL.
type DemoServiceImpl struct{}

// GetUser implements the DemoServiceImpl interface.
func (s *DemoServiceImpl) GetUser(ctx context.Context, req *demo.GetUserRequest) (resp *demo.GetUserResponse, err error) {
	resp = &demo.GetUserResponse{
		User: &user.User{
			Id:   req.UserId,
			Name: "alice",
			Age:  20,
		},
		BaseResp: &common.BaseResp{
			Code:    0,
			Message: "success",
		},
	}
	return resp, nil
}

// CreateOrder implements the DemoServiceImpl interface.
func (s *DemoServiceImpl) CreateOrder(ctx context.Context, req *demo.CreateOrderRequest) (resp *demo.CreateOrderResponse, err error) {
	resp = &demo.CreateOrderResponse{
		Order: &order.Order{
			OrderId: 10001,
			UserId:  req.UserId,
			Amount:  req.Amount,
		},
		BaseResp: &common.BaseResp{
			Code:    0,
			Message: "success",
		},
	}
	return resp, nil
}
下面是服务端的 main 方法。
go
package main

import (
	"log"
	"net"

	demo "example.com/kitex-06/kitex_gen/demo/demoservice"
	"github.com/cloudwego/kitex/server"
)

func main() {
	addr, err := net.ResolveTCPAddr("tcp", "127.0.0.1:8888")
	if err != nil {
		log.Println(err.Error())
		return
	}

	svr := demo.NewServer(
		new(DemoServiceImpl),
		server.WithServiceAddr(addr),
	)

	err = svr.Run()

	if err != nil {
		log.Println(err.Error())
	}
}
然后是客户端的启动代码。
go
package main

import (
	"context"
	demo "example.com/kitex-06/kitex_gen/demo"
	demoservice "example.com/kitex-06/kitex_gen/demo/demoservice"
	"fmt"
	"log"

	"github.com/cloudwego/kitex/client"
)

func main() {
	cli, err := demoservice.NewClient(
		"DemoService",
		client.WithHostPorts("127.0.0.1:8888"),
	)
	if err != nil {
		log.Fatal(err)
	}

	getUserResp, err := cli.GetUser(context.Background(), &demo.GetUserRequest{
		UserId: 1,
	})
	if err != nil {
		log.Fatal(err)
	}
	fmt.Printf("GetUser resp: %+v\n", getUserResp)

	createOrderResp, err := cli.CreateOrder(context.Background(), &demo.CreateOrderRequest{
		UserId: 1,
		Amount: 99.8,
	})
	if err != nil {
		log.Fatal(err)
	}
	fmt.Printf("CreateOrder resp: %+v\n", createOrderResp)
}
最后启动服务端和客户端,客户端的输出如下。
go
GetUser resp: GetUserResponse({User:User({Id:1 Name:alice Age:20}) BaseResp:BaseResp({Code:0 Message:success})})
CreateOrder resp: CreateOrderResponse({Order:Order({OrderId:10001 UserId:1 Amount:99.8}) BaseResp:BaseResp({Code:0 Message:success})})
4. 小结
好了,这篇文章就先到这,下一篇再继续学习 stream 相关的内容。
如有错误,欢迎指出!!!