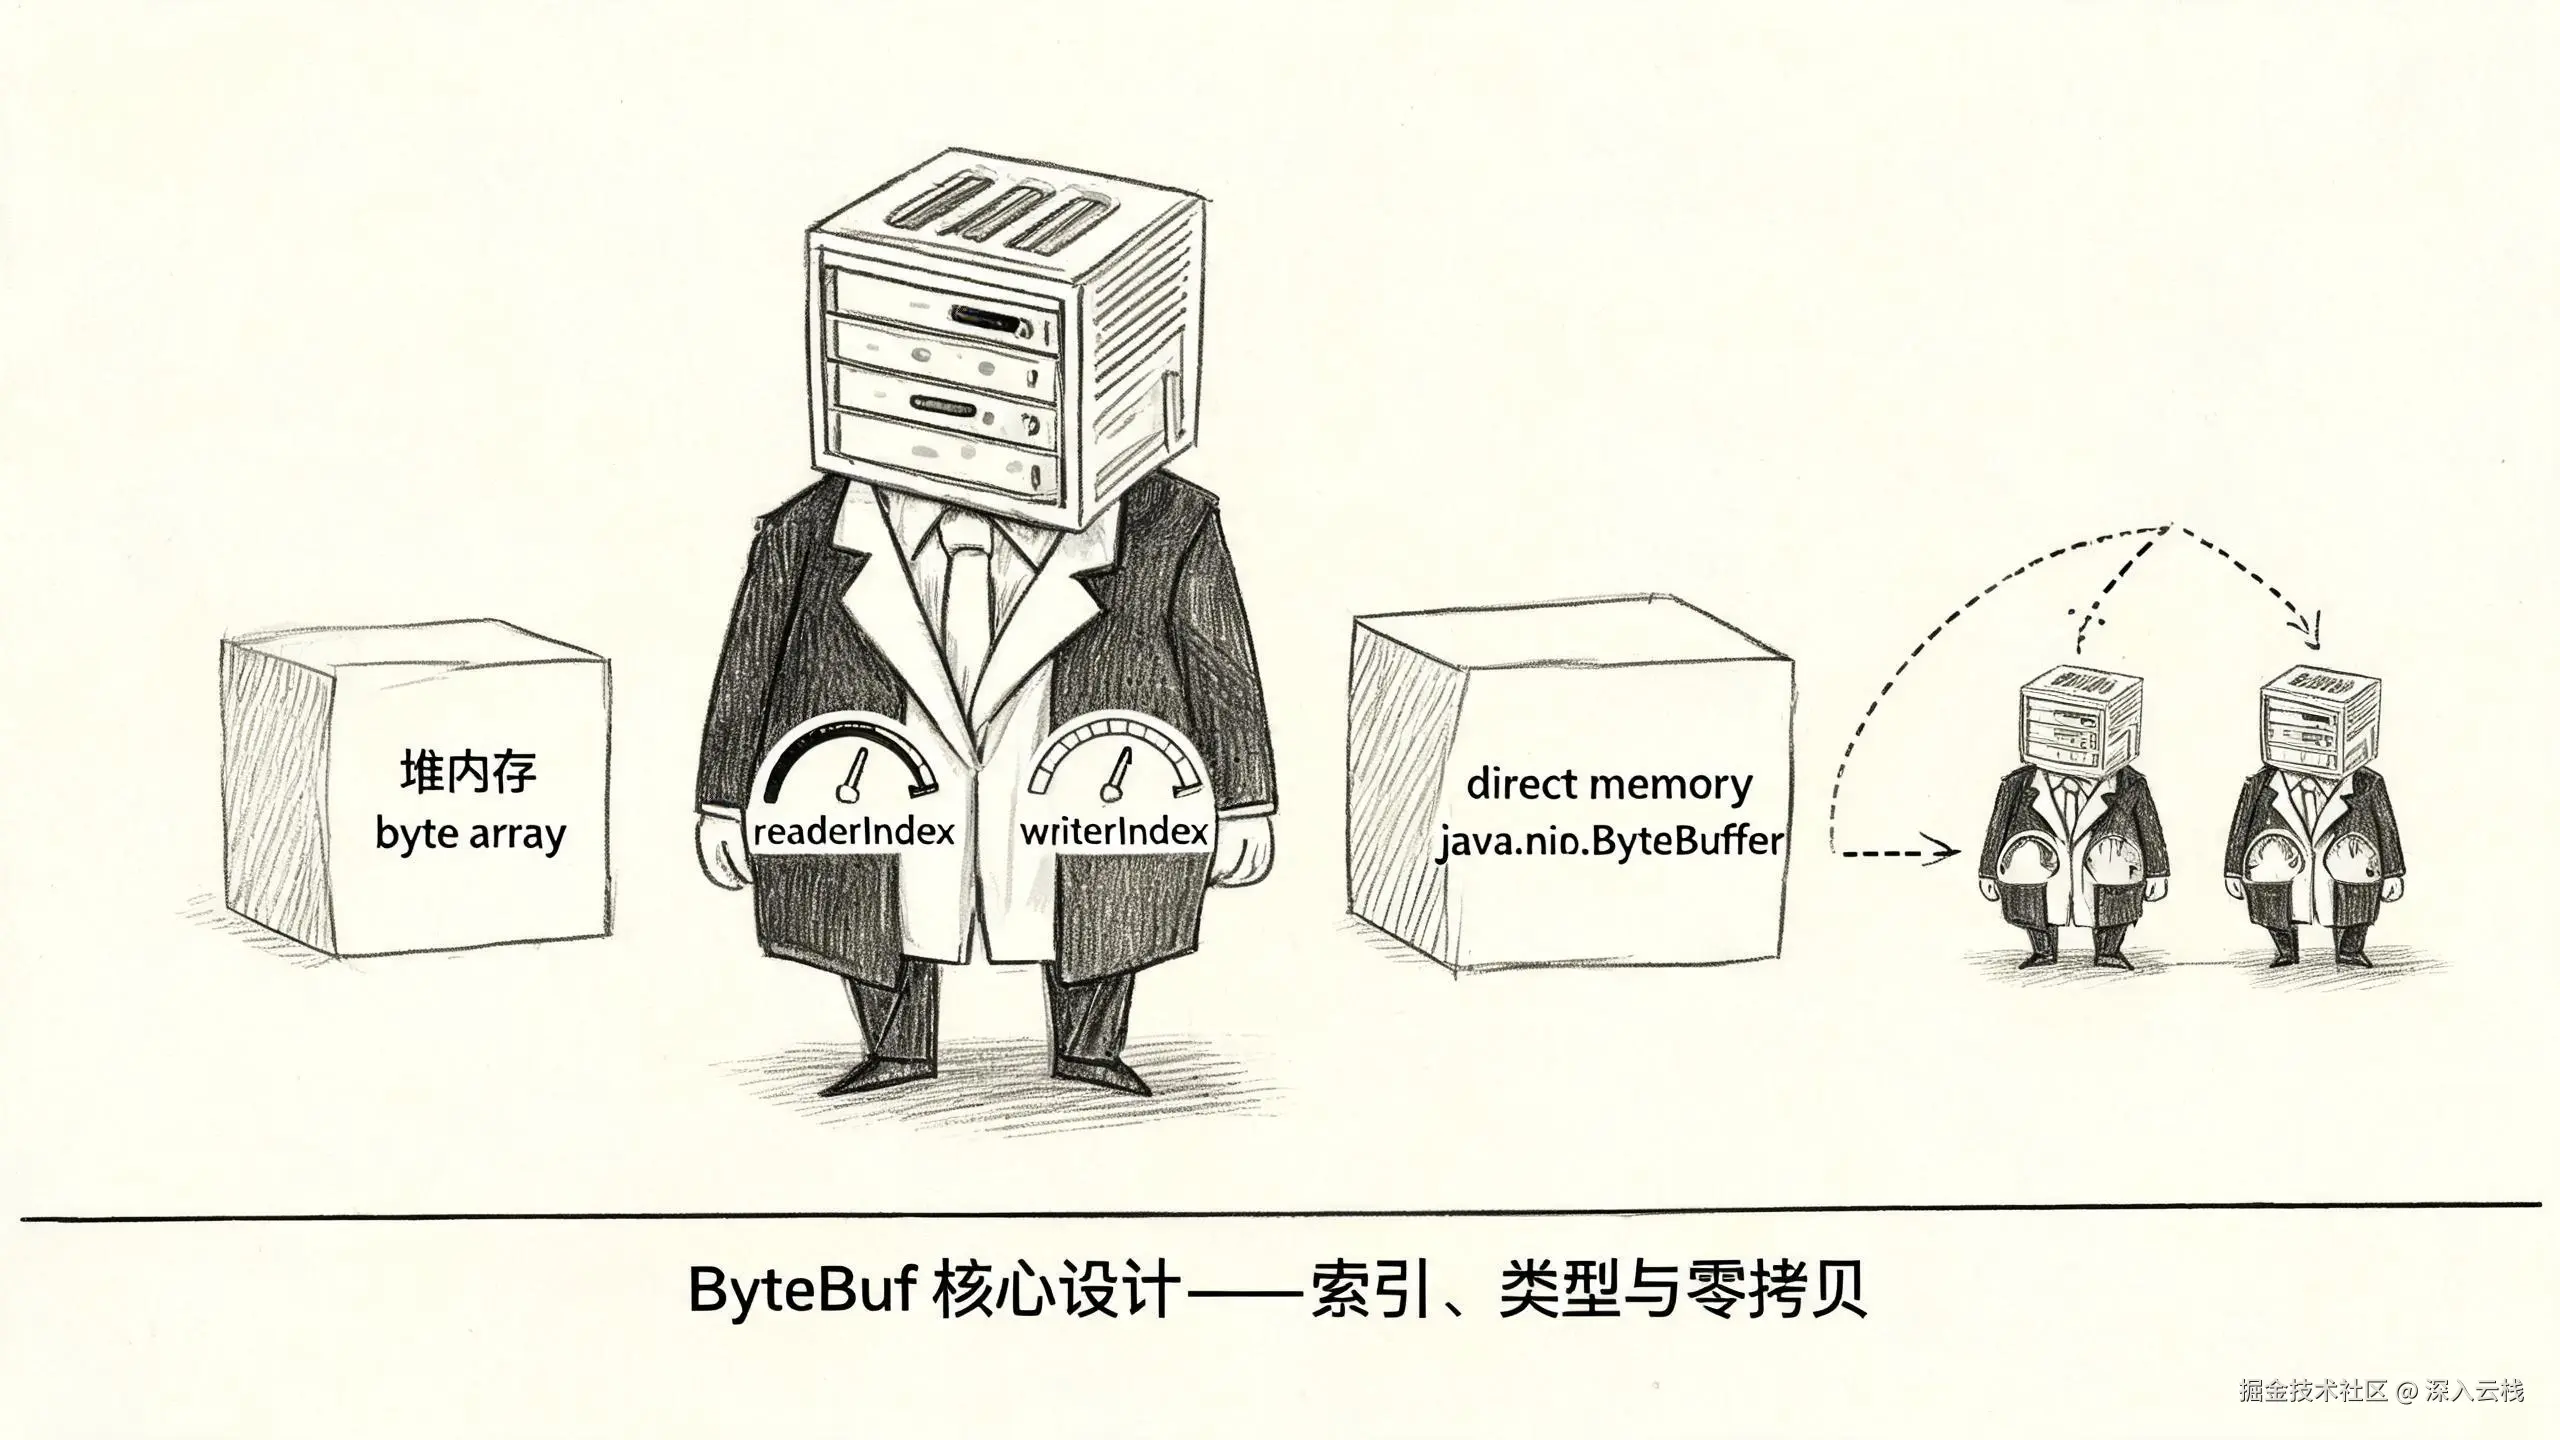
如果把 ChannelPipeline 比作 Netty 的"骨架",那么 ByteBuf 就是流淌其中的"血液":每一次 channelRead 入站、每一次 write 出站,I/O 数据都以 ByteBuf 为载体在网络与业务代码之间流转。Netty 之所以没有沿用 JDK 自带的 java.nio.ByteBuffer,而是自研了一套 ByteBuf 体系,根源在于 ByteBuffer 在真实网络编程场景下暴露了三个短板:单索引 position 混用读写、flip() 切换状态繁琐易错、创建后容量固定无法动态调整。ByteBuf 用 readerIndex 与 writerIndex 双索引彻底解耦读写,用 Heap/Direct × Pooled/Unpooled 的类型矩阵覆盖不同内存场景,又用 slice / duplicate / CompositeByteBuf 三类"共享底层内存、独立读写索引"的派生容器实现了零拷贝。理解 ByteBuf 的索引模型与类型矩阵,是进入 Netty 内存管理世界的第一道门,也是后续池化分配、引用计数与泄漏检测、自适应分配等话题的共同地基。
围绕 ByteBuf 的"索引模型 → 指针操作 → 类型矩阵 → 零拷贝"四条主线,以下几个问题将贯穿本文的源码分析主线:
- JDK
ByteBuffer的单索引position与flip()到底带来了哪些麻烦?Netty 的ByteBuf如何用readerIndex/writerIndex双索引从根本上规避"读写状态切换"这一心智负担? readerIndex/writerIndex/capacity三者之间的恒定关系是什么?readableBytes()/writableBytes()/isReadable()等派生指标是如何由这三个指针实时计算出来的?read*/write*顺序访问与get*/set*随机访问在"是否移动指针"上的本质区别是什么?AbstractByteBuf的模板方法如何把指针移动逻辑与底层存取逻辑解耦?markReaderIndex()/resetReaderIndex()、discardReadBytes()、clear()三个"指针管理"操作的语义差异是什么?为何clear()不清数据、discardReadBytes()却要搬移数据?UnpooledHeapByteBuf(底层byte[])与UnpooledDirectByteBuf(底层java.nio.ByteBuffer)的差异在哪里?slice/duplicate/retainedSlice/retainedDuplicate与CompositeByteBuf又是如何做到"不复制数据、只共享底层内存"的零拷贝?
本文将沿着 ByteBuf "设计动机 → 索引模型 → 指针操作 → 类型矩阵 → 零拷贝派生 → 工具类与模板方法"的主线,先对比 ByteBuffer 与 ByteBuf 剖析设计升级,再深入 readerIndex / writerIndex / capacity 的读写分离模型与指针移动规则,随后逐一拆解 mark/reset、discardReadBytes、clear 的复用语义,接着铺开 Heap/Direct × Pooled/Unpooled 类型矩阵与两种 Unpooled 底层实现,最后分析切片/派生/聚合三类零拷贝容器的内存共享机制与 Unpooled 工具类、AbstractByteBuf 模板方法模式。
一、从 JDK ByteBuffer 到 Netty ByteBuf:设计缺陷与架构升级
1.1 ByteBuffer 的三个原生短板
java.nio.ByteBuffer 是 JDK 早在 NIO 时代就引入的字节容器,但它的设计面向的是"通用 Buffer 操作",并未针对网络编程中"频繁读写、反复复用"的场景做专门优化。Netty 的文档与源码注释反复强调,ByteBuffer 存在三个让人头疼的原生短板。
第一,单索引 position 同时充当读写游标。 在 ByteBuffer 中,读数据和写数据共用同一个 position 指针:从 position 开始读、往 position 处写,两者互相污染。你想读的数据和你刚写入的数据,位置关系全被揉进同一个游标里,稍不留神就"读到了还没写的位置"或"覆盖了刚写完的数据"。
第二,flip() / clear() / rewind() 需要手动切换读写模式。 因为读写共用一个 position,ByteBuffer 强制开发者用 flip() 把 limit 置为当前 position 并把 position 归零,从而完成"写模式 → 读模式"的切换;读完再 clear() 切回"读模式 → 写模式"。这套切换一旦配错,就会抛出 BufferUnderflowException 或 BufferOverflowException,是 NIO 编程里最经典的坑。
第三,创建后容量固定。 通过 allocate(int) / allocateDirect(int) 创建的 ByteBuffer 容量是写死的,无法按需动态扩容。在网络场景下,一条消息的长度往往事先未知,开发者只能"先估一个足够大的容量",白白浪费内存,或者自己实现一套扩容逻辑。
这三个短板叠加起来,让 ByteBuffer 在 Netty 这种"高性能、长连接、消息长度多变"的场景下显得捉襟见肘,也直接催生了 ByteBuf 的自研。
1.2 ByteBuf 的五点架构升级
针对 ByteBuffer 的三个短板,Netty 的 ByteBuf 做了五点系统性升级:
一是双索引读写分离。 用 readerIndex 与 writerIndex 两个独立指针分别管理读位置与写位置,读操作只移动 readerIndex、写操作只移动 writerIndex,从根本上消灭了 flip() 这套心智负担。
二是动态扩容。 ByteBuf 的 capacity 可以在写入过程中按需增长,只要不超过 maxCapacity 上限即可,无需开发者预先估容量。
三是引用计数。 ByteBuf 实现了 ReferenceCounted 接口,通过 retain() / release() 维护引用计数,配合 Netty 的泄漏检测,实现内存的确定性释放。
四是零拷贝派生。 slice() / duplicate() / CompositeByteBuf 等派生容器共享底层内存、只维护独立的读写索引,避免了对同一批字节的反复拷贝。
五是池化分配。 PooledByteBufAllocator 把内存的分配与回收收敛到池化体系中,减少频繁分配带来的开销与 GC 压力。
一句话概括 ByteBuf 的定位:它是 Netty 自研的字节容器抽象 ,既支持 get* / set* 随机访问,又支持 read* / write* 顺序访问;底层内存既可以是 JVM 堆内(Heap),也可以是堆外直接内存(Direct),二者还可与池化/非池化两两组合。下面的"单索引 vs 双索引"对比图,直观呈现了二者在读写模型上的根本差异:
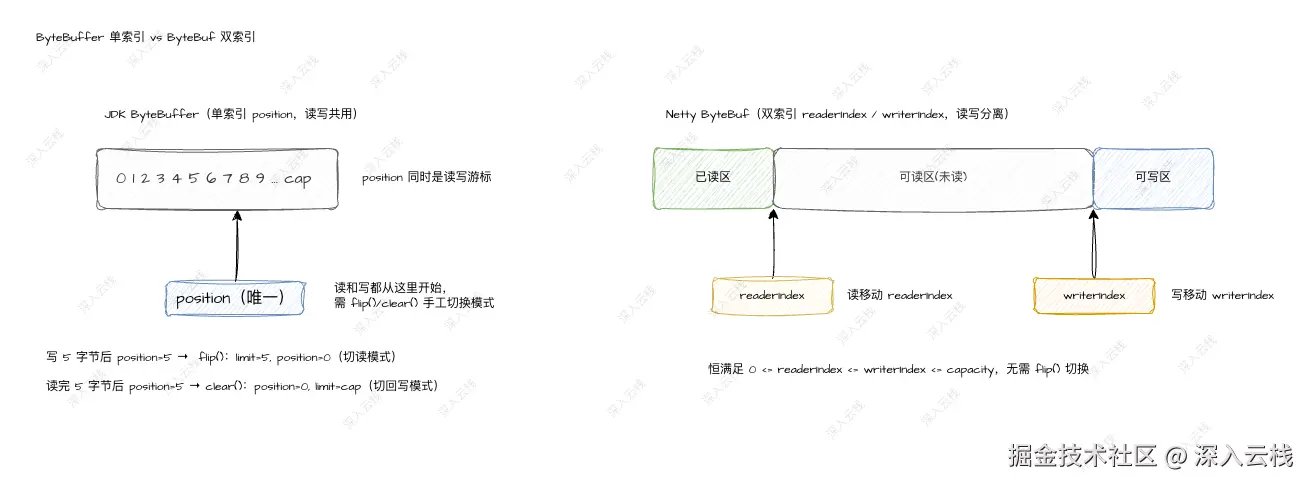
可以看到,ByteBuf 用两个指针把"已读区 / 可读区 / 可写区"三个区域清晰地切分开,读和写各走各的指针,互不干扰。
二、双索引读写模型:readerIndex / writerIndex / capacity
2.1 三指针的恒定关系
ByteBuf 接口的头部注释里,用一张图明确给出了三个指针的恒定关系:
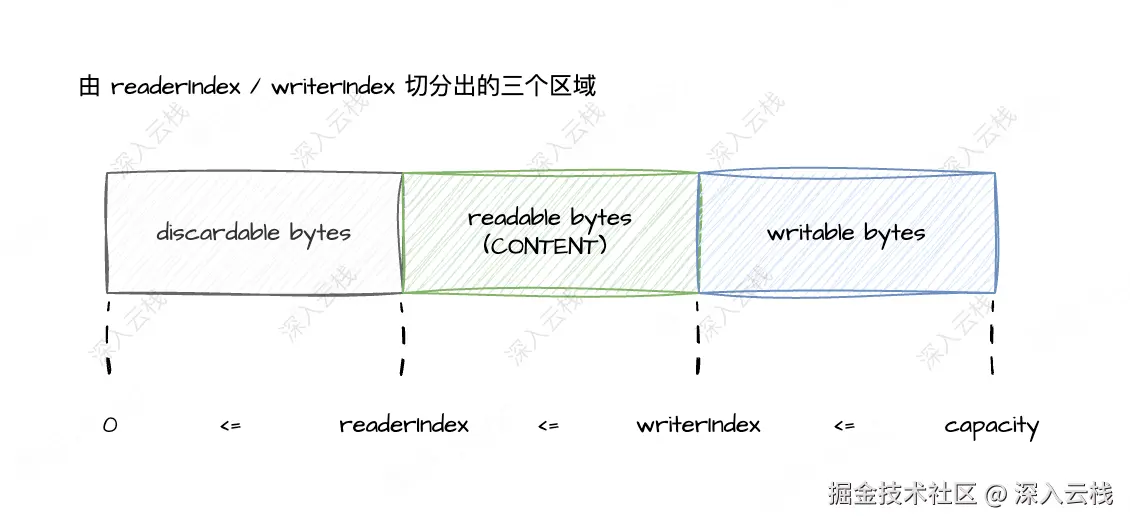
这个不等式 0 <= readerIndex <= writerIndex <= capacity 是全文唯一不变的铁律:readerIndex 是读指针,writerIndex 是写指针,capacity 是当前容量。所有读写操作、所有派生指标,都从这条铁律推导而来。三个指针的含义分别是:
readerIndex:读指针,所有read*/skip*操作从该位置读取/跳过,并把指针向前递增;writerIndex:写指针,所有write*操作把数据写入该位置,并把指针向前递增;capacity:当前容量,[0, readerIndex)是已读区、[readerIndex, writerIndex)是可读区、[writerIndex, capacity)是可写区。
在 ByteBuf 接口中,这三个指针的读取与设置方法以抽象方法声明,把"怎么存"交给实现类:
java
io.netty.buffer.ByteBuf#readerIndex / #writerIndex / #setIndex

public abstract int readerIndex();

public abstract ByteBuf readerIndex(int readerIndex);

public abstract int writerIndex();

public abstract ByteBuf writerIndex(int writerIndex);

public abstract ByteBuf setIndex(int readerIndex, int writerIndex);
其中 setIndex(int readerIndex, int writerIndex) 一次设置两个指针,接口注释特别强调:不能简单地先 readerIndex(x) 再 writerIndex(y),因为中间状态可能违反 readerIndex <= writerIndex 的铁律而抛越界异常,必须用 setIndex 一次性设置。
2.2 由三指针派生的可读/可写指标
有了三个指针,可读字节数、可写字节数等指标都能实时计算出来,而不需要任何额外字段存储。AbstractByteBuf 对这几个派生指标的实现一目了然:
java
io.netty.buffer.AbstractByteBuf#isReadable / #readableBytes / #writableBytes

@Override
public boolean isReadable() {
    return writerIndex > readerIndex;
}

@Override
public int readableBytes() {
    return writerIndex - readerIndex;
}

@Override
public int writableBytes() {
    return capacity() - writerIndex;
}

@Override
public int maxWritableBytes() {
    return maxCapacity() - writerIndex;
}这里的逻辑非常直白:可读字节数 是 writerIndex - readerIndex,可写字节数 是 capacity - writerIndex,最大可写字节数 是 maxCapacity - writerIndex。isReadable() 判断是否有未读数据(writerIndex > readerIndex),isWritable() 判断是否还能继续写(capacity > writerIndex)。
于是,一段典型的循环读和循环写便水到渠成------用 while (buffer.isReadable()) 逐个 readByte(),用 while (buffer.writableBytes() >= 4) 逐个 writeInt()。这个模型的价值在于:可读区永远就是"已经写进来、还没读出去"的那段数据,程序员不再需要关心任何"模式切换",读到哪、写到哪一目了然。
三、索引操作:read 与 write 如何移动指针
3.1 顺序访问:读动 readerIndex,写动 writerIndex
ByteBuf 上以 read 和 write 开头的方法属于顺序访问 ------它们隐式地以当前指针为起点,并在操作完成后自动前移指针。以 readInt() 为例,AbstractByteBuf 的模板实现只有三步:
java
io.netty.buffer.AbstractByteBuf#readInt

@Override
public int readInt() {
    checkReadableBytes0(4);
    int v = _getInt(readerIndex);
    readerIndex += 4;
    return v;
}
第一步 checkReadableBytes0(4) 校验剩余可读字节是否足够 4 个,不够就抛 IndexOutOfBoundsException;第二步 _getInt(readerIndex) 从 readerIndex 处读出 4 字节整数;第三步把 readerIndex 前移 4 位。写操作与之对称,writeInt() 也是三步,只是把"校验可读"换成"校验可写并可能扩容":
java
io.netty.buffer.AbstractByteBuf#writeInt

@Override
public ByteBuf writeInt(int value) {
    ensureWritable0(4);
    _setInt(writerIndex, value);
    writerIndex += 4;
    return this;
}
这里 ensureWritable0(4) 与 checkReadableBytes0(4) 的差异是异步读写信心的关键:读越界直接抛异常(没有数据就是没有数据),写越界则先尝试 capacity 扩容,直到超过 maxCapacity 才抛异常。这正是"动态扩容"在指针层面的落点。
3.2 随机访问:get / set 不移动指针
与顺序访问相对,get / set 方法属于随机访问 ------它们以显式传入的 index 为起点,操作完成后不动任何指针 。getInt(int index) 与 setInt(int index, int value) 的实现同样简单:
java
io.netty.buffer.AbstractByteBuf#getInt / #setInt / #_getInt / #_setInt

@Override
public int getInt(int index) {
    checkIndex(index, 4);
    return _getInt(index);
}

protected abstract int _getInt(int index);

@Override
public ByteBuf setInt(int index, int value) {
    checkIndex(index, 4);
    _setInt(index, value);
    return this;
}

protected abstract void _setInt(int index, int value);
注意 getInt / setInt 只调用 checkIndex 做一次绝对下标越界校验,然后直接委托给抽象方法 _getInt / _setInt,指针纹丝不动。这就引出了 AbstractByteBuf 最核心的设计------模板方法模式 :readInt / writeInt 这类"指针移动 + 边界校验"的通用逻辑在父类里写死,而"到底从堆内 byte[] 还是堆外 ByteBuffer 读 4 个字节"这个底层差异,则下沉给 _getInt / _setInt 由各子类实现。一次校验、一次存取、一次指针前移,三步模板把"指针语义"与"内存介质"彻底解耦,后文第五节我们会看到 Heap 与 Direct 两种子类如何各自实现这套底层存取。
四、指针管理与空间复用:mark/reset、discardReadBytes、clear
指针除了随读写自动前移,还能被"记住、回退、归零"。AbstractByteBuf 提供了三组指针管理操作,分别对应三种不同的复用语义。
4.1 markReaderIndex / resetReaderIndex:读位置回退
InputStream 有 mark(int readlimit) 与 reset(),ByteBuf 也提供了一对标记方法,用于"读了一半发现数据不完整,回退重读"的粘包/半包场景:
java
io.netty.buffer.AbstractByteBuf#markReaderIndex / #resetReaderIndex

@Override
public ByteBuf markReaderIndex() {
    markedReaderIndex = readerIndex;
    return this;
}

@Override
public ByteBuf resetReaderIndex() {
    readerIndex(markedReaderIndex);
    return this;
}
markReaderIndex() 把当前 readerIndex 存进私有字段 markedReaderIndex,resetReaderIndex() 再通过 readerIndex(markedReaderIndex) 回退。除读指针外,ByteBuf 还对称地提供了 markWriterIndex() / resetWriterIndex(),把写指针也纳入标记体系,配合两个私有字段 markedReaderIndex、markedWriterIndex。
4.2 discardReadBytes:搬移未读数据、回收已读空间
顺序读得越多,[0, readerIndex) 这段"已读区"就越大,但底层内存并不减少。长连接场景下,同一个 buffer 反复读、反复写,已读区会越积越大,可写区越来越小。discardReadBytes() 就是为回收这段已读空间而生的:
java
io.netty.buffer.AbstractByteBuf#discardReadBytes

@Override
public ByteBuf discardReadBytes() {
    if (readerIndex == 0) {
        ensureAccessible();
        return this;
    }

    if (readerIndex != writerIndex) {
        setBytes(0, this, readerIndex, writerIndex - readerIndex);
        writerIndex -= readerIndex;
        adjustMarkers(readerIndex);
        readerIndex = 0;
    } else {
        ensureAccessible();
        adjustMarkers(readerIndex);
        writerIndex = readerIndex = 0;
    }
    return this;
}

protected final void adjustMarkers(int decrement) {
    if (markedReaderIndex <= decrement) {
        markedReaderIndex = 0;
        if (markedWriterIndex <= decrement) {
            markedWriterIndex = 0;
        } else {
            markedWriterIndex -= decrement;
        }
    } else {
        markedReaderIndex -= decrement;
        markedWriterIndex -= decrement;
    }
}
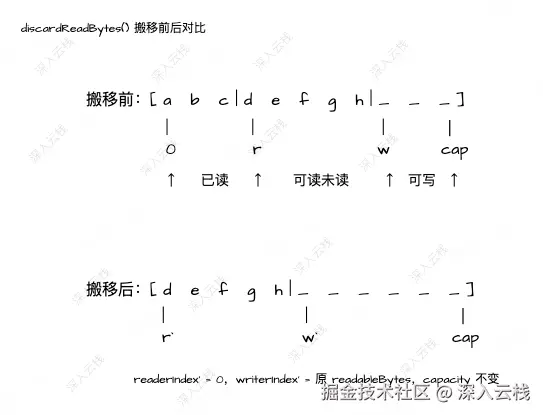
这段代码的意图很清晰:当 readerIndex == 0 时无已读空间可回收,直接返回;否则调用 setBytes(0, this, readerIndex, writerIndex - readerIndex) 把 [readerIndex, writerIndex) 的未读数据整体搬移到数组头部,再把 writerIndex 减去 readerIndex、readerIndex 归零。搬移之后还必须调用 adjustMarkers(readerIndex) 把 markedReaderIndex / markedWriterIndex 同步前移,否则标记会悬空指向已被搬走的位置。
需要注意两点:其一,discardReadBytes() 会做一次真实的字节搬移(对 Heap 是 System.arraycopy),有一定开销,所以 AbstractByteBuf 还提供了 discardSomeReadBytes(),只在 readerIndex >= capacity() >>> 1 时------即已读区超过一半容量------才真正搬移,避免"读一点就搬一次"的频繁开销。其二,搬移后 writable bytes 的内容没有保证,接口注释明确说明这些可写字节"可能被填上完全不同的数据"。下图示意了搬移前后的指针变化:
4.3 clear:仅归零指针,不清数据
与 discardReadBytes() 不同,clear() 的语义极其克制------它只是把两个指针都归零,既不清数据、也不搬移、更不释放内存:
java
io.netty.buffer.AbstractByteBuf#clear

@Override
public ByteBuf clear() {
    readerIndex = writerIndex = 0;
    return this;
}
clear() 的语义与 JDK ByteBuffer.clear() 完全不同 。ByteBuffer.clear() 是"读模式切回写模式"的状态切换,而 ByteBuf.clear() 只是"逻辑清空以便整包复用"------它假设你接下来要往整块 buffer 里重新写一遍,旧数据即将被覆盖,因此无需清零。这一点接口注释特别提醒:它"不清理 buffer 内容(例如填 0),只是清掉两个指针"。典型的场景是:写完一条消息 → 直接用 read* 读给对端 → 读完 clear() → 整块复用写下一轮。
三者的语义对照非常清晰:mark/reset 是"读位置回退"、discardReadBytes 是"搬移未读数据回收已读空间"、clear 是"指针归零以便整包复用"。
五、内存分类矩阵:Heap/Direct 与 Pooled/Unpooled
5.1 两个正交维度组成的四象限
ByteBuf 的类型矩阵由两个正交维度组合而成:内存位置 (堆内 Heap / 堆外 Direct)与分配方式 (非池化 Unpooled / 池化 Pooled),两两组合出四象限:
ByteBuf 类型矩阵:内存位置 × 分配方式
| 分配方式 \ 内存位置 | Heap(JVM 堆内) | Direct(堆外直接内存) |
|---|---|---|
| Unpooled(非池化) | UnpooledHeapByteBuf,底层 byte[] |
UnpooledDirectByteBuf,底层 java.nio.ByteBuffer |
| Pooled(池化) | PooledHeapByteBuf,池化分配器托管 |
PooledDirectByteBuf,池化分配器托管 |
判定接口:hasArray() 返回 true 则为 Heap,array() 暴露 byte[]。
判定一个 ByteBuf 是 Heap 还是 Direct,最直接的入口是 hasArray() / array():Heap buffer 底层是 JVM 的 byte[],hasArray() 返回 true 且 array() 暴露该数组;Direct buffer 底层是 java.nio.ByteBuffer,hasArray() 返回 false。池化两条 PooledHeapByteBuf / PooledDirectByteBuf 由池化分配器托管,本文聚焦 Unpooled 两条基础实现,池化机制另文展开。
5.2 UnpooledHeapByteBuf:底层 byte\[\]
UnpooledHeapByteBuf 继承自 AbstractReferenceCountedByteBuf,底层就是一块朴素的 byte[]:
java
io.netty.buffer.UnpooledHeapByteBuf

public class UnpooledHeapByteBuf extends AbstractReferenceCountedByteBuf {

    private final ByteBufAllocator alloc;

    byte[] array;
    private ByteBuffer tmpNioBuf;

    public UnpooledHeapByteBuf(ByteBufAllocator alloc, int initialCapacity, int maxCapacity) {
        super(maxCapacity);
        ...
        this.alloc = checkNotNull(alloc, "alloc");
        setArray(allocateArray(initialCapacity));
        setIndex(0, 0);
    }
}
字段 byte[] array 是包私有成员(供子类与同包工具类直接访问),构造时通过 allocateArray(initialCapacity) 分配数组并把读写指针都初始化为 0。抽象方法 _getInt / _setInt 的实现直接把字节存取转交给 HeapByteBufUtil 这个静态工具类,本质上是对数组的按位读写:
java
io.netty.buffer.UnpooledHeapByteBuf#_getInt / #_setInt

@Override
protected int _getInt(int index) {
    return HeapByteBufUtil.getInt(array, index);
}

@Override
protected void _setInt(int index, int value) {
    HeapByteBufUtil.setInt(array, index, value);
}
hasArray() 固定返回 true,array() 返回底层数组,使得 Heap buffer 可以被需要 byte[] 的 JDK 组件直接消费。扩容时 capacity(int newCapacity) 走"分配新数组 → System.arraycopy 拷贝 → 换绑 array"的经典流程。堆内存的优势是分配/回收开销低、访问快,代价是会占用 JVM 堆、可能诱发 GC。
5.3 UnpooledDirectByteBuf:底层 java.nio.ByteBuffer
UnpooledDirectByteBuf 同样继承 AbstractReferenceCountedByteBuf,但底层换成了堆外的 ByteBuffer:
java
io.netty.buffer.UnpooledDirectByteBuf

public class UnpooledDirectByteBuf extends AbstractReferenceCountedByteBuf {

    private final ByteBufAllocator alloc;

    CleanableDirectBuffer cleanable;
    ByteBuffer buffer;
    private ByteBuffer tmpNioBuf;
    private int capacity;
    private boolean doNotFree;
    ...
}
堆外内存的申请走 allocateDirectBuffer(int capacity),最终委托 PlatformDependent.allocateDirect(capacity, false) 返回一个 CleanableDirectBuffer(可清理的堆外缓冲):
java
io.netty.buffer.UnpooledDirectByteBuf#allocateDirectBuffer

protected CleanableDirectBuffer allocateDirectBuffer(int capacity) {
    return PlatformDependent.allocateDirect(capacity, false);
}
底层字节存取与 Heap 版形成鲜明对照------Heap 落到 byte[] 数组,Direct 落到 ByteBuffer 的 get / put(当 JVM 支持 VarHandle 时还会走更快的 VarHandleByteBufferAccess 路径):
java
io.netty.buffer.UnpooledDirectByteBuf#_getByte / #_setInt

@Override
protected byte _getByte(int index) {
    return buffer.get(index);
}

@Override
protected void _setInt(int index, int value) {
    if (PlatformDependent.hasVarHandle()) {
        VarHandleByteBufferAccess.setIntBE(buffer, index, value);
        return;
    }
    buffer.putInt(index, value);
}
堆外内存的好处是读写不经 JVM 堆、不触发 GC,且能被 native 传输直接寻址(配合 hasMemoryAddress() / memoryAddress()),因此是网络 I/O 的首选;代价是分配与释放的系统调用开销高于堆内存。至此,AbstractByteBuf 的模板方法价值就体现出来了:readInt / writeInt 的指针移动逻辑只写一份,Heap 与 Direct 子类只需各自由 _getInt / _setInt 决定"从哪种介质读、往哪种介质写"。
六、零拷贝派生缓冲区:slice / duplicate / retainedSlice / retainedDuplicate
6.1 共享底层内存、独立读写索引
先说清楚一个概念边界,免得读者把这两种"零拷贝"搞混。Netty 官方 Wiki 和社区教程里,习惯把 wrap / slice / duplicate / CompositeByteBuf 这类操作统称为 zero-copy 特性,它省掉的是应用层对同一批字节的整块拷贝;而操作系统内核层面 DMA、sendfile、mmap 那种零拷贝省掉的,是数据在内核态与用户态之间来回搬运的开销,二者完全是两个不同的层次。严格说,这里更像浅拷贝------只是新建了一个视图对象头,payload 一个字节都没复制。后文再说到"零拷贝",指的都是这份应用层语义。
回到 slice / duplicate 上,所谓"派生",就是原 buffer 的底层内存纹丝不动,派生的 ByteBuf 只是多出一组独立的 readerIndex / writerIndex / 标记索引,读写互不干扰。ByteBuf 接口注释概括得很清楚------派生 buffer 拥有独立的指针,却共享内部数据表示,"就像一个 NIO buffer 一样"。AbstractByteBuf 里这几个方法(含两个带参重载)的实现如下:
java
io.netty.buffer.AbstractByteBuf#duplicate / #slice / #retainedDuplicate / #retainedSlice

@Override
public ByteBuf duplicate() {
    ensureAccessible();
    return new UnpooledDuplicatedByteBuf(this);
}

@Override
public ByteBuf retainedDuplicate() {
    return duplicate().retain();
}

@Override
public ByteBuf slice() {
    return slice(readerIndex, readableBytes());
}

@Override
public ByteBuf retainedSlice() {
    return slice().retain();
}

@Override
public ByteBuf slice(int index, int length) {
    ensureAccessible();
    return new UnpooledSlicedByteBuf(this, index, length);
}

@Override
public ByteBuf retainedSlice(int index, int length) {
    return slice(index, length).retain();
}
duplicate() 和 slice() 的语义差异体现在覆盖范围上:duplicate() 返回共享整个底层内存 的完整视图(视图的容量与原 buffer 一致,读写索引独立);slice() 则默认只切出可读区间 [readerIndex, writerIndex),也可以 slice(int index, int length) 指定任意区间。下图展示了二者在"共享底层 + 独立索引"上的区别:
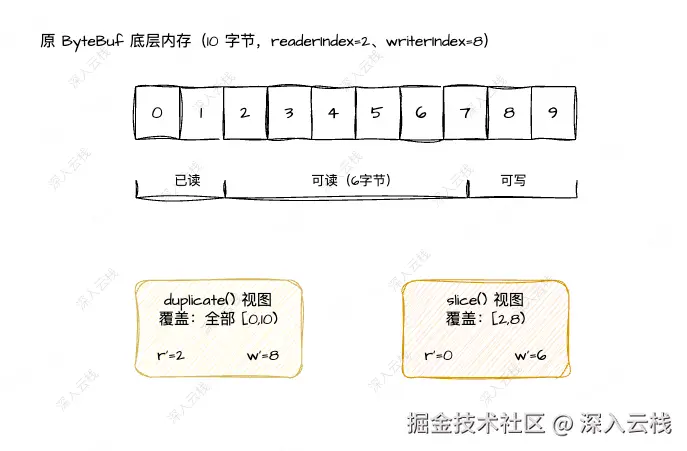
零拷贝的价值在协议解析里体现得最直接:把一条完整的消息 buffer 用 slice() 切出 header 段、body 段,各段独立维护 readerIndex / writerIndex,却都指向同一块内存,全程零拷贝。
6.2 retained 前缀与 copy 的对比
retainedDuplicate() / retainedSlice() 与不带 retained 前缀的版本,差别只在一处:前者会在返回前多调一次 retain(),把派生 buffer 的引用计数加 1。接口注释把这一层说得很明白------duplicate() / slice() 不会 调用 retain(),派生 buffer 的引用计数不会增加;如果派生 buffer 在被使用前、原 buffer 先被 release() 释放,派生 buffer 就会悬空指向一块已归还的内存。因此需要让派生视图"独立存活"时,应使用 retainedDuplicate() / retainedSlice()。
与之相对的还有 copy():copy() 是深拷贝,生成一块全新的独立内存,与原 buffer 彻底无关,安全但付出一次完整拷贝的代价。选择零拷贝派生还是深拷贝,本质是在"内存开销"与"生命周期/并发安全"之间的权衡------零拷贝省内存,但必须靠引用计数约定好"谁先释放、谁还能用"。
七、CompositeByteBuf:零拷贝聚合多个 ByteBuf
7.1 组件数组与 addComponent
slice / duplicate 解决的是"一块内存切分视图",而 CompositeByteBuf 解决的是相反的问题------把多个 ByteBuf 聚合成一个逻辑大 buffer,聚合过程同样不复制数据。它继承 AbstractReferenceCountedByteBuf 并实现 Iterable<ByteBuf>,核心是一块可动态扩容的组件数组:
java
io.netty.buffer.CompositeByteBuf

public class CompositeByteBuf extends AbstractReferenceCountedByteBuf implements Iterable<ByteBuf> {

    private final int maxNumComponents;
    private Component[] components;
    ...
}
每个组件被封装成内部静态类 Component,它持有原始 buffer 的引用,以及该组件在整个 CompositeByteBuf 中的偏移量信息:
java
io.netty.buffer.CompositeByteBuf.Component

private static final class Component {
    final ByteBuf srcBuf;
    final ByteBuf buf;

    int offset;
    int endOffset;
    ...
    int length() {
        return endOffset - offset;
    }
}
Component 里的 offset 与 endOffset 记录了该组件在聚合 buffer 中的全局位置区间,length() 就是该组件的字节数。往聚合 buffer 里追加组件,走的是 addComponent:
java
io.netty.buffer.CompositeByteBuf#addComponent

public CompositeByteBuf addComponent(boolean increaseWriterIndex, ByteBuf buffer) {
    return addComponent(increaseWriterIndex, componentCount, buffer);
}

public CompositeByteBuf addComponents(ByteBuf... buffers) {
    return addComponents(false, buffers);
}
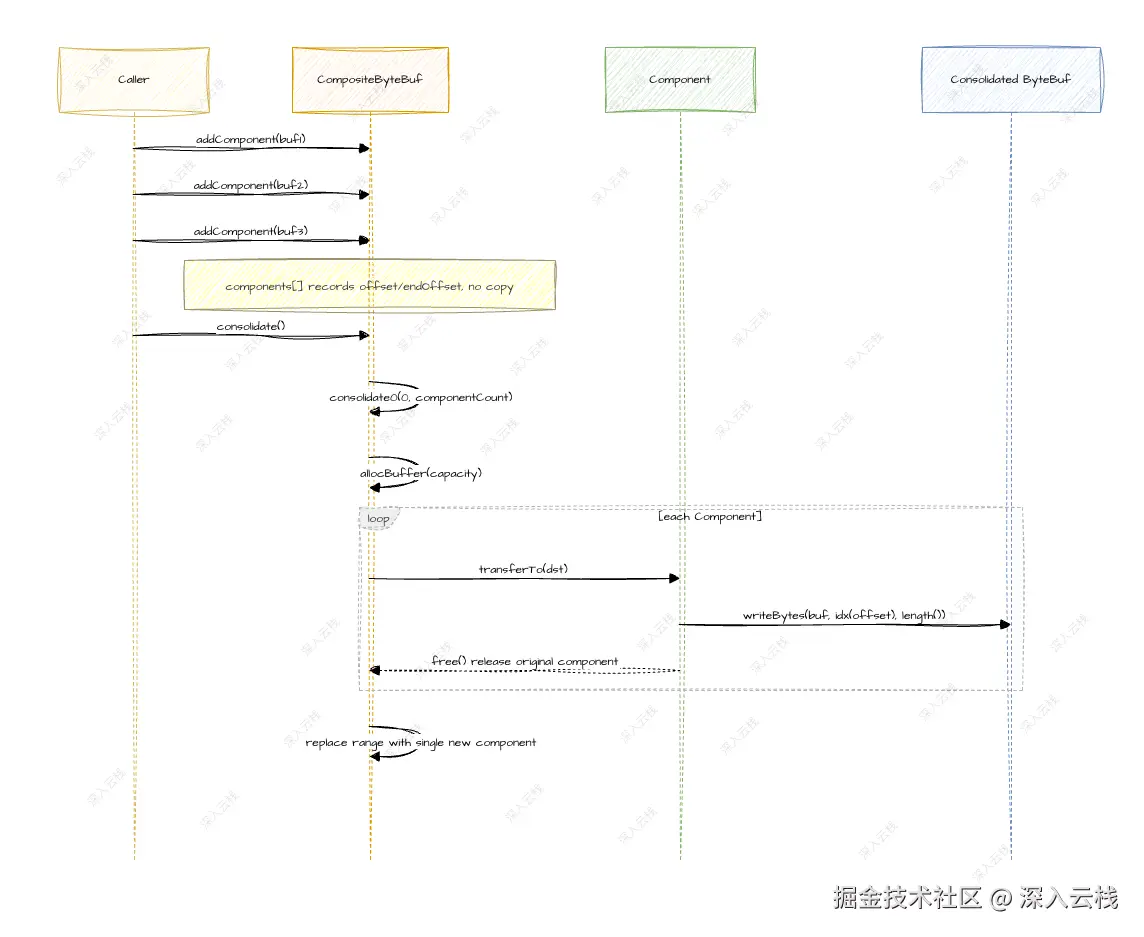
核心方法 addComponent(boolean increaseWriterIndex, int cIndex, ByteBuf buffer) 里,先 checkNotNull 校验后委托私有方法 addComponent0 完成实质逻辑:在 addComponent0 内部先 newComponent(ensureAccessible(buffer), 0) 把传入 buffer 包装成 Component,再 addComp(cIndex, c) 挂进数组,接着按需更新后续组件的偏移量,返回前由 addComponent 调用 consolidateIfNeeded() 兜底组件数。当 increaseWriterIndex 为 true 时,writerIndex 递增该组件的可读字节数;为 false 时则不动写指针(默认 addComponent(ByteBuf) 就是不递增的形式)。这正是 CompositeByteBuf 零拷贝的关键:它只是"记住"了每个子 buffer 的位置区间,数据本身仍各自躺在原 buffer 里。
7.2 consolidate:按需合并
组件多了之后有个代价:像 getInt(index)、nioBuffer() 这类操作需要先在 components 里二分定位到 index 落在哪个组件,再跳进该组件的底层读取,随机访问的开销随组件数上升。CompositeByteBuf 用 consolidate() 把多个组件合并成单个 ByteBuf,此时才真正发生一次数据复制:
java
io.netty.buffer.CompositeByteBuf#consolidate / #consolidate0

public CompositeByteBuf consolidate() {
    ensureAccessible();
    consolidate0(0, componentCount);
    return this;
}

private void consolidate0(int cIndex, int numComponents) {
    if (numComponents <= 1) {
        return;
    }

    final int endCIndex = cIndex + numComponents;
    final int startOffset = cIndex != 0 ? components[cIndex].offset : 0;
    final int capacity = components[endCIndex - 1].endOffset - startOffset;
    final ByteBuf consolidated = allocBuffer(capacity);

    for (int i = cIndex; i < endCIndex; i++) {
        components[i].transferTo(consolidated);
    }
    lastAccessed = null;
    removeCompRange(cIndex + 1, endCIndex);
    components[cIndex] = newComponent(consolidated, 0);
    if (cIndex != 0 || numComponents != componentCount) {
        updateComponentOffsets(cIndex);
    }
}
consolidate0 先按组件区间算出合并后的总容量,allocBuffer(capacity) 分配一块足够大的目标 buffer,再逐个调用 Component.transferTo(consolidated) 把每个组件的字节写进去、并释放原组件,最后用一个新组件替换掉原来的多个组件。Component.transferTo 的实现是"拷贝后释放":
java
io.netty.buffer.CompositeByteBuf.Component#transferTo

void transferTo(ByteBuf dst) {
    dst.writeBytes(buf, idx(offset), length());
    free();
}为防止组件数失控,CompositeByteBuf 在构造、追加组件与扩容三条写路径上通过 consolidateIfNeeded() 兜底------一旦组件数超过构造时设定的 maxNumComponents,就自动触发合并:
java
io.netty.buffer.CompositeByteBuf#consolidateIfNeeded

private void consolidateIfNeeded() {
    int size = componentCount;
    if (size > maxNumComponents) {
        consolidate0(0, size);
    }
}
典型使用场景是协议头 + 协议体分属不同 buffer:用 CompositeByteBuf 把它们零拷贝拼装成一个逻辑 buffer,交给下游一次处理,而无需 copiedBuffer 的整块拷贝。下图是聚合与合并的完整链路:
八、Unpooled 工具类与 AbstractByteBuf 模板方法模式
8.1 三类静态创建方法
Unpooled 是一个没有状态字段的工具类,把"创建 ByteBuf"这一高频动作收敛成一组静态方法。从语义上可以分成三类:新建 (buffer*)、零拷贝包装 (wrappedBuffer*)、深拷贝 (copiedBuffer*):
java
io.netty.buffer.Unpooled#buffer / #directBuffer / #wrappedBuffer / #copiedBuffer / #compositeBuffer

public static ByteBuf buffer() {
    return ALLOC.heapBuffer();
}

public static ByteBuf directBuffer() {
    return ALLOC.directBuffer();
}

public static ByteBuf wrappedBuffer(byte[] array) {
    if (array.length == 0) {
        return EMPTY_BUFFER;
    }
    return new UnpooledHeapByteBuf(ALLOC, array, array.length);
}

public static ByteBuf copiedBuffer(byte[] array) {
    if (array.length == 0) {
        return EMPTY_BUFFER;
    }
    return wrappedBuffer(array.clone());
}

public static CompositeByteBuf compositeBuffer() {
    return compositeBuffer(AbstractByteBufAllocator.DEFAULT_MAX_COMPONENTS);
}
其中 ALLOC 是 UnpooledByteBufAllocator.DEFAULT 的单例。三类的语义边界非常清晰:
buffer()/buffer(int)/buffer(int, int)委托ALLOC.heapBuffer(...)新建 一个堆 buffer;directBuffer(...)委托ALLOC.directBuffer(...)新建直接内存 buffer。wrappedBuffer(byte[] array)直接把传入数组包装 成 buffer,零拷贝引用原数组(writerIndex置为array.length),对数组的修改对 buffer 可见;wrappedBuffer(ByteBuf... buffers)则以各 buffer 的可读区 为界记录组件区间,打包成一个CompositeByteBuf,不创建切片视图、不复制字节,引用计数所有权转交给新聚合 buffer。copiedBuffer(byte[] array)内部先array.clone()再包装,是深拷贝------返回 buffer 拥有独立内存,与源数组无关。
compositeBuffer() 返回一个空组件数组的 CompositeByteBuf,供随后逐个 addComponent。对于"只包装一个可读 buffer"的场景,wrappedBuffer(ByteBuf buffer) 还做了个优化:直接返回 buffer.slice() 而不是套一层 CompositeByteBuf,避免不必要的聚合开销。
8.2 模板方法模式的落点
综观三至七章,AbstractByteBuf 的模板方法模式是一条贯穿始终的主线:readInt / writeInt / getInt / setInt 等顶层方法负责"指针移动 + 边界校验",把真正触及内存介质的 _getInt / _setInt 抽象出来交给子类。UnpooledHeapByteBuf 用 HeapByteBufUtil 操作 byte[],UnpooledDirectByteBuf 用 ByteBuffer.get/put 操作堆外内存,二者对上层暴露的是同一套 ByteBuf 语义。
模板方法的收益在于扩展成本极低 :新增一种内存底层(无论是 Unsafe 优化实现,还是未来的缓存映射、共享内存等形态),只需覆写一组 _getXxx / _setXxx 抽象方法,就能自动复用 AbstractByteBuf 里全部现成的指针管理、边界校验、顺序访问逻辑。这正是 ByteBuf 类型矩阵得以稳定扩展的根基------上层不变,底层可换。
九、整体链路串联
把前八节的内容串起来,一个 ByteBuf 的一生是这样的:用 Unpooled.buffer() 或 wrappedBuffer(...) 创建 → 用 write* 递增 writerIndex 写入数据 → 用 read* / get* 读取并递增或不动指针 → 需要时用 mark/reset 回退重读、用 discardReadBytes / clear 复用空间 → 用 slice / duplicate / CompositeByteBuf 零拷贝派生 → 最后通过引用计数 release() 归还底层内存。下面这张时序图把这条最主线的生命周期串了起来:
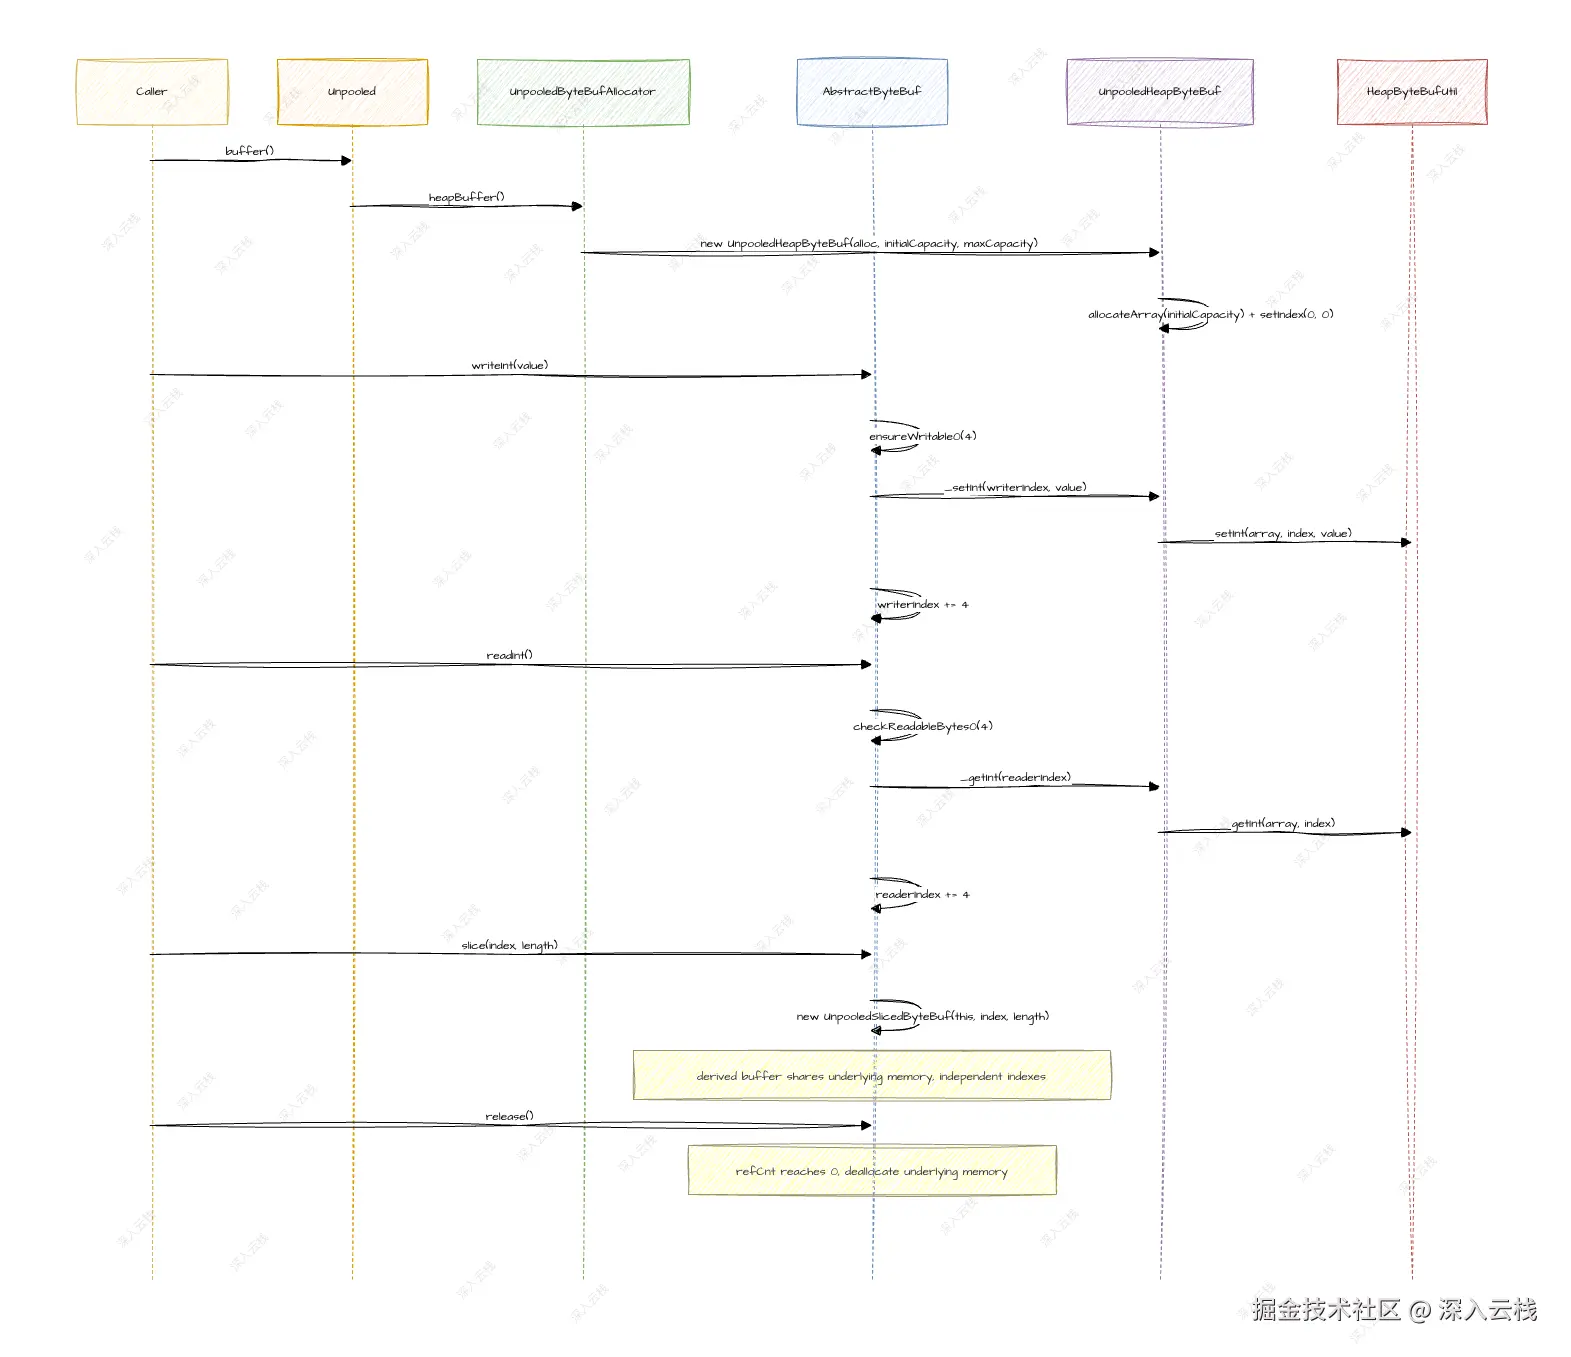
回看全篇,ByteBuf 的核心设计可以用三根主线贯穿:索引线 上,readerIndex / writerIndex 双索引读写分离,0 <= readerIndex <= writerIndex <= capacity 的铁律派生出全部可读/可写指标;类型线 上,Heap/Direct × Pooled/Unpooled 组合出四象限,UnpooledHeapByteBuf 与 UnpooledDirectByteBuf 各自以 byte[] 与 java.nio.ByteBuffer 承载底层字节;零拷贝线 上,slice / duplicate / retainedSlice / retainedDuplicate 共享底层内存、独立索引,CompositeByteBuf 以组件数组聚合多个 buffer 并按需 consolidate。三根主线合在一起,凝练成一句话------"双索引解耦读写 + 模板方法下沉底层 + 派生视图共享内存" :双索引消除了 ByteBuffer 的 flip() 心智负担,模板方法让指针移动与底层存取解耦、新底层可低成本接入,切片/派生/聚合三类派生容器用"共享内存 + 独立索引"实现零拷贝。
全文小结
本文聚焦 Netty 自研字节容器 ByteBuf 的核心设计,从"索引模型"与"类型与零拷贝"两个维度,深入分析了双索引读写分离机制、指针移动与空间复用、Heap/Direct × Pooled/Unpooled 类型矩阵,以及切片/派生/聚合三类零拷贝容器的内存共享机制。
在索引模型方面,readerIndex / writerIndex / capacity 恒满足 0 <= readerIndex <= writerIndex <= capacity,readableBytes / writableBytes / isReadable 等指标均由三指针实时派生;read* / write* 顺序访问先校验再移动指针,get* / set* 随机访问以显式 index 定位、不动指针,AbstractByteBuf 用模板方法把指针移动逻辑与 _getXxx / _setXxx 底层存取解耦。在空间复用方面,markReaderIndex / resetReaderIndex 回退读位置,discardReadBytes 搬移未读数据回收已读空间并 adjustMarkers 同步标记,clear 仅归零指针不清数据。在类型矩阵方面,Heap/Direct × Pooled/Unpooled 组合出四象限,UnpooledHeapByteBuf 底层 byte[] array、UnpooledDirectByteBuf 底层 java.nio.ByteBuffer。在零拷贝方面,duplicate 覆盖全容量、slice 只切可读区间,retainedDuplicate / retainedSlice 额外 retain() 防悬空,CompositeByteBuf 以 Component[] 聚合多个 buffer 并通过 consolidate 按需合并。Unpooled 工具类以 buffer / wrappedBuffer / copiedBuffer 三类方法覆盖新建、零拷贝包装、深拷贝,成为贯穿 ByteBuf 创建流程的入口。
原创不易,如果本文对您有帮助,带来了些许灵感或启发,烦请动动小手点赞、关注、转发、收藏。这是作者持续更新的动力源泉,衷心感谢您的支持。我会尽量在工作之余,为大家带来更高品质的内容,努力保持周更。