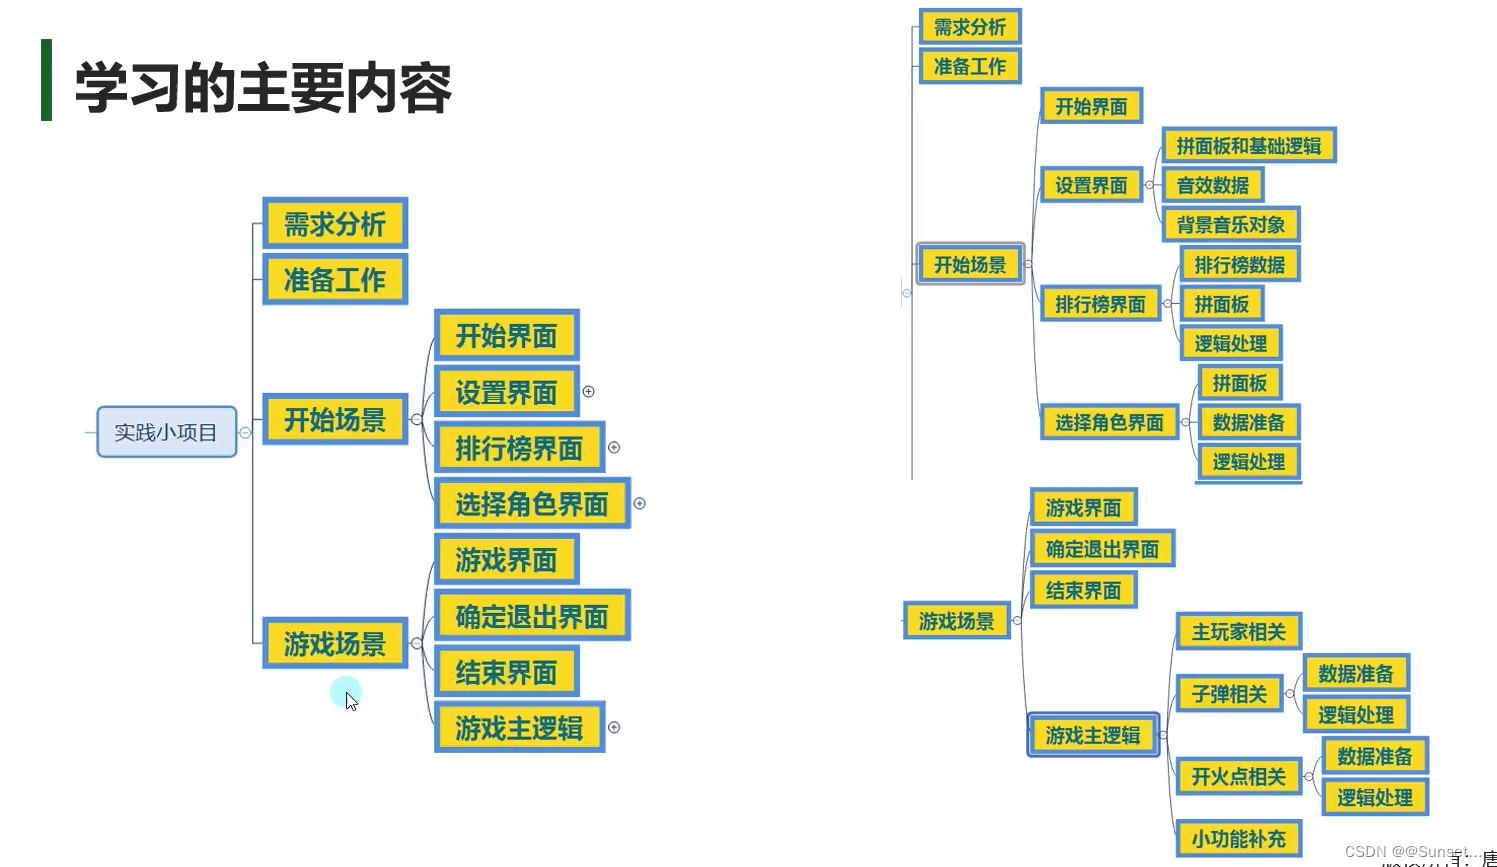
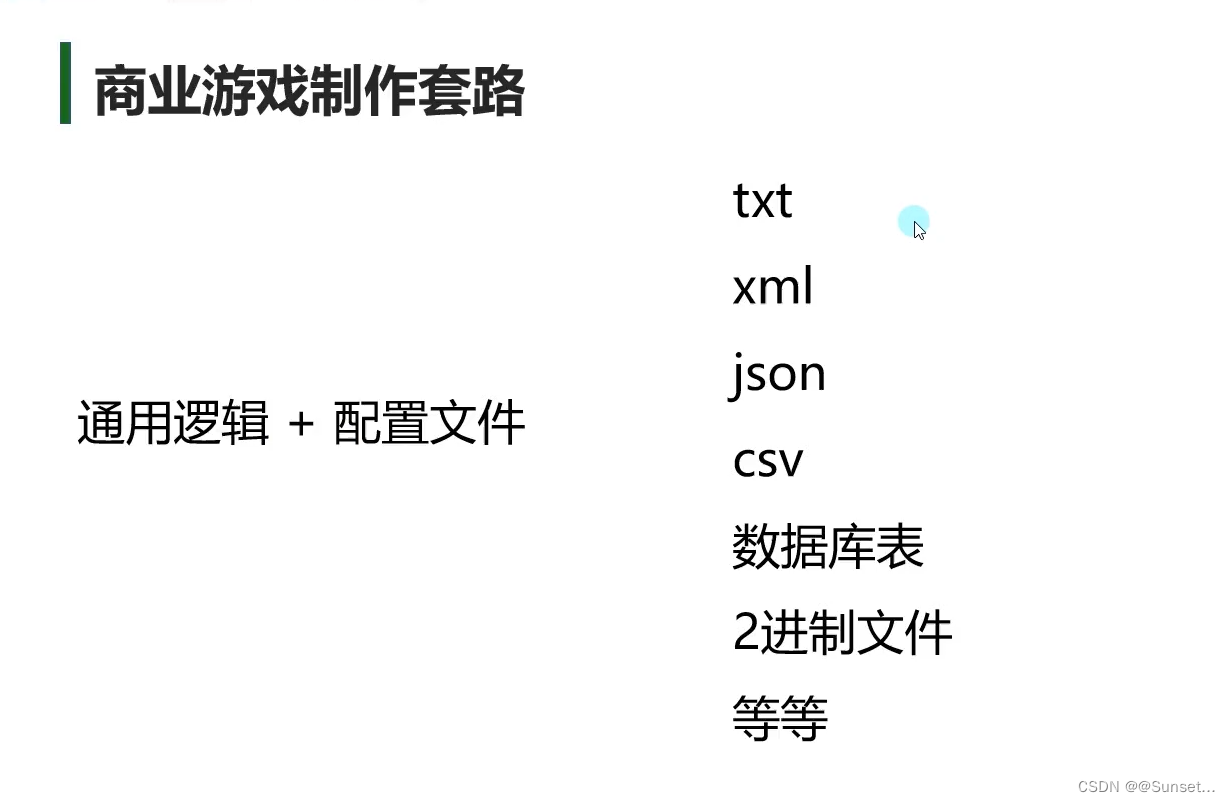
项目流程:
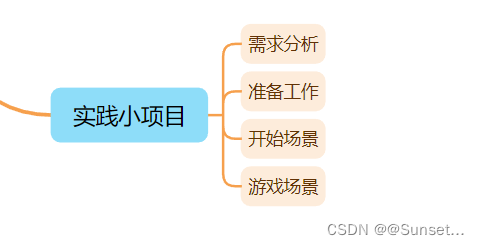
需求分析
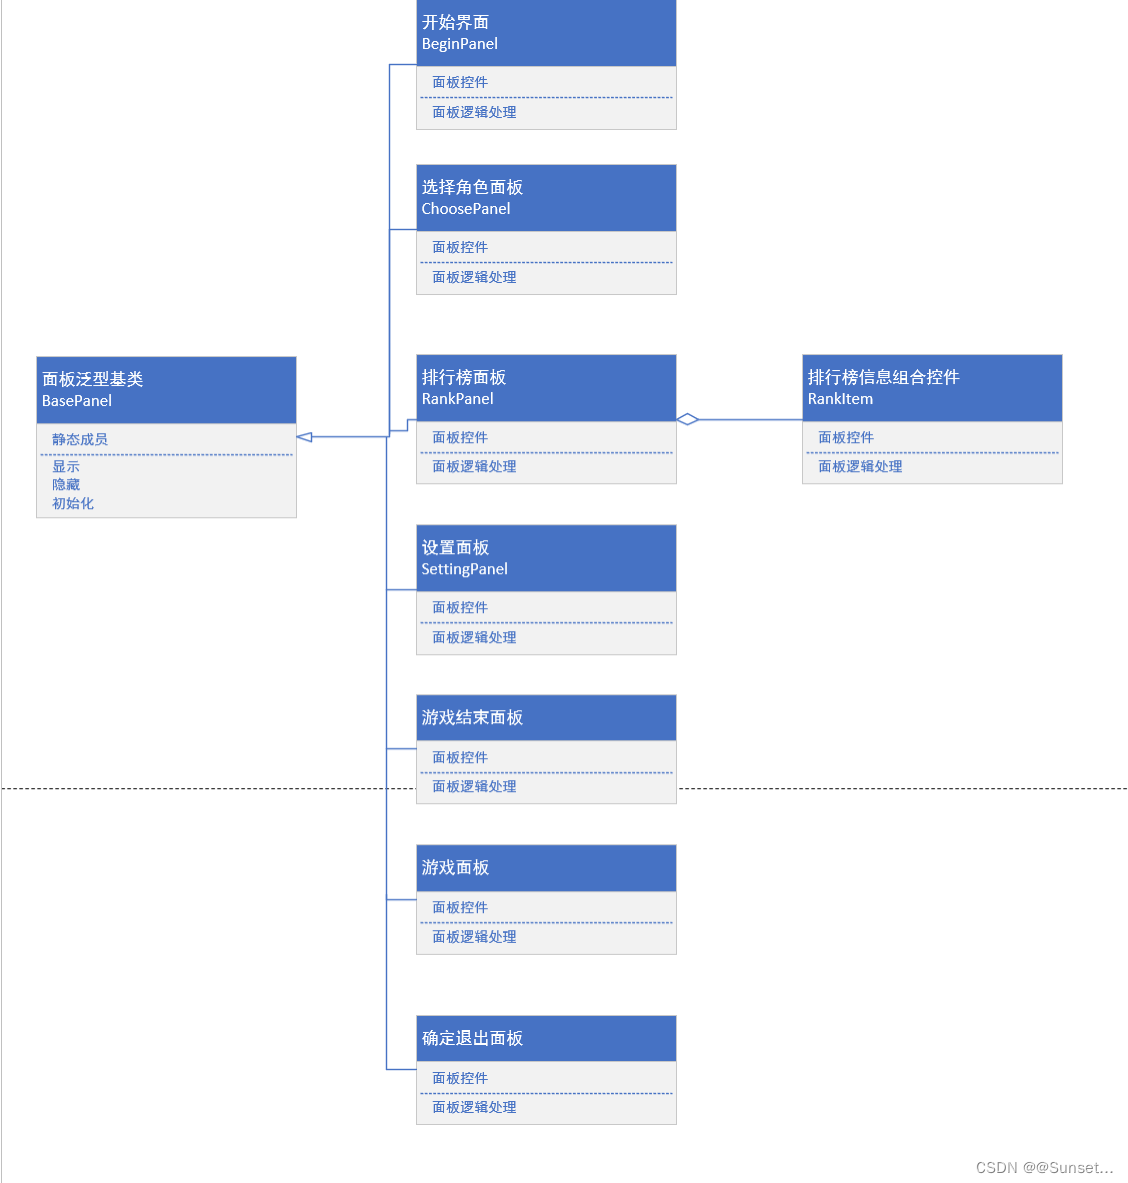
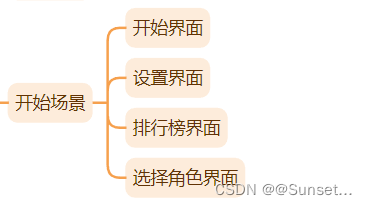
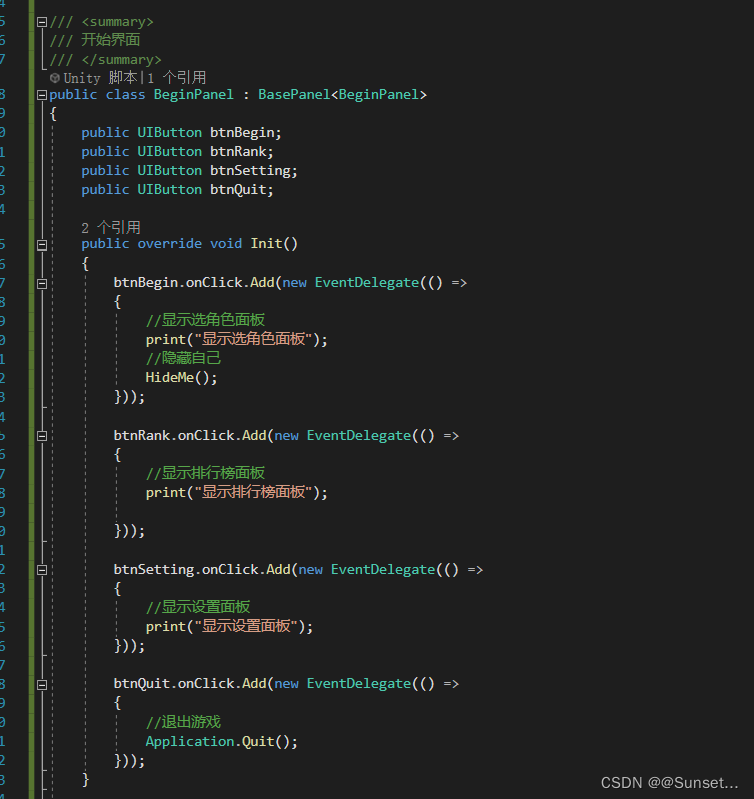
开始界面

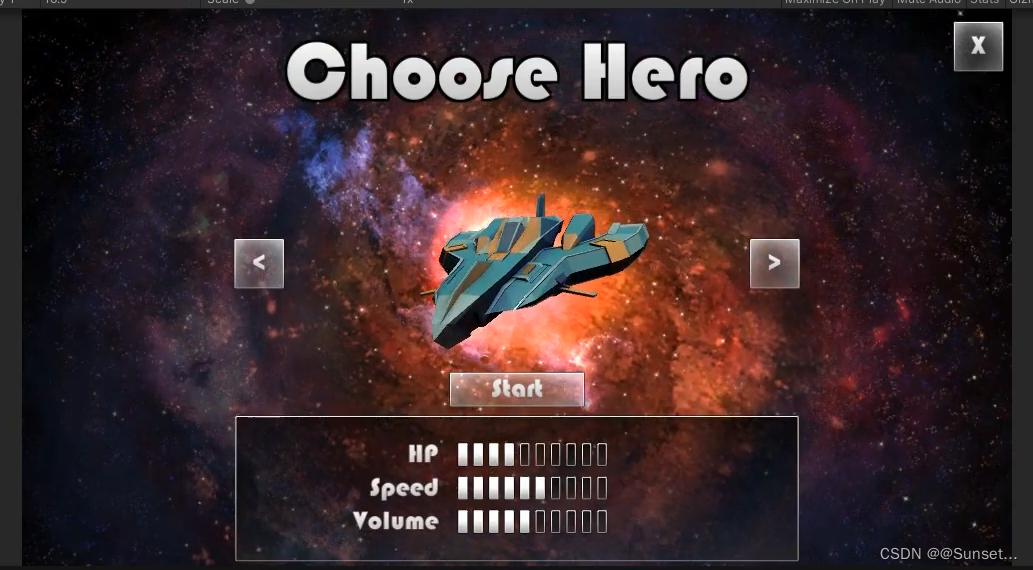
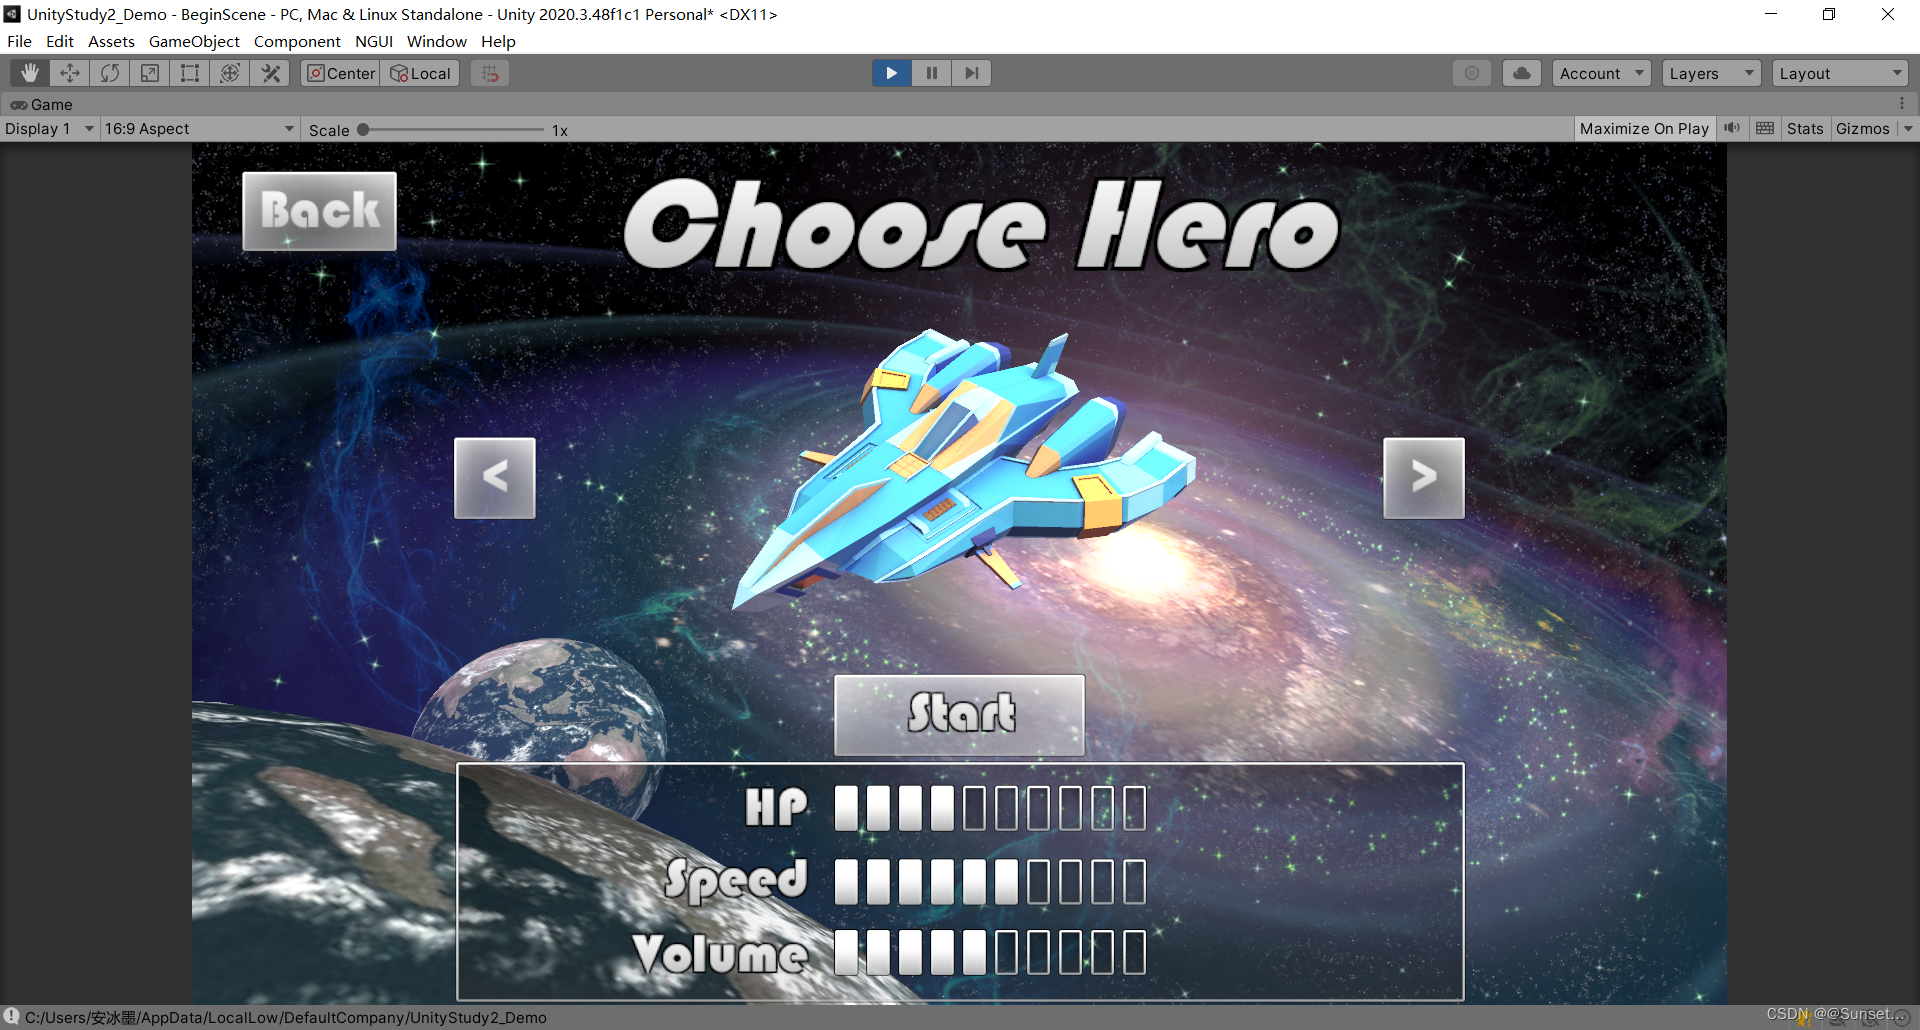
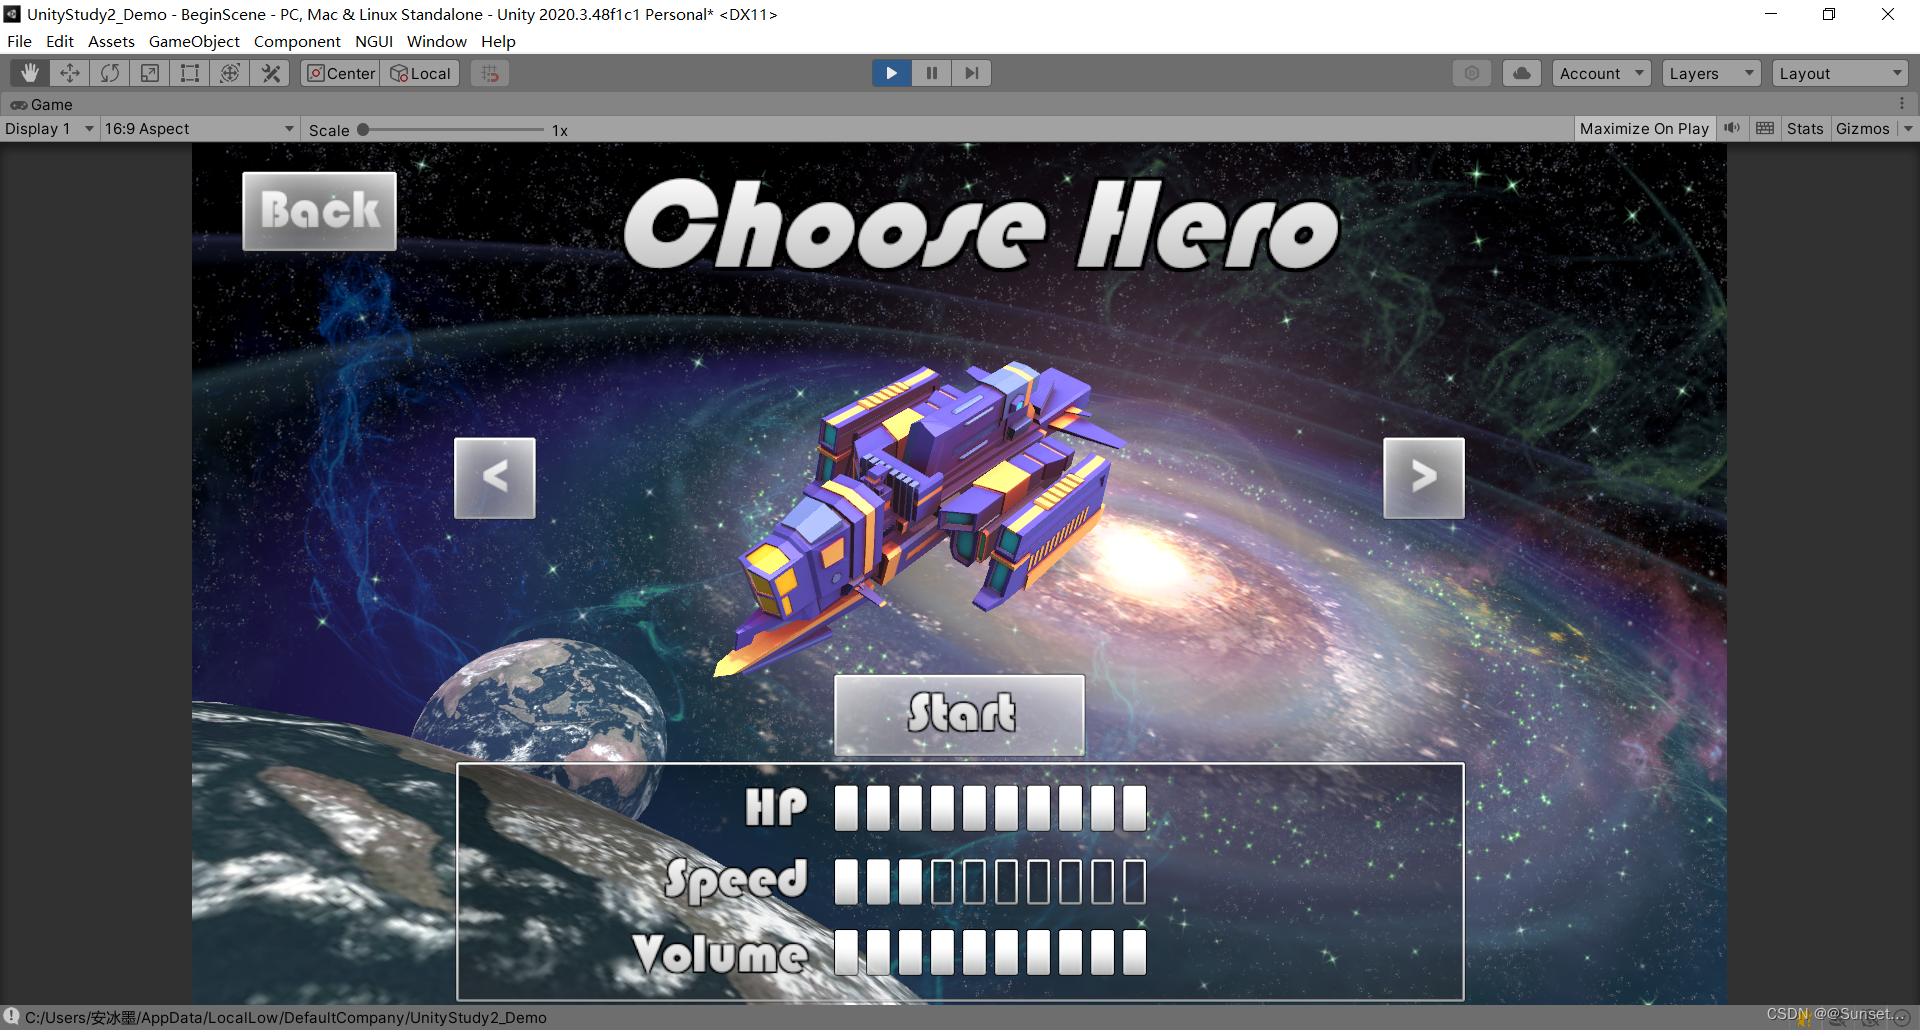
选择角色面板
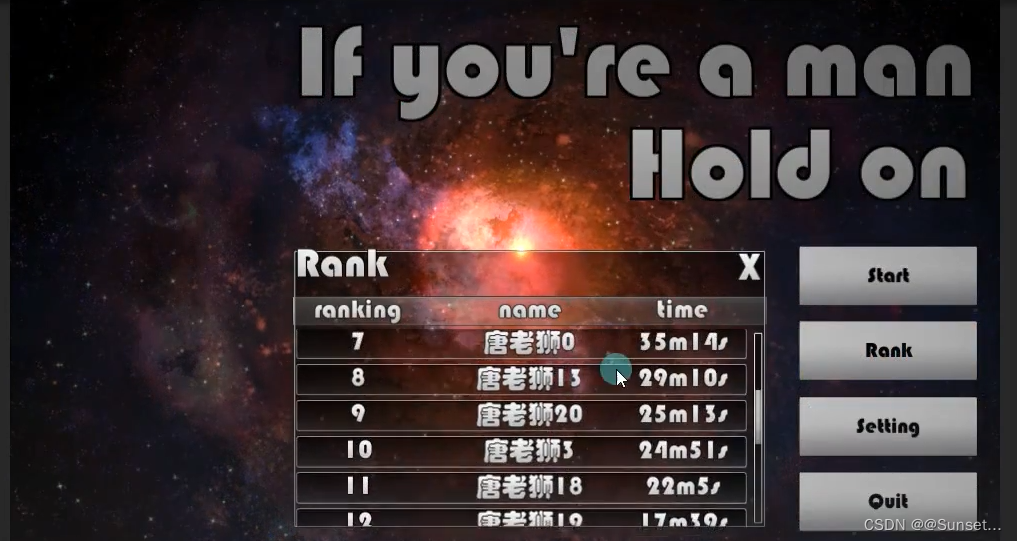
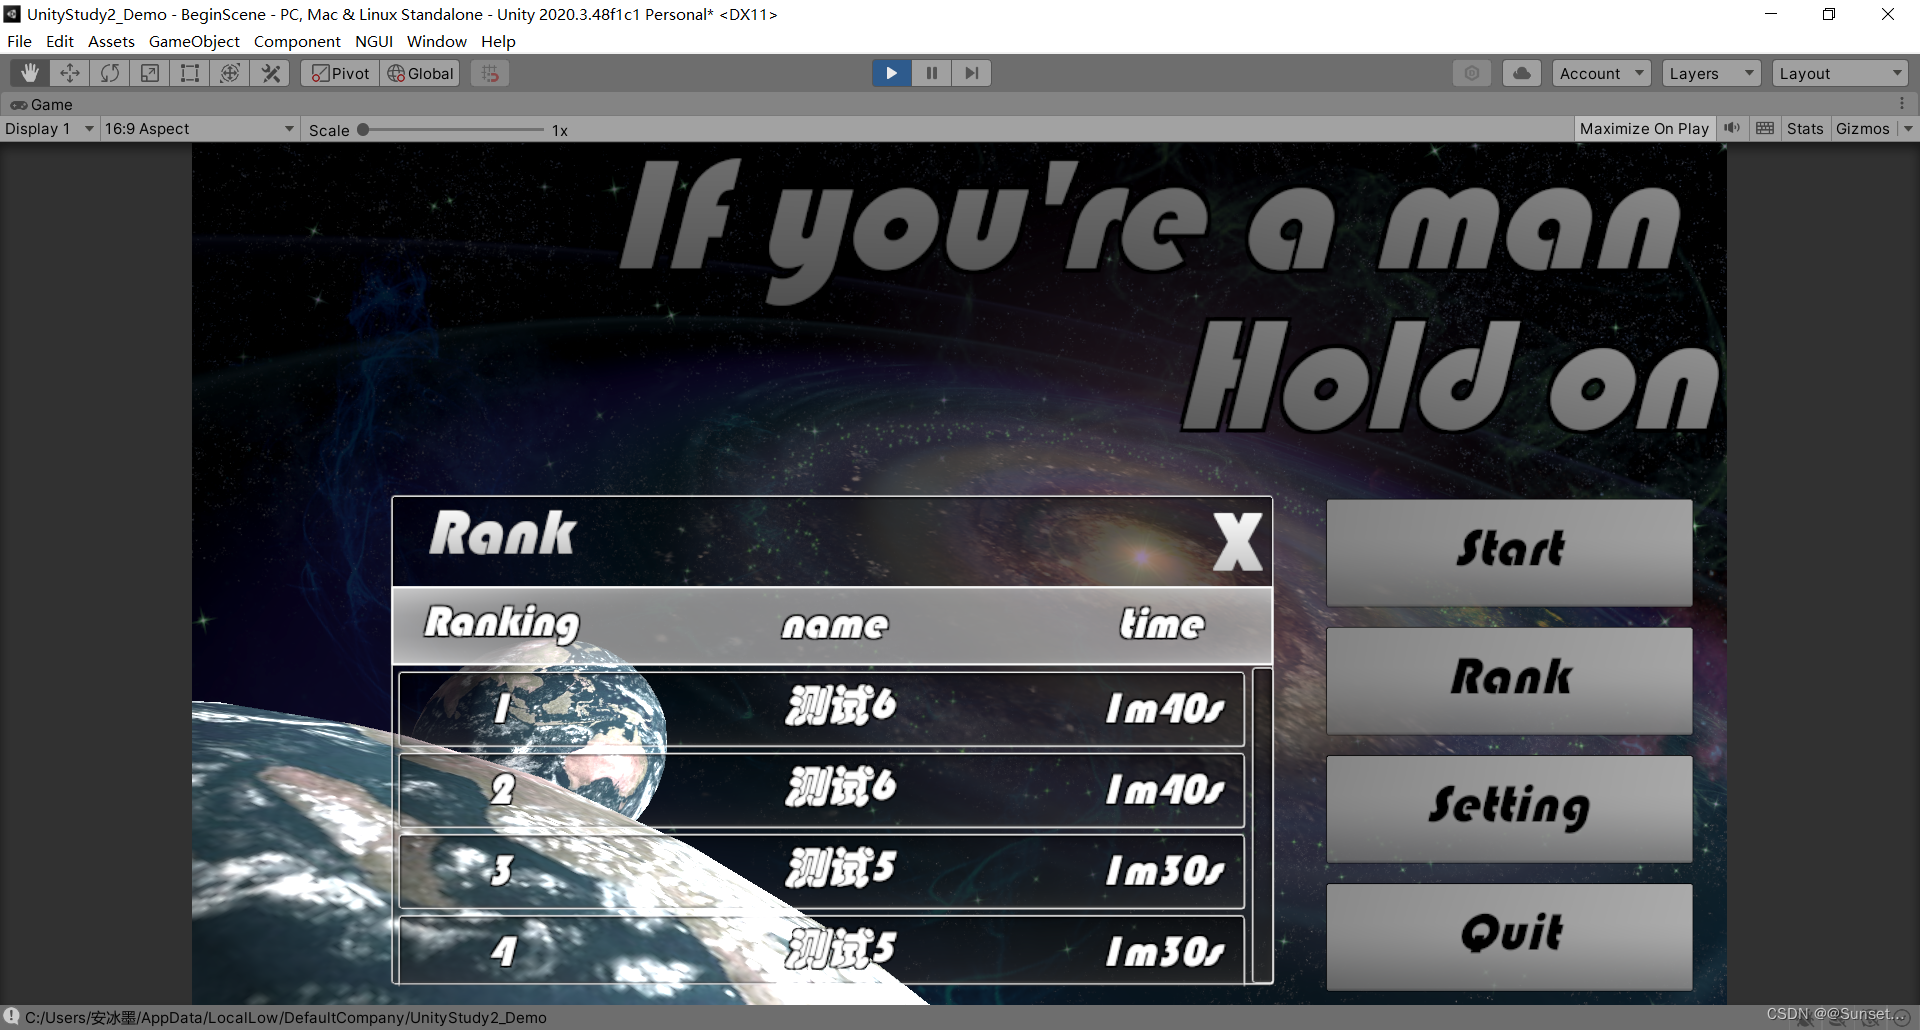
排行榜面板
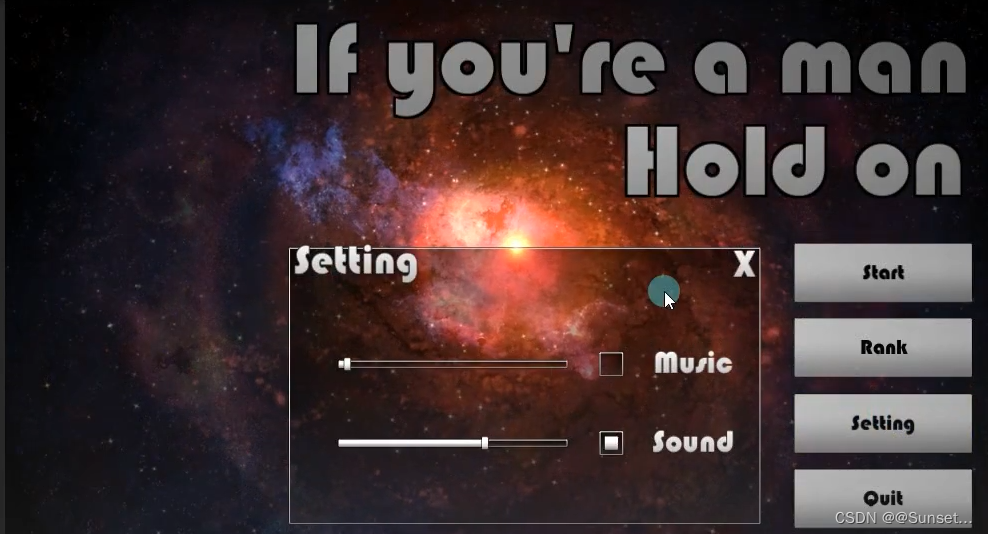
设置面板
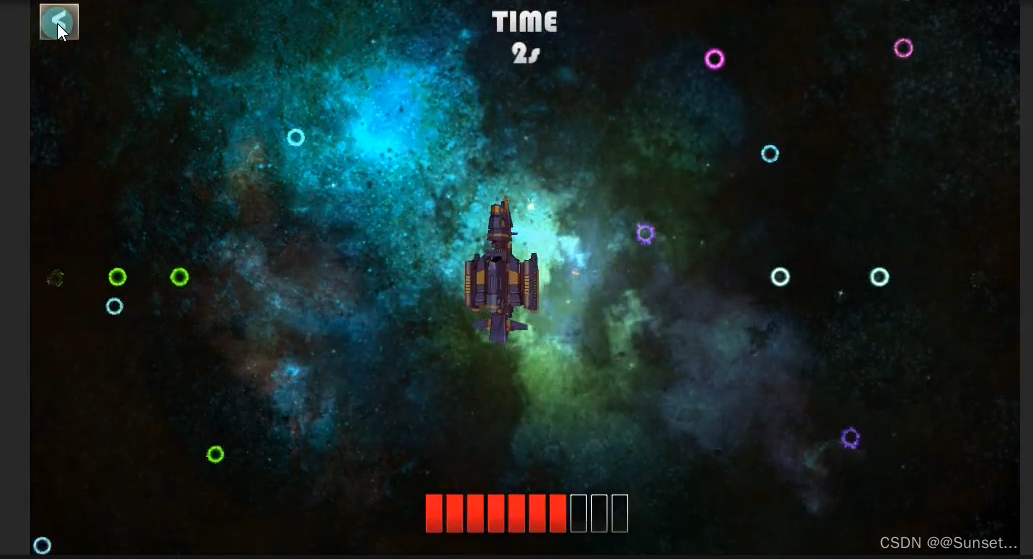
游戏面板
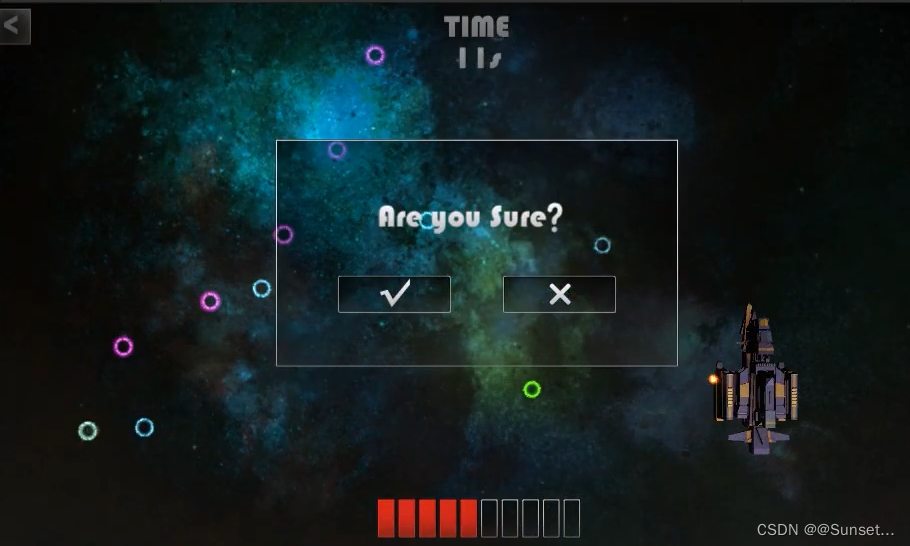
确定退出面板
死亡面板
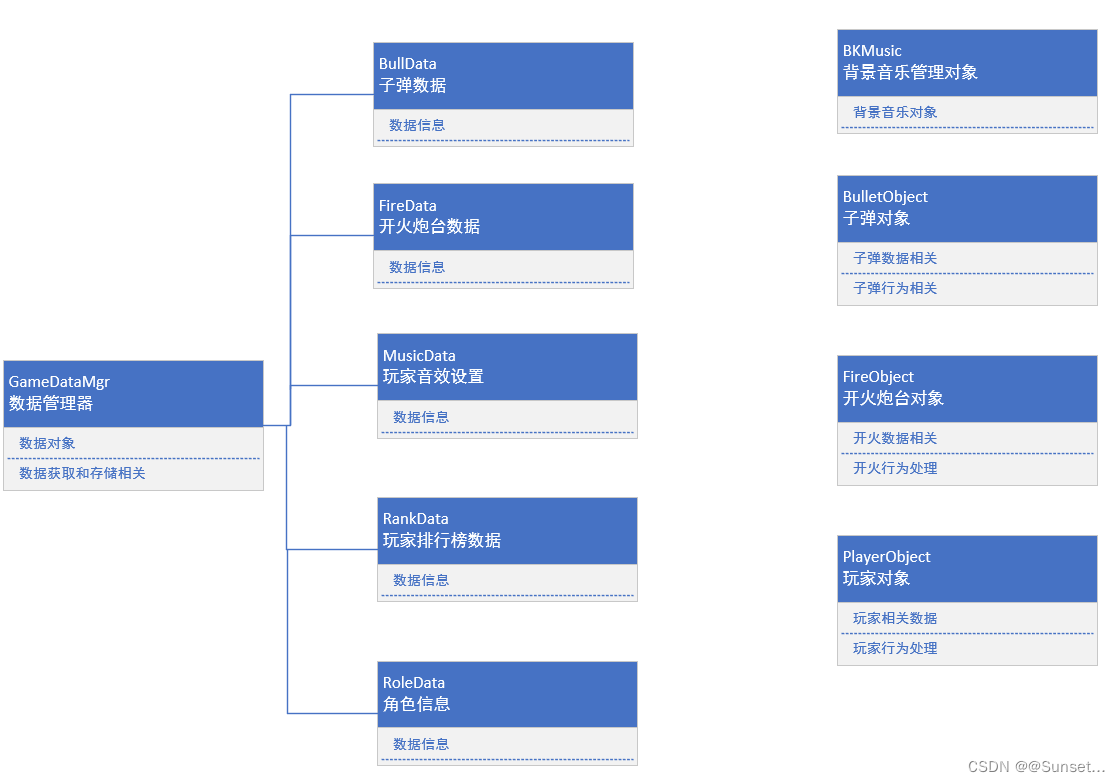
UML类图
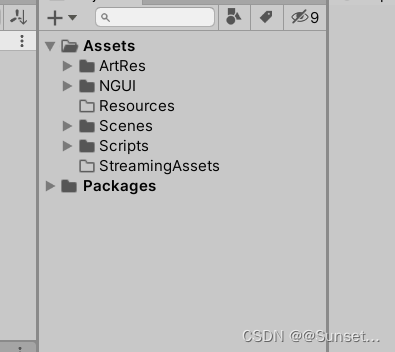
准备工作
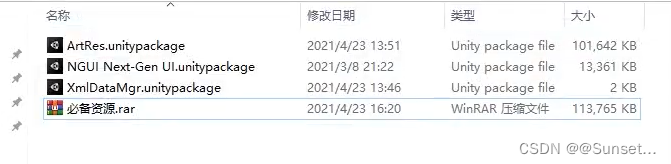
1.导入资源
2.创建需要的文件夹
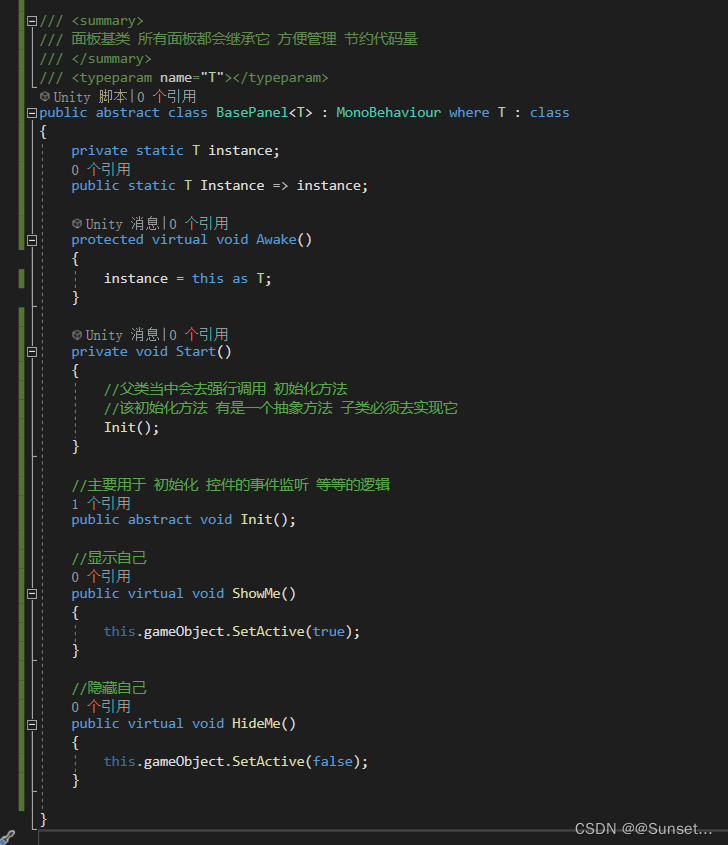
3.创建好面板基类
开始场景
开始界面
1.拼面板
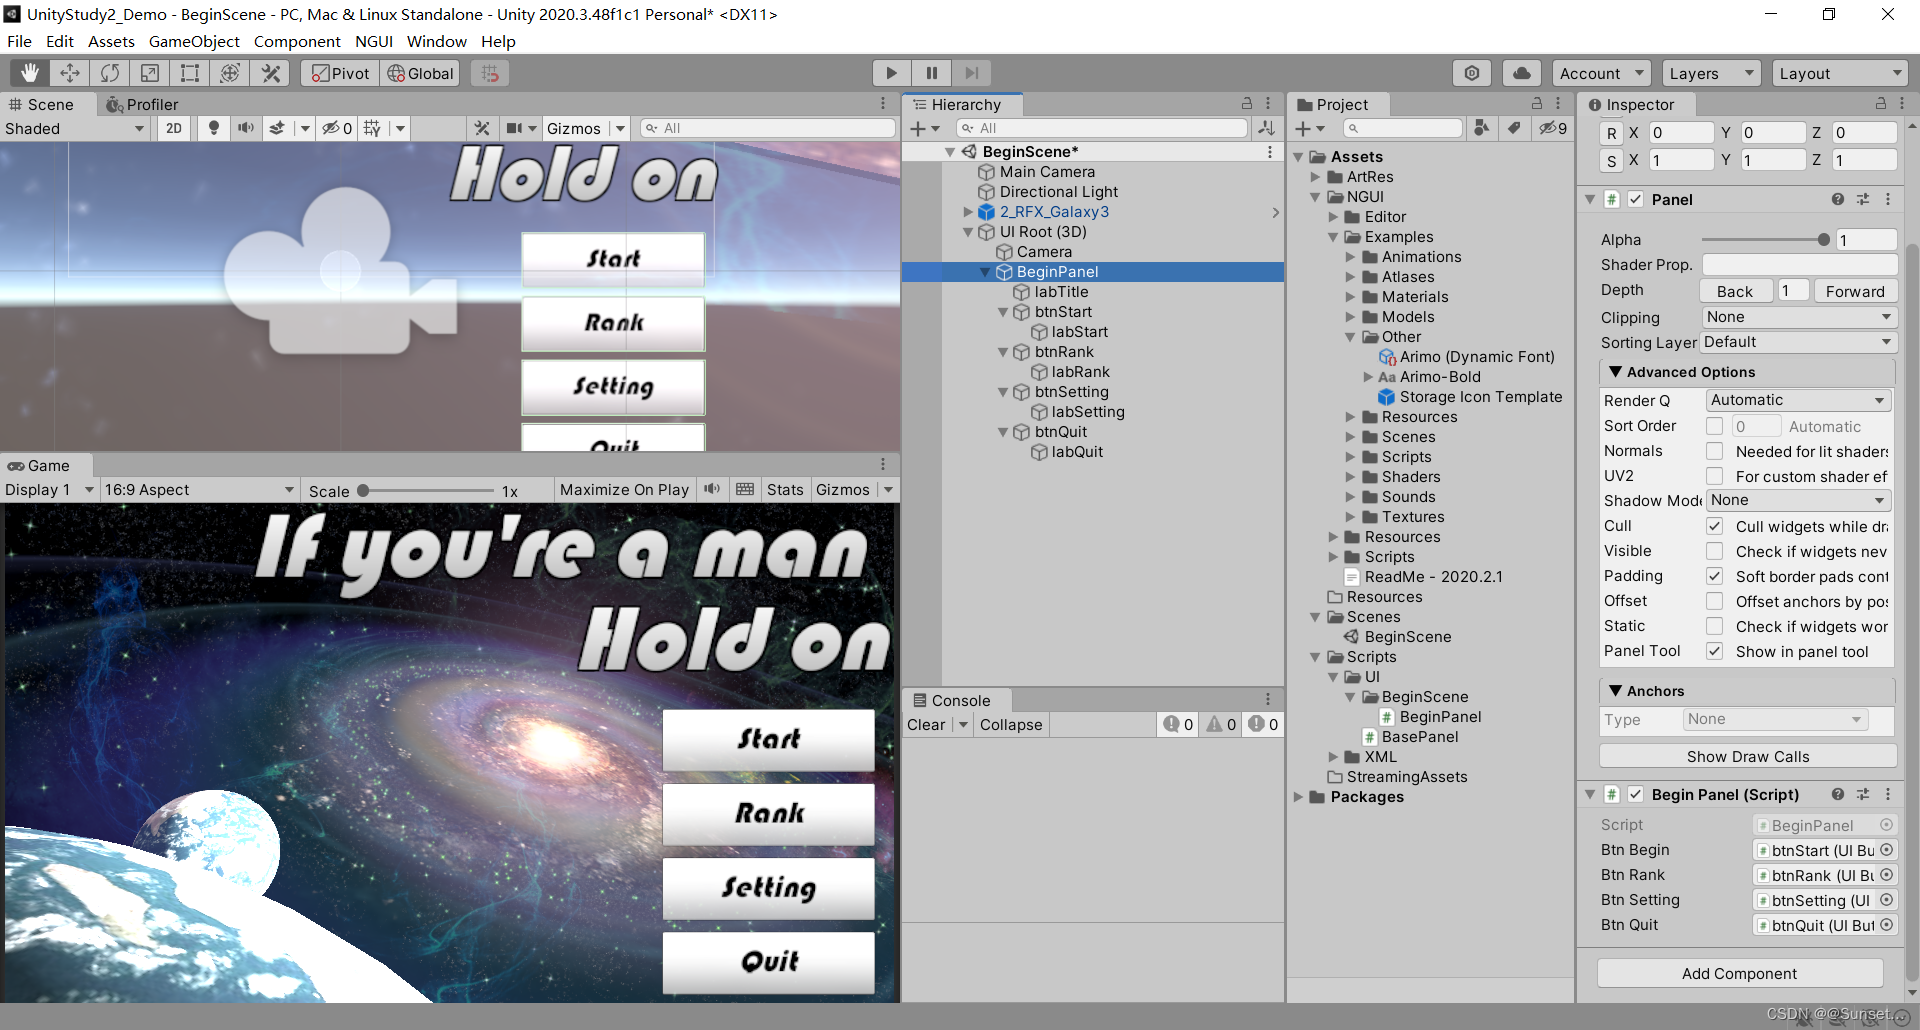
2.写脚本
注意事项:注意先设置NGUI的分辨率大小,注意控件的分辨率自适应,注意 Draw Calls!
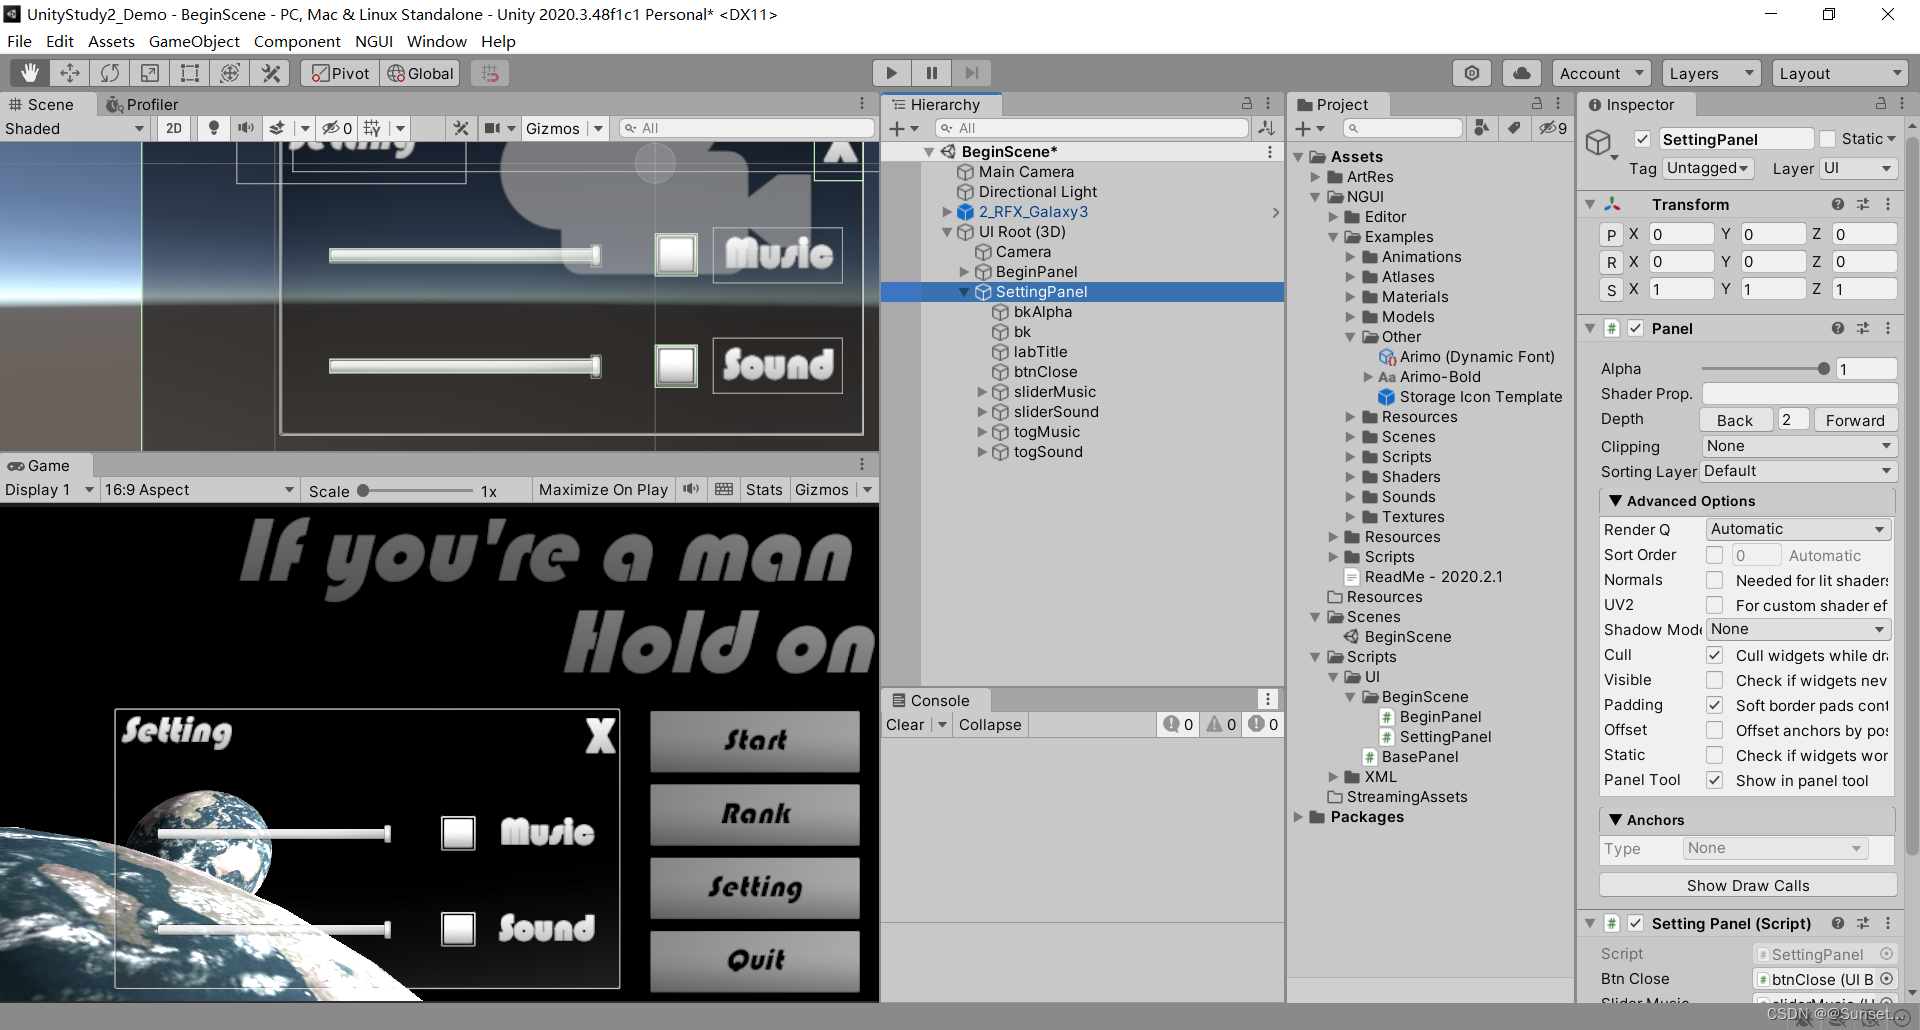
设置界面 ------ 拼面板和基础逻辑
1.拼面板
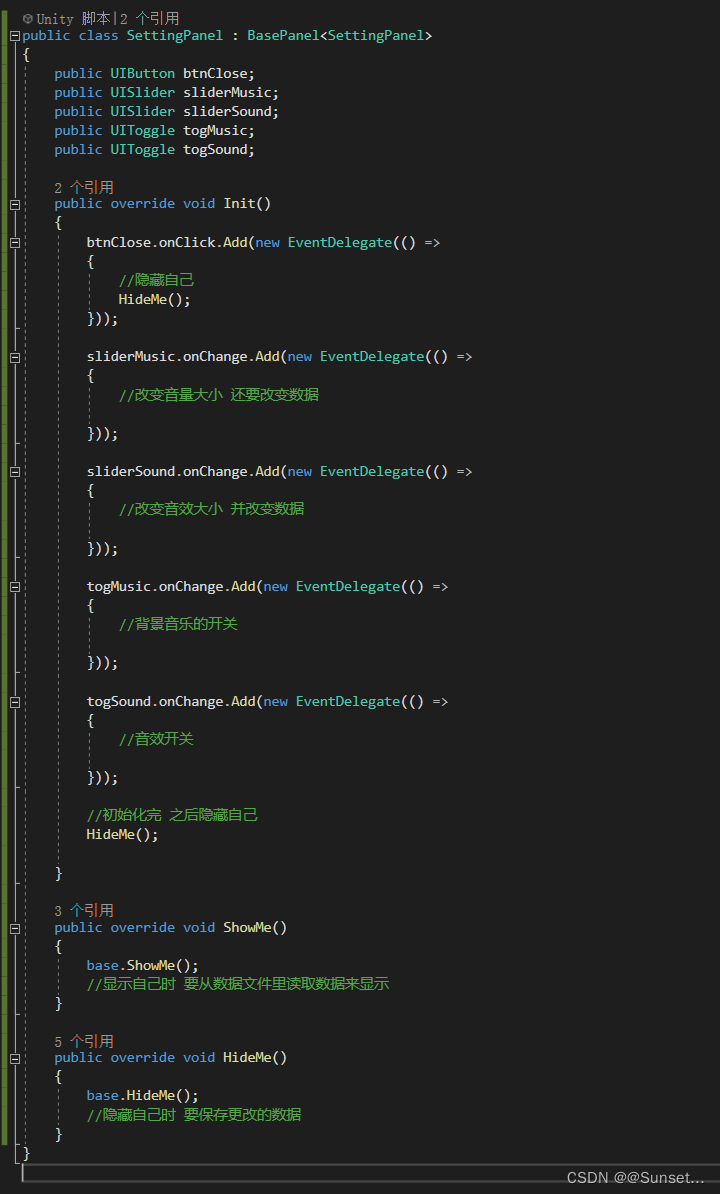
2.逻辑
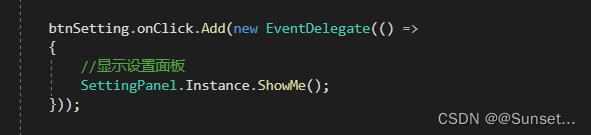
BegingPael 里打开设置面板
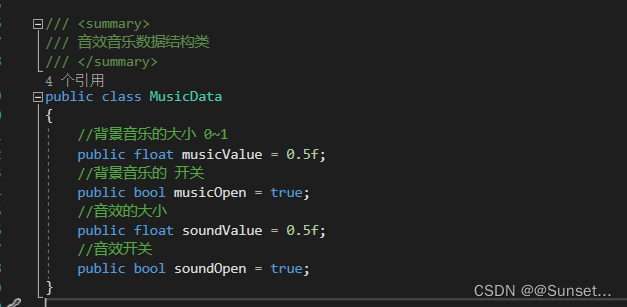
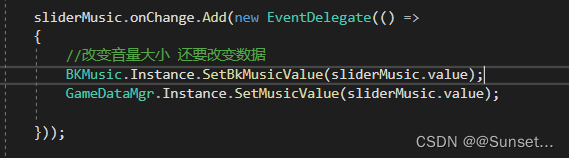
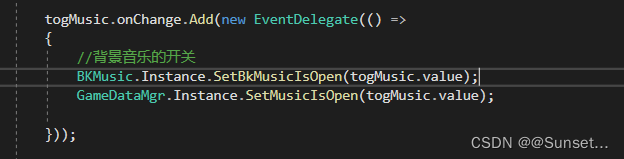
设置界面------音效数据
1.创建音效数据类
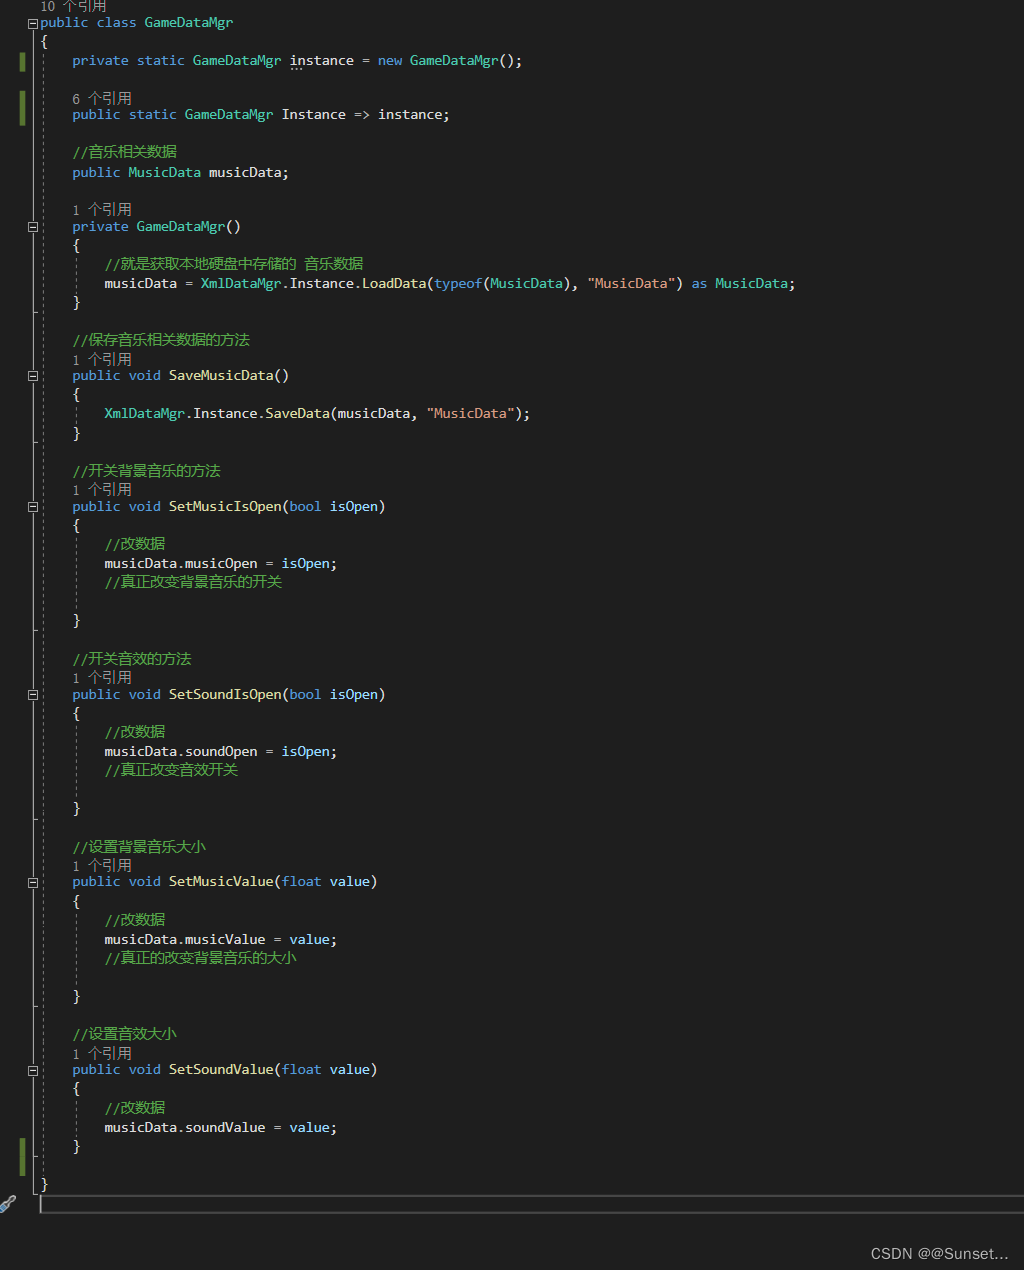
2.创建游戏数据管理类
3.SettingPanel 关联逻辑

实现了音效数据的在设置面板中的获取和修改
设置界面------背景音乐对象
1.创建音乐对象和音乐控制脚本
音乐对象
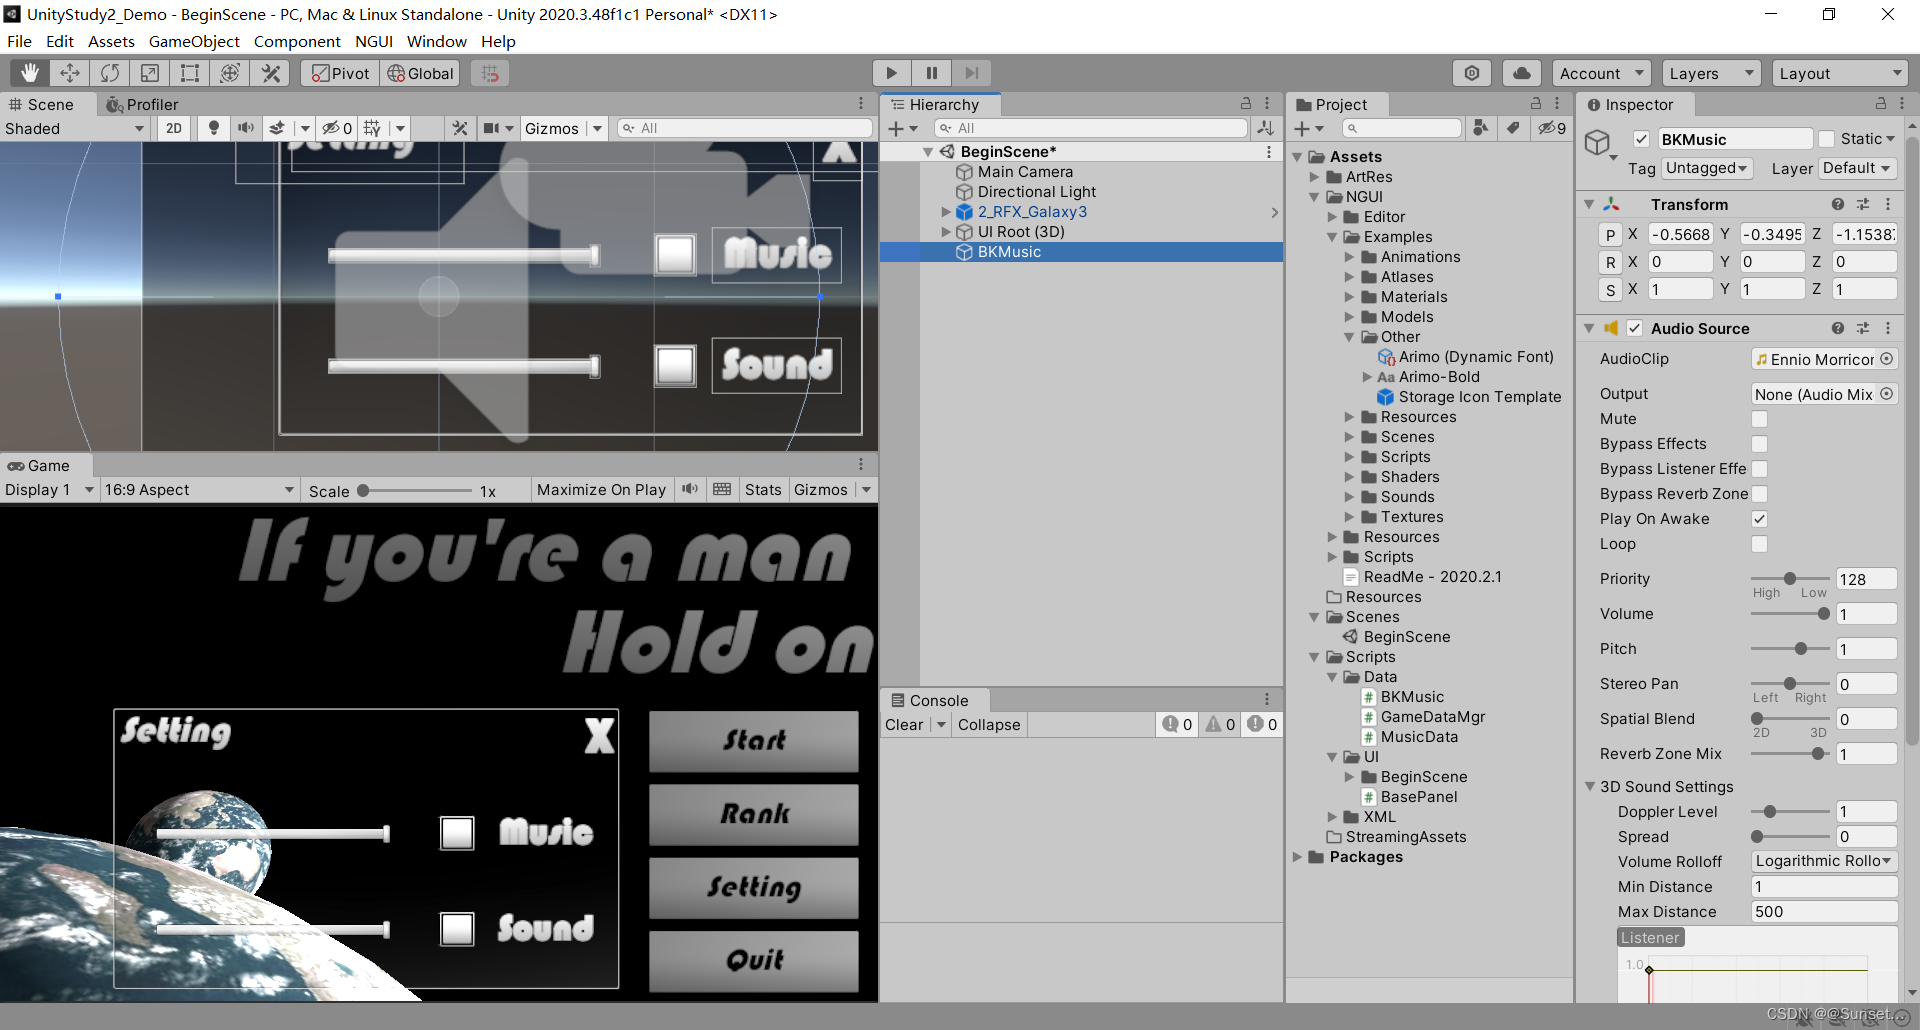
音乐控制脚本
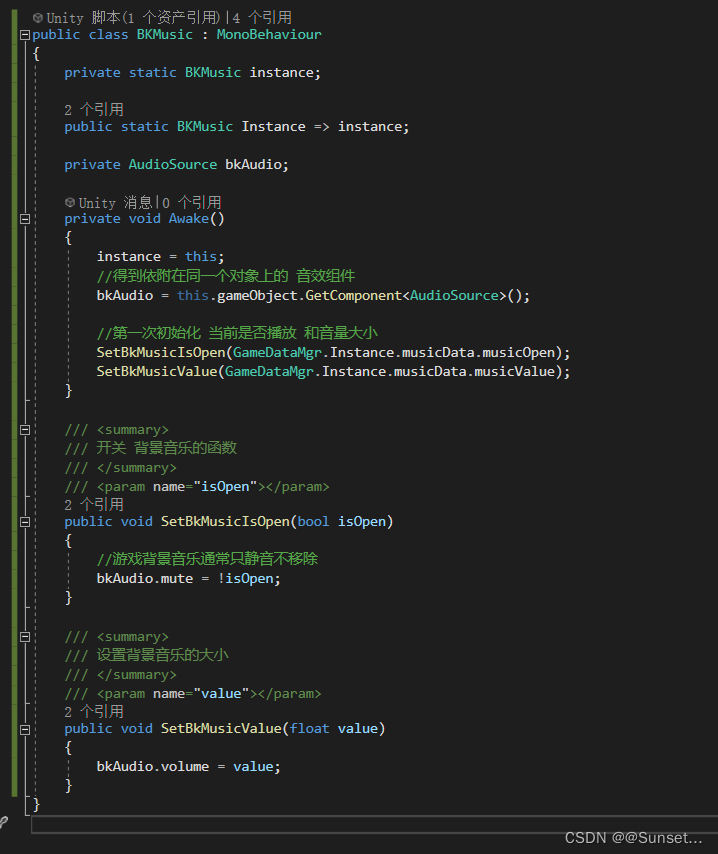
2.设置面板 调用
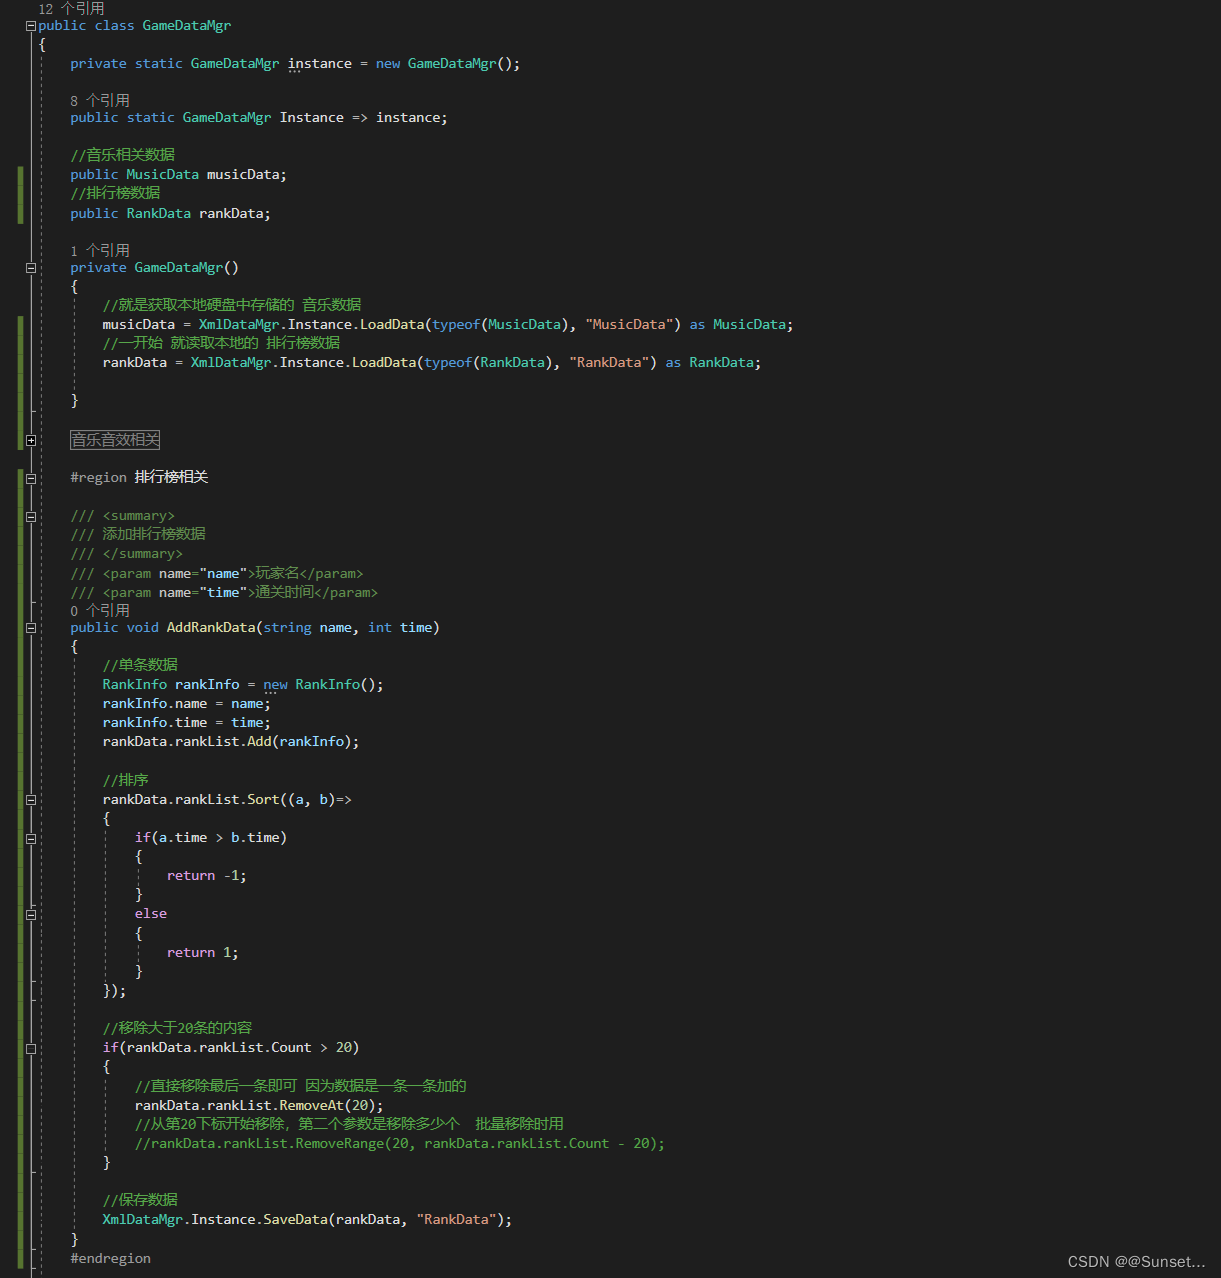
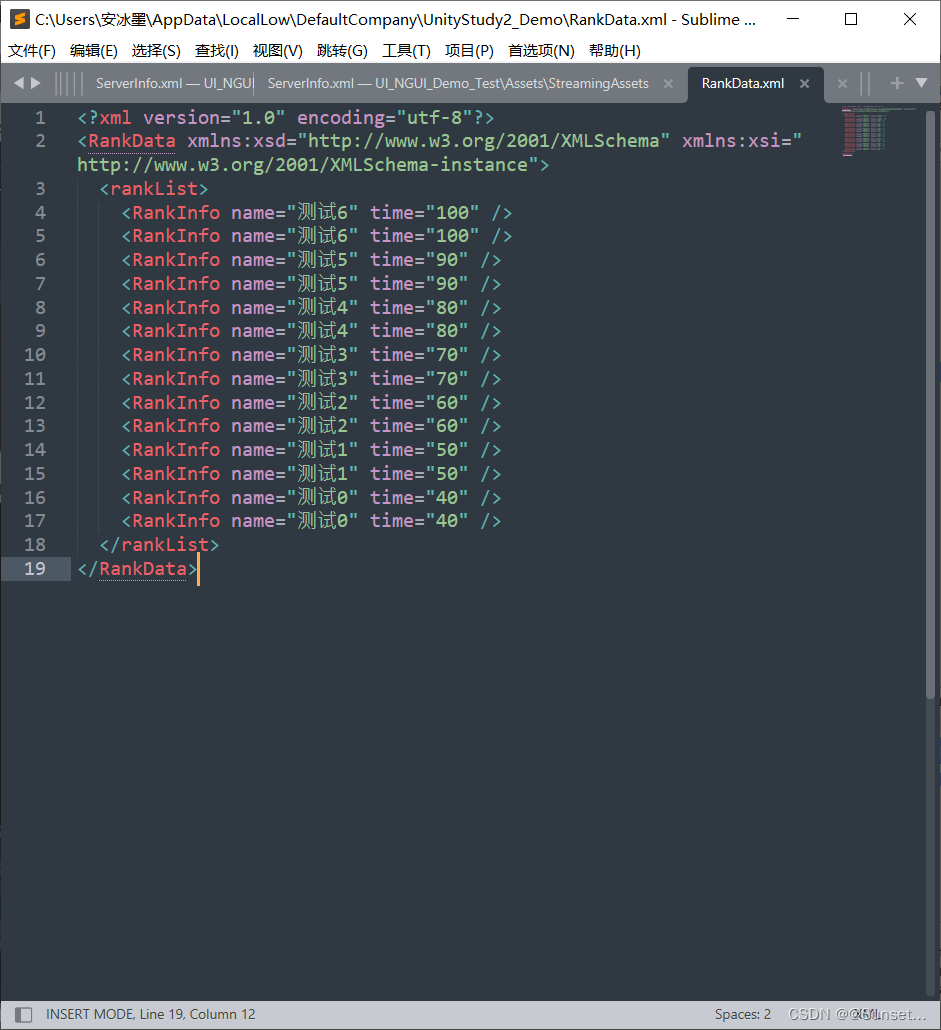
排行榜界面------排行榜数据
1.排行榜数据类
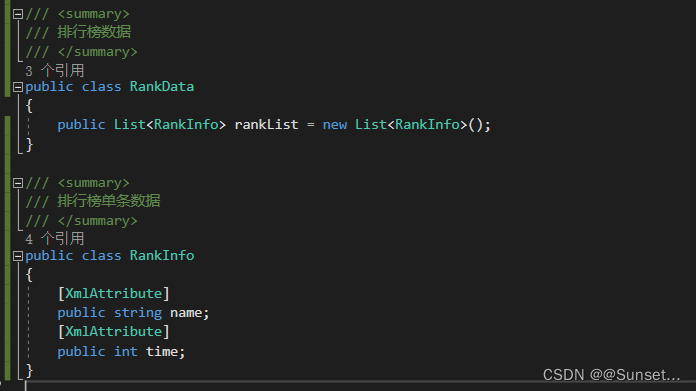
2.GameDataMgr 中调用
排行榜界面------拼面板
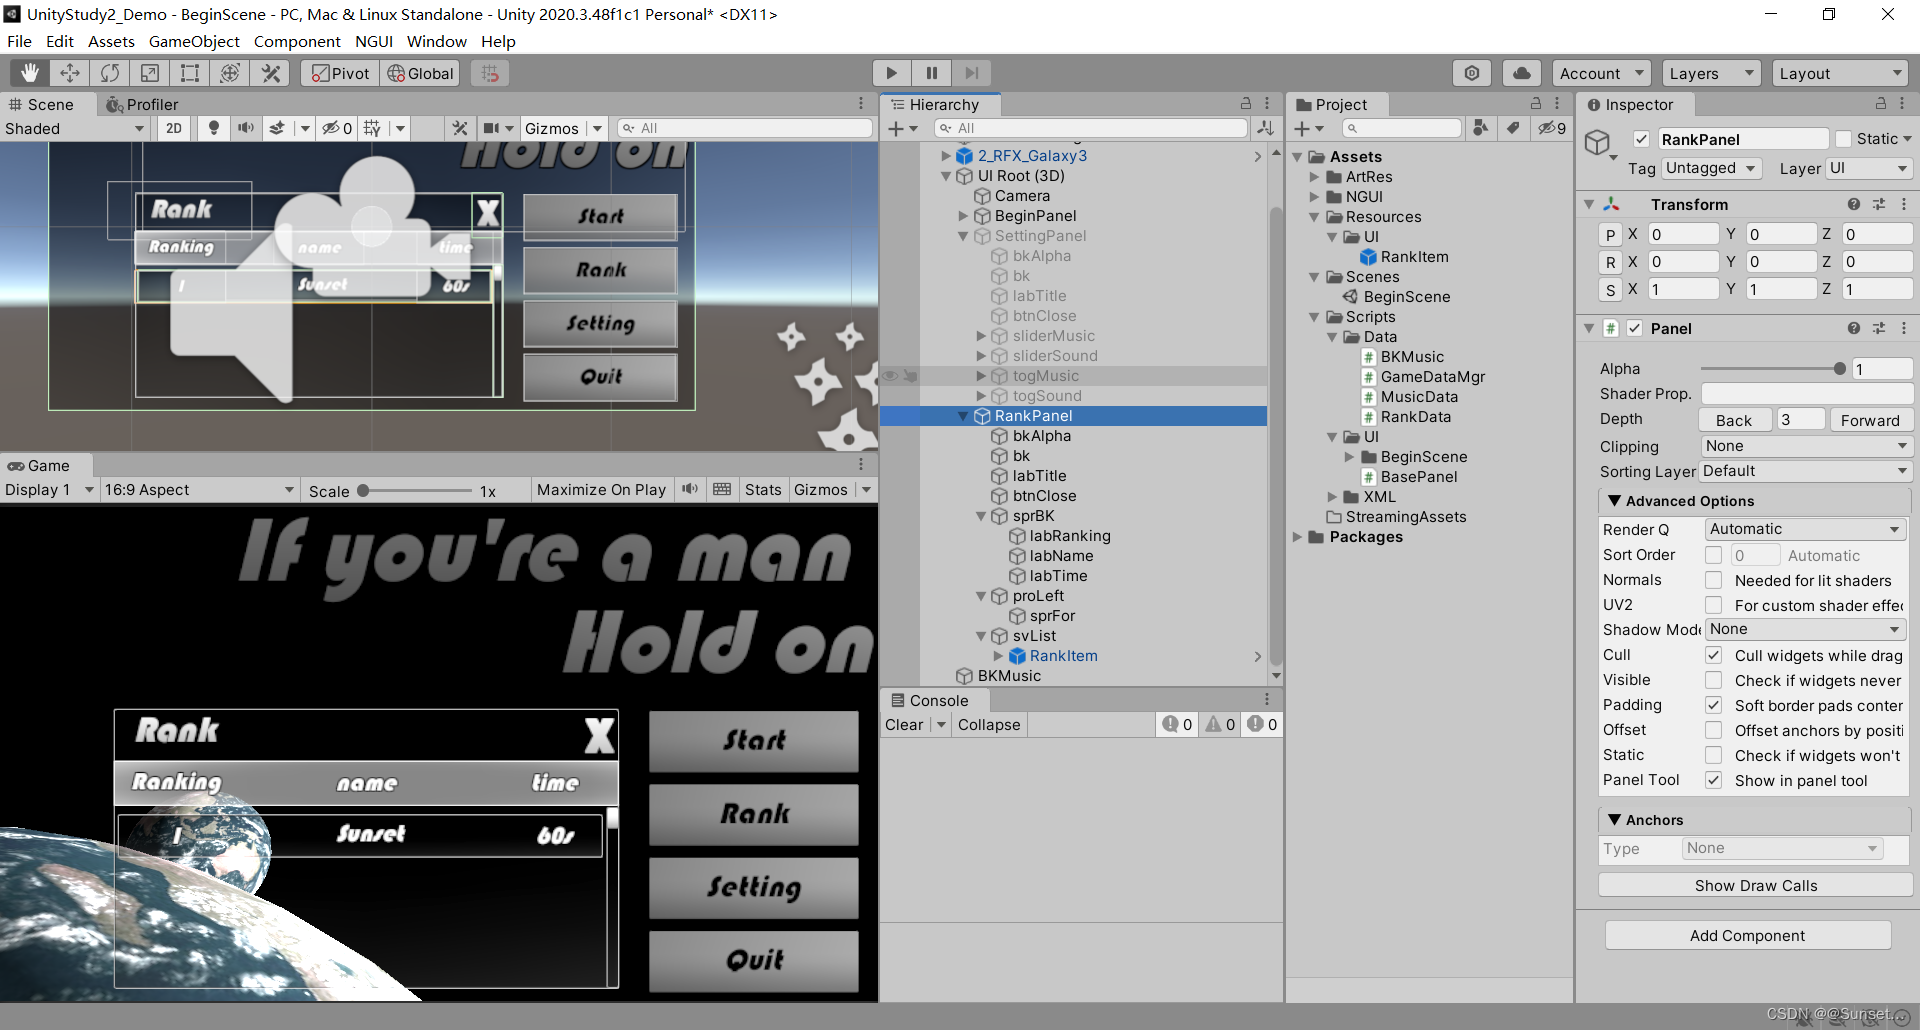
排行榜界面------逻辑处理
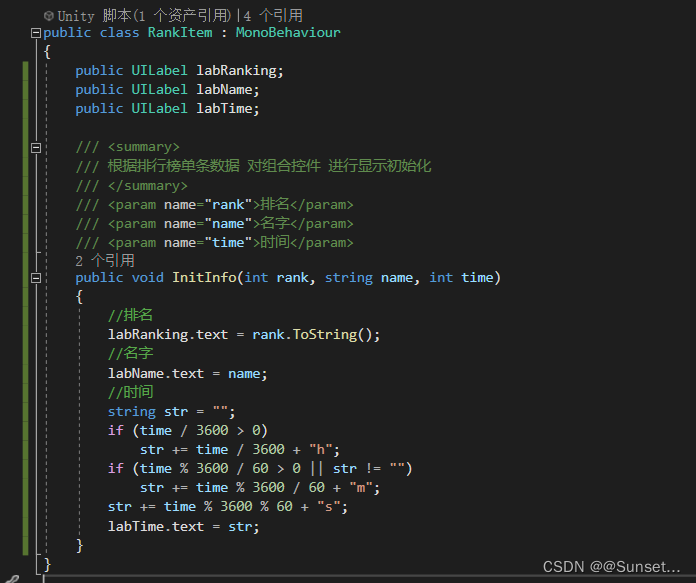
1.单个排行榜控件类------RankItem
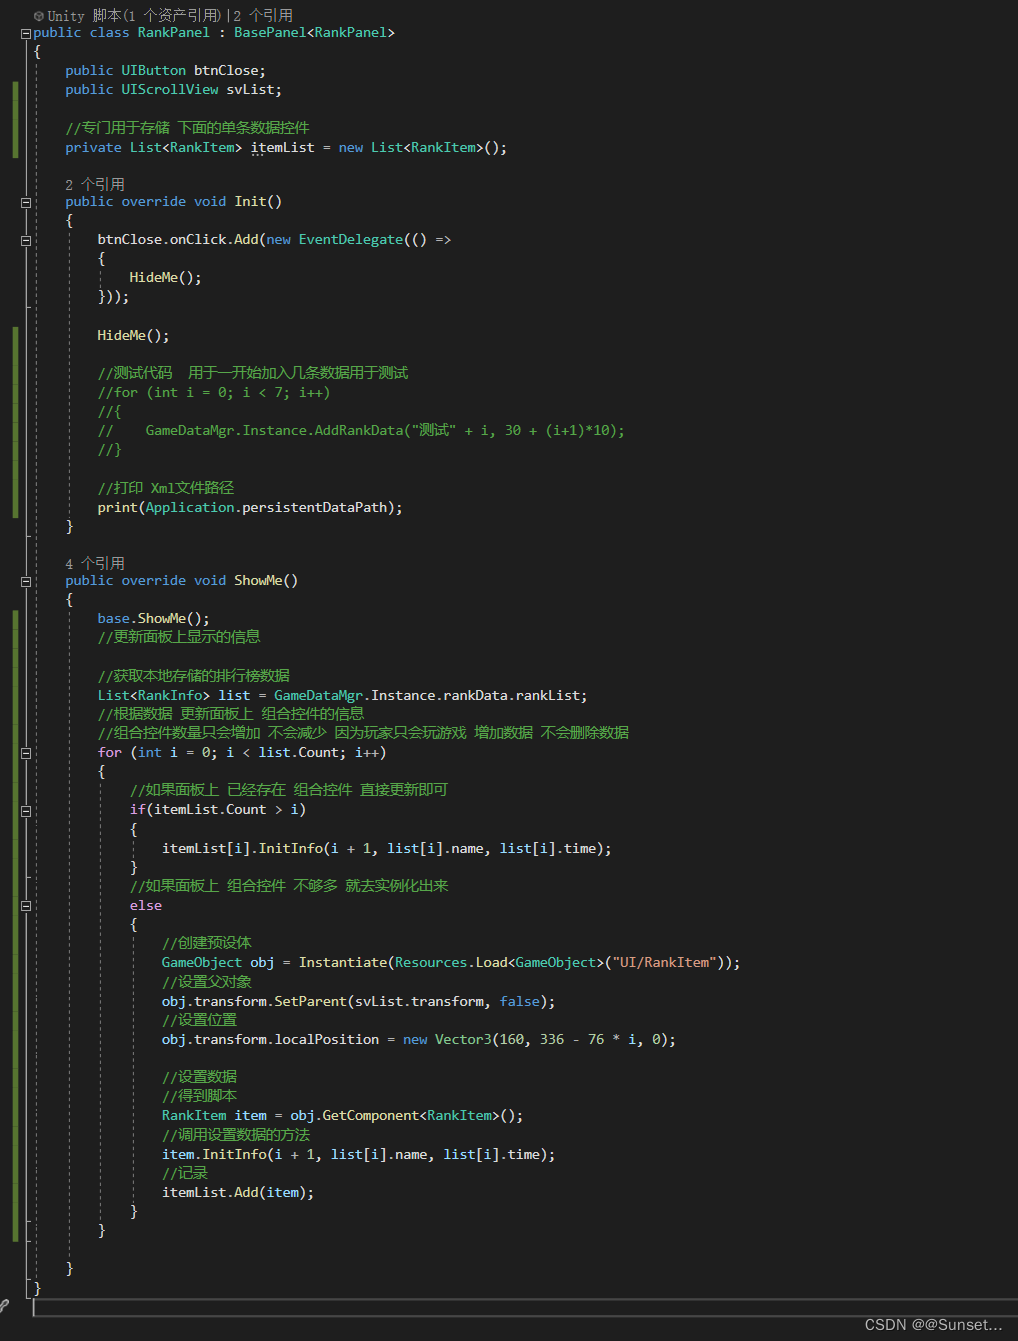
2.创建排行榜面板类
选择角色界面 ------ 拼面板
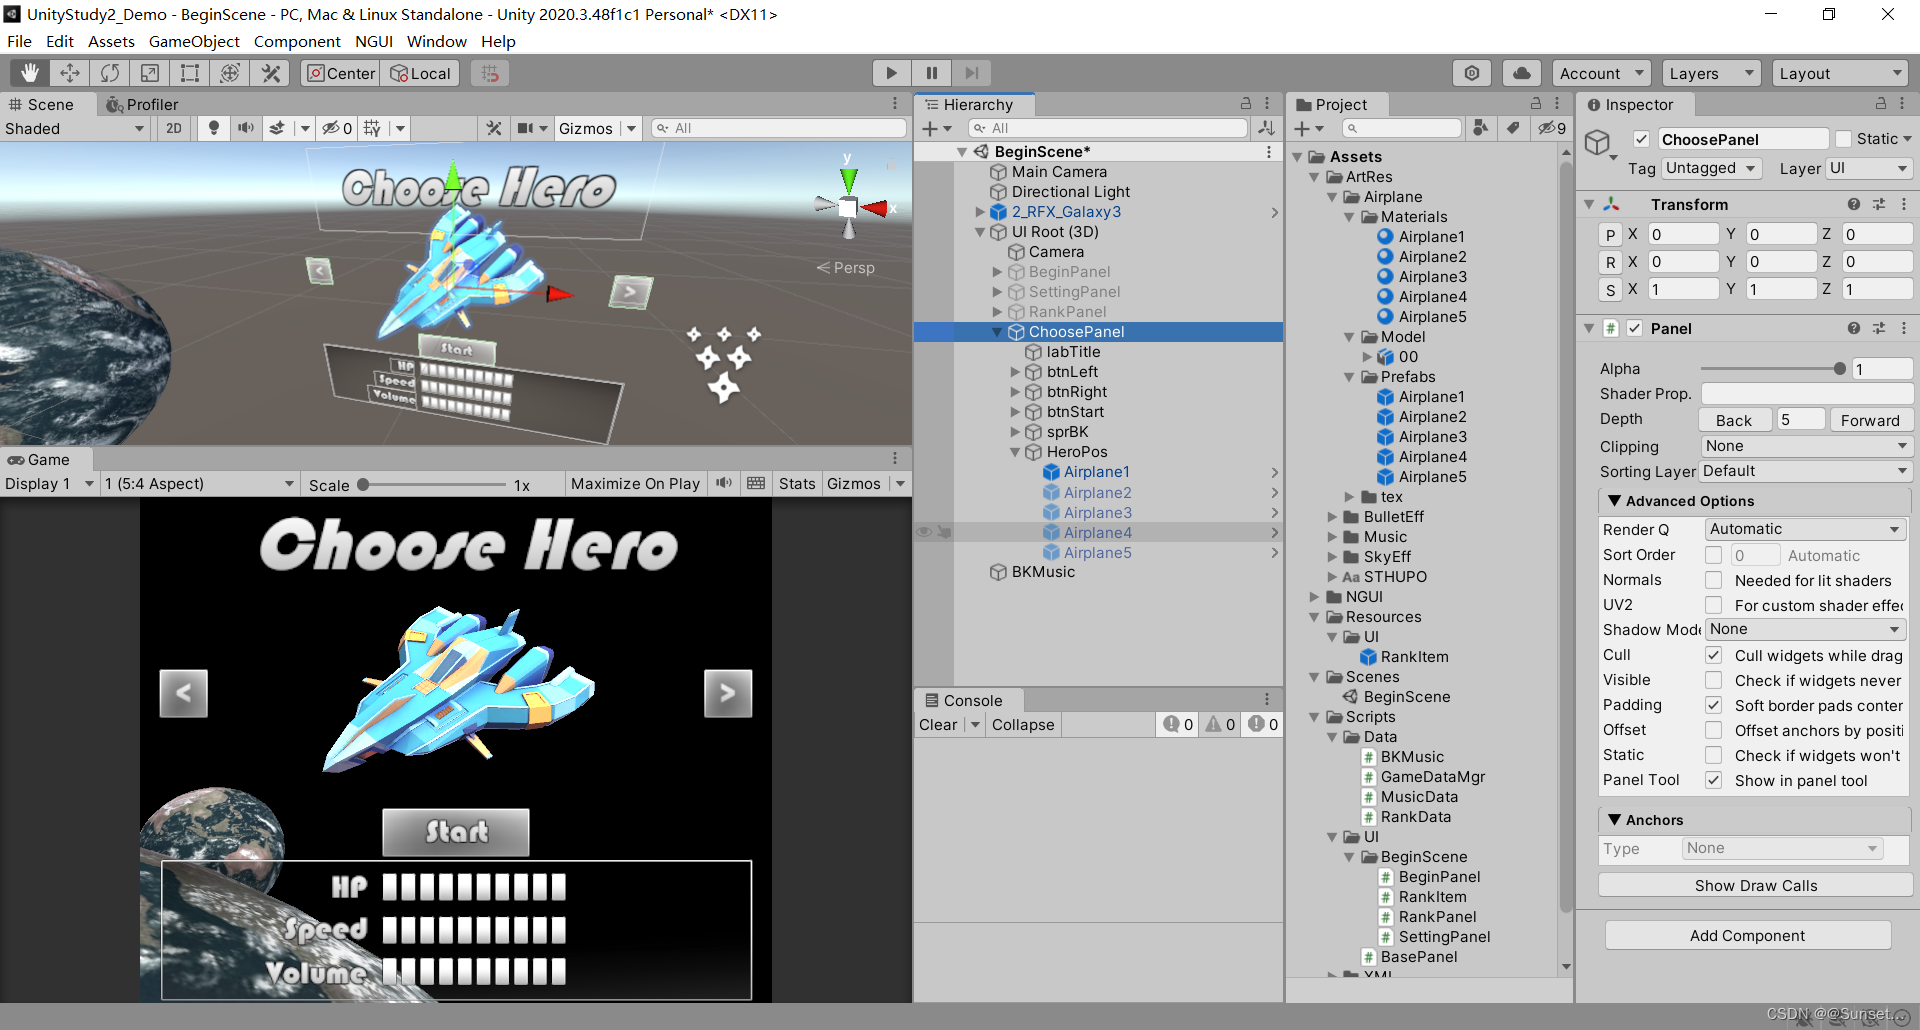
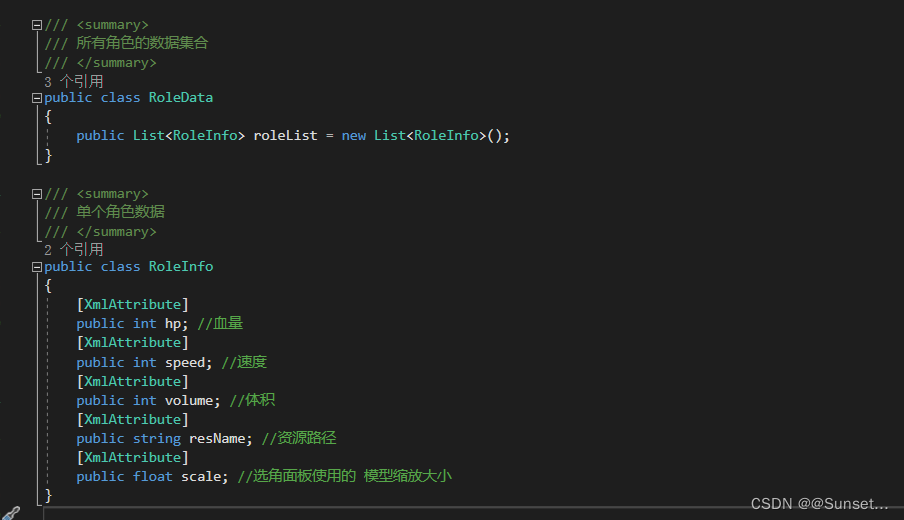
选择角色界面------数据准备
1.创建数据集合
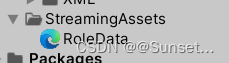
2.创建Xml配置文件
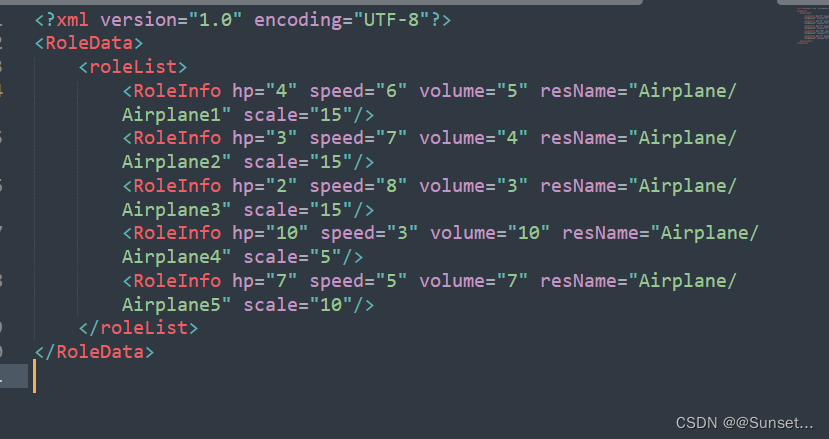
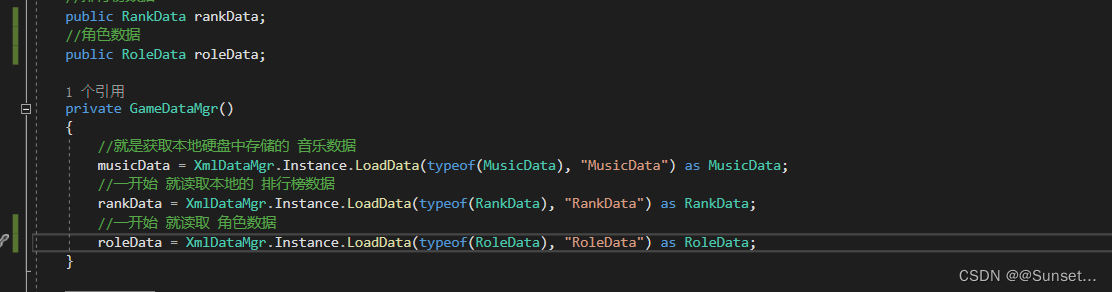
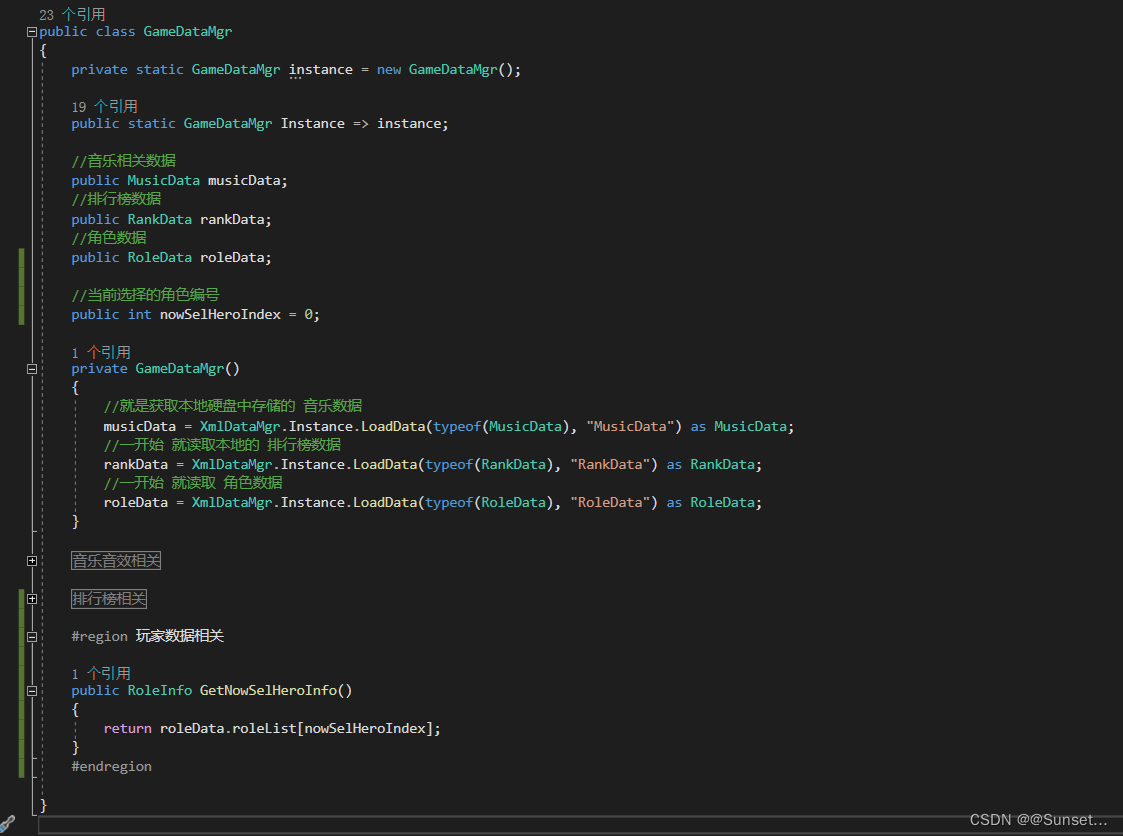
3.GameDataMgr 中调用初始化
选择角色界面------逻辑处理
1.创建 ChoosePanel 类
cs
using System.Collections;
using System.Collections.Generic;
using UnityEngine;
using UnityEngine.SceneManagement;
public class ChoosePanel : BasePanel<ChoosePanel>
{
//各按钮
public UIButton btnClose;
public UIButton btnLeft;
public UIButton btnRight;
public UIButton btnStart;
//模型父对象
public Transform heroPos;
//下方属性相关对象
public List<GameObject> hpObjs;
public List<GameObject> speedObjs;
public List<GameObject> volumeObjs;
//当前显示的飞机模型对象
private GameObject airPlaneObj;
public override void Init()
{
//选择角色后 点击开始 切换场景
btnStart.onClick.Add(new EventDelegate(() =>
{
SceneManager.LoadScene("GameScene");
}));
btnLeft.onClick.Add(new EventDelegate(() =>
{
//左按钮 减我们设定的索引
--GameDataMgr.Instance.nowSelHeroIndex;
//如果 小于最小的索引 直接让其等于 最后一个索引
if (GameDataMgr.Instance.nowSelHeroIndex < 0)
GameDataMgr.Instance.nowSelHeroIndex = GameDataMgr.Instance.roleData.roleList.Count - 1;
ChangeNowHero();
}));
btnRight.onClick.Add(new EventDelegate(() =>
{
//右按钮 加我们设定的索引
++GameDataMgr.Instance.nowSelHeroIndex;
//如果大于了最大索引 就置0
if (GameDataMgr.Instance.nowSelHeroIndex > GameDataMgr.Instance.roleData.roleList.Count - 1)
GameDataMgr.Instance.nowSelHeroIndex = 0;
ChangeNowHero();
}));
btnClose.onClick.Add(new EventDelegate(() =>
{
//关闭自己
HideMe();
//显示开始面板
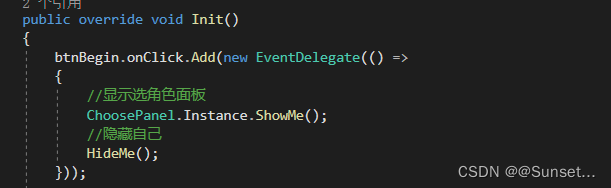
BeginPanel.Instance.ShowMe();
}));
HideMe();
}
public override void ShowMe()
{
base.ShowMe();
//每次显示的时候都从第一个开始
GameDataMgr.Instance.nowSelHeroIndex = 0;
ChangeNowHero();
}
public override void HideMe()
{
base.HideMe();
//删除当前模型
DestroyObj();
}
//切换当前的选择
private void ChangeNowHero()
{
//得到当前选择的 玩家游戏数据
RoleInfo info = GameDataMgr.Instance.GetNowSelHeroInfo();
//更新模型
//先删除上一次的飞机模型
DestroyObj();
//再创建当前的飞机模型
airPlaneObj = Instantiate(Resources.Load<GameObject>(info.resName));
//设置父对象
airPlaneObj.transform.SetParent(heroPos);
//设置角度和位置 缩放
airPlaneObj.transform.localPosition = Vector3.zero;
airPlaneObj.transform.localRotation = Quaternion.identity;
airPlaneObj.transform.localScale = Vector3.one * info.scale;
//修改层级
airPlaneObj.layer = LayerMask.NameToLayer("UI");
//更新属性
for (int i = 0; i < 10; i++)
{
hpObjs[i].SetActive(i < info.hp);
speedObjs[i].SetActive(i < info.speed);
volumeObjs[i].SetActive(i < info.volume);
}
}
/// <summary>
/// 用于删除上一次显示的模型对象
/// </summary>
private void DestroyObj()
{
if(airPlaneObj != null)
{
//移除场景的模型
Destroy(airPlaneObj);
//置空
airPlaneObj = null;
}
}
private float time;
//是否鼠标选中 模型
private bool isSel;
// Update is called once per frame
void Update()
{
//让飞机 上下浮动
time += Time.deltaTime;
heroPos.Translate(Vector3.up * Mathf.Sin(time) * 0.0001f, Space.World);
//射线检测 让飞机 可以左右转动
if (Input.GetMouseButtonDown(0))
{
//如果点击了 UI层碰撞器 认为需要开始 拖动 飞机了
if (Physics.Raycast(Camera.main.ScreenPointToRay(Input.mousePosition),
1000,
1 << LayerMask.NameToLayer("UI")))
{
isSel = true;
}
}
//抬起 取消选中
if (Input.GetMouseButtonUp(0))
isSel = false;
//旋转对象
if (Input.GetMouseButton(0) && isSel)
{
heroPos.rotation *= Quaternion.AngleAxis(Input.GetAxis("Mouse X") * 20, Vector3.up);
}
}
}2.GameDataMgr 中逻辑关联
3.BeginPanel 中显隐设置
注意:模型旋转时,发射射线检测的摄像机要是主摄像机,或者就自己指定摄像机发射。
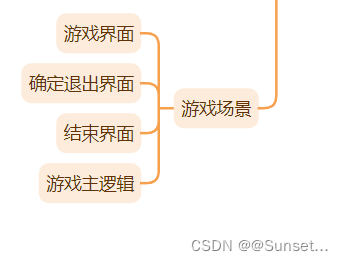
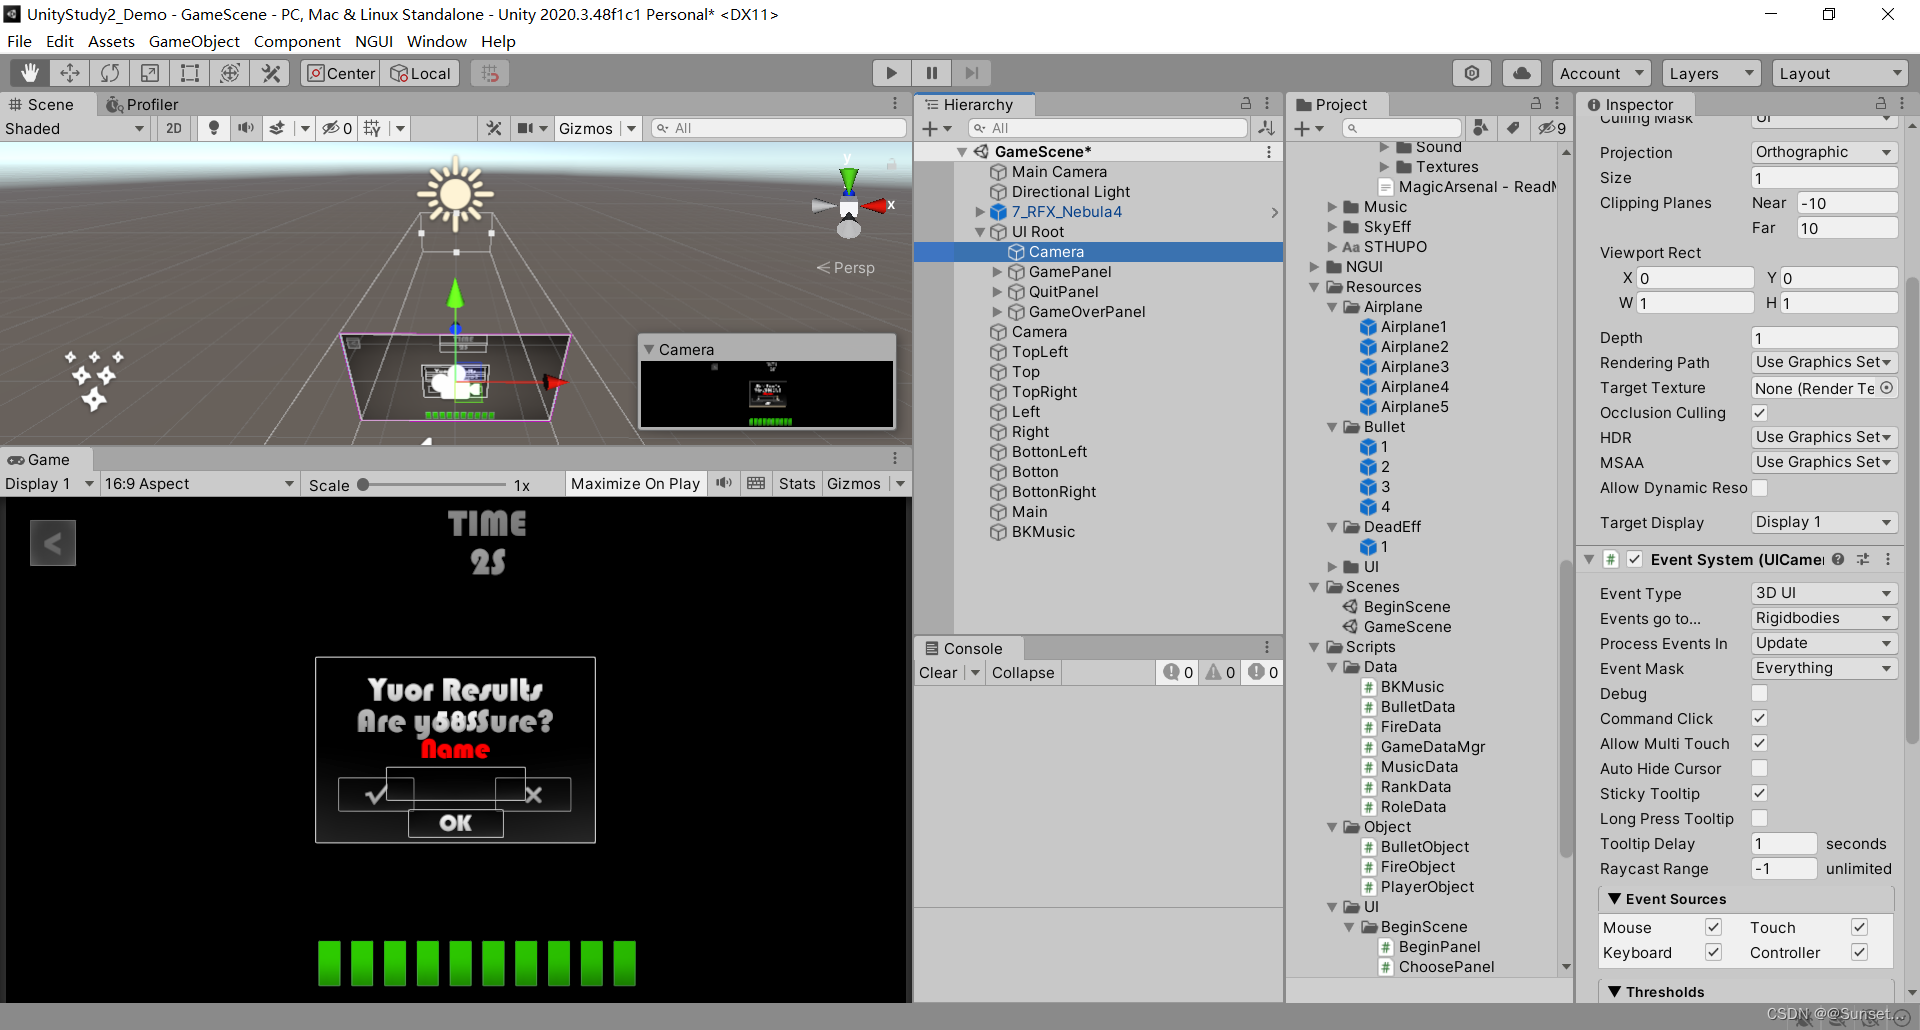
游戏场景
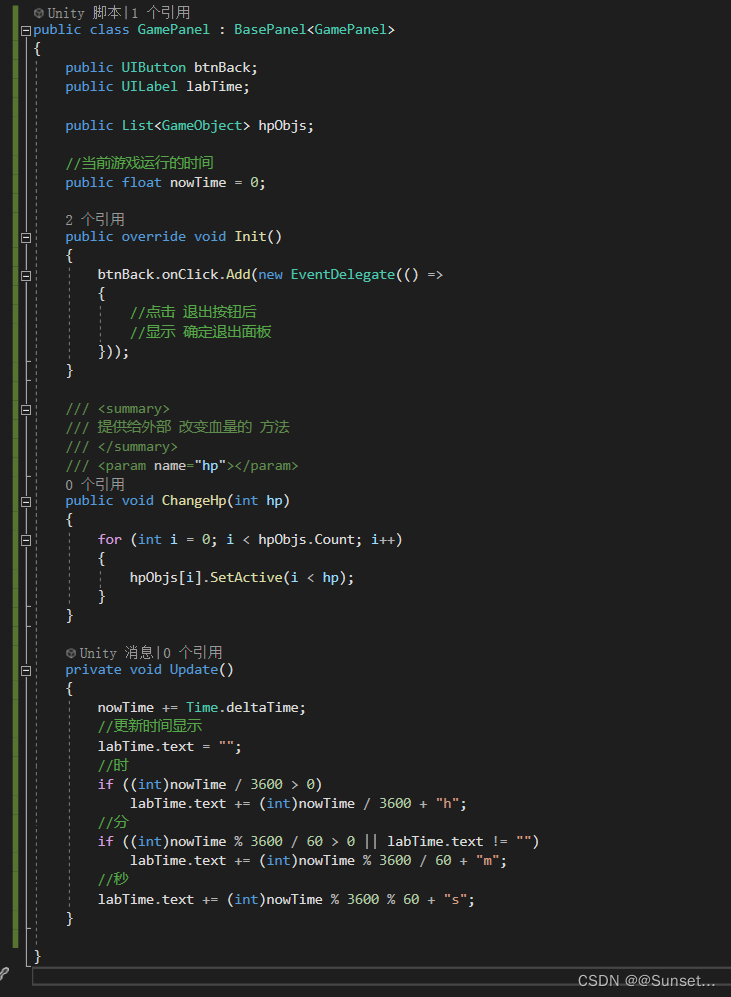
游戏界面
1.拼面板
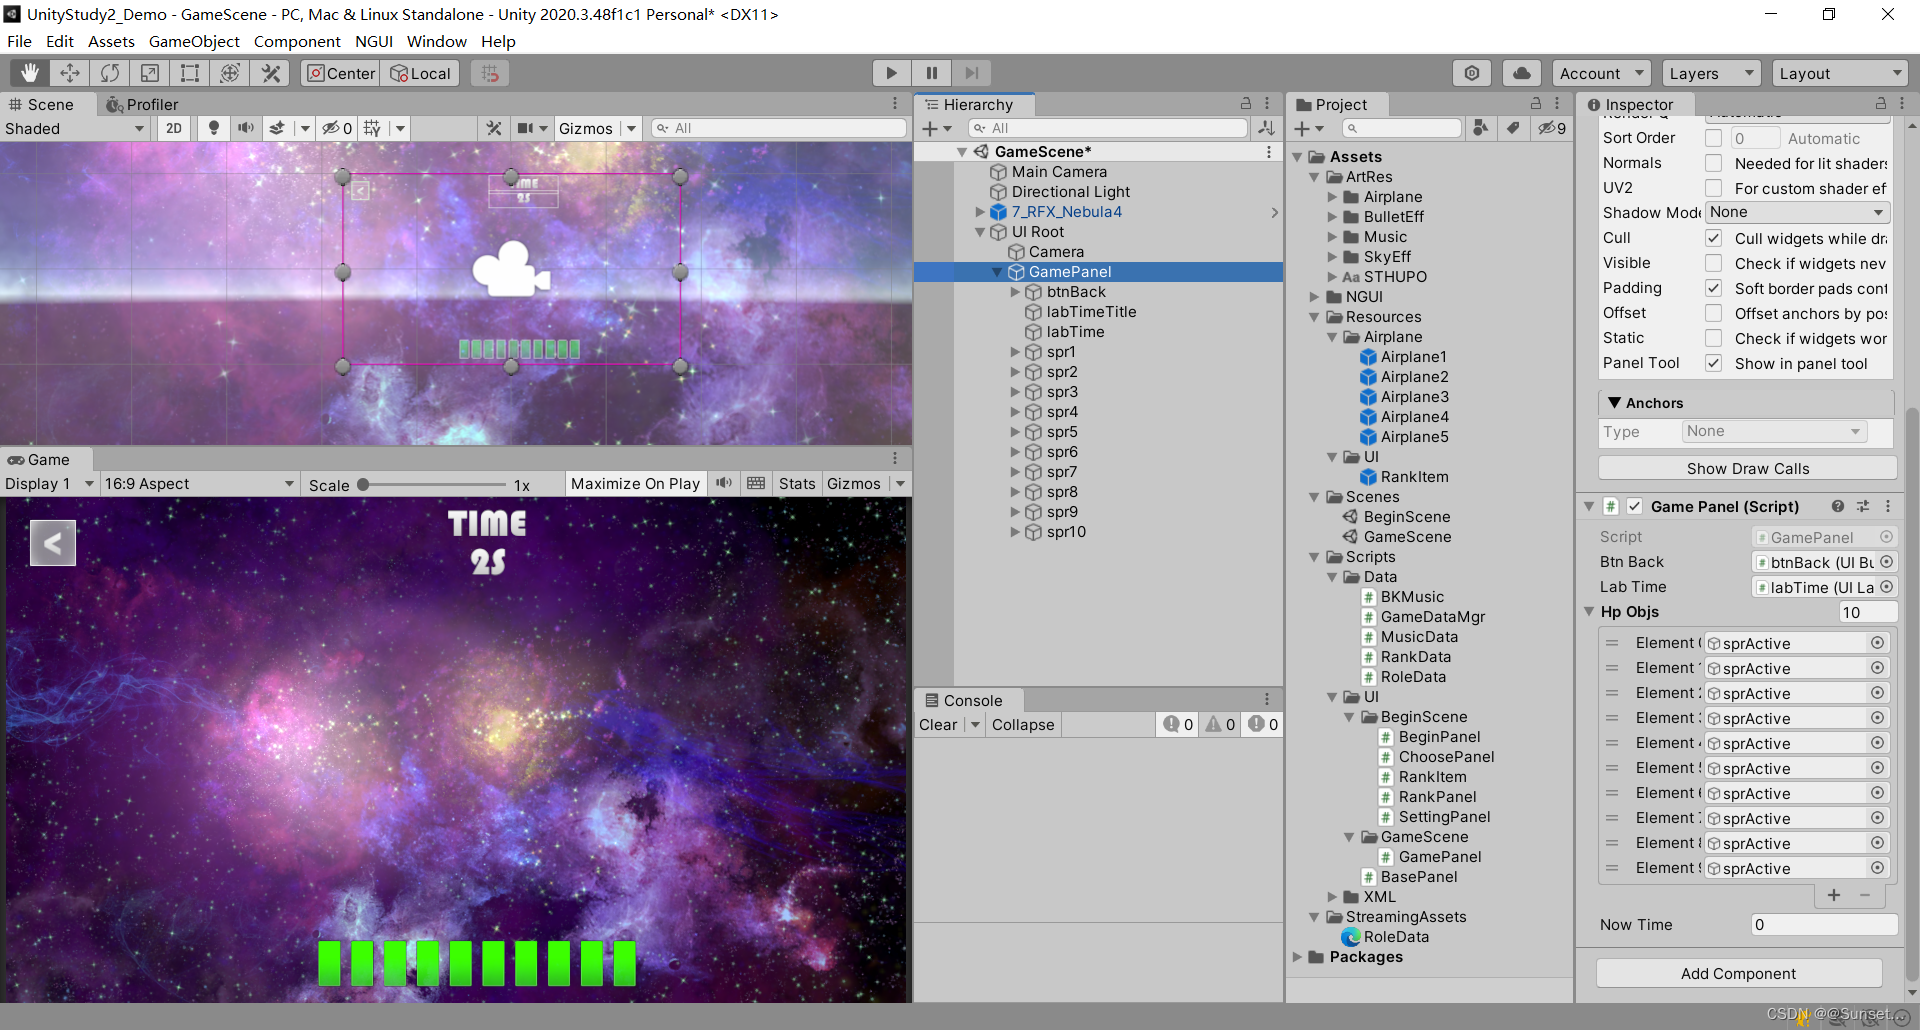
2.逻辑面板
确定退出界面
1.拼面板
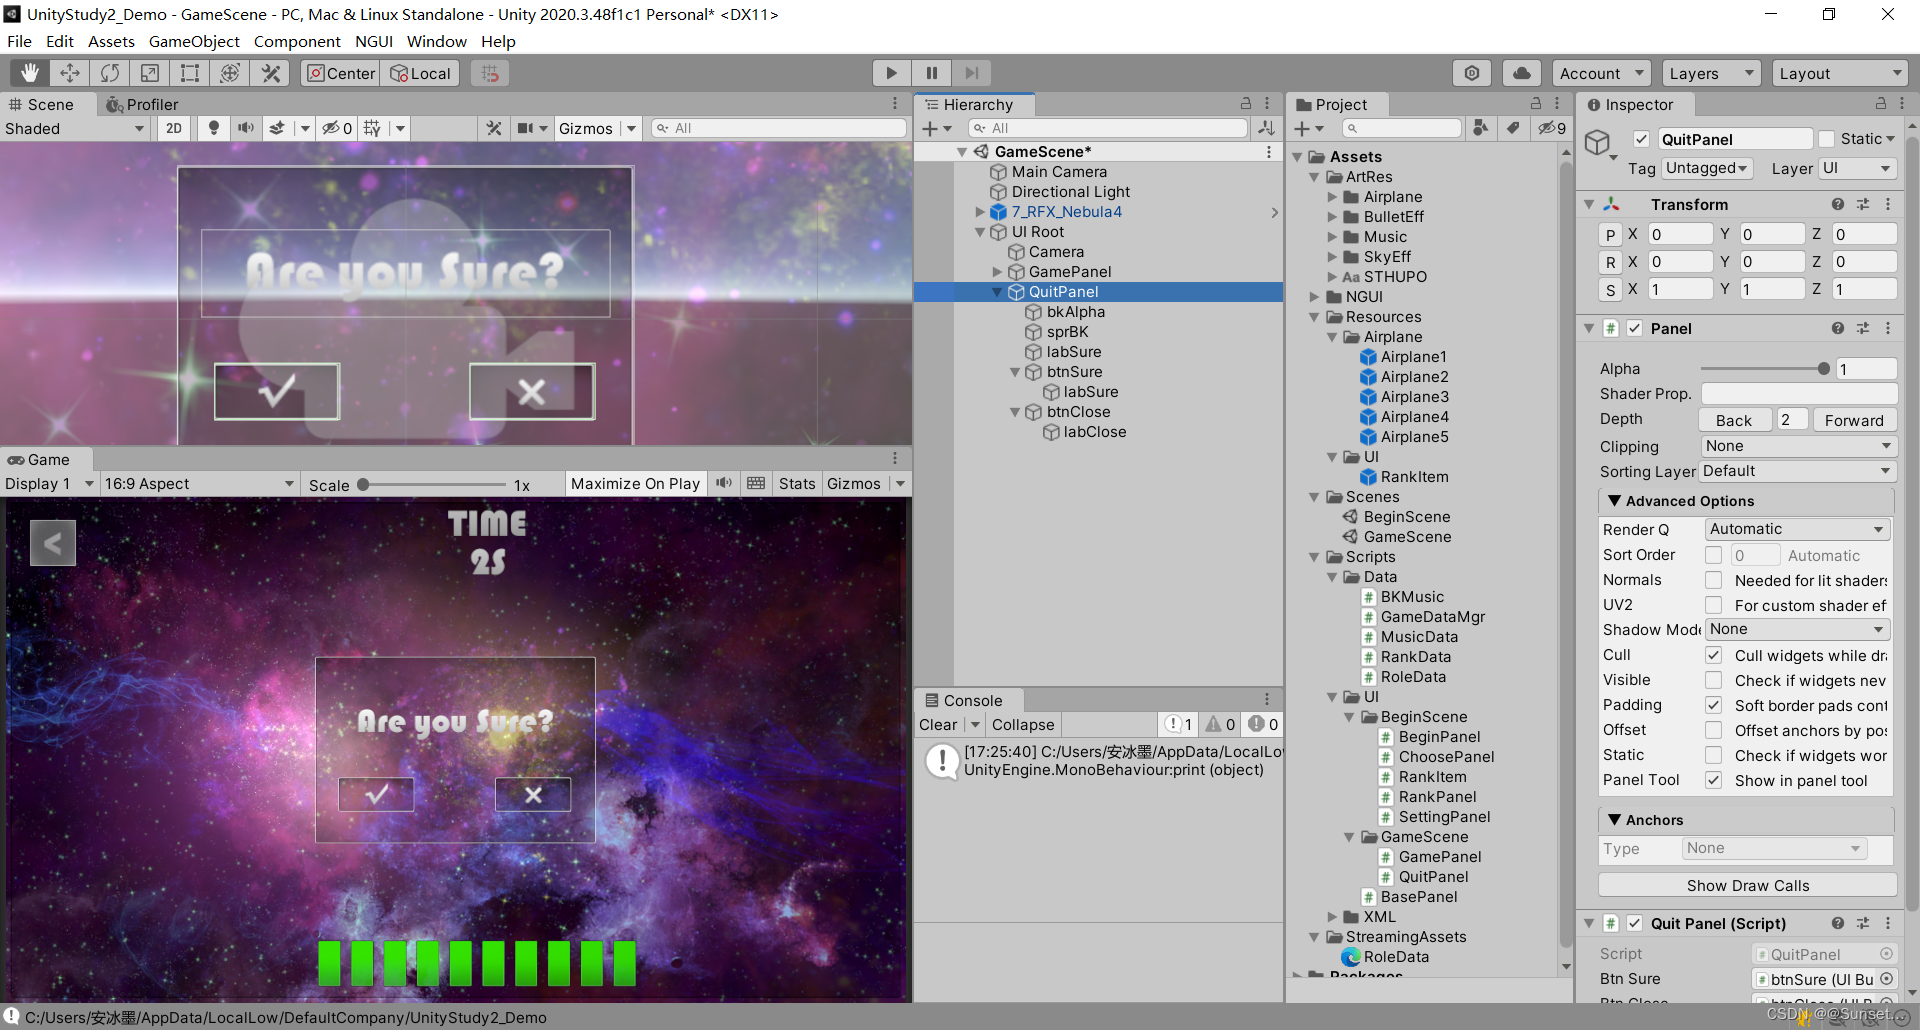
2.写逻辑
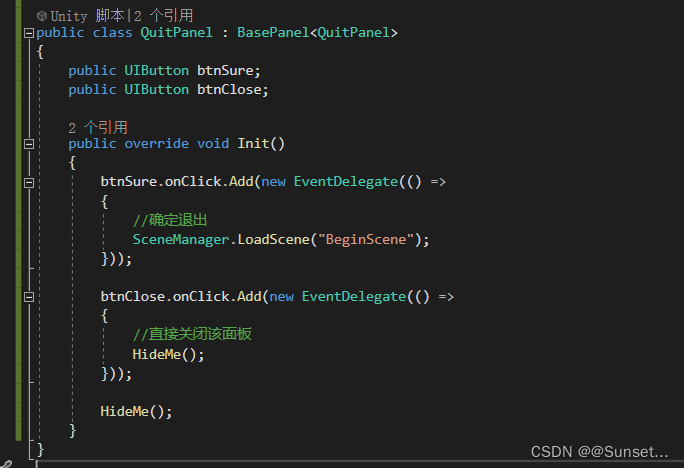
3.调用
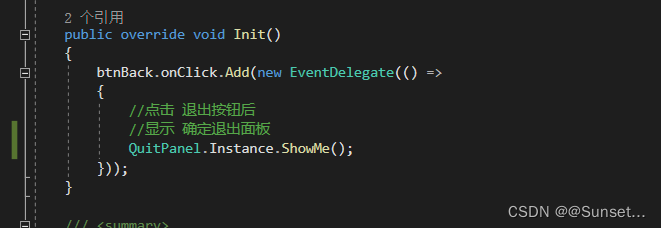
GamePanel 中调用
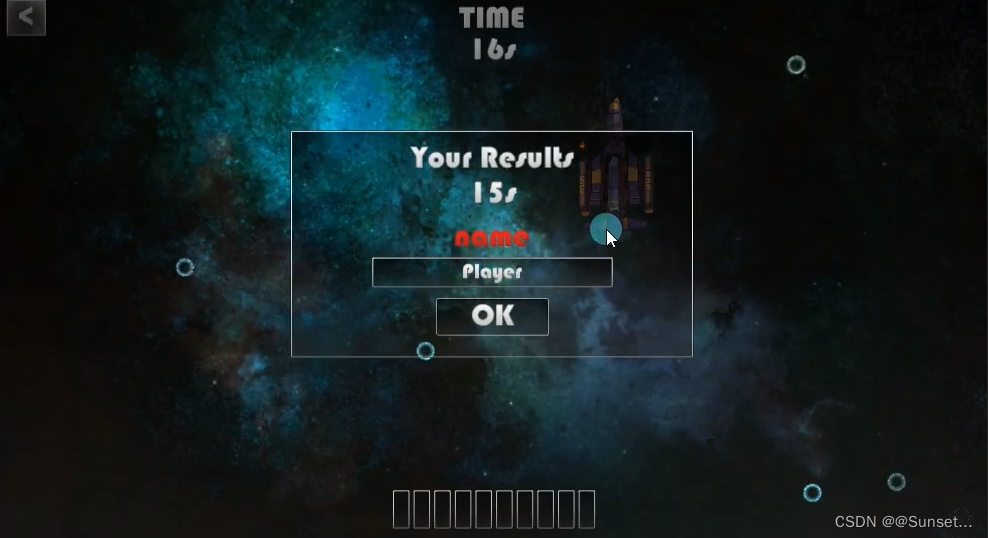
结束界面
1.拼面板
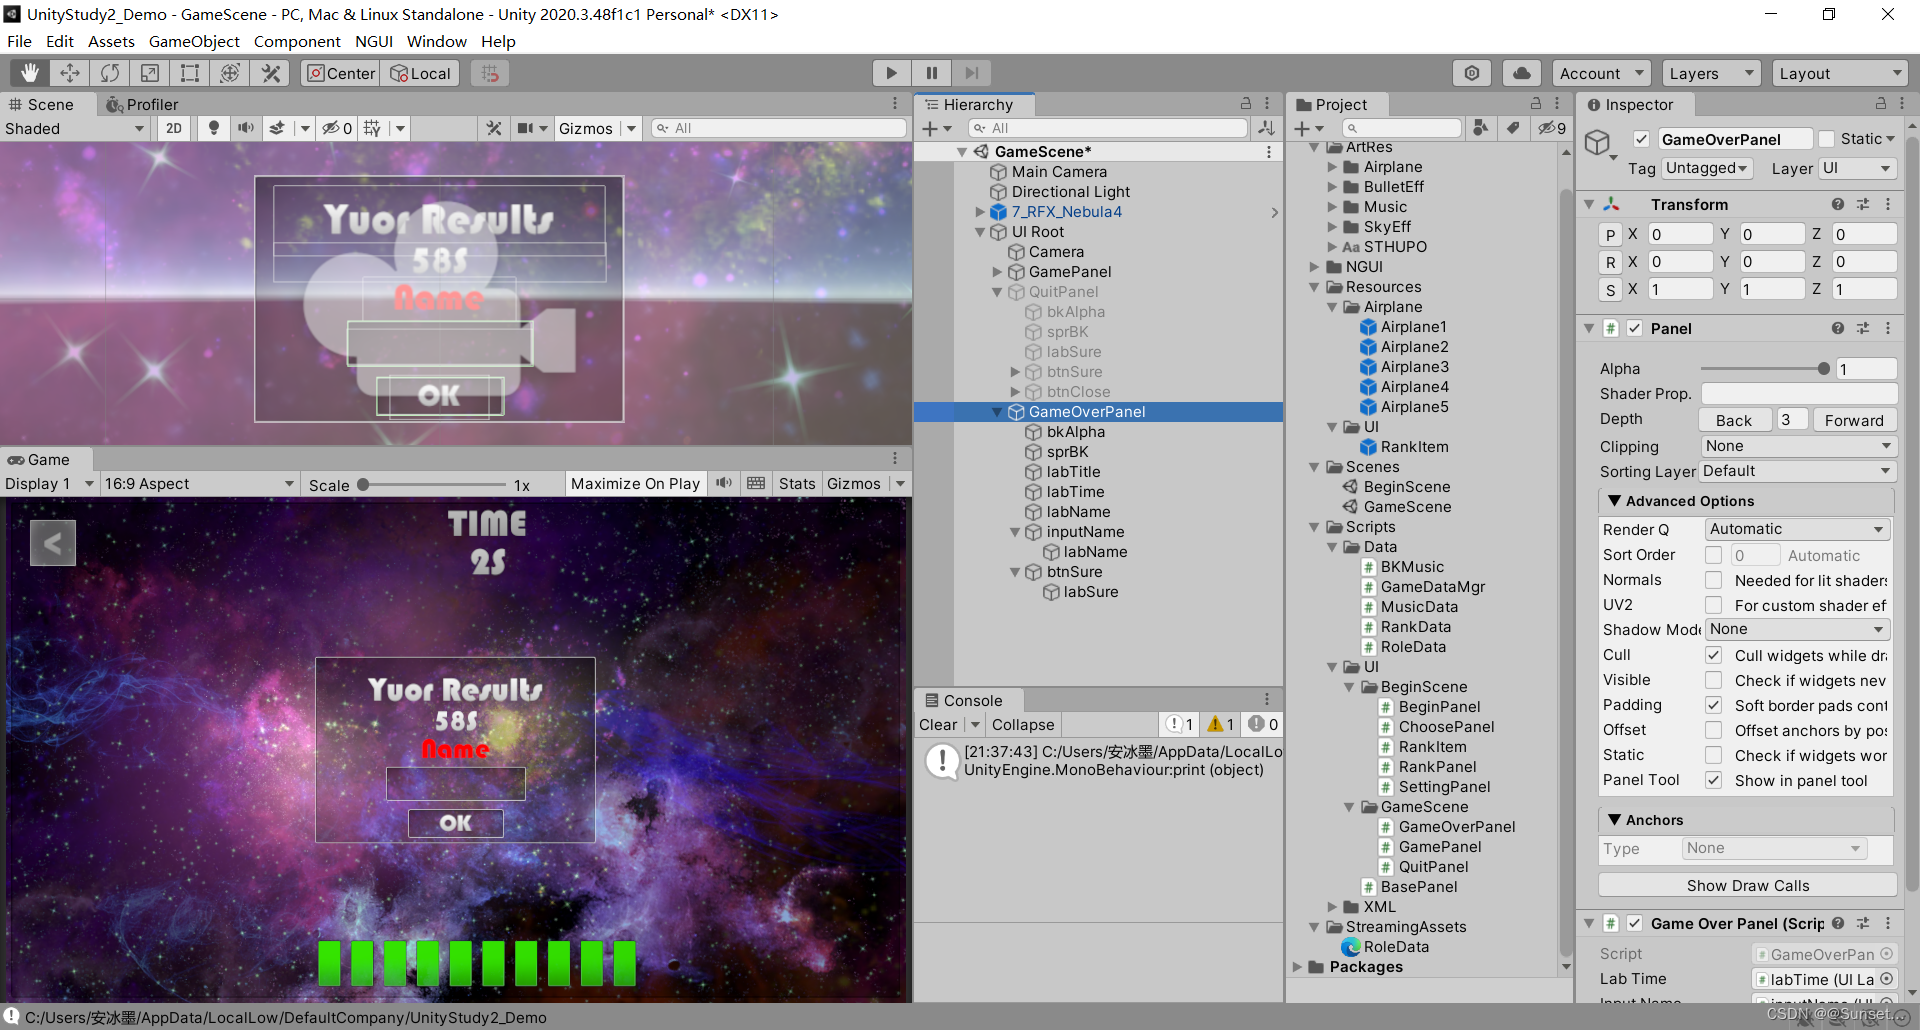
2.写逻辑

游戏主逻辑------主玩家相关
1.加一个相加来渲染
一个专门渲染特效
一个专门渲染UI
一个专门渲染其他

2.玩家逻辑
cs
using System.Collections;
using System.Collections.Generic;
using UnityEngine;

public class PlayerObject : MonoBehaviour
{
    //血量
    public int nowHp;
    public int maxHp;

    //速度
    public int speed;
    //旋转速度
    public int roundSpeed;
    //目标四元数角度
    private Quaternion targetQ;

    //是否死亡
    public bool isDead;

    //当前世界坐标系转屏幕上的点
    private Vector3 nowPos;
    //上一次玩家的位置 就是在位移前 玩家的位置
    private Vector3 frontPos;

    public void Dead()
    {
        isDead = true;
        //显示游戏结束面板
        GameOverPanel.Instance.ShowMe();
    }

    public void Wound()
    {
        if (isDead)
            return;
        //减血
        this.nowHp -= 1;
        //更新游戏面板上的血量显示
        GamePanel.Instance.ChangeHp(this.nowHp);
        //是否死亡了
        if (this.nowHp <= 0)
            this.Dead();
    }

    private float hValue;
    private float vValue;
    // Update is called once per frame
    void Update()
    {
        //如果死亡了 就没有必要移动了
        if (isDead)
            return;

        //移动 旋转逻辑

        //旋转
        hValue = Input.GetAxisRaw("Horizontal");
        vValue = Input.GetAxisRaw("Vertical");
        //如果没有按我们的AD键 那么目标角度 就是(0,0,0)度
        if (hValue == 0)
            targetQ = Quaternion.identity;
        //如果按AD键 就是(0,0,20)或者 (0,0,-20) 根据按的左右决定
        else
            targetQ = hValue < 0 ? Quaternion.AngleAxis(20, Vector3.forward) : Quaternion.AngleAxis(-20, Vector3.forward);

        //让飞机朝着 这个目标四元数 去旋转
        this.transform.rotation = Quaternion.Slerp(this.transform.rotation, targetQ, roundSpeed * Time.deltaTime);

        //在位移之前 记录 之前的位置
        frontPos = this.transform.position;

        //移动
        this.transform.Translate(Vector3.forward * vValue * speed * Time.deltaTime);
        this.transform.Translate(Vector3.right * hValue * speed * Time.deltaTime, Space.World);

        //进行极限判断
        nowPos = Camera.main.WorldToScreenPoint(this.transform.position);
        //左右 溢出判断
        if(nowPos.x < 0 || nowPos.x >= Screen.width)
        {
            this.transform.position = new Vector3(frontPos.x, this.transform.position.y, this.transform.position.z);
        }
        //上下 溢出判断
        if(nowPos.y < 0 || nowPos.y >= Screen.height)
        {
            this.transform.position = new Vector3(this.transform.position.x, this.transform.position.y, frontPos.z);
        }

    }
}
游戏主逻辑------子弹相关
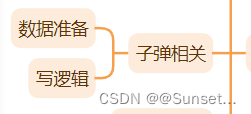
数据准备
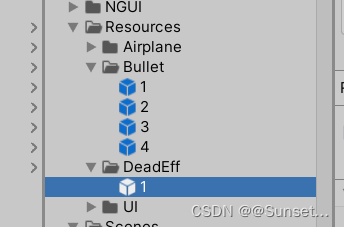
1.制作子弹 和 子弹爆炸特效
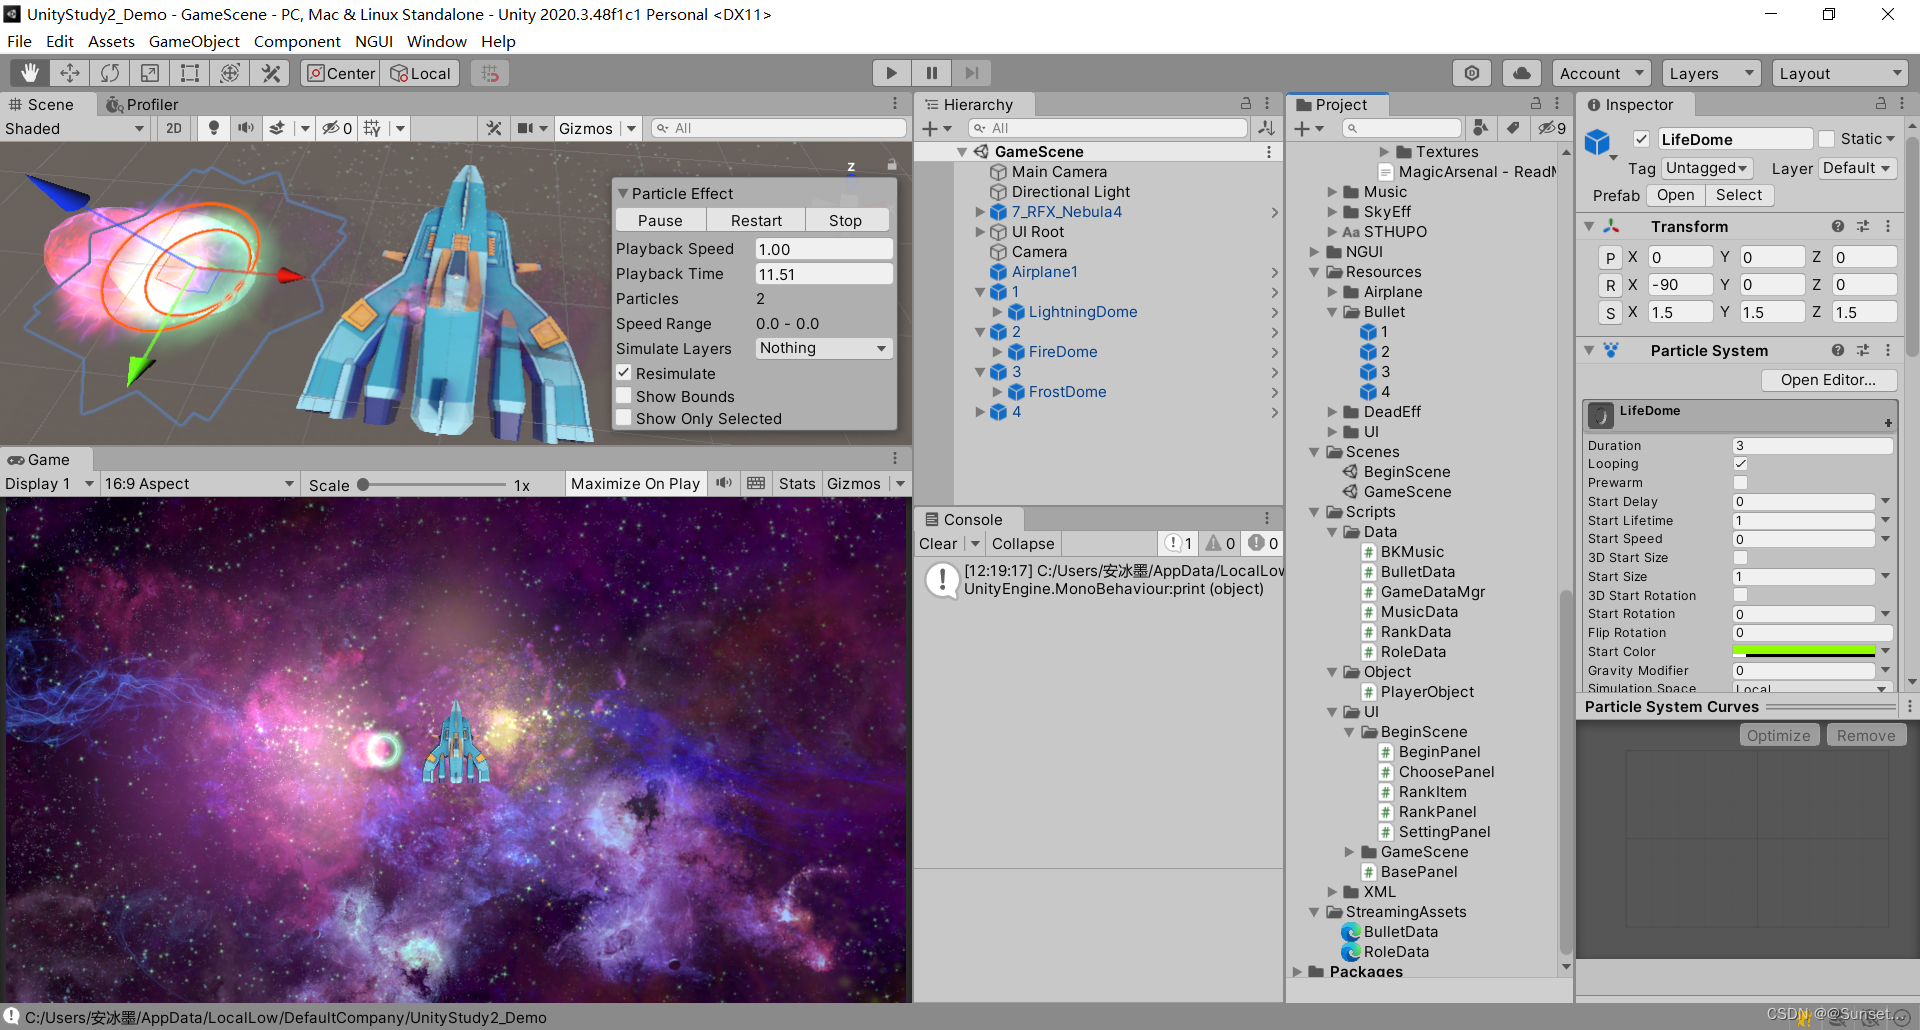
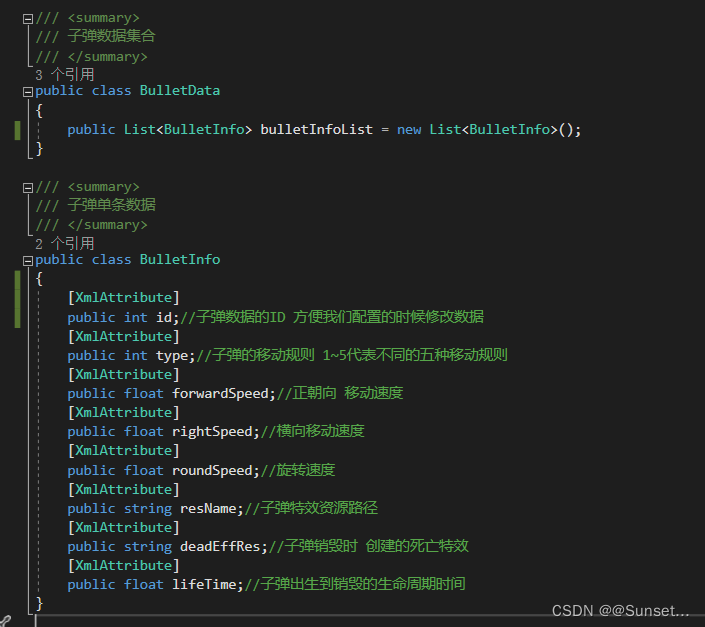
2.子弹数据类
3.Xml文件配置

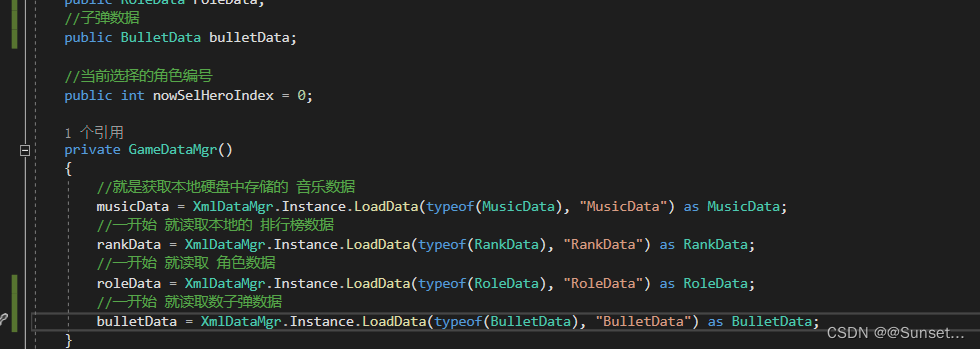
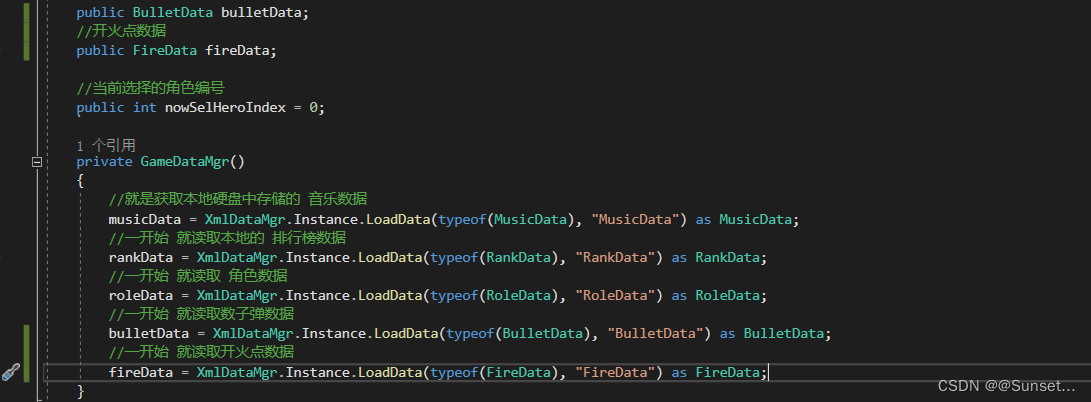
- GameDataMgr 管理初始化
写逻辑
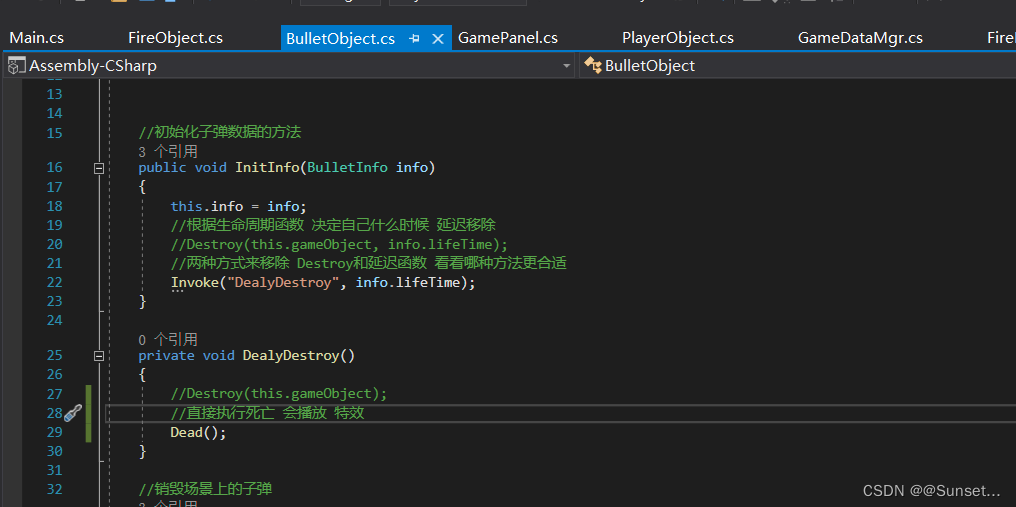
1.创建 BullteObject 脚本
cs
using System.Collections;
using System.Collections.Generic;
using UnityEngine;

public class BulletObject : MonoBehaviour
{
    //子弹使用的数据
    private BulletInfo info;

    //用于曲线移动的 计时变量
    private float time;


    //初始化子弹数据的方法
    public void InitInfo(BulletInfo info)
    {
        this.info = info;
        //根据生命周期函数 决定自己什么时候 延迟移除
        //Destroy(this.gameObject, info.lifeTime);
        //两种方式来移除 Destroy和延迟函数 看看哪种方法更合适
        Invoke("DealyDestroy", info.lifeTime);
    }

    private void DealyDestroy()
    {
        Destroy(this.gameObject);
    }

    //销毁场景上的子弹
    public void Dead()
    {
        //创建死亡特效
        GameObject eff = Instantiate(Resources.Load<GameObject>(this.info.deadEffRes));
        //设置特效的位置 创建在当前子弹的位置
        eff.transform.position = this.transform.position;
        //1秒后延迟移除特效
        Destroy(eff, 1f);

        //销毁子弹对象
        Destroy(this.gameObject);
    }

    //和对象碰撞时 (触发)
    private void OnTriggerEnter(Collider other)
    {
        if (other.gameObject.CompareTag("Player"))
        {
            //得到玩家脚本
            PlayerObject obj = other.GetComponent<PlayerObject>();
            //玩家受伤减血
            obj.Wound();

            //销毁自己 就是直接调用 Dead方法
            Dead();
        }
    }

    // Update is called once per frame
    void Update()
    {
        //所有移动的共同特点 都是朝自己的面朝向动
        this.transform.Translate(Vector3.forward * info.forwardSpeed * Time.deltaTime);
        //接着再来处理 其他的移动逻辑
        //1 代表 只朝自己面朝向移动 直线移动
        //2 代表 曲线运动
        //3 代表 右抛物线
        //4 代表 左抛物线
        //5 代表 跟踪移动
        switch (info.type)
        {
            case 2:
                time += Time.deltaTime;
                //sin里面值变化的快慢 决定了 左右变化的频率
                //乘以的速度 变化的大小 决定了 左右位移的多少
                this.transform.Translate(Vector3.right * info.rightSpeed * Time.deltaTime * Mathf.Sin(time * info.roundSpeed));
                break;
            case 3:
                //右抛物线 无非 就是 去改变 旋转角度
                this.transform.rotation *= Quaternion.AngleAxis(info.roundSpeed * Time.deltaTime, Vector3.up);
                break;
            case 4:
                //左抛物线 无非 就是 去改变 旋转角度
                this.transform.rotation *= Quaternion.AngleAxis(-info.roundSpeed * Time.deltaTime, Vector3.up);
                break;
            case 5:
                //跟踪移动 不停的计算 玩家和我之间的方向向量 得到四元数 然后自己的角度 不停的 变化为这个目标四元数
                this.transform.rotation = Quaternion.Slerp(this.transform.rotation,
                                                            Quaternion.LookRotation(PlayerObject.Instance.transform.position - this.transform.position), info.roundSpeed * Time.deltaTime);
                break;
        }

    }
}
2.测试

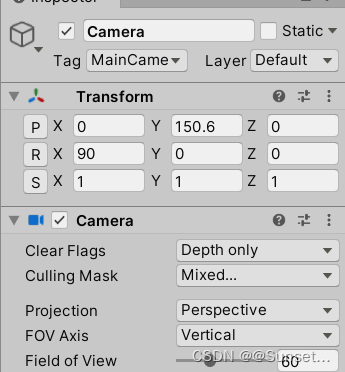
游戏主逻辑------开火点相关
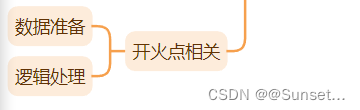
数据准备
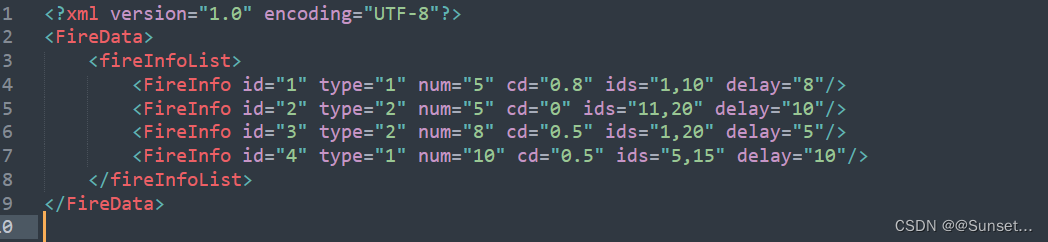
1.创建开火点数据 ------ FireData
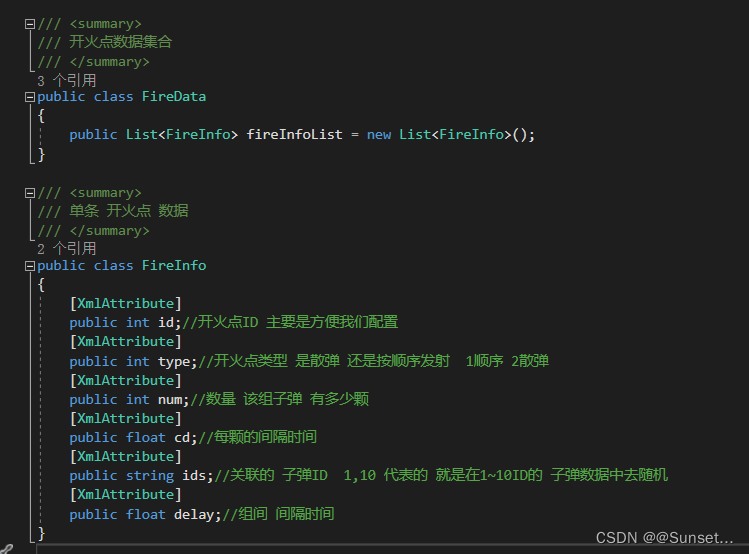
2.配置Xml文件
- GameDataMgr 中初始化
逻辑处理一
主要实现了绘制开火点位置
cs
using System.Collections;
using System.Collections.Generic;
using UnityEngine;

/// <summary>
/// 表示 开火点位置的 类型
/// </summary>
public enum E_Pos_Type
{
    TopLeft,
    Top,
    TopRight,

    Left,
    Right,

    BottonLeft,
    Botton,
    BottonRight,
}

public class FireObject : MonoBehaviour
{
    public E_Pos_Type type;

    //表示屏幕上的点
    private Vector3 screenPos;
    //初始发射子弹的方向 主要用于作为散弹的初始方向 用于计算
    private Vector3 initDir;

    // Update is called once per frame
    void Update()
    {
        //用于测试玩家转屏幕坐标后 横截面的 z轴值
        //print(Camera.main.WorldToScreenPoint(PlayerObject.Instance.transform.position));
        //更新 开火点位置 达到分辨率自适应
        UpdatePos();

    }

    //根据点的类型 来更新它的位置
    private void UpdatePos()
    {
        //这里设置z轴 是为了和主玩家位置转屏幕坐标后的 z位置一样 目的是 让点和玩家 所在的 横截面是一致的
        screenPos.z = 150.6f;
        switch (type)
        {
            case E_Pos_Type.TopLeft:
                screenPos.x = 0;
                screenPos.y = Screen.height;

                initDir = Vector3.right;
                break;
            case E_Pos_Type.Top:
                screenPos.x = Screen.width / 2;
                screenPos.y = Screen.height;

                initDir = Vector3.right;
                break;
            case E_Pos_Type.TopRight:
                screenPos.x = Screen.width;
                screenPos.y = Screen.height;

                initDir = Vector3.left;
                break;
            case E_Pos_Type.Left:
                screenPos.x = 0;
                screenPos.y = Screen.height / 2;

                initDir = Vector3.up;
                break;
            case E_Pos_Type.Right:
                screenPos.x = Screen.width;
                screenPos.y = Screen.height / 2;

                initDir = Vector3.up;
                break;
            case E_Pos_Type.BottonLeft:
                screenPos.x = 0;
                screenPos.y = 0;

                initDir = Vector3.right;
                break;
            case E_Pos_Type.Botton:
                screenPos.x = Screen.width / 2;
                screenPos.y = 0;

                initDir = Vector3.right;
                break;
            case E_Pos_Type.BottonRight:
                screenPos.x = Screen.width;
                screenPos.y = 0;

                initDir = Vector3.left;
                break;
        }

        //再把屏幕点 转换为 世界坐标点 那得到的 就是我们想要的坐标点
        this.transform.position = Camera.main.ScreenToWorldPoint(screenPos);
    }
}
逻辑处理二
1.实现了重置开火点数据 和 检测开火逻辑 (代码量较多 要好好了解)
cs
using System.Collections;
using System.Collections.Generic;
using UnityEngine;

/// <summary>
/// 表示 开火点位置的 类型
/// </summary>
public enum E_Pos_Type
{
    TopLeft,
    Top,
    TopRight,

    Left,
    Right,

    BottonLeft,
    Botton,
    BottonRight,
}

public class FireObject : MonoBehaviour
{
    public E_Pos_Type type;

    //表示屏幕上的点
    private Vector3 screenPos;
    //初始发射子弹的方向 主要用于作为散弹的初始方向 用于计算
    private Vector3 initDir;

    //当前开火点的数据信息
    private FireInfo fireInfo;
    private int nowNum;
    private float nowCD;
    private float nowDelay;
    //当前组开火点 使用的子弹信息
    private BulletInfo nowBulletInfo;

    //散弹时 每颗子弹的间隔角度
    private float changeAngle;

    //用于发射散弹时 记录上一次的方向
    private Vector3 nowDir;

    // Update is called once per frame
    void Update()
    {
        //用于测试玩家转屏幕坐标后 横截面的 z轴值
        //print(Camera.main.WorldToScreenPoint(PlayerObject.Instance.transform.position));
        //更新 开火点位置 达到分辨率自适应
        UpdatePos();
        //每次 都检测 是否需要 重置 开火点数据
        ResetFireInfo();
        //发射子弹
        UpdateFire();
    }

    //根据点的类型 来更新它的位置
    private void UpdatePos()
    {
        //这里设置z轴 是为了和主玩家位置转屏幕坐标后的 z位置一样 目的是 让点和玩家 所在的 横截面是一致的
        screenPos.z = 150.6f;
        switch (type)
        {
            case E_Pos_Type.TopLeft:
                screenPos.x = 0;
                screenPos.y = Screen.height;

                initDir = Vector3.right;
                break;
            case E_Pos_Type.Top:
                screenPos.x = Screen.width / 2;
                screenPos.y = Screen.height;

                initDir = Vector3.right;
                break;
            case E_Pos_Type.TopRight:
                screenPos.x = Screen.width;
                screenPos.y = Screen.height;

                initDir = Vector3.left;
                break;
            case E_Pos_Type.Left:
                screenPos.x = 0;
                screenPos.y = Screen.height / 2;

                initDir = Vector3.up;
                break;
            case E_Pos_Type.Right:
                screenPos.x = Screen.width;
                screenPos.y = Screen.height / 2;

                initDir = Vector3.up;
                break;
            case E_Pos_Type.BottonLeft:
                screenPos.x = 0;
                screenPos.y = 0;

                initDir = Vector3.right;
                break;
            case E_Pos_Type.Botton:
                screenPos.x = Screen.width / 2;
                screenPos.y = 0;

                initDir = Vector3.right;
                break;
            case E_Pos_Type.BottonRight:
                screenPos.x = Screen.width;
                screenPos.y = 0;

                initDir = Vector3.left;
                break;
        }

        //再把屏幕点 转换为 世界坐标点 那得到的 就是我们想要的坐标点
        this.transform.position = Camera.main.ScreenToWorldPoint(screenPos);
    }

    //重置当前要发射的炮台数据
    private void ResetFireInfo()
    {
        //自己定一个规则 只有当cd和数量都为0时 才认为需要重新获取 发射点数据
        if (nowCD != 0 && nowNum != 0)
            return;
        //组间休息时间判断
        if (fireInfo != null)
        {
            nowDelay -= Time.deltaTime;
            //还在组间休息
            if (nowDelay > 0)
                return;
        }

        //从数据中随机取出一条 来按照规则 发射子弹
        List<FireInfo> list = GameDataMgr.Instance.fireData.fireInfoList;
        fireInfo = list[Random.Range(0, list.Count)];
        //我们不能直接改变数据当中的内容 我们应该拿变量 临时存储下来 这样就不会影响我们数据本身
        nowNum = fireInfo.num;
        nowCD = fireInfo.cd;
        nowDelay = fireInfo.delay;

        //通过 开火点数据 取出 当前要使用的子弹数据信息
        //得到开始id 和 结束id 用于随机取子弹信息
        string[] strs = fireInfo.ids.Split(',');
        int beginID = int.Parse(strs[0]);
        int endID = int.Parse(strs[1]);
        int randomBulletID = Random.Range(beginID, endID + 1);
        nowBulletInfo = GameDataMgr.Instance.bulletData.bulletInfoList[randomBulletID - 1];

        //如果是散弹 就需要计算 间隔角度
        if (fireInfo.type == 2)
        {
            switch (type)
            {
                case E_Pos_Type.TopLeft:
                case E_Pos_Type.TopRight:
                case E_Pos_Type.BottonLeft:
                case E_Pos_Type.BottonRight:
                    changeAngle = 90f / (nowNum + 1);
                    break;
                case E_Pos_Type.Top:
                case E_Pos_Type.Left:
                case E_Pos_Type.Right:
                case E_Pos_Type.Botton:
                    changeAngle = 180f / (nowNum + 1);
                    break;
            }
        }

    }

    //检测开火
    private void UpdateFire()
    {
        //当前状态 是不需要发射子弹的
        if (nowCD == 0 && nowNum == 0)
            return;

        //cd更新
        nowCD -= Time.deltaTime;
        if (nowCD > 0)
            return;

        GameObject bullet;
        BulletObject bulletObj;

        switch (fireInfo.type)
        {
            //一颗一颗的发射子弹 朝向玩家
            case 1:
                //动态创建 子弹对象
                bullet = Instantiate(Resources.Load<GameObject>(nowBulletInfo.resName));
                //动态添加 子弹脚本
                bulletObj = bullet.AddComponent<BulletObject>();
                //把当前的子弹数据传入子弹脚本 进行初始化
                bulletObj.InitInfo(nowBulletInfo);

                //设置子弹的位置 和朝向
                bullet.transform.position = this.transform.position;
                bullet.transform.rotation = Quaternion.LookRotation(PlayerObject.Instance.transform.position - bullet.transform.position);

                //表示已经发射一颗子弹
                --nowNum;
                //重置cd
                nowCD = nowNum == 0 ? 0 : fireInfo.cd;


                break;
                //发射散弹
            case 2:
                //无CD 一瞬间 发射所有的散弹
                if(nowCD == 0)
                {
                    for (int i = 0; i < nowNum; i++)
                    {
                        //动态创建 子弹对象
                        bullet = Instantiate(Resources.Load<GameObject>(nowBulletInfo.resName));
                        //动态添加 子弹脚本
                        bulletObj = bullet.AddComponent<BulletObject>();
                        //把当前的子弹数据传入子弹脚本 进行初始化
                        bulletObj.InitInfo(nowBulletInfo);

                        //设置子弹的位置 和朝向
                        bullet.transform.position = this.transform.position;
                        //每次都会旋转一个角度 得到一个新的方向
                        nowDir = Quaternion.AngleAxis(changeAngle * i, Vector3.up) * initDir;
                        bullet.transform.rotation = Quaternion.LookRotation(nowDir);
                    }

                    //因为是瞬间创建完所有子弹 所以 重置数据
                    nowCD = nowNum = 0;
                }
                else
                {
                    //动态创建 子弹对象
                    bullet = Instantiate(Resources.Load<GameObject>(nowBulletInfo.resName));
                    //动态添加 子弹脚本
                    bulletObj = bullet.AddComponent<BulletObject>();
                    //把当前的子弹数据传入子弹脚本 进行初始化
                    bulletObj.InitInfo(nowBulletInfo);

                    //设置子弹的位置 和朝向
                    bullet.transform.position = this.transform.position;
                    //每次都会旋转一个角度 得到一个新的方向
                    nowDir = Quaternion.AngleAxis(changeAngle * (fireInfo.num - nowNum), Vector3.up) * initDir;
                    bullet.transform.rotation = Quaternion.LookRotation(nowDir);

                    //表示已经发射一颗子弹
                    --nowNum;
                    //重置cd
                    nowCD = nowNum == 0 ? 0 : fireInfo.cd;
                }
                break;
        }
    }

}
2.串联 开始面板和游戏面板
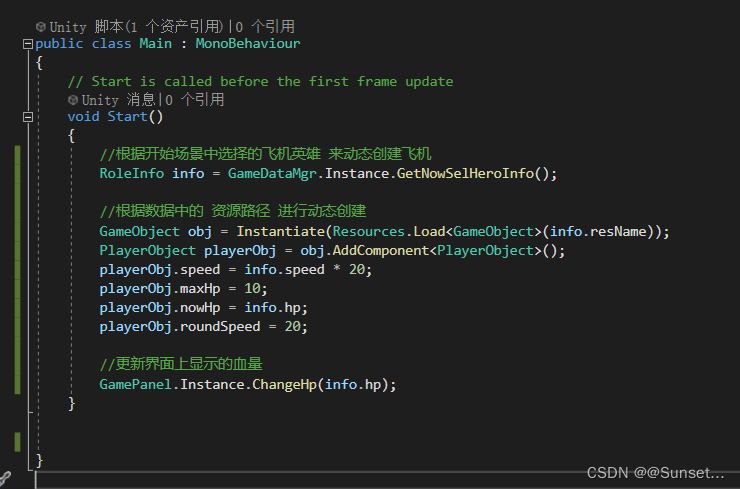
创建 Main 类 用于创建玩家飞机
逻辑功能完善
1.子弹自动销毁
2.不隐藏光标
3.射线检测销毁子弹

游戏展示:
暂时无法上传!
总结