核心
和diffusion相比,使用了latent(隐式空间)做diffusion,这样速度更快!!!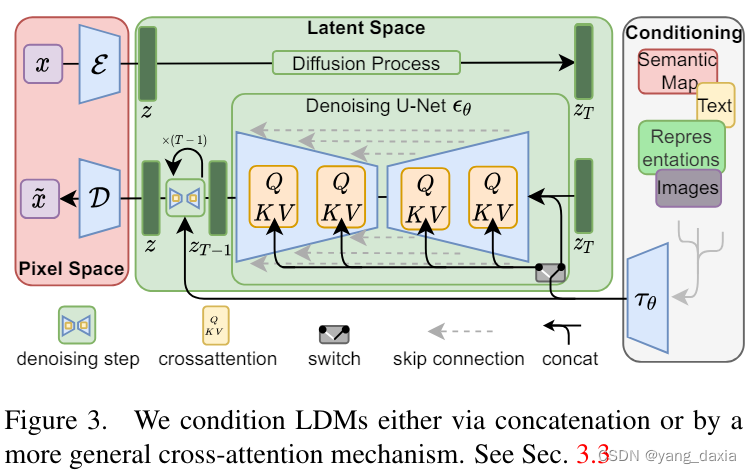
SD模型的主体结构如下图所示,主要包括三个模型:

- autoencoder:encoder将图像压缩到latent空间,而decoder将latent解码为图像;
- CLIP text encoder:提取输入text的text embeddings,通过cross attention方式送入扩散模型的UNet中作为condition;
- UNet:扩散模型的主体,用来实现文本引导下的latent生成。
对于SD模型,其autoencoder模型参数大小为84M,CLIP text encoder模型大小为123M,而UNet参数大小为860M,所以SD模型的总参数量约为1B。
autoencoder
两种正则化方法
KL-reg,类似VAE增加一个latent和标准正态分布的KL loss,不过这里为了保证重建效果,采用比较小的权重(~10e-6);第二种是VQ-reg,引入一个VQ (vector quantization)layer,此时的模型可以看成是一个VQ-GAN,不过VQ层是在decoder模块中,这里VQ的codebook采样较高的维度(8192)来降低正则化对重建效果的影响。
下采样率越小,通道数越多,效果越好。
最终SD采用基于KL-reg的autoencoder,其中下采样率,为8,通道为4。
随机生成的latent方差很大,所以通过rescale进行归一化
CLIP text encoder
使用clip的encoder。输出77(token)x768(维度)
python
from transformers import CLIPTextModel, CLIPTokenizer

text_encoder = CLIPTextModel.from_pretrained("runwayml/stable-diffusion-v1-5", subfolder="text_encoder").to("cuda")
# text_encoder = CLIPTextModel.from_pretrained("openai/clip-vit-large-patch14").to("cuda")
tokenizer = CLIPTokenizer.from_pretrained("runwayml/stable-diffusion-v1-5", subfolder="tokenizer")
# tokenizer = CLIPTokenizer.from_pretrained("openai/clip-vit-large-patch14")

# 对输入的text进行tokenize,得到对应的token ids
prompt = "a photograph of an astronaut riding a horse"
text_input_ids = text_tokenizer(
    prompt,
    padding="max_length",
    max_length=tokenizer.model_max_length,
    truncation=True,
    return_tensors="pt"
).input_ids

# 将token ids送入text model得到77x768的特征
text_embeddings = text_encoder(text_input_ids.to("cuda"))[0]
CLIP text encoder模型是冻结的。直接用预训练好的模型,比直接训要好。
Unet
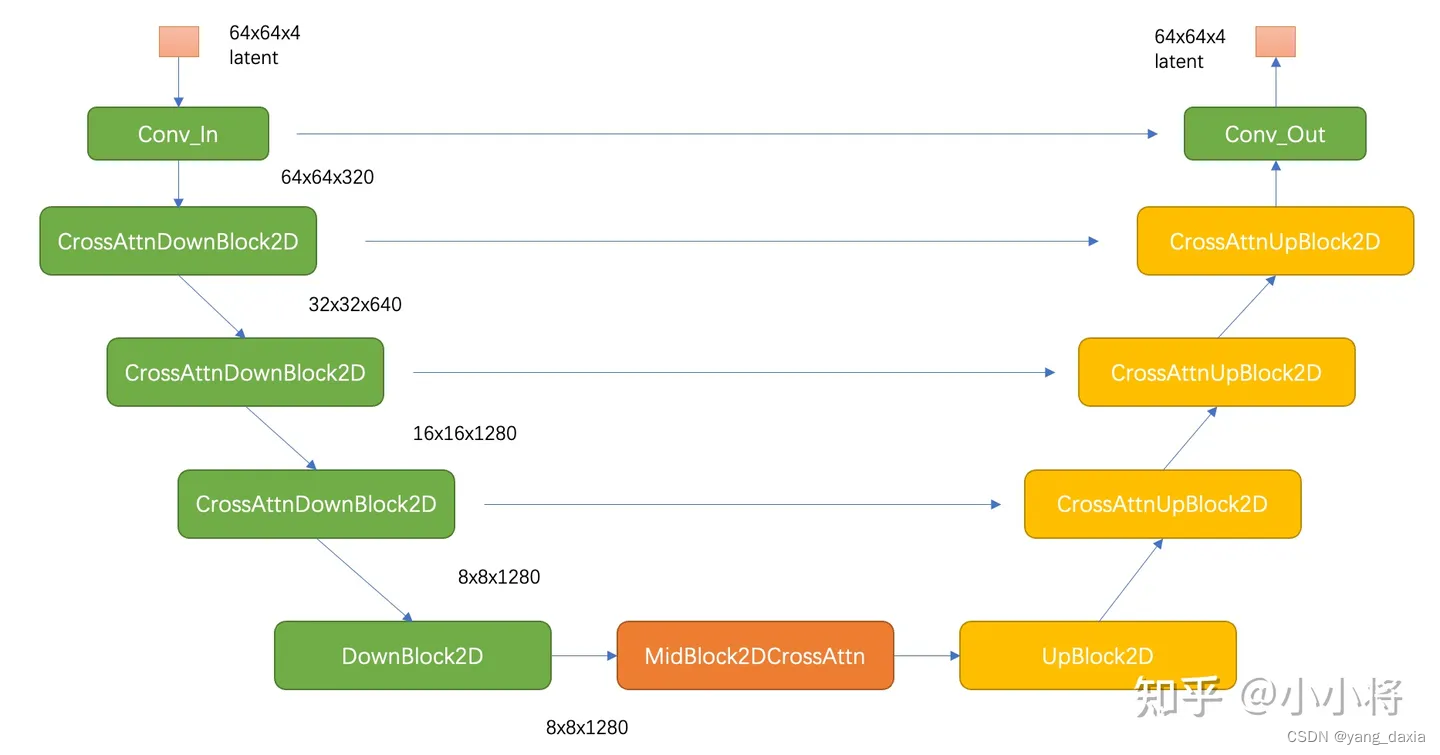
先下采样再上采样,其中下采样部分包括3个CrossAttnDownBlock2D模块和1个DownBlock2D模块,而d上采样部分包括1个UpBlock2D模块和3个CrossAttnUpBlock2D模块,中间还有一个UNetMidBlock2DCrossAttn模块。encoder和decoder两个部分是完全对应的,中间存在skip connection。注意3个CrossAttnDownBlock2D模块最后均有一个2x的downsample操作,而DownBlock2D模块是不包含下采样的。
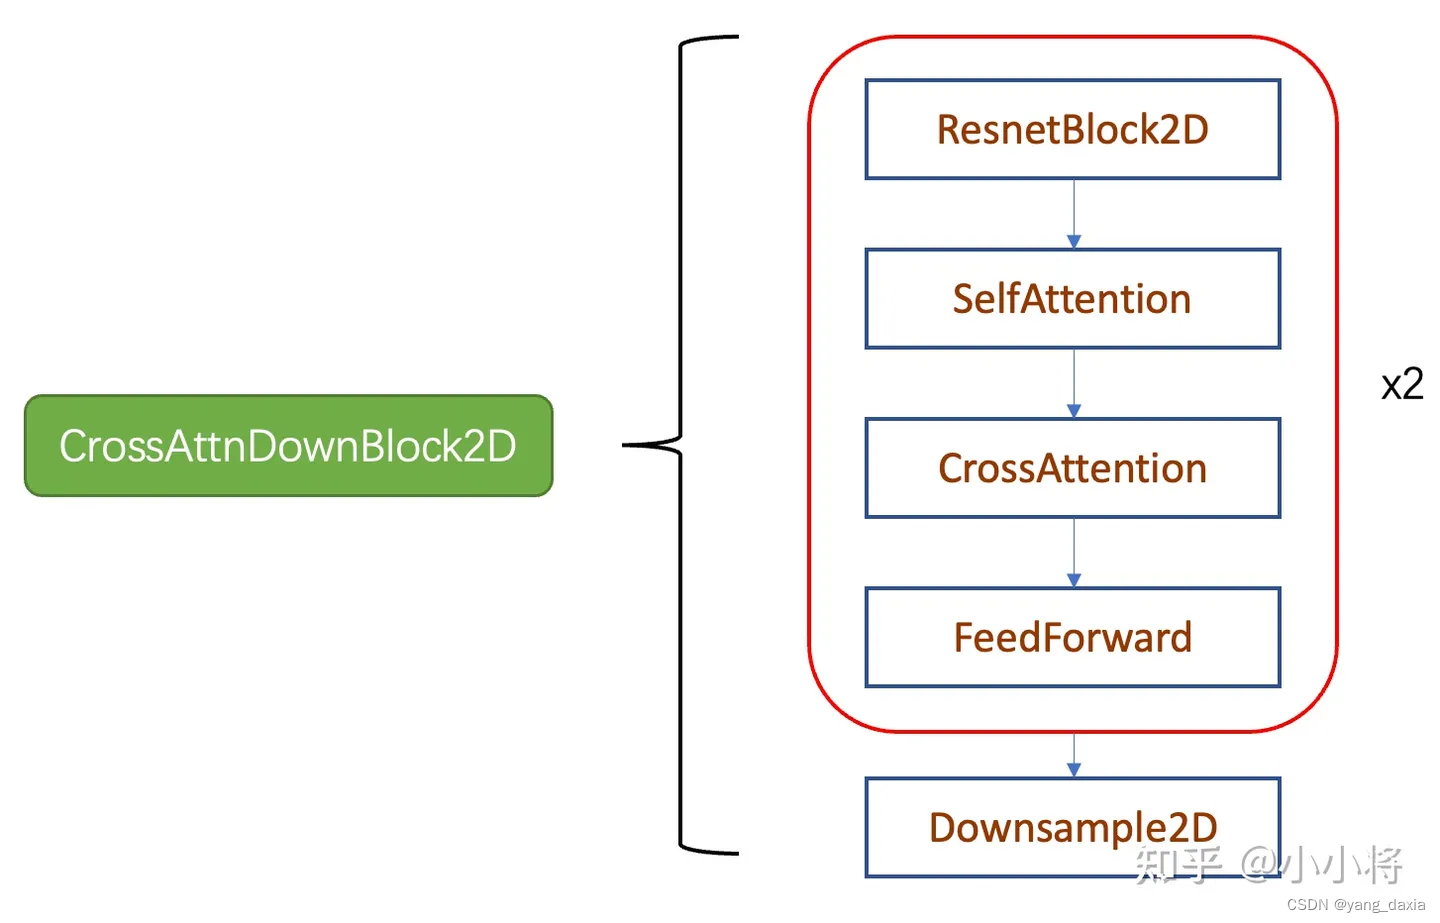
其中CrossAttnDownBlock2D模块的主要结构如下图所示,text condition将通过CrossAttention模块嵌入进来,此时Attention的query是UNet的中间特征,而key和value则是text embeddings。 CrossAttnUpBlock2D模块和CrossAttnDownBlock2D模块是一致的,但是就是总层数为3。
SD和DDPM一样通过预测noise来进行训练。
训练条件扩散模型时,往往会采用Classifier-Free Guidance(这里简称为CFG),同时训练一个无条件的扩散模型(以一定的比例是text为''),然后将两者加权,可以改善最终的生成质量。
python
text_embeddings = torch.cat([uncond_embeddings, text_embeddings])
     latent_model_input = torch.cat([latents] * 2)
     latent_model_input = noise_scheduler.scale_model_input(latent_model_input, t) # for DDIM, do nothing

     # 使用UNet预测噪音
        noise_pred = unet(latent_model_input, t, encoder_hidden_states=text_embeddings).sample

     # 执行CFG
     noise_pred_uncond, noise_pred_text = noise_pred.chunk(2)
     noise_pred = noise_pred_uncond + guidance_scale * (noise_pred_text - noise_pred_uncond)
SD的训练是多阶段的(先在256x256尺寸上预训练,然后在512x512尺寸上精调。这样就产生了不同的版本,下一个版本在上一个版本上继续微调。按照256卡A100来算的话,那么大约需要训练25天左右。
目前常采用的定量指标是FID(Fréchet inception distance)和CLIP score,其中FID可以衡量生成图像的逼真度(image fidelity),而CLIP score评测的是生成的图像与输入文本的一致性,其中FID越低越好,而CLIP score是越大越好。
应用
文生图、图生图、图像inpainting
文生图
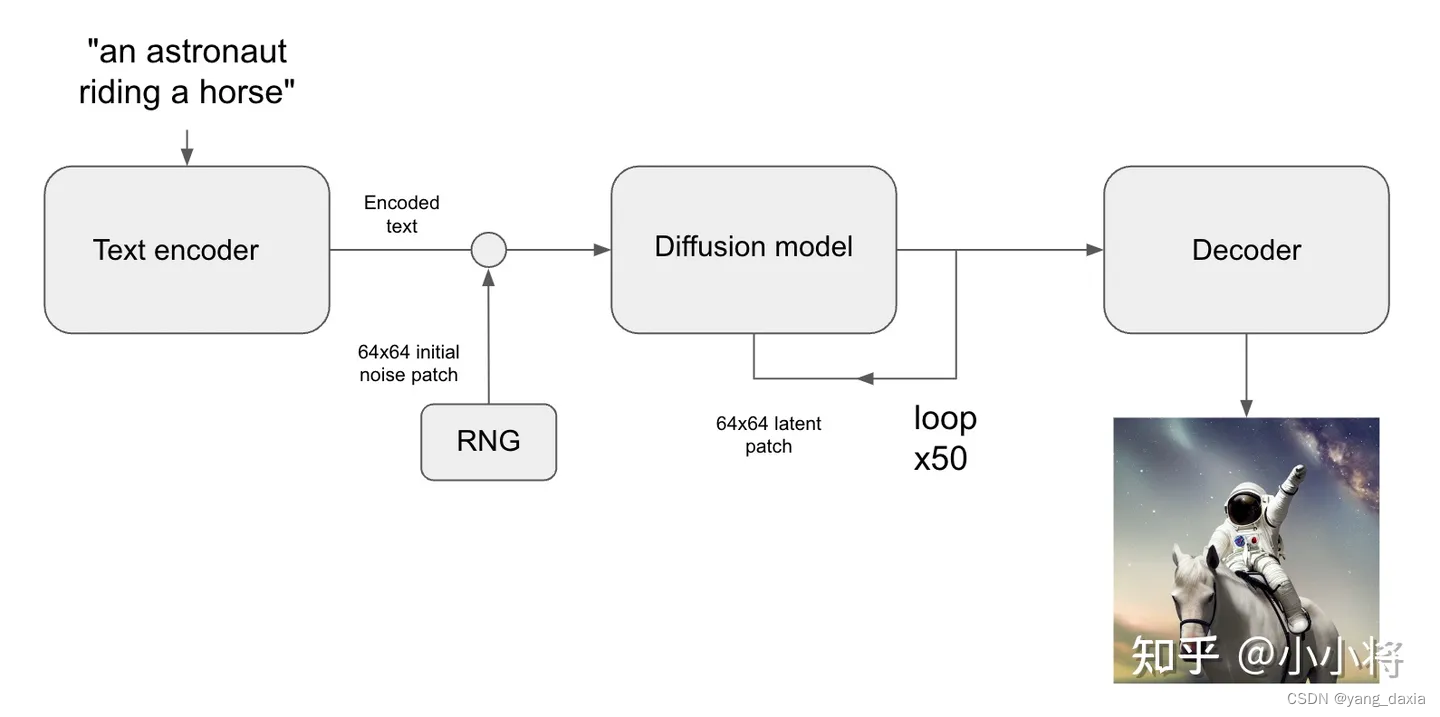
参数影响:
- 分辨率:生成512x512的结果是最好的。其他尺寸也可以,但是hi改变生成的结果(不单单是分辨率的问题,内容也会变)
- 采样步数。训练是1000步,加速采样可以用50步等。效果也不错。SD默认采用PNDM scheduler,它只需要采样50步就可以出图。也可以换用其它类型的scheduler,比如DDIM scheduler和DPM-Solver scheduler
- guidance_scale,由小变大,发现质量变化,过大图像会过饱和,调节发现7.5较好
- negative_prompt来避免模型生成的图像包含不想要的东西
图生图
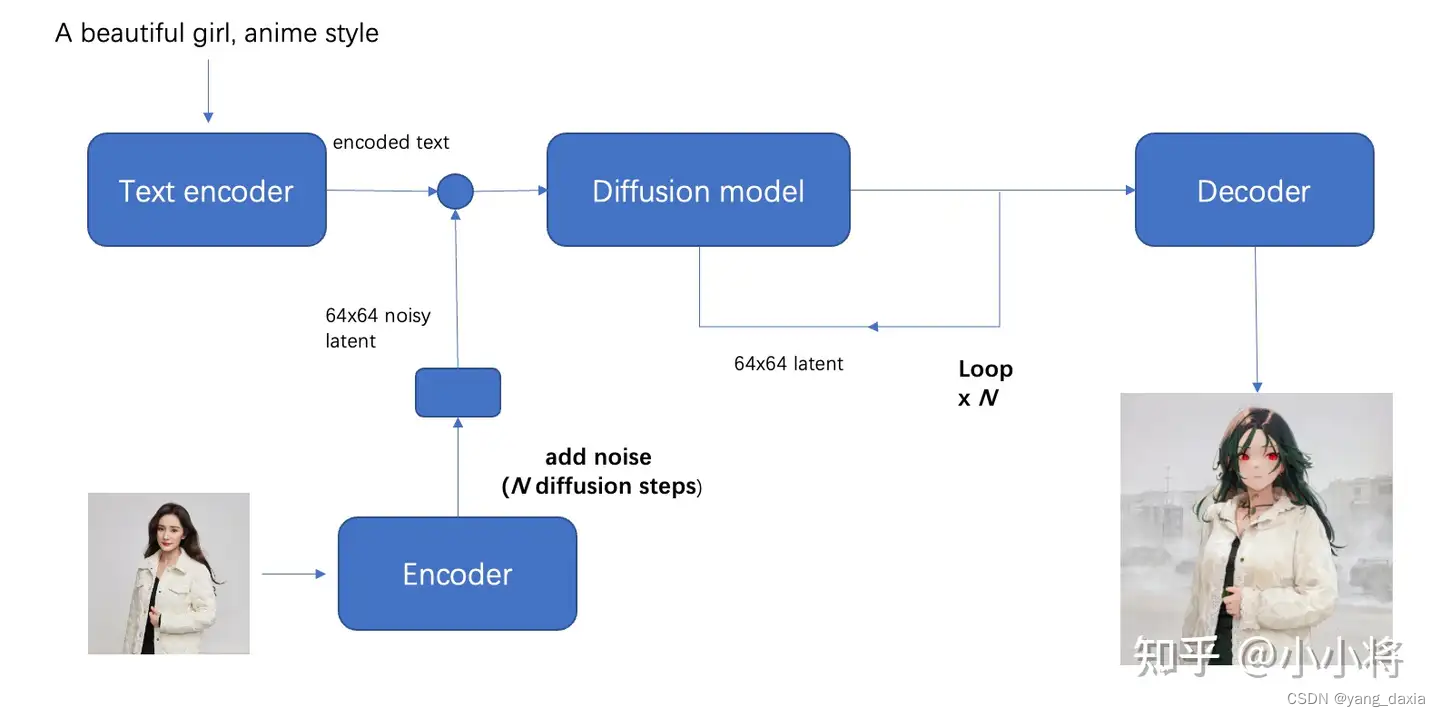
对比文生图,把初始latent由随机噪音,改成初始图像经过autoencoder编码之后的latent加高斯噪音。
图生图的模型一般是在文生图的模型基础上,加上某种风格fintune出来的。比如动漫风格。
SD2.0
更大的clip模型,语义表征更强了。使用clip倒数第2层特征进行表征。更大的数据集训练
SDXL
SDXL的模型参数增大为2.3B,这几乎上原来模型的3倍,而且SDXL采用了两个CLIP text encoder来编码文本特征;
SDXL采用了额外的条件注入来改善训练过程中的数据处理问题,而且最后也采用了多尺度的微调;
SDXL级联了一个细化模型来提升图像的生成质量。
问题:
KLreg原理?
unet的具体实现代码?
Classifier-Free Guidance是什么?
参考: