springboot底层机制实现
- 搭建SpringBoot底层机制开发环境
- @Configuration+@Bean会发生什么,并分析机制
- [提出问题: SpringBoot 是怎么启动Tomcat, 并可以支持访问@Controller](#提出问题: SpringBoot 是怎么启动Tomcat, 并可以支持访问@Controller)
- [源码分析: SpringApplication.run()](#源码分析: SpringApplication.run())
- [实现SpringBoot底层机制Tomcat启动分析 + Spring容器初始化 + Tomcat如何关联Spring容器](#实现SpringBoot底层机制[Tomcat启动分析 + Spring容器初始化 + Tomcat如何关联Spring容器])
-
- [实现任务阶段1-创建Tomcat, 并启动](#实现任务阶段1-创建Tomcat, 并启动)
- 实现任务阶段2-创建Spring容器
- [实现任务阶段3-将Tomcat 和 Spring容器关联, 并启动Spring容器](#实现任务阶段3-将Tomcat 和 Spring容器关联, 并启动Spring容器)
- Lombok

搭建SpringBoot底层机制开发环境
1.创建 Maven 项目 zzw-springboot 参考springboot快速入门
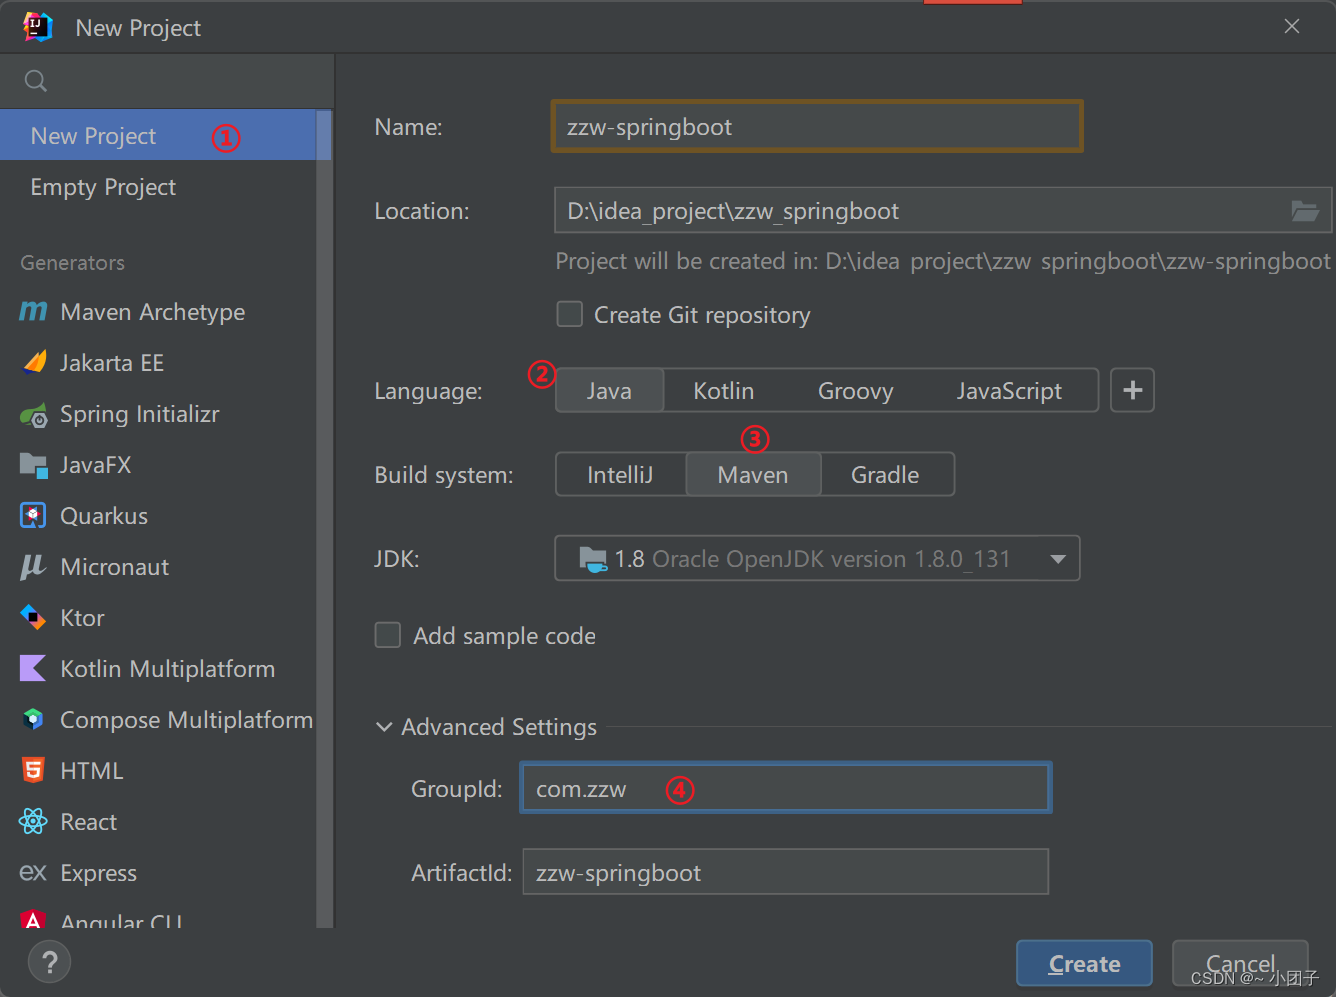
2.在pom.xml 引入SpringBoot 父工程和web项目场景启动器
xml
<?xml version="1.0" encoding="UTF-8"?>
<project xmlns="http://maven.apache.org/POM/4.0.0"
         xmlns:xsi="http://www.w3.org/2001/XMLSchema-instance"
         xsi:schemaLocation="http://maven.apache.org/POM/4.0.0 http://maven.apache.org/xsd/maven-4.0.0.xsd">
    <modelVersion>4.0.0</modelVersion>

    <groupId>com.zzw</groupId>
    <artifactId>quickStart</artifactId>
    <version>1.0-SNAPSHOT</version>

    <properties>
        <maven.compiler.source>8</maven.compiler.source>
        <maven.compiler.target>8</maven.compiler.target>
        <project.build.sourceEncoding>UTF-8</project.build.sourceEncoding>
    </properties>

    <!--导入springboot父工程-规定写法[在mybatis中讲过]-->
    <parent>
        <artifactId>spring-boot-starter-parent</artifactId>
        <groupId>org.springframework.boot</groupId>
        <version>2.5.3</version>
    </parent>

    <!--导入web项目场景启动器: 会自动导入和web开发相关的所有依赖[库/jar]
    后面还会说明spring-boot-starter-web 到底引入哪些相关依赖-->
    <dependencies>
        <dependency>
            <groupId>org.springframework.boot</groupId>
            <artifactId>spring-boot-starter-web</artifactId>
        </dependency>
    </dependencies>
</project>3.创建com.zzw.springboot.MainApp.java SpringBoot引用主程序
java
/**
* @SpringBootApplication: 表示这是一个springboot引用/项目
*/
@SpringBootApplication
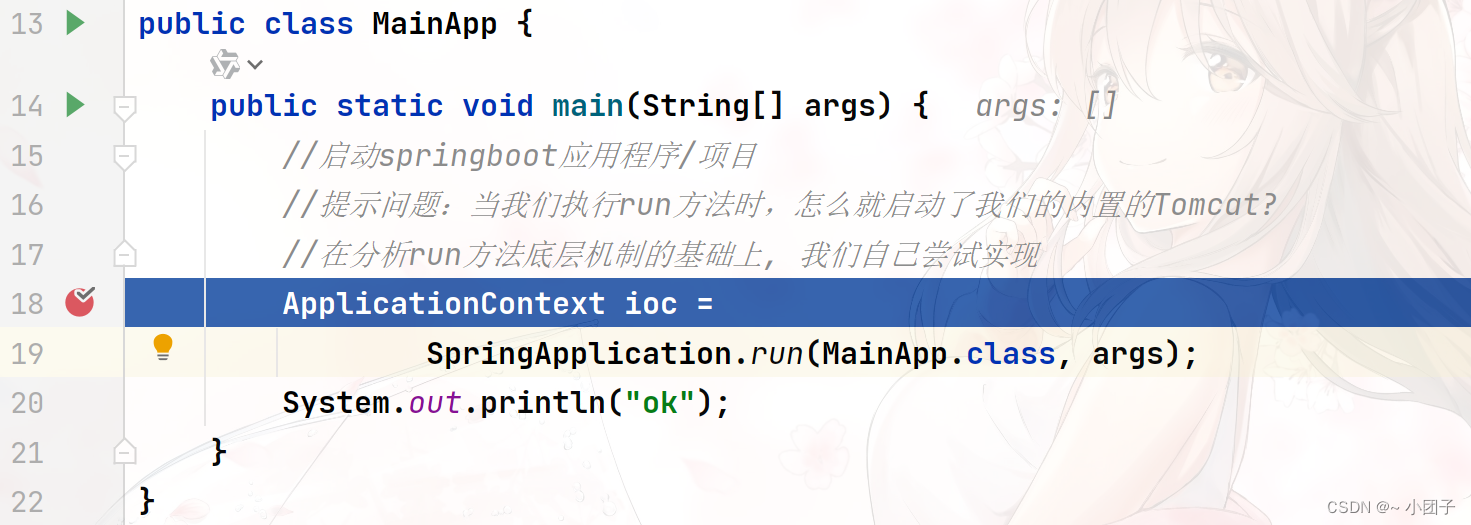
public class MainApp {
public static void main(String[] args) {
//启动springboot应用程序/项目
//提示问题:当我们执行run方法时,怎么就启动了我们的内置的Tomcat?
//在分析run方法底层机制的基础上, 我们自己尝试实现
ApplicationContext ioc =
SpringApplication.run(MainApp.class, args);
}
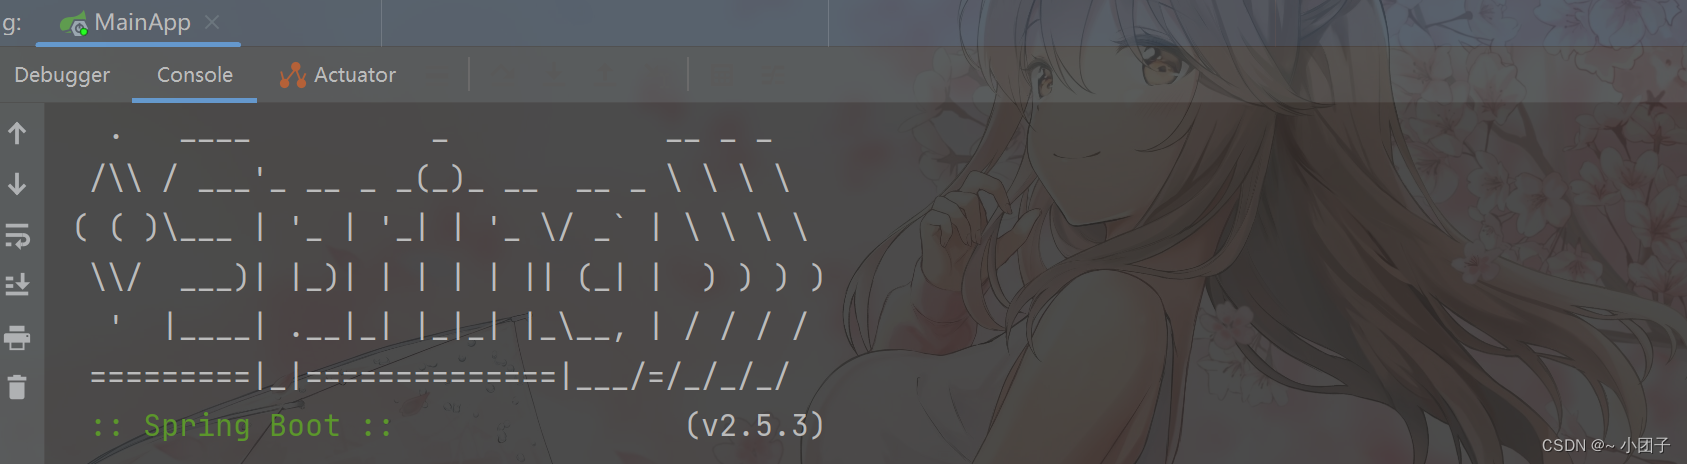
}4.启动项目 ok, 大家注意Tomcat也启动了.这里请同学们先思考, 是如何实现的?
@Configuration+@Bean会发生什么,并分析机制
1.创建D:\idea_project\zzw_springboot\zzw-springboot\src\main\java\com\zzw\springboot\bean\Dog.java
java
public class Dog {}2.创建com.zzw.springboot.config
java
/**
 * @Configuration:指明当前类是一个配置类;充当Spring容器/Spring配置文件
 * 如果该配置类, 在springboot扫描的包/子包下, 会被注入到Spring容器中
 * 在该类中, 可以通过@Bean 来注入其它的组件
 */
@Configuration
public class Config {
    /**
     * 1.通过@Bean的方式, 将new出来的Bean对象, 放入到Spring容器
     * 2.该bean在Spring容器的name/id 默认就是 方法名
     * 3.通过方法名, 可以得到注入到容器中的dog对象
     */
    @Bean
    public Dog dog() {
        return new Dog();
    }
}3.修改com.zzw.springboot.MainApp.java, 看看容器中是否已经注入了 dog 实例
debug
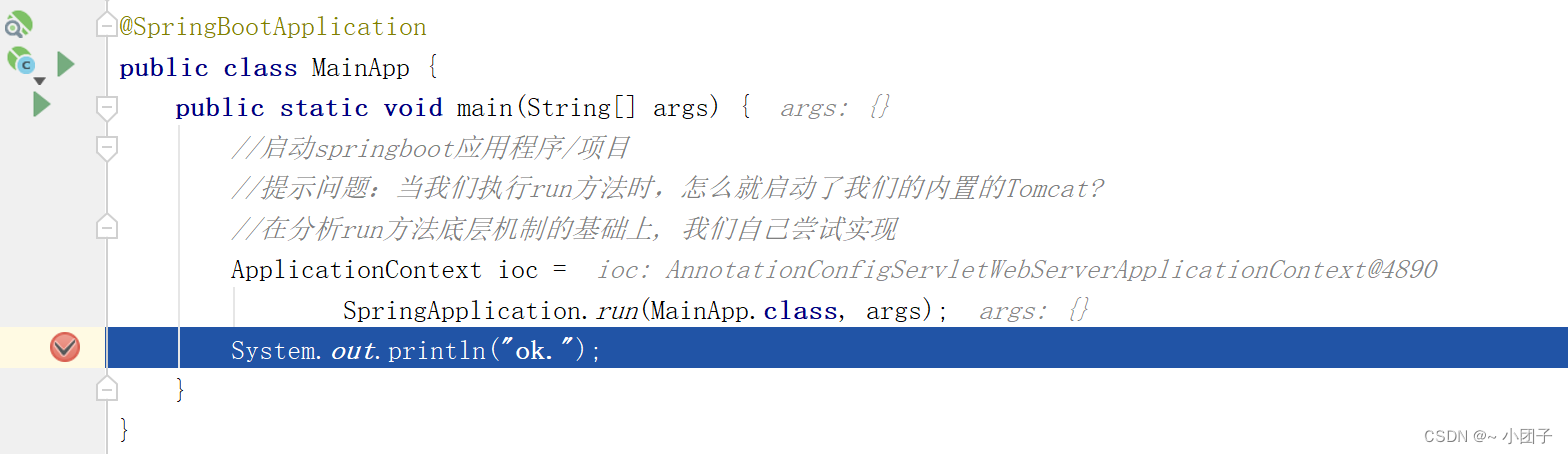
ioc容器中已经注入了 dog 实例
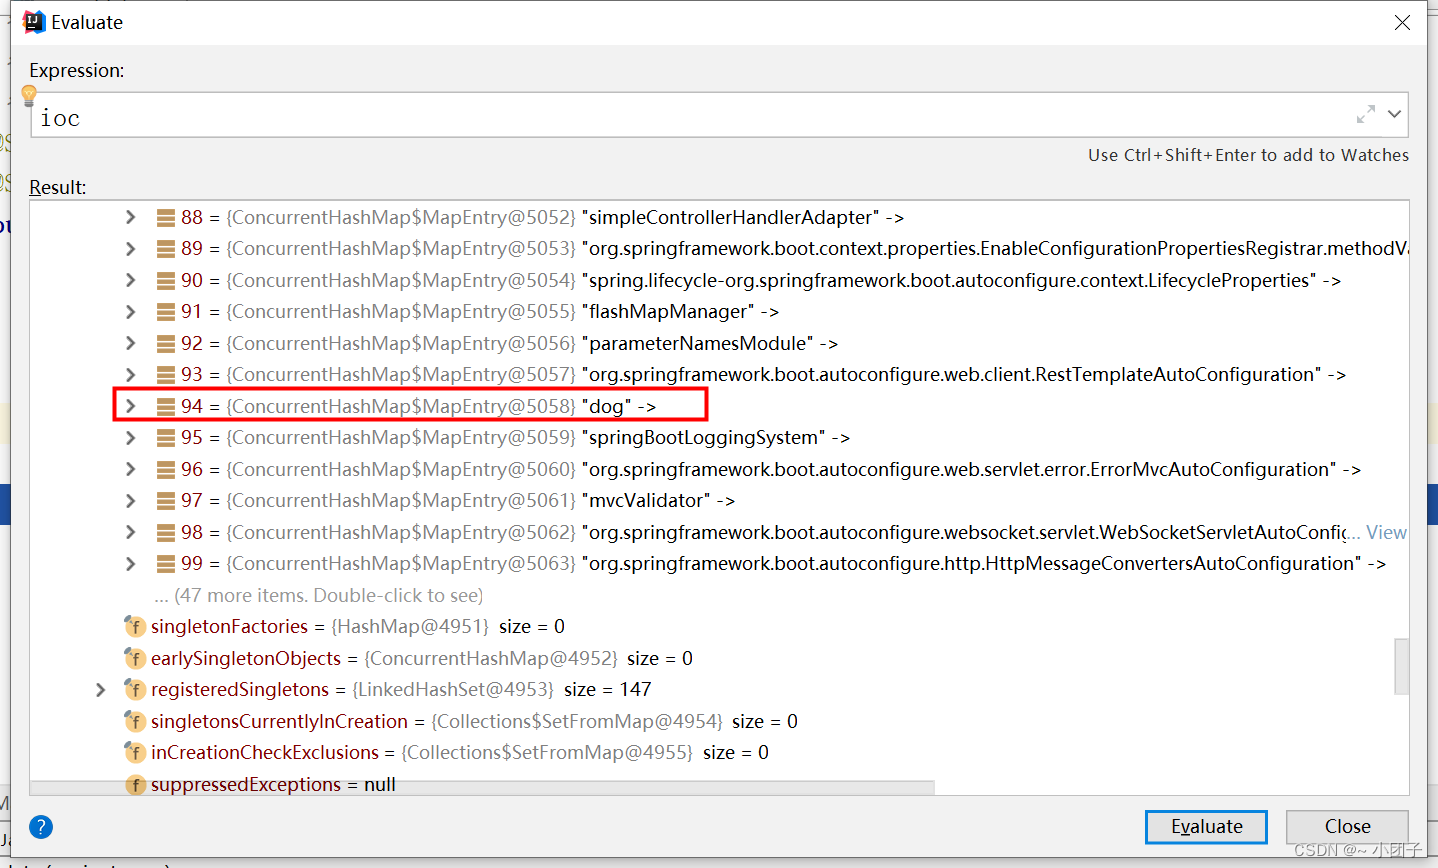
@Configuration注解标注的配置类也会被实例化并被注入到Spring容器.
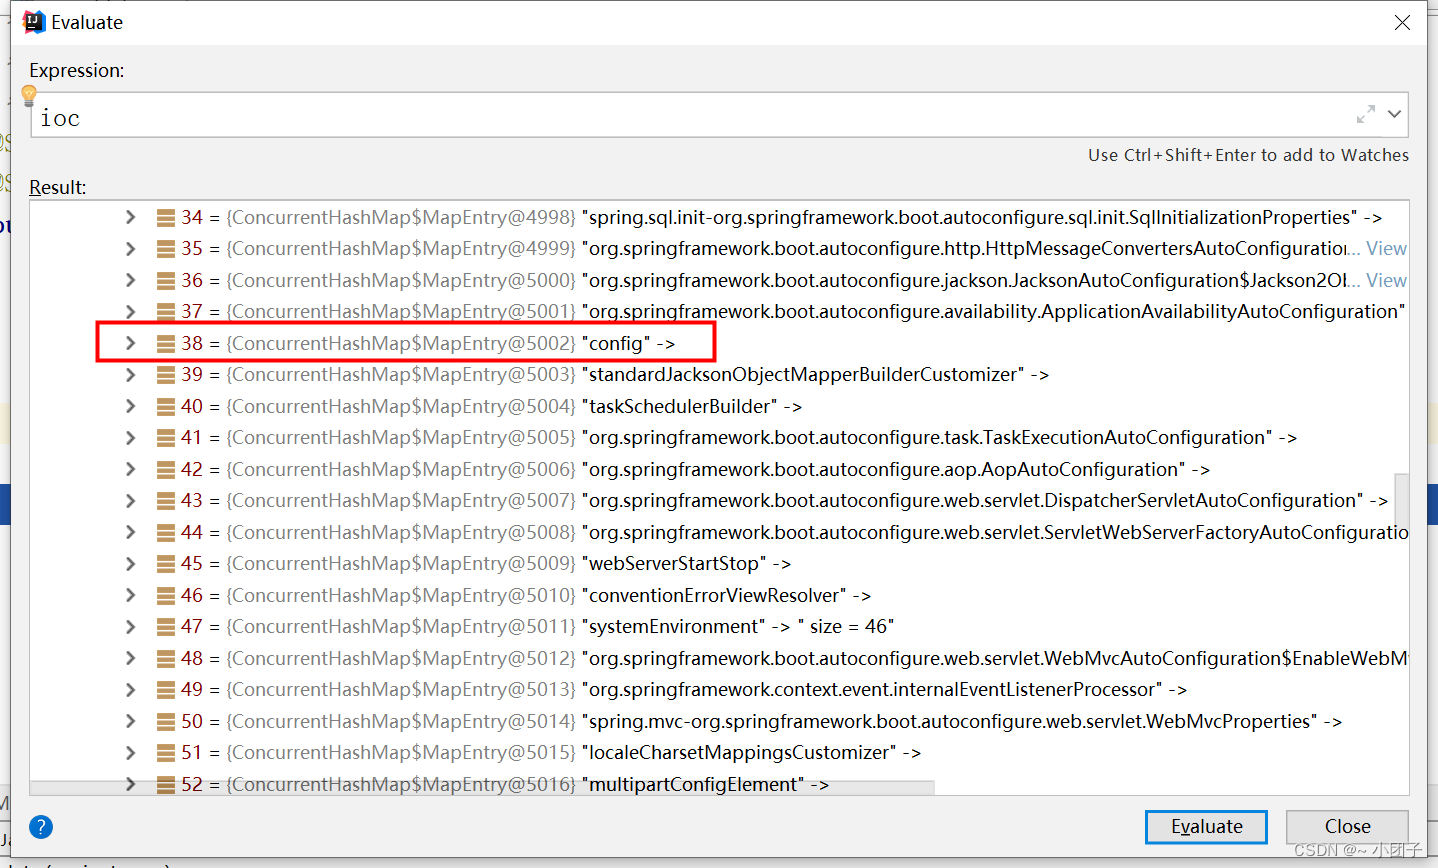
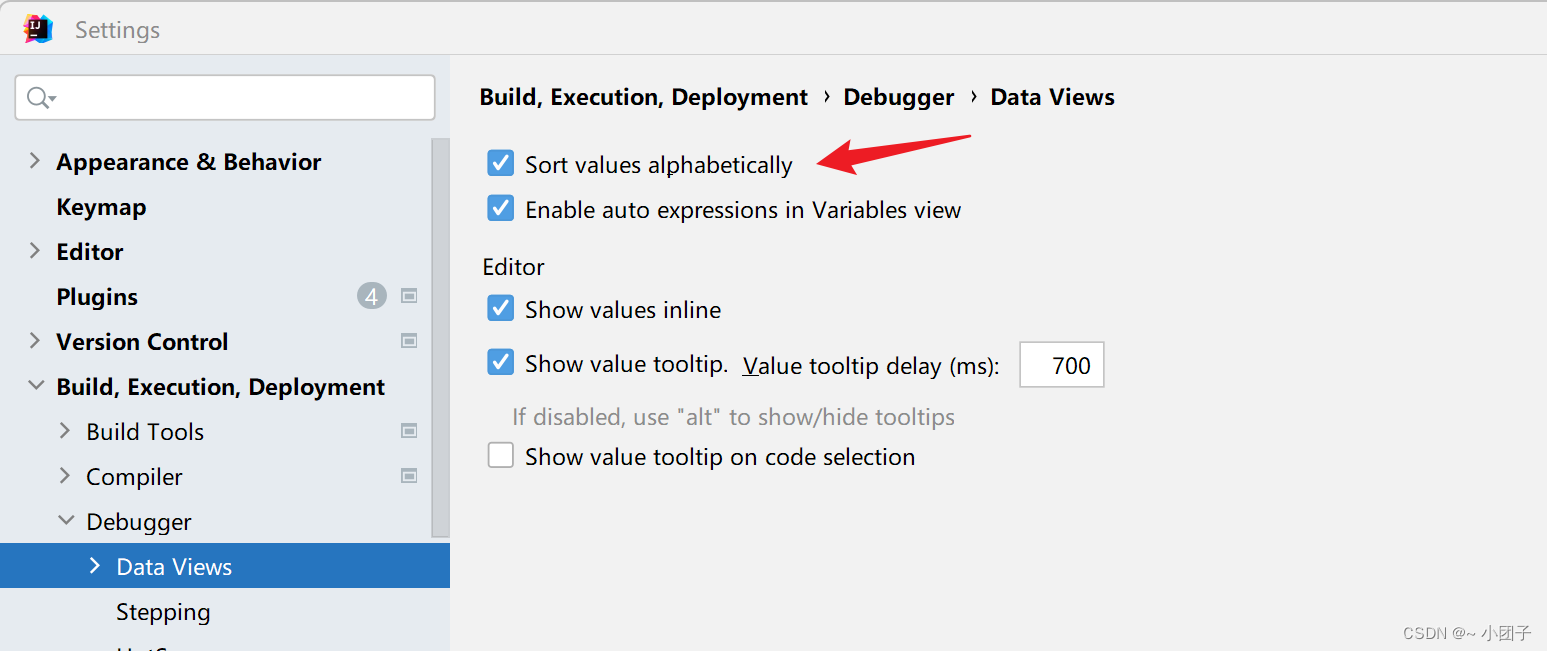
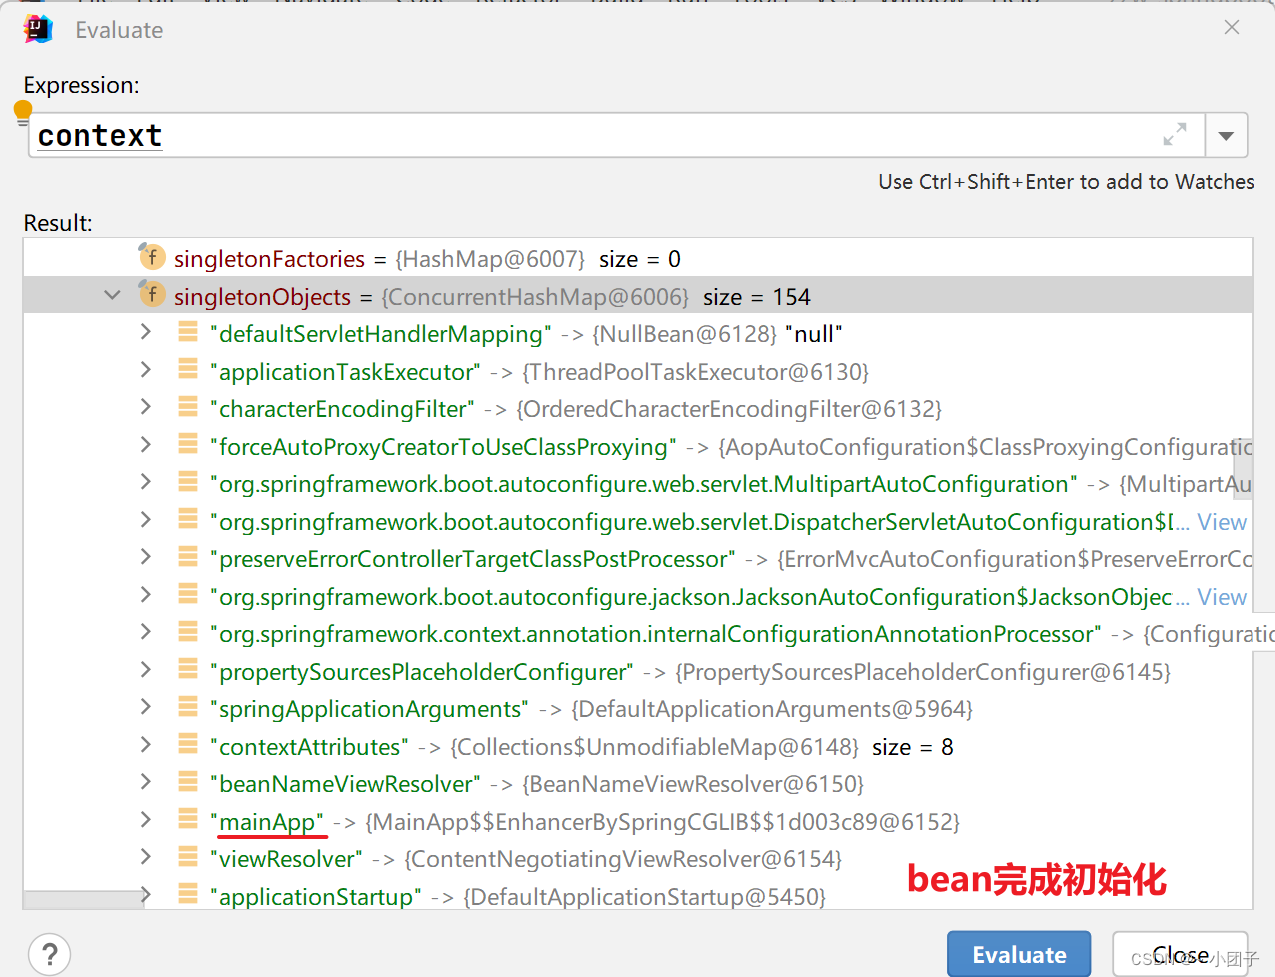
4.底层机制分析: 仍然是 我们实现Spring容器那一套机制 IO/文件扫描+注解+反射+集合+映射. 提示: 回去复习一下 实现Spring底层机制.
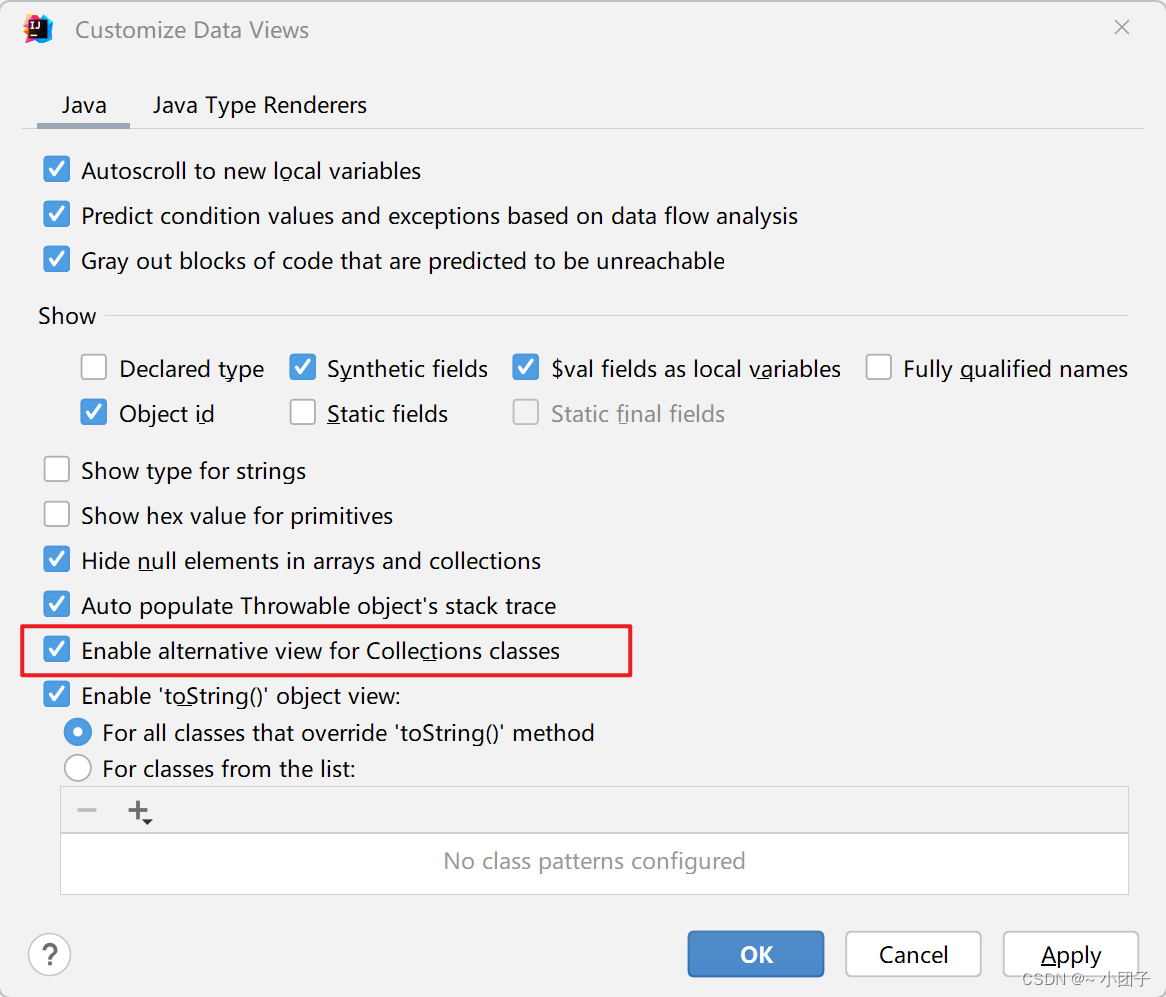
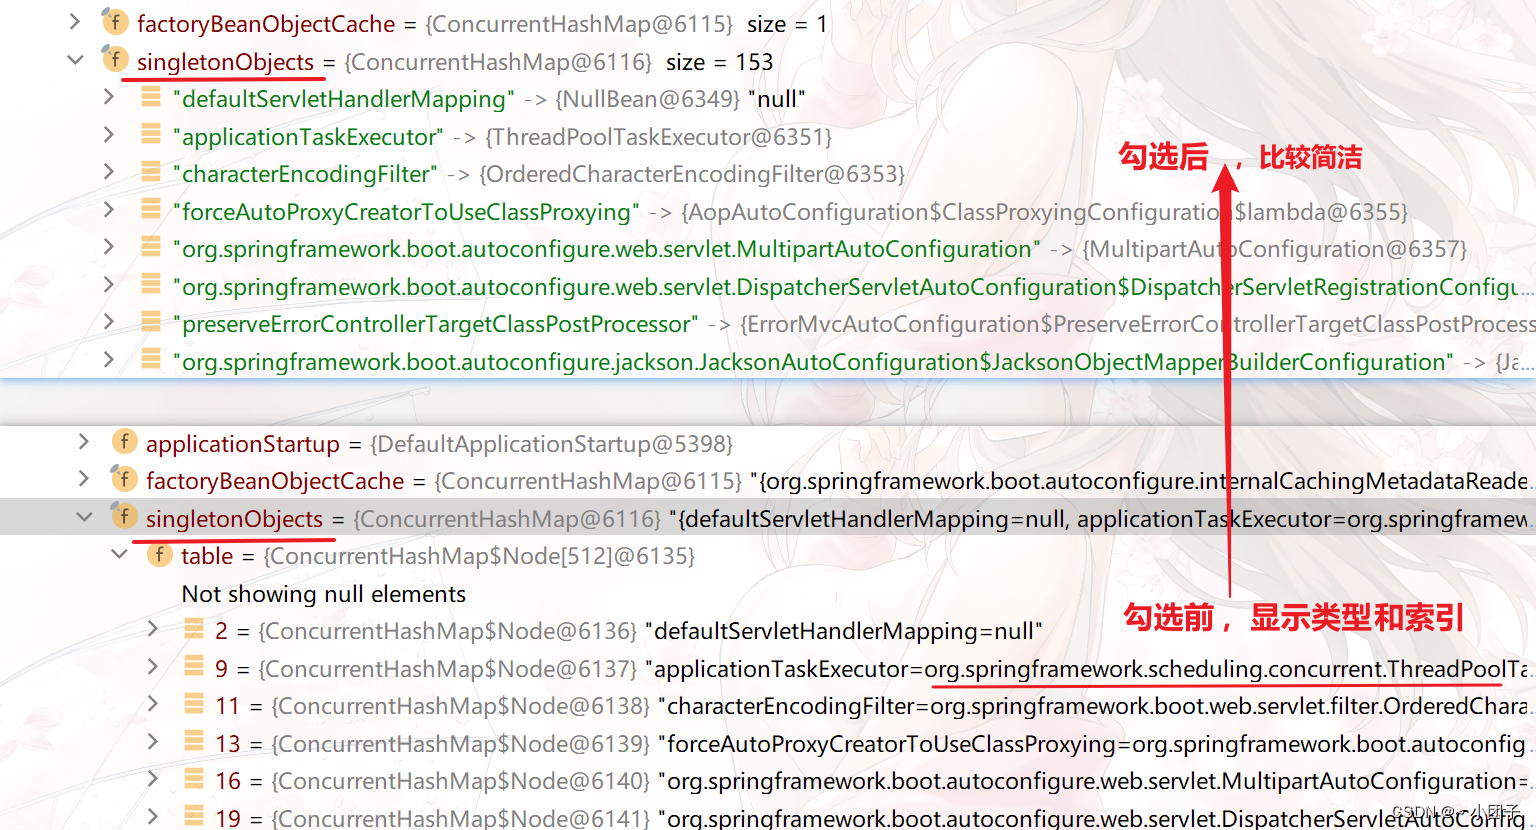
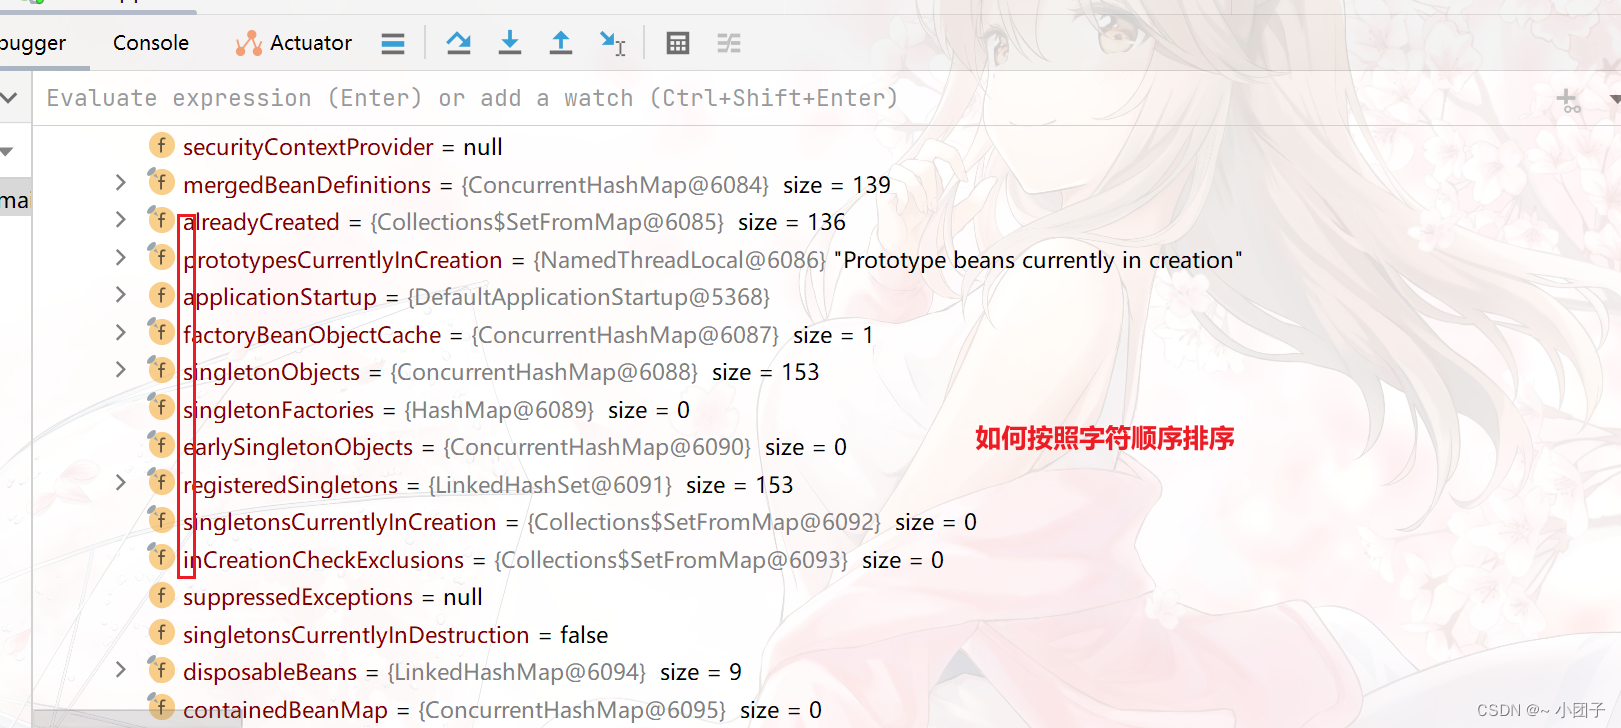
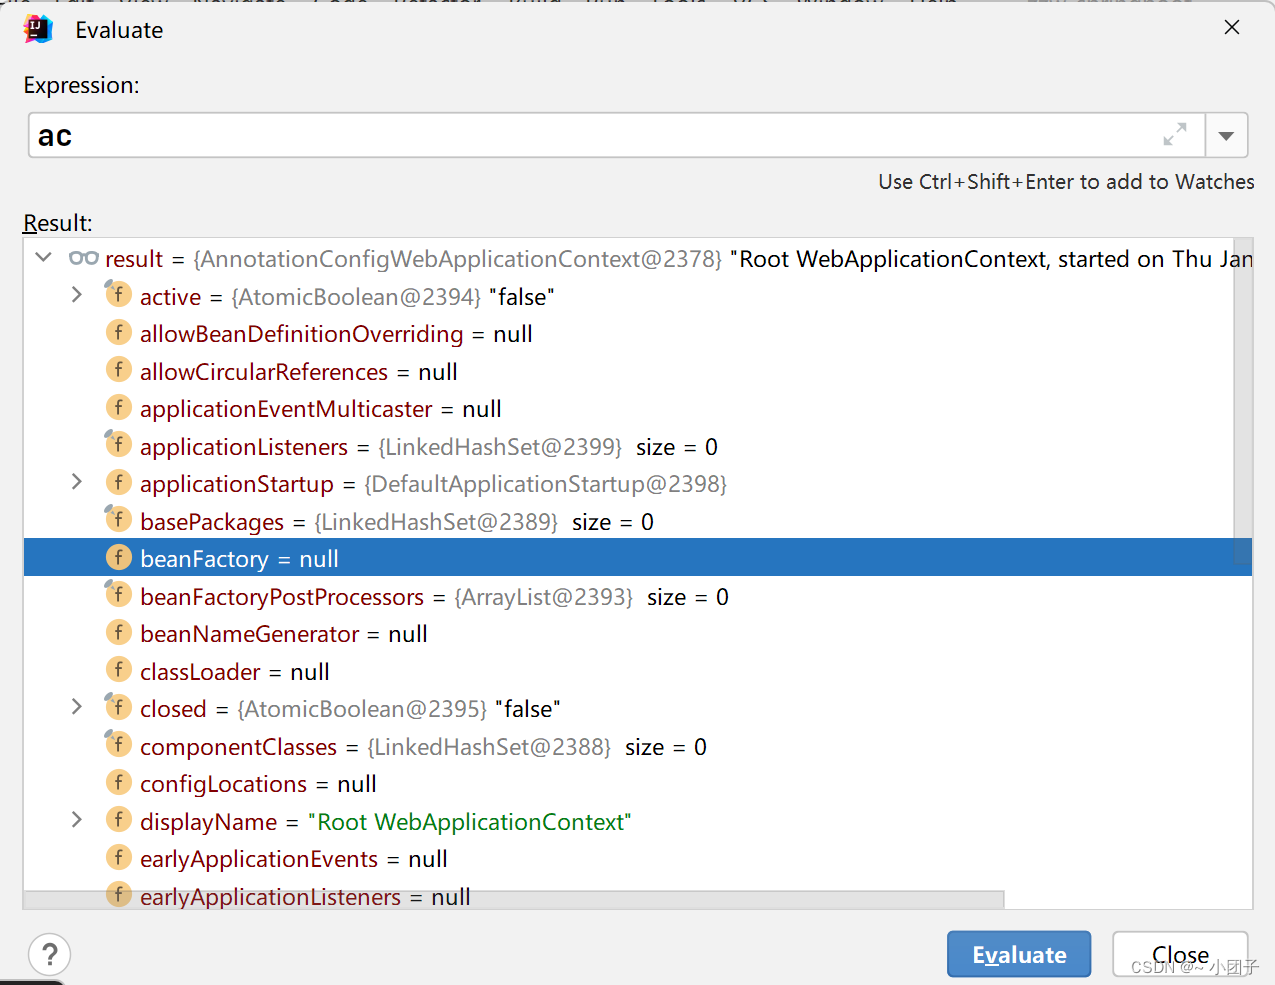
(1)快捷键查看ioc->singletonObjects->table列表 有多少元素? table右键->Customize Data Views->Enable alternative view for... 但是勾选上会少很多东西
这里是按照索引排序,无法按照字母排序。
(2)debug时元素按照字母排列
提出问题: SpringBoot 是怎么启动Tomcat, 并可以支持访问@Controller
1.创建com.zzw.springboot.controller.HiController
RestController解释, 手动实现Tomcat底层机制
java
/**
 * 1.因为 HiController 被 @RestController 标注, 所以就是一个控制器
 * 2.HiController 在扫描包/子包下,就会被注入到Spring容器
 */
@RestController
public class HiController {

    @RequestMapping("/hi")
    public String hi() {
        return "hi zzw HiController";
    }
}
2.完成测试, 浏览器输入 http://localhost:8080/hi

3.提出问题: SpringBoot 是怎么内嵌 Tomcat, 并启动Tomcat的? => 追踪源码
源码分析: SpringApplication.run()
1.Debug SpringApplication.run(MainApp.class, args); 看看SpringBoot 是如何启动Tomcat的.
2.我们的Debug目标: 紧抓一条线, 就是看到 tomcat 被启动的代码, 比如 tomcat.start().
3.源码如下
java
@SpringBootApplication
public class MainApp {
public static void main(String[] args) {
//启动springboot应用程序/项目
//提示问题:当我们执行run方法时,怎么就启动了我们的内置的Tomcat?
//在分析run方法底层机制的基础上, 我们自己尝试实现
ApplicationContext ioc =
SpringApplication.run(MainApp.class, args);
/**
* 这里我们开始Debug SpringApplication.run();
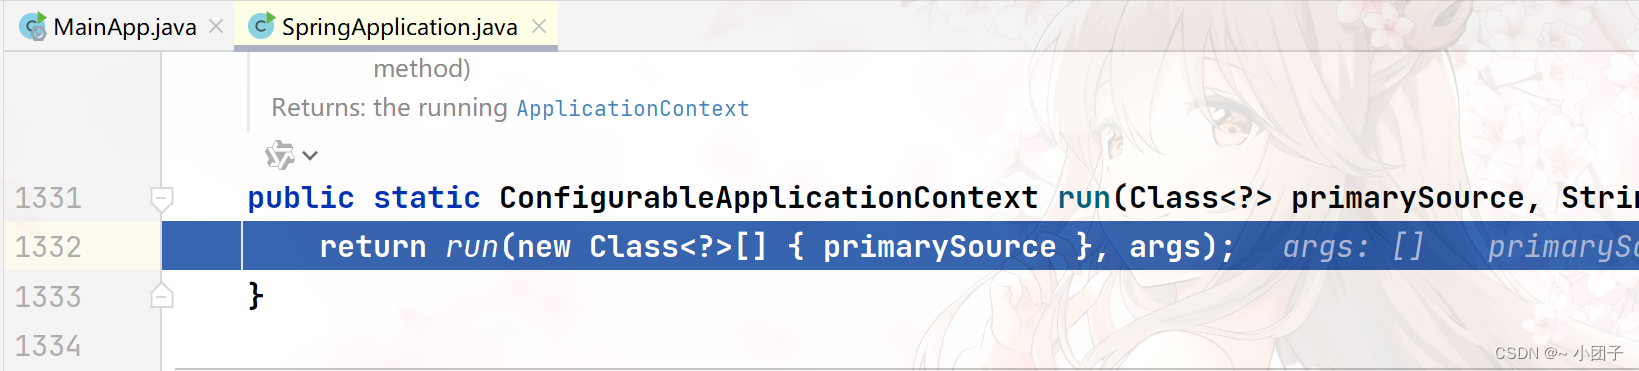
* 1.SpringApplication.java
* public static ConfigurableApplicationContext run(Class<?> primarySource, String... args) {
* return run(new Class[]{primarySource}, args);
* }
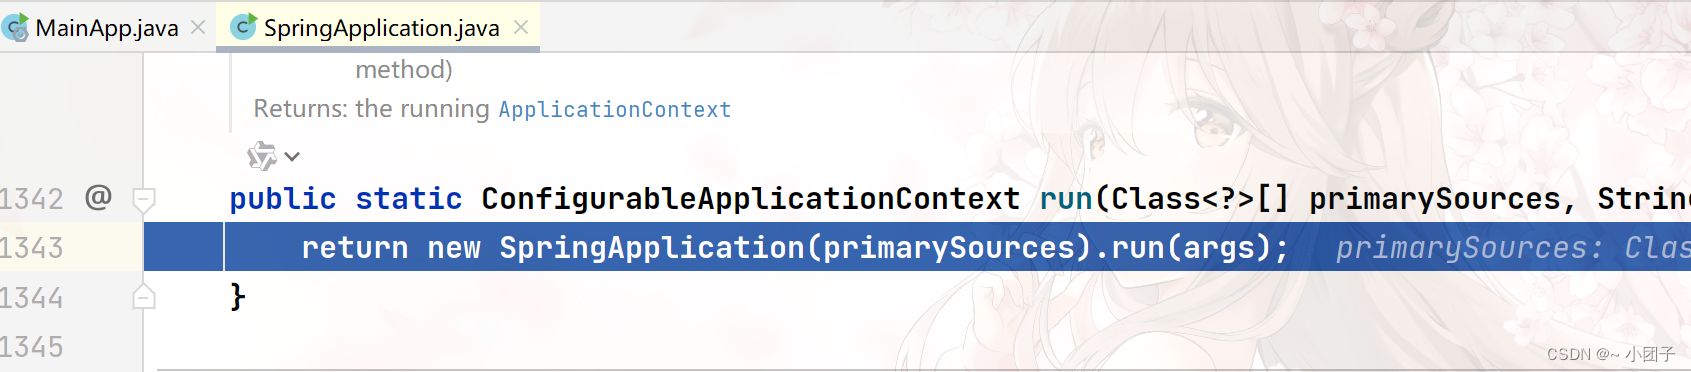
* 2.SpringApplication.java: 创建返回 ConfigurableApplicationContext(这是个接口)对象
* public static ConfigurableApplicationContext run(Class<?>[] primarySources, String[] args) {
* return (new SpringApplication(primarySources)).run(args);
* }
* 3.SpringApplication.java
* public ConfigurableApplicationContext run(String... args) {
* StopWatch stopWatch = new StopWatch();
* stopWatch.start();
* DefaultBootstrapContext bootstrapContext = this.createBootstrapContext();
* ConfigurableApplicationContext context = null;
* this.configureHeadlessProperty();
* SpringApplicationRunListeners listeners = this.getRunListeners(args);
* listeners.starting(bootstrapContext, this.mainApplicationClass);
*
* try {
* ApplicationArguments applicationArguments = new DefaultApplicationArguments(args);
* ConfigurableEnvironment environment = this.prepareEnvironment(listeners, bootstrapContext, applicationArguments);
* this.configureIgnoreBeanInfo(environment);
* Banner printedBanner = this.printBanner(environment);
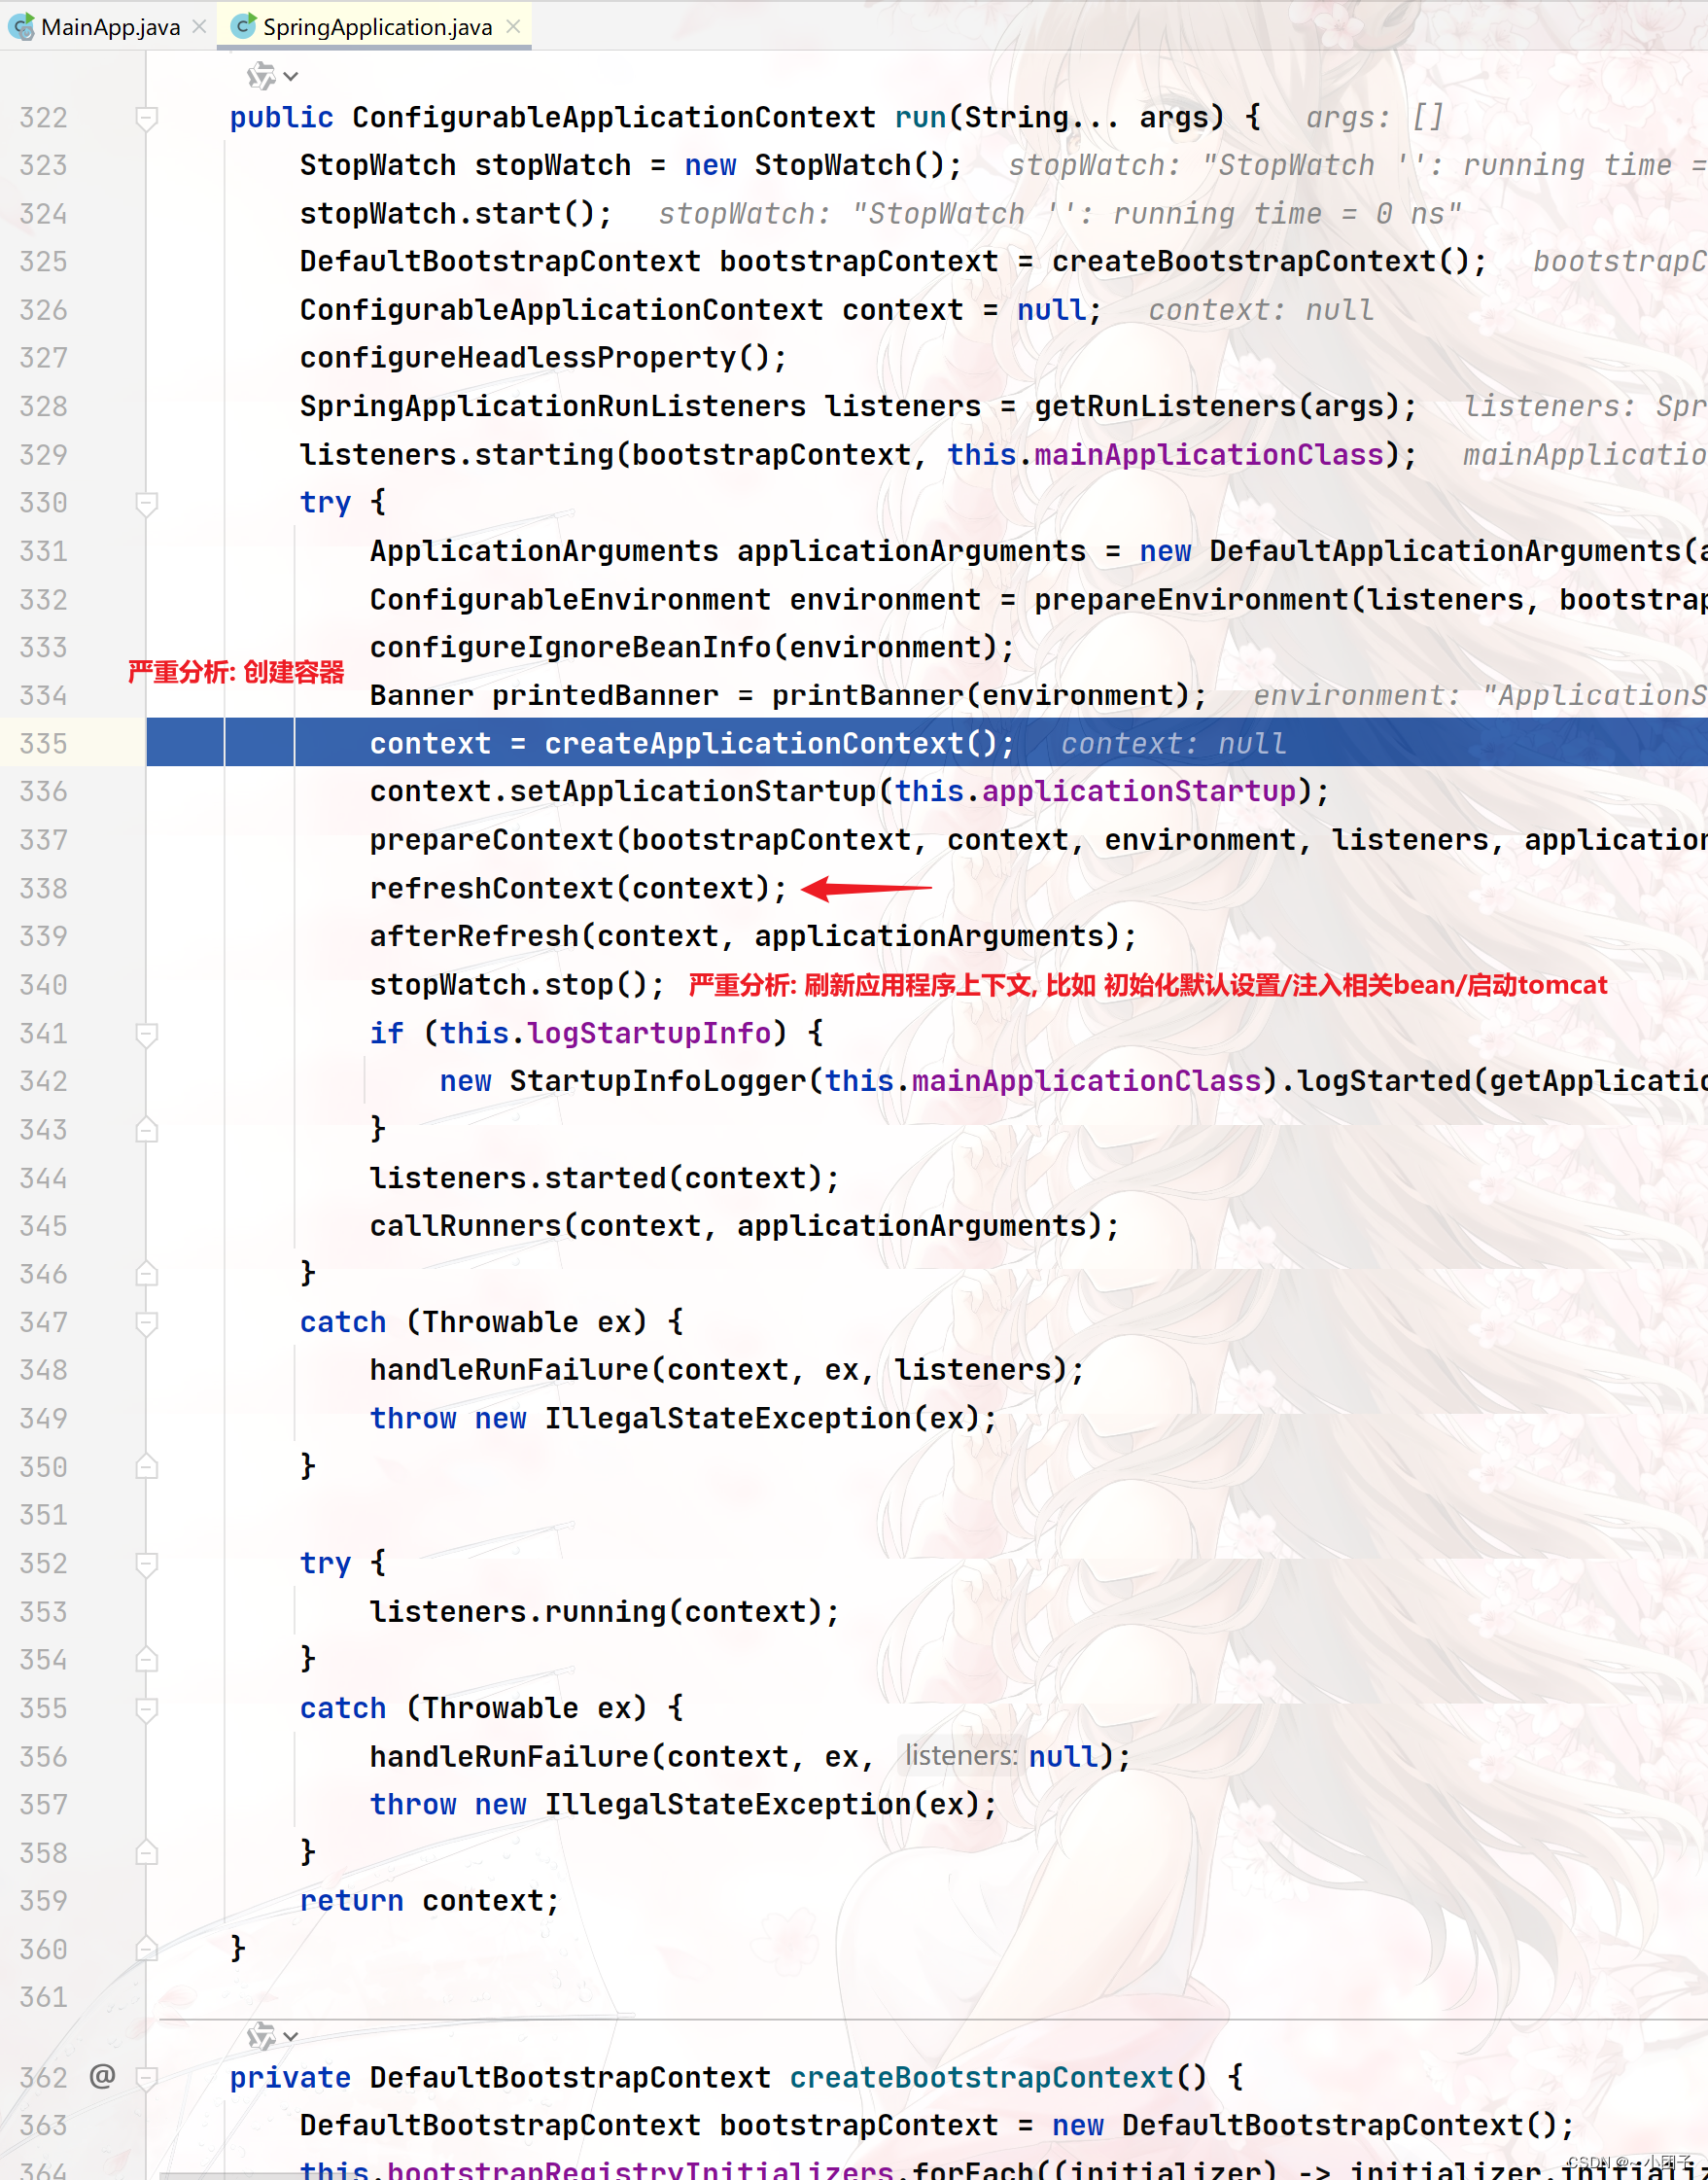
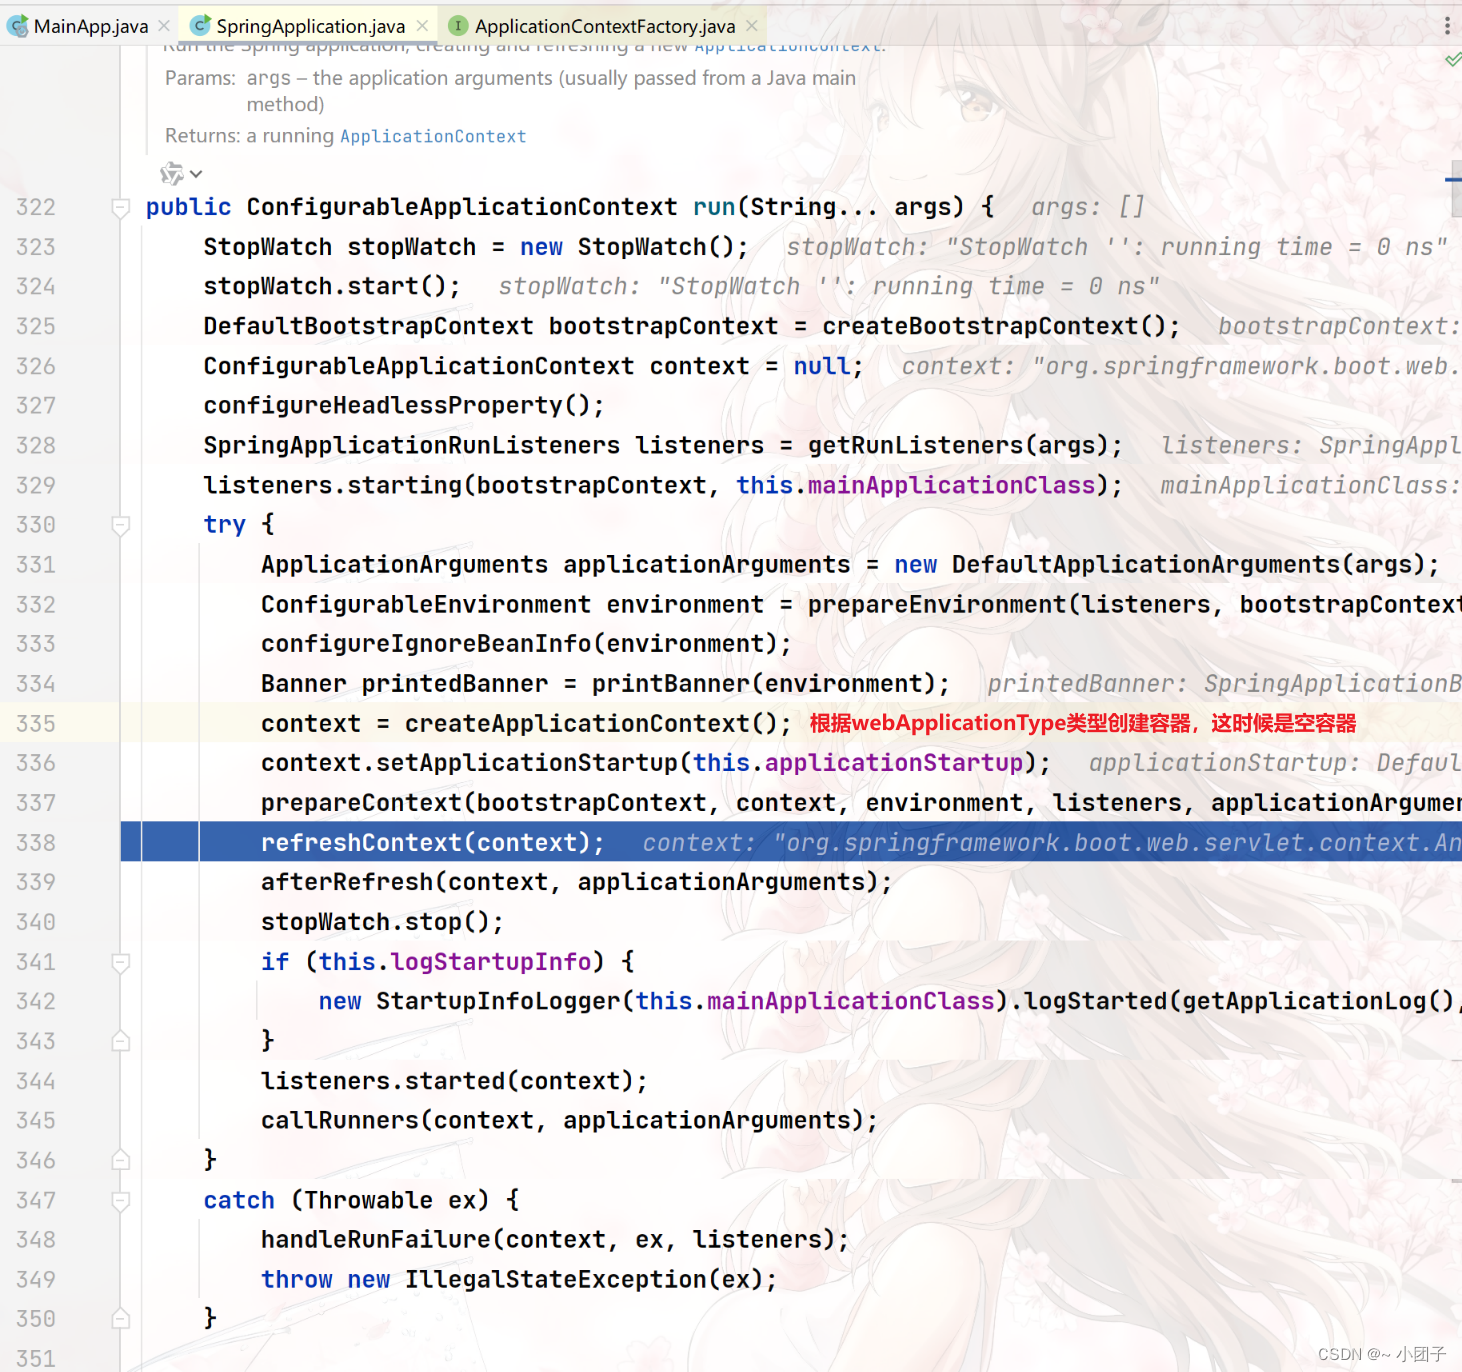
* context = this.createApplicationContext();//严重分析: 创建容器
* context.setApplicationStartup(this.applicationStartup);
* this.prepareContext(bootstrapContext, context, environment, listeners, applicationArguments, printedBanner);
* this.refreshContext(context);//严重分析: 刷新应用程序上下文, 比如 初始化默认设置/注入相关bean/启动tomcat
* this.afterRefresh(context, applicationArguments);
* stopWatch.stop();
* if (this.logStartupInfo) {
* (new StartupInfoLogger(this.mainApplicationClass)).logStarted(this.getApplicationLog(), stopWatch);
* }
*
* listeners.started(context);
* this.callRunners(context, applicationArguments);
* } catch (Throwable var10) {
* this.handleRunFailure(context, var10, listeners);
* throw new IllegalStateException(var10);
* }
*
* try {
* listeners.running(context);
* return context;
* } catch (Throwable var9) {
* this.handleRunFailure(context, var9, (SpringApplicationRunListeners)null);
* throw new IllegalStateException(var9);
* }
* }
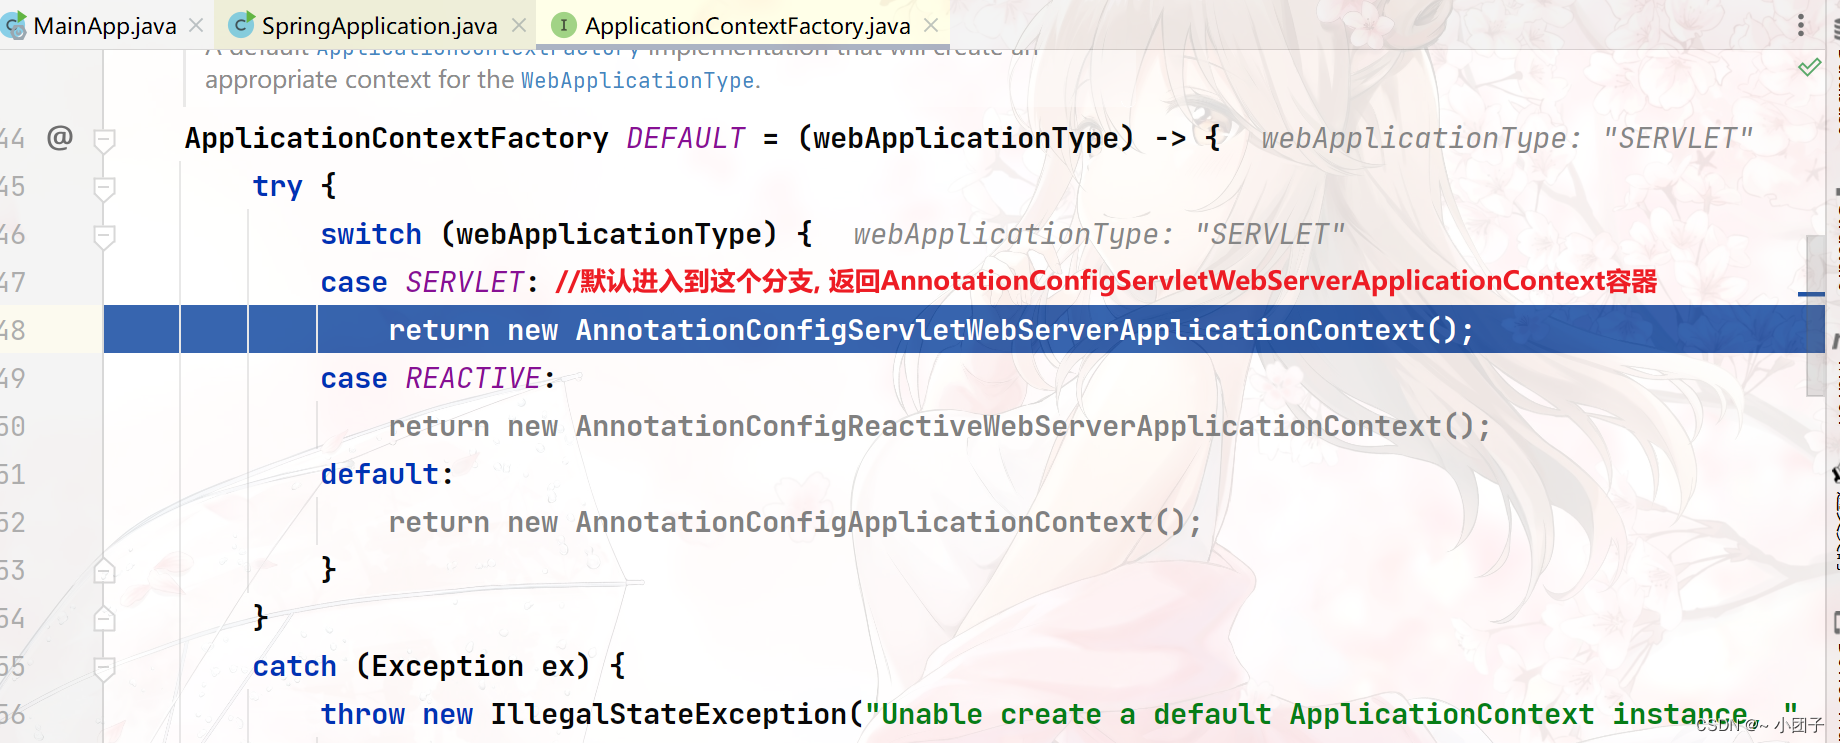
* 4.SpringApplication.java: 容器类型很多, 会根据你的this.webApplicationType创建对应的容器
* this.webApplicationType 默认是 Servlet, 也就是web容器, 可以处理servlet
* protected ConfigurableApplicationContext createApplicationContext() {
* return this.applicationContextFactory.create(this.webApplicationType);
* }
* 5.ApplicationContextFactory.java
* ApplicationContextFactory DEFAULT = (webApplicationType) -> {
* try {
* switch(webApplicationType) {
* case SERVLET://默认进入到这个分支, 返回AnnotationConfigServletWebServerApplicationContext容器
* return new AnnotationConfigServletWebServerApplicationContext();
* case REACTIVE:
* return new AnnotationConfigReactiveWebServerApplicationContext();
* default:
* return new AnnotationConfigApplicationContext();
* }
* } catch (Exception var2) {
* throw new IllegalStateException("Unable create a default ApplicationContext instance, you may need a custom ApplicationContextFactory", var2);
* }
* };
* 6.SpringApplication.java
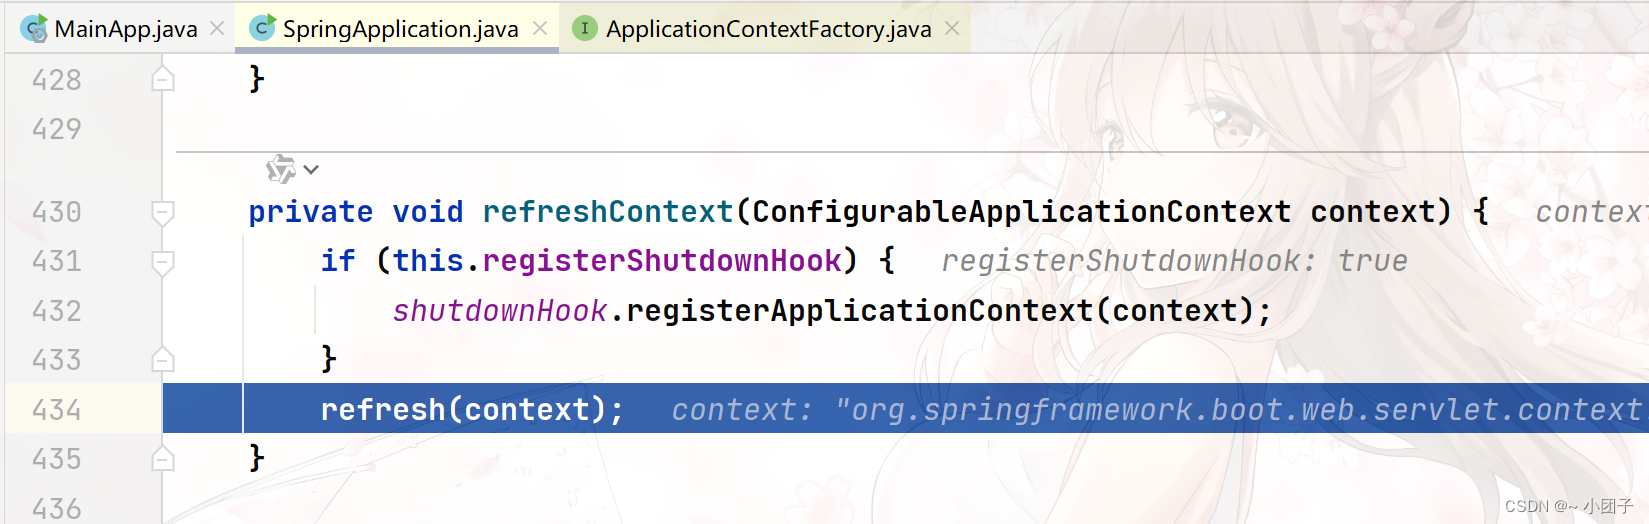
* private void refreshContext(ConfigurableApplicationContext context) {
* if (this.registerShutdownHook) {
* shutdownHook.registerApplicationContext(context);
* }
*
* this.refresh(context);//严重分析, 真正执行相关任务
* }
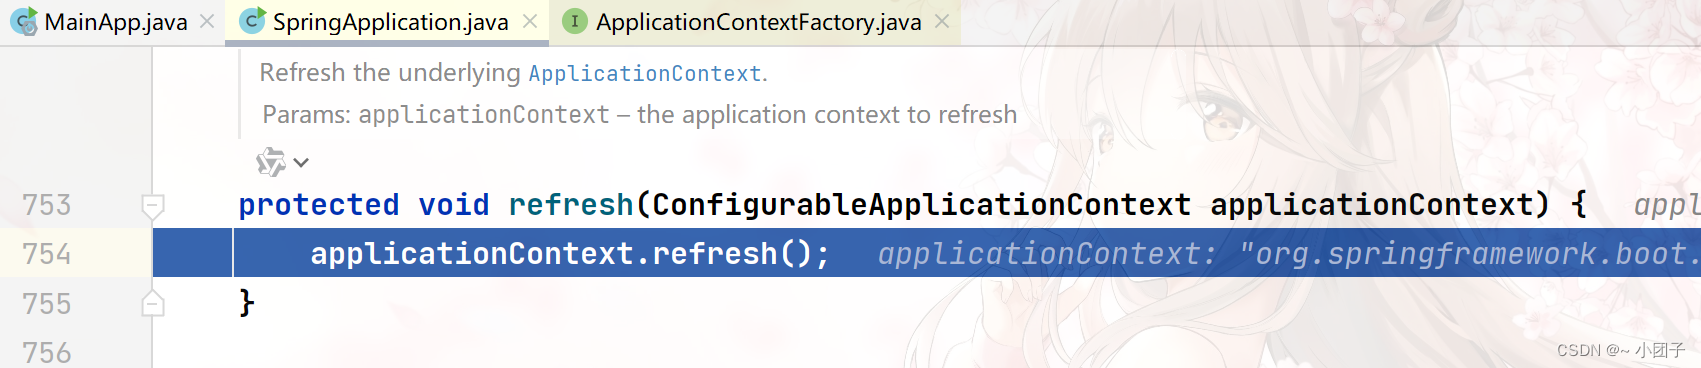
* 7.SpringApplication.java
* protected void refresh(ConfigurableApplicationContext applicationContext) {
* applicationContext.refresh();
* }
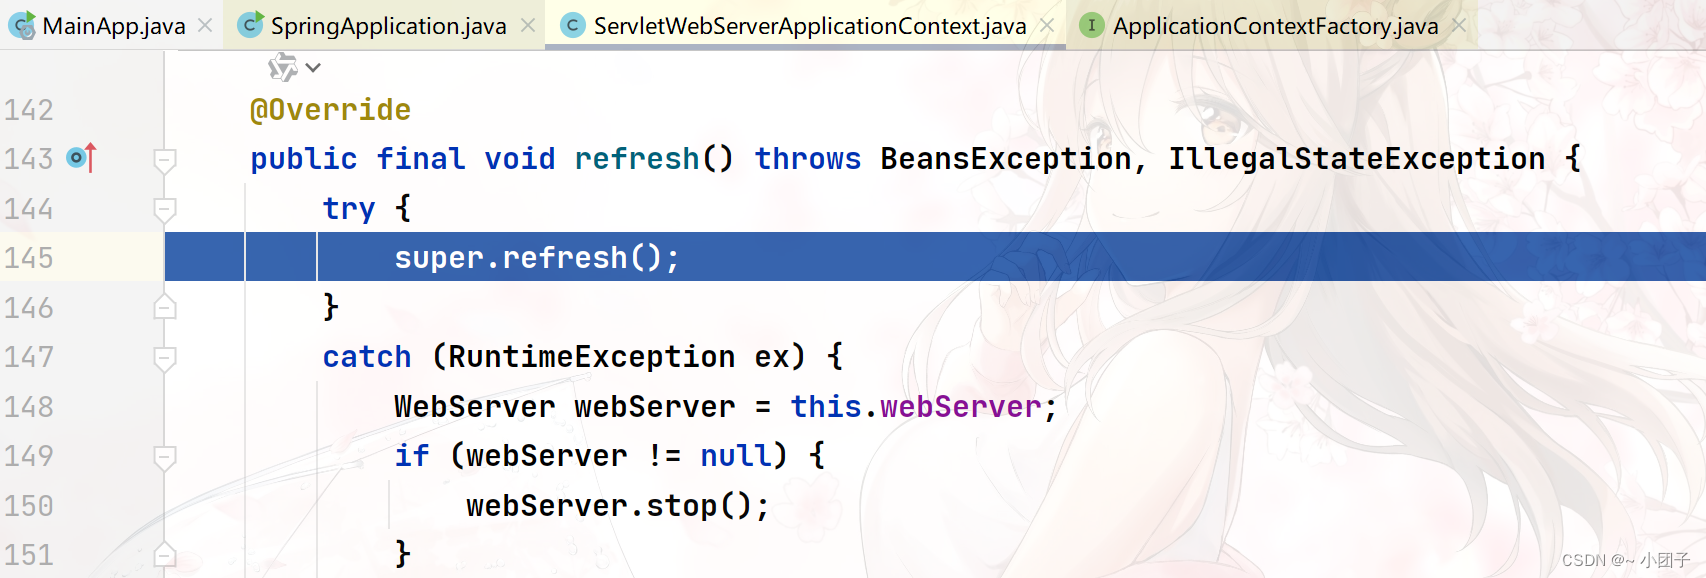
* 8.ServletWebServerApplicationContext.java
* public final void refresh() throws BeansException, IllegalStateException {
* try {
* super.refresh();//分析这个方法
* } catch (RuntimeException var3) {
* WebServer webServer = this.webServer;
* if (webServer != null) {
* webServer.stop();
* }
*
* throw var3;
* }
* }
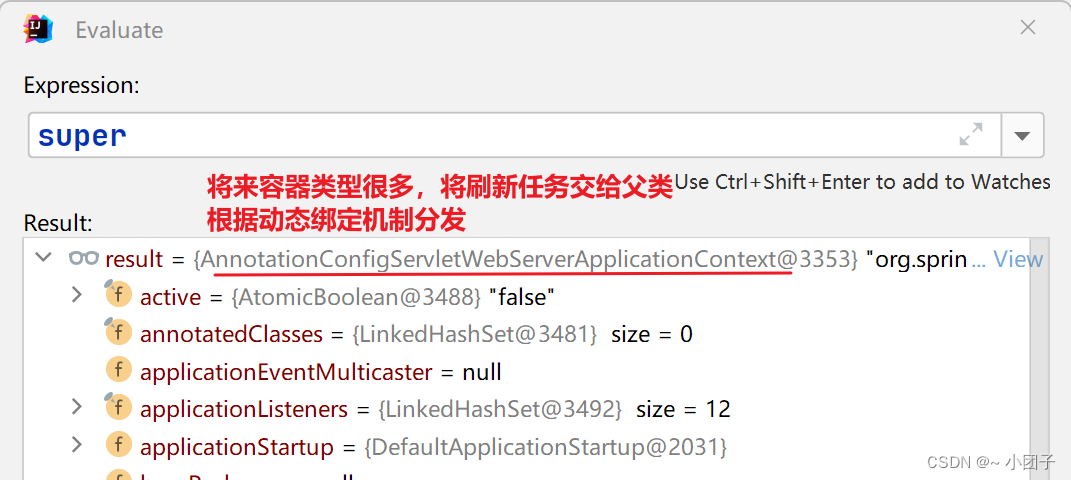
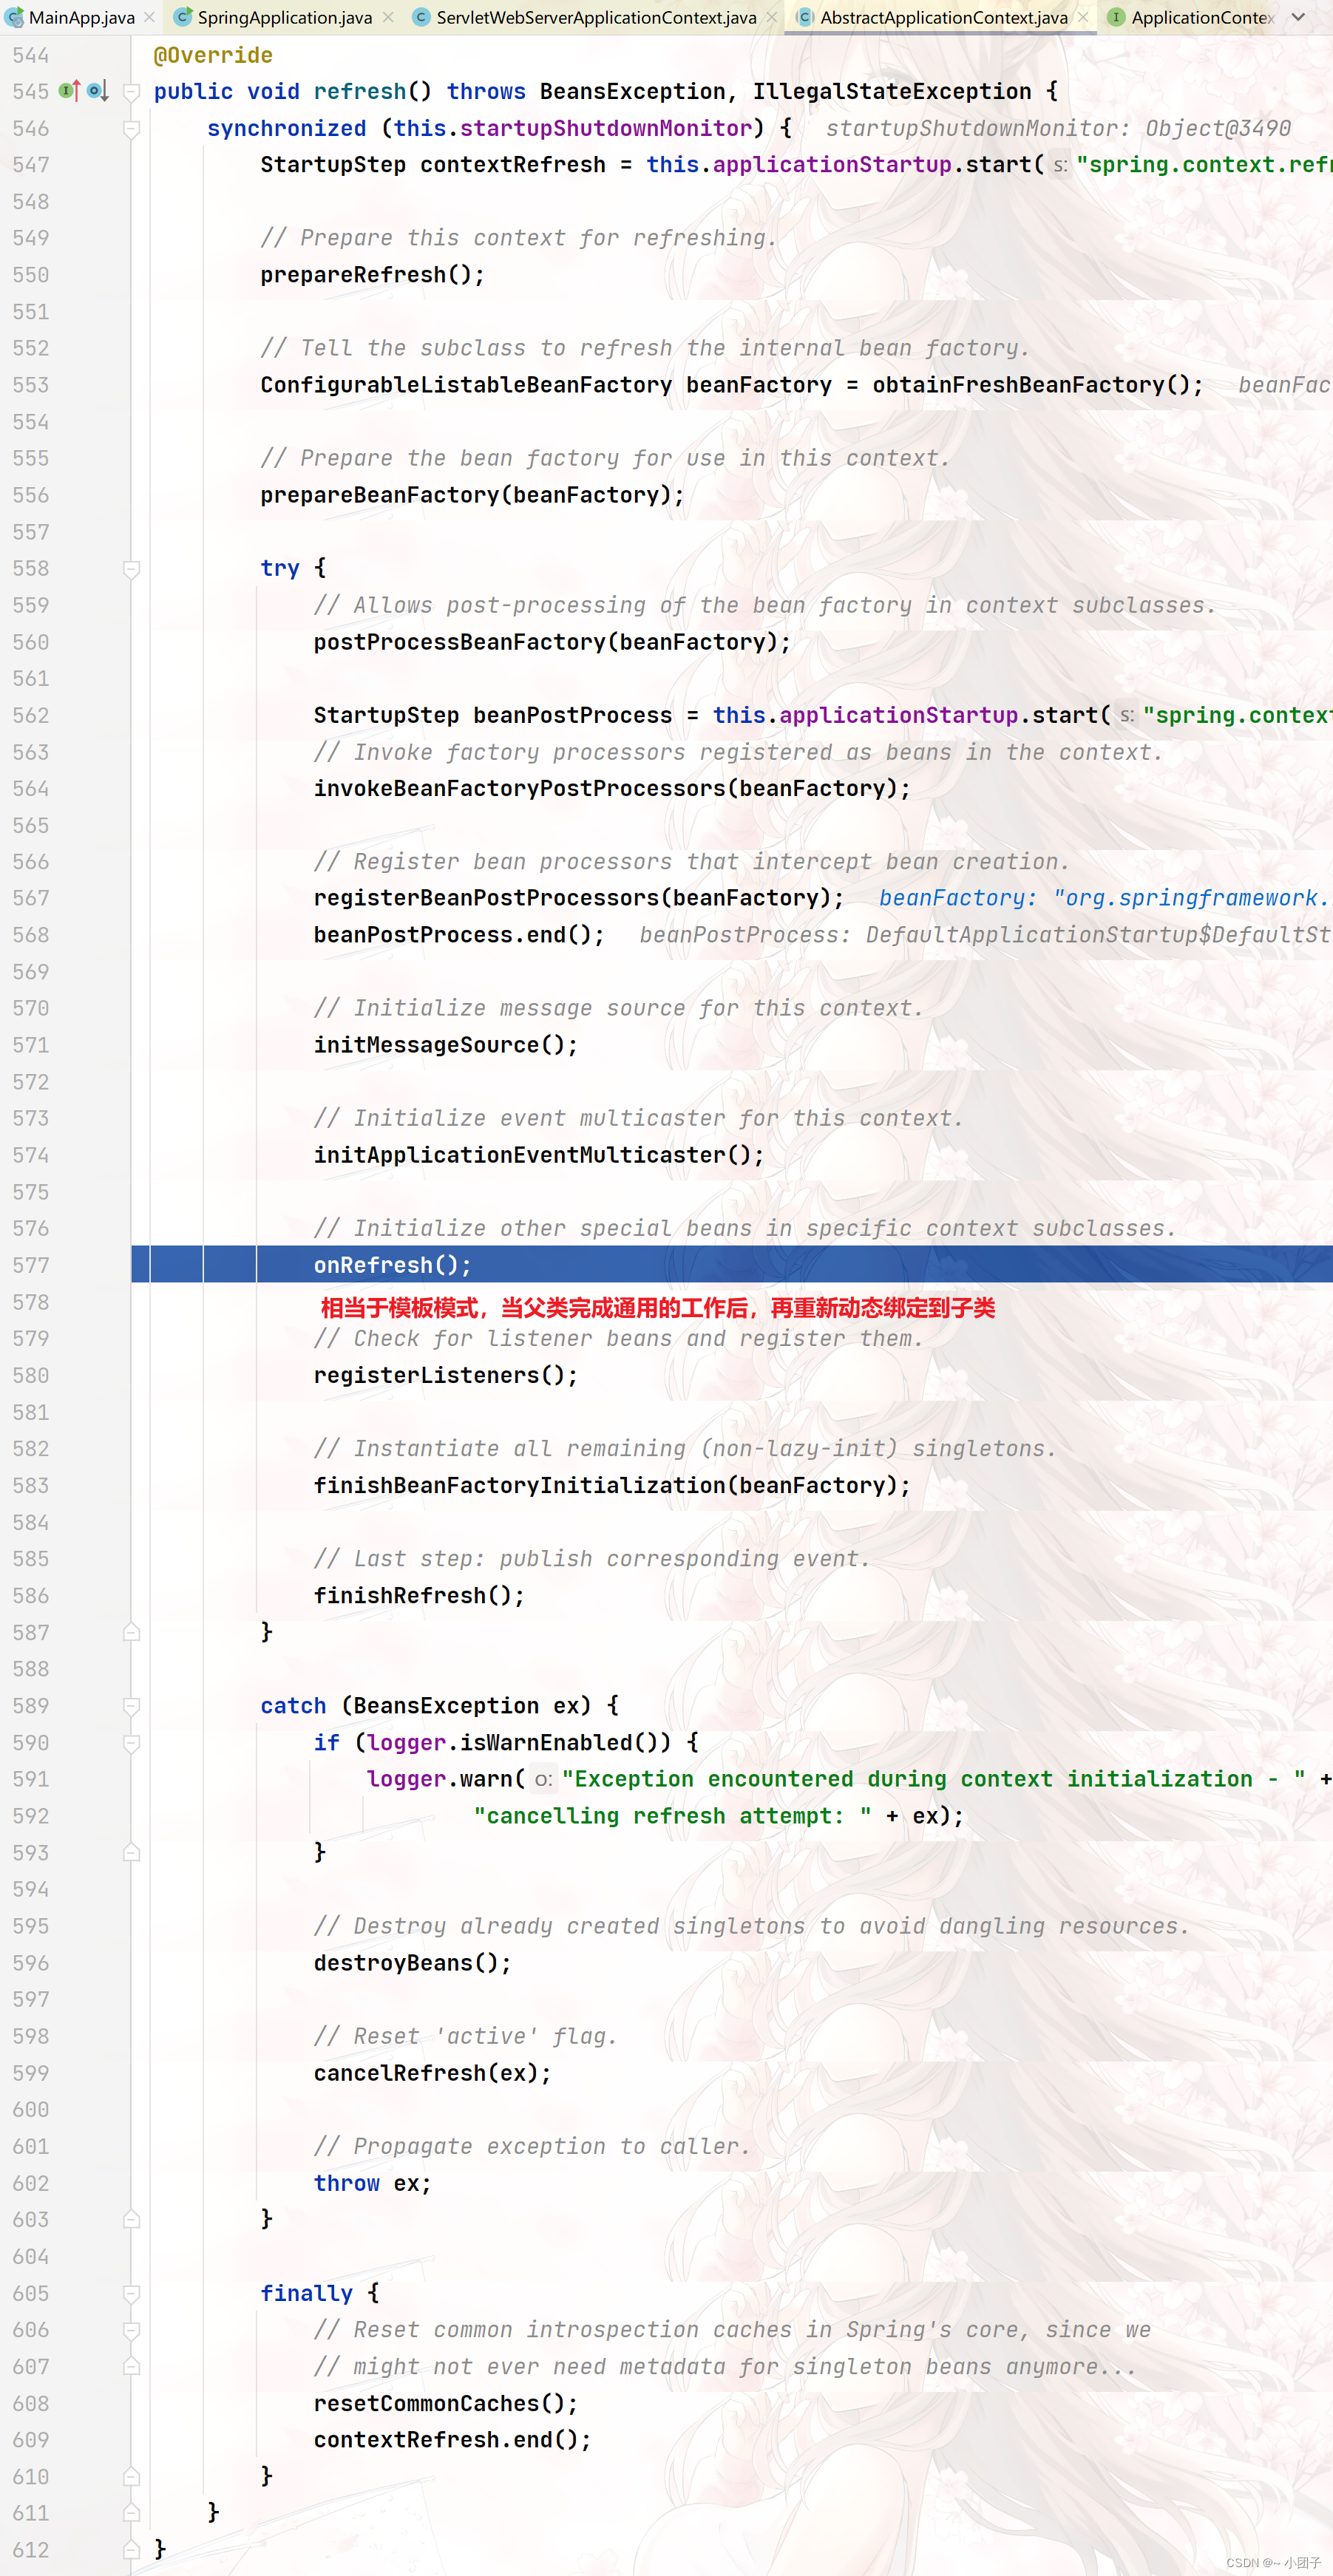
* 9.AbstractApplicationContext.java
* @Override
* public void refresh() throws BeansException, IllegalStateException {
* synchronized (this.startupShutdownMonitor) {
* StartupStep contextRefresh = this.applicationStartup.start("spring.context.refresh");
*
* // Prepare this context for refreshing.
* prepareRefresh();
*
* // Tell the subclass to refresh the internal bean factory.
* ConfigurableListableBeanFactory beanFactory = obtainFreshBeanFactory();
*
* // Prepare the bean factory for use in this context.
* prepareBeanFactory(beanFactory);
*
* try {
* // Allows post-processing of the bean factory in context subclasses.
* postProcessBeanFactory(beanFactory);
*
* StartupStep beanPostProcess = this.applicationStartup.start("spring.context.beans.post-process");
* // Invoke factory processors registered as beans in the context.
* invokeBeanFactoryPostProcessors(beanFactory);
*
* // Register bean processors that intercept bean creation.
* registerBeanPostProcessors(beanFactory);
* beanPostProcess.end();
*
* // Initialize message source for this context.
* initMessageSource();
*
* // Initialize event multicaster for this context.
* initApplicationEventMulticaster();
*
* // Initialize other special beans in specific context subclasses.
* onRefresh();//严重分析, 当父类完成通用的工作后, 再重新动态绑定机制回到子类
*
* // Check for listener beans and register them.
* registerListeners();
*
* // Instantiate all remaining (non-lazy-init) singletons.
* finishBeanFactoryInitialization(beanFactory);
*
* // Last step: publish corresponding event.
* finishRefresh();
* }
*
* catch (BeansException ex) {
* if (logger.isWarnEnabled()) {
* logger.warn("Exception encountered during context initialization - " +
* "cancelling refresh attempt: " + ex);
* }
*
* // Destroy already created singletons to avoid dangling resources.
* destroyBeans();
*
* // Reset 'active' flag.
* cancelRefresh(ex);
*
* // Propagate exception to caller.
* throw ex;
* }
*
* finally {
* // Reset common introspection caches in Spring's core, since we
* // might not ever need metadata for singleton beans anymore...
* resetCommonCaches();
* contextRefresh.end();
* }
* }
* }
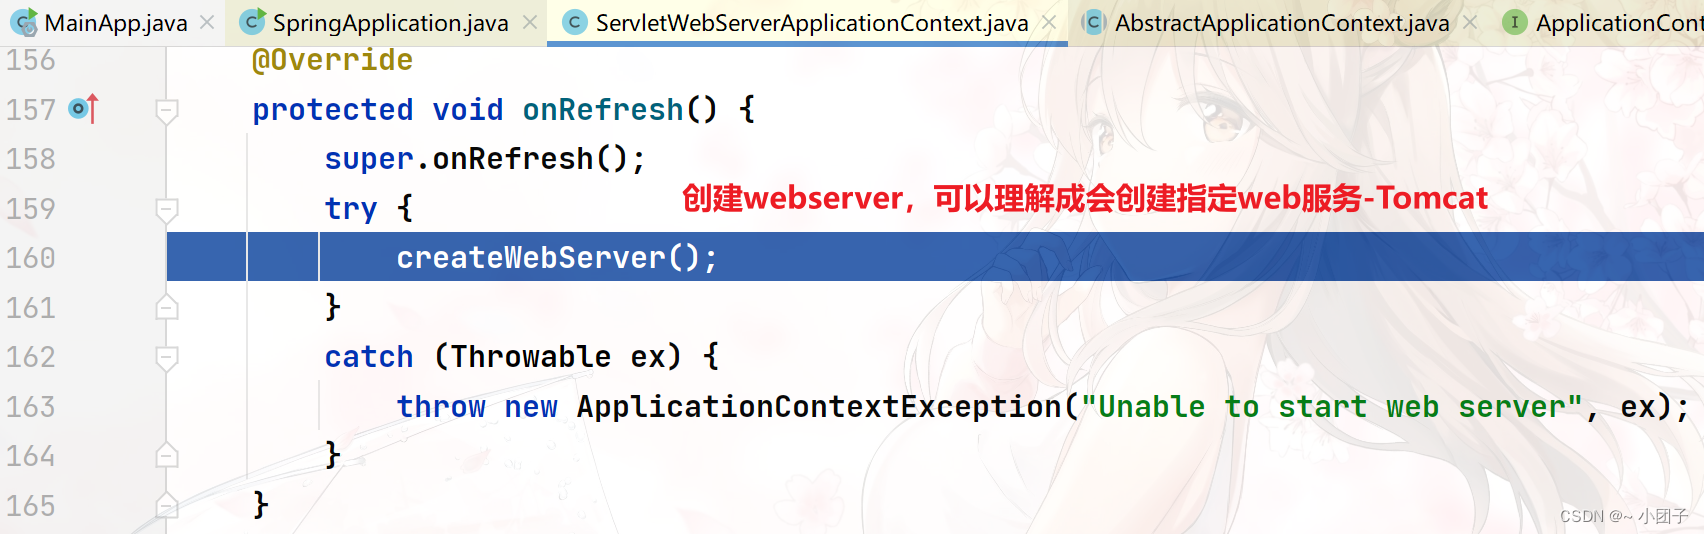
* 10.ServletWebServerApplicationContext.java
* protected void onRefresh() {
* super.onRefresh();
*
* try {
* this.createWebServer();//看到胜利的曙光. 创建webserver 可以理解成会创建指定web服务-Tomcat
* } catch (Throwable var2) {
* throw new ApplicationContextException("Unable to start web server", var2);
* }
* }
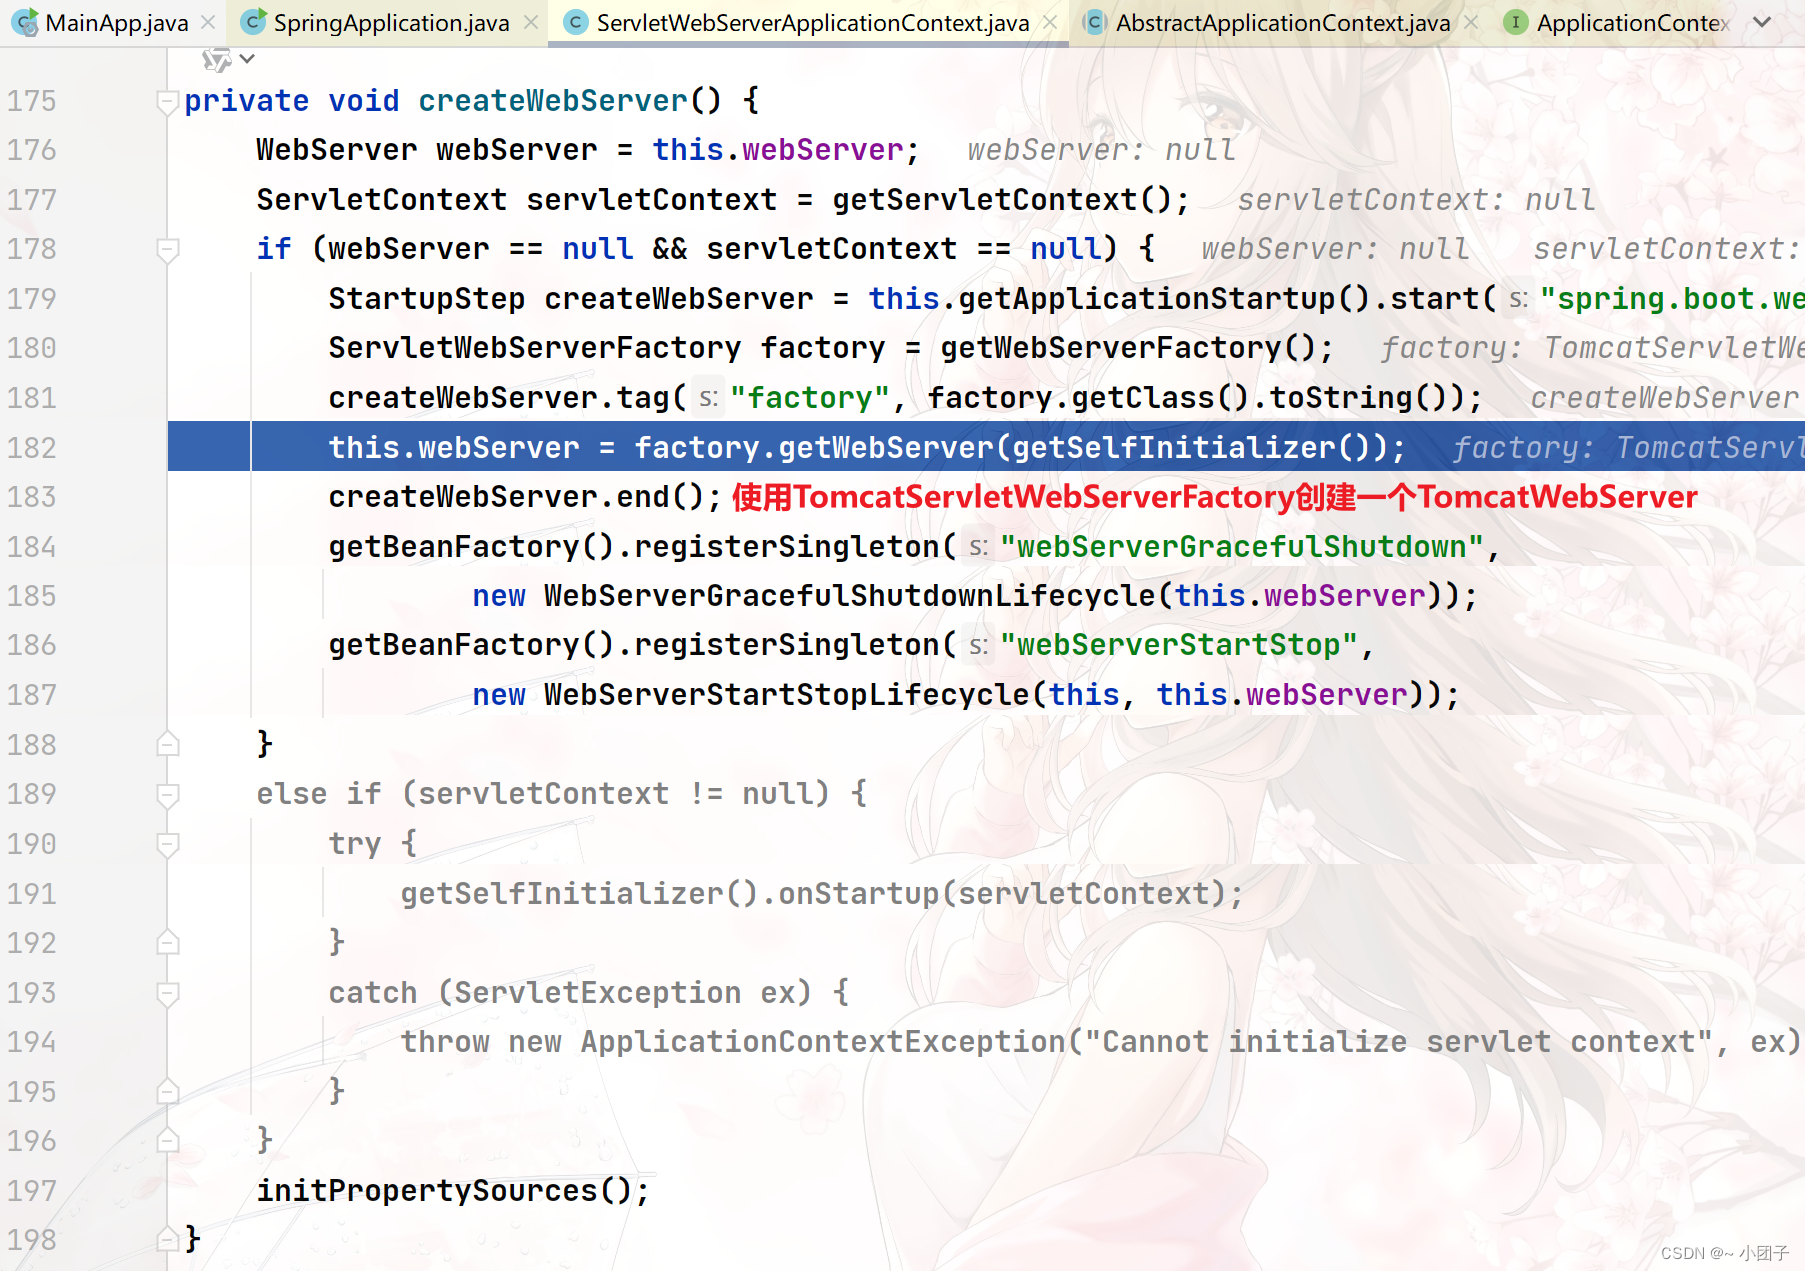
* 11.ServletWebServerApplicationContext.java
* private void createWebServer() {
* WebServer webServer = this.webServer;
* ServletContext servletContext = this.getServletContext();
* if (webServer == null && servletContext == null) {
* StartupStep createWebServer = this.getApplicationStartup().start("spring.boot.webserver.create");
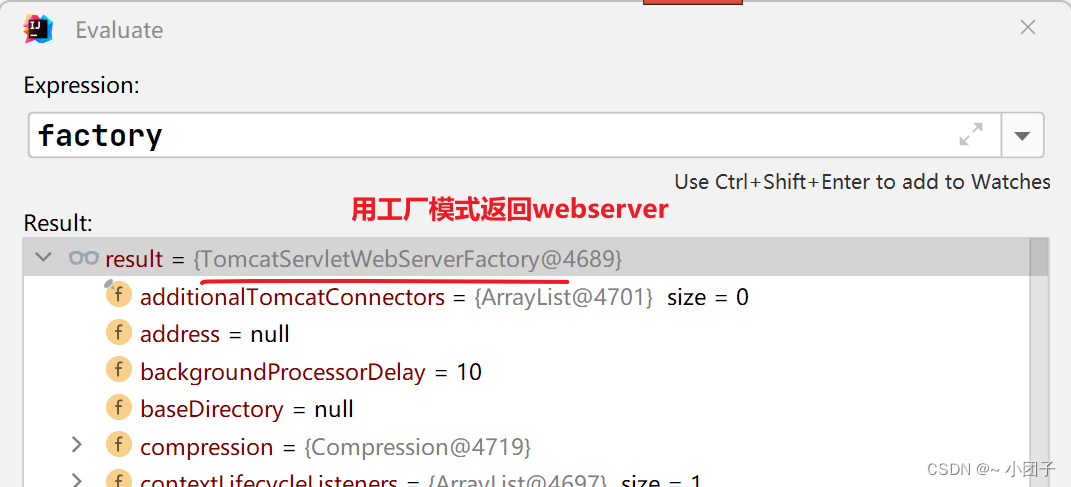
* ServletWebServerFactory factory = this.getWebServerFactory();
* createWebServer.tag("factory", factory.getClass().toString());
* this.webServer = factory.getWebServer(new ServletContextInitializer[]{this.getSelfInitializer()});//严重分析, 使用TomcatServletWebServerFactory 创建一个TomcatWebServer
* createWebServer.end();
* this.getBeanFactory().registerSingleton("webServerGracefulShutdown", new WebServerGracefulShutdownLifecycle(this.webServer));
* this.getBeanFactory().registerSingleton("webServerStartStop", new WebServerStartStopLifecycle(this, this.webServer));
* } else if (servletContext != null) {
* try {
* this.getSelfInitializer().onStartup(servletContext);
* } catch (ServletException var5) {
* throw new ApplicationContextException("Cannot initialize servlet context", var5);
* }
* }
*
* this.initPropertySources();
* }
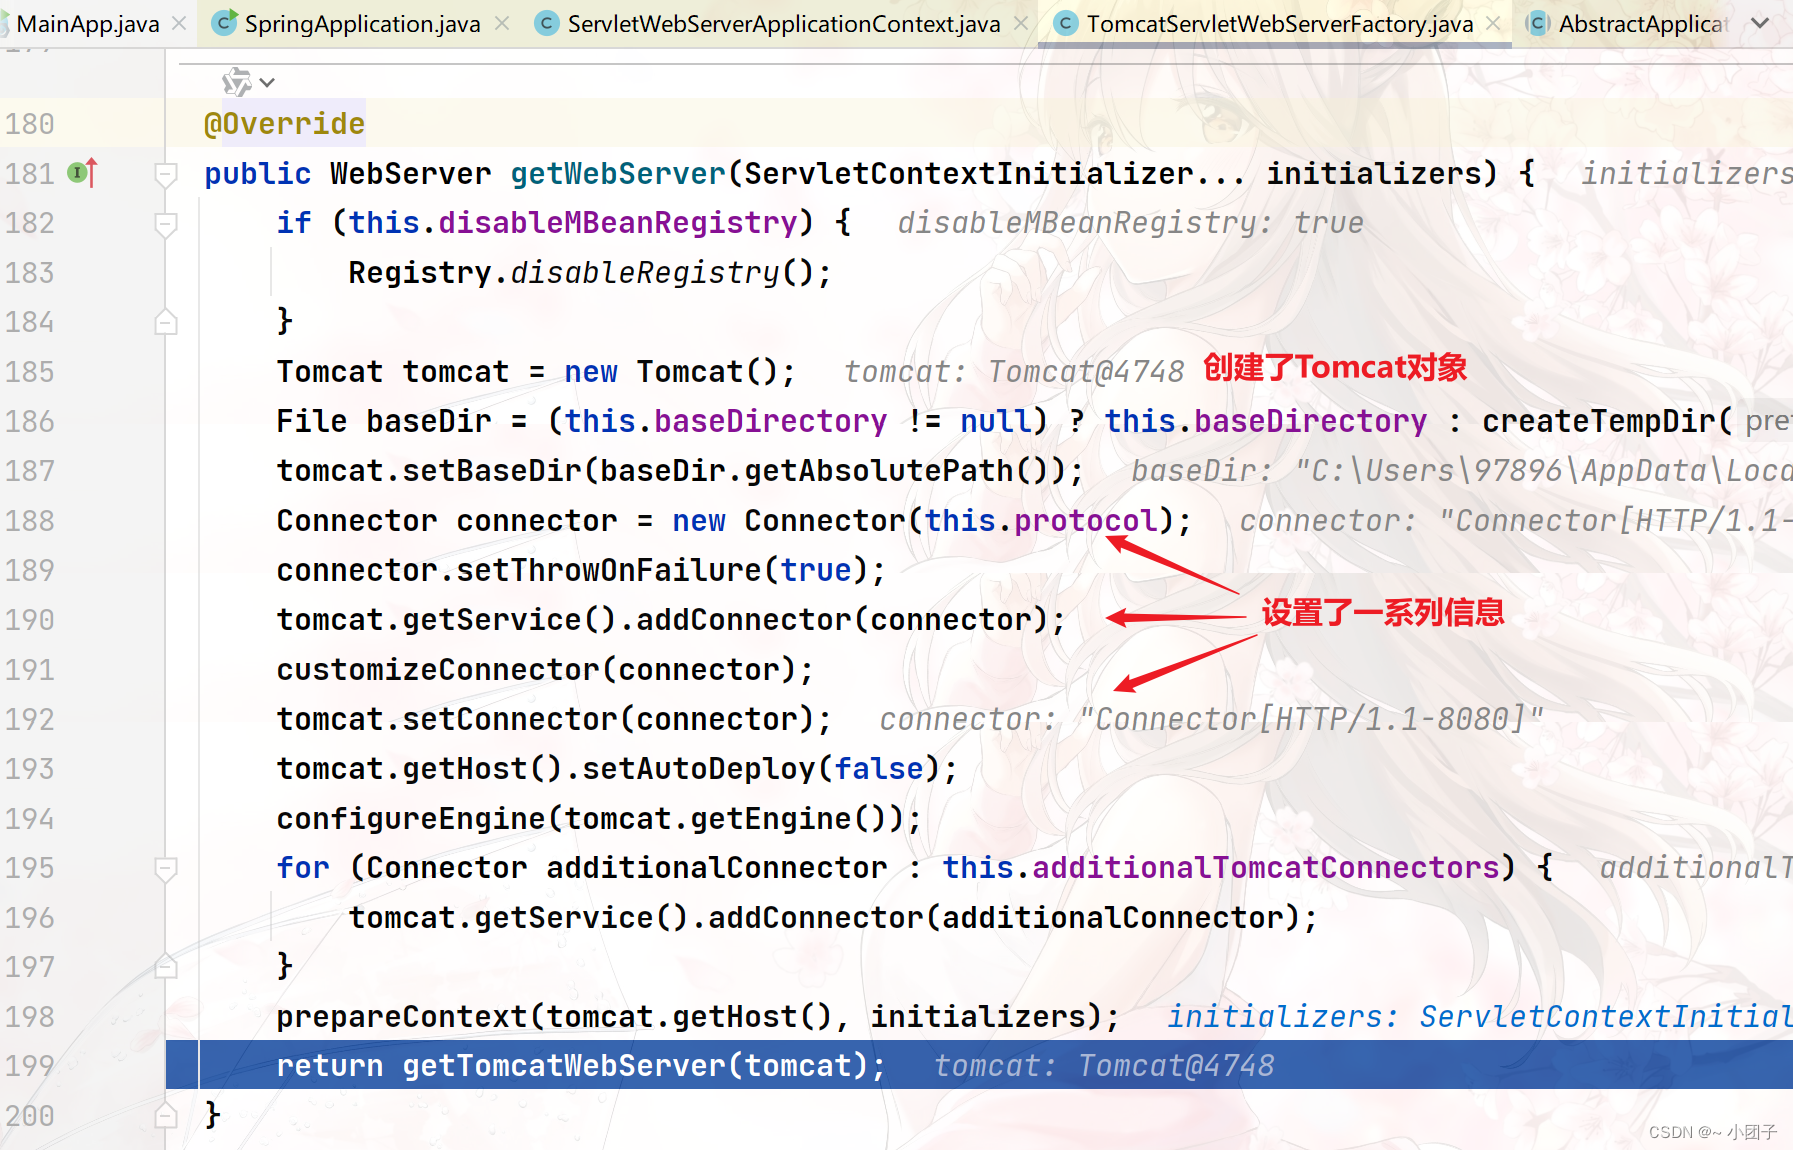
* 12.TomcatServletWebServerFactory.java: 会创建Tomcat, 并启动
* public WebServer getWebServer(ServletContextInitializer... initializers) {
* if (this.disableMBeanRegistry) {
* Registry.disableRegistry();
* }
*
* Tomcat tomcat = new Tomcat();//创建了Tomcat对象
* File baseDir = this.baseDirectory != null ? this.baseDirectory : this.createTempDir("tomcat");
* //这里做了一系列配置
* tomcat.setBaseDir(baseDir.getAbsolutePath());
* Connector connector = new Connector(this.protocol);
* connector.setThrowOnFailure(true);
* tomcat.getService().addConnector(connector);
* this.customizeConnector(connector);
* tomcat.setConnector(connector);
* tomcat.getHost().setAutoDeploy(false);
* this.configureEngine(tomcat.getEngine());
* Iterator var5 = this.additionalTomcatConnectors.iterator();
*
* while(var5.hasNext()) {
* Connector additionalConnector = (Connector)var5.next();
* tomcat.getService().addConnector(additionalConnector);
* }
*
* this.prepareContext(tomcat.getHost(), initializers);
* return this.getTomcatWebServer(tomcat);//严重分析该方法.
* }
* 13.TomcatServletWebServerFactory.java
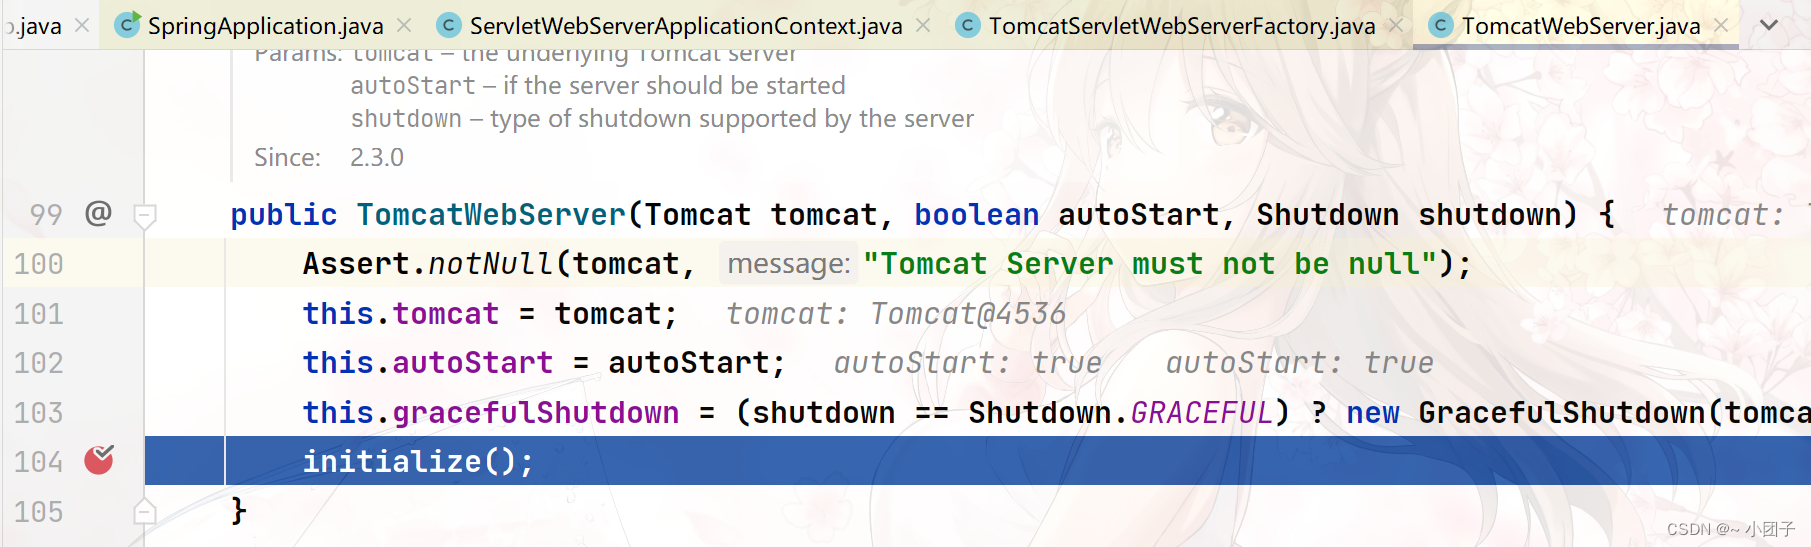
* protected TomcatWebServer getTomcatWebServer(Tomcat tomcat) {
* return new TomcatWebServer(tomcat, this.getPort() >= 0, this.getShutdown());
* }
* 14.TomcatServletWebServerFactory.java
* public TomcatWebServer(Tomcat tomcat, boolean autoStart, Shutdown shutdown) {
* this.monitor = new Object();
* this.serviceConnectors = new HashMap();
* Assert.notNull(tomcat, "Tomcat Server must not be null");
* this.tomcat = tomcat;
* this.autoStart = autoStart;
* this.gracefulShutdown = shutdown == Shutdown.GRACEFUL ? new GracefulShutdown(tomcat) : null;
* this.initialize();//分析这个方法
* }
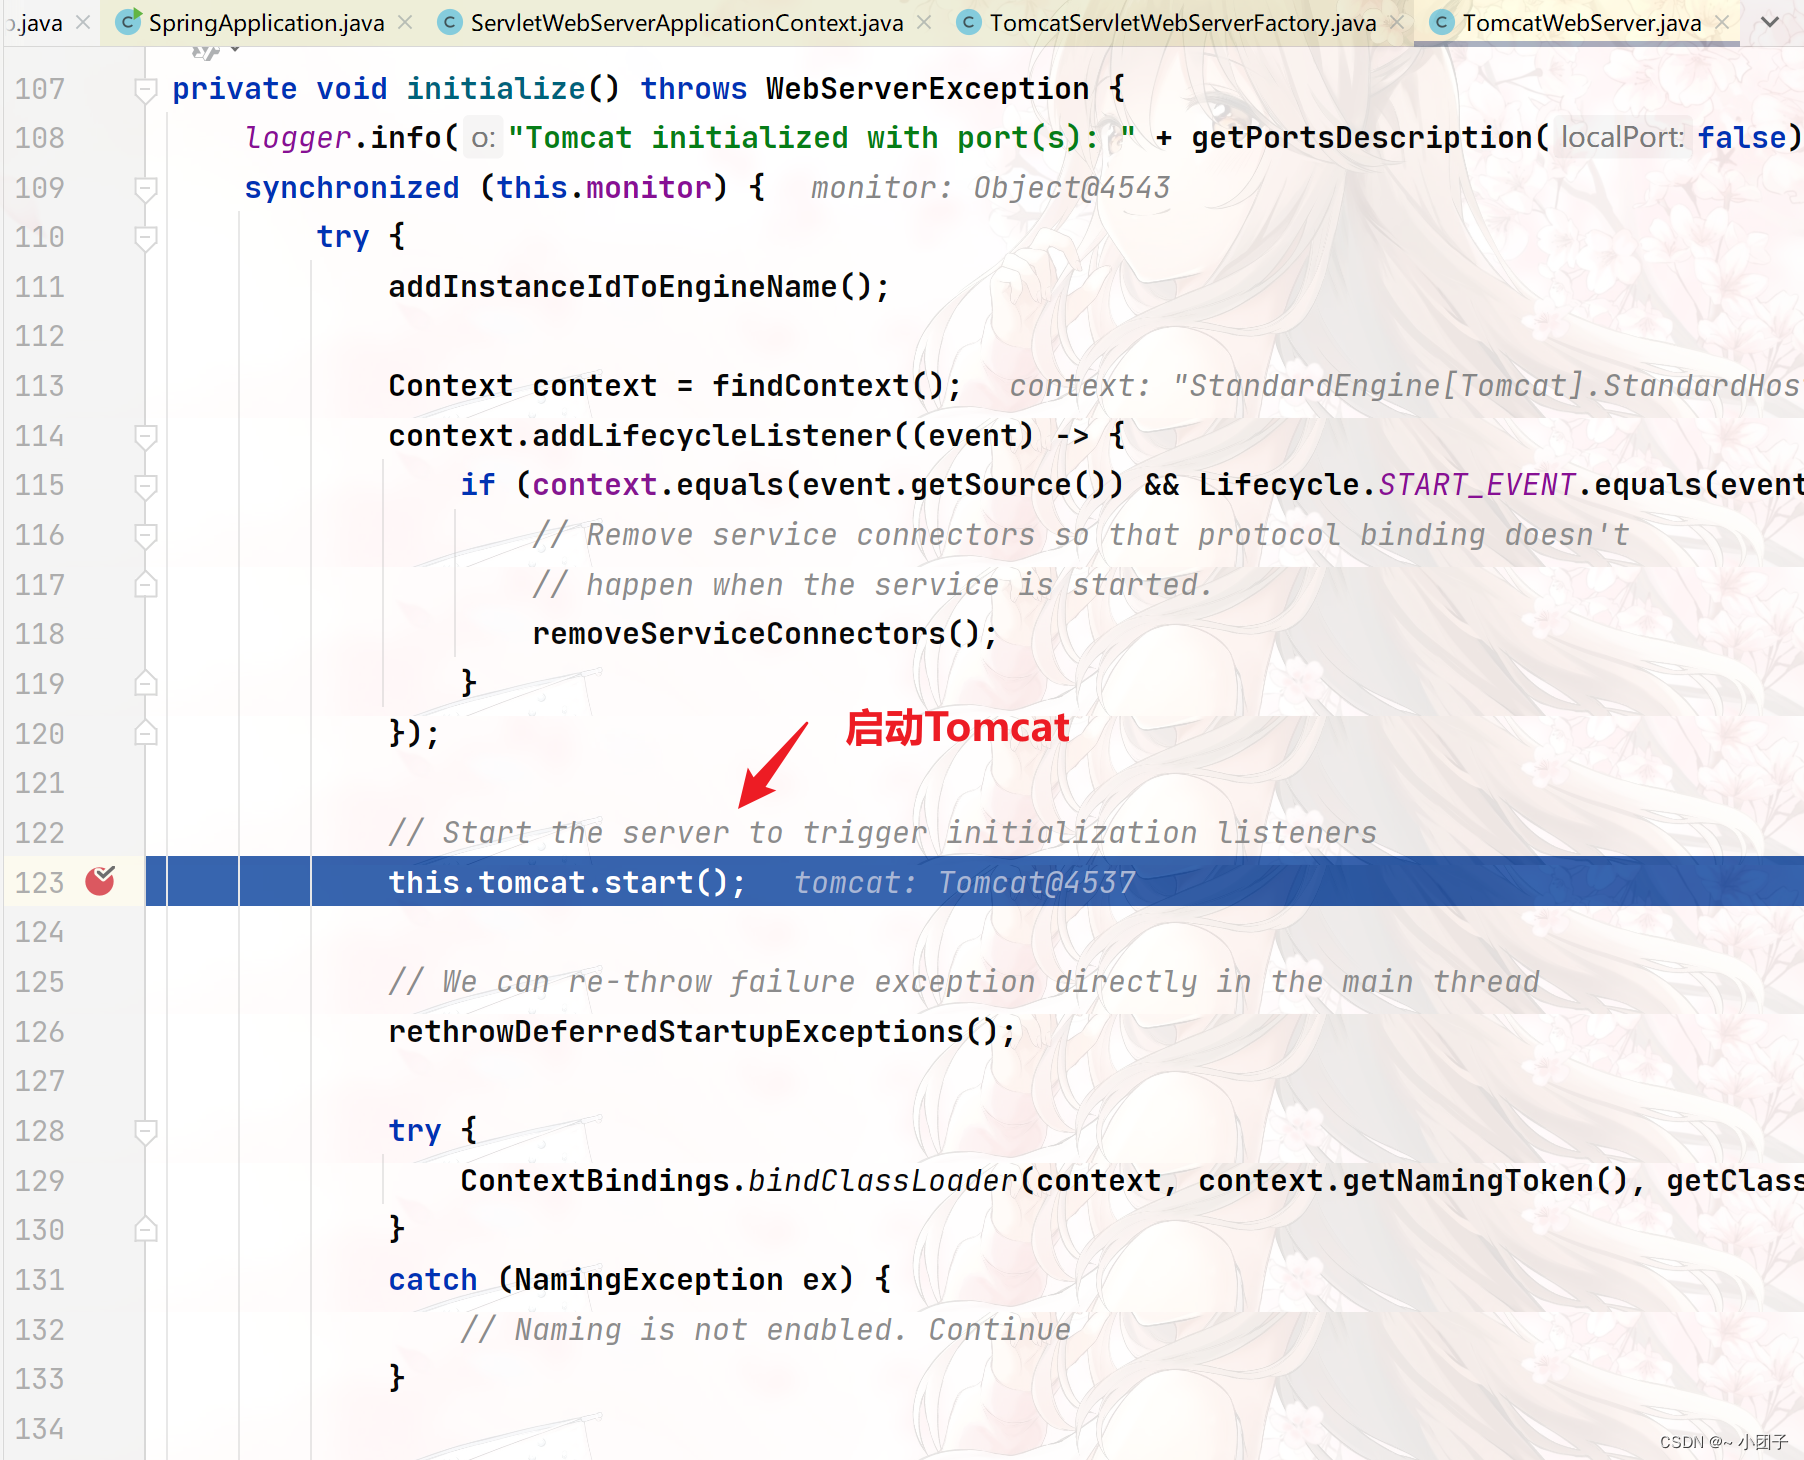
* 15.TomcatServletWebServerFactory.java
* private void initialize() throws WebServerException {
* logger.info("Tomcat initialized with port(s): " + this.getPortsDescription(false));
* Object var1 = this.monitor;
* synchronized(this.monitor) {
* try {
* this.addInstanceIdToEngineName();
* Context context = this.findContext();
* context.addLifecycleListener((event) -> {
* if (context.equals(event.getSource()) && "start".equals(event.getType())) {
* this.removeServiceConnectors();
* }
*
* });
* this.tomcat.start();//启动Tomcat
* this.rethrowDeferredStartupExceptions();
*
* try {
* ContextBindings.bindClassLoader(context, context.getNamingToken(), this.getClass().getClassLoader());
* } catch (NamingException var5) {
* ;
* }
*
* this.startDaemonAwaitThread();
* } catch (Exception var6) {
* this.stopSilently();
* this.destroySilently();
* throw new WebServerException("Unable to start embedded Tomcat", var6);
* }
*
* }
* }
*/
System.out.println("ok.");
}
}SpringBoot的debug流程
F7, Step Into
F7, Step Into
F7, Step Into
F7, Step Into

webApplicationType类型可以在配置文件中修改

F7, Step Into
Shift+F8, Step Out
F7, Step Into
F7, Step Into
F7, Step Into
看看父类的类型
F7, Step Into
F7, Step Into
F7, Step Into
F7, Step Into
F7, Step Into

放行 Resume Problem
F7, Step Into
放行 Resume Problem
对容器进行估值
实现SpringBoot底层机制Tomcat启动分析 + Spring容器初始化 + Tomcat如何关联Spring容器
实现任务阶段1-创建Tomcat, 并启动
🥦说明:创建Tomcat, 并启动
🥦分析+代码实现
1.修改E:\idea_project\zzw_springboot\zzw-springboot\pom.xml
xml
<!--导入web项目场景启动器: 会自动导入和web开发相关的所有依赖[库/jar]
后面还会说明spring-boot-starter-web 到底引入哪些相关依赖-->
<dependencies>
    <dependency>
        <groupId>org.springframework.boot</groupId>
        <artifactId>spring-boot-starter-web</artifactId>
        <!--
            因为我们自己要创建Tomcat对象, 并启动.
            因此我们先排除 内嵌的 spring-boot-starter-tomcat
        -->
        <exclusions>
            <exclusion>
                <groupId>org.springframework.boot</groupId>
                <artifactId>spring-boot-starter-tomcat</artifactId>
            </exclusion>
        </exclusions>
    </dependency>

    <!--我们指定tomcat版本, 引入tomcat依赖/库

    1.使用指定的tomcat 8.5.75, 请小伙伴也引入这个版本
    2.如果我们引入自己指定的tomcat, 一定要记住把前面spring-boot-starter-tomcat排除
    3.如果你不排除, 会出现 GenericServlet Not Found 的错误提示.
    -->
    <dependency>
        <groupId>org.apache.tomcat.embed</groupId>
        <artifactId>tomcat-embed-core</artifactId>
        <version>8.5.75</version>
    </dependency>
</dependencies>2.创建src/main/java/com/zzw/zzwspringboot/ZzwSpringApplication.java
java
public class ZzwSpringApplication {
    //这里我们会创建Tomcat对象, 并关联Spring容器, 并启动
    public static void run() {
        try {
            //创建Tomcat对象
            Tomcat tomcat = new Tomcat();
            //设置9090端口
            tomcat.setPort(9090);
            //启动, 就会在9090端口监听
            tomcat.start();
            //等待请求接入
            System.out.println("====9090 等待请求接入====");
            tomcat.getServer().await();
        } catch (Exception e) {
            throw new RuntimeException(e);
        }
    }
}3.主程序src/main/java/com/zzw/zzwspringboot/ZzwMainApp.java
java
//主程序
public class ZzwMainApp {
    public static void main(String[] args) {
        //启动ZzwSpringBoot项目/程序
        ZzwSpringApplication.run();
    }
}
🥦完成测试
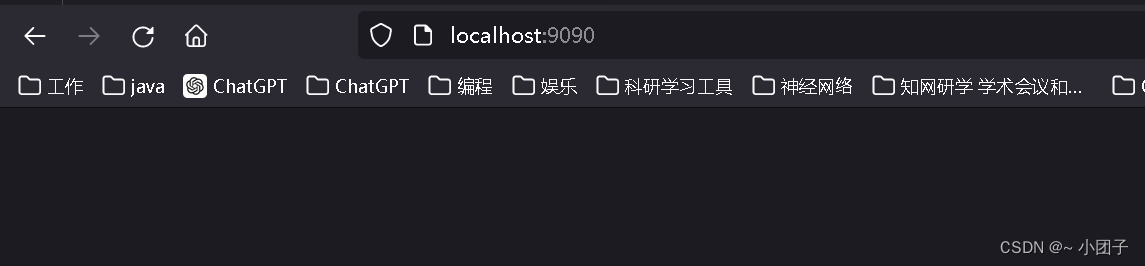
1.运行效果

2.浏览器请求 http://localhost:9090/, 这时没有返回信息, 因为还没有写Controller.
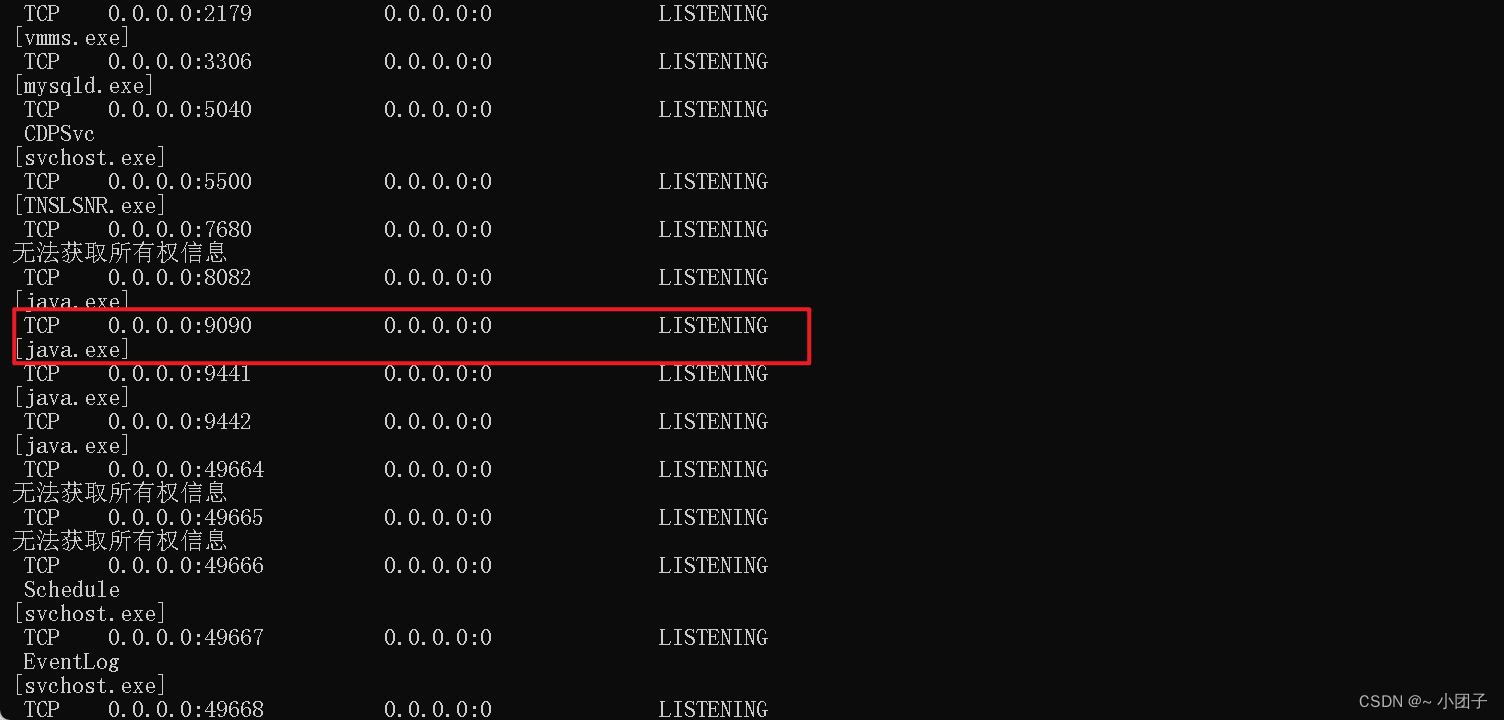
3.管理员权限运行cmd窗口, 输入netstat -anb. 证明9090端口真的在监听.
实现任务阶段2-创建Spring容器
🥦说明:创建Spring容器
🥦分析+代码实现
1.新建src/main/java/com/zzw/zzwspringboot/bean/Monster.java, 做一个测试Bean
java
public class Monster {
}2.新建src/main/java/com/zzw/zzwspringboot/controller/ZzwHiController.java, 作为Controller
java
@RestController
public class ZzwHiController {
    @RequestMapping("/hi")
    public String hi() {
        return "hi ZzwHiController";
    }
}3.新建src/main/java/com/zzw/zzwspringboot/config/ZzwConfig.java, 作为Spring的配置文件
java
/**
 * ZzwConfig 配置类 作为Spring的配置文件
 * 这里有一个问题, 容器怎么知道要扫描哪些包 ?=> 一会代码体现
 *
 * 在配置类中可以指定要扫描的包: @ComponentScan("com.zzw.zzwspringboot")
 */
@Configuration
@ComponentScan("com.zzw.zzwspringboot")
public class ZzwConfig {
    //注入Bean - monster 对象到Spring容器
    @Bean
    public Monster monster() {
        return new Monster();
    }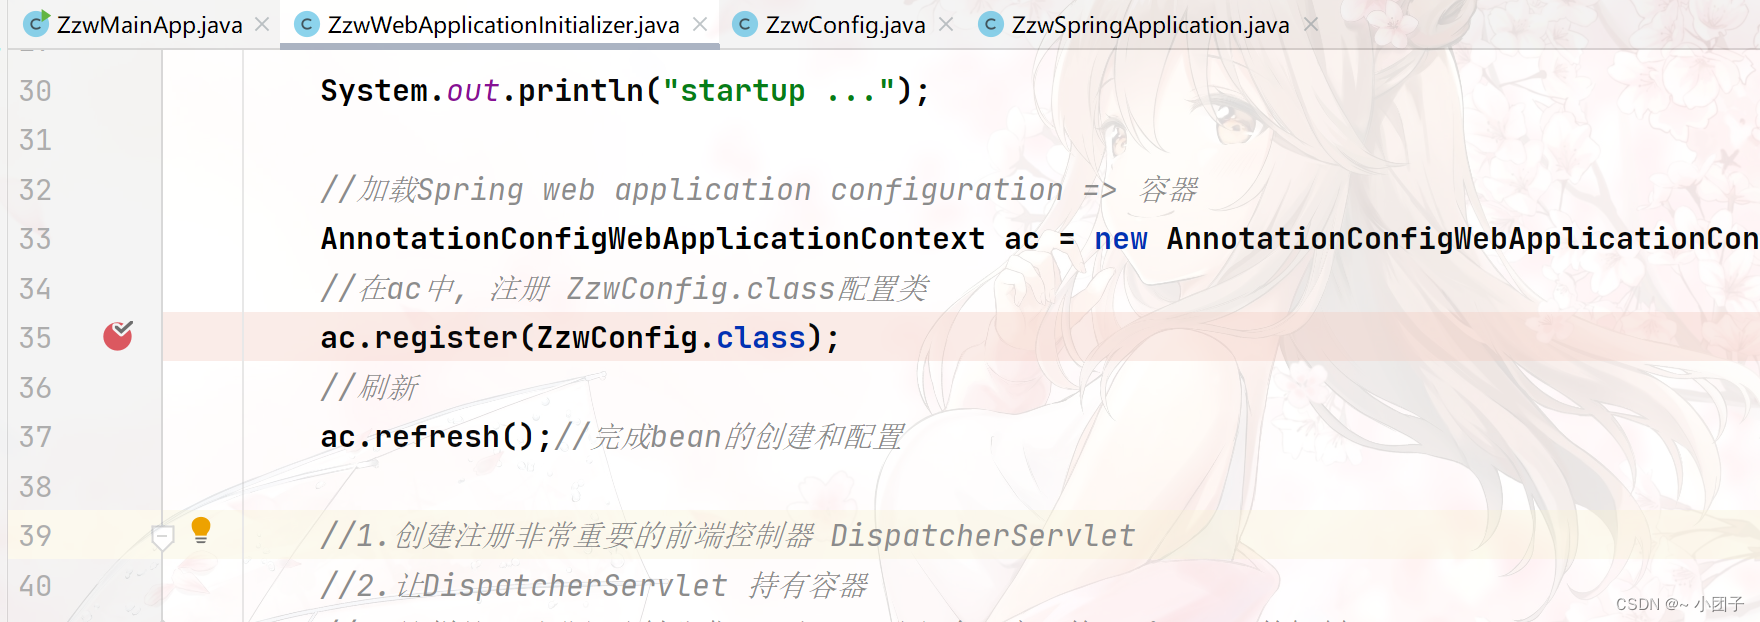
}4.新建src/main/java/com/zzw/zzwspringboot/ZzwWebApplicationInitializer.java
java
/**
* 解读
* 1.创建我们的Spring容器, Initializer-初始化器
* 2.加载/关联Spring容器的配置-按照注解的方式
* 3.完成Spring容器配置的bean的创建, 依赖注入
* 4.创建前端控制器 DispatcherServlet, 并让其持有Spring容器
* 5.当 DispatcherServlet 持有容器, 就可以进行分发映射, 回忆实现SpringMVC底层机制
* 6.这里onStartup 是Tomcat调用, 并把ServletContext 对象传入
*/
public class ZzwWebApplicationInitializer implements WebApplicationInitializer {
@Override
public void onStartup(ServletContext servletContext) throws ServletException {
System.out.println("startup ...");
//加载Spring web application configuration => 容器
//自己实现的Spring容器叫做 ZzwSpringApplicationContext
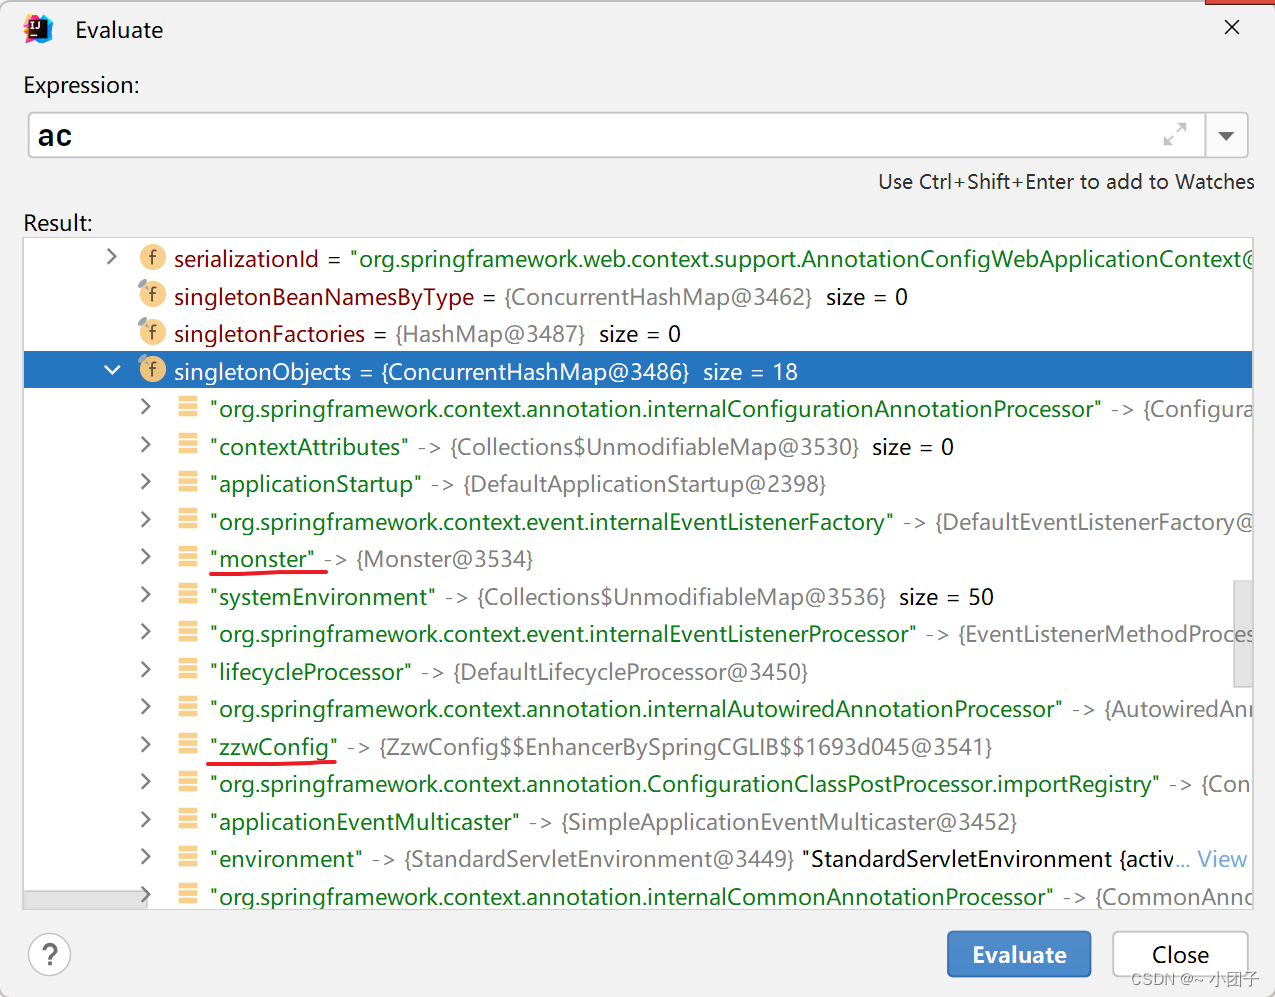
AnnotationConfigWebApplicationContext ac = new AnnotationConfigWebApplicationContext();
//在ac中, 注册 ZzwConfig.class配置类
ac.register(ZzwConfig.class);
//刷新
ac.refresh();//完成bean的创建和配置
//1.创建注册非常重要的前端控制器 DispatcherServlet
//2.让DispatcherServlet 持有容器
//3.这样就可以进行映射分发, 回忆一下我们自己实现的SpringMVC的机制
DispatcherServlet dispatcherServlet = new DispatcherServlet(ac);
//返回了ServletRegistration.Dynamic 对象
ServletRegistration.Dynamic registration
= servletContext.addServlet("app", dispatcherServlet);
//当tomcat启动时,加载 dispatcherServlet
registration.setLoadOnStartup(1);
//拦截请求, 并进行分发处理
//这里再提示一下 / 和 /* 的区别
registration.addMapping("/");
}
}实现任务阶段3-将Tomcat 和 Spring容器关联, 并启动Spring容器
🥦说明:将Tomcat 和 Spring容器关联, 并启动Spring容器
🥦分析+代码实现
1.修改src/main/java/com/zzw/zzwspringboot/ZzwSpringApplication.java
java
public class ZzwSpringApplication {
    //这里我们会创建Tomcat对象, 并关联Spring容器, 并启动
    public static void run() {
        try {
            //创建Tomcat对象
            Tomcat tomcat = new Tomcat();

            //1. 让tomcat可以将请求转发到spring web容器, 因此需要进行关联
            //2. "/zzwboot" 就是我们项目的 application context, 就是我们原来配置tomcat时, 指定的 application context
            //3. "E:\idea_project\zzw_springboot\zzw-springboot" 指定项目的目录
            tomcat.addWebapp("/zzwboot", "E:\\idea_project\\zzw_springboot\\zzw-springboot");

            //设置9090端口
            tomcat.setPort(9090);
            //启动, 就会在9090端口监听
            tomcat.start();
            //等待请求接入
            System.out.println("====9090 等待请求接入====");
            tomcat.getServer().await();
        } catch (Exception e) {
            throw new RuntimeException(e);
        }
    }
}
2.debug运行一下, 这时会报错, 解决方案
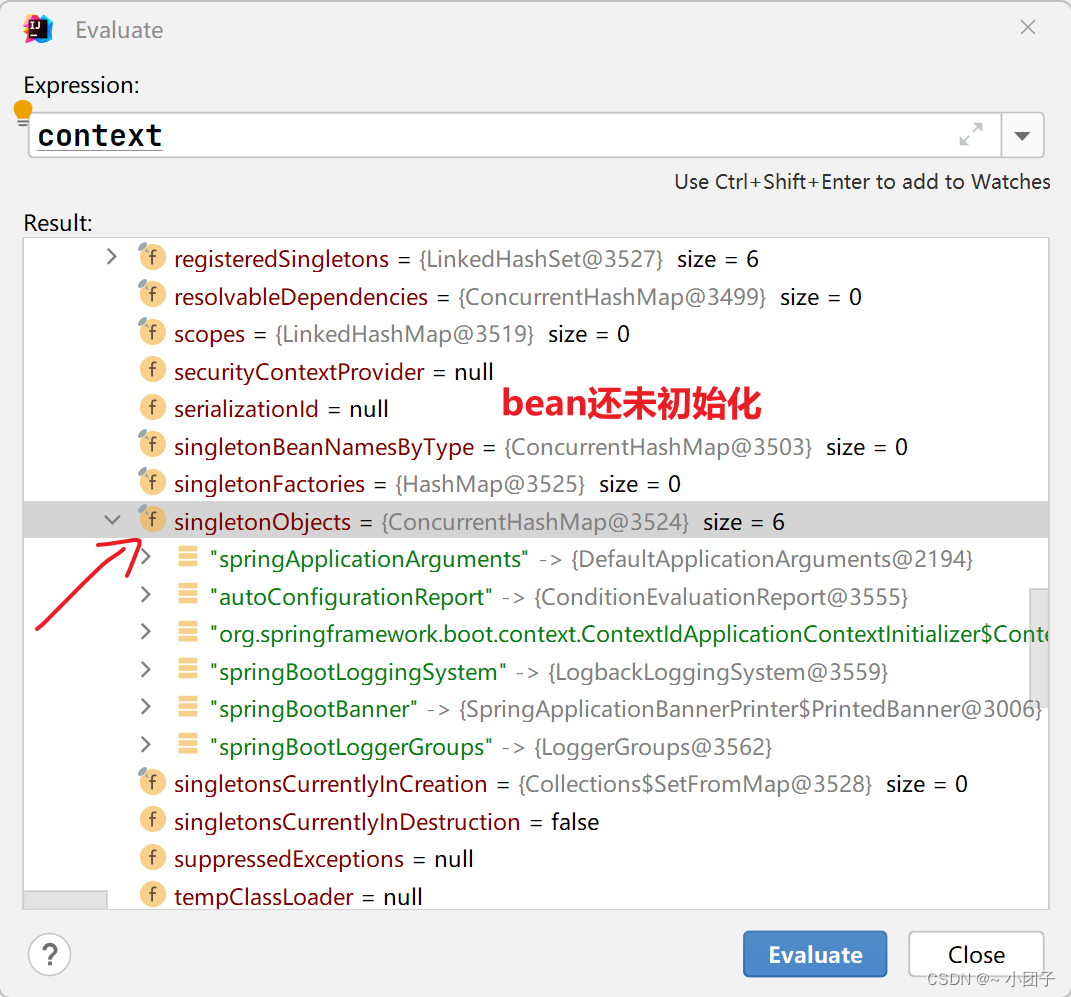
refresh()负责注入初始化相关bean, 在未执行refresh方法前, spring容器是没有bean的
初始化后, 容器中有了bean文件
🥦完成测试
1.拿掉断点, 运行程序
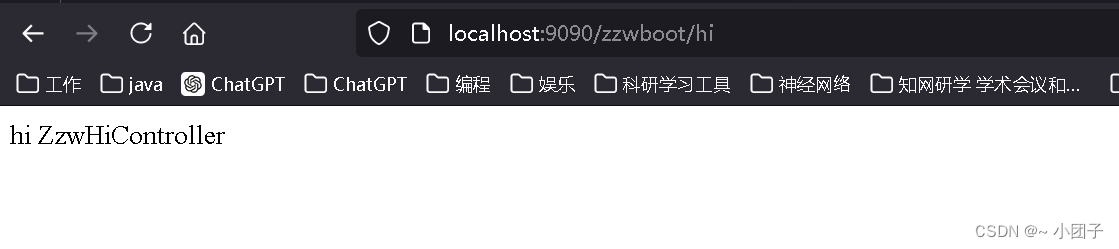
2.浏览器请求 http://localhost:9090/zzwboot/hi
🥦注意事项和细节
1.如果启动包异常, 如下:
严重: Servlet jsp in web application /zzwboot threw load() exception
java.lang.ClassNotFoundException: org.apache.jasper.servlet.JspServlet
2.解决方案: 引入对应版本的jasper包即可, 修改E:\idea_project\zzw_springboot\zzw-springboot\pom.xml
xml
<dependency>
    <groupId>org.apache.tomcat</groupId>
    <artifactId>tomcat-jasper</artifactId>
    <version>8.5.75</version>
</dependency>
Lombok
Lombok介绍
●Lombok介绍
1.简化JavaBean开发, 可以使用Lombok的注解让代码更加简洁. mybatis中学习过
2.Java项目中, 很多没有技术含量又必须存在的代码, POJO的getter/setter/toString;异常处理;I/O流的关闭操作等等,这些代码既没有技术含量,又影响着代码的美观,Lombok应运而生。
●SpringBoot和IDEA官方支持
1.IDEA 2020已经内置了Lombok插件
2.SpringBoot 2.1.x之后的版本也在Starter中内置了Lombok依赖
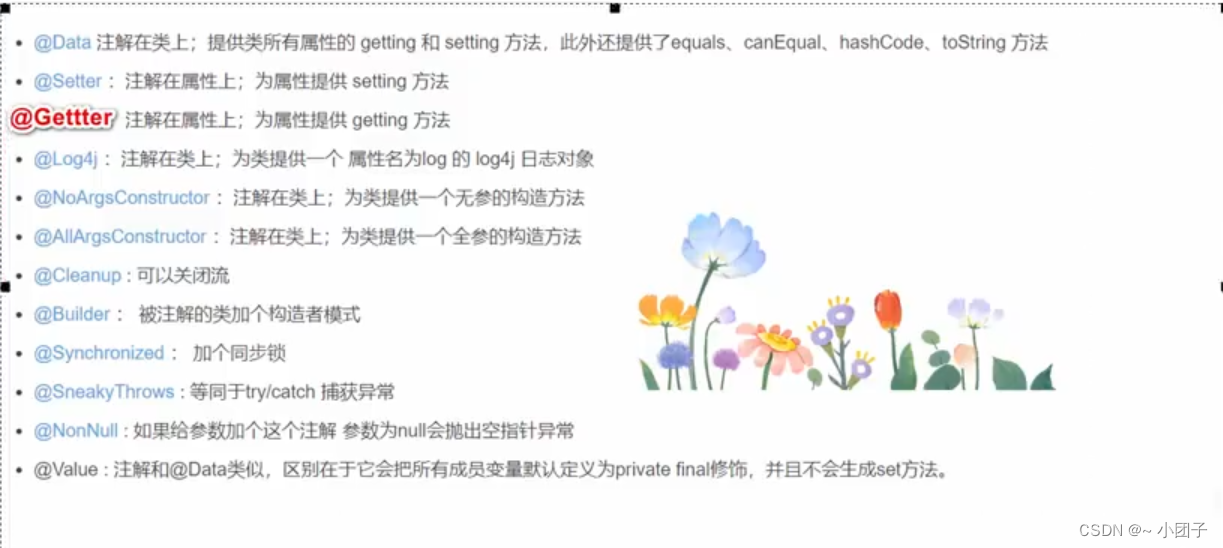
Lombok常用注解
Lombok应用实例
代码实现
●需求说明
回到我们的 quickstart 项目, 使用Lombok简化Furn.java代码, 让代码简洁高效
1.在pom.xml中引入lombok
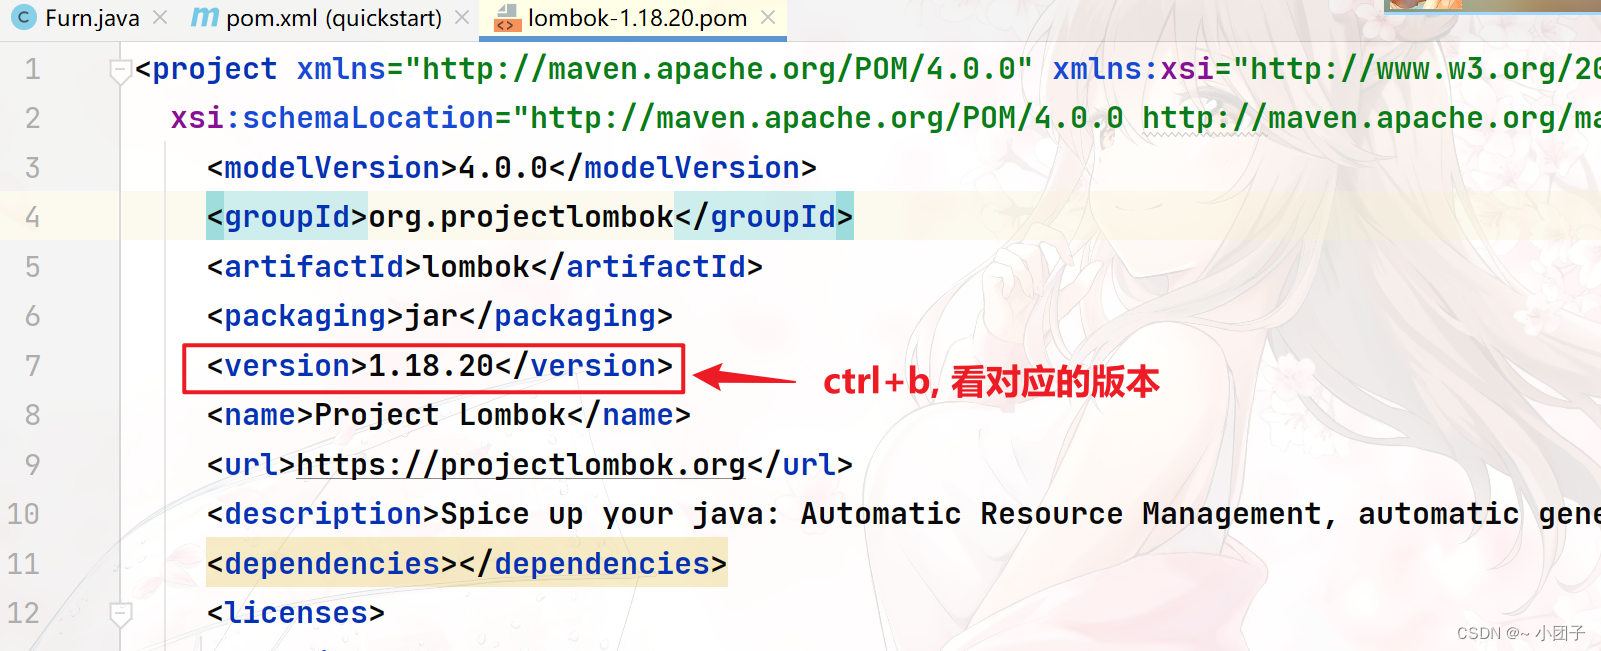
引入lombok, 版本在spring-boot-dependencies-2.5.3.pom已经指定了, 把光标放在lombok, ctrl+b 可以看到. springboot依赖管理
2.修改Furn.java, 使用Lombok注解简化代码. 提示: 可以通过idea自带的反编译功能, 看Furn.class的源代码
java
@Component
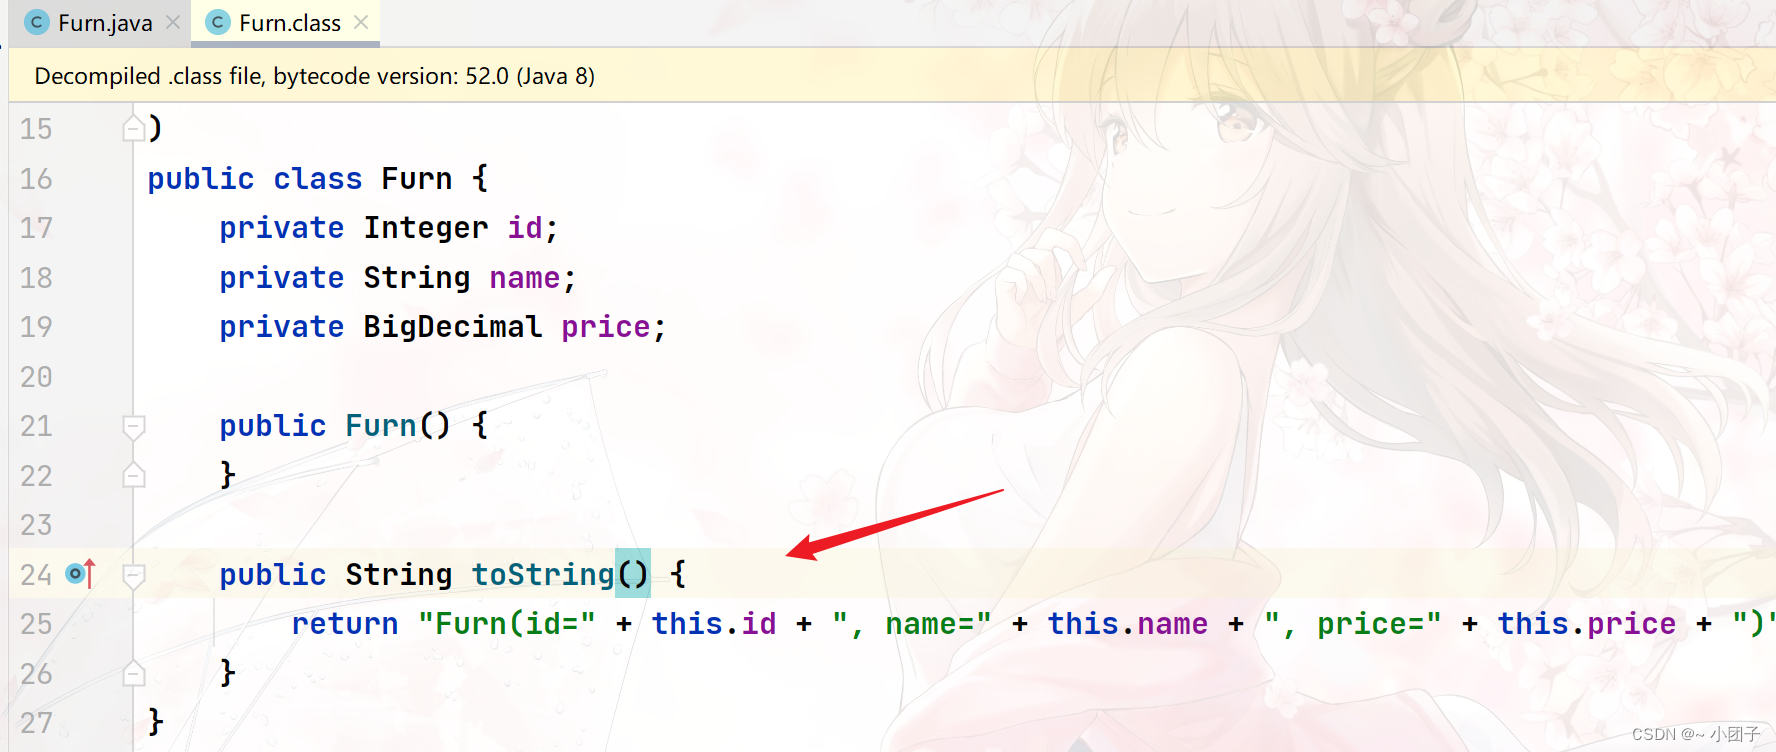
@ToString //编译时, 生成toString方法, 默认情况下, 会生成一个无参构造器
@ConfigurationProperties(prefix = "furn01")
public class Furn {
private Integer id;
private String name;
private BigDecimal price;
}
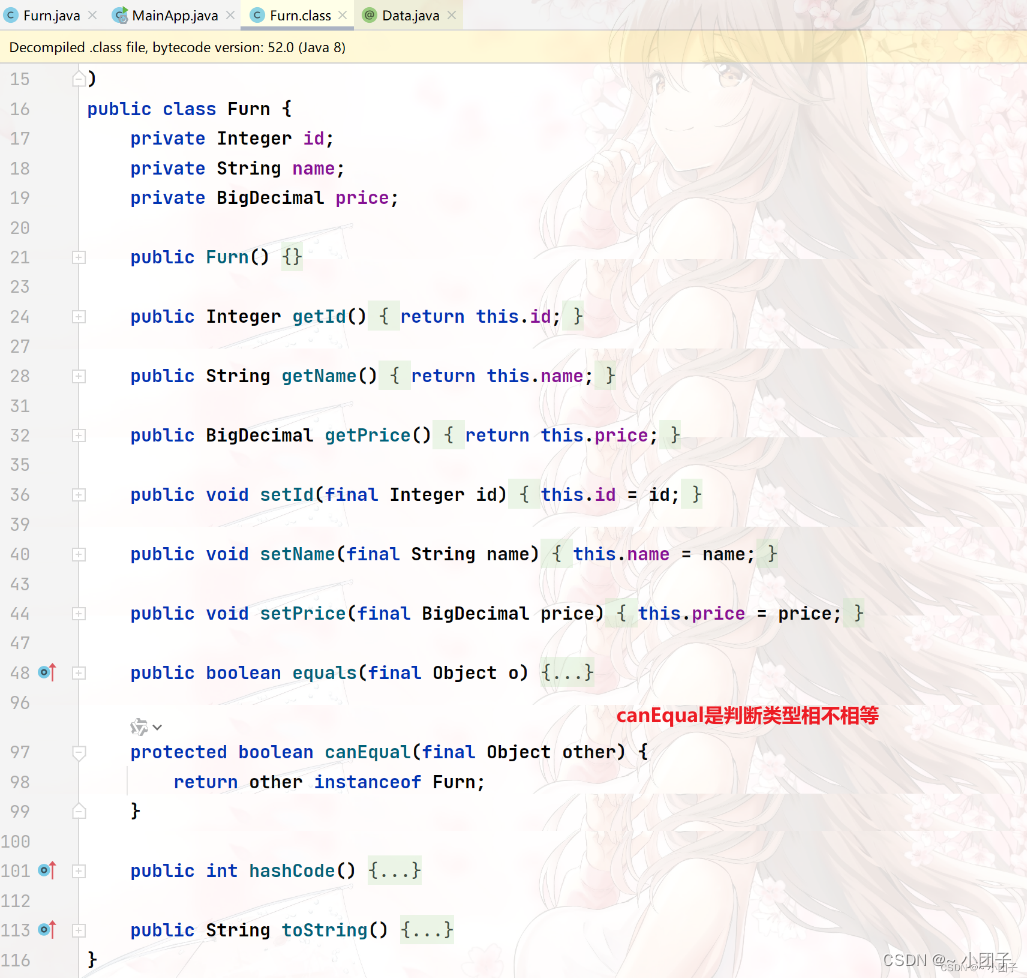
3.@Data注解
java
@Component
@ConfigurationProperties(prefix = "furn01")
/**
 * 说明:
 * 1. Equivalent to {@code @Getter @Setter @RequiredArgsConstructor @ToString @EqualsAndHashCode}.
 * 2. @Data 注解等价使用了 如下注解
 * @Getter @Setter @RequiredArgsConstructor @ToString @EqualsAndHashCode
 * 3. @RequiredArgsConstructor, 单独地说一下
 */
@Data
public class Furn {
    private Integer id;
    private String name;
    private BigDecimal price;
}
编译后
4.@RequiredArgsConstructor详解
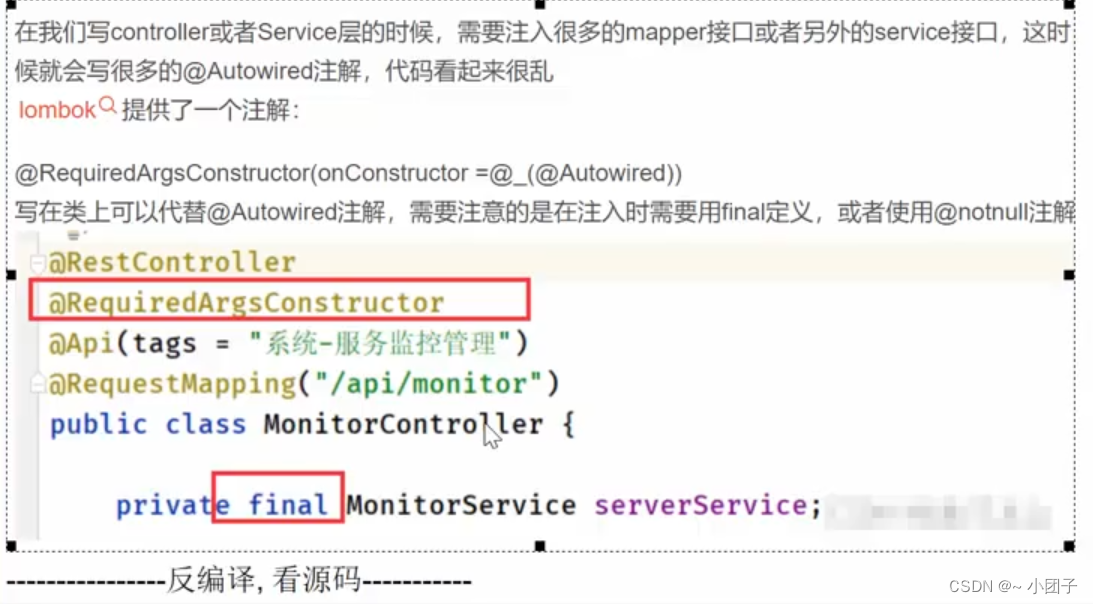
在我们写controller或者Service层的时候,需要注入很多的mapper接口或者另外的service接口,这时候就会写很多的@Autowired注解,代码看起来很乱
lombok提供了一个注解:
@RequiredArgsConstructor(onConstructor = @_(@Autowired))
写在类上可以代替@Autowired注解,需要注意的是在注入时需要用final定义,或者使用@notnull注解
5.@NoArgsConstructor详解