本节内容
- 概述
- 初始化仓库
- 定义数据
- 访问数据
- 修改数据
- 处理异步
- 派生数据
- 模块拆分
- 案例-购物车
概述
vuex是一个vue的状态管理工具, 状态就是数据
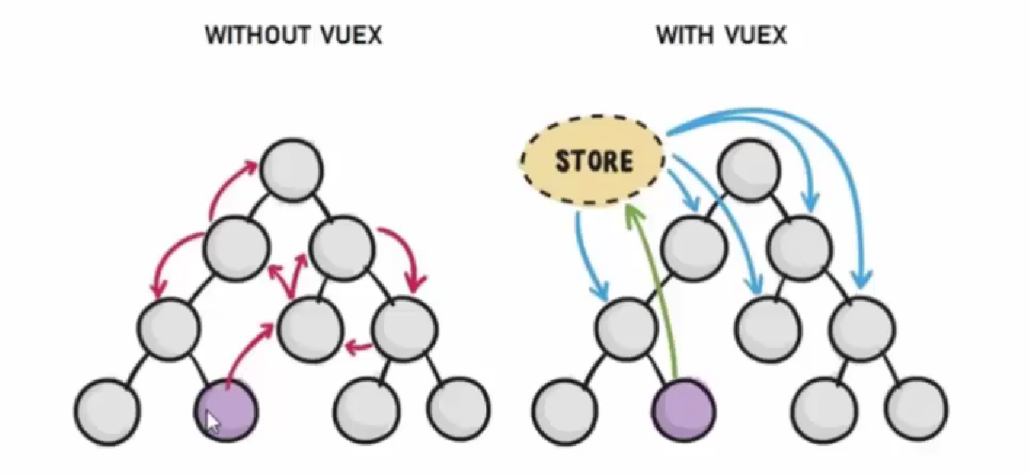
场景
- 某个状态在很多个组件使用 (个人信息)
- 多个组件 共同维护 一份数据 (购物车)
优势
- 数据集中式管理
- 数据响应式变化
初始化仓库
-
安装vuex: yarn add vuex@3
-
创建仓库
// 这里面存放的就是 vuex 相关的核心代码
import Vue from 'vue'
import Vuex from 'vuex'// 插件安装
Vue.use(Vuex)// 创建仓库
const store = new Vuex.Store({ })// 导出给main.js使用
export default store -
挂载仓库
... ...
import store from '@/store/index'// 挂载仓库
new Vue({
render: h => h(App),
store
}).$mount('#app')
定义数据
stata提供唯一的公共数据源, 所有共享的数据都要统一放在store的state中存储
... ...
// 创建仓库
const store = new Vuex.Store({
  // 严格模式 (有利于初学者,检测不规范的代码 => 上线时需要关闭)
  strict: true,
  // 通过 state 可以提供数据 (所有组件共享的数据)
  state: {
    title: '仓库大标题',
    count: 100,
    list: [1, 2, 3, 4, 5, 6, 7, 8, 9, 10]
  }

})
访问数据
1>通过store访问数据
- 获取store
-
- this.$store
- import 导入 store
- 使用store
-
- 模版中: {{ $store.state.xxx }}
- 组件逻辑中: this.$store.state.xxx
- JS模块中: store.state.xxx
2>通过辅助函数访问数据
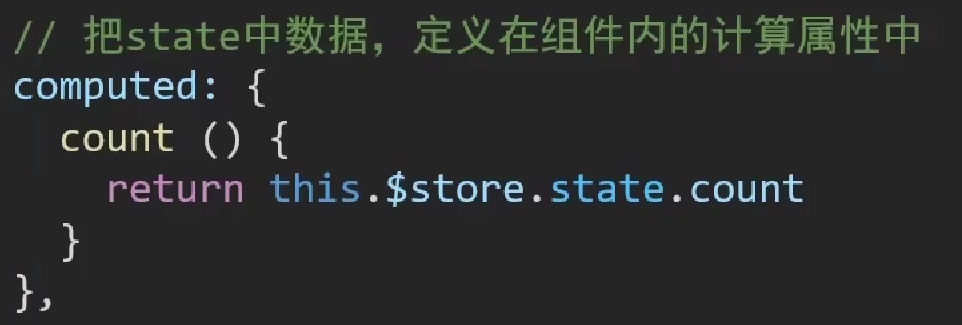
mapState是辅助函数, 帮助我们把store中的数据 自动映射 到组件的计算属性中
- 导入函数: import { mapState } from 'vuex'
- 映射数据: computed: { ...mapState(['count']) }
- 使用数据: this.count
- 辅助函数的本质就是把state中的数据定义在计算属性中, 方便使用
修改数据
vuex同样遵循单向数据流, 组件中不能直接修改仓库数据, 而是提交申请后, 由仓库修改
默认情况, 直接修改数据也不会报错, 因为额外监控损失性能, 通过 strict: true 可以开启严格模式, 监控错误语法
state数据的修改只能通过mutations
1>定义mutations方法
定义mutations对象, 对象中存放修改state的方法
... ...
const store = new Vuex.Store({
  state: {
    count: 100,
  },
  // 通过 mutations 可以提供修改数据的方法
  mutations: {
    // 所有mutation函数,第一个参数都是 state
    addCount (state, n) {
      // 修改数据
      state.count += n
    },
  },
})- 组件中提交commit调用mutations
- 语法: this.$store.commit('addCount', 10 )
- mutation函数的参数也叫载荷, 触发mutations传参也叫提交载荷(payload)
- 注意: mutation提交参数有且只能有一个,如果需要多个参数,包装成一个对象
2>通过辅助函数修改数据
mapMutations辅助函数, 可以把mutations中的方法提取出来, 映射到methods中, 更方便的使用
- 导入函数: import { mapMutations } from 'vuex'
- 映射方法: methods: { ...mapMutations(['subCount']) }
- 使用方法: this.subCount(10)
- 辅助函数的本质就是把mutations中的方法映射在methods中, 方便使用

3>输入框双向绑定
仓库的数据要遵循单向数据流, 所以输入框 绑定仓库数据 不能使用v-model
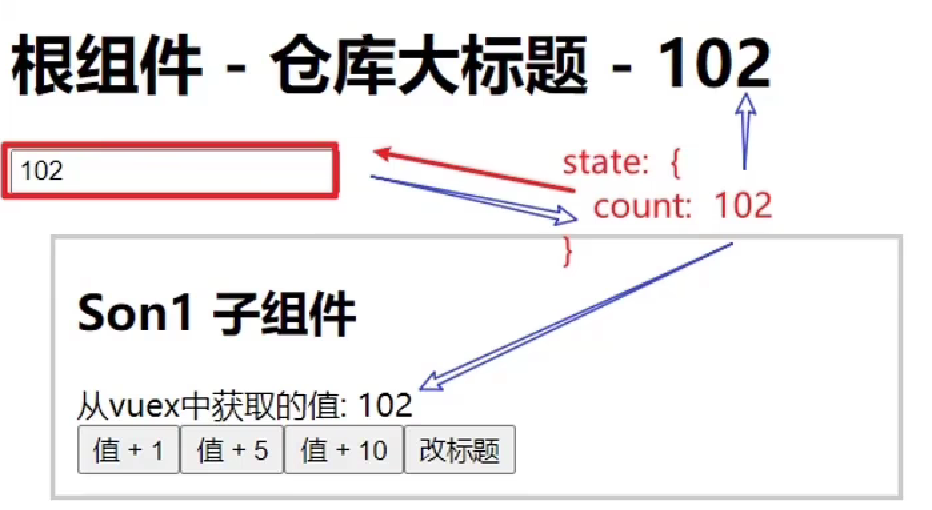
<template>
  <div id="app">
    <h1> 根组件 - {{ count }} </h1>
    <!-- 3, 使用:value绑定仓库的值 -->
    <input :value="count" @input="handleInput" type="text">
  </div>
</template>

<script>
import { mapState } from 'vuex'

export default {
  name: 'app',
  computed: {
    ...mapState(['count'])
  },
  methods: {
    handleInput (e) {
      // 1. 实时获取输入框的值
      const num = +e.target.value
      // 2. 提交mutation,调用mutation函数
      this.$store.commit('changeCount', num)
    }
  },
}
</script>

const store = new Vuex.Store({
  strict: true,
  state: {
    count: 100,
  },
  mutations: {
    // 更新 count 数据的方法
    changeCount (state, newCount) {
      state.count = newCount
    },
  },
})
处理异步
mutations必须是同步的(便于监测数据变化, 记录调试), 需要提供 actions 方法, 处理异步的相关逻辑
-
定义action方法, 处理异步的逻辑
const store = new Vuex.Store({
strict: true,
state: {
count: 100,
},mutations: {
changeCount (state, newCount) {
state.count = newCount
},
},// actions 处理异步
// 注意:不能直接操作 state,操作 state,还是需要 commit mutation
actions: {
// context上下文 (未分模块,当成store仓库, 分模块后, 当成所在模块)
// context.commit('mutation名字', 额外参数)
changeCountAction (context, num) {
// 这里是setTimeout模拟异步,以后大部分场景是发请求
setTimeout(() => {
context.commit('changeCount', num)
}, 1000)
}
},
}) -
直接dispatch调用
<template><button @click="handleChange">一秒后修改成666</button></template> <script> export default { methods: { handleChange () { this.$store.dispatch('changeCountAction', 200) } } } </script> -
mapActions 辅助函数调用
<template><button @click="handleChange">一秒后修改成666</button></template> <script> import { mapActions } from 'vuex' export default { methods: { ...mapActions(['changeCountAction']),change () { this.changeCountAction('100') }}
}
</script> -
辅助函数的本质是把actions中的方法映射到组件methods中, 方便调用

派生数据
有时需要基于state 派生出一些数据, 这些数据依赖state, 就可以使用getters
1, 定义getters方法
const store = new Vuex.Store({
  strict: true,
  state: {
    list: [1, 2, 3, 4, 5, 6, 7, 8, 9, 10]
  },

  // 4. getters 类似于计算属性
  getters: {
    // 注意点:
    // 1. 形参第一个参数,就是state
    // 2. 必须有返回值,返回值就是getters的值
    filterList (state) {
      return state.list.filter(item => item > 5)
    }
  },
})
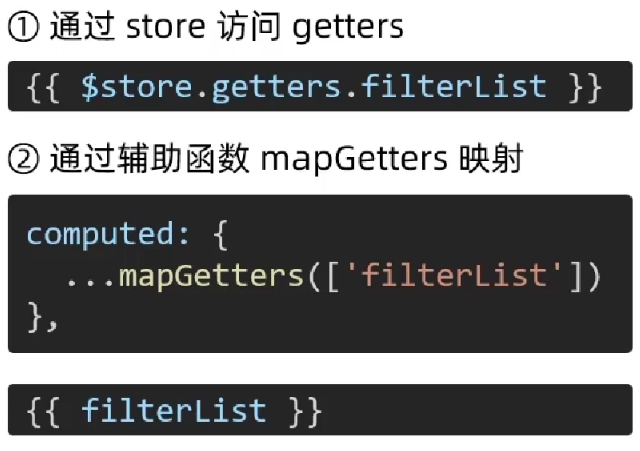
2, 访问getters数据
3, 在getters中访问getters
export default {
  namespaced: true,
  state () {
    return {
      cartList: []
    }
  },
  getters: {
    // 选中的商品
    selCartList (state) {
      return state.cartList.filter(item => item.isChecked)
    },
    // 选中的商品总数
    selCount (stat, getterse) {
      // 注意:
      // 可以在getters中,通过第二个参数, 拿到其他getters
      return getterse.selCartList.reduce((sum, item) => sum + item.goods_num, 0)
    },
  }
}
模块拆分
由于vuex使用单一状态树, 应用的所有状态都会集中到一个大的对象, 当应用复杂时, store对象就会相当臃肿
步骤
-
新建子模块
// user模块
const state = {
userInfo: {
name: 'zs',
age: 18
},
score: 80
}
const mutations = { }
const actions = { }
const getters = { }export default {
state,
mutations,
actions,
getters
} -
挂载子模块
// 1,引入子模块
import user from './modules/user'const store = new Vuex.Store({
... ...// 2. 通过modules挂载子模块
modules: {
user,
}
}) -
检测: 查看调试工具
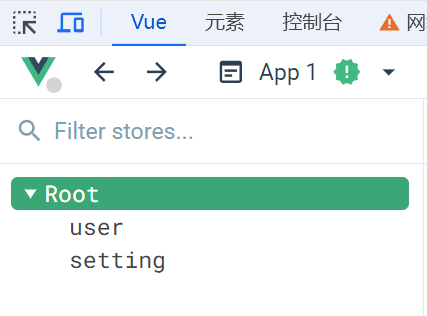
开启命名空间
子模块开启命名名后, 每个子模块之间相互隔离, 访问子模块数据时, 会更加清晰
export default {
  // 开启子模块命名空间
  // 好处:数据独立,更加清晰
  namespaced: true,
  state,
  mutations,
  actions,
  getters
}
访问子模块数据
尽管已经分模块了, 但其实子模块的数据, 还是会挂载到根级别的 state中, 属性名就是模块名
- 直接通过模块名访问
- 通过mapState映射数据
- 不开启命名空间: mapState(['xxx'])
- 开启命名空间: mapState('模块名', ['xxx']) (推荐)
修改子模块数据
mutation会被挂载到全局, 需要开启命名空间, 才会挂载到子模块
- 直接通过store访问
- $store.commit('模块名/xxx', 额外参数)
- 通过mapMutations映射
- 不开启命名空间: mapMutations(['xxx'])
- 开启命名空间: mapMutations('模块名', ['xxx']) (推荐)
异步修改子模块数据
action会被挂载到全局, 需要开启命名空间, 才会挂载到子模块
- 直接通过store访问
- $store.dispatch('模块名/xxx', 额外参数)
- 通过mapActions映射
- 不开启命名空间: mapActions(['xxx'])
- 开启命名空间: mapActions('模块名', ['xxx']) (推荐)
访问子模块getters
- 直接通过模块名访问
- $store.store.getters['模块名/xxx']
- 通过mapGetters映射
- 不开启命名空间: mapGetters(['xxx'])
- 开启命名空间: mapGetters('模块名', ['xxx']) (推荐)
跨模块调用mutations
export default {
  namespaced: true,
  state () {
    return {
      // 个人权证相关
      userInfo: getInfo()
    }
  },
  mutations: {
    // 设置用户信息
    SET_USER_INFO (state, userInfo) {
      state.userInfo = userInfo
      setInfo(userInfo) // 存储用户信息到本地
    }
  },
  actions: {
    // 退出登录
    logout ({ commit }) {
      // 清空个人信息
      commit('SET_USER_INFO', {})
      // 情况购物车信息(跨模块调用mutations)
      // commit('模块名/方法名', 传值/null, { root: true(开启全局) })
      commit('cart/setCartList', [], { root: true })
    }
  },
  getters: {}
}
案例-购物车
效果展示

功能分析
- 请求动态渲染购物车, 数据存veux
- 数据框控件 修改数据
- 动态计算总价和总数量
搭建环境
通过脚手架新建项目, 清空src文件夹, 替换准备好的素材
mock数据
基于 json-server 工具, 模拟后端接口服务
-
- 全局安装: npm install json-server -g
- 代码根目录新建db文件夹
- 准备index.json文件, 放入db目录
- 进入db目录, 执行命令启动接口服务: json-server index.json
- 访问接口测试: http://localhost:3000/cart
创建cart模块
export default {
  // 开启命名空间
  namespaced: true,
  // 分模块存储, 官方建议使用函数方式提供数据
  state () {
    return {
      list: []
    }
  }
}

import cart from './modules/cart'

export default new Vuex.Store({
  modules: {
    cart
  }
})
请求数据渲染
import axios from 'axios'
export default {
  // 开启命名空间
  namespaced: true,
  // 数据源
  state () {
    return {
      list: []
    }
  },
  mutations: {
    // 同步更新数据
    updataList (state, list) {
      state.list = list
    }
  },
  actions: {
    // 异步请求数据
    async getList (context) {
      const res = await axios.get('http://localhost:3000/cart')
      context.commit('updataList', res.data)
    }
  },
  getters: {
  }
}

<template>
  <div class="app-container">
    ... ...
    <!-- 商品 Item 项组件 -->
    <cart-item v-for="item in list" :key="item.id" :item="item"></cart-item>
    ... ...
  </div>
</template>

<script>
import { mapState } from 'vuex'

export default {
  name: 'App',
  created () {
    // 触发异步请求
    this.$store.dispatch('cart/getList')
  },
  computed: {
    // 映射仓库数据
    ...mapState('cart', ['list'])
  }
}
</script>
修改数量
import axios from 'axios'
export default {
  // 开启命名空间
  namespaced: true,
  // 数据源
  state () {
    return {
      list: []
    }
  },
  mutations: {
    updataItem (state, obj) {
      const goods = state.list.find(item => item.id === obj.id)
      goods.count = obj.newNnm
    }
  },
  actions: {
    async updateList (context, obj) {
      // 修改后台数据
      const res = await axios.get(`http://localhost:3000/cart/${obj.id}`, {
        count: obj.newNnm
      })
      // 更新仓库数据
      context.commit('updataItem', obj)
    }
  },
}

<template>
  <div class="goods-container">
    ...
    <div class="btns">
          <!-- 按钮区域 -->
          <button class="btn btn-light" @click="changNum(-1)">-</button>
          <span class="count">{{ item.count }}</span>
          <button class="btn btn-light" @click="changNum(1)">+</button>
      </div>
    ...
  </div>
</template>

<script>
export default {
  name: 'CartItem',
  props: {
    item: {
      type: Object,
      required: true
    }
  },
  methods: {
    changNum (n) {
      const newNnm = this.item.count + n
      const id = this.item.id
      if (newNnm === 0) return
      this.$store.dispatch('cart/updateList', { id, newNnm })
    }
  }
}
</script>
计算底部数据
export default {
  ... ...
  getters: {
    total (state) {
      return state.list.reduce((sum, item) => sum + item.count, 0)
    },

    totalPrice (state) {
      return state.list.reduce((sum, item) => sum + item.count * item.price, 0)
    }
  }
}

<template>
  <div class="footer-container">
    <!-- 中间的合计 -->
    <div>
      <span>共 {{ total }} 件商品,合计:</span>
      <span class="price">¥{{ totalPrice }}</span>
    </div>
    ... ...
  </div>
</template>

<script>
import { mapGetters } from 'vuex'
export default {
  name: 'CartFooter',
  computed: {
    ...mapGetters('cart', ['total', 'totalPrice'])
  }
}
</script>