UI学习
UITableView基础
UITableView作为iOS中的一个控件,用于以表格形式展示数据。例如通讯录好友,朋友圈信息等,都是UITableView的实际运用场景。
首先我们先要加入两个协议:UITableViewDelegate,UITableViewDataSource
在这两个协议中,有必须实现的四个协议方法:
- (NSInteger)tableView:(UITableView *)tableView numberOfRowsInSection:(NSInteger)section:获取每组元素的个数-(NSInteger) numberOfSectionsInTableView:(UITableView *)tableView:获取每组元素的行数- (UITableViewCell *)tableView:(UITableView *)tableView cellForRowAtIndexPath:(NSIndexPath *)indexPath:创建单元格对象函数。
然后我们现在接口文件中添加协议和UITableView对象
objectivec
#import <UIKit/UIKit.h>

@interface ViewController : UIViewController
<
//实现数据视图的普通协议
//数据视图的普通事件处理
UITableViewDelegate,
//实现数据视图的数据代理协议
//实现数据视图的数据代理
UITableViewDataSource
>
{
    //定义一个数据视图对象
    //数据视图用来显示大量相同格式的大量信息的视图
    //例如:电话通讯录,QQ好友,朋友圈信息
    //相同格式信息内容不同
    UITableView *_tablelView;
}

@end
然后我们在实现部分创建数据视图并实现协议函数
objectivec
#import "ViewController.h"
@interface ViewController ()
@end
@implementation ViewController
- (void)viewDidLoad {
[super viewDidLoad];
// Do any additional setup after loading the view.
//创建数据视图,传入两个参数
//参一:数据视图的位置
//参二:数据视图的风格
//UITableViewStylePlain:普通风格
//UITableViewStyleGrouped:分组风格
_tablelView = [[UITableView alloc] initWithFrame:self.view.bounds style:UITableViewStyleGrouped];
//设置数据视图的代理对象
_tablelView.delegate = self;
//设置数据视图的数据源对象
_tablelView.dataSource = self;
[self.view addSubview:_tablelView];
}
//获取每组元素的个数(行数)
//必须要实现的协议函数
//程序在显示数据视图是会调用此函数
//返回值:表示每组元素的个数
//P1:数据视图对象本身
//P2:哪一组需要的行数
- (NSInteger)tableView:(UITableView *)tableView numberOfRowsInSection:(NSInteger)section
{
return 6;
}
-(NSInteger) numberOfSectionsInTableView:(UITableView *)tableView
{
return 4;
}
//创建单元格对象函数
- (UITableViewCell *)tableView:(UITableView *)tableView cellForRowAtIndexPath:(NSIndexPath *)indexPath
{
NSString *cellStr = @"cell";
UITableViewCell *cell = [_tablelView dequeueReusableCellWithIdentifier:cellStr];
if (cell == nil) {
//创建一个单元格对象
//参一:单元格的样式
//参二:单元格的复用标记
cell = [[UITableViewCell alloc] initWithStyle:UITableViewCellStyleDefault reuseIdentifier:cellStr];
}
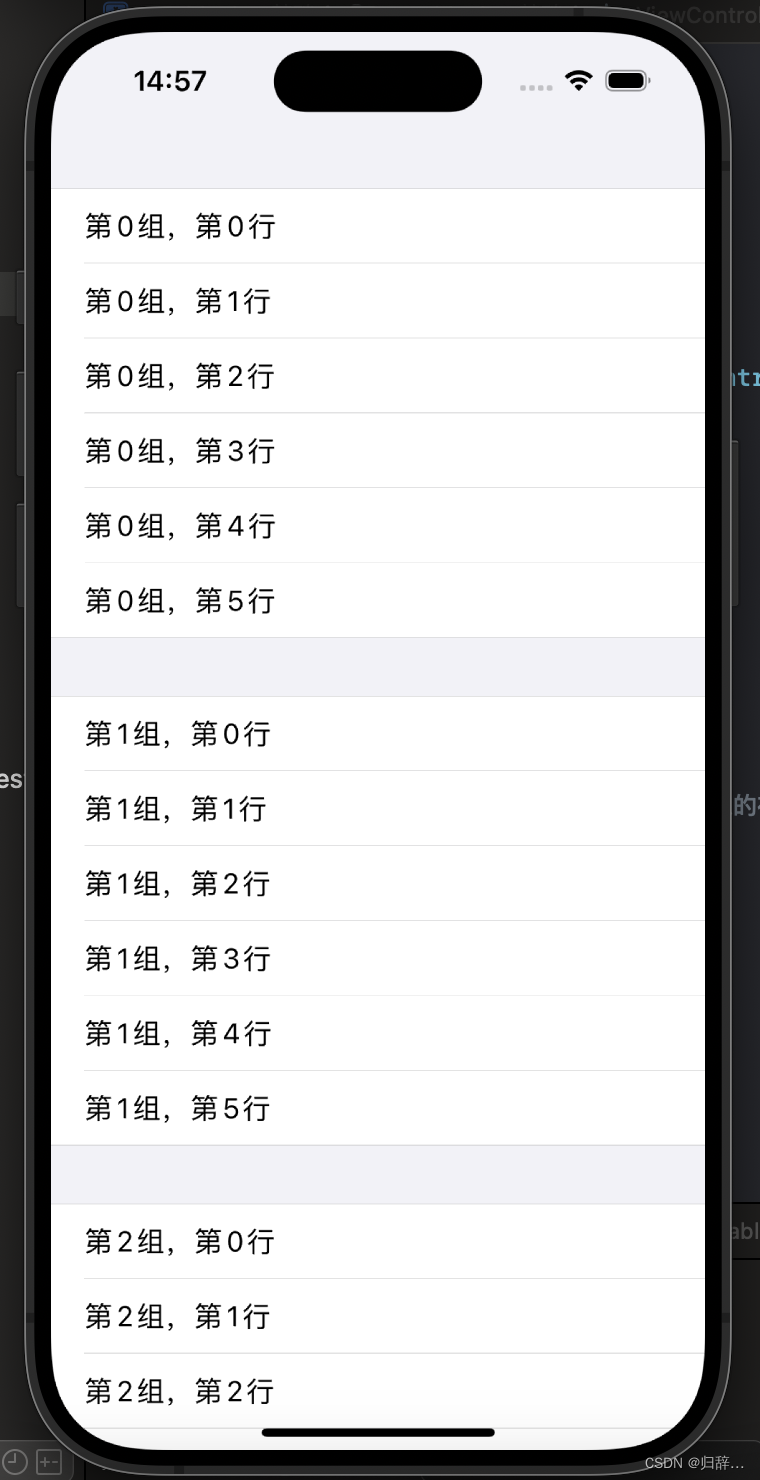
NSString *str = [NSString stringWithFormat:@"第%ld组,第%ld行", indexPath.section, indexPath.row];
//将单元格的主文字内容赋值
cell.textLabel.text = str;
return cell;
}
@end效果:
UITableView协议
我们在此处学习如下几个协议:
- (CGFloat) tableView:(UITableView *)tableView heightForRowAtIndexPath:(NSIndexPath *)indexPath:获取单元格高度-(NSString*) tableView:(UITableView *)tableView titleForHeaderInSection:(NSInteger)section:获取每组头部标题-(NSString*) tableView:(UITableView *)tableView titleForFooterInSection:(NSInteger)section:获取每组尾部标题- (CGFloat) tableView:(UITableView *)tableView heightForHeaderInSection:(NSInteger)section:获取头部高度-(CGFloat) tableView:(UITableView *)tableView heightForFooterInSection:(NSInteger)section:获取尾部高度
我们省略接口部分,给出实现部分并将上述协议实现:
objectivec
#import "ViewController.h"
@interface ViewController ()
@end
@implementation ViewController
- (void)viewDidLoad {
[super viewDidLoad];
// Do any additional setup after loading the view.
//创建数据视图对象
_tableView = [[UITableView alloc] initWithFrame:self.view.bounds style:UITableViewStyleGrouped];
//设置代理对象
_tableView.delegate = self;
//设置数据代理对象
_tableView.dataSource = self;
//数据视图显示
[self.view addSubview:_tableView];
//创建一个可变数组
_arrayData = [[NSMutableArray alloc] init];
for (int i = 'A'; i <= 'Z'; i++) {
//定义小数组
NSMutableArray *arraySmall = [[NSMutableArray alloc] init];
for (int j = 1; j <= 5 ; j++) {
NSString *str = [NSString stringWithFormat:@"%c%d", i, j];
[arraySmall addObject:str];
}
//生成一个二维数组
[_arrayData addObject:arraySmall];
}
}
//获取组数
-(NSInteger) numberOfSectionsInTableView:(UITableView *)tableView
{
return _arrayData.count;
}
//获取每组的元素个数
-(NSInteger) tableView:(UITableView *)tableView numberOfRowsInSection:(NSInteger)section
{
NSInteger numRow = [[_arrayData objectAtIndex:section] count];
return numRow;
}
-(UITableViewCell*) tableView:(UITableView *)tableView cellForRowAtIndexPath:(NSIndexPath *)indexPath
{
NSString *str = @"cell";
UITableViewCell *cell = [_tableView dequeueReusableCellWithIdentifier:str];
if (cell == nil) {
cell = [[UITableViewCell alloc] initWithStyle:UITableViewCellStyleDefault reuseIdentifier:str];
}
cell.textLabel.text = _arrayData[indexPath.section][indexPath.row];
return cell;
}
//获取高度
- (CGFloat) tableView:(UITableView *)tableView heightForRowAtIndexPath:(NSIndexPath *)indexPath
{
return 100;
}
//获取每组头部标题
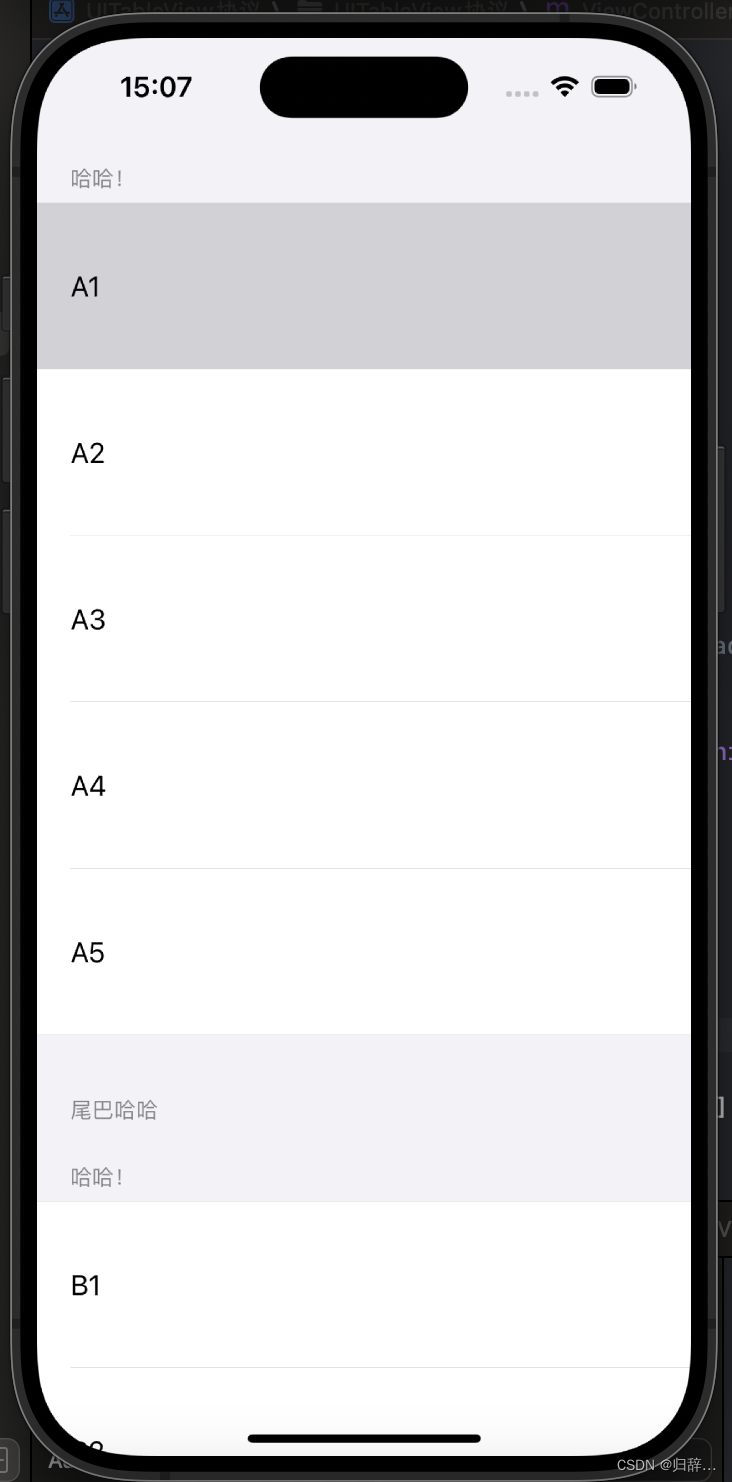
-(NSString*) tableView:(UITableView *)tableView titleForHeaderInSection:(NSInteger)section
{
return @"哈哈!";
}
//获取每组尾部标题
-(NSString*) tableView:(UITableView *)tableView titleForFooterInSection:(NSInteger)section
{
return @"尾巴哈哈";
}
//获取头部高度
- (CGFloat) tableView:(UITableView *)tableView heightForHeaderInSection:(NSInteger)section
{
return 40;
}
//获取尾部高度
-(CGFloat) tableView:(UITableView *)tableView heightForFooterInSection:(NSInteger)section
{
return 60;
}
@end注意:这些协议函数是可选择实现的
效果:
UITableView高级协议与单元格
我们在此处学习以下高级协议:
- (UITableViewCellEditingStyle) tableView:(UITableView *)tableView editingStyleForRowAtIndexPath:(NSIndexPath *)indexPath:单元格显示效果协议- (void) tableView:(UITableView *)tableView commitEditingStyle:(UITableViewCellEditingStyle)editingStyle forRowAtIndexPath:(NSIndexPath *)indexPath:当手指在单元格上移动时,显示编辑状态- (void) tableView:(UITableView *)tableView didSelectRowAtIndexPath:(NSIndexPath *)indexPath:选中单元格-(void) tableView:(UITableView *)tableView didDeselectRowAtIndexPath:(NSIndexPath *)indexPath:取消所选单元格,需要在已选择单元格后再选另一单元格后调用。
我们先在接口文件中创建对象,并在SceneDelegate文件里添加导航控制器。
objectivec
#import <UIKit/UIKit.h>

@interface ViewController : UIViewController
<UITableViewDelegate,
UITableViewDataSource
>

{
    //数据视图
    UITableView *_tableView;
    //数据源
    NSMutableArray* _arrayData;

    //添加导航按钮
    UIBarButtonItem *btnEdit;
    UIBarButtonItem *btnFinish;
    UIBarButtonItem *btnDelete;
    //设置编辑状态
    BOOL isEdit;
}
@end
然后,我们在实现部分中,完成对导航栏按钮的创建。并且实现高级协议。
objectivec
#import "ViewController.h"

@interface ViewController ()

@end

@implementation ViewController

- (void)viewDidLoad {
    [super viewDidLoad];
    // Do any additional setup after loading the view.

    _tableView = [[UITableView alloc] initWithFrame:self.view.bounds style:UITableViewStylePlain];

    //自动调整子视图大小
    _tableView.autoresizingMask = UIViewAutoresizingFlexibleHeight | UIViewAutoresizingFlexibleWidth;

    //设置代理
    _tableView.delegate = self;
    _tableView.dataSource = self;

    //数据视图的头部视图的设定
    _tableView.tableHeaderView = nil;
    //数据视图的尾部视图
    _tableView.tableFooterView = nil;

    [self.view addSubview:_tableView];

    //初始化数据源数组

    _arrayData = [[NSMutableArray alloc] init];

    for (int i = 1; i < 20; i++) {
        NSString *str = [NSString stringWithFormat:@"A %d",i];

        [_arrayData addObject:str];
    }

    //当数据的数据源发生变化时,
    //更新数据视图,重新加载数据
    [_tableView reloadData];

    [self createBtn];
}

-(NSInteger) tableView:(UITableView *)tableView numberOfRowsInSection:(NSInteger)section
{
    return _arrayData.count;
}

//默认情况下
-(NSInteger) numberOfSectionsInTableView:(UITableView *)tableView
{
    return 1;
}

-(UITableViewCell*) tableView:(UITableView *)tableView cellForRowAtIndexPath:(NSIndexPath *)indexPath
{
    NSString *strID = @"ID";

    //尝试获取可以复用的单元格
    //如歌得不到,返回nil
    UITableViewCell *cell = [_tableView dequeueReusableCellWithIdentifier:strID];

    //需要显示子标题必须为UITableViewCellStyleSubtitle
    if (cell == nil) {
        cell = [[UITableViewCell alloc] initWithStyle:UITableViewCellStyleSubtitle reuseIdentifier:strID];
    }

    //单元格文字赋值
    cell.textLabel.text = [_arrayData objectAtIndex:indexPath.row];

    cell.detailTextLabel.text = @"儿子标题";

    NSString *str = [NSString stringWithFormat:@"%d.jpg",(indexPath.row % 10 + 1)];

    UIImage *image = [UIImage imageNamed:str];

    UIImageView *iView = [[UIImageView alloc] initWithImage:image];

    cell.imageView.image = image;
    // UIImageView *iView = [[UIImageView alloc] initWithImage:image]
    //设置默认的图标信息
    return cell;


}

-(void) createBtn
{
    isEdit = NO;

    btnEdit = [[UIBarButtonItem alloc] initWithTitle:@"编辑" style:UIBarButtonItemStylePlain target:self action:@selector(pressEdit)];
    btnFinish = [[UIBarButtonItem alloc] initWithTitle:@"完成" style:UIBarButtonItemStylePlain target:self action:@selector(pressFinish)];
    btnDelete = [[UIBarButtonItem alloc] initWithTitle:@"删除" style:UIBarButtonItemStylePlain target:self action:@selector(pressDelete)];

    self.navigationItem.rightBarButtonItem = btnEdit;

}

-(void) pressEdit
{
    isEdit = YES;
    self.navigationItem.rightBarButtonItem = btnFinish;
    [_tableView setEditing:YES];
    self.navigationItem.leftBarButtonItem = btnDelete;

}

-(void) pressFinish
{
    isEdit = NO;
    self.navigationItem.rightBarButtonItem = btnEdit;
    [_tableView setEditing:NO];
    self.navigationItem.leftBarButtonItem = nil;

}


- (void)pressDelete {
    // 获取被选中的行的索引集合
    NSArray *selectedRows = [_tableView indexPathsForSelectedRows];

    if (selectedRows.count > 0) {
        // 创建一个可变数组,用于存储需要删除的数据
        NSMutableArray *rowsToDelete = [NSMutableArray array];

        for (NSIndexPath *indexPath in selectedRows) {
            // 获取需要删除的数据的索引
            NSInteger row = indexPath.row;

            // 添加到需要删除的数据数组中
            [rowsToDelete addObject:[NSNumber numberWithInteger:row]];
        }

        // 排序需要删除的数据的索引,以确保正确删除
        NSArray *sortedRows = [rowsToDelete sortedArrayUsingSelector:@selector(compare:)];

        // 逆序遍历需要删除的数据的索引,从数据源数组中删除对应的数据
        for (NSInteger i = sortedRows.count - 1; i >= 0; i--) {
            NSInteger deleteRow = [sortedRows[i] integerValue];
            [_arrayData removeObjectAtIndex:deleteRow];
        }

        // 删除对应的行
        [_tableView deleteRowsAtIndexPaths:selectedRows withRowAnimation:UITableViewRowAnimationAutomatic];
    }
}
//单元格显示效果协议
- (UITableViewCellEditingStyle) tableView:(UITableView *)tableView editingStyleForRowAtIndexPath:(NSIndexPath *)indexPath
{
    //默认为删除
    //UITableViewCellEditingStyleDelete:删除
    //UITableViewCellEditingStyleInsert:插入
    //UITableViewCellEditingStyleNone:空
    //多选状态UITableViewCellEditingStyleDelete|UITableViewCellEditingStyleInsert
    return UITableViewCellEditingStyleDelete|UITableViewCellEditingStyleInsert;
}

//可以显示编辑状态,当手指在单元格上移动时。
- (void) tableView:(UITableView *)tableView commitEditingStyle:(UITableViewCellEditingStyle)editingStyle forRowAtIndexPath:(NSIndexPath *)indexPath
{
    //删除数据源对应的数据
    [_arrayData removeObjectAtIndex:indexPath.row];
    //数据源更新
    [_tableView reloadData];


    NSLog(@"delete!");
}

//选中时调用
- (void) tableView:(UITableView *)tableView didSelectRowAtIndexPath:(NSIndexPath *)indexPath
{
    NSLog(@"选中单元格! %ld, %ld",(long)indexPath.section, (long)indexPath.row);
}

//取消时调用
-(void) tableView:(UITableView *)tableView didDeselectRowAtIndexPath:(NSIndexPath *)indexPath
{
    NSLog(@"取消选中单元格! %ld, %ld",(long)indexPath.section, (long)indexPath.row);
}
@end
我们通过加入一个布尔变量isEdit来判断是否处于编辑状态。在编辑状态下,我们可以对单元格进行插入,删除等操作。
通过使用UITableViewCellEditingStyleDelete|UITableViewCellEditingStyleInsert多选状态,我们可以实现批量删除的操作。
多选后,我们需要重新写编辑状态的删除按钮。即:
objectivec
- (void)pressDelete {
    // 获取被选中的行的索引集合
    NSArray *selectedRows = [_tableView indexPathsForSelectedRows];

    if (selectedRows.count > 0) {
        // 创建一个可变数组,用于存储需要删除的数据
        NSMutableArray *rowsToDelete = [NSMutableArray array];

        for (NSIndexPath *indexPath in selectedRows) {
            // 获取需要删除的数据的索引
            NSInteger row = indexPath.row;

            // 添加到需要删除的数据数组中
            [rowsToDelete addObject:[NSNumber numberWithInteger:row]];
        }

        // 排序需要删除的数据的索引,以确保正确删除
        NSArray *sortedRows = [rowsToDelete sortedArrayUsingSelector:@selector(compare:)];

        // 逆序遍历需要删除的数据的索引,从数据源数组中删除对应的数据
        for (NSInteger i = sortedRows.count - 1; i >= 0; i--) {
            NSInteger deleteRow = [sortedRows[i] integerValue];
            [_arrayData removeObjectAtIndex:deleteRow];
        }

        // 删除对应的行
        [_tableView deleteRowsAtIndexPaths:selectedRows withRowAnimation:UITableViewRowAnimationAutomatic];
    }
}
效果:

总结
以上就是对UITableView粗略的学习,还有许多未知的领域等待探索。
下一步,自定义cell和cell的复用!在学习中不断有进步。