GitHub - LINHYYY/Real-time-handwritten-digit-recognition: VGG16和PyQt5的实时手写数字识别/Real-time handwritten digit recognition for VGG16 and PyQt5
pyqt5+Pytorch内容已进行开源,链接如上,请遵守开源协议维护开源环境,如果觉得内容还可以的话请各位老板们点点star
数据集
给定数据集MNIST,Downloading data from
https://storage.googleapis.com/tensorflow/tf-keras-datasets/mnist.npz
MNIST是一个计算机视觉数据集,它包含各种手写数字图片0,1,2,...,9
MNIST数据集包含:60000行的训练数据集(mnist.train)和10000行的测试数据集(mnist.test)。训练数据集和测试数据集都包含有一张手写的数字,和对应的标签,训练数据集的图片是 mnist.train.images ,训练数据集的标签是 mnist.train.labels;测试数据集的图片是 mnist.test.images ,训练数据集的标签是 mnist.test.labels每一张图片都是28*28像素(784个像素点),可以用点矩阵来表示每张图片
(一) 应用 TensorFlow 机器学习库建模实现手写体( 0,1,2,...,9 )识别
1.1 安装TensorFlow:
python
pip install tensorflow

pip install --user --upgrade tensorflow  # install in $HOME

pip install tensorflow_cpu-2.6.0-cp36-cp36-win_amd64.whl

pip install tensorflow==2.2.0

pip install tensorflow_cpu-2.6.0-cp38-cp38-win_amd64.whl
查看安装库:pip list
验证安装:
python
import tensorflow as tf

print(tf.reduce_sum(tf.random.normal([1000, 1000])))
1.2 安装Pytorch
python
pip install torch==1.13.1+cu116 torchvision==0.14.1+cu116 torchaudio==0.13.1 --extra-index-url https://download.pytorch.org/whl/cu116

conda install pytorch==1.13.1 torchvision==0.14.1 torchaudio==0.13.1 pytorch-cuda=11.6 -c pytorch -c nvidia

print(torch.__version__) #检查torch版本

print(torch.cuda.device_count()) #Gpu数量

print(torch.version.cuda) #检查cuda版本

print(torch.cuda.is_available()) #检查cuda是否可用


if torch.cuda.is_available():

    device = torch.device("cuda:0")

else: device = torch.device("cpu")

print(device)
2. 下载数据集并归一化
python
import tensorflow as tf
tf.random.set_seed(100)   # 随机种子,以便在后续的代码中生成可重复的随机数。
# 注意,这个设置对GPU不起作用,因为GPU有自己独立的随机数生成器。

mnist = tf.keras.datasets.mnist  # 下载数据集
(X_train, y_train), (X_test, y_test) = mnist.load_data()  # 划分为训练集和测试集
X_train, X_test = X_train/255.0, X_test/255.0 # 将图像数据归一化,使其范围在0到1之间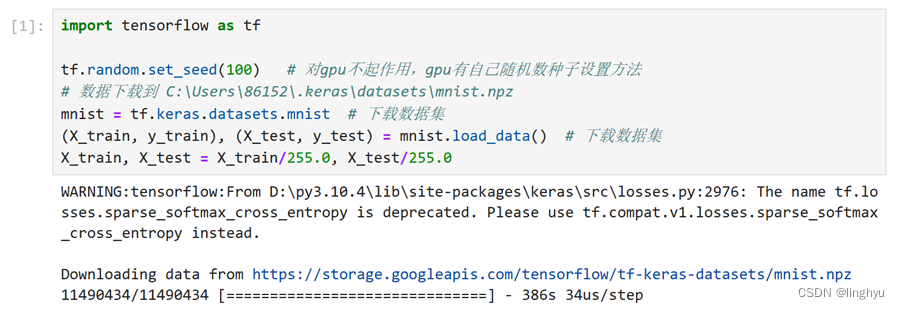
3. 使用Sequential快速构建模型并自动完成训练
python
# 创建神经网络
model = tf.keras.models.Sequential([
     # 展成一维,(60000,28,28)----->(60000,784)
    tf.keras.layers.Flatten(input_shape=(28, 28)),    # 将图像数据展平为一维向量
    tf.keras.layers.Dense(128, activation='relu'),    # 隐藏层128个节点
    tf.keras.layers.Dropout(0.2),    # 丢弃20%的节点
    tf.keras.layers.Dense(10, activation='softmax')    # 10个输出值
])

model.summary()    # 输出模型结构和参数信息
# 编译模型,指定相关参数
model.compile(optimizer='adam', # 指定优化器(Adam
              loss = 'sparse_categorical_crossentropy',   # 交叉熵
              # sparse_categorical_crossentropy是Softmax损失函数,
              # 因为输出已经通过Softmax转成了概率(而不是logits),因此无需设置from_logits为True
              metrics=['accuracy'])  # 评价标准
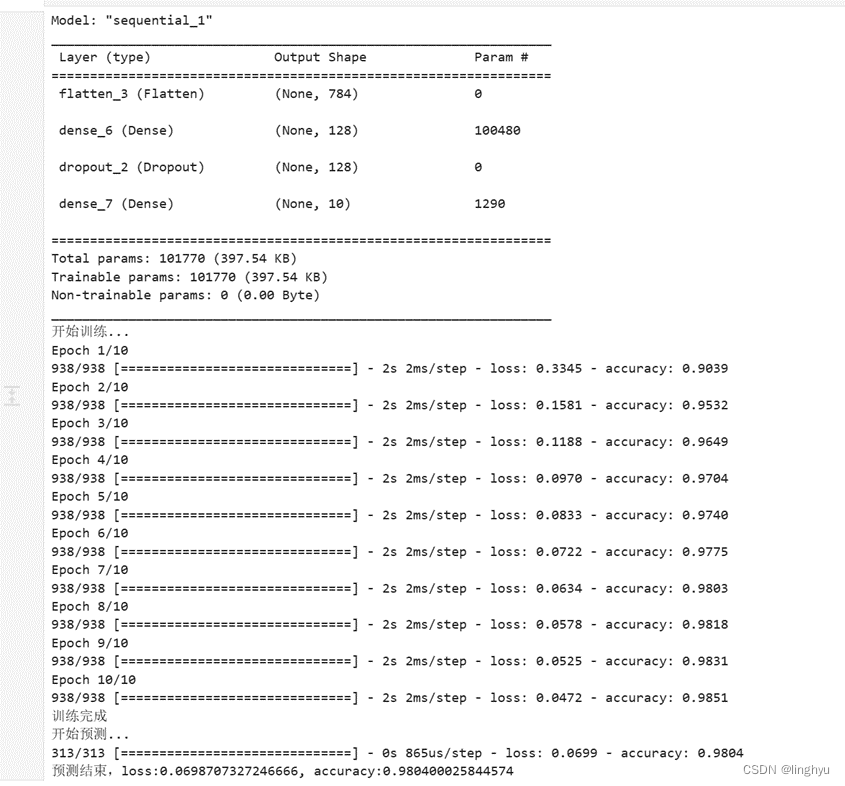
print("开始训练...")
model.fit(X_train ,y_train, epochs=10, batch_size=64)    # batch_size默认为32
print("训练完成")
print("开始预测...")
result = model.evaluate(X_test, y_test)
print("预测结束,loss:{}, accuracy:{}".format(result[0], result[1]))
执行结果:
4. 查看X_train、X_test形状

(二) 使用 keras.layers 组合模型并手动控制训练过程
- 准备数据
python
import tensorflow as tf
from tensorflow.keras.layers import Dense, Flatten, Conv2D, Dropout
from tensorflow.keras import Model

tf.random.set_seed(100)
(X_train, y_train), (X_test, y_test) = mnist.load_data() # 加载数据集
X_train, X_test = X_train/255.0, X_test/255.0 # 归一化

# 将特征数据集从(N,32,32)转变成(N,32,32,1),因为Conv2D需要(NHWC)四阶张量结构
X_train = X_train[..., tf.newaxis]
X_test = X_test[..., tf.newaxis]
print(X_train.shape)

batch_size = 64 # 设置训练集和测试集的批次大小
# 手动生成mini_batch数据集
# 使用shuffle()函数打乱数据,使用batch()函数将数据划分为批次
train_ds = tf.data.Dataset.from_tensor_slices((X_train, y_train))
.shuffle(10000).batch(batch_size)
test_ds = tf.data.Dataset.from_tensor_slices((X_test, y_test)).batch
(batch_size)- Python 类建立组合模型保存训练集和测试集loss、accuracy
python
# 定义模型结构
import tensorflow as tf
from tensorflow.keras.layers import Dense, Flatten, Conv2D, Dropout
from tensorflow.keras import Model
class Basic_CNN_Model(Model):
    def __init__(self):
        super(Basic_CNN_Model, self).__init__()
        # 定义卷积层
        self.conv1 = Conv2D(32, 3, activation='relu')    # 32个filter,3x3核(1x3x3)
        self.flatten = Flatten()
        self.d1 = Dense(128, activation='relu')    # 隐藏层128个节点
        self.d2 = Dense(10, activation='softmax')

    def call(self, X):
        X = self.conv1(X)
        X = self.flatten(X)
        X = self.d1(X)
        return self.d2(X)
model = Basic_CNN_Model()
loss_object = tf.keras.losses.SparseCategoricalCrossentropy()    # 因为是softmax输出,因此无需指定from_logits=True
optimizer = tf.keras.optimizers.Adam()

# tf.keras.metrics.Mean()对象,能够持续记录传入的数据并同步更新其mean值,直到调用reset_states()方法清空原有数据
train_loss = tf.keras.metrics.Mean(name='train_loss')    # 用于计算并保存平均loss
train_accuracy = tf.keras.metrics.SparseCategoricalAccuracy(name='train_accuracy')    # 用于计算并保存平均accuracy
test_loss = tf.keras.metrics.Mean(name='test_loss')
test_accuracy = tf.keras.metrics.SparseCategoricalAccuracy(name='test_accuracy')- 定义单批次的训练和预测操作
python
@tf.function    # @tf.function用于将python的函数编译成tensorflow的图结构
def train_step(images, labels):    # 针对batch_size个样本,进行一次训练
    with tf.GradientTape() as tape:
        predictions = model(images)
        loss = loss_object(labels, predictions)    # 计算损失函数值,(batch_size, loss)二维结构
    gradients = tape.gradient(loss, model.trainable_variables)    # 根据loss反向传播计算所有权重参数的梯度
    optimizer.apply_gradients(zip(gradients, model.trainable_variables))    # 使用优化器更新权重参数的梯度
    train_loss(loss)    # 结合历史数据和新传入的loss,计算新的平均值
    train_accuracy(labels, predictions)

@tf.function # 装饰器
def test_step(images, labels):    # 针对batch_size个样本,进行一次预测(无需更新梯度)
    predictions = model(images)
    t_loss = loss_object(labels, predictions) # 计算损失函数值
    test_loss(t_loss)
test_accuracy(labels, predictions)- 执行完整的训练过程
python
EPOCHS = 10 # 迭代次数
# TODO:完成完整的训练过程
for epoch in range(EPOCHS):
    for images, labels in train_ds: # 训练
        train_step(images, labels)

    for images, labels in test_ds: # 测试
        test_step(images, labels)

    # TODO:输出本周期所有批次训练(或测试)数据的平均loss和accuracy
    # 输出当前周期数据的平均loss和accuracy
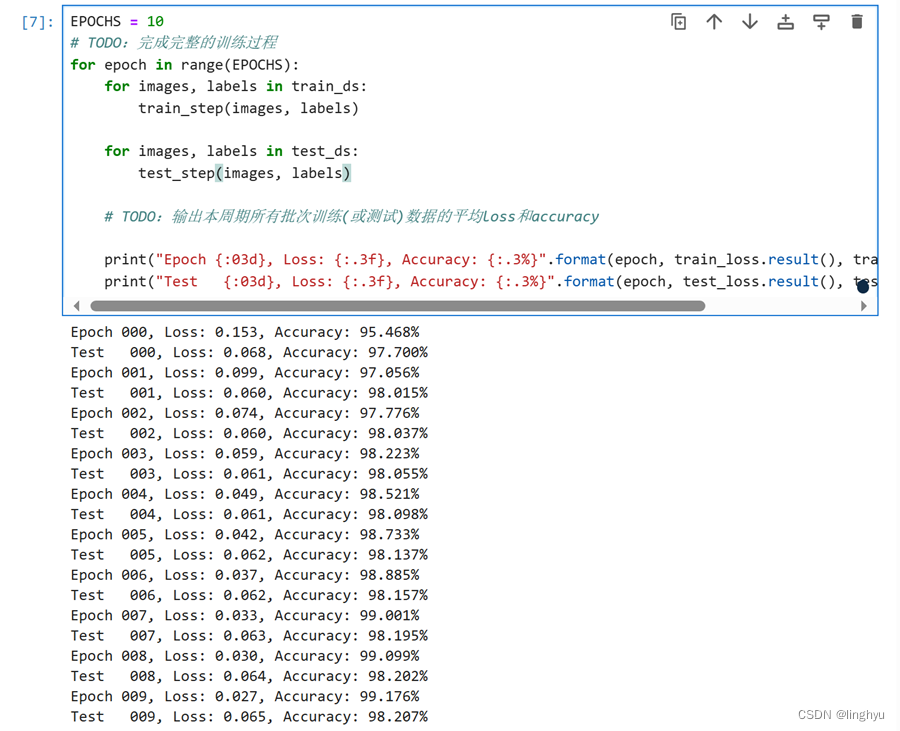
    print("Epoch  {:03d}, Loss: {:.3f}, Accuracy: {:.3%}".format(epoch, train_loss.result(), train_accuracy.result()))
    print("Test   {:03d}, Loss: {:.3f}, Accuracy: {:.3%}".format(epoch, test_loss.result(), test_accuracy.result()))
执行结果:
python
# 绘制训练测试曲线
import numpy as np
import pandas as pd
import matplotlib.pyplot as plt

# loss value
plt.plot(tr_loss_data, range(0, EPOCHS), label='train_loss')
plt.plot(ts_loss_data, range(0, EPOCHS), label='test_loss')
plt.title('loss curve')
plt.legend()  #显示上面的label
plt.xlabel('loss value') #x_label
plt.ylabel('epoch')#y_label
plt.show()

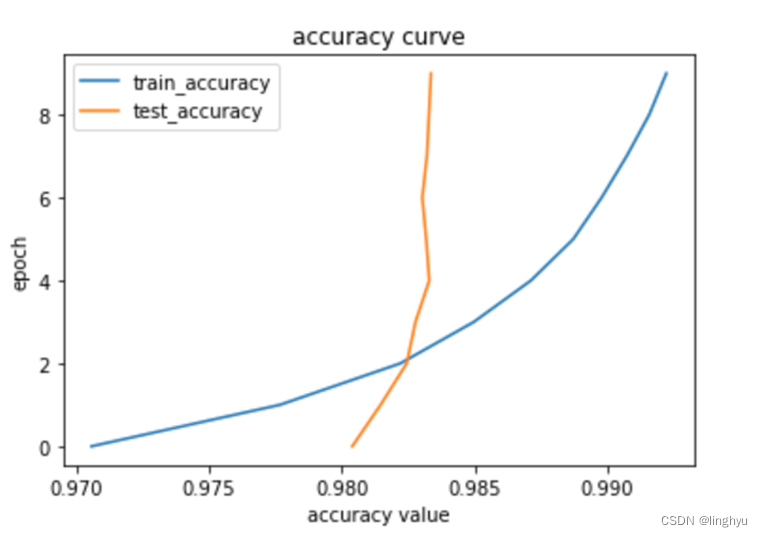
# accuracy value
plt.plot(tr_acc_data, range(0, EPOCHS), label='train_accuracy')
plt.plot(ts_acc_data, range(0, EPOCHS), label='test_accuracy')
plt.title('accuracy curve')
plt.legend()  #显示上面的label
plt.xlabel('accuracy value') #x_label
plt.ylabel('epoch')#y_label
plt.show()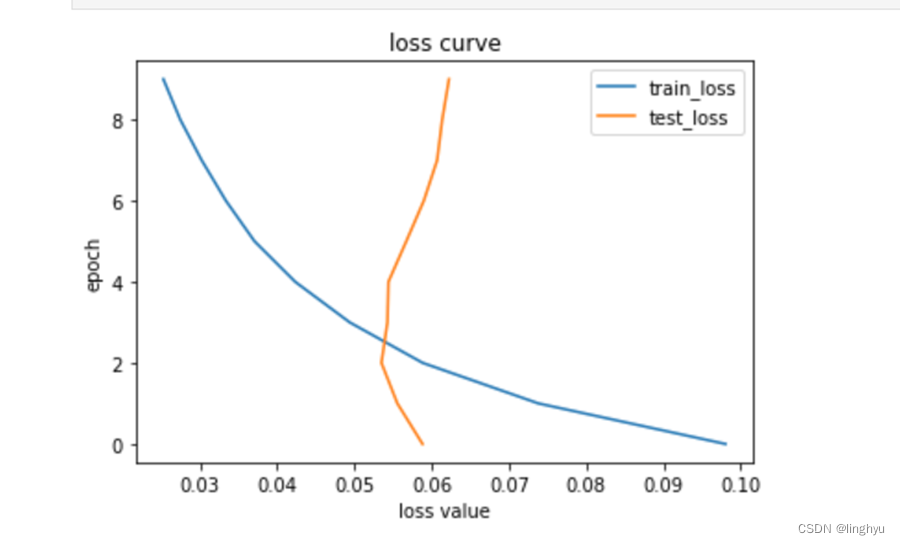
(三) 自定义卷积神经网络
python
# 导入所需库及库函数
import tensorflow as tf
from tensorflow.keras.layers import Dense, Flatten, Conv2D, MaxPool2D, Dropout
from tensorflow.keras import Model

tf.random.set_seed(100) # 设定随机种子
mnist = tf.keras.datasets.mnist
(X_train, y_train), (X_test, y_test) = mnist.load_data() # 划分为训练集和测试集
X_train, X_test = X_train/255.0, X_test/255.0 # 归一化

# 将特征数据集从(N,32,32)转变成(N,32,32,1),因为Conv2D需要(NHWC)四阶张量结构
X_train = X_train[..., tf.newaxis]
X_test = X_test[..., tf.newaxis]

batch_size = 64  #每次迭代都使用64个样本

# 手动生成mini_batch数据集
train_ds = tf.data.Dataset.from_tensor_slices((X_train, y_train)).shuffle(10000).batch(batch_size)
test_ds = tf.data.Dataset.from_tensor_slices((X_test, y_test)).batch(batch_size)

class Deep_CNN_Model(Model):
# 包括两个卷积层、两个池化层、一个全连接层和一个softmax层
    def __init__(self):
        super(Deep_CNN_Model, self).__init__()
        self.conv1 = Conv2D(32, 5, activation='relu')
        self.pool1 = MaxPool2D()
        self.conv2 = Conv2D(64, 5, activation='relu')
        self.pool2 = MaxPool2D()
        self.flatten = Flatten()
        self.d1 = Dense(128, activation='relu')
        self.dropout = Dropout(0.2)
        self.d2 = Dense(10, activation='softmax')

    def call(self, X):
        X = self.conv1(X)
        X = self.pool1(X)
        X = self.conv2(X)
        X = self.pool2(X)
        X = self.flatten(X)
        X = self.d1(X)
        X = self.dropout(X)   # 无需在此处设置training状态。只需要在调用Model.call时,传递training参数即可
        return self.d2(X)
# 定义卷积神经网络、损失函数以及优化器
model = Deep_CNN_Model()
loss_object = tf.keras.losses.SparseCategoricalCrossentropy()
optimizer = tf.keras.optimizers.Adam()

train_loss = tf.keras.metrics.Mean(name='train_loss')
train_accuracy = tf.keras.metrics.SparseCategoricalAccuracy(name='train_accuracy')
test_loss = tf.keras.metrics.Mean(name='test_loss')
test_accuracy = tf.keras.metrics.SparseCategoricalAccuracy(name='test_accuracy')

# TODO:定义单批次的训练和预测操作
@tf.function # 装饰器将训练和测试操作转换为TensorFlow图模式
def train_step(images, labels):

    with tf.GradientTape() as tape: # 记录模型在训练模式下的前向传播过程
        predictions = model(images, training=True)
        loss = loss_object(labels, predictions)
    gradients = tape.gradient(loss, model.trainable_variables) # 计算损失函数对模型参数的梯度
    optimizer.apply_gradients(zip(gradients, model.trainable_variables))

    train_loss(loss)
    train_accuracy(labels, predictions)

@tf.function
def test_step(images, labels): # 计算模型在测试模式下的前向传播过程,以及计算损失函数和测试准确率
    predictions = model(images, training=False)
    loss = loss_object(labels, predictions)

    test_loss(loss)
    test_accuracy(labels, predictions)

# TODO:执行完整的训练过程
EPOCHS = 10 # 训练的周期数
for epoch in range(EPOCHS):
    # 训练本周期所有批次数据
    for images, labels in train_ds:
        train_step(images, labels)

    # 在测试数据集上评估模型性能
    for test_images, test_labels in test_ds:
        test_step(test_images, test_labels)

    # TODO:输出本周期所有批次训练(或测试)数据的平均loss和accuracy
    train_loss_value, train_accuracy_value = train_loss.result(), train_accuracy.result()
    test_loss_value, test_accuracy_value = test_loss.result(), test_accuracy.result()
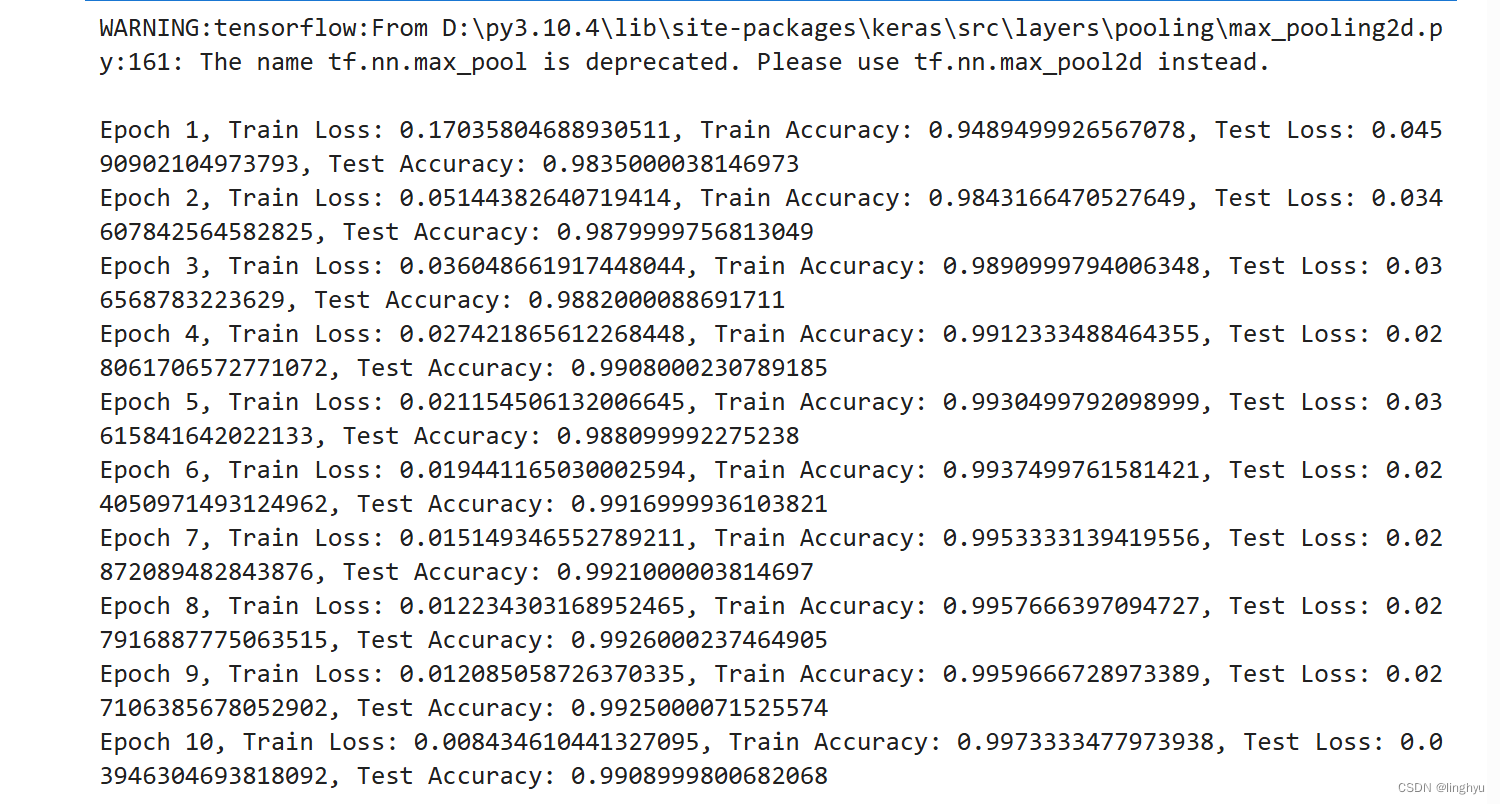
    print(f"Epoch {epoch+1}, Train Loss: {train_loss_value}, Train Accuracy: {train_accuracy_value}, Test Loss: {test_loss_value}, Test Accuracy: {test_accuracy_value}")

    # 重置损失和准确率
    train_loss.reset_states()
    train_accuracy.reset_states()
    test_loss.reset_states()
    test_accuracy.reset_states()
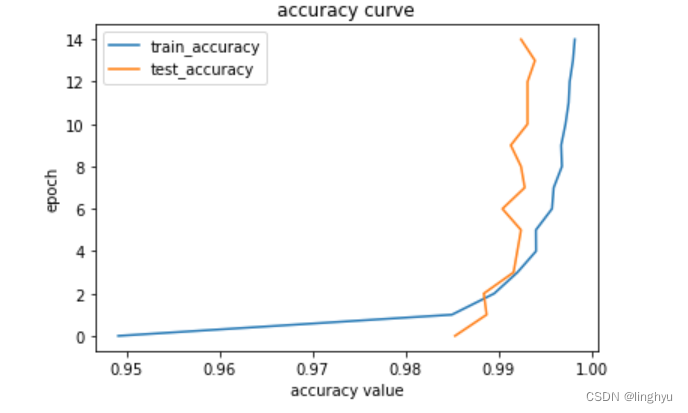
代码训练执行结果:
python
# 绘制折线图,描述变化趋势
import numpy as np
import pandas as pd
import matplotlib.pyplot as plt
# loss value
plt.plot(A_loss_data, range(0, EPOCHS), label='train_loss')
plt.plot(B_loss_data, range(0, EPOCHS), label='test_loss')
plt.title('loss curve')
plt.legend()  #显示上面的label
plt.xlabel('loss value') #x_label
plt.ylabel('epoch')#y_label
plt.show()
# accuracy value
plt.plot(A_acc_data, range(0, EPOCHS), label='train_accuracy')
plt.plot(B_acc_data, range(0, EPOCHS), label='test_accuracy')
plt.title('accuracy curve')
plt.legend()  #显示上面的label
plt.xlabel('accuracy value') #x_label
plt.ylabel('epoch')#y_label
plt.show()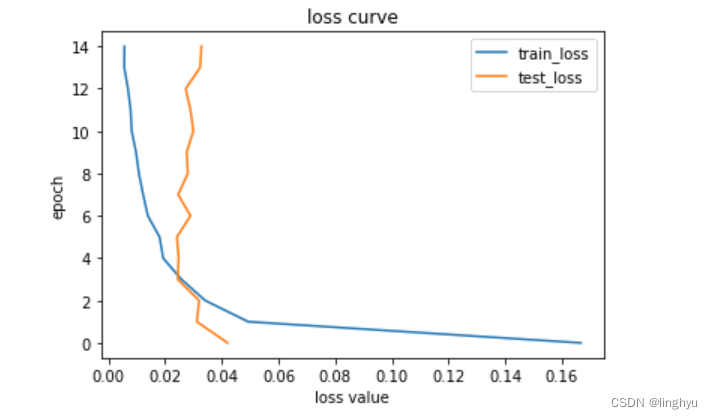
(四) Pytorch 自定义实现 VGG16 的手写数字识别
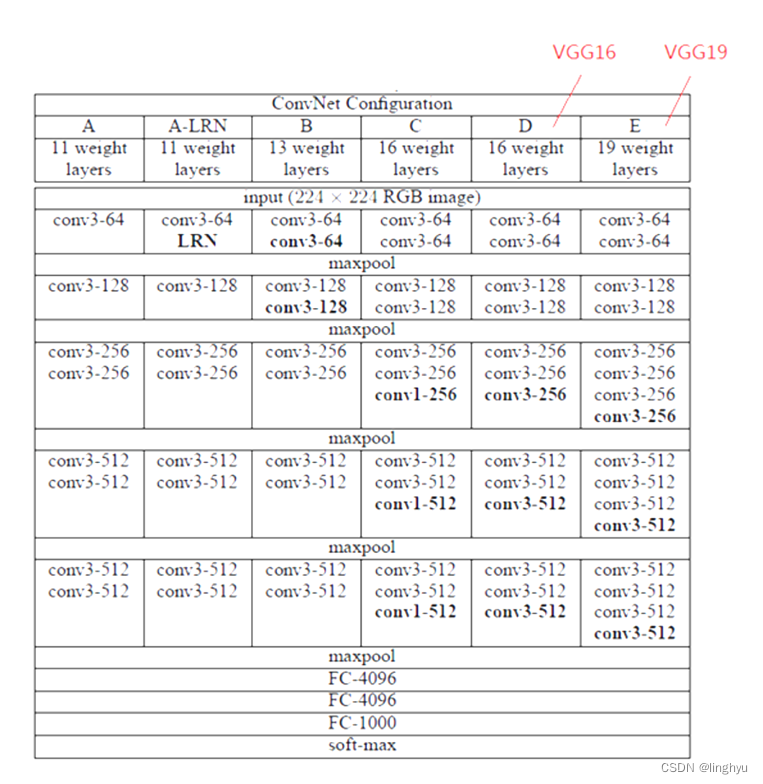
VGG16是一种广泛使用的卷积神经网络模型,它在ImageNet图像分类任务中表现优异。VGG16模型由英国计算机科学家 Karen Simonyan 和 Andrew Zisserman 提出。VGG16模型采用了大量的3x3卷积层和最大池化层,使得模型能够提取到更加丰富的图像特征。
VGG16模型包含16个卷积层和3个全连接层。其中,卷积层用于提取图像特征,全连接层用于分类。
python
class VGGBlock(nn.Module):
    def __init__(self, in_channels, out_channels, batch_norm=False): # 输入输出通道数,是否使用批量归一化
        super().__init__()
        conv2_params = {'kernel_size': (3, 3),
                        'stride'     : (1, 1),
                        'padding'   : 1}
        noop = lambda x : x
        self._batch_norm = batch_norm

        # 卷积层
        self.conv1 = nn.Conv2d(in_channels=in_channels, out_channels=out_channels , **conv2_params)
        self.bn1 = nn.BatchNorm2d(out_channels) if batch_norm else noop
        self.conv2 = nn.Conv2d(in_channels=out_channels, out_channels=out_channels, **conv2_params)
        self.bn2 = nn.BatchNorm2d(out_channels) if batch_norm else noop
        # 最大池化层
        self.max_pooling = nn.MaxPool2d(kernel_size=(2, 2), stride=(2, 2))

    @property
    def batch_norm(self):
        return self._batch_norm

    def forward(self,x):
        # 依次经过conv1、conv2,使用ReLU激活函数,最后通过max_pooling层减小特征图的大小神经网络模型构建
        x = self.conv1(x)
        x = self.bn1(x)
        x = F.relu(x)
        x = self.conv2(x)
        x = self.bn2(x)
        x = F.relu(x)
        x = self.max_pooling(x)
        return x

# VGG16类定义一个VGG16网络,该网络由四个卷积块和全连接层组成,该类继承自nn.Module。
class VGG16(nn.Module):
    def __init__(self, input_size, num_classes=10, batch_norm=False): # 类别数(num_classes)
        super(VGG16, self).__init__()
        self.in_channels, self.in_width, self.in_height = input_size
        # VGG网络的四个卷积块
        self.block_1 = VGGBlock(self.in_channels, 64, batch_norm=batch_norm)
        self.block_2 = VGGBlock(64, 128, batch_norm=batch_norm)
        self.block_3 = VGGBlock(128, 256, batch_norm=batch_norm)
        self.block_4 = VGGBlock(256,512, batch_norm=batch_norm)
        # 全连接层
        self.classifier = nn.Sequential(
                nn.Linear(2048, 4096),
                nn.ReLU(True),
                nn.Dropout(p=0.65),
                nn.Linear(4096, 4096),
                nn.ReLU(True),
                nn.Dropout(p=0.65),
                nn.Linear(4096, num_classes)
            )
    @property
    def input_size(self):
          return self.in_channels, self.in_width, self.in_height
    def forward(self, x): # 将输入图像x传递给VGGBlock对象,然后将输出特征展平,最后通过全连接层计算类别概率
        x = self.block_1(x)
        x = self.block_2(x)
        x = self.block_3(x)
        x = self.block_4(x)
        x = x.view(x.size(0), -1)
        x = self.classifier(x)
        return x
1 、导入所需库
python
import torch

import torchvision

import torchvision.transforms as transforms

import torch.optim as optim

import torch.nn.functional as F

import torch.nn as nn

from torchvision import models


import matplotlib.pyplot as plt

import numpy as np # linear algebra

import pandas as pd

import time

from VGG import VGG16,VGGBlock
2 、进行模型训练
整个训练过程分为以下几个步骤:
1.初始化模型、损失函数、优化器等。
python
def train(loaders, optimizer, criterion, epochs=10, save_param=True, dataset="mnist"):

    global device

    global model
2.定义训练和测试的加载器
python
model = model.to(device)

history_loss = {"train": [], "test": []}

history_accuracy = {"train": [], "test": []}

best_test_accuracy = 0

start_time = time.time()
3.使用try-except结构捕获可能的键盘中断异常。
python
    except KeyboardInterrupt: # 用户键盘中断异常

        print("Interrupted")
4.使用for循环进行训练和测试。
python
for epoch in range(epochs):

     sum_loss = {"train": 0, "test": 0}

     sum_accuracy = {"train": 0, "test": 0}

     for split in ["train", "test"]:

         if split == "train":

             model.train()

         else:

             model.eval()
5.计算每个批次的损失和准确率。
python
# 计算批次的loss/accuracy

epoch_loss = {split: sum_loss[split] / len(loaders[split]) for split in ["train", "test"]}

epoch_accuracy = {split: sum_accuracy[split] / len(loaders[split]) for split in ["train", "test"]}
6.计算每个epoch的损失和准确率。
python
for (inputs, labels) in loaders[split]:

   inputs = inputs.to(device)

   labels = labels.to(device)


   optimizer.zero_grad()

   prediction = model(inputs)

   labels = labels.long()

   loss = criterion(prediction, labels)

   sum_loss[split] += loss.item()  # 更新loss

    if split == "train":

         loss.backward()  # 计算梯度

         optimizer.step()


     _,pred_label = torch.max(prediction, dim = 1)

     pred_labels = (pred_label == labels).float()

     batch_accuracy = pred_labels.sum().item() / inputs.size(0)

     sum_accuracy[split] += batch_accuracy  # 更新accuracy
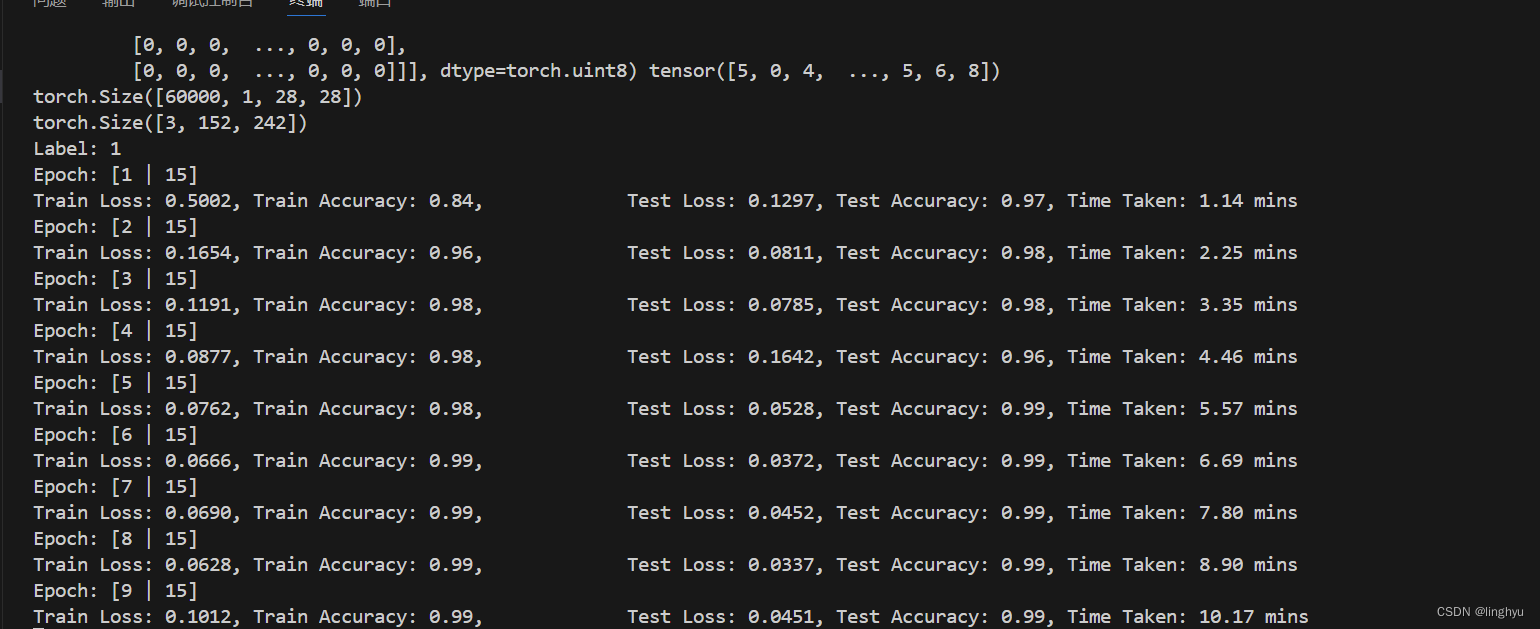
训练过程截图:
3 、Main主程序
python
# main

model = VGG16((1,32,32), batch_norm=True)

# 随机梯度下降(SGD)

optimizer = optim.SGD(model.parameters(), lr=0.001)

criterion = nn.CrossEntropyLoss() # 交叉熵损失函数

transform = transforms.Compose([

  transforms.Resize(32),

  transforms.ToTensor(),

])

# 加载数据集

train_set = torchvision.datasets.MNIST(root='', train=True, download=True, transform=transform)

test_set = torchvision.datasets.MNIST(root='', train=False, download=True, transform=transform)

# 查看数据集信息

print(f"Number of training samples: {len(train_set)}")

print(f"Number of test samples: {len(test_set)}")


# 提取数据标签

x_train, y_train = train_set.data, train_set.targets

print(x_train, y_train)

# 如果训练集的图像数据的维度是3,则添加一个维度,使其变为B*C*H*W的格式

if len(x_train.shape) == 3:

      x_train = x_train.unsqueeze(1)

print(x_train.shape)


# 制作 40 张图像的网格,每行 8 张图像

x_grid = torchvision.utils.make_grid(x_train[:40], nrow=8, padding=2)

print(x_grid.shape)

# 将 tensor 转换为 numpy 数组

npimg = x_grid.numpy()

# 转换为 H*W*C 形状

npimg_tr = np.transpose(npimg, (1, 2, 0))

plt.imshow(npimg_tr, interpolation='nearest')


image, label = train_set[200]

plt.imshow(image.squeeze(), cmap='gray')

print('Label:', label)


train_loader = torch.utils.data.DataLoader(train_set, batch_size=64, shuffle=True)

test_loader = torch.utils.data.DataLoader(test_set, batch_size=64, shuffle=False)

loaders = {"train": train_loader,

           "test": test_loader}


train(loaders, optimizer, criterion, epochs=15)
在上述代码中,定义了优化器optimizer,使用SGD进行优化;使用交叉熵损失函数,并且定义一个图像处理管道transform,将图像大小调整为32x32,并将图像转化为张量。
加载MNIST数据集,并查看数据集信息,从数据集中提取图像数据和标签,如果训练集的图像数据的维度是3,则添加一个维度,使其变为BCH*W的格式。将张量转换为NumPy数组,并将其转换为HWC的形状。
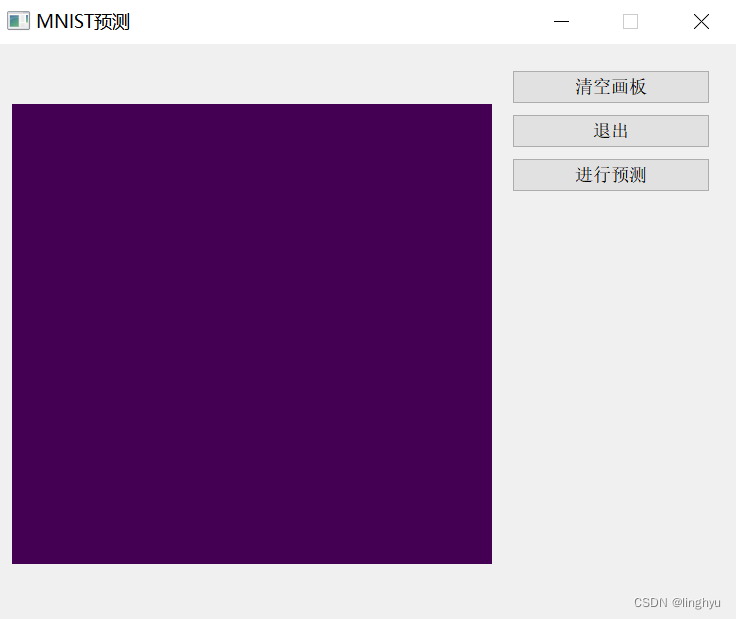
4 、使用pyqt5制作一个简单交互界面
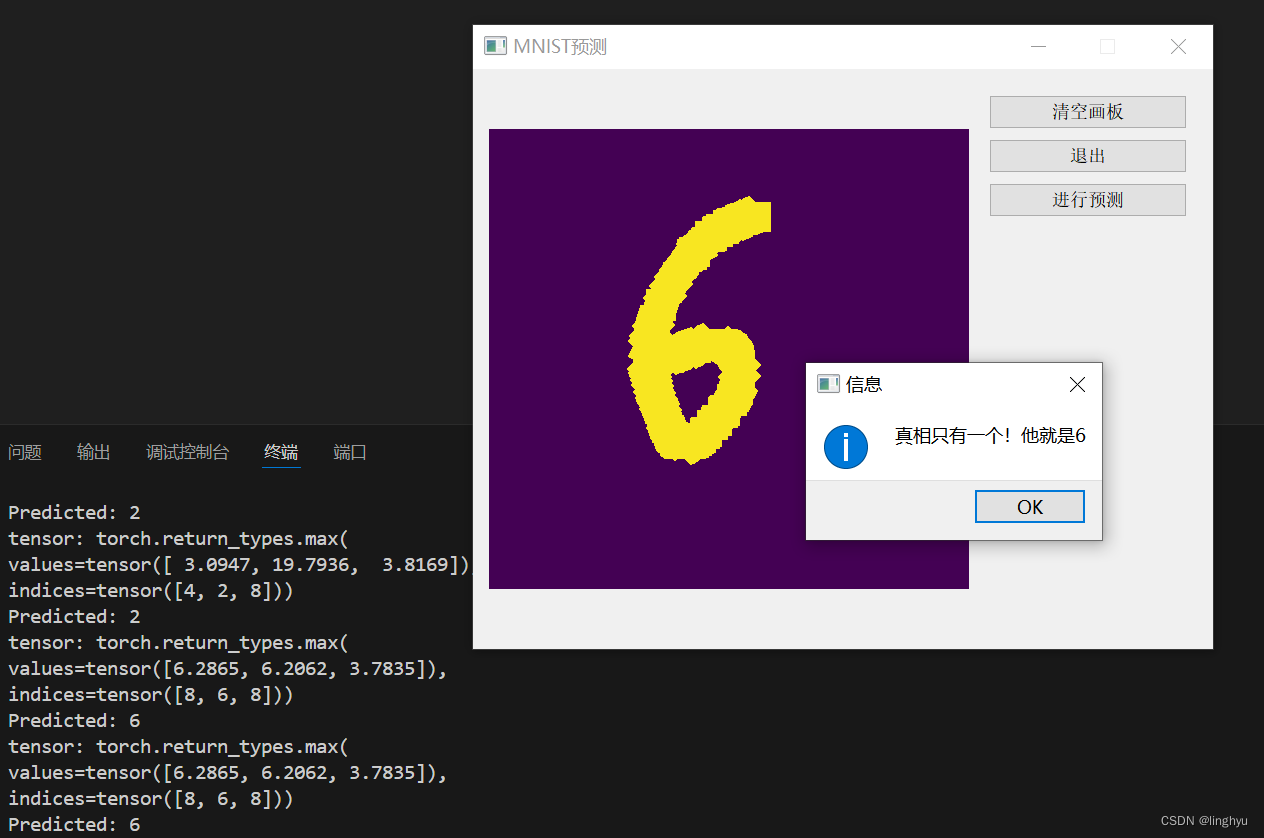
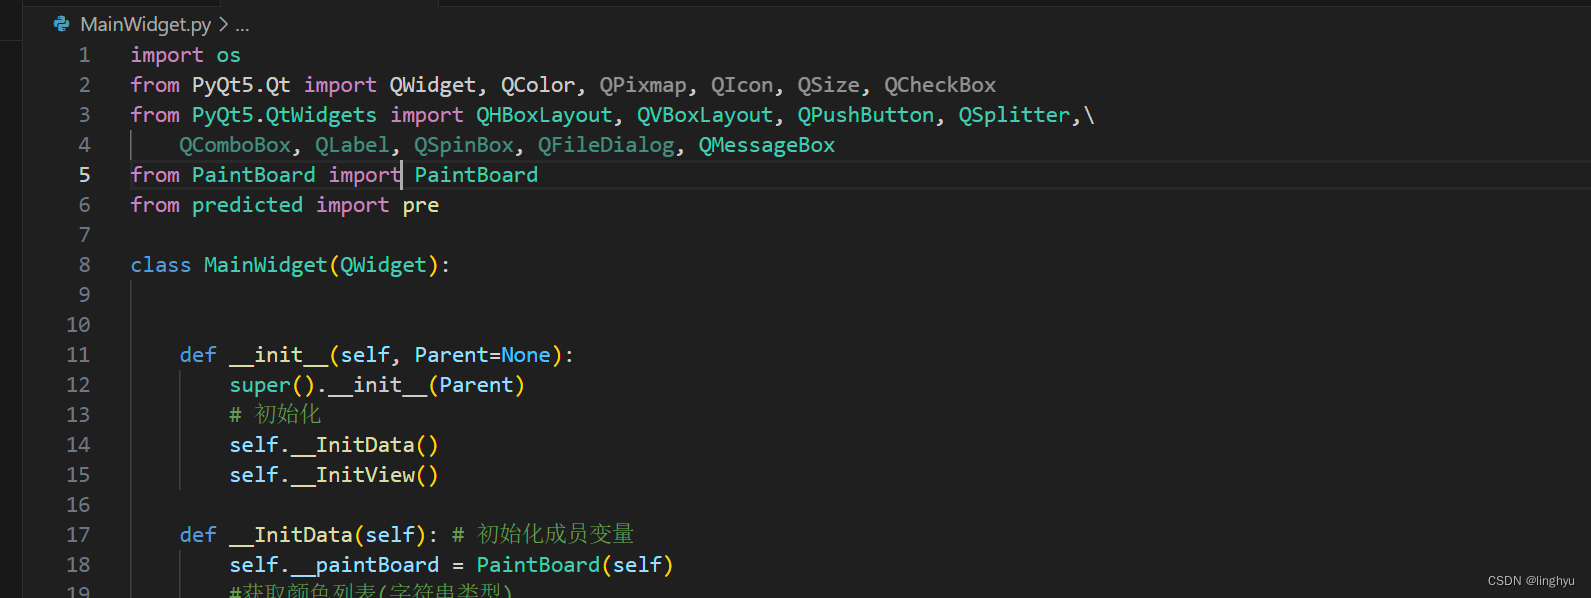
利用pyqt5进行简单交互界面的制作,并且调用预测图片结果的函数,实时处理并且反馈回简单界面中。
声明了一个画板类,简单实现了清空画板、调用预测结果函数、退出的功能。
通过将用户手写的数字图片保存,传入函数中进行结果的预测,反馈最终的可能性最大的结果标签。
5 、运行示例

