
😄 19年之后由于某些原因断更了三年,23年重新扬帆起航,推出更多优质博文,希望大家多多支持~
🌷 古之立大事者,不惟有超世之才,亦必有坚忍不拔之志
🎐 个人CSND主页------Micro麦可乐的博客
🐥《Docker实操教程》专栏以最新的Centos版本为基础进行Docker实操教程,入门到实战
🌺《RabbitMQ》专栏主要介绍使用JAVA开发RabbitMQ的系列教程,从基础知识到项目实战
🌸《设计模式》专栏以实际的生活场景为案例进行讲解,让大家对设计模式有一个更清晰的理解
💕《Jenkins实战》专栏主要介绍Jenkins+Docker的实战教程,让你快速掌握项目CI/CD,是2024年最新的实战教程
🌞《Spring Boot》专栏主要介绍我们日常工作项目中经常应用到的功能以及技巧,代码样例完整
如果文章能够给大家带来一定的帮助!欢迎关注、评论互动~
Spring Boot整合 SpringDoc OpenAPI 生成接口文档
- 1、前言
- [2、SpringDoc OpenAPI版本介绍](#2、SpringDoc OpenAPI版本介绍)
- 3、项目初始化
-
- [❶ 配置依赖](#❶ 配置依赖)
- [❷ 配置 Springdoc OpenAPI](#❷ 配置 Springdoc OpenAPI)
- [❸ 编写 REST Controller](#❸ 编写 REST Controller)
- [❹ 测试查看文档](#❹ 测试查看文档)
- 4、如何进行文档分组
- 5、更换接口文档UI
- 6、字段必填如何设置
- 7、结语
1、前言
本文对应代码下载地址:https://download.csdn.net/download/lhmyy521125/89459959 无需积分!
在我们日常开发过程中,维护良好的 API 文档对于团队协作和开发效率至关重要。SpringDoc OpenAPI 是一个强大的工具,能够帮助我们轻松生成 OpenAPI 3.0 规范的文档,并提供交互式的 Swagger UI 界面。

本文跟着博主一起来学习如何在 Spring Boot 3 项目中整合 SpringDoc OpenAPI,生成在线接口文档
2、SpringDoc OpenAPI版本介绍
目前 SpringDoc OpenAPI 有两个版本 1.x 以及 2.x , 以下是版本对应的支持:
Springdoc OpenAPI 1.x:支持 JDK 8 及以上版本(Spring Boot 2.x and 1.x.)
Springdoc OpenAPI 2.x:最新版本要求 JDK 11 及以上(Spring Boot 3.x)
下表描述了两个版本主要模块的更改:
| springdoc-openapi-v1 | springdoc-openapi-v2 | 描述 |
|---|---|---|
| springdoc-openapi-common | springdoc-openapi-starter-common | 包含基础springdoc-openapi功能 |
| springdoc-openapi-data-rest | springdoc-openapi-starter-common | SpringData Rest 支持 |
| springdoc-openapi-groovy | springdoc-openapi-starter-common | Groovy支持 |
| springdoc-openapi-hateoas | springdoc-openapi-starter-common | Spring Hateoas 支持 |
| springdoc-openapi-javadoc | springdoc-openapi-starter-common | Javadoc支持 |
| springdoc-openapi-kotlin | springdoc-openapi-starter-common | kotlin支持 |
| springdoc-openapi-security | springdoc-openapi-starter-common | Spring Security支持 |
| springdoc-openapi-webmvc-core | springdoc-openapi-starter-webmvc-api | Spring WebMvc支持 |
| springdoc-openapi-webflux-core | springdoc-openapi-starter-webflux-api | Spring WebFlux支持 |
| springdoc-openapi-ui | springdoc-openapi-starter-webmvc-ui | 在Spring WebMvc上下文中使用Swagger-UI |
| springdoc-openapi-webflux-ui | springdoc-openapi-starter-webflux-ui | 在Spring WebFlux上下文中使用Swagger-UI |
确保你使用的 JDK 版本与 springdoc-openapi 的版本相匹配。如果你使用的是 Spring Boot 3,Springdoc OpenAPI 2.x 是推荐的版本,因为 Spring Boot 3 也要求 JDK 17 及以上
3、项目初始化
❶ 配置依赖
创建一个新的 Spring Boot 3 项目,这里博主选用的JDK版本为JDK17 ,Spring Boot: 3.0.0,在我们的在 pom.xml 文件中添加 Springdoc OpenAPI 的依赖
xml
	<dependency>
        <groupId>org.springframework.boot</groupId>
        <artifactId>spring-boot-starter-web</artifactId>
    </dependency>
    <!-- Springdoc OpenAPI Starter -->
   <dependency>
      <groupId>org.springdoc</groupId>
      <artifactId>springdoc-openapi-starter-webmvc-ui</artifactId>
      <version>2.5.0</version>
   </dependency>
❷ 配置 Springdoc OpenAPI
springdoc-openapi 通过自动配置大多数情况下无需额外配置,但如果小伙伴有特定需求,可以在 application.yml 文件中添加配置,如:
yml
springdoc:
  api-docs:
    enabled: true #
    path: /api-docs # 默认/v3/api-docs
  swagger-ui:
    path: /swagger-ui.html #自定义swagger-ui HTML文档路径
❸ 编写 REST Controller
创建一个简单的 REST 控制器,并使用 OpenAPI 注解来描述 API
定义User对象
首先,我们为 User 类的字段添加注解说明
java
/**
* description 字段描述
* example 字段返回示例
**/
@Data
public class User {
    @Schema(description = "用户ID", example = "1")
    private Long id;
    @Schema(description = "用户姓名", example = "张三")
    private String name;
    @Schema(description = "用户邮箱", example = "zhansan@qq.com")
    private String email;
}
创建一个简单的 REST Controller,并使用 OpenAPI 注解来描述 API
java
import com.toher.springdoc.bean.User;
import io.swagger.v3.oas.annotations.Operation;
import io.swagger.v3.oas.annotations.Parameter;
import io.swagger.v3.oas.annotations.media.Content;
import io.swagger.v3.oas.annotations.media.Schema;
import io.swagger.v3.oas.annotations.responses.ApiResponse;
import io.swagger.v3.oas.annotations.responses.ApiResponses;
import org.springframework.web.bind.annotation.*;
/**
* @Author 麦可乐
* @Date 2024/6/20 11:17 AM
* @Version 1.0
*/
@RestController
@RequestMapping("/api/users")
public class UserController {
@Operation(summary = "获取用户信息接口", description = "通过用户ID获取用户信息")
@ApiResponses(value = {
@ApiResponse(responseCode = "200", description = "用户信息",
content = {@Content(mediaType = "application/json",
schema = @Schema(implementation = User.class))}),
@ApiResponse(responseCode = "404", description = "无法获取用户信息")
})
@GetMapping("/{id}")
public User getUserById(@Parameter(description = "用户ID") @PathVariable Long id) {
//模拟数据库获取用户
User user = new User();
user.setId(1L);
user.setName("张三");
user.setEmail("zhansan@qq.com");
return user;
}
@Operation(summary = "创建用户接口", description = "创建一个新用户并返回带有用户id的User对象")
@ApiResponses(value = {
@ApiResponse(responseCode = "200", description = "用户创建",
content = {@Content(mediaType = "application/json",
schema = @Schema(implementation = User.class))})
})
@PostMapping
public User createUser(@RequestBody User user) {
//模拟数据库保存用户并返回用户ID主键
user.setId(1L);
return user;
}
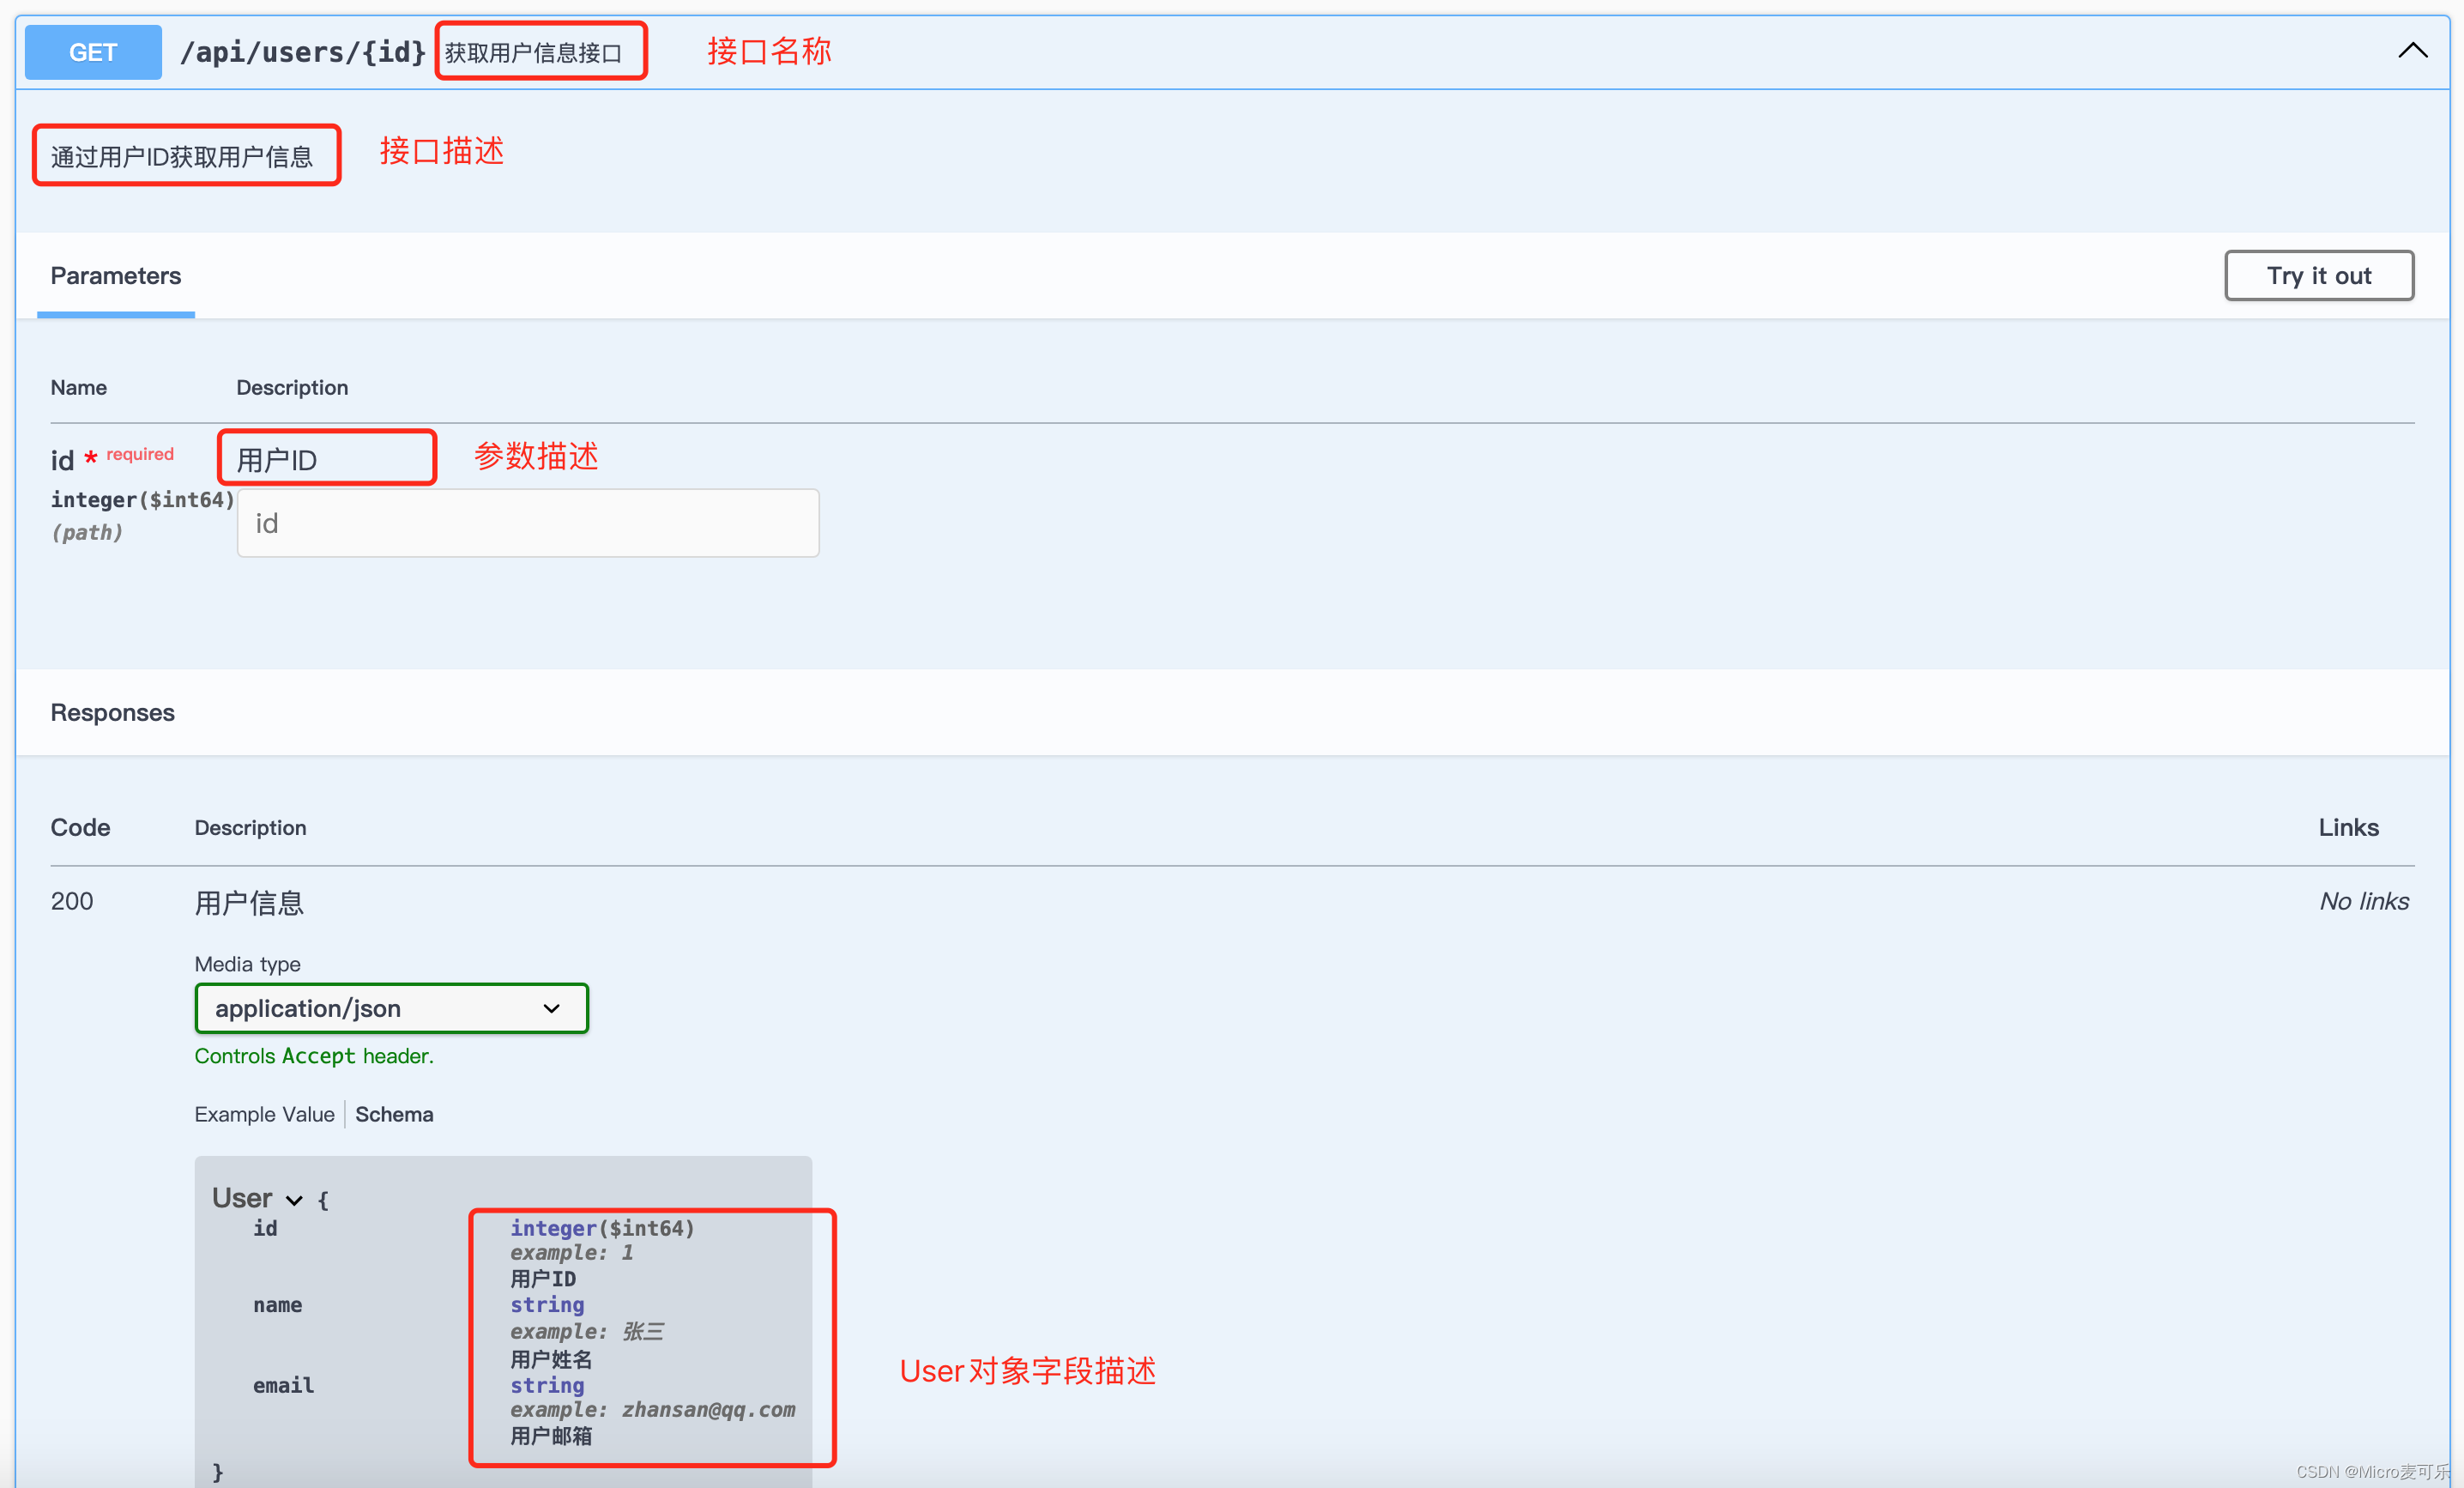
}❹ 测试查看文档
最后启动项目访问查看文档 http://localhost:端口号/swagger-ui,小伙伴应该能够看到自动生成的 API 文档,并可以在界面中进行 API 测试,如下图:
4、如何进行文档分组
很多时候我们的接口很多,且可能不同的开发人员分配不同的模块,如果所有接口都集中在一起,很明显不利于我们查阅,这里博主介绍一下如何对文档进行分组。
需要实用一个配置 group-configs, 如博主的配置
yml
springdoc:
api-docs:
enabled: true #
path: /api-docs # 默认/v3/api-docs
swagger-ui:
path: /swagger-ui.html
group-configs: #进行文档分组每个组配置对应的请求路径以及区分所在包
- group: 'user'
paths-to-match: '/api/users/**'
packages-to-scan: com.toher.springdoc.user
- group: 'product'
paths-to-match: '/api/product/**'
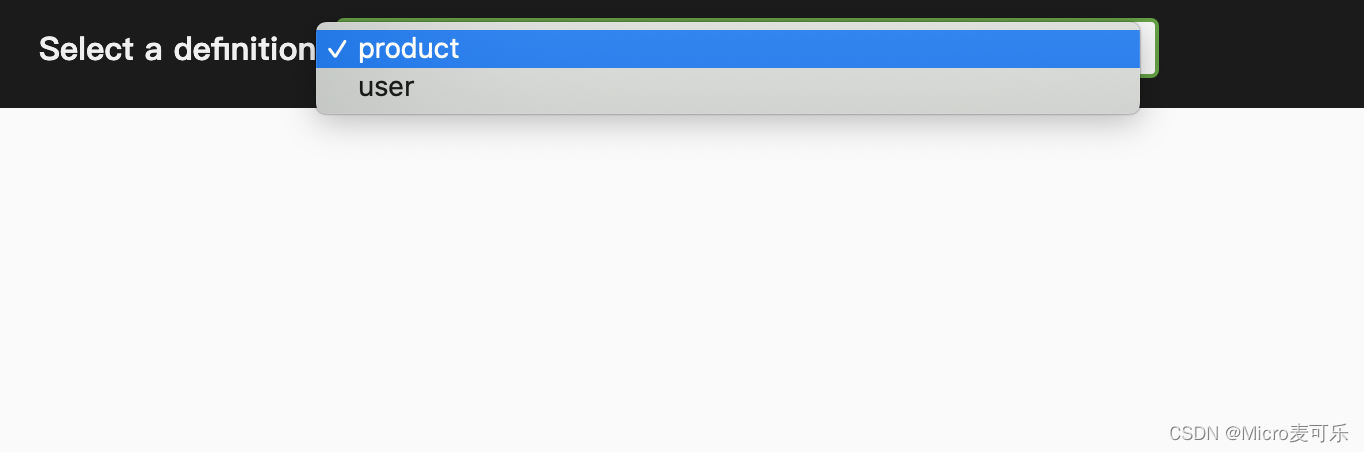
packages-to-scan: com.toher.springdoc.product继续测试访问文档,右上角 Select a definition 查看是否已经分组
5、更换接口文档UI
相信很多小伙伴还是不喜欢swagger-ui的文档,这里博主介绍一个集 Swagger2 和 OpenAPI3 为一体的增强解决方案 - Knife4j
要使用 Knife4j 非常简单,只需要引入依赖即可
xml
<dependency>
    <groupId>com.github.xiaoymin</groupId>
    <artifactId>knife4j-openapi3-jakarta-spring-boot-starter</artifactId>
    <version>4.4.0</version>
</dependency>
如果你希望开启 Knife4j 的增强,可以在yml配置文件中追加,具体Knife4j增强配置明细,可以查看官方文档 https://doc.xiaominfo.com/docs/features/enhance 这里就不赘述了
sql
# knife4j的增强配置,不需要增强可以不配
knife4j:
enable: true
setting:
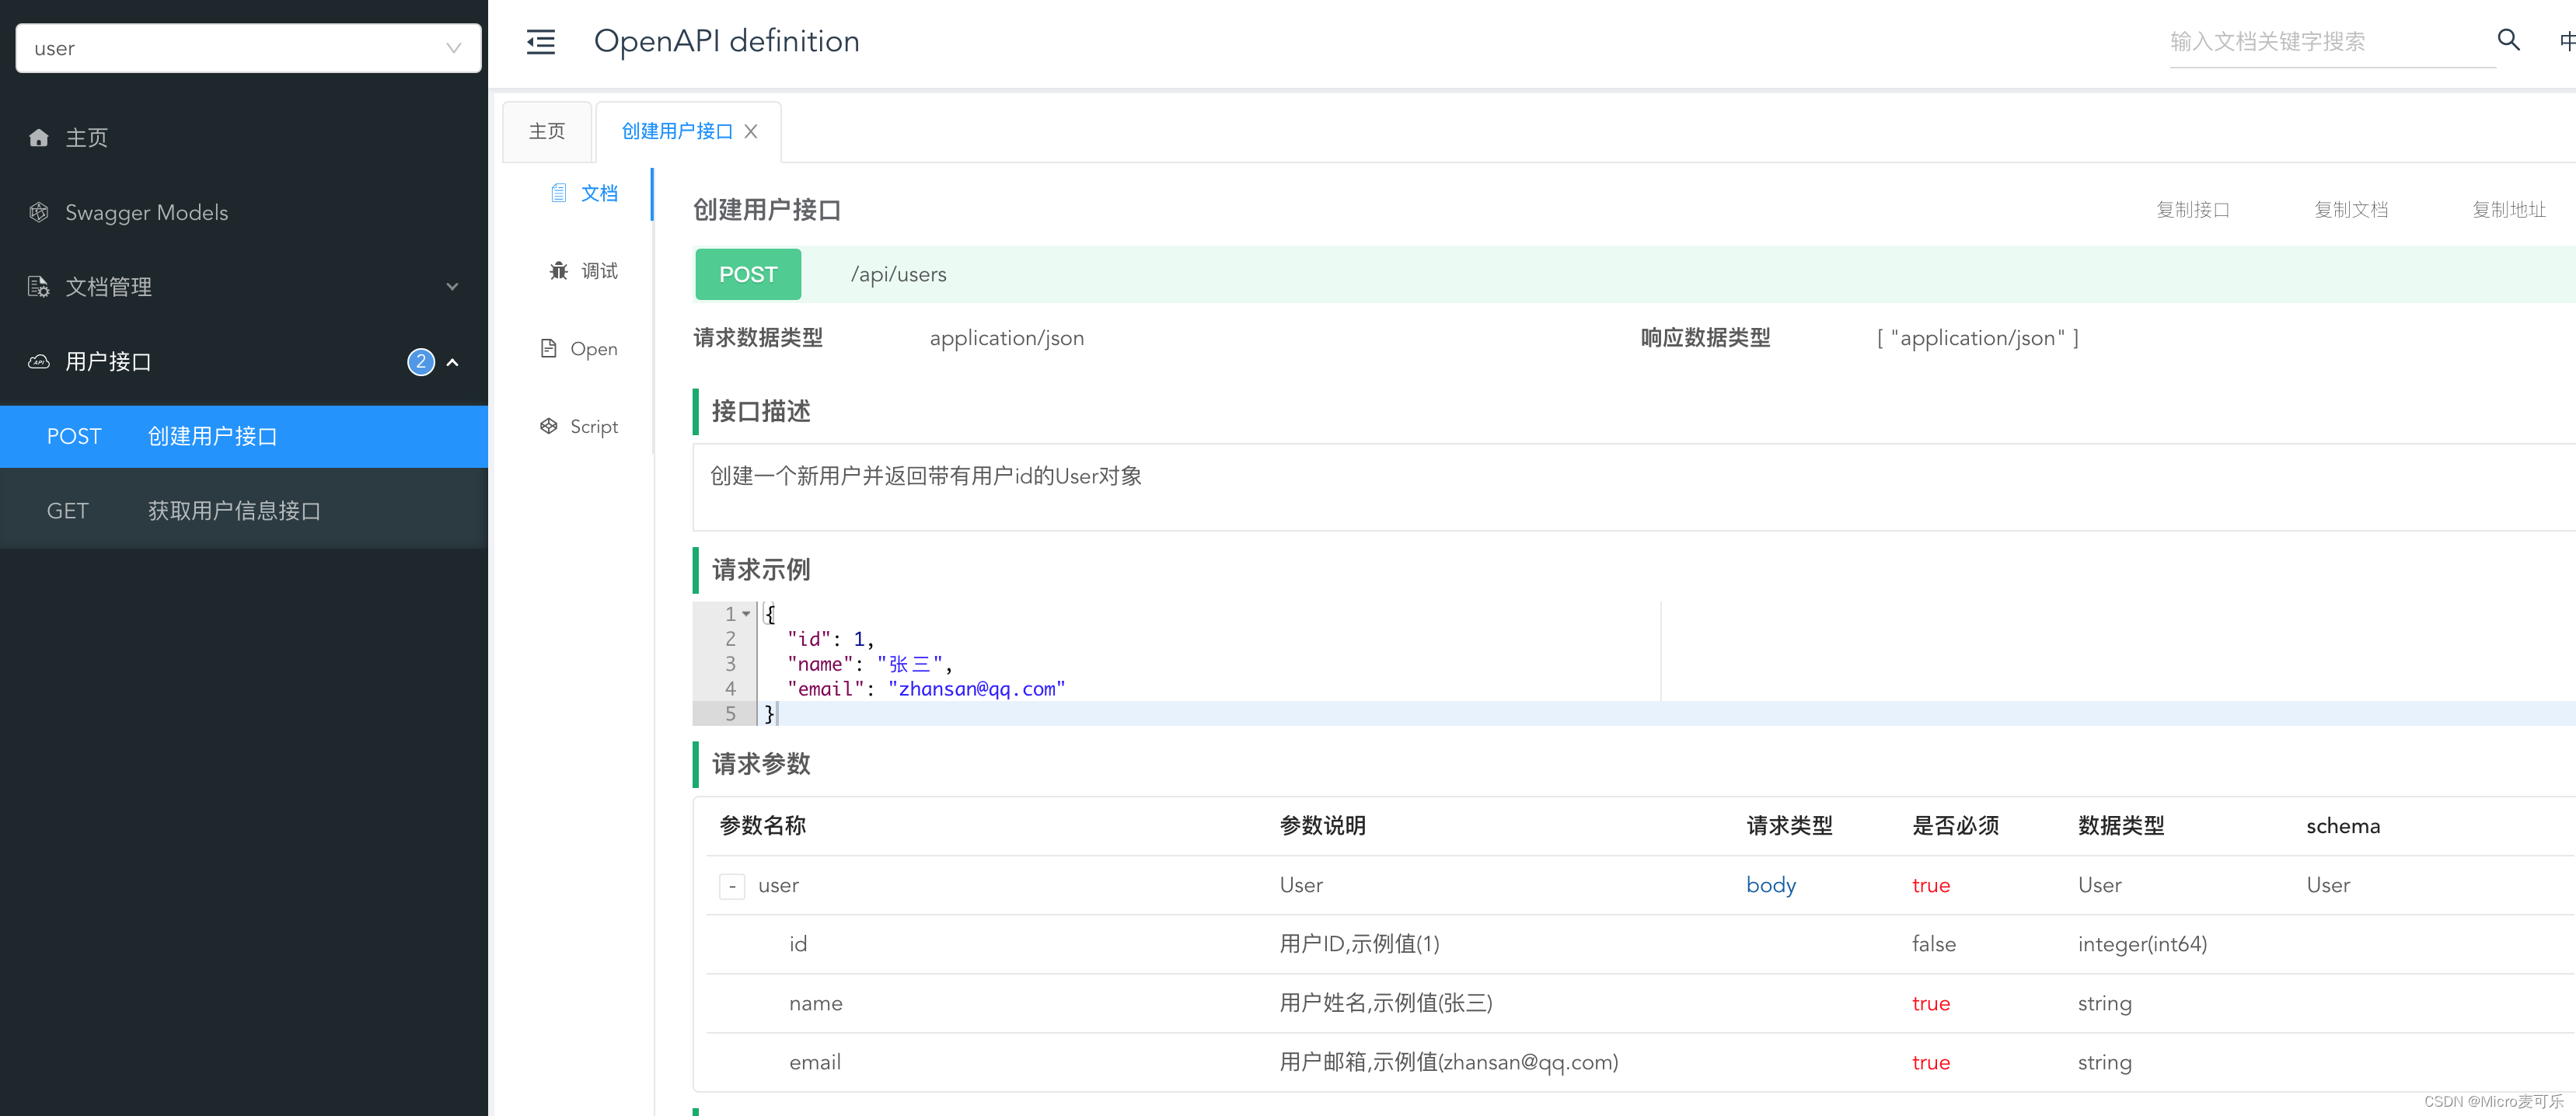
language: zh_cn重启我们的 SpringBoot 应用访问 http://localhost:端口号/doc.html 查看
6、字段必填如何设置
相信很多小伙伴在SpringBoot2的时候对于文档中一些字段的要求,如:必填,我们可以使用一个注解属性 required = true 来说明
java
	@Schema(description = "用户姓名", example = "张三" , required = true)
    private String name;
但实际上在最新版本的 Springdoc OpenAPI 中,@Schema 注解的 required 属性已经被标记为过时。取而代之的是将字段的非空校验放在参数或方法级别的注解上,结合 jakarta.validation
在 Springdoc OpenAPI 3 中,你可以使用 @Parameter 和 @RequestBody 注解来指定字段是否必需,同时在 @Schema 注解中可以通过指定非空属性
下面我们来改造一下我们之前的代码
User对象
java
import io.swagger.v3.oas.annotations.media.Schema;
import jakarta.validation.constraints.Email;
import jakarta.validation.constraints.NotNull;
import lombok.Data;

@Data
public class User {
    @Schema(description = "用户ID", example = "1")
    private Long id;

    @Schema(description = "用户姓名", example = "张三")
    @NotNull(message = "Name必填")
    private String name;

    @Schema(description = "用户邮箱", example = "zhansan@qq.com")
    @NotNull(message = "Email必填")
    @Email(message = "邮箱格式不正确")
    private String email;
}
UserController
java
import com.toher.springdoc.user.bean.User;
import io.swagger.v3.oas.annotations.Operation;
import io.swagger.v3.oas.annotations.Parameter;
import io.swagger.v3.oas.annotations.media.Content;
import io.swagger.v3.oas.annotations.media.Schema;
import io.swagger.v3.oas.annotations.responses.ApiResponse;
import io.swagger.v3.oas.annotations.responses.ApiResponses;
import io.swagger.v3.oas.annotations.tags.Tag;
import jakarta.validation.Valid;
import org.springframework.web.bind.annotation.*;
@RestController
@RequestMapping("/api/users")
@Tag(name = "用户接口")
public class UserController {
@Operation(summary = "获取用户信息接口", description = "通过用户ID获取用户信息")
@ApiResponses(value = {
@ApiResponse(responseCode = "200", description = "用户信息",
content = {@Content(mediaType = "application/json",
schema = @Schema(implementation = User.class))}),
@ApiResponse(responseCode = "404", description = "无法获取用户信息")
})
@GetMapping("/{id}")
public User getUserById(@Parameter(description = "用户ID") @PathVariable Long id) {
//模拟数据库获取用户
User user = new User();
user.setId(1L);
user.setName("张三");
user.setEmail("zhansan@qq.com");
return user;
}
@Operation(summary = "创建用户接口", description = "创建一个新用户并返回带有用户id的User对象")
@ApiResponses(value = {
@ApiResponse(responseCode = "200", description = "用户创建",
content = {@Content(mediaType = "application/json",
schema = @Schema(implementation = User.class))})
})
@PostMapping
public User createUser(@Valid @RequestBody User user) {
//模拟数据库保存用户并返回用户ID主键
user.setId(1L);
return user;
}
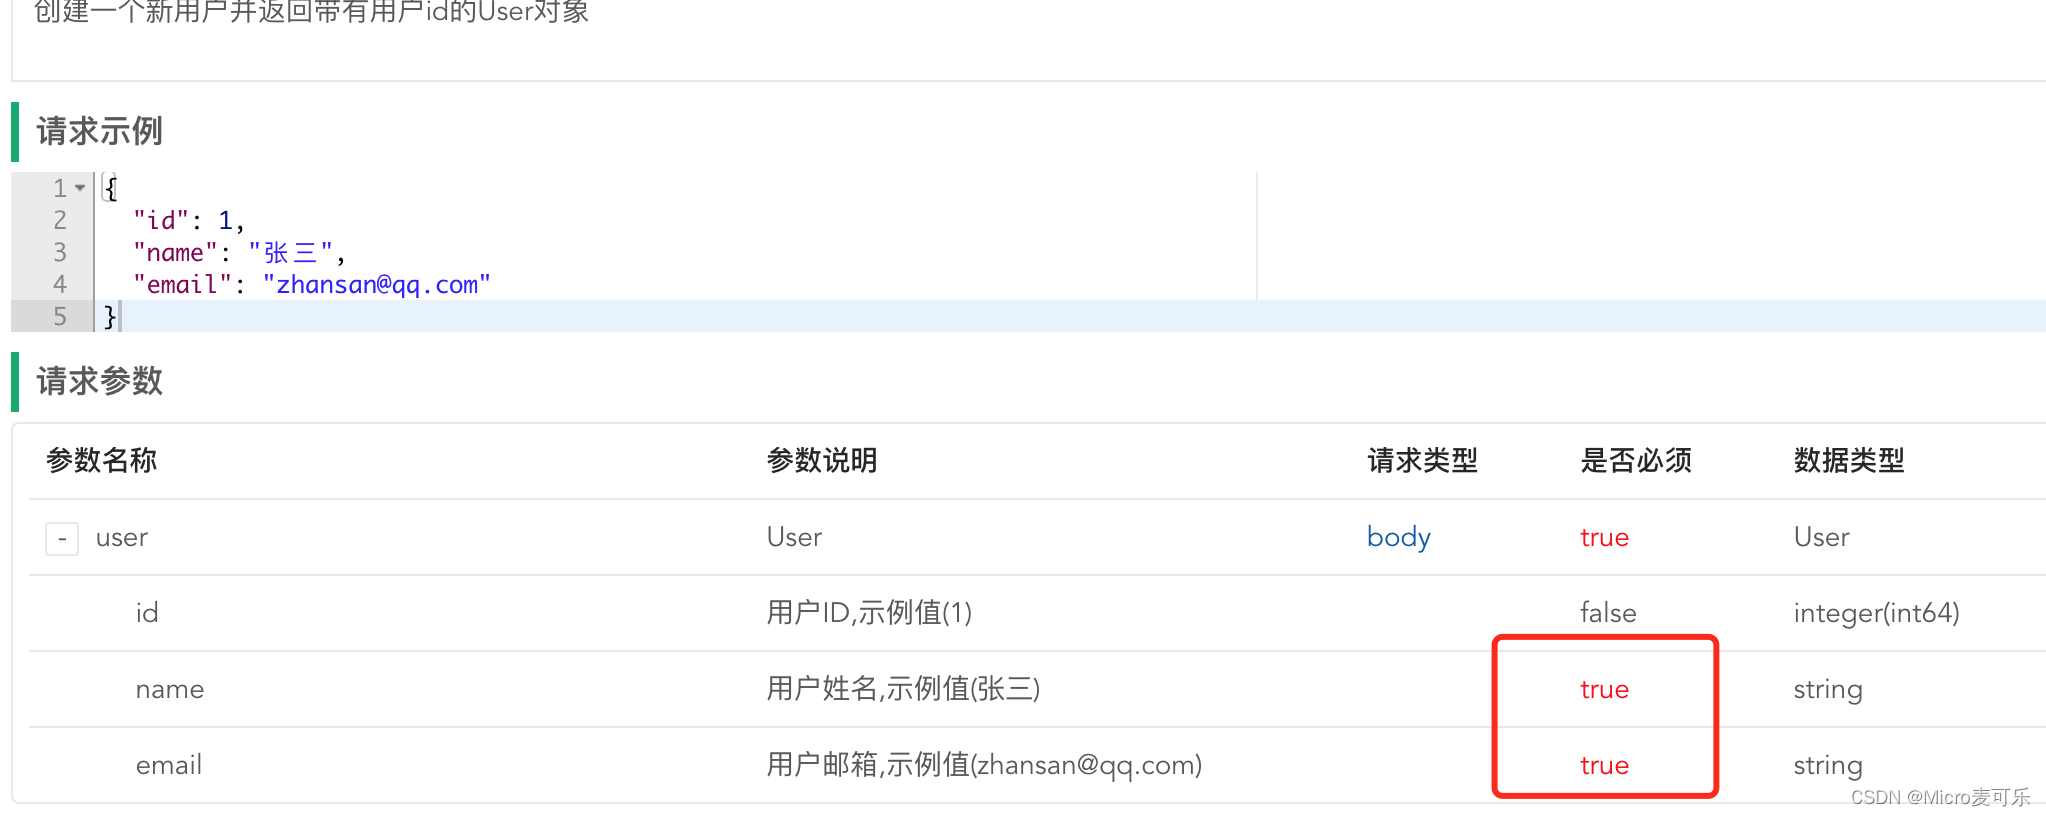
}OK,我们还是重启应用观察文档说明。是否必填项上已经显示必填
7、结语
通过整合 Spring Boot 3 和 Springdoc OpenAPI,可以非常方便地生成交互式的在线 API 文档,帮助开发者和使用者理解和测试 API。这不仅提高了开发效率,还能保证文档的及时更新,保持与实际代码的一致性。
到这里相信小伙伴们已经能熟练在Spring Boot 3中生成接口文档了。如果本文对您有所帮助,希望 一键三连 给博主一点点鼓励,如果您有任何疑问或建议,请随时留言讨论!
