写在前面
在现目前项目开发中,一般都是前后端分离项目。前端小姐姐负责开发前端,苦逼的我们负责后端开发
事实是一个人全干,在这过程中编写接口文档就显得尤为重要了。然而作为一个程序员,最怕的莫过于自己写文档和别人不写文档
大家都不想写文档,那这活就交给今天的主角Swagger来实现了
一、专业名词介绍
①OpenApi是什么?
解答: OpenApi是一个用于描述、定义和共享 RESTful API 文档的规范。最新规范是 OpenAPI 3.0
② Swagger是什么?
解答: Swagger 是一个用于设计和测试 RESTful APIs 的工具。
它提供了API 描述、请求和响应示例、API 测试和文档生成等丰富的功能。最新版本是Swagger3,支持OpenAPI3.0规范
③ SpringFox 是什么?
SpringFox 是 Spring 社区维护的一个项目(非官方),帮助使用者将 Swagger 2 集成到 Spring 中。
目前国内项目使用的都是它
github地址:https://github.com/springfox/springfox
④springDoc是什么?
解答: Spring-doc也是 Spring 社区维护的一个项目(非官方),帮助使用者将 Swagger 3 集成到 Spring 中
SpringDoc 支持 Swagger 页面 Oauth2 登录,相较于 SpringFox 而言,它的支撑时间更长,无疑是更好的选择。
但是在国内发展较慢,网上一找资料,出来的基本上是 Swagger2的内容。
⑤ OpenAPI 、Spring-doc和 Swagger 之间的关系
解答: OpenAPI 定义了一种标准的格式来表示 API 文档,而 Swagger 是一个实现 OpenAPI 规范的工具
二、Swagger详细简介
Swagger 江湖人称"丝袜哥",是一个帮助程序员生成接口文档的利器。
只需要简单配置,就可以生成带有漂亮UI界面的接口文档,而且编写的接口代码变了
接口文档随之也跟着变,做到了真正的解放双手。
Swagger 优点
- 号称世界上最流行的
API框架 Restful Api文档在线自动生成器- 直接运行,支持在线测试
API - 不仅仅支持Java,还支持多种语言(如:
PHP、Python、Node.js等)
三、小试牛刀
说了这么多Swagger 的优点,接下来就小试牛刀,看看怎么将Swagger集成到SpringBoot中。
3.1、环境介绍
JDK:17SpringBoot:3.3.0Springdoc
注: 细心的小伙伴可能已经发现了,在springboot3.0之前我用的都是Springfox来集成Swagger管理我们的API接口文档,
但是Springfox已经停止更新了,我们使用的是SpringBoot3 +jdk17 的环境后,Spring官网推荐了Springdoc 来整合swagger
3.2 新建一个springboot-web项目
3.3 添加依赖
由于篇幅原因,其他web项目相关依赖这里就不一一贴出来了。
第一个依赖是必须的,而且版本必须大于2.0.0
xml
<dependency>
    <groupId>org.springdoc</groupId>
    <artifactId>springdoc-openapi-starter-webmvc-ui</artifactId>
    <version>2.2.0</version>
</dependency>
<dependency>
    <groupId>org.springdoc</groupId>
    <artifactId>springdoc-openapi-starter-webmvc-api</artifactId>
    <version>2.2.0</version>
</dependency>
注:
我们这里使用的是jdk17+springboot3.3.0 环境,原来swagger的V2和V3都不能用了,小伙伴们一定更要注意这儿
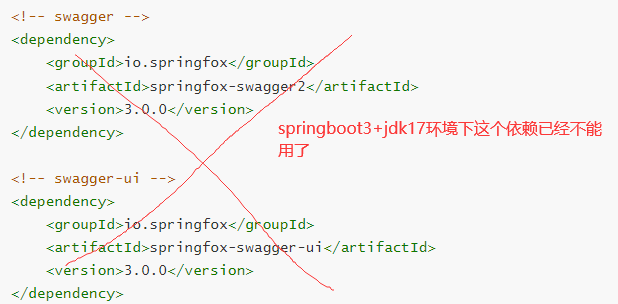
如果引入上面错误的依赖,项目启动会报下面错误,这时候我们引入上面正确的依赖重新启动项目即可

3.4 编写HelloController
新建一个controller包--->建立一个HelloController类
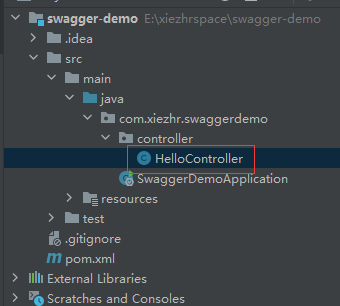
java
@RestController
public class HelloController {

    @RequestMapping("/hello")
    public String hello(){
        return "hello";
    }
}我们在浏览器中输入"http://localhost:8080/hello" 后回车,出现如下界面,说明我们的hello开发成功了

3.5 访问swagger接口页面
注 :我们这里采用的是openapi ,所以就不用像swagger的V2和v3那样添加配置类了
浏览器直接输入:http://localhost:8080/swagger-ui/index.html 回车即可看到下面界面
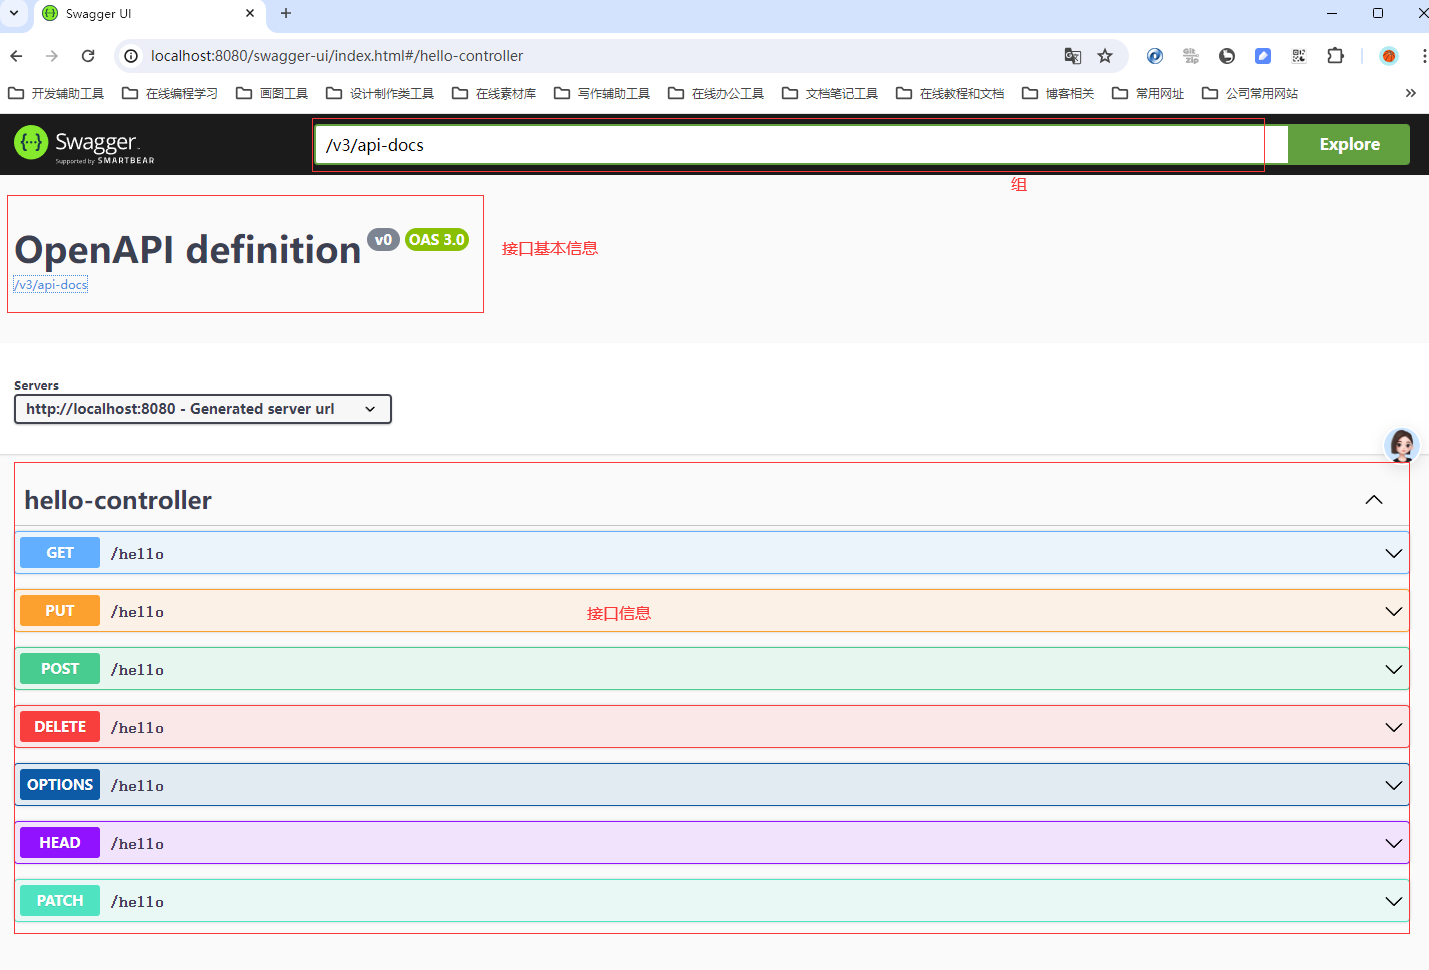
整合swagger是不是很简单呢
四、修改接口

从上面截图中我们看到,我们在HelloController 中只定义了一个接口,但是前端UI界面中出来个7种请求方式(GET、PUT、POST、DELETE、OPTIONS、HEAD、PATCH)的接口,这是为什么呢?
解答: @RequestMapping("/hello") 我们接口中只是指定了访问地址,并没有指定请求方式
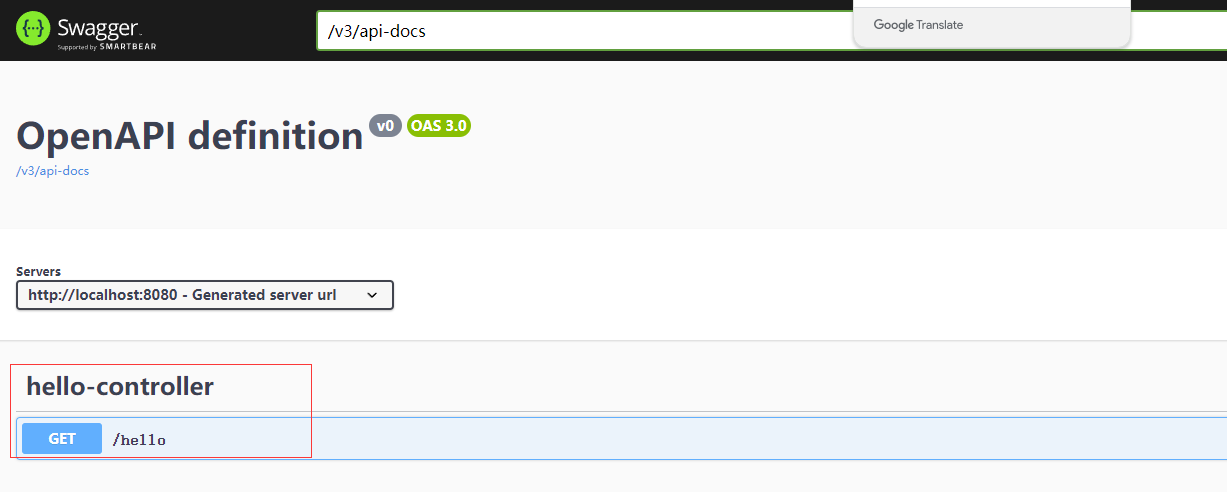
我们将注解修改成@RequestMapping(path = "/hello",method = RequestMethod.GET)
或者@GetMapping("/hello") 然后重启服务,我们看到界面上就只有一种请求方式的接口了
五、接口文档常用配置
5.1 配置访问路径
在application.yml中可以自定义api-docs和swagger-ui的访问路径。当然了,如果没配置,默认就是下面路径
yaml
springdoc:
  api-docs:
    path: /v3/api-docs
  swagger-ui:
    path: /swagger-ui.html
5.2 配置接口文档基本信息
① 配置接口基本信息
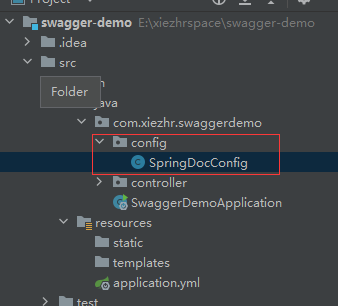
新建一个config包--->并在包下建立一个SpringDocConfig配置类
② 配置接口文档基础信息
我们在配置类中添加如下代码,
java
@Configuration
public class SpringDocConfig {

    @Bean
    public OpenAPI openAPI() {
        return new OpenAPI()
                // 配置接口文档基本信息
                .info(this.getApiInfo())
                ;
    }

    private Info getApiInfo() {
        return new Info()
                 // 配置文档标题
                .title("SpringBoot3集成Swagger3")
                // 配置文档描述
                .description("SpringBoot3集成Swagger3示例文档")
                // 配置作者信息
                .contact(new Contact().name("程序员小凡").url("https://www.xiezhrspace.cn").email("1666397814@163.com"))
                // 配置License许可证信息
                .license(new License().name("Apache 2.0").url("https://www.xiezhrspace.cn"))
                // 概述信息
                .summary("SpringBoot3集成Swagger3示例文档aaa")
                .termsOfService("https://www.xiezhrspace.cn")
                // 配置版本号
                .version("2.0");
    }

}
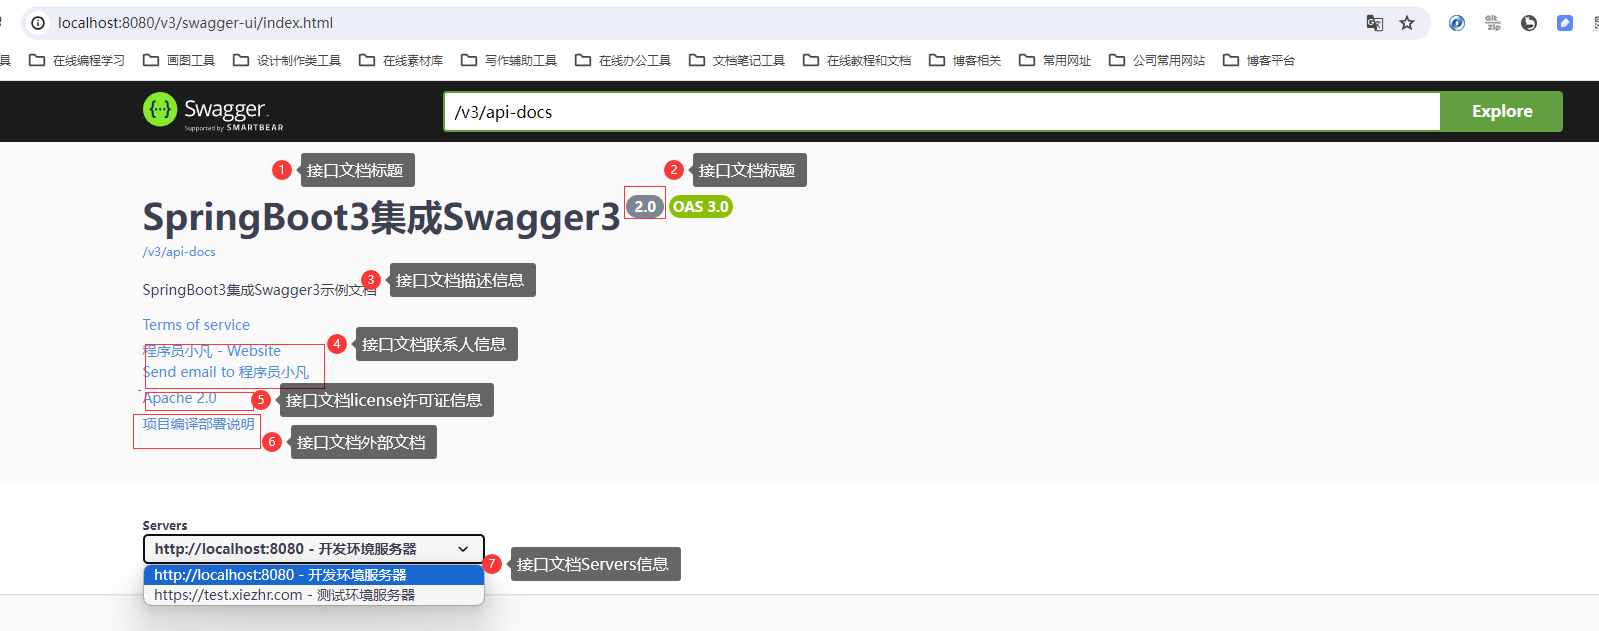
前端页面访问接口文档页面后显示如下

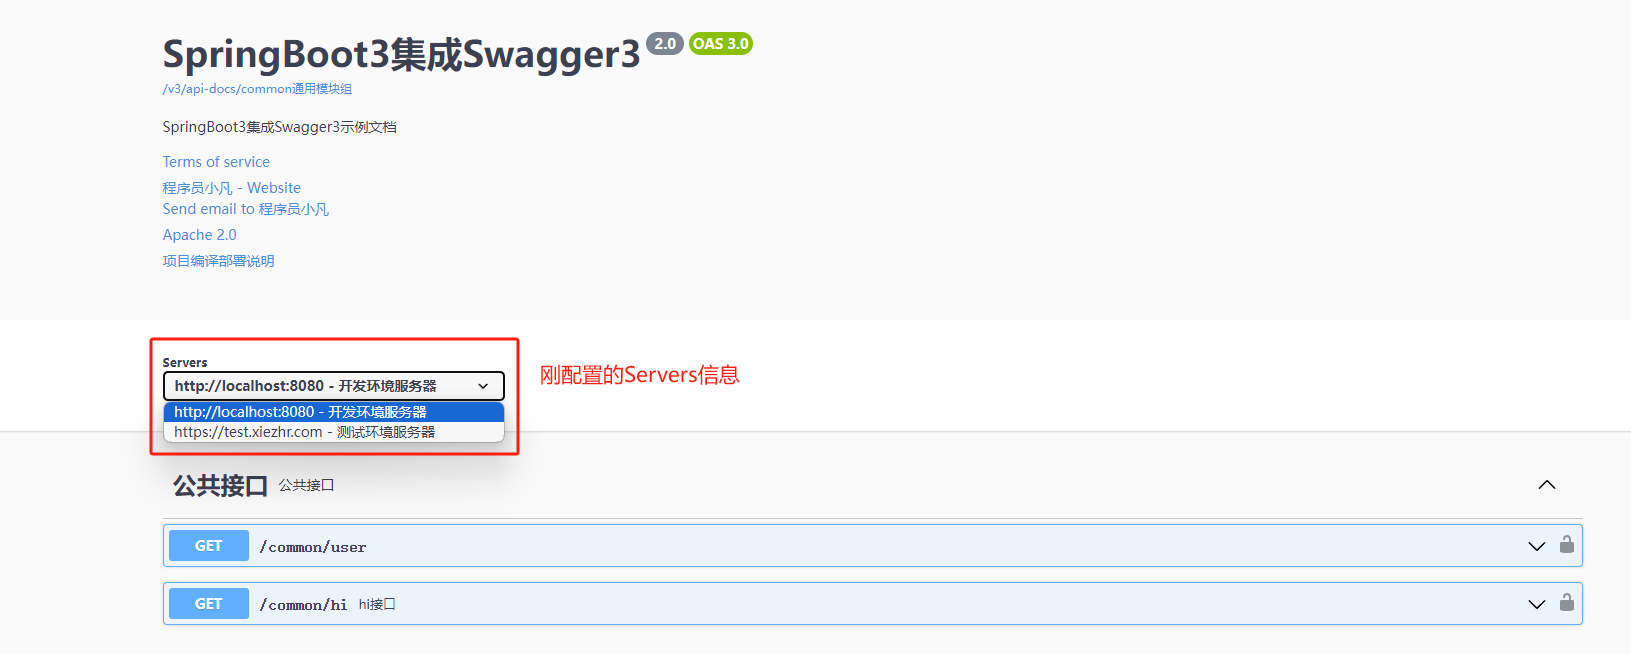
② 配置接口servers信息
接口可能存在多环境,如开发环境、测试环境、生产环境等
我们可以通过@OpenAPIDefinition 配合servers 属性来配置不同环境,具体配置示例如下
java
@OpenAPIDefinition(
        servers = {
                @Server(description = "开发环境服务器", url = "http://localhost:8080"),
                @Server(description = "测试环境服务器", url = "https://test.xiezhr.com")
        }
)
@Configuration
public class SpringDocConfig {
    //...
}
配置完成后,浏览器访问显示如下
③ 配置外部文档信息
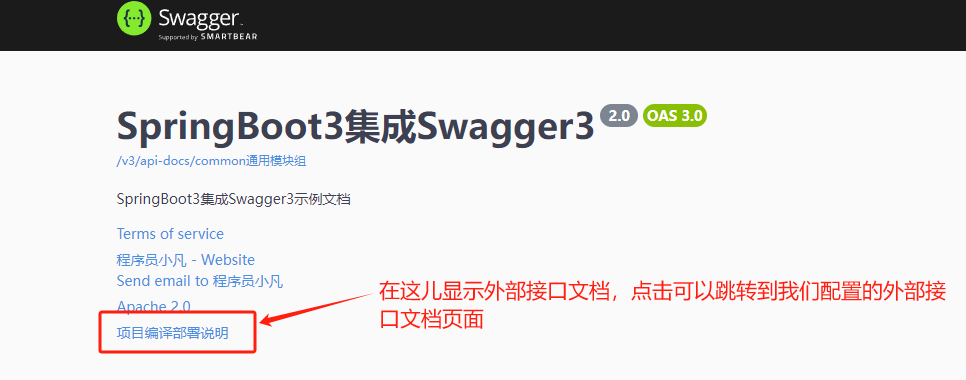
有时候我们需要在在线接口文档中可以显示跳转到API的一些外部文档(比如 项目部署文档等)
这个时候我们可以通过@OpenAPIDefinition 配合 externalDocs 属性来配置外部文档
具体配置如下
java
@OpenAPIDefinition(

    externalDocs = @ExternalDocumentation(
        description = "项目编译部署说明",
        url = "http://localhost:8080/deplay/readme.md"
    )
)
@Configuration
public class SpringDocConfig {
    //......
}
配置完后重启服务,浏览器访问接口文档,显示如下
SpringDocConfig 类完整配置代码如下
java
@OpenAPIDefinition(

        servers = {
                @Server(description = "开发环境服务器", url = "http://localhost:8080"),
                @Server(description = "测试环境服务器", url = "https://test.xiezhr.com")
        },
        externalDocs = @ExternalDocumentation(
                description = "项目编译部署说明",
                url = "http://localhost:8080/deplay/readme.md"
        )
)

@Configuration
public class SpringDocConfig {

    @Bean
    public OpenAPI openAPI() {
        return new OpenAPI()
                // 配置接口文档基本信息
                .info(this.getApiInfo())
                ;
    }

    private Info getApiInfo() {
        return new Info()
                 // 配置文档标题
                .title("SpringBoot3集成Swagger3")
                // 配置文档描述
                .description("SpringBoot3集成Swagger3示例文档")
                // 配置作者信息
                .contact(new Contact().name("程序员小凡").url("https://www.xiezhrspace.cn").email("1666397814@163.com"))
                // 配置License许可证信息
                .license(new License().name("Apache 2.0").url("https://www.xiezhrspace.cn"))
                //
                .summary("SpringBoot3集成Swagger3示例文档aaa")
                .termsOfService("https://www.xiezhrspace.cn")

                // 配置版本号
                .version("2.0");
    }


}配置完上面信息后,重启服务,浏览器访问:http://localhost:8080/v3/swagger-ui/index.html
5.3 配置扫描接口
应用场景:
有时候我们为了业务需要,我们建立了多个包下的接口,如admin包下的,common包下的接口,
为了安全起见,我们只允许接口文档中访问comm包下面的接口。
在不加任何配置的情况下,所以接口都会默认显示,具体如下

配置扫描接口包:
在application.yml中可以自定义要扫描的接口包
yaml
springdoc:
  packages-to-scan: com.xiezhr.swaggerdemo.common.controller
配置好之后重启服务,我们发现前台UI只显示了common包下面的接口了

5.4 配置接口文档开关
使用场景:
为了接口安全,我们一般需要在测试(test)环境或者开发(dev)环境中开启接口文档,而在生产(prod)环境中 关闭接口文档
这个应该怎么做呢?
这里涉及到SpringBoot多环境配置,忘记的小伙伴可以翻一翻之前的文章。传送门:
我们创建三个配置文件,分别为
-
①
application-dev.yml开发环境 -
②
application-test.yml测试环境 -
③
application-prod.yml生产环境
只需在①和②配置文件中添加如下配置
yaml
springdoc:
  api-docs:
    enabled: true
而③配置文件中添加
yml
springdoc:
  api-docs:
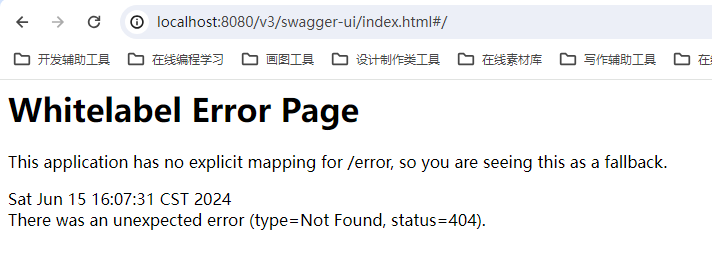
enabled: false通过上面配置后,我们在开发和测试环境下:就能正常访问http://localhost:8080/v3/swagger-ui/index.html#/
而在生产环境下就无法访问,报如下错误
5.5 配置API分组
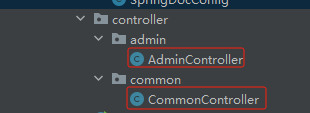
为了演示API分组,我们在controller包下面再建立admin包和common包,包下分别添加AdminController和CommonController接口类,结构及代码如下
① AdminController类
java
// AdminController
@RestController
@RequestMapping("/admin")
public class AdminController {

    @GetMapping("/index")
    public String  admin(){
        return "admin";
    }
}
② CommonController 类
java
@RestController
@RequestMapping("/common")
public class CommonController {

   @GetMapping("/hello")
    public String hello(){
        return "hello";
    }
}
在默认情况(没有分组)的情况下,所有包下接口都显示在一一个默认组下面,如/common/* 和/admin/* 访问路径下的接口都显示在一起,如下图所示
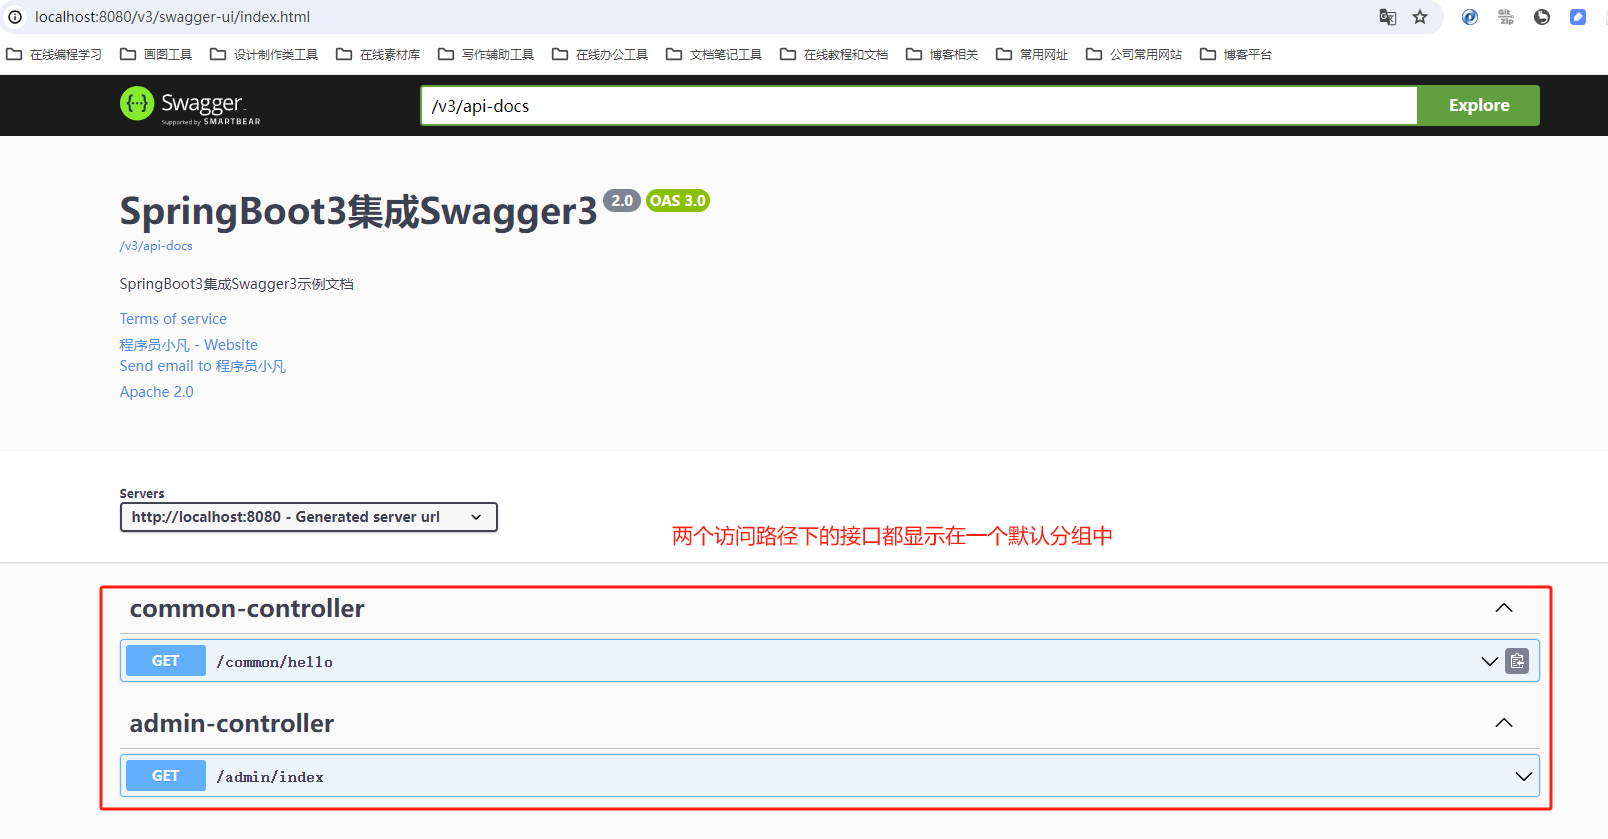
这时,如果/common/* 下的接口比较多,/admin/* 下的接口也比较多,界面上显示就很混乱
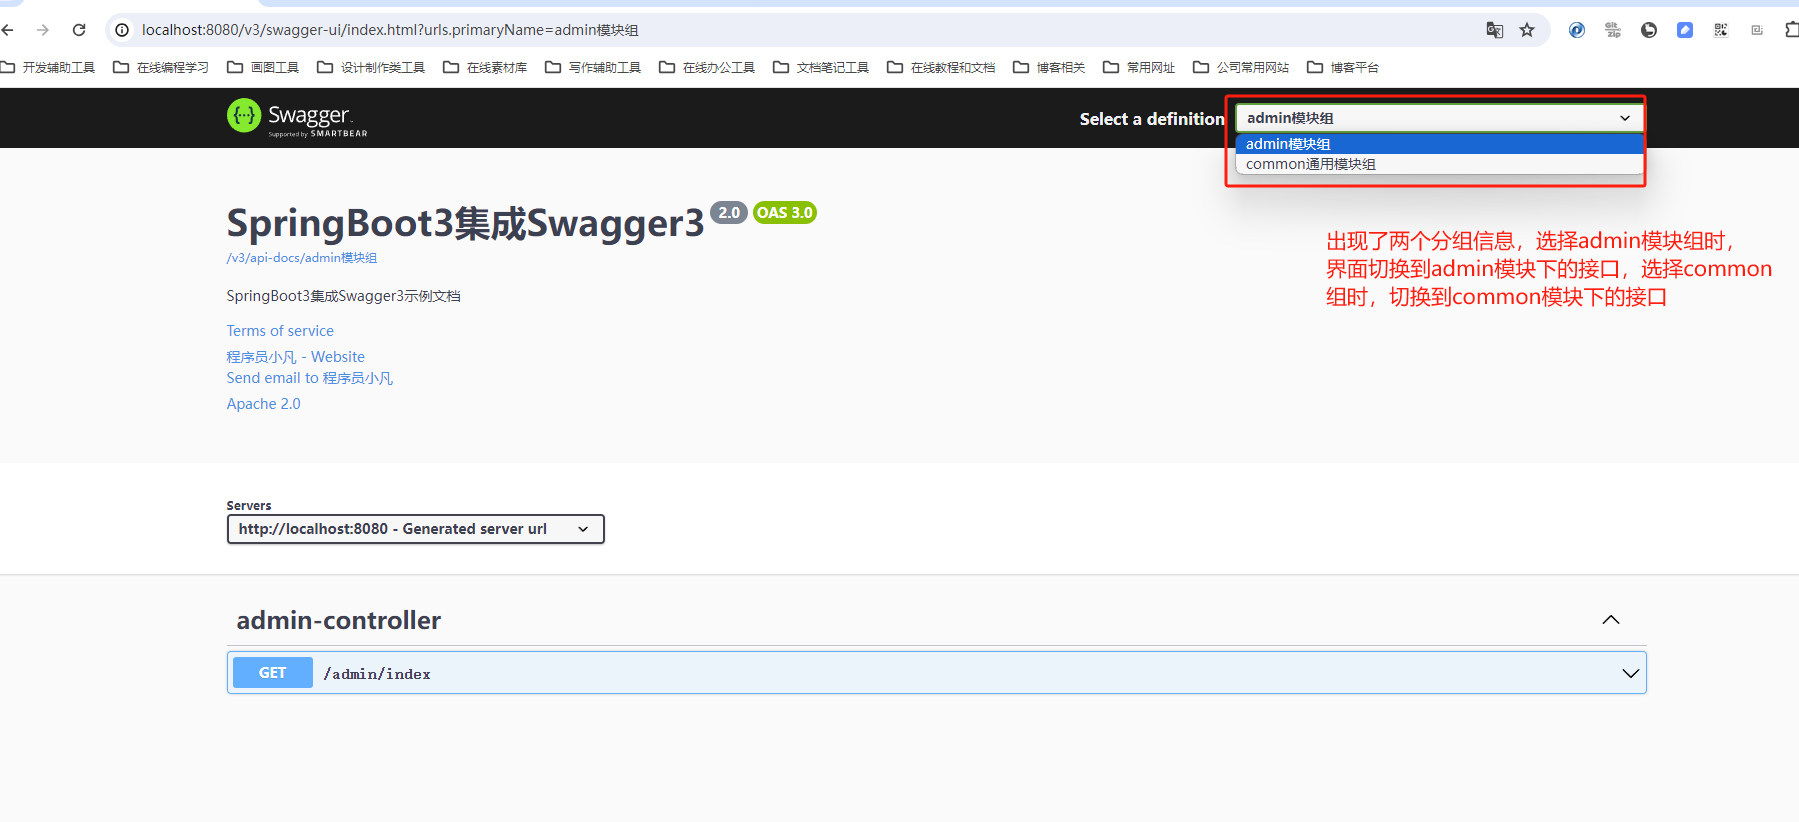
解决办法就是添加分组信息 ,我们在SpringDocConfig 配置类中添加如下代码,这样就把接口分为了"common通用模块组" 和"admin模块组" 两个组
java
@Bean("commonGroupApi")
public GroupedOpenApi webGroupApi() {
    return GroupedOpenApi.builder().group("common通用模块组")
        .pathsToMatch("/common/**")
        .build();
}

@Bean("adminGroupApi")
public GroupedOpenApi adminGroupApi() {
    return GroupedOpenApi.builder().group("admin模块组")
        .pathsToMatch("/admin/**")
        .build();
}重启服务,再访问http://localhost:8080/v3/swagger-ui/index.html 如下
5.6 配置接口信息
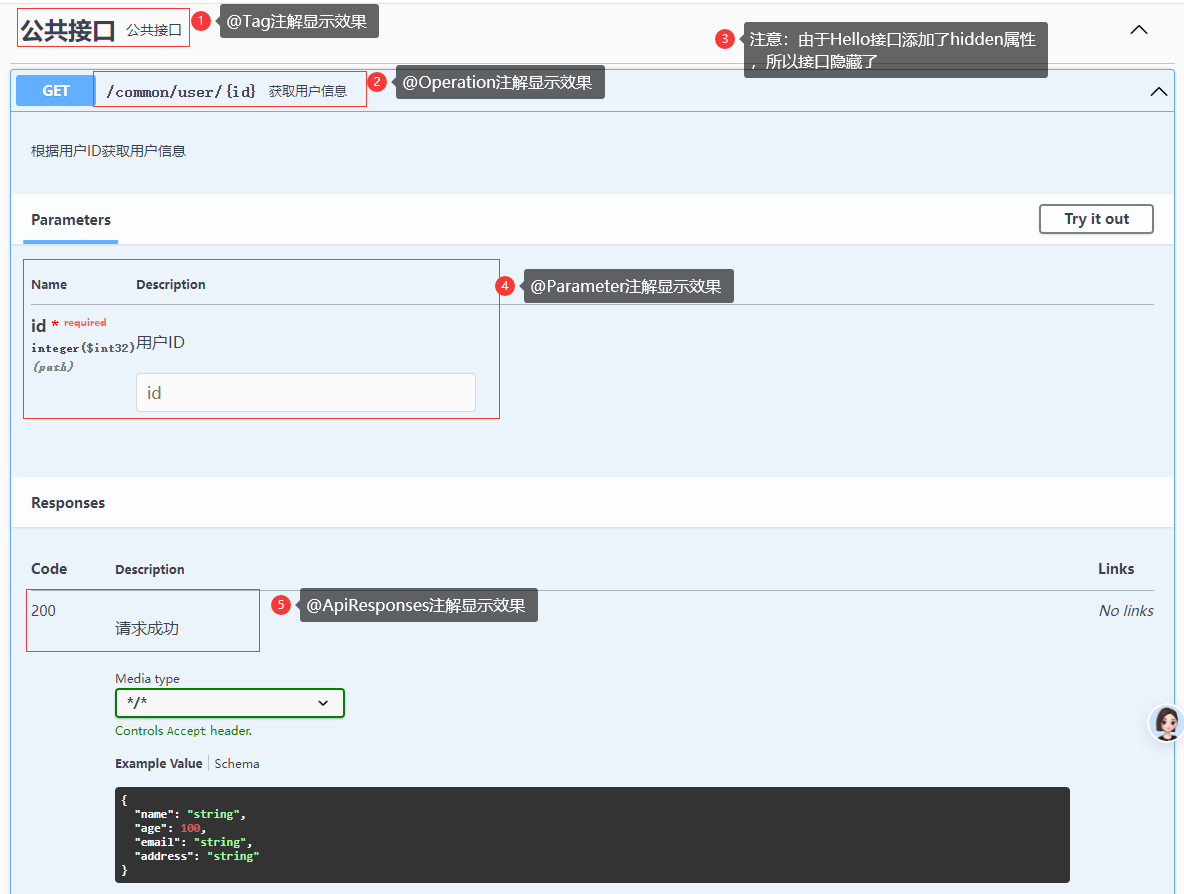
① @Tag 注解使用
对一个 operation 进行说明或定义的标签,用在类或方法上,也可以用在 @OpenAPIDefinition 中定义标签。
常用参数:
name: 名称description: 接口描述信息
示例:
用在类上
java
@RestController
@RequestMapping("/common")
@Tag(name = "公共接口", description = "公共接口")
public class CommonController {
    //......
}
② @Operation 注解使用
用于说明方法用途,用在方法上。
参数:
summary:方法概要,方法的一个简单介绍,建议 120 个字符内description:方法描述,一般是很长的内容hidden:是否隐藏
示例:
java
@GetMapping("/hello")
@Operation(summary = "hello接口", description = "hello接口描述" ,hidden = true)
public String hello(){
    return "hello";
}
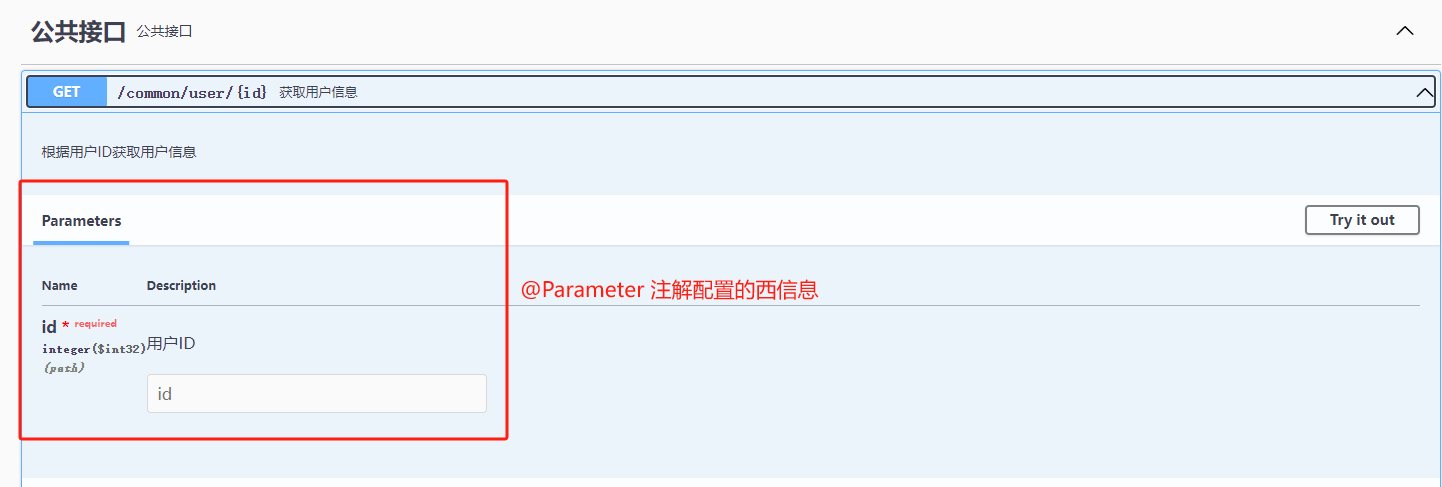
③ @Parameter注解使用
用于说明方法参数,用在方法参数上。
参数:
name:指定的参数名in:参数位置,可选query、header、path或cookie,默认为空,表示忽略description:参数描述required:是否必填,默认为false
示例:
java
@GetMapping("/user/{id}")
public User getUser( @Parameter(name = "id",in = ParameterIn.PATH,description = "用户ID",required = true) @PathVariable("id") Integer id){
    User user = userService.getUserById(id);
    return user;
}
前端页面查看
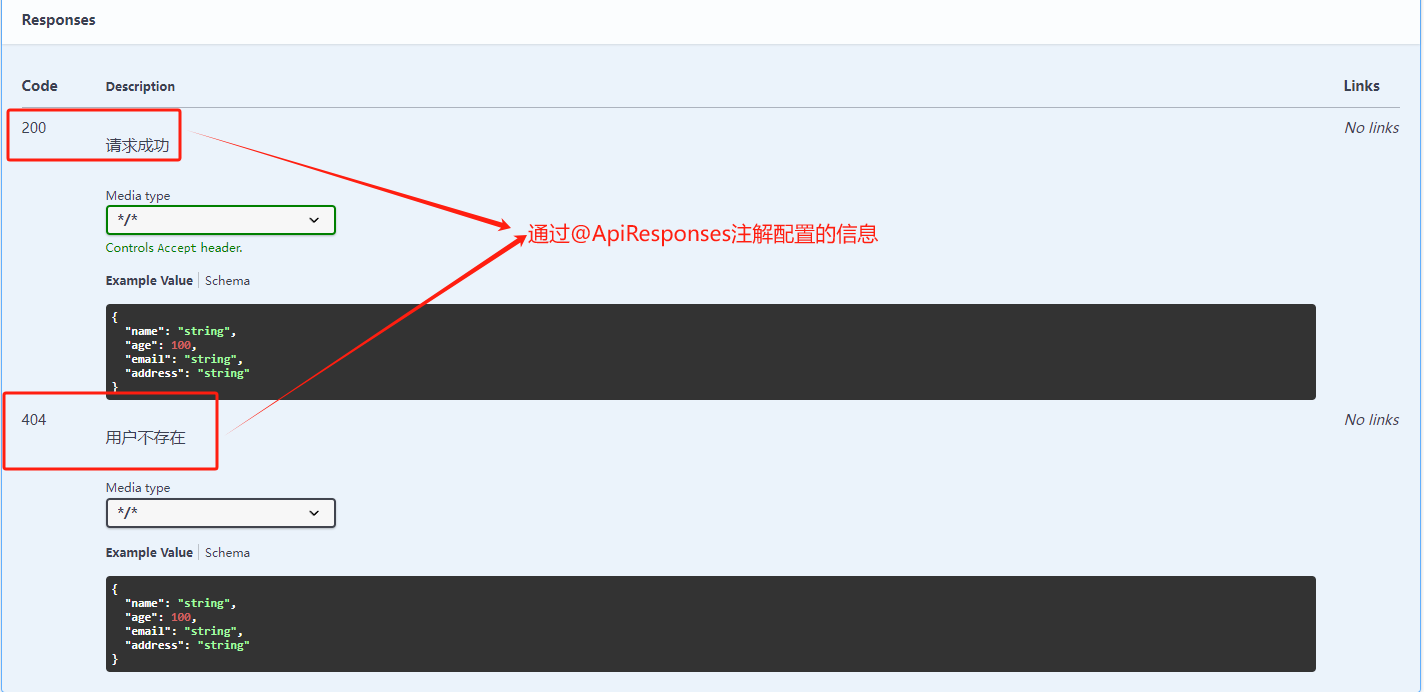
④ @ApiResponse 注解使用
用于说明一个响应信息,用在 @ApiResponses 中。
参数:
responseCode:HTTP 响应码description:描述
示例:
java
@GetMapping("/user/{id}")
@Operation(summary = "获取用户信息", description = "根据用户ID获取用户信息")
@ApiResponses(value ={
    @ApiResponse(responseCode = "200", description = "请求成功"),
    @ApiResponse(responseCode = "404", description = "用户不存在")
})
public User getUser( @Parameter(name = "id",in = ParameterIn.PATH,description = "用户ID",required = true) @PathVariable("id") Integer id){
    User user = userService.getUserById(id);
    return user;
}
完整配置
java
@RestController
@RequestMapping("/common")
@Tag(name = "公共接口", description = "公共接口")
public class CommonController {

    @Autowired
    private IUserService userService;

   @GetMapping("/hello")
   @Operation(summary = "hello接口", description = "hello接口描述" ,hidden = true)
    public String hello(){
        return "hello";
    }

    @GetMapping("/hi")

    @Operation(summary = "hi接口", description = "hi接口描述")
    public String Hi(){
        return "Hi 程序员小凡";
    }

    @GetMapping("/user/{id}")
    @Operation(summary = "获取用户信息", description = "根据用户ID获取用户信息")
    @ApiResponses(value ={
            @ApiResponse(responseCode = "200", description = "请求成功"),
            @ApiResponse(responseCode = "404", description = "用户不存在")
    })
    public User getUser( @Parameter(name = "id",in = ParameterIn.PATH,description = "用户ID",required = true) @PathVariable("id") Integer id){
        User user = userService.getUserById(id);
        return user;
    }
}重启后,浏览器访问http://localhost:8080/v3/swagger-ui/index.html 如下
5.7 配置实体信息
① 新建一个User实体类
java
@Data
public class User {
    private String name;
    private Integer age;
    private String email;
    private String address;
}
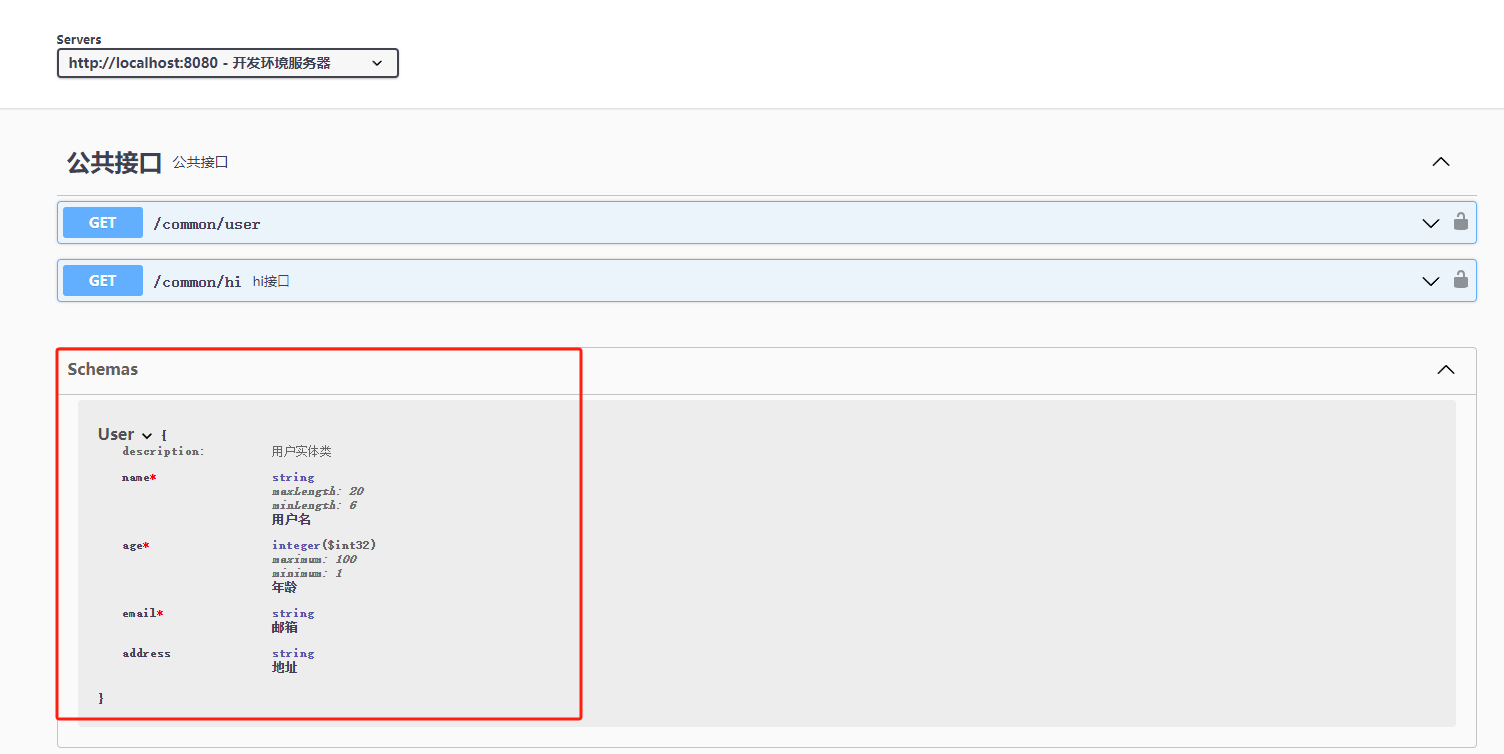
② @Schema标签使用
用于描述数据对象信息或数据对象属性,比如各种POJO类及属性,用在类或类属性上。
参数:
name:属性名称description:属性描述required:是否必须minLength:字符最小长度maxLength:字符最大长度
③使用示例:
java
@Data
@Schema(description = "用户实体类",name = "User")
public class User {
    @Schema(description = "用户名",name =  "name",minLength =  6,maxLength = 20,required = true)
    private String name;
    @Schema(description = "年龄",name =  "age",required = true,minimum = "1",maximum = "100")
    private Integer age;
    @Schema(description = "邮箱",name =  "email",required = true)
    private String email;
    @Schema(description = "地址",name =  "address")
    private String address;
}
④ 浏览器访问:http://localhost:8080/v3/swagger-ui/index.html ,我们看到配置的实体信息显示出来了
六、接口调试
通过上面各种配置之后,我们的在线接口文档基本上生成得差不多了。接下来我们就来说说怎么使用在线接口文档进行接口测试
① 测试说明
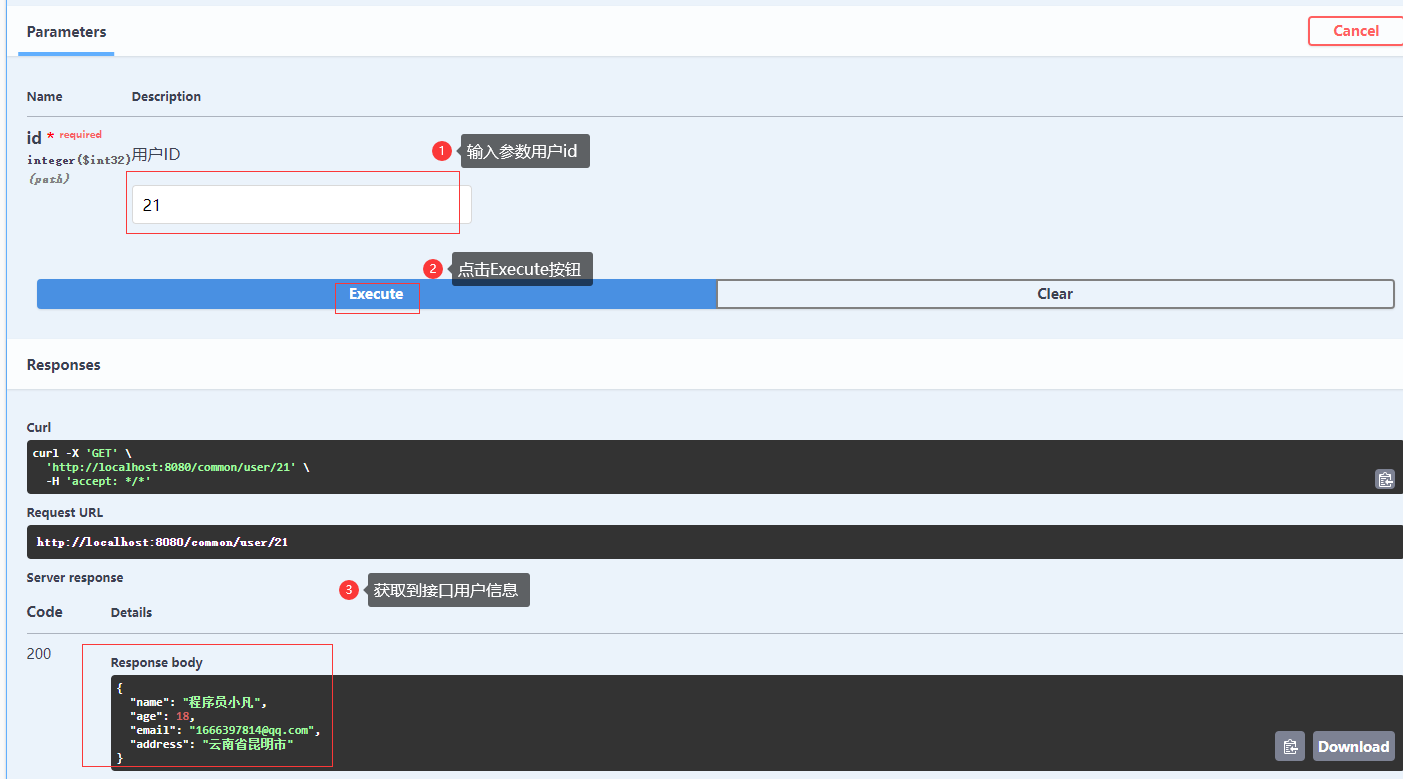
在之前小节中我们开发了要给根据用户ID 获取用户信息的接口getUser。我们现在要做的就是在前端UI界面中找到这个接口,
在开发环境下输入用户ID值,然后获取用户信息。
② 选择组信息
【获取用户信息】这个接口在,common通用模块组下面,所以我们第一步就要前端UI界面右上角选择这个组

② 选择开发环境
在Servers 下选择配置好的开发环境

③ 找到我们要测试的接口

④ 测试接口,获取响应数据
接口右边下三角箭头展开接口------>点击Try it out

输入参数:用户ID------> 点击【Execute】----->在Response body 中查看接口响应信息
七、添加请求头
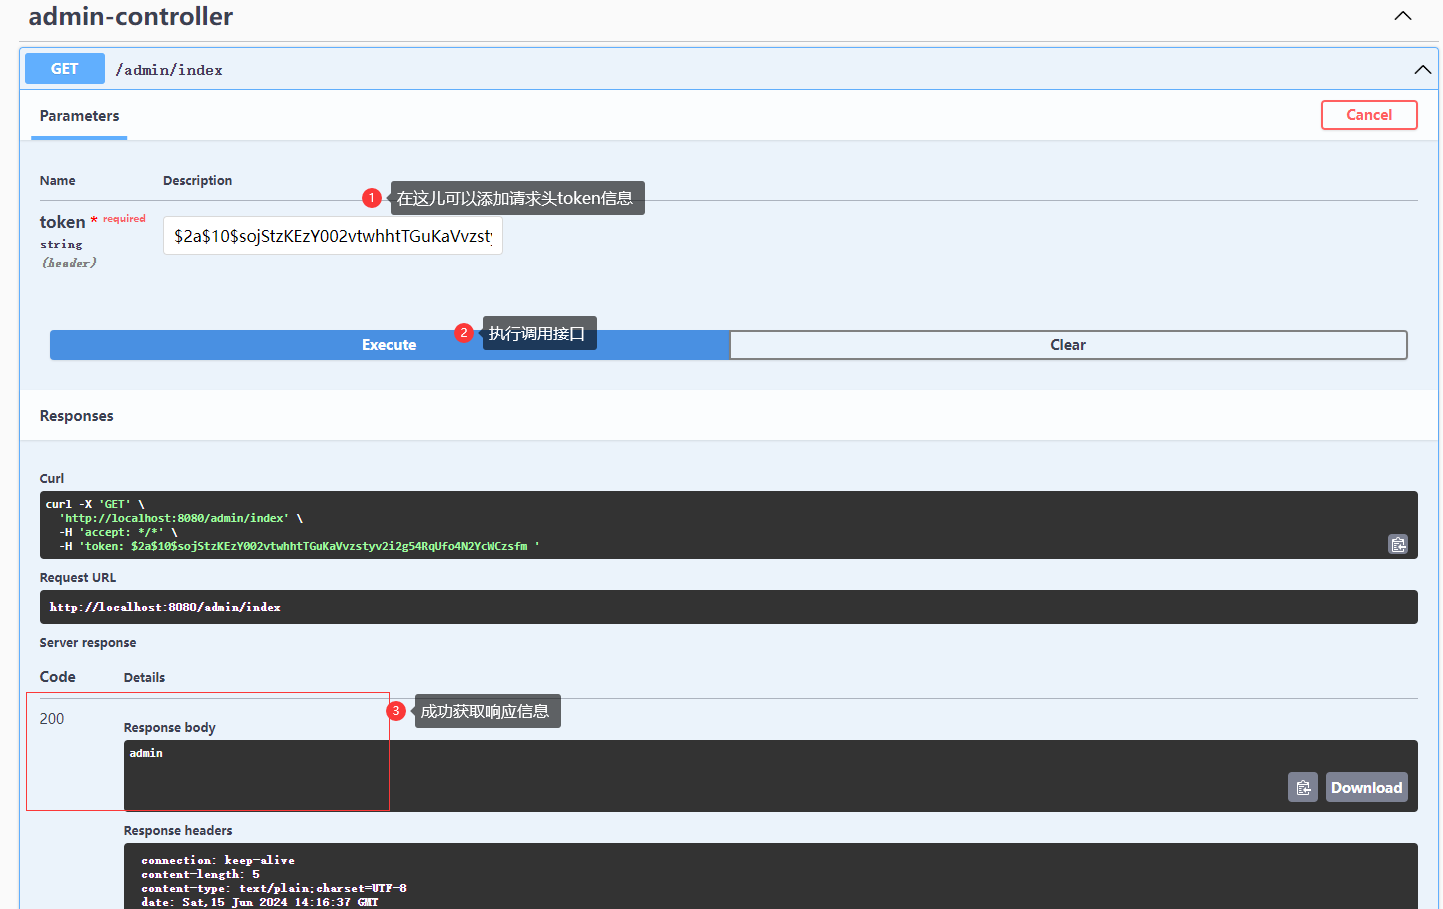
很多时候我们接口都需要认证之后才能访问,这时候我们就需要接口调用的时候携带着Token信息
示例:
我们通过@RequestHeader 注解 获取请求头中token信息
java
@GetMapping("/index")
public String  admin(@RequestHeader ("token") String token){
	System.out.println("token>>>>>>>>>>>>>>>>>>>>>>>>"+token);
    //token 验证
    //.....各种业务逻辑
    return "admin";
}
到此,本期内容就结束了,★,° :.☆( ̄▽ ̄)/$:.°★ 。 希望对您有所帮助
我们下期再见 ヾ(•ω•`)o (●'◡'●)