注册 QQ 开放平台账号
账号注册
QQ 机器人:一个机器人可以被添加到 群聊/频道 内对话,QQ 用户也可以直接跟机器人 单独对话。
开发者账号主体要求
python
单聊对话:【定向邀请】
群聊场景:仅支持企业主体【个人主体暂不支持】
频道场景:企业主体与个人主体均可申请
注册地址:QQ 开放平台(opens new window)
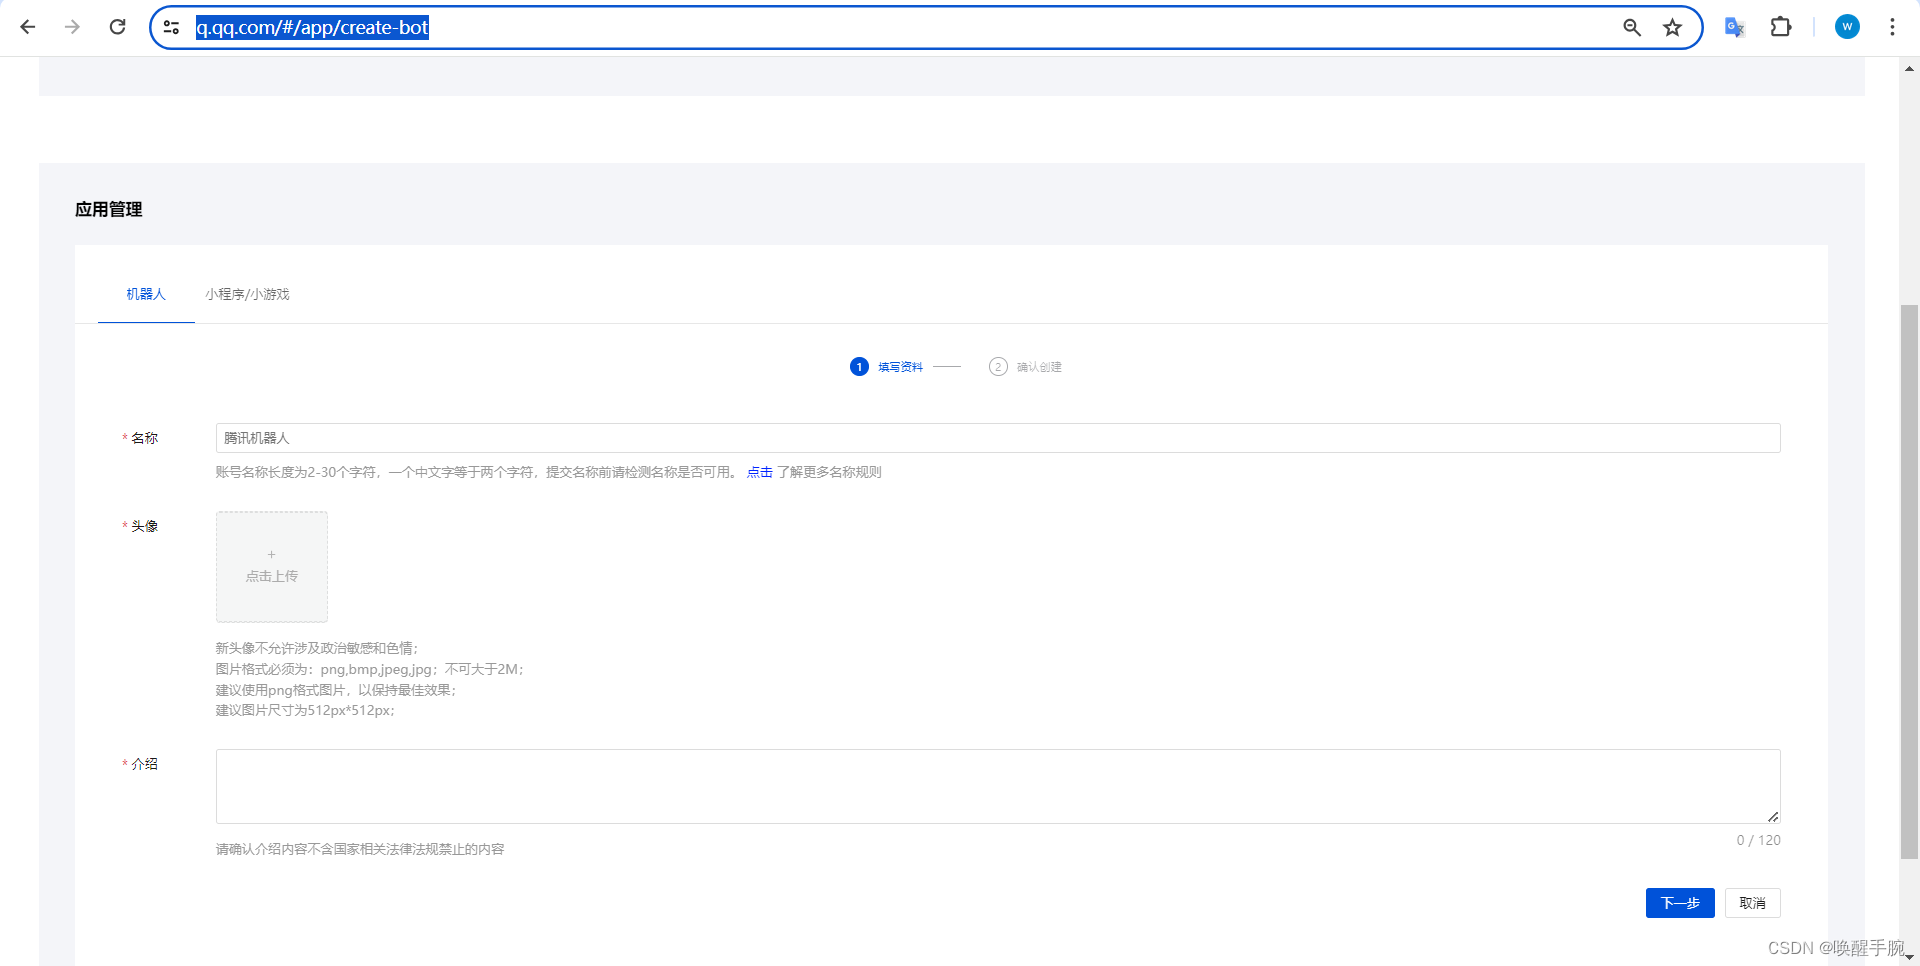
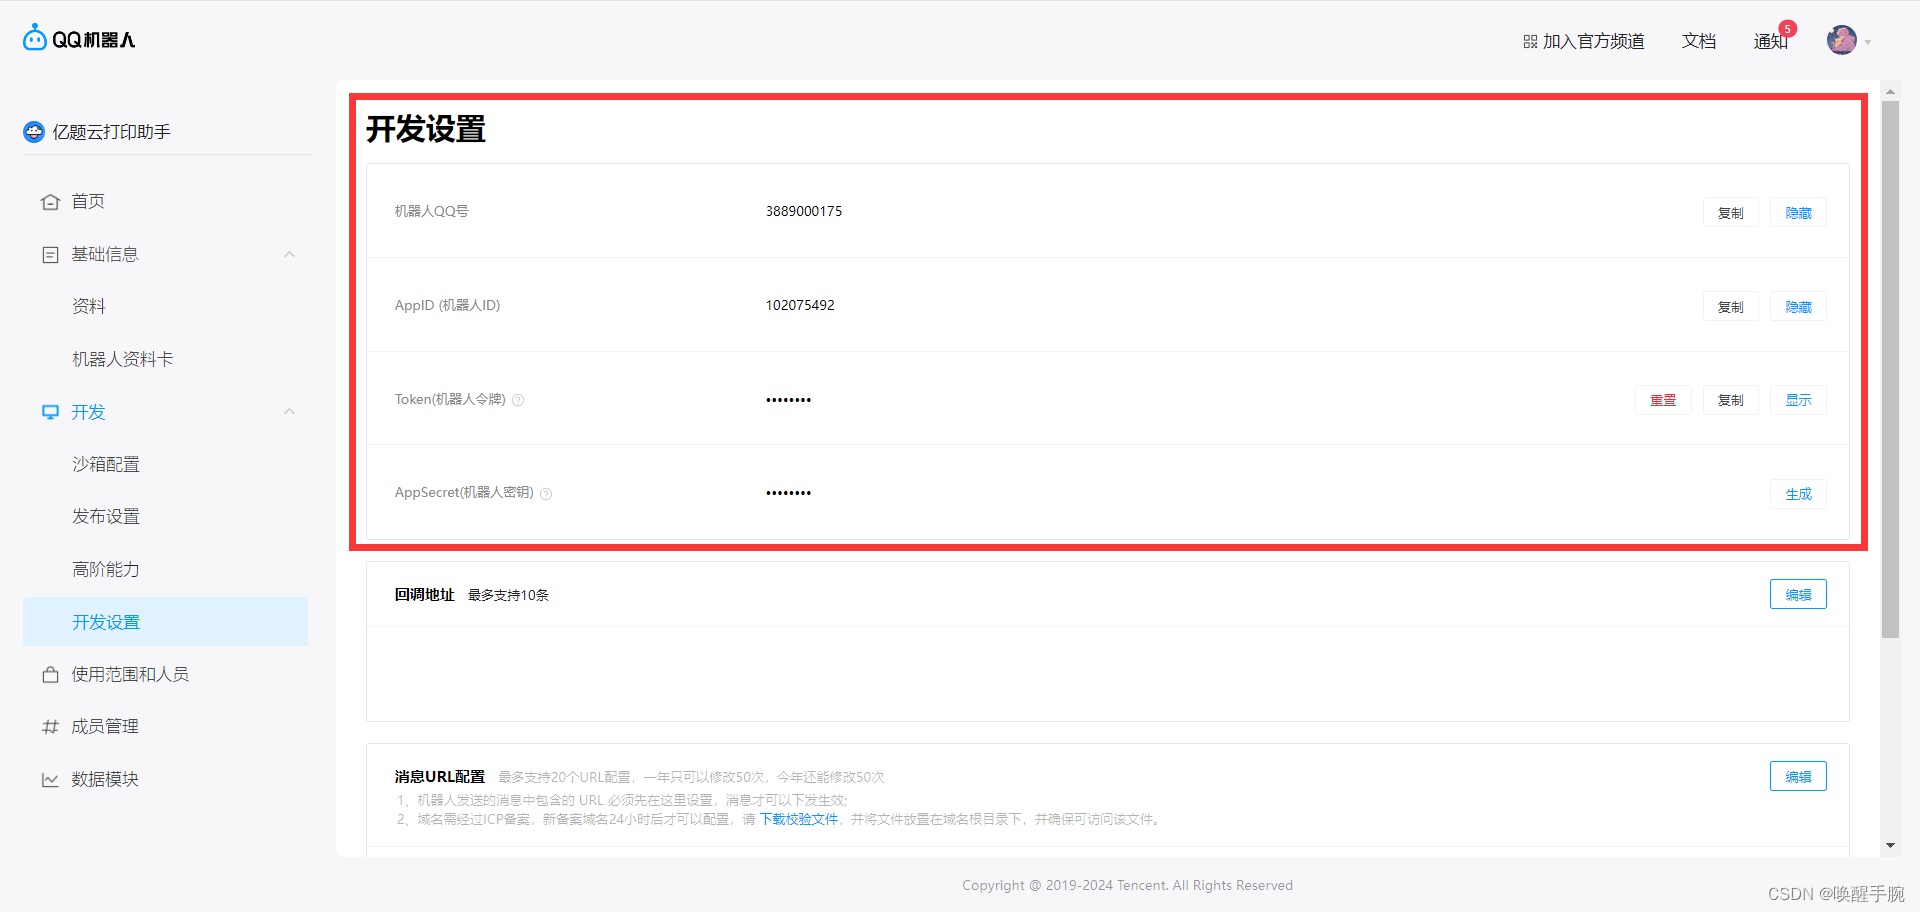
注册创建机器人:获得的开发机器人接入票据 AppID AppSecret Token
创建机器人:https://q.qq.com/#/app/create-bot
开发设置:https://q.qq.com/qqbot/#/developer/developer-setting
查询官方文档
新版机器人官方文档:https://bot.q.qq.com/wiki/develop/api-v2/
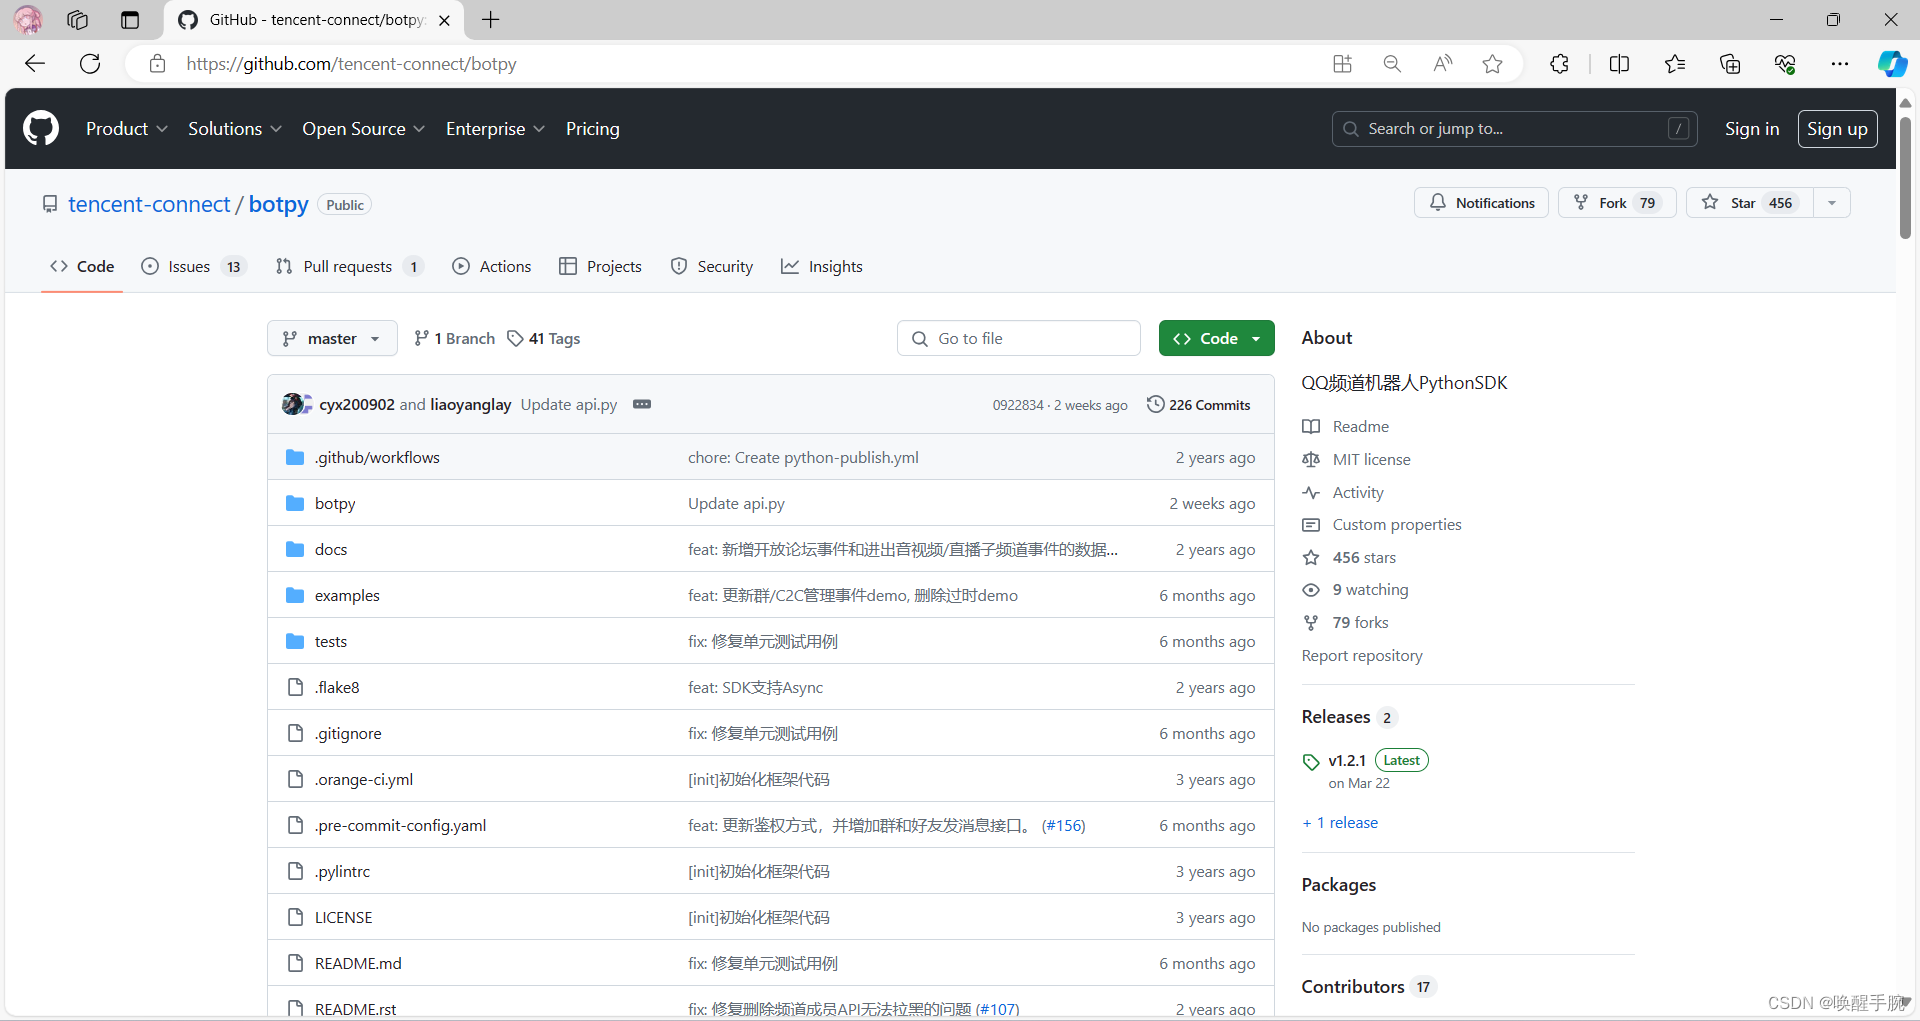
GitHub 地址
安装 qq-botpy 环境
更新包的话需要添加 --upgrade 兼容版本:python3.8+
python
pip install qq-botpy使用
需要使用的地方import botpy
python
import botpy兼容提示
原机器人的老版本qq-bot仍然可以使用,但新接口的支持上会逐渐暂停,此次升级不会影响线上使用的机器人。
基础案例演示
通过继承实现bot.Client, 实现自己的机器人Client
实现机器人相关事件的处理方法,如 on_at_message_create, 详细的事件监听列表,请参考 事件监听.md
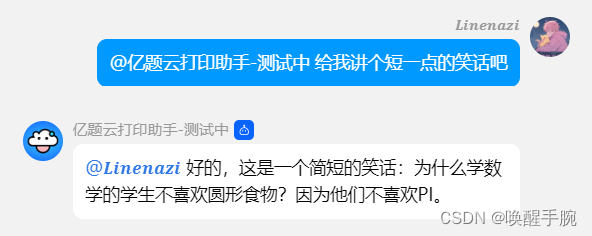
定义机器人被@的后自动回复
python
import botpy
from botpy.message import Message

class MyClient(botpy.Client):
    async def on_at_message_create(self, message: Message):
await message.reply(content=f"机器人{self.robot.name}收到你的@消息了: {message.content}")注意:每个事件会下发具体的数据对象,如message相关事件是message.Message的对象 (部分事件透传了后台数据,暂未实现对象缓存)
设置机器人需要监听的事件通道并启动client
python
import botpy
from botpy.message import Message

class MyClient(botpy.Client):
    async def on_at_message_create(self, message: Message):
        await self.api.post_message(channel_id=message.channel_id, content="content")

intents = botpy.Intents(public_guild_messages=True)
client = MyClient(intents=intents)
client.run(appid="12345", token="xxxx")
其他案例
examples 目录下存放示例机器人 具体使用可参考 Readme.md:https://github.com/tencent-connect/botpy/blob/master/examples/README.md
examples/
.
├── README.md
├── config.example.yaml # 示例配置文件(需要修改为config.yaml)
├── demo_announce.py # 机器人公告API使用示例
├── demo_api_permission.py # 机器人授权查询API使用示例
├── demo_at_reply.py # 机器人at被动回复async示例
├── demo_at_reply_ark.py # 机器人at被动回复ark消息示例
├── demo_at_reply_embed.py # 机器人at被动回复embed消息示例
├── demo_at_reply_command.py # 机器人at被动使用Command指令装饰器回复消息示例
├── demo_at_reply_file_data.py # 机器人at被动回复本地图片消息示例
├── demo_at_reply_keyboard.py # 机器人at被动回复md带内嵌键盘的示例
├── demo_at_reply_markdown.py # 机器人at被动回复md消息示例
├── demo_at_reply_reference.py # 机器人at被动回复消息引用示例
├── demo_dms_reply.py # 机器人私信被动回复示例
├── demo_get_reaction_users.py # 机器人获取表情表态成员列表示例
├── demo_guild_member_event.py # 机器人频道成员变化事件示例
├── demo_interaction.py # 机器人互动事件示例(未启用)
├── demo_pins_message.py # 机器人消息置顶示例
├── demo_recall.py # 机器人消息撤回示例
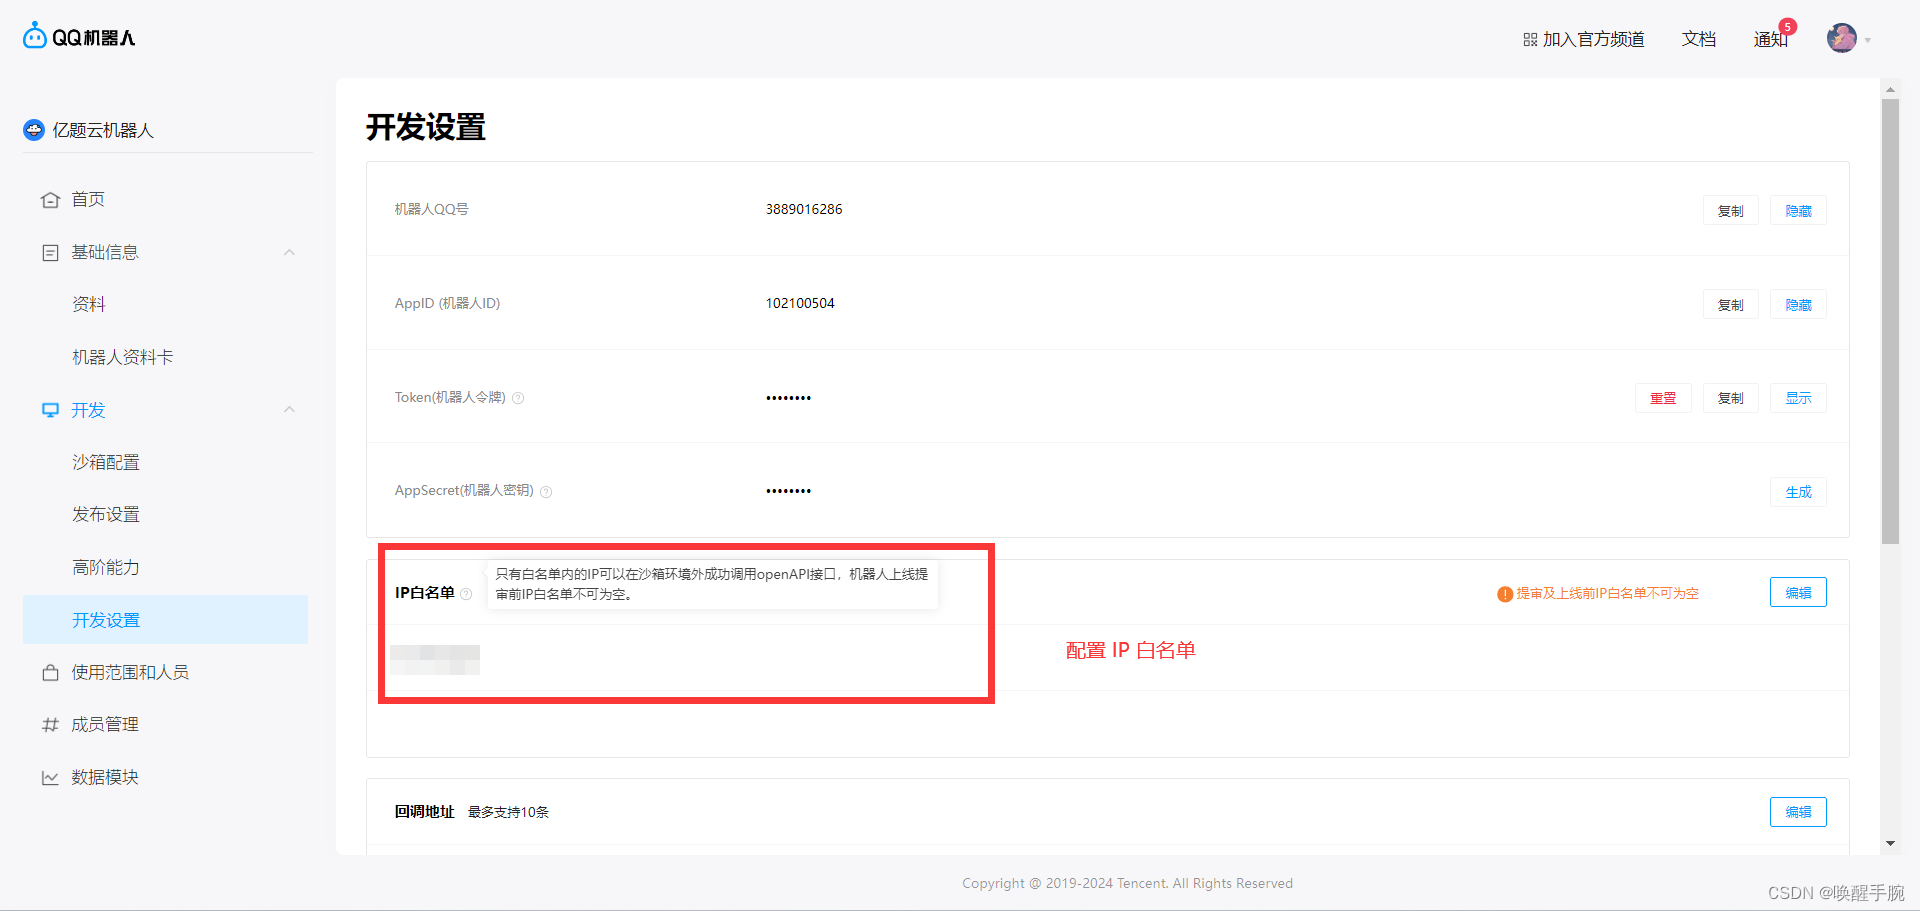
├── demo_schedule.py # 机器人日程相关示例配置 IP 白名单
部分之前就注册的机器人可能不需要进行配置,但是新注册的机器人在进行腾讯开放平台的提审之前,需要进行 IP 白名单的配置。
注意:只有白名单内的IP可以在沙箱环境外成功调用openAPI接口,机器人上线提审前IP白名单不可为空。
配置 Sandbox QQ 群
在QQ群配置
如需开发在QQ群使用的机器人功能请完成此项配置
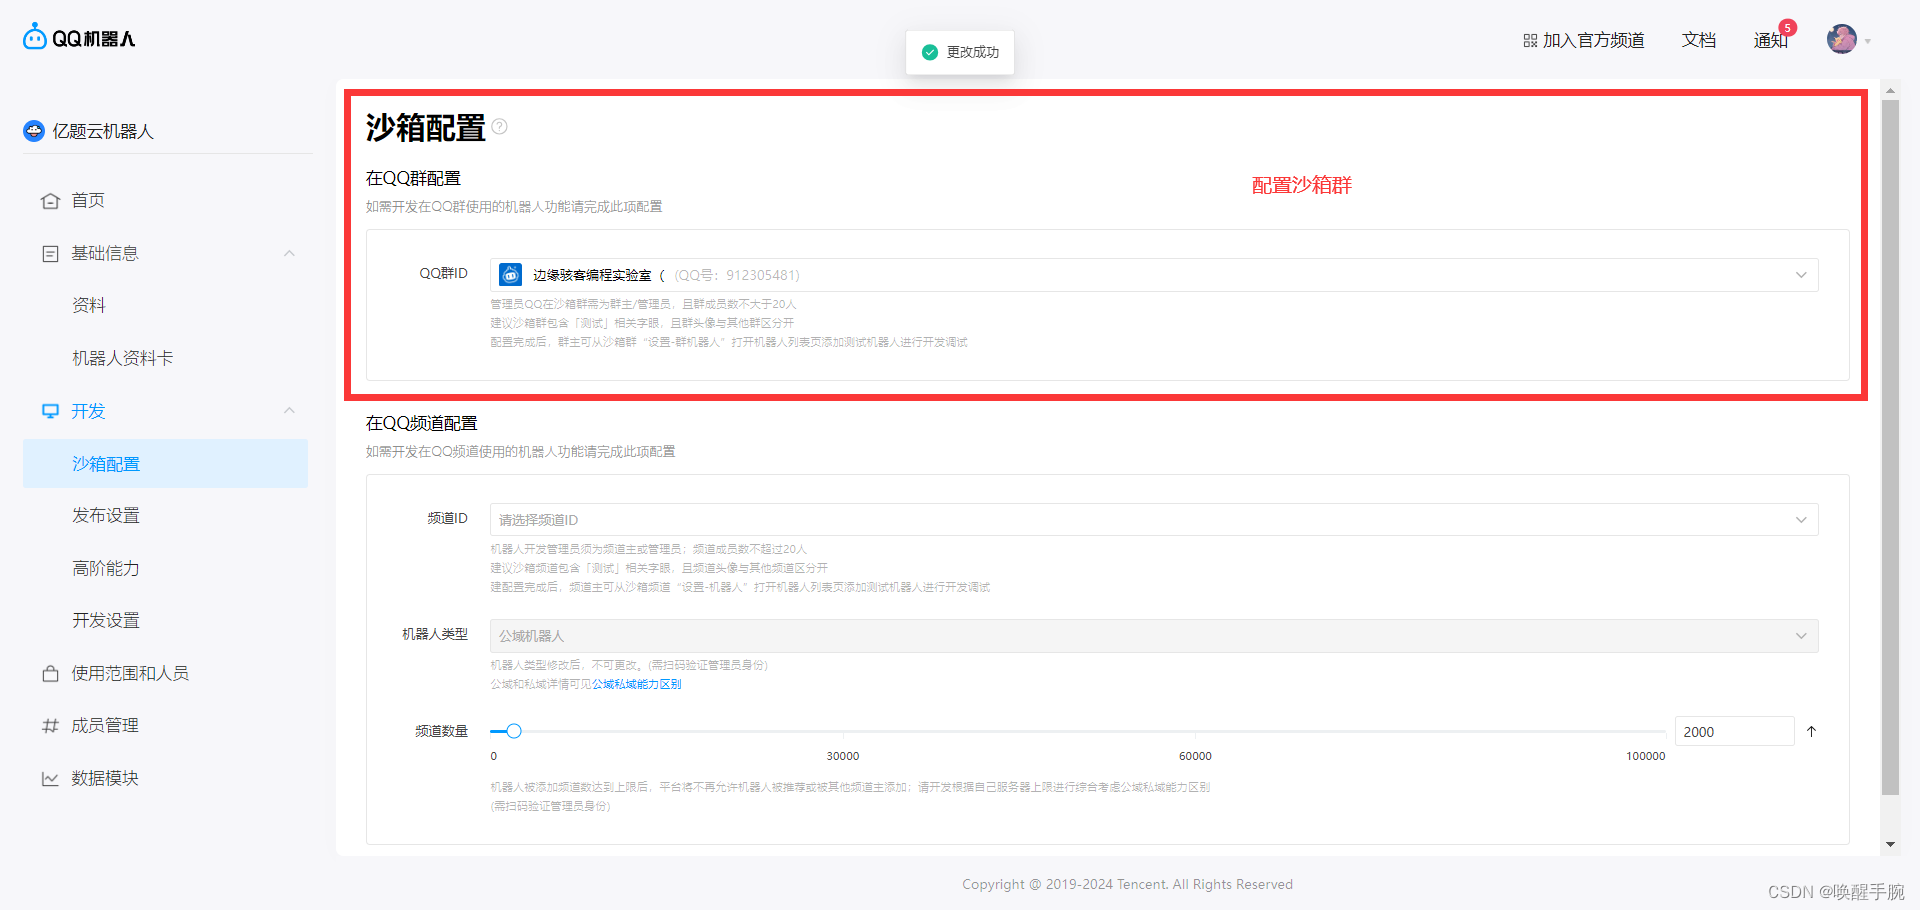
管理员QQ在沙箱群需为群主/管理员,且群成员数不大于20人。建议沙箱群包含「测试」相关字眼,且群头像与其他群区分开。配置完成后,群主可从沙箱群"设置-群机器人"打开机器人列表页添加测试机器人进行开发调试。
案例:OpenAi 问答
常用镜像源
python
清华:https://pypi.tuna.tsinghua.edu.cn/simple
阿里云:http://mirrors.aliyun.com/pypi/simple/
中国科技大学 https://pypi.mirrors.ustc.edu.cn/simple/
华中理工大学:http://pypi.hustunique.com/
山东理工大学:http://pypi.sdutlinux.org/
豆瓣:http://pypi.douban.com/simple/
配置镜像源
python
pip config set global.index-url https://pypi.tuna.tsinghua.edu.cn/simple
Writing to C:\Users\Administrator\AppData\Roaming\pip\pip.ini
然后我们把这个 C:\Users\Administrator\AppData\Roaming\pip\pip.ini 路径添加到系统环境变量就好了(怎么添加环境变量?跟给 pip 添加环境变量一样操作,只是路径不一样)
安装 openai 库
python
pip install openai==1.33.0 -i 镜像源项目结构
python
bot.py      					机器人主函数
plugins/chat_api.py 		    调用查询 OpenAi 接口插件
config.yaml						机器人基本信息
.env 					        OpenAi token 和 中转路径配置
配置 Token 和 中转地址
在项目同级目录创建 .env 文件
python
OPENAI_API_KEY=sk-······
OPENAI_BASE_URL=https://api.······
./plugins/chat_api.py 调用查询 OpenAi 接口
python
from openai import OpenAI
import dotenv
dotenv.load_dotenv(".env")

client = OpenAI()


def chat_answer(text):
    response = client.chat.completions.create(
        model="gpt-3.5-turbo",
        messages=[
            {"role": "system", "content": "You are a helpful assistant."},
            {"role": "user", "content": text}
        ]
    )
    return response.choices[0].message.content
查询 openai bot.py 源码
python
import os

import botpy
from botpy import logging
from botpy.ext.cog_yaml import read
from botpy.message import GroupMessage
from plugins import chat_api

test_config = read(os.path.join(os.path.dirname(__file__), "config.yaml"))
_log = logging.get_logger()


class MyClient(botpy.Client):
    async def on_ready(self):
        _log.info(f"robot 「{self.robot.name}」 on_ready!")

    async def on_group_at_message_create(self, message: GroupMessage):
        openid = message.author.member_openid
        _log.info(f"robot {openid} on_ready!")
        msg = message.content.strip()

        result = chat_api.chat_answer(text=msg)
        await message._api.post_group_message(
            group_openid=message.group_openid,
            msg_type=0,
            msg_id=message.id,
            content=f"{result}")
        return

if __name__ == "__main__":
    intents = botpy.Intents(public_messages=True)
    client = MyClient(intents=intents)
    client.run(appid=test_config["appid"], secret=test_config["secret"])
运行效果
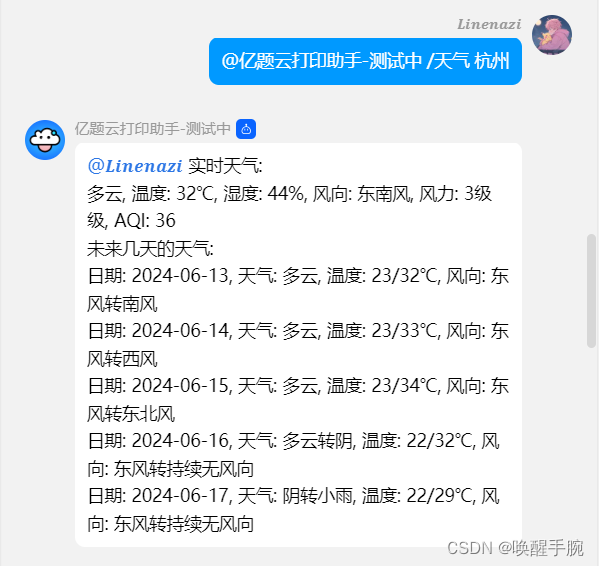
案例:查询天气信息
项目结构
python
bot.py      					机器人主函数
plugins/weather_api.py 		    调用查询天气接口插件
config.yaml						机器人基本信息
./plugins/weather_api.py 调用查询天气接口
python
import requests


def get_weather(city_name):
    # 设置请求的URL和参数
    url = f'https://apis.juhe.cn/simpleWeather/query?key=50a3bd415158e186903d6e6994157589&city={city_name}'
    # 发送GET请求
    response = requests.get(url)
    # 检查请求是否成功
    if response.status_code == 200:
        # 解析返回的JSON数据
        data = response.json()

        # 检查是否查询成功
        if data['reason'] == '查询成功!':
            # 返回天气数据
            return data['result']
        else:
            return {"error": "查询失败: " + data['reason']}
    else:
        return {"error": "请求失败,状态码: " + str(response.status_code)}


# 调用函数并处理返回的天气数据
def format_weather(city_name):
    # 假设这里你已经有了城市的URL编码,这里用'%E9%87%8D%E5%BA%86'作为示例
    city_encoded = city_name  # 重庆的URL编码
    weather_data = get_weather(city_encoded)

    # 检查是否返回了错误
    if 'error' in weather_data:
        return weather_data['error']
    else:
        # 实时天气
        realtime_weather = weather_data['realtime']
        result = f"实时天气:" + "\n" +  f"{realtime_weather['info']}, 温度: {realtime_weather['temperature']}℃, 湿度: {realtime_weather['humidity']}%, 风向: {realtime_weather['direct']}, 风力: {realtime_weather['power']}级, AQI: {realtime_weather['aqi']}"
        # 未来几天的天气
        result = result + "\n" + "未来几天的天气:"
        for day in weather_data['future']:
            result = result + "\n" + f"日期: {day['date']}, 天气: {day['weather']}, 温度: {day['temperature']}, 风向: {day['direct']}"
        return result
查询天气信息 bot.py 源码
python
import os

import botpy
from botpy import logging
from botpy.ext.cog_yaml import read
from botpy.message import GroupMessage
from plugins import weather_api

config = read(os.path.join(os.path.dirname(__file__), "config.yaml"))
_log = logging.get_logger()


class MyClient(botpy.Client):
    async def on_ready(self):
        _log.info(f"robot 「{self.robot.name}」 on_ready!")

    async def on_group_at_message_create(self, message: GroupMessage):
        openid = message.author.member_openid
        _log.info(f"robot {openid} on_ready!")
        msg = message.content.strip()

        if msg.startswith("/天气"):
            city_name = msg.replace("/天气", "").strip()
            result = weather_api.format_weather(city_name)
            await message._api.post_group_message(
                group_openid=message.group_openid,
                msg_type=0,
                msg_id=message.id,
                content=f"{result}")


if __name__ == "__main__":
    intents = botpy.Intents(public_messages=True)
    client = MyClient(intents=intents)
    client.run(appid=config["appid"], secret=config["secret"])
运行结果预览
案例:配置关键词回复
项目结构
python
bot.py      					机器人主函数
plugins/match_question.py 		查询本地 excel 问答表插件
config.yaml						机器人基本信息
关键词.xlsx						关键词问答表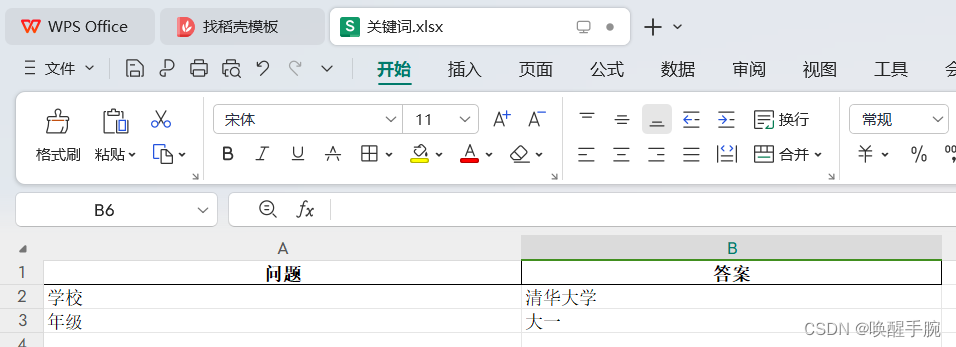
./plugins/match_question.py 查询本地 excel 问答表
python
from openpyxl import load_workbook

# 加载工作簿
wb = load_workbook('关键词.xlsx')
# 选择活动工作表,或者通过名称或索引选择其他工作表
sheet = wb.active  # 或者 wb['Sheet1'] 或 wb.worksheets[0]
question_list = []

# 遍历行和列(从第二行开始,假设第一行是标题)
for row in sheet.iter_rows(min_row=2, values_only=True):  # 添加 values_only=True 以只获取单元格的值
    question = {
        "question": row[0] if row[0] is not None else '',  # 确保如果单元格为空,则使用空字符串
        "answer": row[1] if row[1] is not None else '',
    }
    question_list.append(question)  # 添加创建的字典到列表中,而不是原始的 row


def match(word):
    """
    匹配关键词
    :param word:
    :return:
    """
    for question in question_list:
        if word in question['question']:
            return question['answer']

    for question in question_list:
        if word == question['question']:
            return question['answer']

    return ""
bot.py 源码
python
import os

import botpy
from botpy import logging
from botpy.ext.cog_yaml import read
from botpy.message import GroupMessage
from plugins import match_question

test_config = read(os.path.join(os.path.dirname(__file__), "config.yaml"))
_log = logging.get_logger()


class MyClient(botpy.Client):
    async def on_ready(self):
        _log.info(f"robot 「{self.robot.name}」 on_ready!")

    async def on_group_at_message_create(self, message: GroupMessage):
        openid = message.author.member_openid
        _log.info(f"robot {openid} on_ready!")
        msg = message.content.strip()

        if match_question.match(msg):
            result = match_question.match(msg)
            await message._api.post_group_message(
                group_openid=message.group_openid,
                msg_type=0,
                msg_id=message.id,
                content=f"{result}")
            return


if __name__ == "__main__":
    intents = botpy.Intents(public_messages=True)
    client = MyClient(intents=intents)
    client.run(appid=test_config["appid"], secret=test_config["secret"])
运行效果

requirements.txt 依赖
进入项目路径执行如下 cmd 命令,然后在当前目录是可以看到生成"requirements.txt"文件,可以打开看看,会发现有很多个包信息,其实这里是把你当前 python 环境的所有包的相关信息导出来了。
pip freeze 是一个常用的 pip 命令,用于列出当前 Python 环境中已安装的所有包及其版本号。这个命令的输出通常被用于生成requirements.txt文件,该文件包含了项目运行所需的所有依赖项及其版本信息。这样,其他开发者或系统可以轻松地安装与项目兼容的依赖项版本。
python
pip freeze > requirements.txt如果我们只需导出当前项目所需的依赖包,我可以采用另外一种方式(只导出项目的依赖包)。
pipreqs 是一个用于自动生成 Python 项目的依赖需求文件(requirements.txt)的工具。它可以根据项目中的import语句分析出项目所需的依赖包,并生成一个清单文件,方便其他人在不同环境中安装该项目所需的所有依赖包。
python
pip install pipreqs

pipreqs ./
本地演示
pipreqs --force ./
INFO: Not scanning for jupyter notebooks.
WARNING: Import named "openai" not found locally. Trying to resolve it at the PyPI server.
WARNING: Import named "openai" was resolved to "openai:1.34.0" package (https://pypi.org/project/openai/).
Please, verify manually the final list of requirements.txt to avoid possible dependency confusions.
WARNING: Import named "python-dotenv" not found locally. Trying to resolve it at the PyPI server.
WARNING: Import named "python-dotenv" was resolved to "python-dotenv:1.0.1" package (https://pypi.org/project/python-dotenv/).
Please, verify manually the final list of requirements.txt to avoid possible dependency confusions.
WARNING: Import named "Requests" not found locally. Trying to resolve it at the PyPI server.
WARNING: Import named "Requests" was resolved to "requests:2.32.3" package (https://pypi.org/project/requests/).
Please, verify manually the final list of requirements.txt to avoid possible dependency confusions.
INFO: Successfully saved requirements file in ./requirements.txt
注意:如果已经有
requirements.txt,需要使用pipreqs --force ./稍等一会就可以导出成功。
Ubantu 服务器部署
ubantu 安装 python 环境
首先,确保你的Ubuntu系统已更新到最新版本。然后,你可以通过以下步骤安装 Python 3(推荐安装 Python 3.x 版本,因为 Python 2.x 已经停止维护)在终端中输入以下命令并输入你的密码来更新软件包列表:
python
sudo apt update安装Python 3:在终端中输入以下命令并按下 Enter 键来安装Python 3:
python
sudo apt install python3安装过程中,系统会提示你确认安装,输入Y并按下Enter键开始安装过程。验证Python安装:安装完成后,你可以通过输入以下命令来验证Python是否已成功安装:
python
python3 --version提示:如果成功安装,系统将显示已安装的Python版本号。
在 Ubuntu 系统上安装 Python 环境,通常包括安装 Python 本身以及可能需要的 Python 包管理工具 pip,还可以进一步设置 Python 的虚拟环境。
root@ser542134727854:/home/guild-bot-server# pip3 install -r requirements.txt -i https://pypi.tuna.tsinghua.edu.cn/simple

Command 'pip3' not found, but can be installed with:

apt install python3-pip
安装依赖环境
pip install -r requirements.txt -i -i https://pypi.tuna.tsinghua.edu.cn/simple运行 bot.py 程序
nohup python3 bot.py &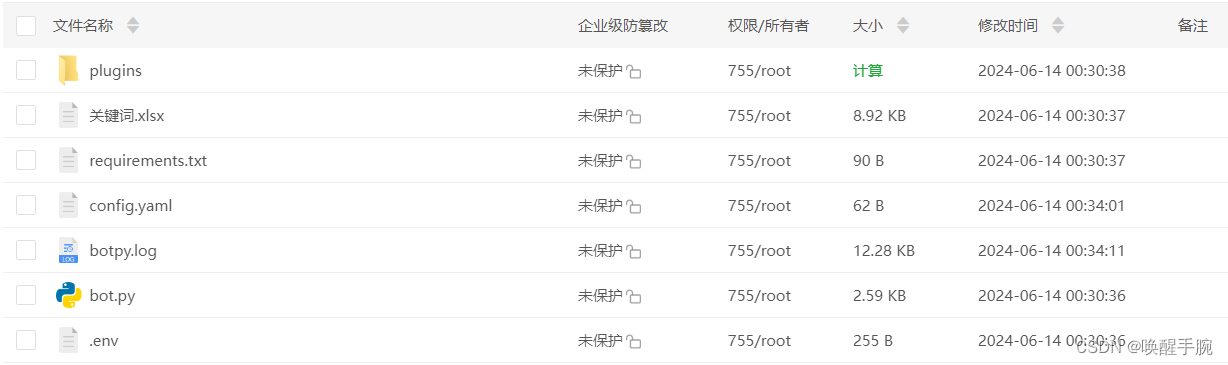
Centos 服务器部署
选择要安装python的目录,获取下载最新python的安装压缩包:
python
cd /home/python

wget https://www.python.org/ftp/python/3.10.2/Python-3.10.2.tgz
下载完成后解压缩:

说明:tar是Linux系统的解压命令,这句话是把文件解压到文件所在的文件夹。如果是土星话操作界面可以向在WIN上一样解压文件。同样也可以像在win上一样下载Python源文件放置在指定文件夹。
python
tar -zxvf Python-3.10.2.tgz进入解压缩后的目录,安装配置:
python
cd Python-3.10.2/
./configure
执行 ./configure 时,如果报错:configure: error: no acceptable C compiler found in $PATH
说明没有安装合适的编译器。这时,需要安装/升级 gcc 及其它依赖包。
python
sudo apt-get install make gcc gcc-c++ 安装编译Python3源文件所需的编译环境
python
$ yum install -y gcc
$ yum install -y zlib*
$ yum -y install zlib-devel bzip2-devel openssl-devel ncurses-devel sqlite-devel readline-devel tk-devel gdbm-devel db4-devel libpcap-devel xz-devel
说明:这里功能很简单,要说的是yum命令。虽然linux也可以像win上一样在指定的软件的官网下载软件,但是有一些常用且公用的软件会被放置在特定的远程仓库里面,可以通过使用yum命令来安装。而且yum命令还可以主动帮用户解决软件的依赖问题。所以想要学好linux的话了解一下yum也是必须的。此外还有anaconda也是类似的软件。
进入Python3 源文件文件夹
python
cd Python-3.10.2/ 指定安装python的目录 :说明:不要忘记最前面的".",如下所示:/usr/local/python3就是安装的目录
python
./configure --prefix=/usr/local/python3 --with-ssl 编译源文件,正式安装
python
make
make install
建立软连接(配置环境变量)
python
$ ln -s /usr/local/python3/bin/python3 /usr/bin/python3
$ ln -s /usr/local/python3/bin/pip3 /usr/bin/pip3
在执行ln -s /usr/python/bin/python3(python 安装目录) /usr/bin/python
的时候有可能会报错
报错信息如下:
python
ln: failed to create symbolic link '/usr/bin/python': File exists解决方法:ln -sf 加一个 f 即可
python
ln -sf /usr/python/bin/python3(python 安装目录) /usr/bin/python建立软连接说明:
很多教程都有最后一步,但是很少有网站会告诉你为什么会有最后一步。所谓软连接就相当于win下的快捷方式。
你可以通过快捷方式打开你想要使用的软件。但是为什么要把快捷方式放在/usr/bin/呢。这就涉及到环境变量的问题了,你当然可以不使用最后的软连接而直接把/usr/local/python3/bin加到环境变量里面,那随你喜好。
但是在这里/usr/bin/是默认已经在环境变量里面的,把快捷方式放到这个文件夹相当于间接的把该Python3加入环境变量,这样你才可以直接在终端输入"python3"打开Python。
运行 bot.py 程序
nohup python3 bot.py &