本篇实现对gpio的控制,通过控制输出进行gpio的点灯操作。
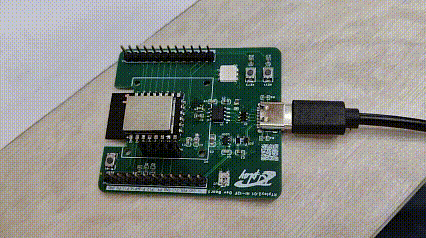
硬件
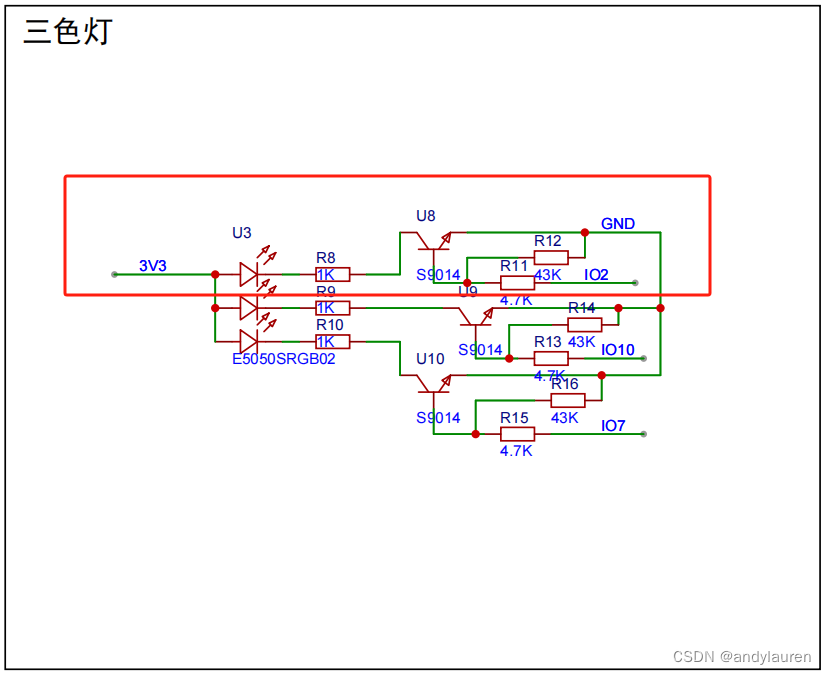
我们来操作IO2,控制绿色的灯。
软件
GPIO API
|------------------------------------------------------------------|-------------------------------------------|
| API名称 | 说明 |
| hi_u32 hi_gpio_deinit(hi_void); | GPIO模块初始化 |
| hi_u32 hi_io_set_pull(hi_io_name id, hi_io_pull val); | 设置某个IO上下拉功能。 |
| hi_u32 hi_gpio_set_dir(hi_gpio_idx id, hi_gpio_dir dir); | 设置GPIO引脚方向,id参数用于指定引脚,dir参数用于指定输入或输出 |
| hi_u32 hi_gpio_set_ouput_val(hi_gpio_idx id, hi_gpio_value val); | 设置GPIO引脚的输出状态,id参数用于指定引脚,val参数用于指定高电平或低电平 |
| hi_u32 hi_io_set_func(hi_io_name id, hi_u8 val); | 设置引脚功能,id参数用于指定引脚,val用于指定引脚功能 |
| hi_u32 hi_gpio_deinit(hi_void); | 解除GPIO模块初始化 |
修改D:\DevEcoProjects\test\src\vendor\rtplay\rt_hi3861\demo\BUILD.gn文件,让工程编译led代码
# Copyright (c) 2023 Beijing HuaQing YuanJian Education Technology Co., Ltd
# Licensed under the Apache License, Version 2.0 (the "License");
# you may not use this file except in compliance with the License.
# You may obtain a copy of the License at
#
#    http://www.apache.org/licenses/LICENSE-2.0
#
# Unless required by applicable law or agreed to in writing, software
# distributed under the License is distributed on an "AS IS" BASIS,
# WITHOUT WARRANTIES OR CONDITIONS OF ANY KIND, either express or implied.
# See the License for the specific language governing permissions and
# limitations under the License.

import("//build/lite/config/component/lite_component.gni")

lite_component("demo") {
  features = [
    "base_01_led:base_led_example",
  ]
}
创建D:\DevEcoProjects\test\src\vendor\rtplay\rt_hi3861\demo\base_01_led文件夹
文件夹中创建D:\DevEcoProjects\test\src\vendor\rtplay\rt_hi3861\demo\base_01_led\base_led_example.c文件D:\DevEcoProjects\test\src\vendor\rtplay\rt_hi3861\demo\base_01_led\BUILD.gn文件
# Copyright (c) 2023 Beijing HuaQing YuanJian Education Technology Co., Ltd
# Licensed under the Apache License, Version 2.0 (the "License");
# you may not use this file except in compliance with the License.
# You may obtain a copy of the License at
#
#    http://www.apache.org/licenses/LICENSE-2.0
#
# Unless required by applicable law or agreed to in writing, software
# distributed under the License is distributed on an "AS IS" BASIS,
# WITHOUT WARRANTIES OR CONDITIONS OF ANY KIND, either express or implied.
# See the License for the specific language governing permissions and
# limitations under the License.

static_library("base_led_example") {
    sources = [
        "base_led_example.c",
    ]

    include_dirs = [
        "//utils/native/lite/include",
        "//kernel/liteos_m/kal/cmsis",
        "//base/iot_hardware/peripheral/interfaces/kits",
        "//vendor/hqyj/fs_hi3861/common/bsp/include"
    ]
}

/*
 * Copyright (c) 2023 Beijing HuaQing YuanJian Education Technology Co., Ltd
 * Licensed under the Apache License, Version 2.0 (the "License");
 * you may not use this file except in compliance with the License.
 * You may obtain a copy of the License at
 *
 *    http://www.apache.org/licenses/LICENSE-2.0
 *
 * Unless required by applicable law or agreed to in writing, software
 * distributed under the License is distributed on an "AS IS" BASIS,
 * WITHOUT WARRANTIES OR CONDITIONS OF ANY KIND, either express or implied.
 * See the License for the specific language governing permissions and
 * limitations under the License.
 */

#include <stdio.h>
#include <unistd.h>

#include "cmsis_os2.h"
#include "hi_gpio.h"
#include "hi_io.h"
#include "ohos_init.h"

#define LED HI_IO_NAME_GPIO_2  // 开发板三色灯其中一个引脚

osThreadId_t Task1_ID = 0;    //  任务1 ID
hi_gpio_value val, val_last;  // GPIO的状态值
#define TASK_STACK_SIZE 1024
#define TASK_DELAY_TIME (1000 * 1000)

/**
 * @description: 任务1
 * @param {*}
 * @return {*}
 */
void Task1(void)
{
    printf("enter Task 1.......\r\n");
    hi_gpio_init();                               // GPIO初始化
    hi_io_set_pull(LED, HI_IO_PULL_DOWN);         // 设置GPIO下拉,保证上电时为灭灯状态
    hi_io_set_func(LED, HI_IO_FUNC_GPIO_2_GPIO);  // 设置IO2为GPIO功能
    hi_gpio_set_dir(LED, HI_GPIO_DIR_OUT);        // 设置GPIO为输入模式

    while (1) {
        hi_gpio_set_ouput_val(LED, HI_GPIO_VALUE0);  // 设置GPIO引脚为低电平
        usleep(TASK_DELAY_TIME);                      // 1s sleep
        hi_gpio_set_ouput_val(LED, HI_GPIO_VALUE1);  // 设置GPIO引脚为高电平
        usleep(TASK_DELAY_TIME);                      // 1s sleep
    }
}

/**
 * @description: 初始化并创建任务
 * @param {*}
 * @return {*}
 */
static void base_led_demo(void)
{
    printf("[demo] Enter base_led_demo()!\r\n");

    osThreadAttr_t taskOptions;
    taskOptions.name = "Task1";                // 任务的名字
    taskOptions.attr_bits = 0;                 // 属性位
    taskOptions.cb_mem = NULL;                 // 堆空间地址
    taskOptions.cb_size = 0;                   // 堆空间大小
    taskOptions.stack_mem = NULL;              // 栈空间地址
    taskOptions.stack_size = TASK_STACK_SIZE;  // 栈空间大小 单位:字节
    taskOptions.priority = osPriorityNormal;   // 任务的优先级:wq

    Task1_ID = osThreadNew((osThreadFunc_t)Task1, NULL, &taskOptions);  // 创建任务1
    if (Task1_ID != NULL) {
        printf("ID = %d, Create Task1_ID is OK!\r\n", Task1_ID);
    }
}
SYS_RUN(base_led_demo);
目录结构
│  config.json
│
├─common
│  └─bsp
│      ├─include
│      └─src
├─demo
│  │  BUILD.gn
│  │
│  ├─base_00_helloworld
│  │      base_helloworld_example.c
│  │      BUILD.gn
│  │
│  └─base_01_led
│          base_led_example.c
│          BUILD.gn
│
└─doc
    │  HarmonyOS开发板实验指导书 v2.1.pdf
    │  华清远见 FS_Hi3861开发指导.md
    │  华清远见 FS_Hi3861新手入门手册.md
    │
    ├─board
    │      FS-Hi3861-V4.2.pdf
    │      FS-Hi3861QDB-V3.2.pdf
    │      hi-12f_kit_v1.1.0A7E6BCB9%A6-20211025.pdf
    │      hi-12f_v1.1.2-A7E6BCB9%A6-20211202.pdf
    │      nodemcu-hi-07s_12f-kit_v1.1-20210913.pdf
    │      RTplay2.01_2024-06-14.pdf
    │
    └─figures
使用build
效果就是LED间隔1秒闪烁。