文章目录
- 前言:
- 1.简介
-
- [1.1. 交叉编译工具](#1.1. 交叉编译工具)
- [1.2. 项目开发流程:](#1.2. 项目开发流程:)
- [1.3. ARM开发板的连接方法](#1.3. ARM开发板的连接方法)
- [2. 开发板连接](#2. 开发板连接)
- [3. 系统文件 IO](#3. 系统文件 IO)
- [4. 设置共享文件夹](#4. 设置共享文件夹)
-
- [3.1. 读文件](#3.1. 读文件)
- [3.2. 写文件](#3.2. 写文件)
- [3.2. 设置文件偏移量](#3.2. 设置文件偏移量)
- [4. LCD显示屏显示](#4. LCD显示屏显示)
-
- [4.1. LCD 显示颜色](#4.1. LCD 显示颜色)
- [4.2. 将文件下载到开发板](#4.2. 将文件下载到开发板)
-
- [4.2.1. 在CRT链接开发板中输入命令"rx 需要下载的文件名"](#4.2.1. 在CRT链接开发板中输入命令"rx 需要下载的文件名")
- [4.3. lcd 使用 write 函数直接写入像素点出现噪点等待一点后又能完全显示](#4.3. lcd 使用 write 函数直接写入像素点出现噪点等待一点后又能完全显示)
- [4.4. 开发板lcd 显示 bmp 图片](#4.4. 开发板lcd 显示 bmp 图片)
- [5. 触摸屏](#5. 触摸屏)
-
- [5.1. 触摸屏 之 Linux 输入子系统模型](#5.1. 触摸屏 之 Linux 输入子系统模型)
- [5.1.1 input.h](#5.1.1 input.h)
- [5.1.2 事件数据分析](#5.1.2 事件数据分析)
- 总结:
前言:
在嵌入式系统开发领域,交叉编译、系统文件IO操作、LCD显示以及触摸屏处理是一些基本且关键的技能。本文将详细介绍这些技能的实现方法和相关技术细节,旨在帮助开发者更好地理解和掌握嵌入式Linux开发过程中的常用操作。我们将从交叉编译工具的介绍开始,逐步深入到项目开发流程、开发板连接方法、系统文件IO的基本操作,再到LCD显示屏的显示技术以及触摸屏的Linux输入子系统模型和事件分析。通过本文的学习,读者将能够获得从硬件连接到软件编程的全面知识。
1.简介
1.1. 交叉编译工具
每个不同的平台可执行的格式都不尽相同,我们需要Linux系统的ARM平台执行程序,故需要ARM-Linux交叉编译工具,ubuntu 交叉编译工具链"arm-linux-gcc"
1.2. 项目开发流程:
1、使用C语言编写项目源代码
2、使用交叉编译工具编译项目源码
3、将编译生成的可执行程序下载到ARM开发板
4、在ARM开发板执行项目程序
5、验证项目程序的准确性
1.3. ARM开发板的连接方法
SecureCRT是一款支持SSH(SSH1和SSH2)的终端仿真程序,简单的说是Windows下登录UNIX或Linux服务器主机的软件。
2. 开发板连接
-
使用 串口线 与 usb 转串口线将开发板与电脑进行连接
-
检查电脑是否识别 usb 转串口驱动
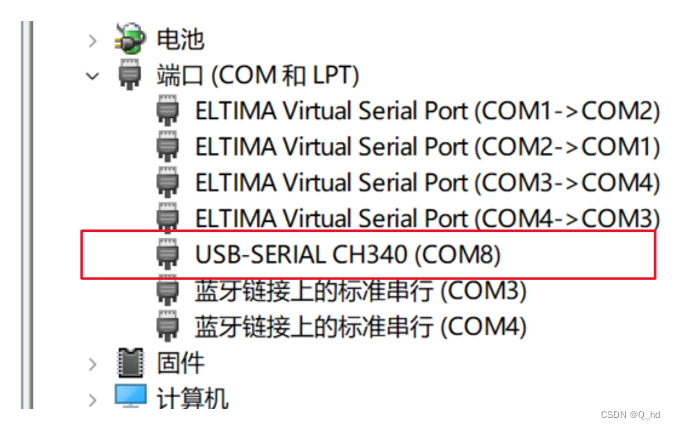
-
打开 CRT 软件
-
在快速链接向导里向导中进行配置
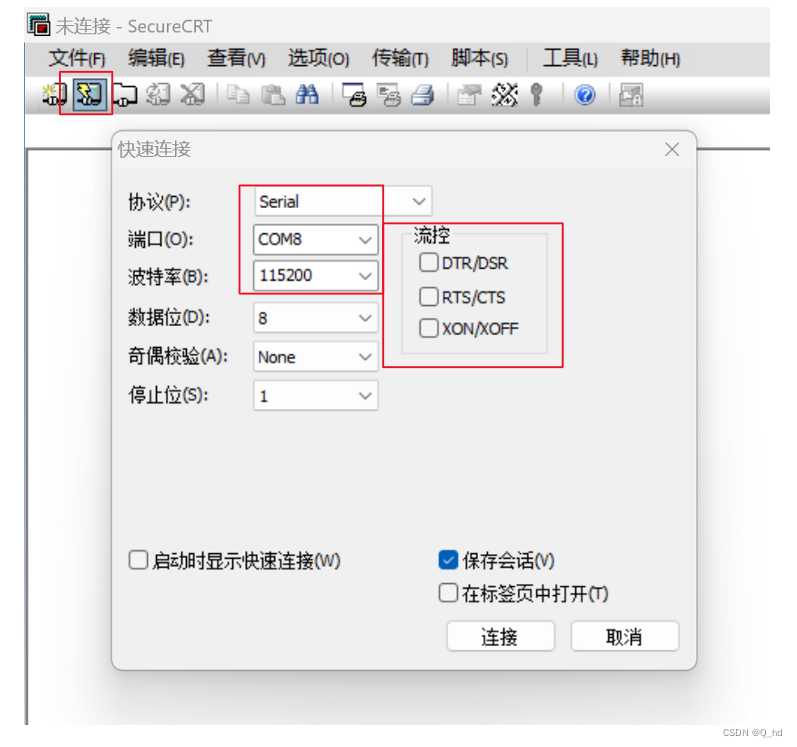
-
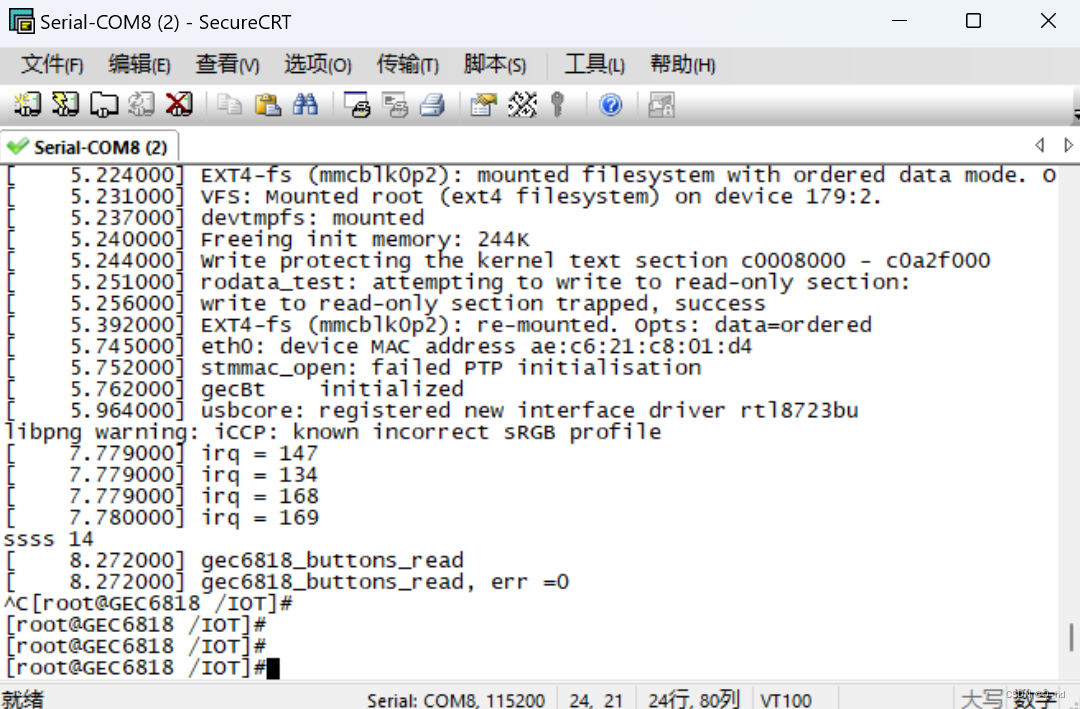
打开开发板
3. 系统文件 IO
- 打开文件 open
c
   #include <sys/types.h>
   #include <sys/stat.h>
   #include <fcntl.h>

   int open(const char *pathname, int flags);
   // pathname:	需要打开的文件的路径名+文件名
   // flag:		打开文件的模式( O_RDONLY, O_WRONLY, or O_RDWR)
// 返回值: 成功返回新的文件描述符,失败返回-1和出错码(perror)- 关闭文件 close
c
   #include <unistd.h>
   int close(int fd);
   // fd:	文件描述符
// 返回值: 成功返回0,失败返回-1和错误码- 读取文件内容 read
c
   #include <unistd.h>
   ssize_t read(int fd, void *buf, size_t count);
   // fd:	文件描述符
   // buf:	读到的数据缓冲区
   // count:需要读取的字节数
// 返回值: 成功返回实际度到的字节数,失败返回-1 和 错误码- 写数据到文件中 write
c
#include <unistd.h>
ssize_t write(int fd, const void *buf, size_t count);
   // fd:	文件描述符
   // buf:	写到的数据缓冲区
   // count:需要写入的字节数
// 返回值: 成功返回实际度写入字节数,失败返回-1 和 错误码- 设置文件偏移量 Iseek
c
   #include <sys/types.h>
   #include <unistd.h>

   off_t lseek(int fd, off_t offset, int whence);
   // fd:	文件描述符
   // offset:偏移量
   // whence:基准点(SEEK_SET开头、SEEK_CUR当前、SEEK_END结尾)
   // 返回值:成功返回文件新的文件偏移量,失败返回-1
4. 设置共享文件夹
- 打开VMware虚拟机打开设置
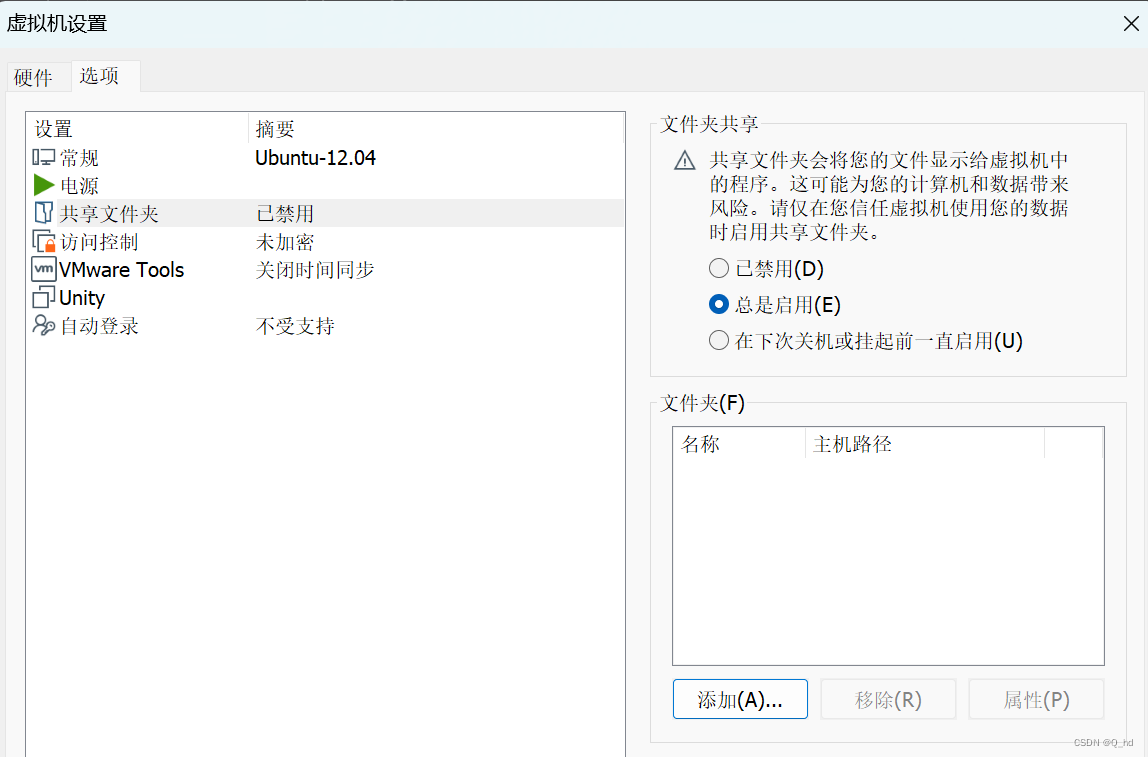
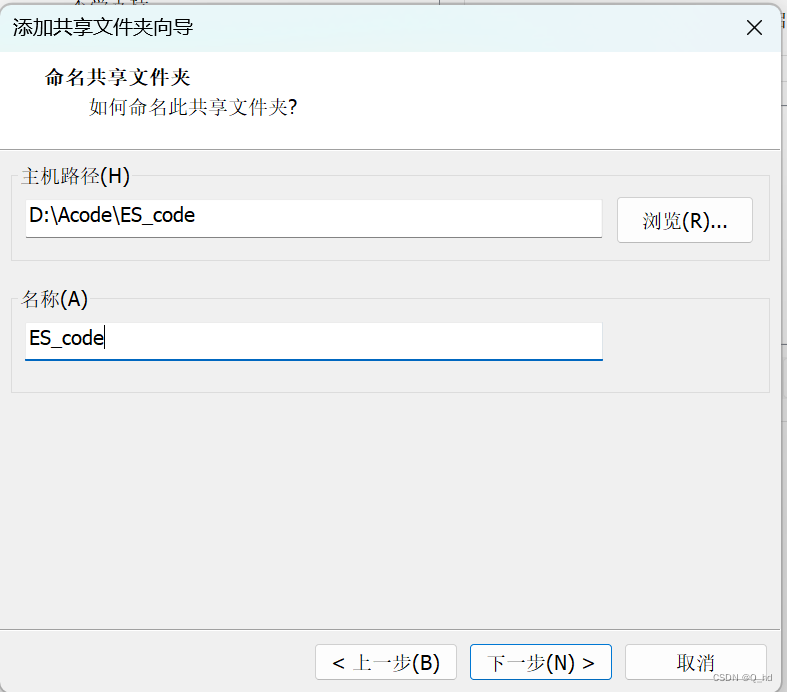

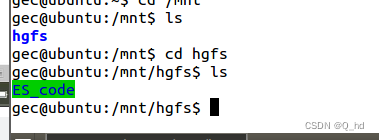
在ubantu虚拟机中检查是否创建成功。
3.1. 读文件
c
#include <stdio.h>
#include <sys/types.h>
#include <sys/stat.h>
#include <fcntl.h>
#include <stdlib.h>
#include <string.h>
#include <unistd.h>

int main()
{
    // 1.打开文件
    int rd_fd = open("1.txt", O_RDONLY);
    if (rd_fd == -1) // 判断是否打开成功
    {
        perror("open 1.txt failed");
        exit(-1); // 退出程序
    }
    // 2.读取文件
    char buf[1024]; //定义缓冲区
    bzero(buf, sizeof(buf)); //清空缓冲区
    int ret = read(rd_fd, buf, sizeof(buf));
    if (ret == -1)
    {
        perror("read 1.txt failed");
        exit(-2); // 退出程序
    }

    // 3.查看数据
    printf("read 1.txt %d byte is: %s\n", ret, buf);

    // 4.关闭文件
    close(rd_fd);
}
3.2. 写文件
c
#include <stdio.h>
#include <sys/types.h>
#include <sys/stat.h>
#include <fcntl.h>
#include <stdlib.h>
#include <string.h>
#include <unistd.h>

int main()
{
    // 1.打开文件
    int wd_fd = open("2.txt", O_WRONLY | O_CREAT, 0644);
    if (wd_fd == -1) // 判断是否打开成功
    {
        perror("open 1.txt failaed");
        exit(-1); // 退出程序
    }
    // 2.写数据
    int ret = write(wd_fd, "zhangsan hello", sizeof("zhangsan hello"));
    if (ret == -1)
    {
        perror("write 2.txt failed");
        exit(-2); // 退出程序
    }

    // 4.关闭文件
    close(wd_fd);
}
3.2. 设置文件偏移量
c
#include <stdio.h>
#include <sys/types.h>
#include <sys/stat.h>
#include <fcntl.h>
#include <stdlib.h>
#include <string.h>
#include <unistd.h>

int main()
{
    // 1.打开文件
    int wd_fd = open("2.txt", O_WRONLY | O_CREAT, 0644);
    if (wd_fd == -1) // 判断是否打开成功
    {
        perror("open 1.txt failaed");
        exit(-1); // 退出程序
    }
    // 2.写数据
    int l_ret = lseek(wd_fd, 0, SEEK_END); // 将偏移量移动到文件末尾
    int ret = write(wd_fd, "zhangsan hello", sizeof("zhangsan hello"));
    if (ret == -1)
    {
        perror("write 2.txt failed");
        exit(-2); // 退出程序
    }
    printf("lseek %d byte; write %d byte\n", l_ret, ret);
    // 4.关闭文件
    close(wd_fd);
}
4. LCD显示屏显示
4.1. LCD 显示颜色
lcd屏可显示显示像素点得组成ARGB四个元素组成,一个元素得有256个不同的值故需要8位二进制来描述,因此4个元素要需要32位(4字节)二进制来表示。
c
#include <stdio.h>
#include <sys/types.h>
#include <sys/stat.h>
#include <fcntl.h>
#include <stdlib.h>
#include <string.h>
#include <unistd.h>

int main()
{
    // 打开lcd设备
    int lcd_fd = open("/dev/fb0", O_RDWR);
    if (lcd_fd == -1)
    {
        perror("open LCD failed");
        exit(-1);
    }
    // 定义色彩
    int color = 0xFF0000; // 假设是红色
    // 将色彩写入lcd设备文件
    for (int i = 0; i < 800 * 480; i++)
    {
        write(lcd_fd, &color, sizeof(color)); //写一个像素点
    }
    // 关闭lcd设备
    close(lcd_fd);
    return 0;
}
4.2. 将文件下载到开发板
4.2.1. 在CRT链接开发板中输入命令"rx 需要下载的文件名"
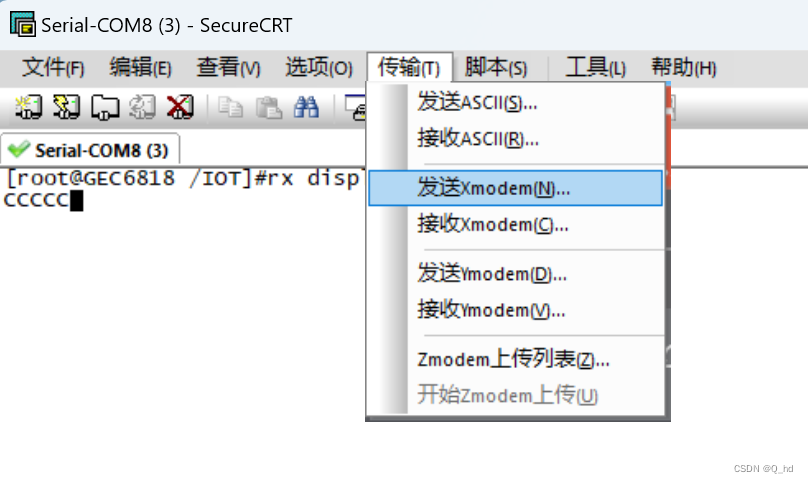
通过Xmode发送
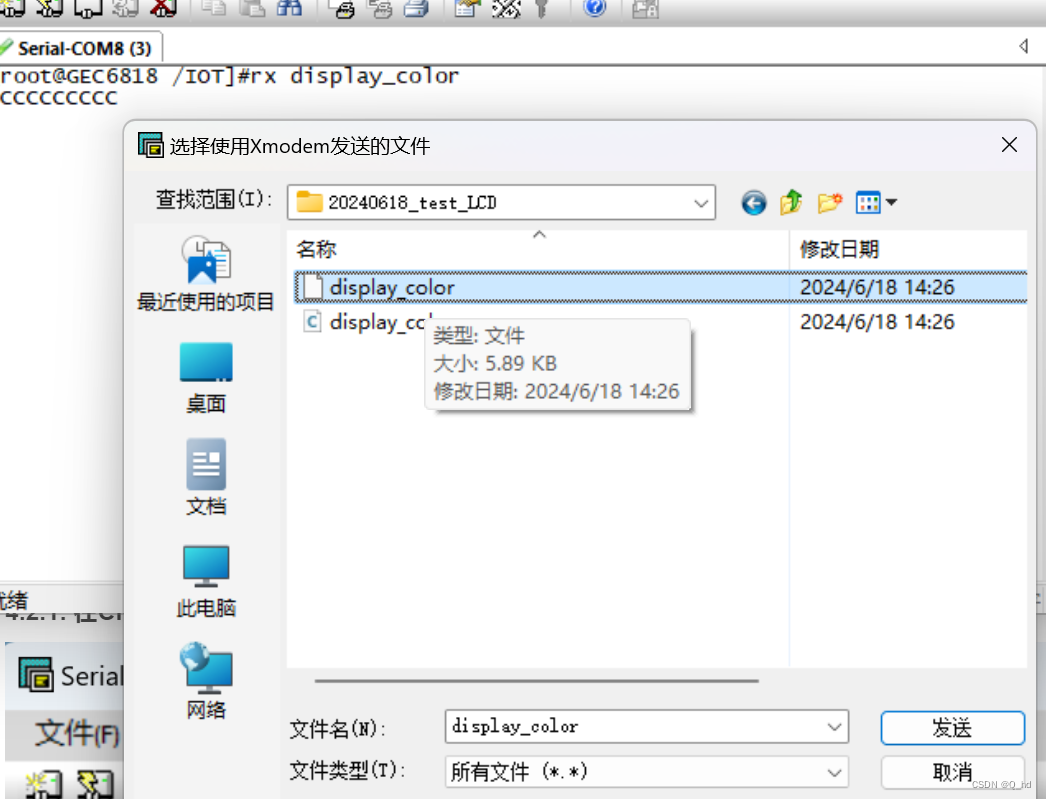
发送完成
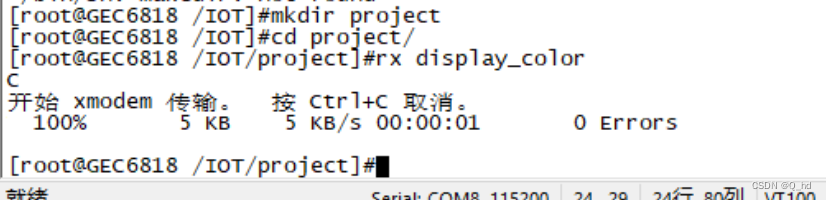
下载文件执行成功后修改文件权限,修改文件权限后方可执行

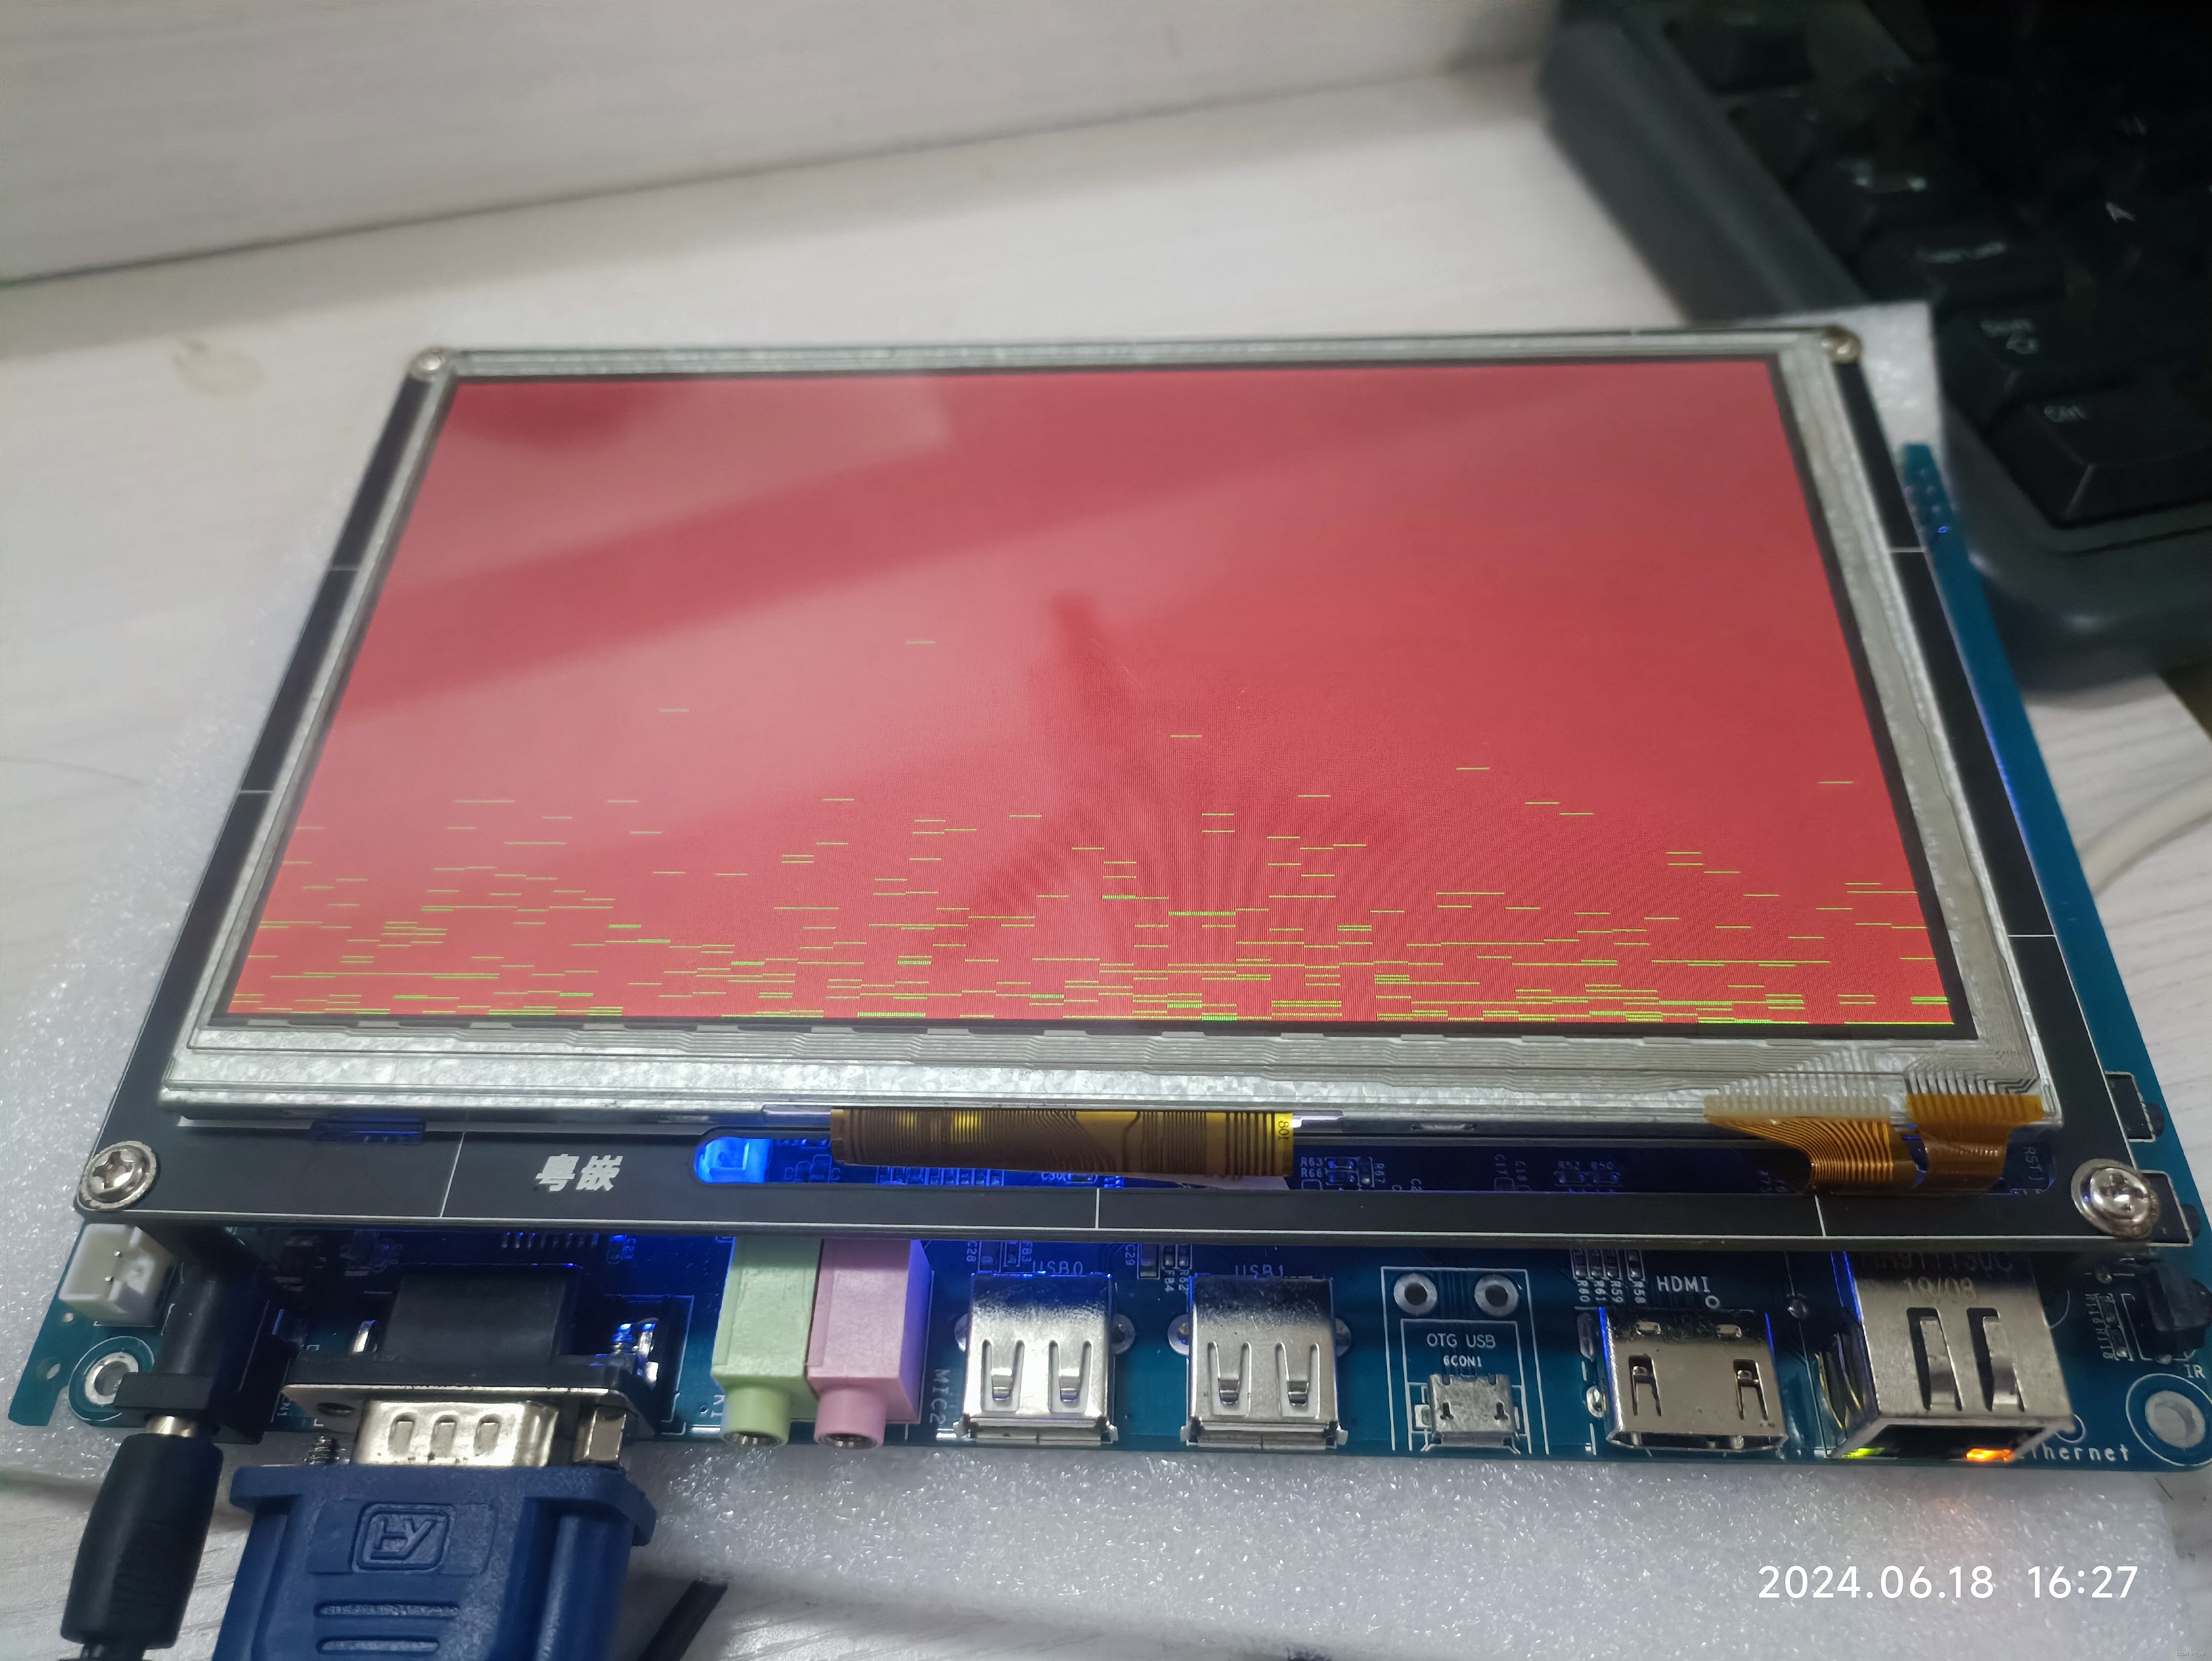
屏幕显示红色:
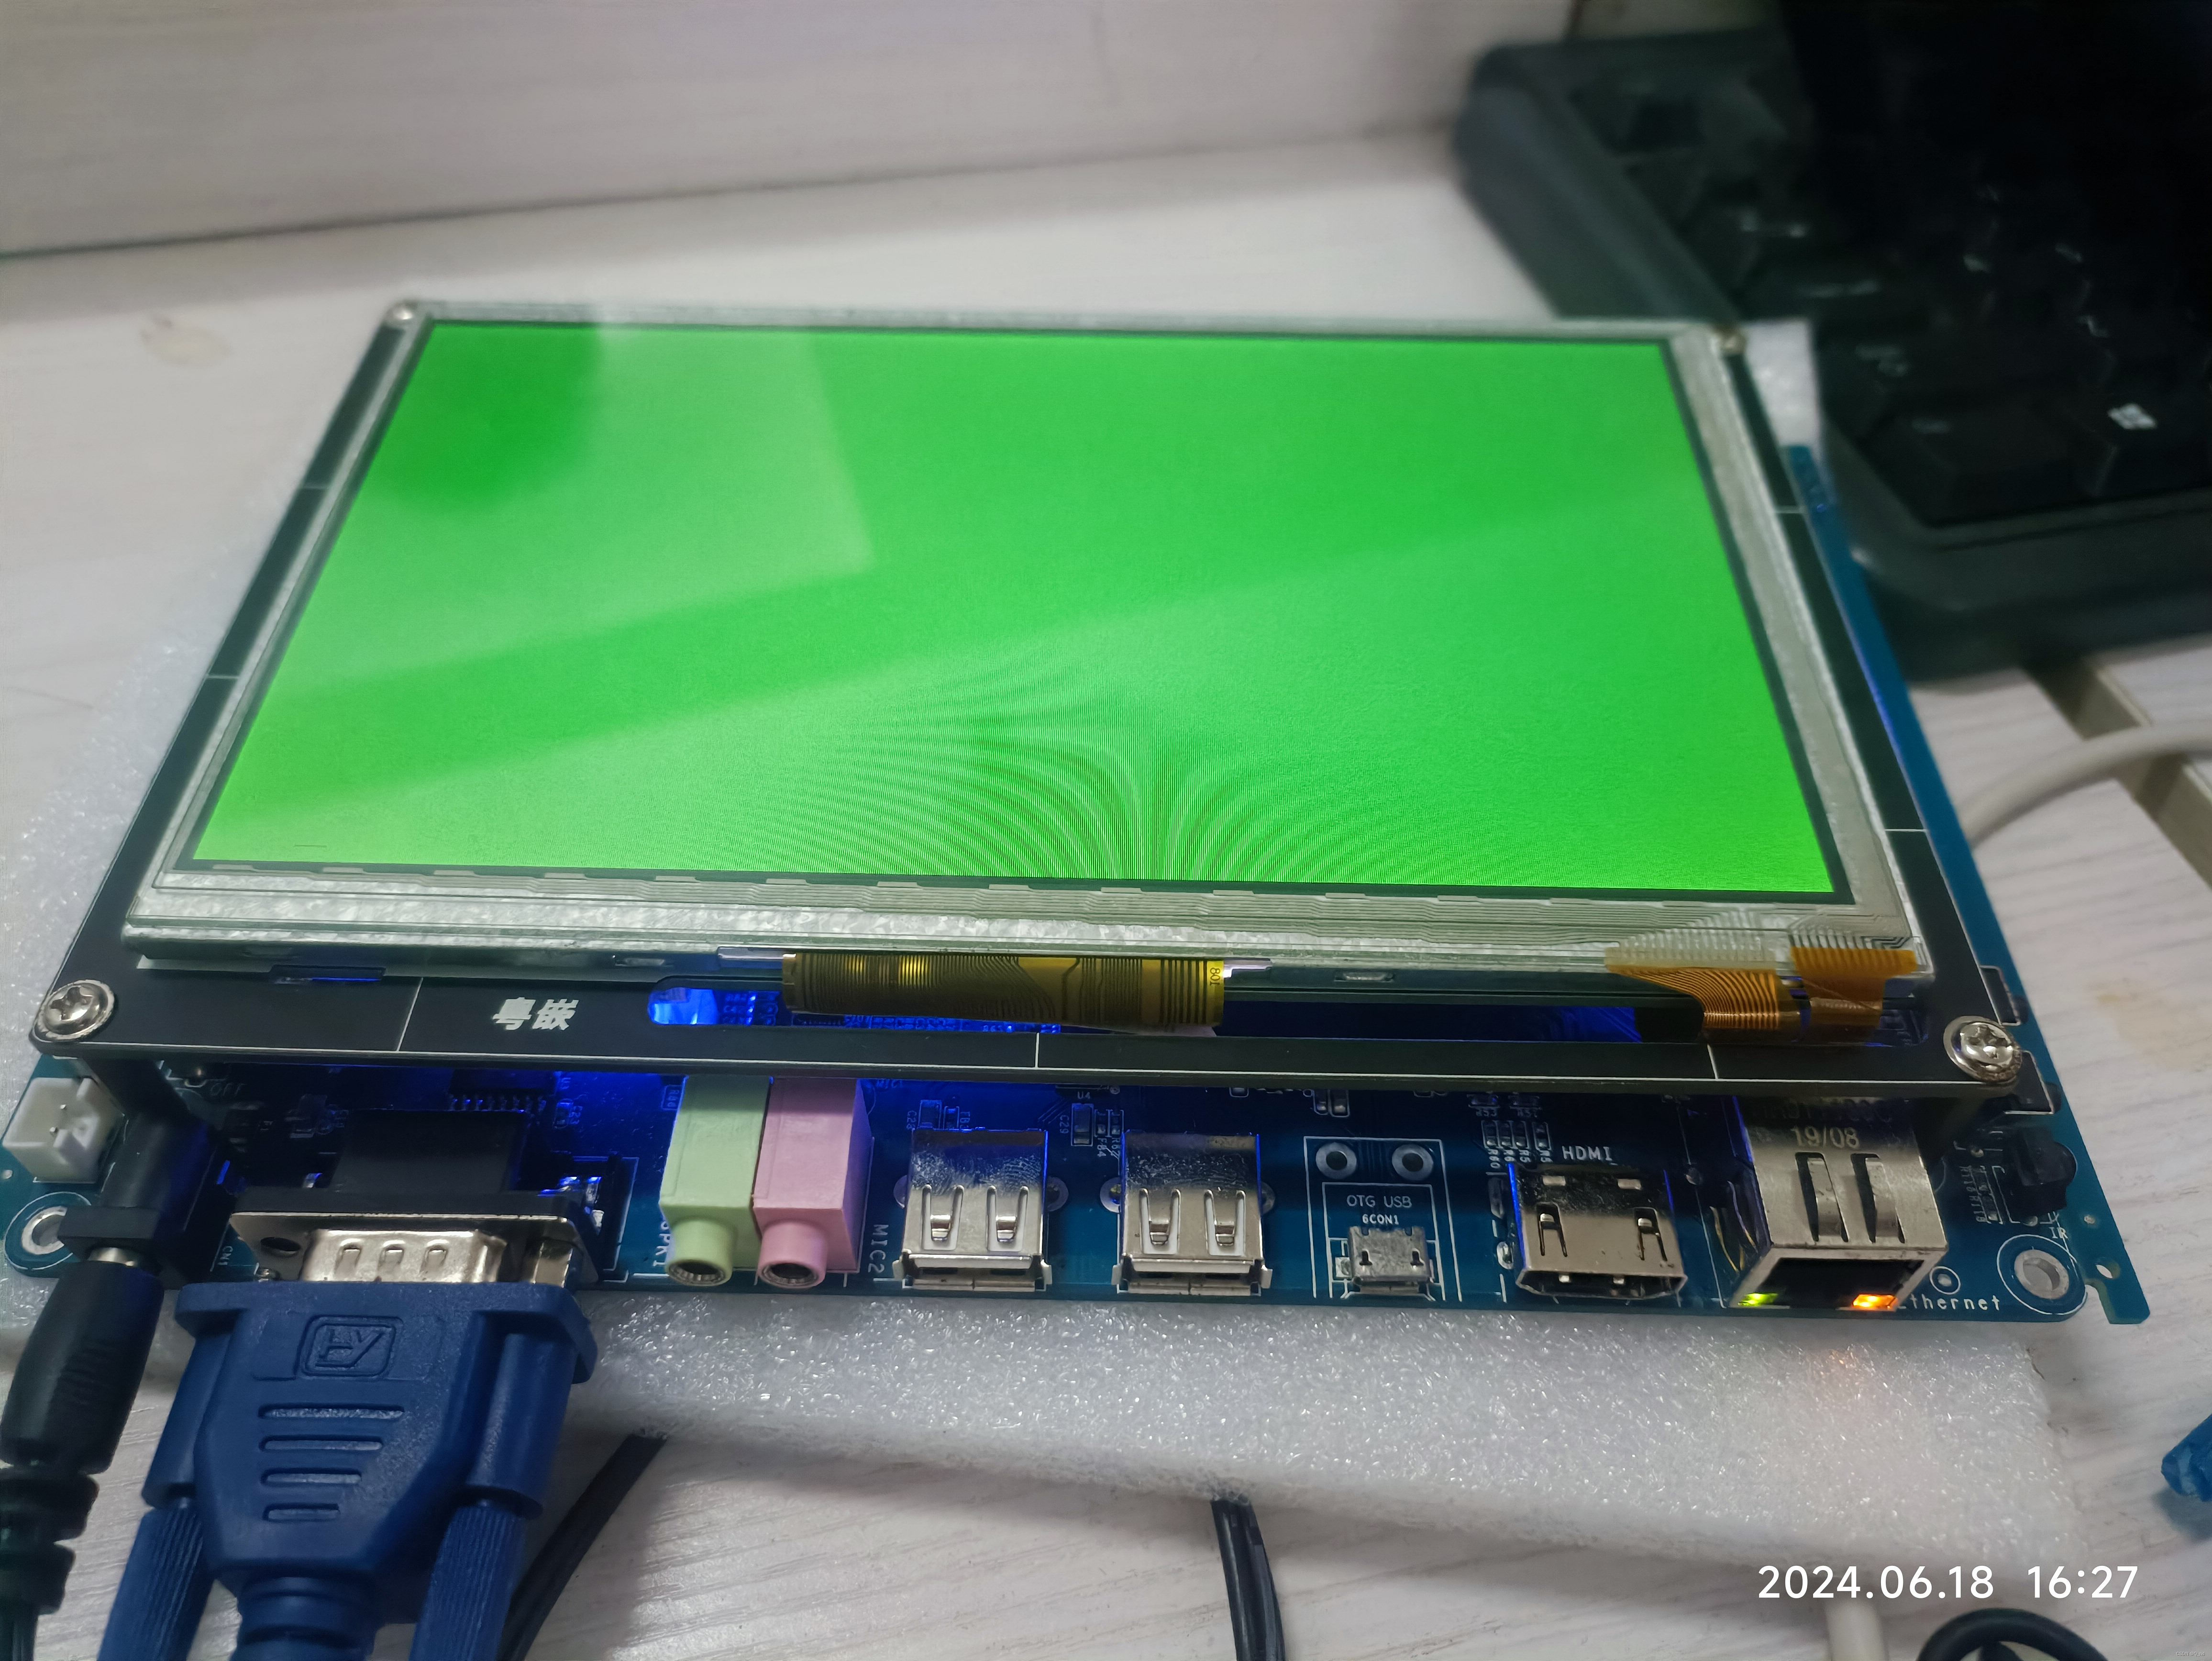
4.3. lcd 使用 write 函数直接写入像素点出现噪点等待一点后又能完全显示
问题分析 :由于系统调用需要花费时间
解决办法 :给 lcd 申请一片显存
使用 mmap 函数可以采用内存映射的方式来为 lcd 映射一块特殊的内存作为 lcd 的显存
c
#include <sys/mman.h>
void *mmap(void *addr, size_t length, int prot, int flags, int fd, off_t offset); // 映射函数
// 主要参数:
// addr:	映射内存的起始地址(NULL表述由内核自己找到符合要求的地址)
// length:	映射内存的大小
// prot: 	映射内存的权限(与 open 的权限一致)
//       		PROT_EXEC  Pages may be executed.
//       		PROT_READ  Pages may be read.
//       		PROT_WRITE Pages may be written.
//      		PROT_NONE  Pages may not be accessed.
// flags: 	映射内存的更新方式
//				MAP_SHARED: 共享内存的方式更新(更新已有的内存)
//				MAP_PRIVATE: 创建新的内存并更新
// fd: 		需要映射的文件描述符
// offset: 	映射内存的偏移量
// 返回值:
//	成功返回映射内存基地址
//	失败返回 MAP_FAILED 和 错误码

int munmap(void *addr, size_t length); // 解除映射函数
显示绿色:
c
#include <stdio.h>
#include <sys/types.h>
#include <sys/stat.h>
#include <fcntl.h>
#include <stdlib.h>
#include <string.h>
#include <unistd.h>
#include <sys/mman.h>

int main()
{
    int i;
    // 打开lcd设备
    int lcd_fd = open("/dev/fb0", O_RDWR);
    if (lcd_fd == -1)
    {
        perror("open LCD failed");
        exit(-1);
    }

    // 开启映射
    int* lcd_map = mmap(NULL, 800*480*4, PROT_READ|PROT_WRITE, MAP_SHARED, lcd_fd, 0);

    // 定义色彩
    int color = 0x00FF00; // 假设是绿色
    // 将色彩写入lcd设备文件
    for (i = 0; i < 800 * 480; i++)
    {
        *(lcd_map + i) = color; // 显示一个像素点
    }
    // 关闭lcd设备
    close(lcd_fd);
    // 关闭映射
    munmap(lcd_map, 800 * 480);
    return 0;
}
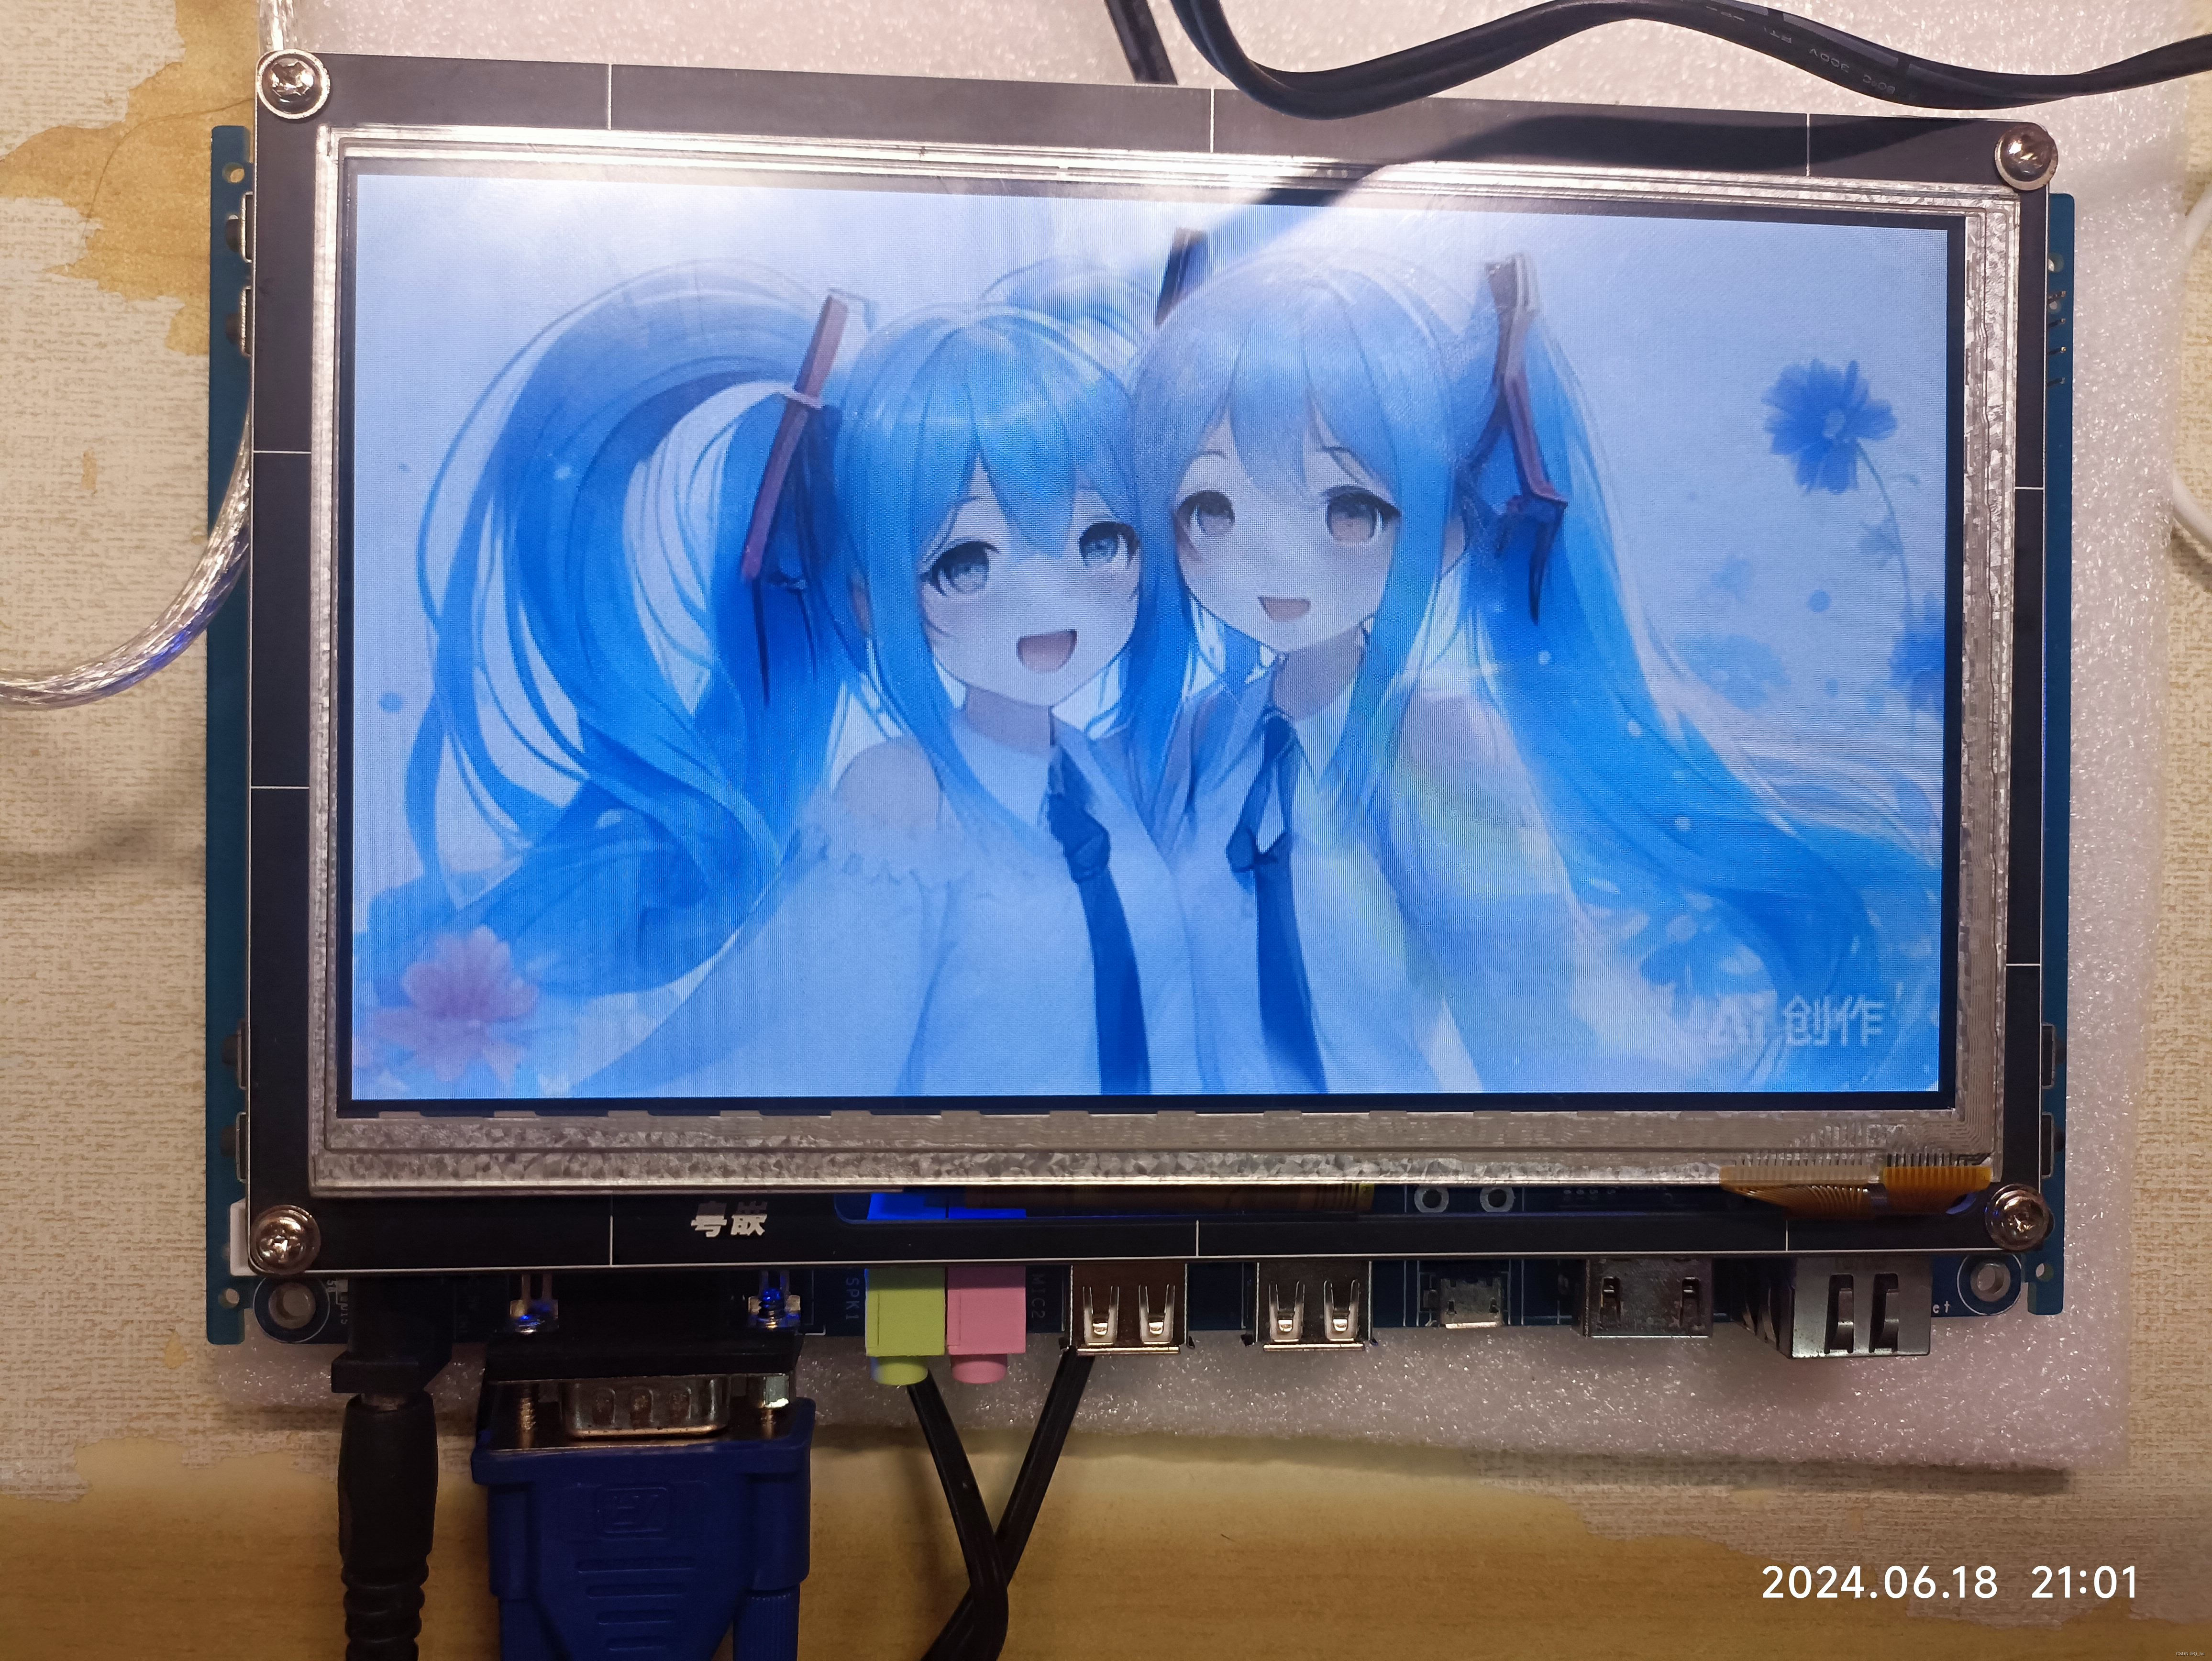
4.4. 开发板lcd 显示 bmp 图片
- 常见的图片格式:jpeg / jpg, png, bmp
- jpeg / jpg: 采用专用的图像压缩算法进行压缩
bmp: 它采用位映射存储格式,除了图像深度可选外,不采用其他任何压缩,因此,BMP 文件所占用的空间很大(推荐24位的位图)。

分析:由于 lcd 显示的像素点是 32位 的彩色,而bmp图片的像素点是 24位,所以需要要完成 24位 到 32位 的转换
c
#include <stdio.h>
#include <sys/types.h>
#include <sys/stat.h>
#include <fcntl.h>
#include <stdlib.h>
#include <string.h>
#include <unistd.h>
#include <sys/mman.h>


int main()
{
    int i;
    // 打开lcd设备
    int lcd_fd = open("/dev/fb0", O_RDWR);
    if (lcd_fd == -1)
    {
        perror("open LCD failed");
        exit(-1);
    }

    // 开启映射
    int* lcd_map = mmap(NULL, 800*480*4, PROT_READ|PROT_WRITE, MAP_SHARED, lcd_fd, 0);
    if (lcd_map == MAP_FAILED)
    {
        perror("mmap failed");
        close(lcd_fd);
        exit(-1);
    }

    // 打开bmp图片
    int bmp_fd = open("bgt.bmp", O_RDONLY);
    if (bmp_fd == -1)
    {
        perror("open BMP failed");
        munmap(lcd_map, 800*480*4);
        close(lcd_fd);
        exit(-1);
    }

    // 跳过BMP文件头(假设54字节标准头)
    lseek(bmp_fd, 54, SEEK_SET);

    // 读取图片数据
    int bmp_buf[800*480]; // 图片的大致大小
    char tmp_buf[800*480*3];
    bzero(bmp_buf, sizeof(bmp_buf)); // 清除缓冲区
    bzero(tmp_buf, sizeof(tmp_buf));
    read(bmp_fd, tmp_buf, sizeof(tmp_buf)); // 读取数据

    // 关闭bmp图片文件
    close(bmp_fd);

    // 将 24位 的像素点转换为 32位
    for (i = 0; i < 800*480; ++i)
    {
        bmp_buf[i] = tmp_buf[i*3]|tmp_buf[i*3+1]<<8|tmp_buf[i*3+2]<<16|0x00<<24;
    }

    // 显示
    for (i = 0; i < 800*480; i++)
    {
        *(lcd_map + i) = bmp_buf[i]; // 显示一个像素点
    }


    // 关闭lcd设备
    close(lcd_fd);
    // 关闭映射
    munmap(lcd_map, 800*480*4);
    return 0;
}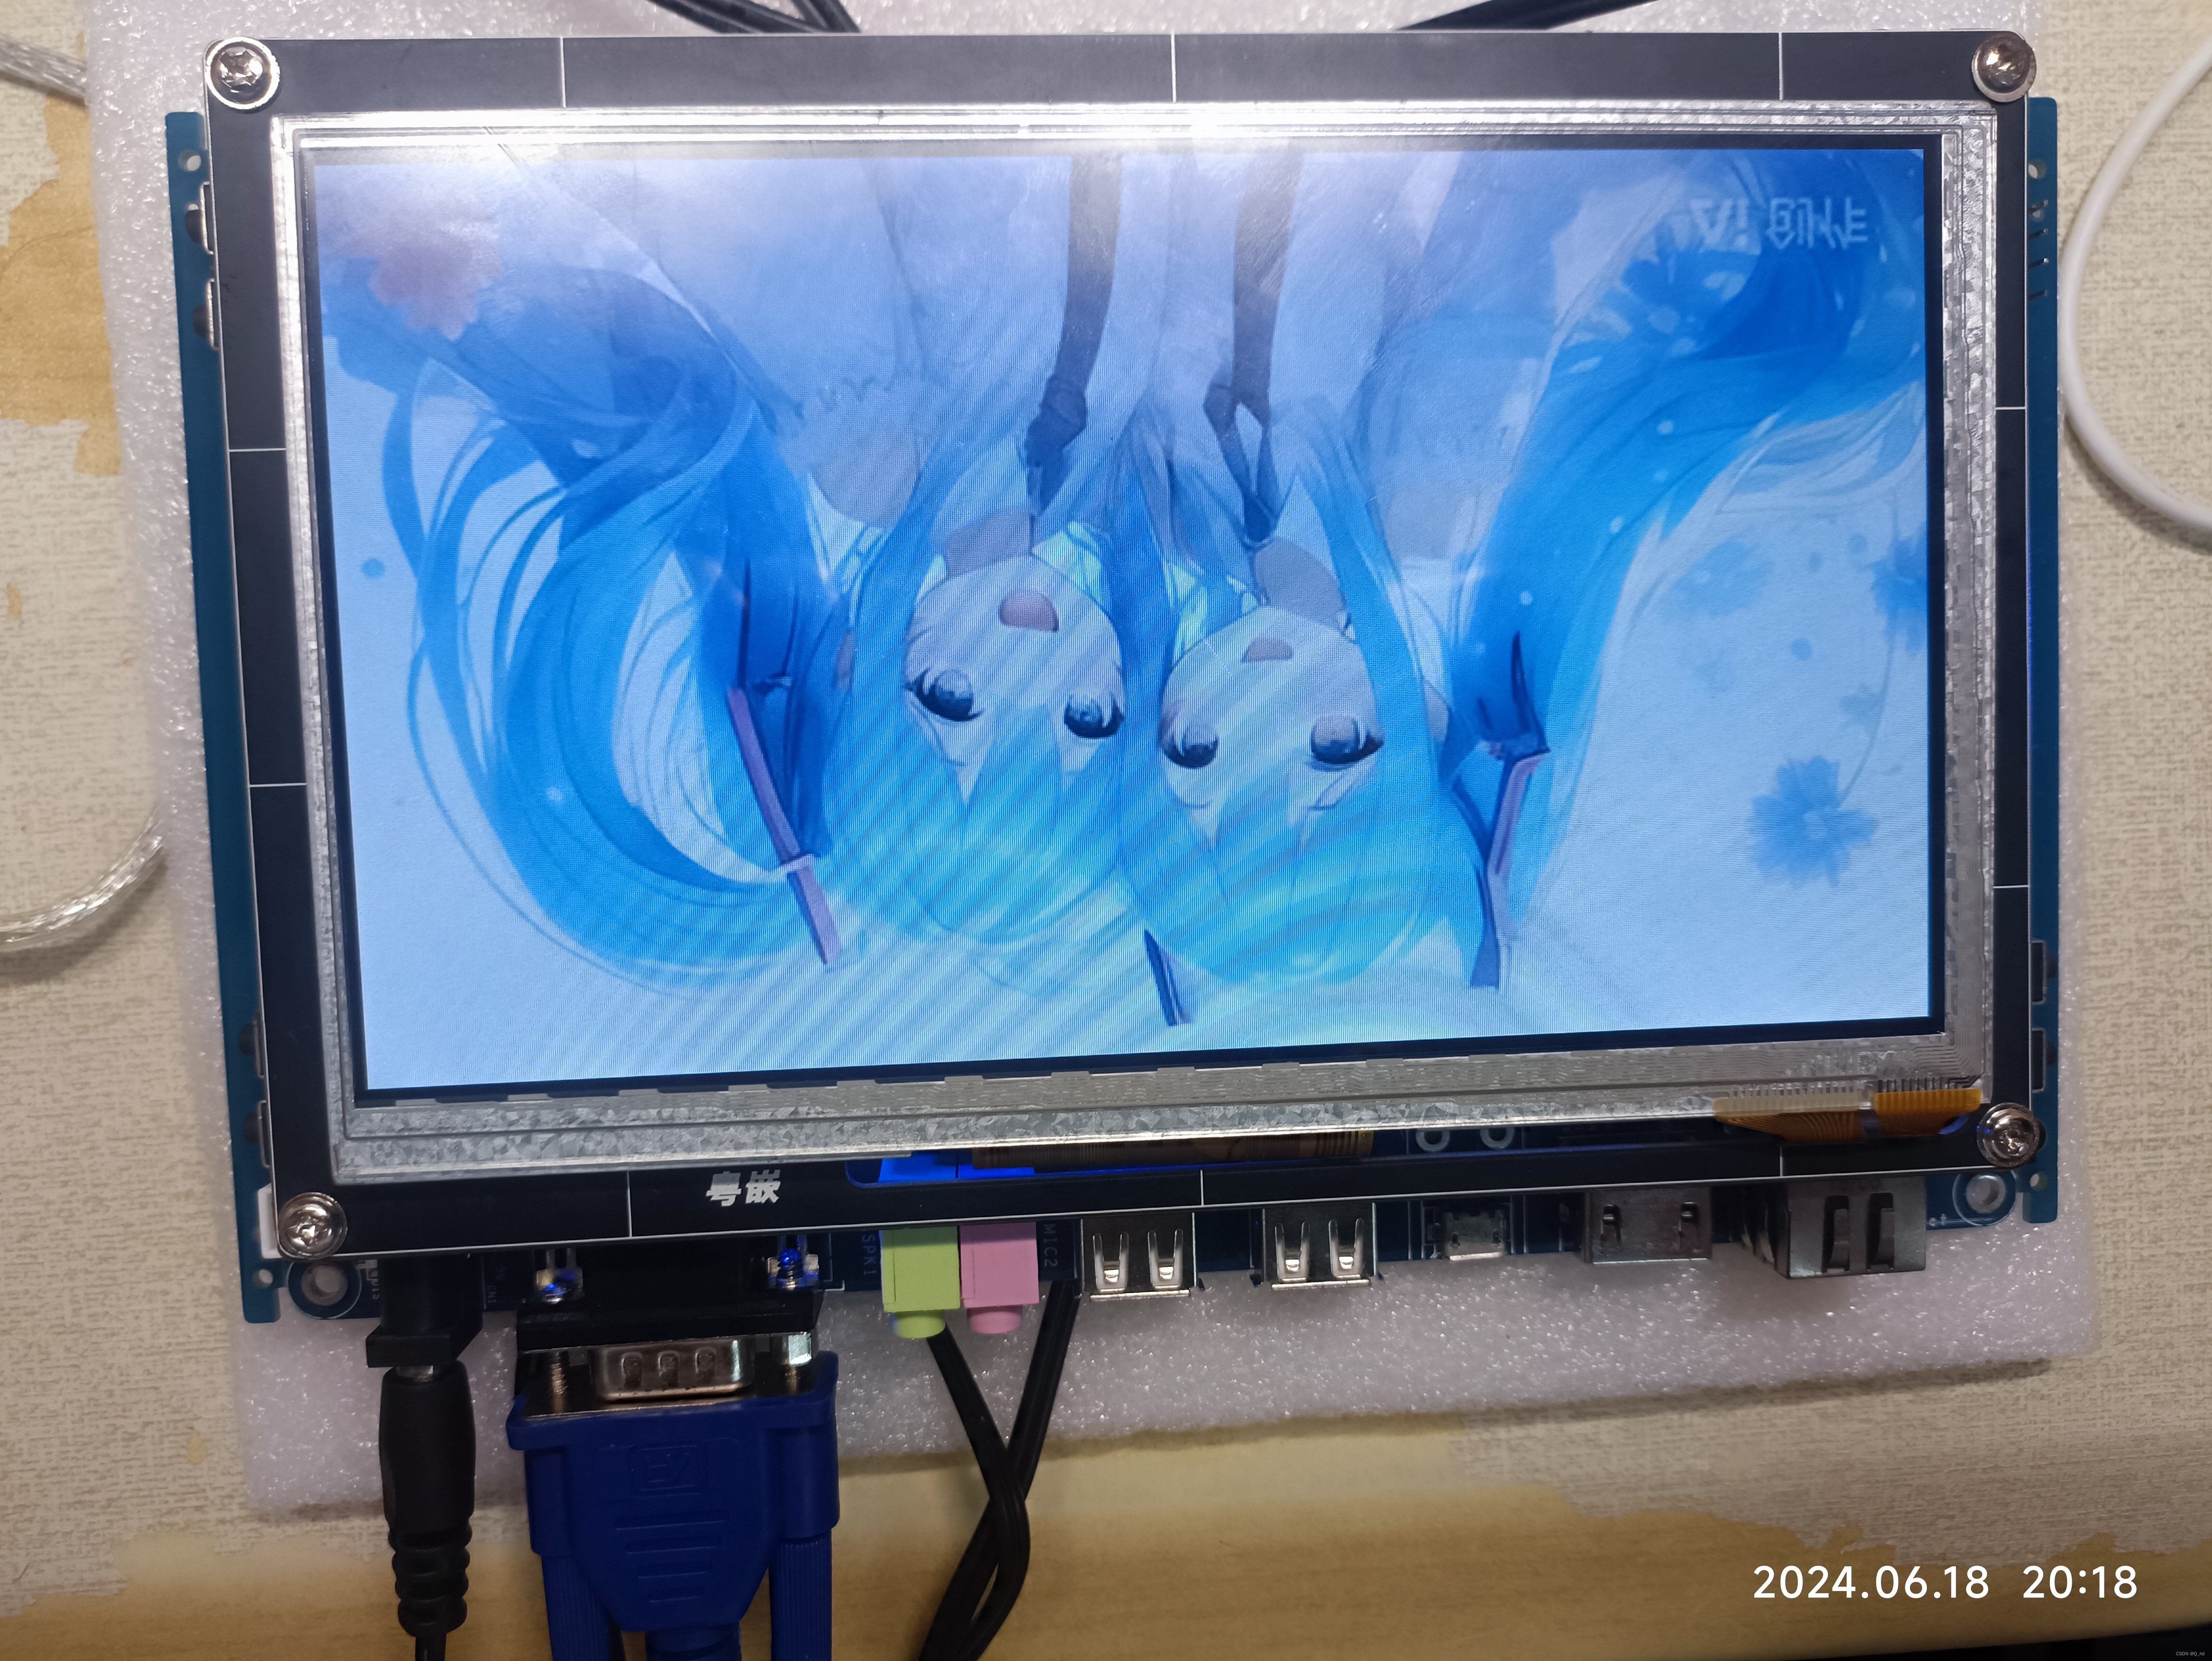
但是图片是反转过来的
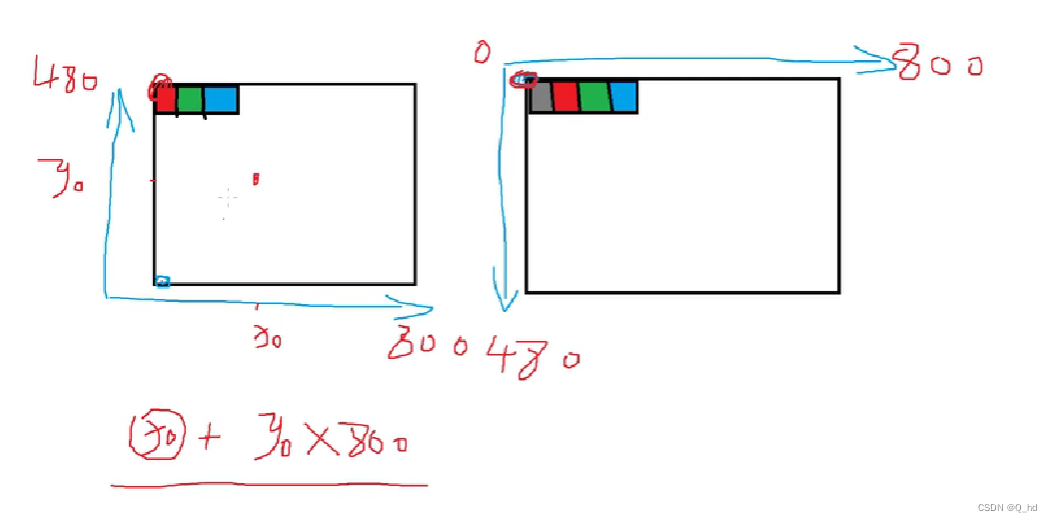
c
// 将 24位 的像素点转换为 32位,并将图片翻转过来
for (i = 0; i < 480; ++i) {
    for (j = 0; j < 800; ++j) {
        bmp_buf[i*800+j] = tmp_buf[((479-i)*800 + j)*3] |
                        tmp_buf[((479-i)*800 + j)*3+1]<<8 |
                        tmp_buf[((479-i)*800 + j)*3+2]<<16 |
                        0x00<<24;
    }
}
现在就正了:
5. 触摸屏
5.1. 触摸屏 之 Linux 输入子系统模型
可以通过查看 input.h 的代码,了解输入子系统的框架
c
cd /usr/include/linux/5.1.1 input.h
c
/*
 * The event structure itself
 */

struct input_event {
	struct timeval time; // 事件发生的时间
	__u16 type;			 // 事件发生类型
	__u16 code;			 // 事件的代码
	__s32 value;		 // 事件的值
};
在开发板上有这样一些事件:

c
/*
 * Event types
 */

#define EV_SYN			0x00
#define EV_KEY			0x01
#define EV_REL			0x02
#define EV_ABS			0x03
#define EV_MSC			0x04
#define EV_SW			0x05
#define EV_LED			0x11
#define EV_SND			0x12
#define EV_REP			0x14
#define EV_FF			0x15
#define EV_PWR			0x16
#define EV_FF_STATUS		0x17
#define EV_MAX			0x1f
#define EV_CNT			(EV_MAX+1)
c
/*
 * Absolute axes
 */

#define ABS_X			0x00
#define ABS_Y			0x01
#define ABS_Z			0x02
#define ABS_RX			0x03
#define ABS_RY			0x04
#define ABS_RZ			0x05
#define ABS_THROTTLE		0x06
#define ABS_RUDDER		0x07
#define ABS_WHEEL		0x08
#define ABS_GAS			0x09
#define ABS_BRAKE		0x0a
// ...
5.1.2 事件数据分析
c
#include <stdio.h>
#include <stdlib.h>
#include <sys/types.h>
#include <sys/stat.h>
#include <fcntl.h>
#include <unistd.h>

#include<linux/input.h>

int main(void)
{
    // 打开触摸屏
    int ts_fd = open("/dev/input/event0", O_RDONLY);
    if(ts_fd == -1)
    {
        perror("open touchscreen failed");
        exit(-1);
    }

    // 定义输入事件缓冲区
    struct input_event myevent;

    while(1)
    {
        // 读入数据并输出
        read(ts_fd, &myevent, sizeof(struct input_event)); //阻塞等待输入数据
        printf("type:%d code:%d value:%d\n", myevent.type, myevent.code, myevent.value);
    }

    // 关闭文件
    close(ts_fd);

    return 0;
}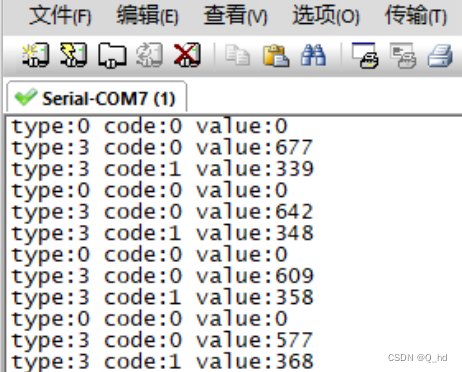
c
type:0 code:0 value:0 // 同步事件
type:3/*EV_ABS触摸屏事件*/ code:0/*ABS_X x轴*/ value:520
type:3/*EV_ABS触摸屏事件*/ code:1/*ABS_Y y轴*/ value:457
type:0 code:0 value:0 // 同步事件
type:1/*EV_KEY键盘事件*/ code:330/*BTN_TOUCH键盘事件*/ value:0//松开
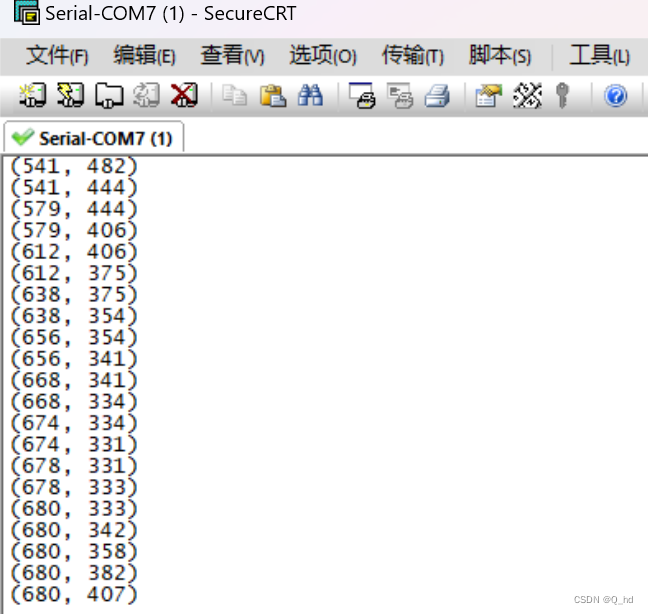
type:0 code:0 value:0 // 同步事件获取触摸屏 的 x,y值:
c
#include <stdio.h>
#include <stdlib.h>
#include <sys/types.h>
#include <sys/stat.h>
#include <fcntl.h>
#include <unistd.h>

#include<linux/input.h>

int main(void)
{
    // 打开触摸屏
    int ts_fd = open("/dev/input/event0", O_RDONLY);
    if(ts_fd == -1)
    {
        perror("open touchscreen failed");
        exit(-1);
    }

    // 定义输入事件缓冲区
    struct input_event myevent;
    int x, y, count = 0;
    while(1)
    {
        // 读入数据并输出
        read(ts_fd, &myevent, sizeof(struct input_event)); //阻塞等待输入数据

        if(myevent.type == EV_ABS) // 触摸屏事件
        {
            if(myevent.code == ABS_X) // X轴
            {
                x = myevent.value;
                count++;
            }
            if(myevent.code == ABS_Y)
            {
                y=myevent.value;
                count++;
            }
            if (count == 2)
            {
                count = 0;
                printf("(%d, %d)\n", x, y);
            }
        }

        //printf("type:%d code:%d value:%d\n", myevent.type, myevent.code, myevent.value);
    }

    // 关闭文件
    close(ts_fd);

    return 0;
}
总结:
本文全面介绍了嵌入式Linux开发中的一系列关键技术,包括交叉编译工具的使用、项目开发流程、开发板的连接方法、系统文件IO的基本操作、LCD显示屏的显示技术以及触摸屏的输入子系统模型和事件分析。通过详细的代码示例和步骤说明,读者可以对这些技术有一个清晰的认识,并能够在实际开发中灵活应用。
交叉编译工具是开发过程中不可或缺的一部分,它允许开发者在不同平台之间进行代码的编译和移植。而项目开发流程的介绍,为读者提供了一个清晰的开发路线图,确保开发工作的有序进行。开发板的连接方法和系统文件IO操作是进行硬件交互的基础,LCD显示屏的显示技术和触摸屏事件分析则进一步扩展了开发者在用户界面交互方面的技能。
通过本文的学习,开发者不仅能够掌握嵌入式Linux开发的基本技能,还能够对LCD显示和触摸屏处理等高级主题有更深入的理解。希望本文能够成为嵌入式Linux开发者的一份宝贵参考资料,帮助他们在项目开发中更加得心应手。