ubuntu 18 虚拟机安装(3)安装mysql
参考
https://cloud.tencent.com/developer/article/1700780
技术分享 | MySQL 设置管理员密码无法生效一例
https://cloud.tencent.com/developer/article/2014384
在Ubuntu18.04上安装MySQL | 超级详细
https://baijiahao.baidu.com/s?id=1626805903141392082&wfr=spider&for=pc
MySQL查看用户权限及权限管理的方法详解
https://www.jb51.net/database/318148q0l.htm
mysql------数据库备份------使用mysqldump命令备份所有数据库
https://blog.csdn.net/m0_61442607/article/details/127968055
MySQL "grant all"与"grant all privileges"的差别
https://deepinout.com/mysql/mysql-questions/5_mysql_mysql_grant_all_vs_grant_all_privileges.html
1
c
sudo apt update
sudo apt install mysql-server -y
2
安装完成之后可以使用如下命令来检查是否安装成功:
sudo netstat -tap | grep mysql
通过上述命令检查之后,如果看到有 mysql 的socket处于 LISTEN 状态则表示安装成功。
3
对于全新安装,你应该运行包含的安全脚本。该脚本改变一些诸如远程root登录和简单用户等不安全的缺省选项。在老版本的MySQL中,你还需要手动初始化数据目录,但现在将被自动完成。
运行安全脚本:
sudo mysql_secure_installation
该脚本将通过一系列的提示帮你完成MySQL安装安全选项的变更。第一个提示将询问你是否愿意安装密码检测插件,该插件用来测试你设置的MySQL密码的强壮性。无论你如何选择,下一个提示是让你设置MySQL root用户的密码。回车,然后需要确认你输入的密码。
从这开始,后续所有问题可以输入Y或者回车,采用默认配置即可。这将移除一些匿名用户和测试数据库,并且禁用远程root登录。同时,将加载这些新规则以使您做的变更能够在MySQL立刻生效。
sudo mysql_secure_installation
c
Securing the MySQL server deployment.

Connecting to MySQL using a blank password.

VALIDATE PASSWORD PLUGIN can be used to test passwords
and improve security. It checks the strength of password
and allows the users to set only those passwords which are
secure enough. Would you like to setup VALIDATE PASSWORD plugin?

Press y|Y for Yes, any other key for No: N
Please set the password for root here.

New password:

Re-enter new password:
By default, a MySQL installation has an anonymous user,
allowing anyone to log into MySQL without having to have
a user account created for them. This is intended only for
testing, and to make the installation go a bit smoother.
You should remove them before moving into a production
environment.

Remove anonymous users? (Press y|Y for Yes, any other key for No) : y
Success.


Normally, root should only be allowed to connect from
'localhost'. This ensures that someone cannot guess at
the root password from the network.

Disallow root login remotely? (Press y|Y for Yes, any other key for No) : y
Success.

By default, MySQL comes with a database named 'test' that
anyone can access. This is also intended only for testing,
and should be removed before moving into a production
environment.


Remove test database and access to it? (Press y|Y for Yes, any other key for No) : y
 - Dropping test database...
Success.

 - Removing privileges on test database...
Success.

Reloading the privilege tables will ensure that all changes
made so far will take effect immediately.

Reload privilege tables now? (Press y|Y for Yes, any other key for No) : y
Success.

All done!
11
sudo mysql_secure_installation
接下来,为了确保数据库的安全性和正常运转,对数据库进行初始化操作。这个初始化操作涉及下面5个步骤。
(1)安装验证密码插件。
(2)设置root管理员在数据库中的专有密码。
(3)随后删除匿名账户,并使用root管理员从远程登录数据库,以确保数据库上运行的业务的安全性。
(4)删除默认的测试数据库,取消测试数据库的一系列访问权限。
(5)刷新授权列表,让初始化的设定立即生效。
对于上述数据库初始化的操作步骤,在下面的输出信息旁边我做了简单注释。
root@ubuntu-virtual-machine:~# mysql_secure_installation
Securing the MySQL server deployment.
Connecting to MySQL using a blank password.
VALIDATE PASSWORD PLUGIN can be used to test passwords
and improve security. It checks the strength of password
and allows the users to set only those passwords which are
secure enough. Would you like to setup VALIDATE PASSWORD plugin? #要安装验证密码插件吗?
Press y|Y for Yes, any other key for No: N # 这里我选择N
Please set the password for root here.
New password: #输入要为root管理员设置的数据库密码
Re-enter new password: #再次输入密码
By default, a MySQL installation has an anonymous user,
allowing anyone to log into MySQL without having to have
a user account created for them. This is intended only for
testing, and to make the installation go a bit smoother.
You should remove them before moving into a production
environment.
Remove anonymous users? (Press y|Y for Yes, any other key for No) : y #删除匿名账户
Success.
Normally, root should only be allowed to connect from
'localhost'. This ensures that someone cannot guess at
the root password from the network.
Disallow root login remotely? (Press y|Y for Yes, any other key for No) : N #禁止root管理员从远程登录,这里我没有禁止
... skipping.
By default, MySQL comes with a database named 'test' that
anyone can access. This is also intended only for testing,
and should be removed before moving into a production
environment.
Remove test database and access to it? (Press y|Y for Yes, any other key for No) : y #删除test数据库并取消对它的访问权限
-
Dropping test database...
Success.
-
Removing privileges on test database...
Success.
Reloading the privilege tables will ensure that all changes
made so far will take effect immediately.
Reload privilege tables now? (Press y|Y for Yes, any other key for No) : y #刷新授权表,让初始化后的设定立即生效
Success.
All done!
4
初始化MySQL数据目录,在5.7.6之前的版本需要使用mysql_install_db, 5.7.6及之后的版本使用mysqld --initialize进行初始化。如果您通过步骤1描述的Debian包安装的MySQL,数据目录将被自动初始化,您不需要做任何事情。
5
登录mysql数据库可以通过如下命令:
mysql -u root -p
c
mysql -u root -p
Enter password:
ERROR 1698 (28000): Access denied for user 'root'@'localhost'
前面加上 sudo mysql -u root -p
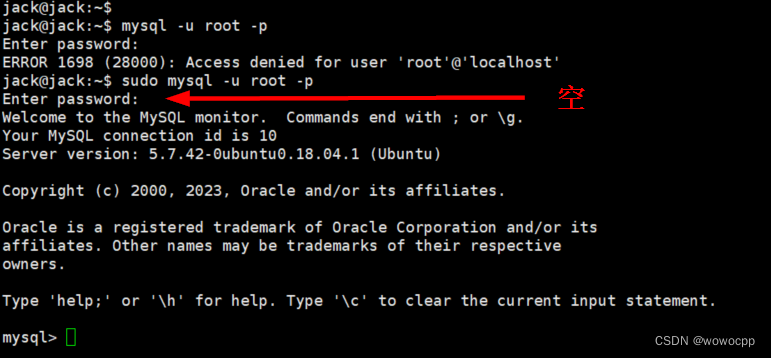
-u 表示选择登陆的用户名,
-p 表示登陆的用户密码,
现在是mysql数据库是没有密码的,
Enter password:处直接回车,
就能够进入mysql数据库。
然后通过 show databases; 就可以查看当前的所有数据库。
之前通过 sudo mysql_secure_installation 设置 的密码,没有起作用,为啥呢?
执行下面这句话 查看状态
c
select plugin,authentication_string from mysql.user where user = 'root' ;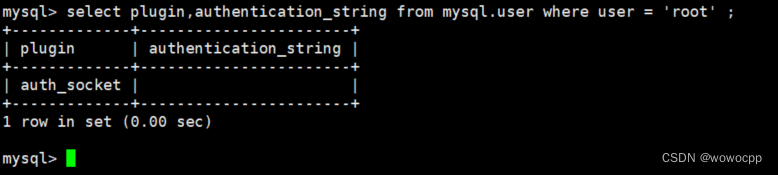
6
用户的认证插件有可能使用 auth_socket 。
极有可能是这个原因!
插件 auth_socket MySQL 官网全称为:Socket Peer-Credential Pluggable Authentication(套接字对等凭据可插拔的身份验证)。
官方文档地址:https://dev.mysql.com/doc/refman/8.0/en/socket-pluggable-authentication.html
阅读官方文档后可以得出的结论为插件 auth_socket 不需要验证密码即可进行本地认证!它有两个认证条件:
客户端通过本地 unix socket 文件连接 MySQL 服务端。
通过 socket 的选项 SO_PEERCRED 来获取运行客户端的 OS 用户名,随后判断 OS 用户名是否在 mysql.user 表里。
另外,想了解更多关于 socket 的选项 SO_PEERCRED 可以参考这个网址:https://man7.org/linux/man-pages/man7/unix.7.html
那我们接下来验证结论是否正确。查看当前登录用户是不是root@localhost: 确认无疑。
检查 mysql.user 表记录:检查字段 plugin、authentication_string(此字段有可能不为空)。
确认管理员账号插件为 auth_socket ,难怪改密码无效。接下来把插件改为非 auth_socket 即可。
c
alter user root@localhost identified with mysql_native_password by '1234abcd';
flush privileges; # 刷新权限
在Ubuntu系统中MySQL 5.7及之后的版本,MySQL的root用户被默认设置成通过auth_socket插件进行认证,而不是通过密码。在很多情况下,这些配置可以使系统更加的安全和可靠,但如果允许外部程序(例如phpMyAdmin)访问时,这将是事情变得非常复杂。
为了能够以root用户通过密码的方式连接MySQL,你需要将其认证方式从 auth_socket 方式变更为mysql_native_password。进行该设置,通过终端打开MySQL的提示符:
SELECT user,authentication_string,plugin,host FROM mysql.user;
本例中,您可以看到实际上root用户通过auth_socket插件的方式进行认证。要将root用户设置为通过密码认证,运行如下ALTER USER命令。务必将密码设置为高强度的密码,需要注意的是该操作将改变您在步骤2中设置的密码:
ALTER USER 'root'@'localhost' IDENTIFIED WITH mysql_native_password BY 'password';
然后运行 FLUSH PRIVILEGES, 这将让数据库系统重新加载授权表是变更生效:
FLUSH PRIVILEGES;
检查每个用户的授权方法,确认root用户不再使用auth_socket插件进行认证。
SELECT user,authentication_string,plugin,host FROM mysql.user;
检查mysql服务状态:
systemctl status mysql
显示如下结果说明mysql服务运行是正常的:
然后执行exit命令退出mysql服务,再执行如下命令重启mysql:
systemctl restart mysql
(可选)启动MySQL服务并设置开机自启:
c
sudo systemctl start mysql
sudo systemctl enable mysql
(可选)查看MySQL服务的状态:
c
sudo systemctl status mysql以上步骤会安装MySQL服务器,执行安全设置,并启动MySQL服务。如果需要进一步配置,可以登录MySQL后执行相关SQL命令。
7. 添加用户
如果一直都是sudo才能进入mysql,那就很没有意思了
所以可以在mysql里创建一个新的用户,命令为:
其中ubuntu为新用户名称,123456为新用户的密码
c
mysql> create user 'ubuntu'@'%' identified by '123456';
Query OK, 0 rows affected (0.02 sec)

mysql> grant all privileges on *.* to ubuntu@'%' identified by '123456';
Query OK, 0 rows affected, 1 warning (0.00 sec)
再次用mysql -u root -p命令,Enter password:处输入刚设置的密码,回车,就能够进入mysql数据库。
使用 use mysql; 命令打开mysql命名的数据库,显示当前数据库的表:show tables; 查询user表里的数据:select * from user;(user表里是mysql数据库的所有账户信息)
保存退出,然后进入mysql数据库,执行授权命令:
c
mysql> grant all on *.* to root@'%' identified by '你的密码' with grant option;
mysql> flush privileges; # 刷新权限
11
注意: 如果您启用的root用户的密码认证,您需要通过不同的命令登录MySQL终端。如上所述,将以常规用户权限运行MySQL客户端。只能通过认证以获得管理员权限。
mysql -u root -p
如下,创建一个新用户,并设置强密码:
CREATE USER 'sammy'@'localhost' IDENTIFIED BY 'password';
然后,授予新用户合适的权限。例如,授予新用户访问数据库中所有表的权限,及添加、变更和移除用户的权限,通过如下命令即可:
GRANT ALL PRIVILEGES ON . TO 'sammy'@'localhost' WITH GRANT OPTION;
需要注意的是,这时您不再需要运行FLUSH PRIVILEGES命令。只有通过 INSERT, UPDATE或者DELETE命令的方式变更授权表的时候才需要该命令。由于您创建了一个新用户,而不是改变一个已经存在的用户,因此FLUSH PRIVILEGES并不是必须要运行的。
退出MySQL终端:
exit
最后,我们测试一下安装的结果。
测试MySQL(步骤4)
无论您如何安装的,MySQL都应该自动运行,通过如下命令可以查看其状态:
systemctl status mysql.service
您可以看到类似如下输出:
● mysql.service - MySQL Community ServerLoaded: loaded (/lib/systemd/system/mysql.service; enabled; vendor preset: enActive: active (running) since Wed 2018-04-23 21:21:25 UTC; 30min agoMain PID: 3754 (mysqld)Tasks: 28Memory: 142.3MCPU: 1.994sCGroup: /system.slice/mysql.service└─3754 /usr/sbin/mysqld
如果MySQL没有运行,你可以通过sudo systemctl start mysql启动服务。
最为进一步的检查,可以通过mysqladmin 工具连接数据库,这是一个让你运行管理层面命令的客户端。例如,该命令提示以root(-u root)用户连接MySQL,并提示输入密码(-p),然后返回版本信息。
sudo mysqladmin -p -u root version
可以看到如下输出信息:
mysqladmin Ver 8.42 Distrib 5.7.21, for Linux on x86_64Copyright © 2000, 2018, Oracle and/or its affiliates. All rights reserved.Oracle is a registered trademark of Oracle Corporation and/or itsaffiliates. Other names may be trademarks of their respectiveowners.Server version 5.7.21-1ubuntu1Protocol version 10Connection Localhost via UNIX socketUNIX socket /var/run/mysqld/mysqld.sockUptime: 30 min 54 secThreads: 1 Questions: 12 Slow queries: 0 Opens: 115 Flush tables: 1 Open tables: 34 Queries per second avg: 0.006
这意味着MySQL已经起来,并处以运行状态。
8. 查看用户权限
c
select * from mysql.user where user='root'\G
SHOW GRANTS FOR 'root'@'%';
SHOW GRANTS FOR 'root'@'localhost';
22
SHOW GRANTS FOR 'root'@'localhost';
SHOW GRANTS FOR 'root'@'%';
mysqldump
备份命令的 -B 参数
执行备份语句的时候,其中可以加上很多的参数,用来添加一些备份的时候的特殊要求的,其中有一个-B参数。执行备份语句时,如果加上了-B参数,那么将来再执行数据还原的时候,就不需要自己到数据库里面去先创建一个目标库了,并且执行数据还原语句的时候也不需要指定目标库了。如果没有加-B参数,就需要自行到数据库中先创建一个目标库,并且执行恢复语句时要指定将数据恢复到目标库。
原因是-B参数导出的文件中自带创建数据库和连接数据库的功能:(使用-B参数备份出来的内容自带create database 库名和use 库名的功能)。
备份命令的 | gzip 管道符
【压缩备份】:实际生产上导出的数据有可能比较大,不好备份到远程,这时候就需要进行压缩。
然后执行如下mysql命令(需要首先确认db_backup.dump文件存在于当前路径下):
mysql > source db_backup.dump;
这一方法的优点在于能够显示读取备份的过程和时间。
删除数据库
数据库的创建,删除与命名规范
https://blog.csdn.net/weixin_52034946/article/details/114888387
msyql 删除带横杠名字的数据库 用tab 上面的 例如 drop databasetest-1-2`
c
drop database `wechat-test` ;
show databases ;