40、防火墙
一、防火墙
1.1、备份防火墙规则
1、iptables的配置文件
/etc/sysconfig/iptables2、创建临时规则,save到备份文件,再清空规则,用cat备份文件到配置文件。利用重定向写入。
备份文件iptables-save >/opt/iptables.bak
备份文件写入永久配置文件cat /opt/iptables.bak > /etc/sysconfig/iptables
[root@test1 opt]# iptables-save >/opt/iptables.bak

[root@test1 opt]# cat /opt/iptables.bak

*filter
:INPUT ACCEPT [129:8848]
:FORWARD ACCEPT [0:0]
:OUTPUT ACCEPT [87:10440]
-A INPUT -s 192.168.168.30/32 -p tcp -m tcp --dport 80 -j REJECT --reject-with icmp-port-unreachable
COMMIT

Completed on Thu Jun 27 09:16:01 2024


[root@test1 opt]# iptables-restore < /opt/iptables.bak

[root@test1 opt]# cat /opt/iptables.bak > /etc/sysconfig/iptables

 systemctl restart iptables.service

 [root@test1 opt]# iptables -vnL
Chain INPUT (policy ACCEPT 16 packets, 968 bytes)
 pkts bytes target     prot opt in     out     source               destination
    0     0 REJECT     tcp  --  *      *       192.168.168.30       0.0.0.0/0            tcp dpt:80 reject-with icmp-port-unreachable
二、自定义链
-
iptables -N xy增加自定义链 -
iptables -E xy ly更改自定义链名称 -
iptables -D chengqian #删除自定义链下规则 -
iptables -X chengqian---清除自定义链 -
iptables -A ly向自定义链中添加规则,添加与iptables规则一样[root@test1 opt]# iptables -N xy
[root@test1 opt]# iptables -vnL
Chain INPUT (policy ACCEPT 6 packets, 364 bytes)
pkts bytes target prot opt in out source destination
0 0 REJECT tcp -- * * 192.168.168.30 0.0.0.0/0 tcp dpt:80 reject-with icmp-port-unreachableChain FORWARD (policy ACCEPT 0 packets, 0 bytes)
pkts bytes target prot opt in out source destinationChain OUTPUT (policy ACCEPT 4 packets, 376 bytes)
pkts bytes target prot opt in out source destinationChain xy (0 references)
pkts bytes target prot opt in out source destination
iptables -E xy ly更改自定义链名称
[root@test1 opt]# iptables -E xy ly
[root@test1 opt]# iptables -vnL
Chain INPUT (policy ACCEPT 6 packets, 364 bytes)
 pkts bytes target     prot opt in     out     source               destination
    0     0 REJECT     tcp  --  *      *       192.168.168.30       0.0.0.0/0            tcp dpt:80 reject-with icmp-port-unreachable

Chain FORWARD (policy ACCEPT 0 packets, 0 bytes)
 pkts bytes target     prot opt in     out     source               destination

Chain OUTPUT (policy ACCEPT 4 packets, 376 bytes)
 pkts bytes target     prot opt in     out     source               destination

Chain ly (0 references)
 pkts bytes target     prot opt in     out     source               destination
iptables -A ly向自定义链中添加规则,添加与iptables规则一样
[root@test1 opt]# iptables -A ly -p tcp -j ACCEPT
[root@test1 opt]# iptables -vnL
Chain INPUT (policy ACCEPT 6 packets, 364 bytes)
 pkts bytes target     prot opt in     out     source               destination
    0     0 REJECT     tcp  --  *      *       192.168.168.30       0.0.0.0/0            tcp dpt:80 reject-with icmp-port-unreachable

Chain FORWARD (policy ACCEPT 0 packets, 0 bytes)
 pkts bytes target     prot opt in     out     source               destination

Chain OUTPUT (policy ACCEPT 4 packets, 408 bytes)
 pkts bytes target     prot opt in     out     source               destination

Chain ly (0 references)
 pkts bytes target     prot opt in     out     source               destination
    0     0 ACCEPT     tcp  --  *      *       0.0.0.0/0            0.0.0.0/0
iptables -D chengqian # 删除自定义链下规则
iptables -X chengqian---清除自定义链
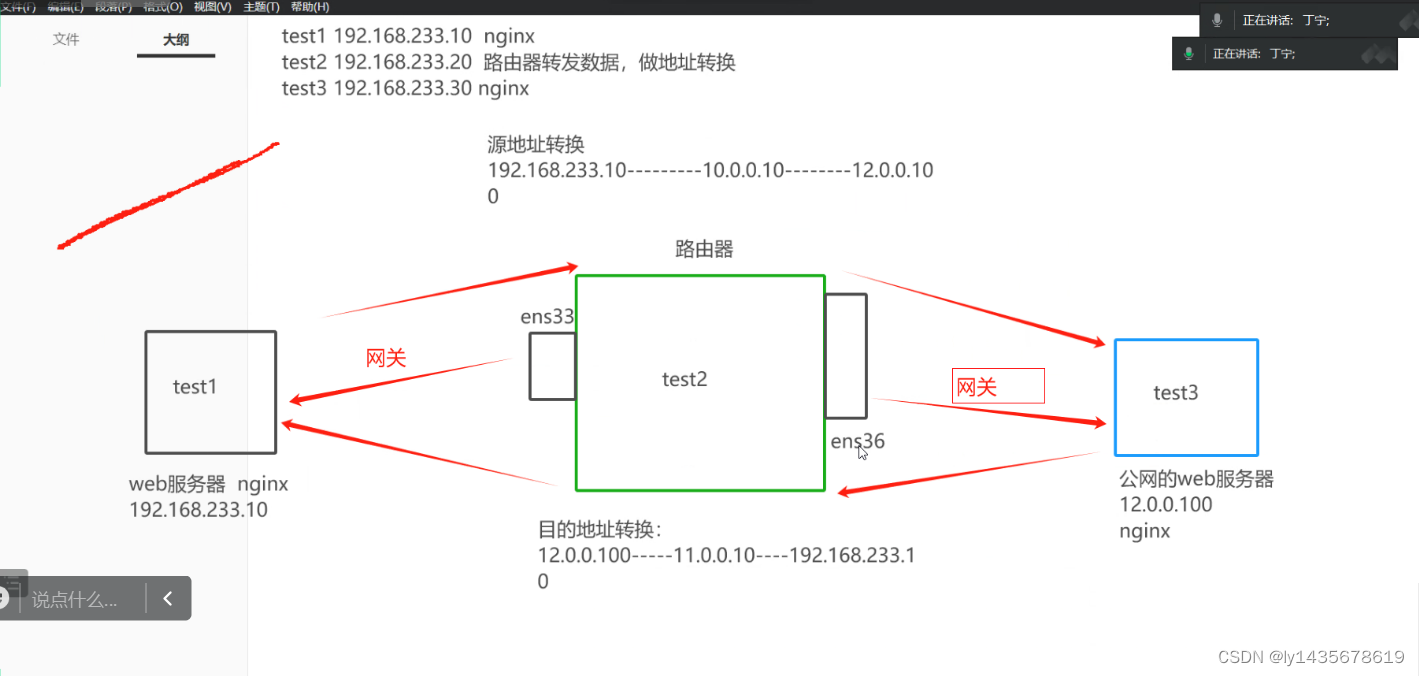
NAT控制类型
SDAT:源地址转换
DNAT:目的地址转换
内网----外网 内网ip转换成可以访问外网的ip
内网的多个主机可以只有一个有效的公网ip地址访问外部网络
DNAT:目的地址转发
外部用户,可以通过一个公网地址访问服务内部的私网服务。
私网的ip和公网的ip做一个映射。
三、练习
1、linux的内核参数的配置文件,内核优化都在这个配置/etc/sysctl.conf文件当中设置。
vim /etc/sysctl.conf
sysctl -p 可以使内核参数的配置立刻生效
sysctl -p  ##可以使内核参数的配置立刻生效

[root@test2 ~]# vim /etc/sysctl.conf
[root@test2 ~]# sysctl -p
net.ipv4.ip_forward = 1
2、nat表规则解释
iptables -t nat -A POSTROUTING -s 192.168.168.0/24 -o ens33 -j SNAT --to 10.0.0.10 ##-
-t nat 指定网络地址转换表
-
-A POSTROUTING 输出之后的规则,A添加
-
-s 指定源ip
-
-o 指定离开设备输出网络设备
-
-j 控制类型 SNAT
-
--to 指定整个网络192.168.168.0/24从ens33设备出去转换成10.0.0.10
内网访问外网的web服务。是以10.0.0.10ip地址访问外网。
iptables -t nat -A PREROUTING -d 11.0.0.11 -i ens33 -p tcp --dport 80 -j DNAT --to 192.168.168.10
-
-d 11.0.0.11 指定作为目的地址转换的ip地址
-
-i 从指定设备进入本机
-
-p指定协议
-
-dport 指定端口
-
-j DNAT 使用目的地址转换
-
--to 192.168.168.10
外网想要访问内网的192.168.168.10:80的这个web服务。只需要访问11.0.0.11,就可以实现访问192.168.168.10
练习
1、工具打开所有会话
systemctl stop firewalld
setenforce 0
2、1,3主机安装nginx --web服务,2主机安装iptables
yum -y install nginx

yum -y install iptables iptables-service
3、1、3开启nginx
systemctl restart nginx4、主机2添加网络设备
vim /etc/sysconfig/network-scripts/ifcfg-ens33设置ip
TYPE=Ethernet
DEVICE=ens33
ONBOOT=yes
BOOTPROTO=static
IPADDR=192.168.168.254
NETMASK=255.255.255.0
#GATEWAY=192.168.168.2
#DNS1=218.2.135.1

vim /etc/sysconfig/network-scripts/ifcfg-ens36

TYPE=Ethernet
DEVICE=ens36
ONBOOT=yes
BOOTPROTO=static
IPADDR=12.0.0.254
NETMASK=255.255.255.0
#GATEWAY=192.168.168.2
#DNS1=218.2.135.1
5、更改3的地址和网关
vim /etc/sysconfig/network-scripts/ifcfg-ens33

TYPE=Ethernet
DEVICE=ens33
ONBOOT=yes
BOOTPROTO=static
IPADDR=12.0.0.100
NETMASK=255.255.255.0
GATEWAY=12.0.0.254
DNS1=218.2.135.1
6、更改主机1的网关
vim /etc/sysconfig/network-scripts/ifcfg-ens33

TYPE=Ethernet
DEVICE=ens33
ONBOOT=yes
BOOTPROTO=static
IPADDR=192.168.168.10
NETMASK=255.255.255.0
GATEWAY=192.168.168.254
DNS1=218.2.135.1
7、主机2的内核参数配置文件
vim /etc/sysctl.conf  ##内核参数配置文件

net.ipv4.ip_forward = 1   ##开启转发功能

sysctl -p

[root@test2 ~]# sysctl -p
net.ipv4.ip_forward = 1
8、写入规则
iptables -t nat -A POSTROUTING -s 192.168.168.0/24 -o ens33 -j SNAT --to 10.0.0.10iptables -t nat -vnL 查看
`iptables -t nat -A PREROUTING -d 11.0.0.11 -i ens33 -p tcp --dport 80 -j DNAT --to 192.168.168.10`9、主机123全部重启网卡
systemctl restart network
10、打开1,3虚拟机终端
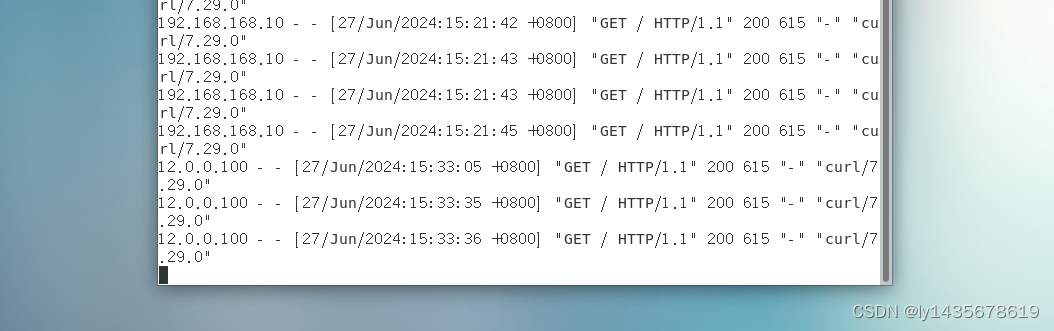
在3中打卡日志
tail -f /var/log/nginx/access.log
在1中访问curl 12.0.0.100
root@localhost \~# tail -f /usr/local/nginx/logs/access.log
/usr/local/nginx/logs/access.log ##编译安装的访问目录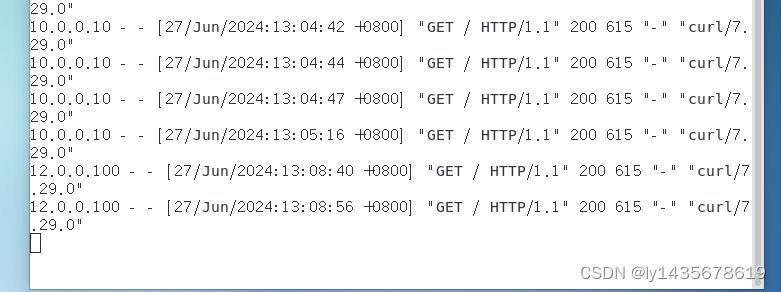
四、面试题在linux中如何抓包:
tcpdump就是linux自带的抓包工具。(做小化安装是不带的,需要额外安装)
静态和动态
tcpdump tcp -i ens33 -t -s0 -c 10 and dst port 80 and src net 192.168.168.0/24 -w /opt/target.cap-
tcp 指定抓包的协议 udp icmp 第一个参数
-
-i 只抓经过指定设备的包
-
-t 不显示时间戳
-
-s0 抓完整的数据包
-
-c 10:抓几个包 10个包
-
dst port :指定抓包的目的端口
-
src net 192.168.168.0/24 :指定抓包的ip地址
-
net 网段
-
host 主机(ip地址)
-
src host 192.168.168.10
target.cap sz下载到电脑上可以用windows抓包工具打开
sz /opt/target.cap
tcpdump -i ens33 > /opt/ens33-w保存到指定路径
如果要用wireshark对数据包进行分析,tcpdump在抓包时,要使用s0,抓取完整格式,否则wireshark无法分析。
tcpdump -i ens33 -s0 > /opt/ens33.cap    ##动态抓包,到指定位置

tcpdump -i ens33 -s0 -w /opt/ens33.cap
防火墙
防火墙(英语:Firewall)技术是通过有机结合各类用于安全管理与筛选的软件和硬件设备,帮助计算机网络于其内、
外网之间构建一道相对隔绝的保护屏障,以保护用户资料与信息安全性的一种技术。
硬件防火墙:通过硬件和软件的组合,基于硬件的防火墙保护整个内部网络安全。
软件防火墙:通过纯软件,单独使用软件系统来完成防火墙功能,保护安装它的系统。
另外:因为iptables是开源的,就安全系数来讲软件防火墙只能用于辅助硬件防火墙,无法做到真正的安全效果。
此外软件防火墙也是需要占用硬件资源运行
防火墙技术的功能主要在于及时发现并处理计算机网络运行时可能存在的安全风险、数据传输等问题,
其中处理措施包括隔离与保护,同时可对计算机网络安全当中的各项操作实施记录与检测,以确保计算机网络运行的安全性,
保障用户资料与信息的完整性,为用户提供更好、更安全的计算机网络使用体验。
firewalld防火墙是Centos7系统默认的防火墙管理工具,取代了之前的iptables防火墙,也是工作在网络层,
属于包过滤防火墙
firewalld和iptables都是用来管理防火墙的工具(属于用户态)来定义防火墙的各种规则功能,
内部结构都指向netfilter网络过滤子系统(属于内核态)来实现包过滤防火墙功能。
firewalld提供了支持网络区域所定义的网络连接以及接口安全等级的动态防火墙管理工具。
它支持IPv4、IPv6防火墙设置以及以太网桥(在某些高级服务可能会用到,比如云计算),
并且拥有两种配置模式:运行时配置与永久配置。
5.1、firewalld与iptables 的区别
1、iptables主要是基于接口,来设置规则,从而判断网络的安全性。
firewalld是基于区域,根据不同的区域来设置不同的规则,从而保证网络的安全。与硬件防火墙的设置相类似。
2、iptables在/etc/ sysconfig/iptables中储存配置,
firewalld将配置储存在/etc/firewalld/ ( 优先加载)和/usr/lib/ firewalld/ ( 默认的配置文件)中的各种XML文件里。
3、使用iptables每一个单独更改意味着清除所有旧有的规则和从/etc/sysconfig/iptables里读取所有新的规则。
使用firewalld却不会再创建任何新的规则,仅仅运行规则中的不同之处。因此firewalld可以在运行时间内,改变设置而不丢失现行连接。
4、iptables防火墙类型为静态防火墙,firewalld防火墙类型为动态防火墙
firewalld区域的概念:
firewalld防火墙为了简化管理,将所有网络流量分为多个区域(zone)。
然后根据数据包的源IP地址或传入的网络接口等条件将流量传入相应区域。
每个区域都定义了自己打开或者关闭的端口和服务列表。
5.2、firewalld防火墙9个区域
1、trusted(信任区域):允许所有的传入流量。
2、public(公共区域):允许与ssh或dhcpv6-client预定义服务匹配的传入流量,其余均拒绝。是新添加网络接口的默认区域。
3、external(外部区域):
允许与 ssh 预定义服务匹配的传入流量,其余均拒绝。 默认将通过此区域转发的IPv4传出流量将进行地址伪装,可用于为路由器启用了伪装功能的外部网络。
4、home(家庭区域):允许与ssh、ipp-client、mdns、samba-client或dhcpv6-client预定义服务匹配的传入流量,其余均拒绝
5、internal(内部区域):默认值时与home区域相同。
6、work(工作区域):允许与 ssh、ipp-client、dhcpv6-client 预定义服务匹配的传入流量,其余均拒绝。
7、dmz(隔离区域也称为非军事区域):允许与 ssh 预定义服务匹配的传入流量,其余均拒绝。
8、block(限制区域):拒绝所有传入流量。
9、drop(丢弃区域):丢弃所有传入流量,并且不产生包含ICMP的错误响应。
5.3、firewalld命令行工具
firewall-cmd命令行工具
firewall-cmd --get-default-zone---查看当前系统的默认区域
[root@test4 ~]# firewall-cmd --get-default-zone
public
[root@test4 ~]# firewall-cmd --list-all
public (active)
  target: default
  icmp-block-inversion: no
  interfaces: ens33
  sources:
  services: ssh dhcpv6-client
  ports:
  protocols:
  masquerade: no
  forward-ports:
  source-ports:
  icmp-blocks:
  rich rules:
firewall-cmd --list-all 显示默认区域的所有规则
firewall-cmd --set-default-zone=block切换默认区域
firewall-cmd --list-service查看区域内允许访问的服务
firewall-cmd --list-all --zone=public 查看public区域已配置规则
[root@test4 ~]# firewall-cmd --list-service
ssh dhcpv6-clienthcpv6-client:通过与DHCPv6服务器进行报文交互,获取IPv6地址
firewall-cmd --get-zone-of-interface=ens33 #显示默认区域的指定网卡
firewall-cmd --set-default-zone=home#修改制定区域
firewall-cmd --zone=home --add-interface=ens33 #给指定接口的区域添加网卡
firewall-cmd --zone=home --change-interface=ens33 #更改指定区域的接口网卡
firewall-cmd --zone=home --remove-interface=ens33 #删除指定区域的网卡
只要添加了网卡,会把默认的把网卡添加到区域中。
firewall-cmd --add-service=http --zone=public #添加httpd服务到public 区域
firewall-cmd --remove-service=http --zone=public #删除public区域的httpd 服务
[root@test4 ~]# firewall-cmd --add-service=http --zone=public
success

[root@test4 ~]# firewall-cmd --list-all --zone=public
public (active)
  target: default
  icmp-block-inversion: no
  interfaces: ens33
  sources:
  services: ssh dhcpv6-client http
  ports:
  protocols:
  masquerade: no
  forward-ports:
  source-ports:
  icmp-blocks:
  rich rules:
添加多个服务
firewall-cmd --add-service=http --add-service=ftp --zone=public #方法一
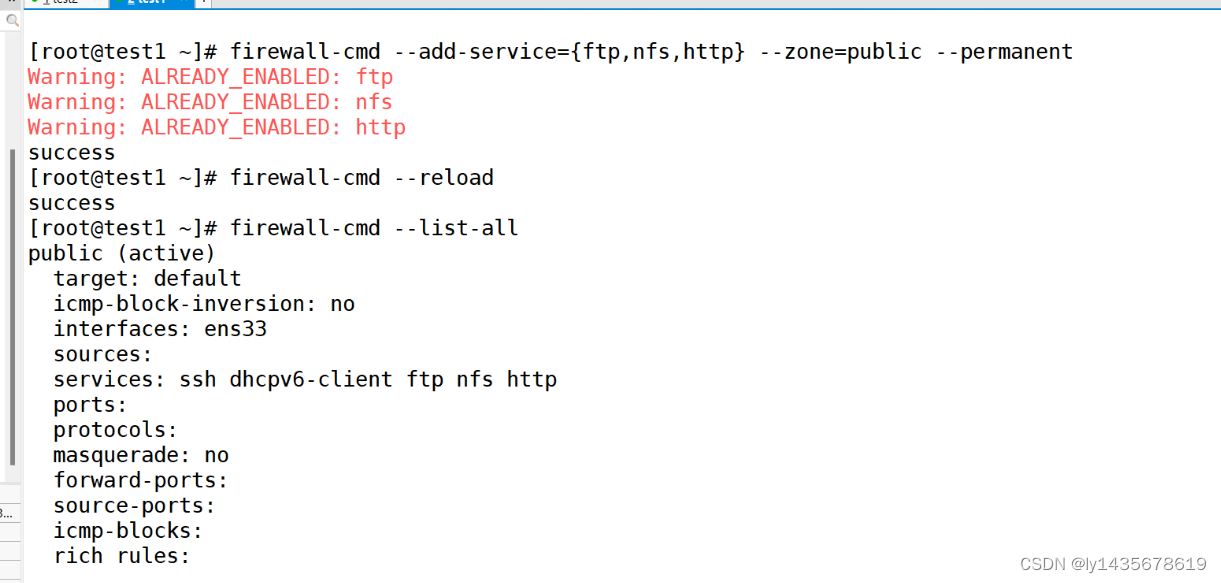
firewall-cmd --add-service={ftp,http} #方法二永久添加
同时添加httpd、ftp服务到默认区域,设置成永久生效
firewall-cmd --add-service=http --add-service=ftp --permanent
firewall-cmd  --add-service={ftp,http} --zone=public --permanent        #两种方式

firewall-cmd --reload	  ##重新加载
firewall-cmd --list-all
添加使用 --permanent选项表示设置成永久生效,需要重新启动firewalld服务或执行firewall-cmd --reload命令
重新加载防火墙规则时才会生效。若不带有此选项,表示用于设置运行时规则,
但是这些规则在系统或firewalld服务重启、停止时配置将失效。
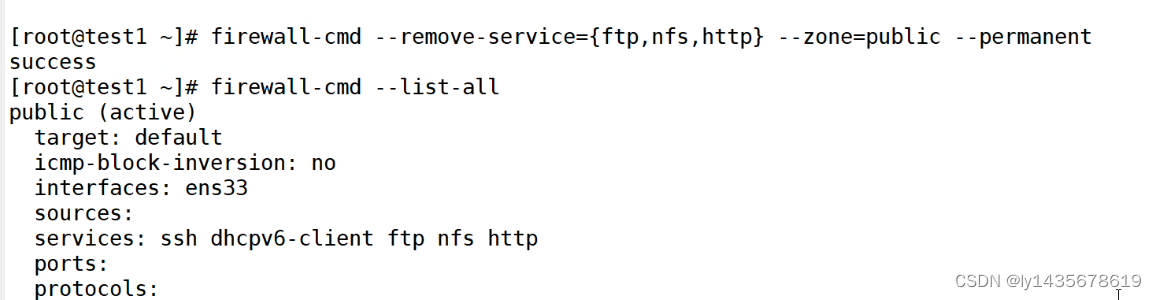
删除永久服务规则
root@localhost \~# firewall-cmd --remove-service=ftp --zone=public --permanent
success
root@localhost \~# firewall-cmd --remove-service=http --zone=public --permanent
success
root@localhost \~# firewall-cmd --reload
success
root@localhost \~# systemctl restart firewalld.service
root@localhost \~# firewall-cmd --list-all
端口

、

端口管理
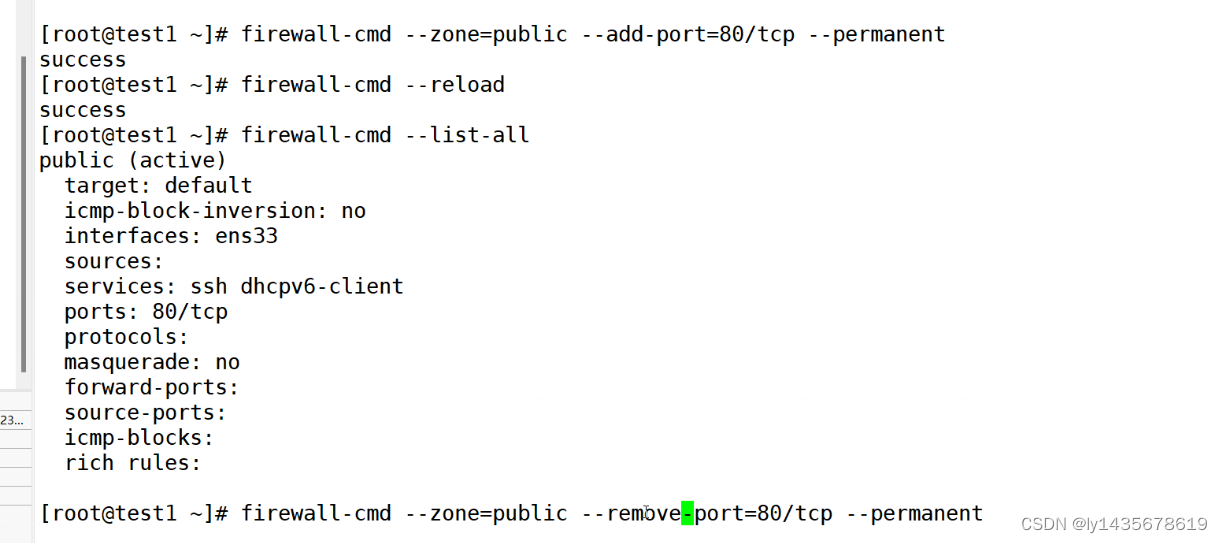
1、允许TCP的443端口到internal区域
firewall-cmd --zone=internal --add-port=443/tcp
firewall-cmd --list-all --zone=internal
2、从internal 区域将TCP的443端口移除
firewall-cmd --zone=internal --remove-port=443/tcp3、允许UDP的2048~2050端口到默认区域
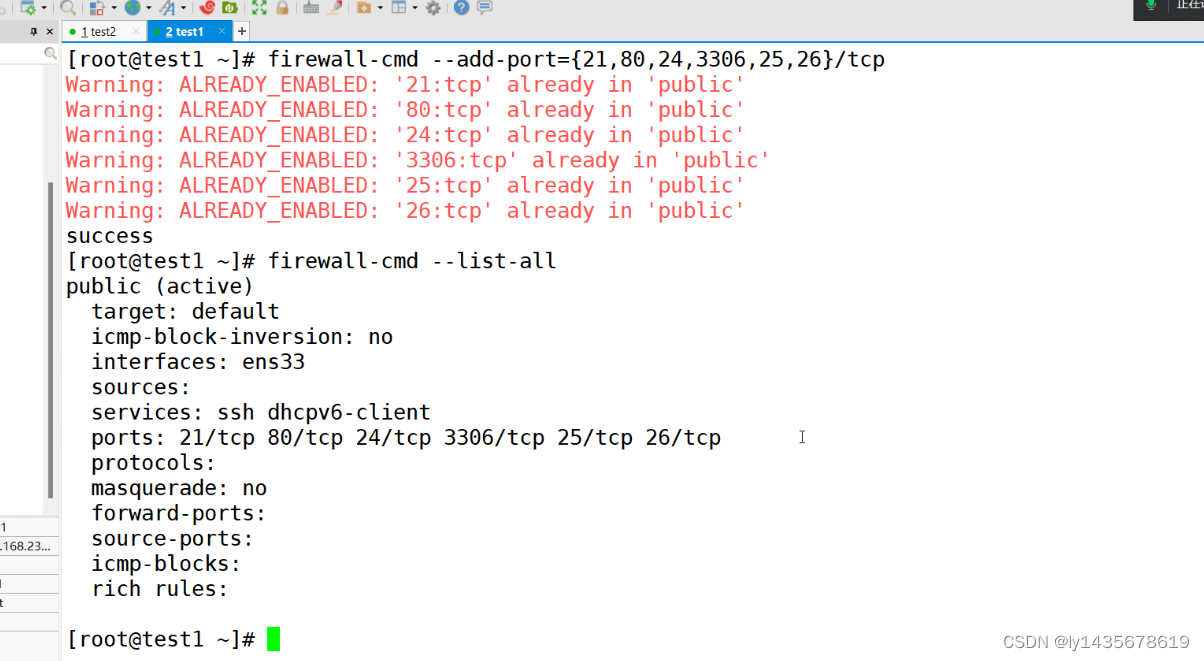
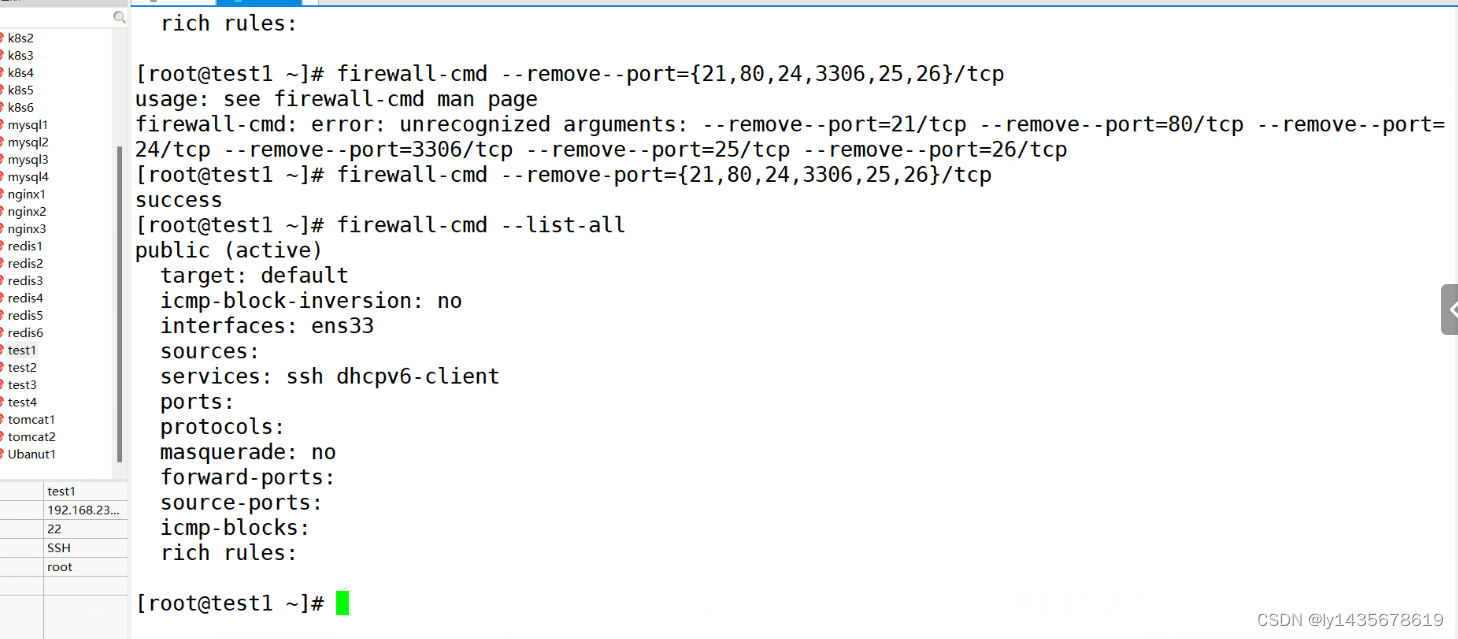
[root@localhost ~]# firewall-cmd --add-port={21,80,23,24}/tcp
success
[root@localhost ~]# firewall-cmd --add-port=30-35/tcp
success
firewall-cmd --add-port=2048-2050/udp
firewall-cmd --list-all
添加源地址进行操作
[root@localhost ~]# firewall-cmd --add-source=192.168.233.20 --zone=block

[root@localhost ~]# firewall-cmd --get-active-zone