文章目录
- [一.Seal Unseal原理介绍](#一.Seal Unseal原理介绍)
-
- [1.1 Intel® SGX supported Sealing Policies](#1.1 Intel® SGX supported Sealing Policies)
- 二.源码分析
-
- [2.1 README](#2.1 README)
- [2.2 重点代码分析](#2.2 重点代码分析)
-
- [2.2.1 主要代码模块交互流程分析](#2.2.1 主要代码模块交互流程分析)
- [2.2.2 App/App.cpp](#2.2.2 App/App.cpp)
- [2.2.3 Enclave_Seal/Enclave_Seal.cpp](#2.2.3 Enclave_Seal/Enclave_Seal.cpp)
- [2.2.4 Enclave_Unseal/Enclave_Unseal.cpp](#2.2.4 Enclave_Unseal/Enclave_Unseal.cpp)
- [2.3 总结](#2.3 总结)
- 三.参考文献
- 四.感谢支持
下面将给出一些sgx源码包中的示例SealUnseal分析,从中学习enclave密封与解封和SGX的基本使用方法:关于 SGX 开发运行环境的搭建可参考之前的一篇博客:【SGX系列教程】(一)。
一.Seal Unseal原理介绍
当enclave被实例化时,当其维护在enclave边界内时,硬件为其数据提供保护(机密性和完整性)。然而,当enclave进程退出时,enclave将被摧毁,在enclave内得到安全的任何数据都将丢失。如果这些数据意味着以后会被重用,那么该enclave必须做出特殊安排,在该飞地之外存储这些数据(主要目的:如何在enclave外持久化安全的存储数据?)。
如下面的表1显示,EGETKEY提供了对持久性Sealing Keys的访问,飞地软件可以使用这些密钥来加密和完整性保护数据。Intel®SGX对该飞地使用的加密方案没有任何限制。当与平台提供的其他服务结合时,如单调计数器,对数据也有可能进行Replay保护。

1.1 Intel® SGX supported Sealing Policies
指令集:
EGETKEY:enclave 使用此指令来访问平台提供的各种不同密钥。每个密钥启用不同的操作(密封、证明)。
说明:
当一个 enclave 被实例化时,它的代码和数据被保护免被外部访问。但是当它停止时,它的所有数据都将丢失。密封是一种将数据安全地保存在 enclave 之外的方法,例如在硬盘驱动器上。enclave 必须使用 EGETKEY 指令检索其密封密钥,它使用此密钥来加密并确保其数据完整性,使用的算法由 enclave 作者选择。
-
使用 Enclave 标识符
密封可以使用 enclave 标识来完成。此时基于
MRENCLAVE的值进行密钥派生,两个不同的 enclave 具有不同的密钥,同一个 enclave 的两个版本也将有不同的密钥,这会阻止数据的本地迁移。 -
使用签名者标识符
也可以使用签名者身份标识符进行密封。这个密钥派生是基于
MRSIGNER的值,两个不同的 enclave 仍然具有不同的密钥,但是一个 enclave 的两个版本共享同一个密钥并且可以读取密封数据。如果多个 enclave 使用相同的密钥进行签名,则它们都可以读取彼此的数据。 -
安全版本号 (SVN)
不允许旧版本的 enclave 读取新版本的 enclave 密封的数据。为了防止它,使用了安全版本号 (SVN)。这是一个计数器,在每次更新影响 enclave 安全性后递增。使用 SVN 派生密钥的方式是,enclave 可以检索与当前或较旧的安全级别相对应的密钥,但不能检索较新的密钥。
二.源码分析
2.1 README
bash
------------------------
Purpose of SealUnseal
------------------------
The project demonstrates sealing/unsealing data between two enclaves.
------------------------------------
How to Build/Execute the Sample Code
------------------------------------
1. Install Intel(R) SGX SDK for Linux* OS
2. Enclave test key(two options):
    a. Install openssl first, then the project will generate a test key<Enclave_private_test.pem> automatically when you build the project.
    b. Rename your test key(3072-bit RSA private key) to <Enclave_private_test.pem> and put it under the <Enclave_Seal> folder.
2. Make sure your environment is set:
    $ source ${sgx-sdk-install-path}/environment
3. Build the project with the prepared Makefile:
    a. Hardware Mode, Debug build:
        $ make
    b. Hardware Mode, Pre-release build:
        $ make SGX_PRERELEASE=1 SGX_DEBUG=0
    c. Hardware Mode, Release build:
        $ make SGX_DEBUG=0
    d. Simulation Mode, Debug build:
        $ make SGX_MODE=SIM
    e. Simulation Mode, Pre-release build:
        $ make SGX_MODE=SIM SGX_PRERELEASE=1 SGX_DEBUG=0
    f. Simulation Mode, Release build:
        $ make SGX_MODE=SIM SGX_DEBUG=0
4. Execute the binary directly:
    $ ./app
5. Remember to "make clean" before switching build mode

-------------------------------------------------
Launch token initialization
-------------------------------------------------
If using libsgx-enclave-common or sgxpsw under version 2.4, an initialized variable launch_token needs to be passed as the 3rd parameter of API sgx_create_enclave. For example,

sgx_launch_token_t launch_token = {0};
sgx_create_enclave(ENCLAVE_FILENAME, SGX_DEBUG_FLAG, launch_token, NULL, &global_eid, NULL); 根据上面的README,项目SealUnseal演示了在两个enclave之间封装和解封数据的过程。以下是如何构建和执行示例代码的步骤总结:
构建和执行示例代码的步骤:
- 安装Intel® SGX SDK for Linux OS
这是基本的前提条件,确保已正确安装SGX SDK。 - 准备Enclave测试密钥(两种选择)
a. 安装openssl,然后在构建项目时,会自动生成一个测试密钥<Enclave_private_test.pem>。
b. 或者,使用你自己的测试密钥(3072位RSA私钥),将其重命名为<Enclave_private_test.pem>并放在<Enclave_Seal>文件夹下。 - 确保sdk环境变量已设置:
source ${sgx-sdk-install-path}/environment - 构建项目:根据不同的MODE构建项目。
- 执行:
./app。 - 切换build模式时记得
make clean。 - 启动令牌初始化:如果使用的libsgx-enclave-common或sgxpsw版本低于2.4(最近安装的都不会),在调用API sgx_create_enclave时需要传递一个初始化的变量launch_token作为第三个参数。例如:
sgx_launch_token_t launch_token = {0}; sgx_create_enclave(ENCLAVE_FILENAME, SGX_DEBUG_FLAG, launch_token, NULL, &global_eid, NULL);
2.2 重点代码分析
SGX工程的整个构建流程在之前的文章中已经给出给出了详细教程:【SGX系列教程】(二)第一个 SGX 程序: HelloWorld,因此在此处仅给出部分重点代码分析,主要讲清楚enclave如何实现密封/解封,其他通用代码不做展开分析。
2.2.1 主要代码模块交互流程分析
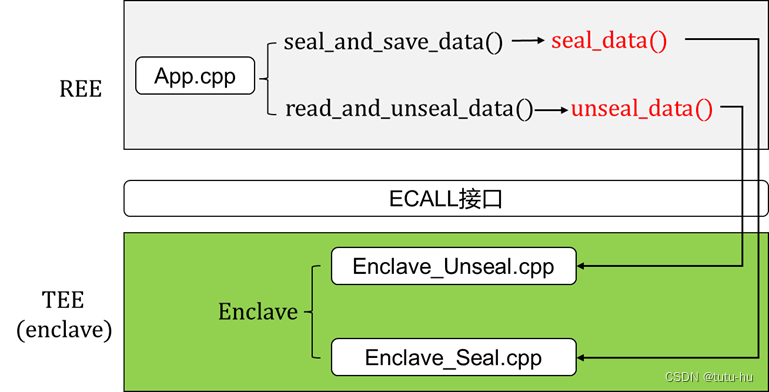
文件目录如下图,主要包括三个文件夹,其中App表示REE侧应用程序,Enclave_Seal表示enclave侧数据密封程序,Enclave_Unseal表示enclave侧数据解封程序。主要通过三个程序之间的交互完成远程认证流程。
2.2.2 App/App.cpp
cpp
// App.cpp : 定义控制台应用程序的入口点
#include <string.h>
#include <assert.h>
#include <fstream>
#include <thread>
#include <iostream>

#include "sgx_urts.h"
#include "Enclave_Seal_u.h"
#include "Enclave_Unseal_u.h"

#include "ErrorSupport.h"

// 定义封装和解封相关的常量
#define ENCLAVE_NAME_SEAL "libenclave_seal.signed.so"
#define ENCLAVE_NAME_UNSEAL "libenclave_unseal.signed.so"
#define SEALED_DATA_FILE "sealed_data_blob.txt"

// 获取文件大小的函数
static size_t get_file_size(const char *filename)
{
    std::ifstream ifs(filename, std::ios::in | std::ios::binary);
    if (!ifs.good())
    {
        std::cout << "无法打开文件 \"" << filename << "\"" << std::endl;
        return -1;
    }
    ifs.seekg(0, std::ios::end);
    size_t size = (size_t)ifs.tellg();
    return size;
}

// 将文件内容读入缓冲区的函数
static bool read_file_to_buf(const char *filename, uint8_t *buf, size_t bsize)
{
    if (filename == NULL || buf == NULL || bsize == 0)
        return false;
    std::ifstream ifs(filename, std::ios::binary | std::ios::in);
    if (!ifs.good())
    {
        std::cout << "无法打开文件 \"" << filename << "\"" << std::endl;
        return false;
    }
    ifs.read(reinterpret_cast<char *> (buf), bsize);
    if (ifs.fail())
    {
        std::cout << "从文件 \"" << filename << "\" 读取失败" << std::endl;
        return false;
    }
    return true;
}

// 将缓冲区内容写入文件的函数
static bool write_buf_to_file(const char *filename, const uint8_t *buf, size_t bsize, long offset)
{
    if (filename == NULL || buf == NULL || bsize == 0)
        return false;
    std::ofstream ofs(filename, std::ios::binary | std::ios::out);
    if (!ofs.good())
    {
        std::cout << "无法打开文件 \"" << filename << "\"" << std::endl;
        return false;
    }
    ofs.seekp(offset, std::ios::beg);
    ofs.write(reinterpret_cast<const char*>(buf), bsize);
    if (ofs.fail())
    {
        std::cout << "写入文件 \"" << filename << "\" 失败" << std::endl;
        return false;
    }
    return true;
}

/* 初始化enclave:
*   调用 sgx_create_enclave 来初始化一个enclave实例
*/
static sgx_status_t initialize_enclave(const char* enclave_path, sgx_enclave_id_t *eid)
{
    sgx_status_t ret = SGX_ERROR_UNEXPECTED;
    /* 调用 sgx_create_enclave 来初始化一个enclave实例 */
    /* 调试支持: 设置第二个参数为1 */
    ret = sgx_create_enclave(enclave_path, SGX_DEBUG_FLAG, NULL, NULL, eid, NULL);
    if (ret != SGX_SUCCESS) {
        return ret;
    }
    return SGX_SUCCESS;
}

// 封装数据并保存到文件的函数
static bool seal_and_save_data()
{
    sgx_enclave_id_t eid_seal = 0;
    // 加载封装enclave
    sgx_status_t ret = initialize_enclave(ENCLAVE_NAME_SEAL, &eid_seal);
    if (ret != SGX_SUCCESS)
    {
        ret_error_support(ret);
        return false;
    }
    // 获取封装数据的大小
    uint32_t sealed_data_size = 0;
    ret = get_sealed_data_size(eid_seal, &sealed_data_size); // 获取封装数据大小的enclave调用
    if (ret != SGX_SUCCESS)
    {
        ret_error_support(ret);
        sgx_destroy_enclave(eid_seal);
        return false;
    }
    else if(sealed_data_size == UINT32_MAX)
    {
        sgx_destroy_enclave(eid_seal);
        return false;
    }

    uint8_t *temp_sealed_buf = (uint8_t *)malloc(sealed_data_size); // 分配内存来存储封装的数据
    if(temp_sealed_buf == NULL)
    {
        std::cout << "内存不足" << std::endl;
        sgx_destroy_enclave(eid_seal);
        return false;
    }
    sgx_status_t retval;
    ret = seal_data(eid_seal, &retval, temp_sealed_buf, sealed_data_size); // 调用封装数据的enclave,ECALL函数
    if (ret != SGX_SUCCESS)
    {
        ret_error_support(ret);
        free(temp_sealed_buf);
        sgx_destroy_enclave(eid_seal);
        return false;
    }
    else if( retval != SGX_SUCCESS)
    {
        ret_error_support(retval);
        free(temp_sealed_buf);
        sgx_destroy_enclave(eid_seal);
        return false;
    }
    // 保存封装的blob数据
    if (write_buf_to_file(SEALED_DATA_FILE, temp_sealed_buf, sealed_data_size, 0) == false)
    {
        std::cout << "无法将封装数据blob保存到 \"" << SEALED_DATA_FILE << "\"" << std::endl;
        free(temp_sealed_buf);
        sgx_destroy_enclave(eid_seal);
        return false;
    }
    free(temp_sealed_buf); // 释放内存
    sgx_destroy_enclave(eid_seal); // 销毁enclave实例
    std::cout << "封装数据成功。" << std::endl;
    return true;

}

// 读取并解封数据的函数
static bool read_and_unseal_data()
{
    sgx_enclave_id_t eid_unseal = 0;
    // 加载解封enclave
    sgx_status_t ret = initialize_enclave(ENCLAVE_NAME_UNSEAL, &eid_unseal);
    if (ret != SGX_SUCCESS)
    {
        ret_error_support(ret);
        return false;
    }
    // 从文件中读取封装的blob数据
    size_t fsize = get_file_size(SEALED_DATA_FILE);
    if (fsize == (size_t)-1)
    {
        std::cout << "无法获取文件 \"" << SEALED_DATA_FILE << "\" 大小" << std::endl;
        sgx_destroy_enclave(eid_unseal);
        return false;
    }
    uint8_t *temp_buf = (uint8_t *)malloc(fsize);
    if(temp_buf == NULL)
    {
        std::cout << "内存不足" << std::endl;
        sgx_destroy_enclave(eid_unseal);
        return false;
    }
    if (read_file_to_buf(SEALED_DATA_FILE, temp_buf, fsize) == false)
    {
        std::cout << "无法从文件 \"" << SEALED_DATA_FILE << "\" 读取封装数据blob" << std::endl;
        free(temp_buf);
        sgx_destroy_enclave(eid_unseal);
        return false;
    }
    // 解封封装的blob数据
    sgx_status_t retval;
    ret = unseal_data(eid_unseal, &retval, temp_buf, fsize); // 调用解封数据的enclave,ECALL函数
    if (ret != SGX_SUCCESS)
    {
        ret_error_support(ret);
        free(temp_buf);
        sgx_destroy_enclave(eid_unseal);
        return false;
    }
    else if(retval != SGX_SUCCESS)
    {
        ret_error_support(retval);
        free(temp_buf);
        sgx_destroy_enclave(eid_unseal);
        return false;
    }
    free(temp_buf); // 释放内存
    sgx_destroy_enclave(eid_unseal); // 销毁enclave实例
    std::cout << "解封成功。" << std::endl;
    return true;
}

int main(int argc, char* argv[])
{
    (void)argc, (void)argv; // 消除未使用参数的警告
    // Enclave_Seal: 封装秘密并将数据blob保存到文件
    if (seal_and_save_data() == false)
    {
        std::cout << "无法封装秘密并将其保存到文件。" << std::endl;
        return -1;
    }
    // Enclave_Unseal: 从文件中读取数据blob并解封
    if (read_and_unseal_data() == false)
    {
        std::cout << "无法解封数据blob。" << std::endl;
        return -1;
    }
    return 0;
}
代码功能分析:
-
初始化与配置:
代码包含初始化
SGX enclave所需的头文件和库文件,并针对封装和解封功能定义了一些常量如ENCLAVE_NAME_SEAL和ENCLAVE_NAME_UNSEAL。 -
文件操作函数:
get_file_size:获取指定文件的大小。
read_file_to_buf:将文件内容读入到指定的缓冲区中。
write_buf_to_file:将缓冲区的内容写入到指定的文件中。
-
封装数据并保存到文件的函数(
seal_and_save_data):封装数据并保存到文件的函数,具体步骤如下:
- 使用
initialize_enclave初始化一个封装用的enclave,得到封装过程所需的enclave ID eid_seal。 - 调用
get_sealed_data_size获取封装数据的大小。 - 分配内存来临时存储封装数据
temp_sealed_buf。 - 使用
seal_dataECALL封装数据,并将结果存储在临时缓冲区中。 - 将临时缓冲区中的封装数据复制到外部缓冲区
sealed_blob。 - 将缓冲区中的封装数据写入文件
SEALED_DATA_FILE。 - 释放临时缓冲区、销毁enclave实例并输出封装成功的信息。
- 读取并解封数据的函数(
read_and_unseal_data):读取并解封数据的函数,具体步骤如下:
- 使用
initialize_enclave初始化一个解封用的enclave,得到解封过程所需的enclave ID eid_unseal。 - 使用
get_file_size获取封装数据文件的大小。 - 分配内存来临时存储读取的封装数据
temp_buf。 - 将封装数据文件中的内容读入临时缓冲区
temp_buf。 - 使用
unseal_dataECALL函数解封数据,并检查返回状态。 - 释放临时缓冲区、销毁enclave实例并输出解封成功的信息。
- 主函数main执行以下操作:
- 通过上述
seal_and_save_data封装秘密并将数据blob保存到文件,如果失败则输出错误信息并返回-1。 - 通过上述
read_and_unseal_data从文件中读取数据blob并解封,如果失败则输出错误信息并返回-1。 - 程序成功执行完所有操作后返回0。
总的来说,App.cpp中的代码展示了一个简单的封装和解封数据的过程。首先通过封装数据并保存到文件,再通过读取文件内容并解封数据,验证数据封装和解封的完整性和安全性。整个过程主要包括初始化enclave、数据封装、文件操作、数据解封等关键环节。
2.2.3 Enclave_Seal/Enclave_Seal.cpp
cpp
#include "Enclave_Seal_t.h"
#include "sgx_trts.h"
#include "sgx_tseal.h"
#include "stdio.h"
#include "string.h"
#include "stdlib.h"

// 待加密的数据
char encrypt_data[BUFSIZ] = "Data to encrypt";
// 附加验证数据
char aad_mac_text[BUFSIZ] = "aad mac text";
// 获取封装数据的大小
uint32_t get_sealed_data_size()
{
    // 计算封装数据的大小
    return sgx_calc_sealed_data_size((uint32_t)strlen(aad_mac_text), (uint32_t)strlen(encrypt_data));
}

// 封装数据函数
sgx_status_t seal_data(uint8_t* sealed_blob, uint32_t data_size)
{
    // 计算封装数据的大小
    uint32_t sealed_data_size = sgx_calc_sealed_data_size((uint32_t)strlen(aad_mac_text), (uint32_t)strlen(encrypt_data));
    // 如果计算出来的封装数据大小为最大值,表示发生了错误
    if (sealed_data_size == UINT32_MAX)
        return SGX_ERROR_UNEXPECTED;
    // 如果封装数据大小超过传入的buffer大小,则返回参数错误
    if (sealed_data_size > data_size)
        return SGX_ERROR_INVALID_PARAMETER;
    // 分配内存用于临时存储封装数据
    uint8_t *temp_sealed_buf = (uint8_t *)malloc(sealed_data_size);
    // 如果内存分配失败,返回内存不足错误
    if(temp_sealed_buf == NULL)
        return SGX_ERROR_OUT_OF_MEMORY;
    // 封装数据并存储在临时缓冲区中
    sgx_status_t  err = sgx_seal_data(
        (uint32_t)strlen(aad_mac_text), // 附加验证数据的长度
        (const uint8_t *)aad_mac_text,  // 附加验证数据
        (uint32_t)strlen(encrypt_data), // 待封装的数据长度
        (uint8_t *)encrypt_data,        // 待封装的数据
        sealed_data_size,               // 封装数据的大小
        (sgx_sealed_data_t *)temp_sealed_buf // 临时存储封装数据的缓冲区
    );
    // 如果封装成功,将封装的数据复制到外部缓冲区
    if (err == SGX_SUCCESS)
    {
        memcpy(sealed_blob, temp_sealed_buf, sealed_data_size);
    }
    // 释放临时缓冲区的内存
    free(temp_sealed_buf);
    // 返回封装操作的结果
    return err;
}
代码功能分析
- 获取封装数据的大小:
get_sealed_data_size函数通过调用sgx_calc_sealed_data_size计算封装数据的大小,并返回该大小。其中,sgx_calc_sealed_data_size根据附加验证数据的长度和待封装数据的长度进行计算。 - 封装数据,
seal_data函数执行实际的数据封装操作:
- 首先计算封装数据的大小,并进行错误检查,如封装数据大小是否为最大值,或者是否超过传入的缓冲区大小。
- 为临时存储封装数据分配内存,如果内存不足则返回错误。
- 调用
sgx_seal_data函数进行数据封装,将结果存储在临时缓冲区中。该函数会将附加验证数据、待封装数据和封装数据大小传递给enclave。 - 如果封装成功,则将临时缓冲区中的封装数据复制到传入的外部缓冲区
sealed_blob中。 - 最后释放临时缓冲区的内存,并返回封装操作的结果状态码。
整体而言,这段代码的功能是实现了在SGX enclave内对数据的封装操作,并将封装后的数据通过外部缓冲区返回。封装操作会对数据进行加密和生成验证信息,以确保数据的安全性和完整性。
- Enclave_Seal.edl
bash
enclave {
    from "sgx_tstdc.edl" import *;
    trusted {
        /* define ECALLs here. */
		public uint32_t get_sealed_data_size();
		public sgx_status_t seal_data([out, size=data_size] uint8_t* sealed_blob, uint32_t data_size);
    };
    untrusted {
        /* define OCALLs here. */
    };
};
2.2.4 Enclave_Unseal/Enclave_Unseal.cpp
cpp
#include "Enclave_Unseal_t.h"

#include "sgx_trts.h"
#include "sgx_tseal.h"
#include "stdio.h"
#include "string.h"
#include "stdlib.h"

// 用于比较的原始秘密数据,解封后用于比较以确定数据的一致性
char encrypt_data[BUFSIZ] = "Data to encrypt";
char aad_mac_text[BUFSIZ] = "aad mac text";

// 解封数据函数,ECALL函数
sgx_status_t unseal_data(const uint8_t *sealed_blob, size_t data_size)
{
    // 获取附加验证数据(MAC)的长度
    uint32_t mac_text_len = sgx_get_add_mac_txt_len((const sgx_sealed_data_t *)sealed_blob);
    // 获取解密后数据的长度
    uint32_t decrypt_data_len = sgx_get_encrypt_txt_len((const sgx_sealed_data_t *)sealed_blob);
    // 如果获取到的长度为最大值,表示发生了错误
    if (mac_text_len == UINT32_MAX || decrypt_data_len == UINT32_MAX)
        return SGX_ERROR_UNEXPECTED;
    // 如果长度超过传入的数据大小,返回参数错误
    if(mac_text_len > data_size || decrypt_data_len > data_size)
        return SGX_ERROR_INVALID_PARAMETER;
    // 分配内存用于存储解封后的附加验证数据
    uint8_t *de_mac_text =(uint8_t *)malloc(mac_text_len);
    if(de_mac_text == NULL)
        return SGX_ERROR_OUT_OF_MEMORY;
    // 分配内存用于存储解封后的数据
    uint8_t *decrypt_data = (uint8_t *)malloc(decrypt_data_len);
    if(decrypt_data == NULL)
    {
        free(de_mac_text);
        return SGX_ERROR_OUT_OF_MEMORY;
    }

    // 调用sgx_unseal_data解封数据,并将解封后的数据存储在分配的缓冲区中
    sgx_status_t ret = sgx_unseal_data(
        (const sgx_sealed_data_t *)sealed_blob, // 封装数据的指针
        de_mac_text,                            // 存储解封后的附加验证数据
        &mac_text_len,                          // 输出的附加验证数据长度
        decrypt_data,                           // 存储解封后的数据
        &decrypt_data_len                       // 输出的解封后数据长度
    );
    // 如果解封操作失败,释放内存并返回错误状态
    if (ret != SGX_SUCCESS)
    {
        free(de_mac_text);
        free(decrypt_data);
        return ret;
    }
    // 比较解封后的附加验证数据和原始附加验证数据,以及解封后的数据和原始数据
    // 如果不一致,则返回意外错误
    if (memcmp(de_mac_text, aad_mac_text, strlen(aad_mac_text)) || memcmp(decrypt_data, encrypt_data, strlen(encrypt_data)))
    {
        ret = SGX_ERROR_UNEXPECTED;
    }
    // 释放内存
    free(de_mac_text);
    free(decrypt_data);
    // 返回解封操作的结果状态
    return ret;
}
代码功能分析
- 解封数据函数(
unseal_data):解封并验证封装数据的函数,具体步骤如下:
- 获取解封数据长度:
使用sgx_get_add_mac_txt_len获取封装数据中附加验证数据的长度。
使用sgx_get_encrypt_txt_len获取封装数据中解密后数据的长度。
如果这两个长度中的任意一个为UINT32_MAX,则表示发生了错误,返回SGX_ERROR_UNEXPECTED。 - 参数检查:
检查mac_text_len或decrypt_data_len是否大于传入的data_size,如果是则返回SGX_ERROR_INVALID_PARAMETER。 - 分配内存:
为存储解封后的附加验证数据和解密数据分配内存。如果内存分配失败,返回SGX_ERROR_OUT_OF_MEMORY。 - 解封数据:
调用sgx_unseal_data进行数据解封,并将结果存储在分配的缓冲区中。如果解封操作失败,释放内存并返回相应的错误状态。 - 数据比较:
比较解封后的附加验证数据de_mac_text与原始附加验证数据aad_mac_text,以及解封后的数据decrypt_data与原始数据encrypt_data。如果数据不一致,返回SGX_ERROR_UNEXPECTED。 - 内存释放:
释放de_mac_text和decrypt_data缓冲区的内存,并返回解封操作的结果状态。
总体而言,这段代码实现了对封装数据的解封操作,并对解封后的数据进行验证,以确保数据的完整性和安全性。通过获取封装数据的附加验证数据和解密数据长度,并分配相应的内存来存储解封后的数据,代码完成了数据的解封、验证和清理工作。
- Enclave_Unseal.edl
bash
enclave {
    from "sgx_tstdc.edl" import *;
    include "stdint.h"
    trusted {
        /* define ECALLs here. */
		public sgx_status_t unseal_data([in, size=data_size] const uint8_t *sealed_blob, size_t data_size);
    };

    untrusted {
        /* define OCALLs here. */
    };
};
2.3 总结
Enclave 密封与解封的工程实现流程总结:
App.cpp、Enclave_Seal.cpp 和 Enclave_Unseal.cpp 三个文件为主要功能文件,实现了在两个SGX enclave之间的密封和解封操作。以下是整个工程的实现流程总结:
- 封装流程 :封装流程主要涉及
App.cpp和Enclave_Seal.cpp文件:
-
App.cpp:
Initialize Enclave:调用 initialize_enclave 函数初始化一个封装用的enclave实例。
Seal Data:通过 seal_and_save_data 函数,调用封装enclave中的 seal_data 函数执行数据封装,并将封装后的数据保存到文件中。
Write to File:使用 write_buf_to_file 函数将封装后的数据写入到文件 SEALED_DATA_FILE 中。
-
Enclave_Seal.cpp:
Calculate Sealed Data Size:通过 sgx_calc_sealed_data_size 计算封装数据所需的大小。
Seal Data:使用 sgx_seal_data 执行数据封装,将待封装的数据和附加验证数据一起进行加密并生成验证信息。
Copy Sealed Data:将封装后的数据复制到提供的缓冲区 sealed_blob 中。
- 解封流程 :解封流程主要涉及
App.cpp和Enclave_Unseal.cpp文件:
- App.cpp:
Initialize Enclave:调用 initialize_enclave 函数初始化一个解封用的enclave实例。
Read File:通过 read_and_unseal_data 函数,读取封装数据文件 SEALED_DATA_FILE 并将数据加载到缓冲区中。
Unseal Data:调用解封enclave中的 unseal_data 函数执行数据解封。 - Enclave_Unseal.cpp:
Get Sealed Data Sizes:通过 sgx_get_add_mac_txt_len 和 sgx_get_encrypt_txt_len 获取封装数据中附加验证数据和解密数据的长度。
Allocate Memory:分配内存用于存储解封后的附加验证数据 de_mac_text 和解密数据 decrypt_data。
Unseal Data:使用 sgx_unseal_data 函数解封数据,根据解封后数据的验证信息检查数据的完整性。
Compare Data:将解封后的附加验证数据和解密数据与原始数据进行比较,确保数据未被篡改。
Free Memory:释放用于存储解封数据的内存。
三.参考文献
- https://github.com/intel/linux-sgx/tree/main/SampleCode/SealUnseal
- Innovative Technology for CPU Based Attestation and Sealing论文翻译
- 基于 CPU 的认证和密封技术
四.感谢支持
完结撒花!后续将持续输出,形成Intel SGX的系列教程,并结合密码学算法设计更复杂功能。希望看到这里的小伙伴能点个关注,也欢迎志同道合的小伙伴一起广泛交流。
码字实属不易,如果本文对你有10分帮助,就赏个10分把,感谢各位大佬支持!