一.前言
- mybatis-plus是什么
mybatis-plus是一个对mybati框架的拓展框架,它在mybatis框架基础上做了许多的增强,帮助我们快速的进行代码开发。目前企业开发中,使用mybati的项目基本会选择使用mybatis-plus来提升开发效率。
2.官网地址:MyBatis-Plus 🚀 为简化开发而生
二.项目集成
- 项目中集成(示例用的springboot2.x+mysql)
step1.引入依赖
<dependency>
    <groupId>com.baomidou</groupId>
    <artifactId>mybatis-plus-boot-starter</artifactId>
    <version>3.5.7</version>
</dependency>
step2.配置数据源
spring:
  datasource:
    driver-class-name: com.mysql.cj.jdbc.Driver
    url: jdbc:mysql://192.168.**.**:3306/rui
    username: root
    password: ******
step3.启动类添加注解 @MapperScan 指向mapper接口所在包
@SpringBootApplication
@MapperScan("com.rui.mapper")
@EnableFeignClients(defaultConfiguration = MyFeignConfiguration.class)
public class AdminServerApplication {
    public static void main(String[] args) {
        SpringApplication.run(AdminServerApplication.class, args);
    }
}
step4.定义实体类
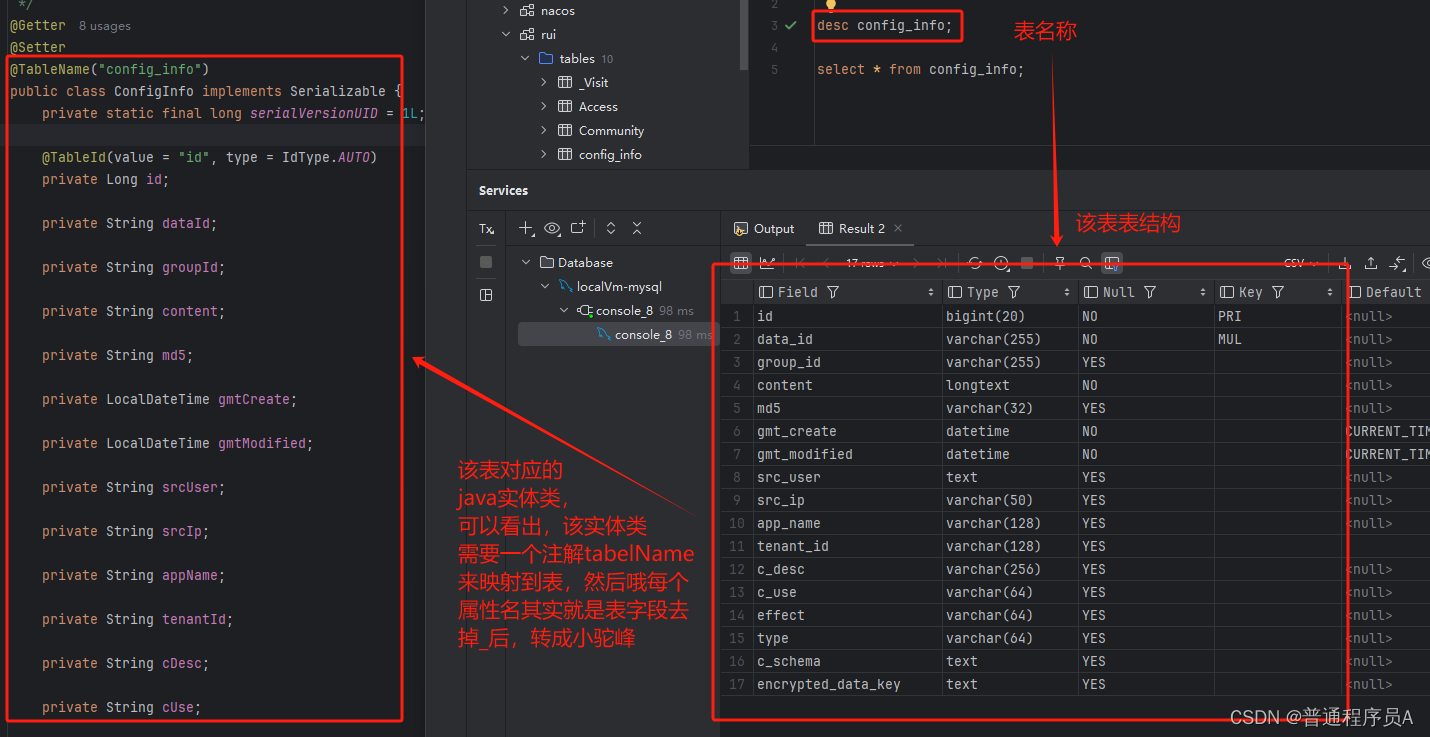
step5.编码测试:
(编码测试演示比较接近实际开发的代码,如果只是简单验证,用baseMapper就行了)
以下代码均为mybatis-plus提供的代码生成器生成的,如何使用在后续段落会讲,这里先看一下代码样子,眼熟以下
代码结构:
controller层:
@Slf4j
@RestController
@RequestMapping("/configInfo")
public class ConfigInfoController {

    @Autowired
    private IConfigInfoService configInfoService;

    @GetMapping("/list")
    public List<ConfigInfo>  listConfigs () {
        return configInfoService.list();
    }

}
service层:
interface:
public interface IConfigInfoService extends IService<ConfigInfo> {

}
impl:
** 注意,这里继承了一个ServiceImpl 它是mybatis-plus提供的类,帮我们完成许DB操作**
@Service
public class ConfigInfoServiceImpl extends ServiceImpl<ConfigInfoMapper, ConfigInfo> implements IConfigInfoService {

}
mapper层:
mapper接口:
** 注意,我们的mapper实现了 BaseMapper ,它是mybatis-plus提供的接口,有常用的CRUD**
public interface ConfigInfoMapper extends BaseMapper<ConfigInfo> {

}
mapper.xml: (其实就是空的,如果后面开始有自定义sql,需要这里写)
<?xml version="1.0" encoding="UTF-8"?>
<!DOCTYPE mapper PUBLIC "-//mybatis.org//DTD Mapper 3.0//EN" "http://mybatis.org/dtd/mybatis-3-mapper.dtd">
<mapper namespace="com.rui.mapper.ConfigInfoMapper">

</mapper>
以上操作结束后,启动项目,postMan访问接口,发现可以正常访问数据库:
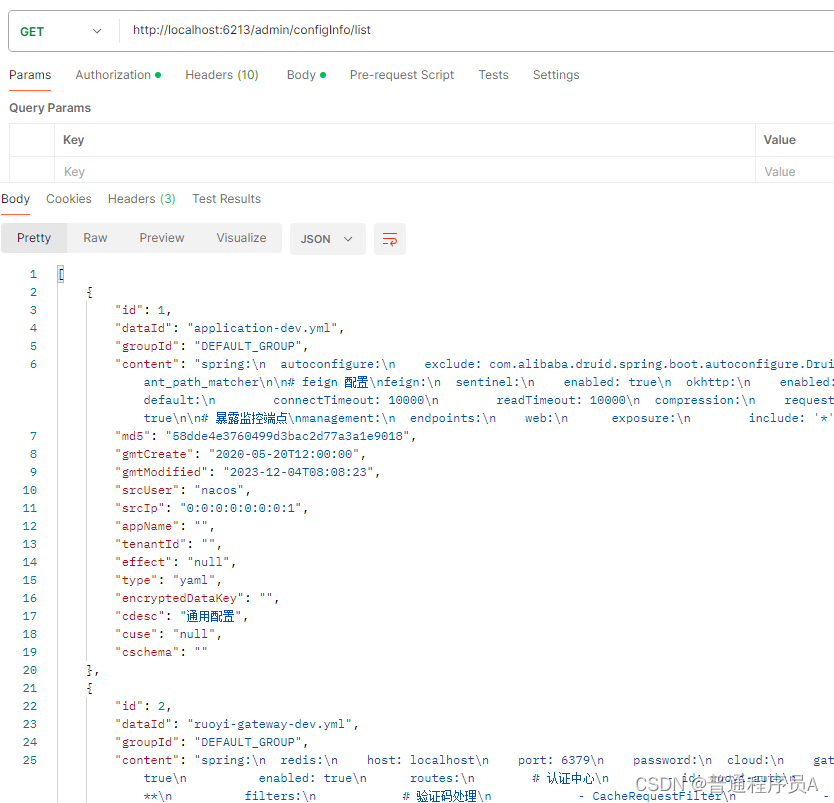
在测试环节,大家可以发现我的service和mapper都是空的,但是却可以调用list方法访问数据库。
其实,上面的编码中,我们在自己的业务Service中继承了抽象类ServiceImpl,ServiceImpl实现了IService这个接口中的方法,并定义了四个成员变量 baseMapper,entityClass, mapperClass,log,且这四个成员变量都是protected的,因此,在我们的业务Service中,我们可以直接调用IService的方法诸如saveAndUpdate,list,page等,也可以通过this.baseMapper 的方式来获取baseMapper对象,来调用baseMapper的方法
三.使用技巧
1.理解mybatis-plus在代码中做的事情
mybatis-plus为我们提供的最核心的功能其实就是对Mybatis的Mapper接口的增强 ,它提供了一个BaseMapper ,一个mybatis的mapper接口继承了BaseMapper的话,就会被mybatis-plus进行增强,实现一系列的常用的数据库操。使用mybatis-plus最简单的办法其实就是引入mybatis-plus的依赖后,定义好Entity对象(实体对象),然后让mapper继承BaseMapper,最终我们使用baseMaper中的方法来进行开发。
看一个使用baseMapper的例子:
todo
但是直接使用baseMaper的话,有许多操作我们还需要自己写代码,比如一些批量操作,如batchSave(批量插入)等。所以,mybatis-plus还提供了ServiceImpl,来帮我们实现这些。
上面的编码中,我们在自己的业务Service中继承了抽象类ServiceImpl,ServiceImpl实现了IService这个接口中的方法,并定义了四个成员变量 baseMapper,entityClass, mapperClass,log,且这四个成员变量都是protected的,因此,在我们的业务Service中,我们可以直接调用IService的方法诸如saveAndUpdate,list,page等,也可以通过this.baseMapper 的方式来获取baseMapper对象,来调用baseMapper的方法。
2.使用QueryWrapper进行查询
以该service为例:
QueryWrapper是我们工作中每天都啊哟使用的,场景非常多,我列出一些常见的场景,方便大家查阅
1.1. 新增
        ConfigInfo configInfo = mockData();
        this.baseMapper.insert(configInfo);
1.2. 删除
        LambdaQueryWrapper<ConfigInfo> configInfoQueryWrapper = new LambdaQueryWrapper<>();
        configInfoQueryWrapper.eq(ConfigInfo::getId, 500L);
        this.baseMapper.delete(configInfoQueryWrapper);
1.3. 修改
        // 方法1 根据id更新,直接传入对象
        ConfigInfo configInfo = mockData();
        this.baseMapper.updateById(configInfo);

        //方法2 使用wrapper更新 set代表要修改的字段 eq是条件为相等的isi
        UpdateWrapper<ConfigInfo> configInfoUpdateWrapper = Wrappers.update();
        configInfoUpdateWrapper.set("appName","chengxuyuanA");
        configInfoUpdateWrapper.set("groupId", "groupA");
        configInfoUpdateWrapper.eq("id", 500L);
        this.baseMapper.update(configInfoUpdateWrapper);
1.4. 查询
列表查询
简单查询(简单的条件查询)
        // 查润groupId 为 5001的数据
        LambdaQueryWrapper<ConfigInfo> configInfoQueryWrapper = new LambdaQueryWrapper<>();
        configInfoQueryWrapper.eq(ConfigInfo::getGroupId, "5001");
        List<ConfigInfo> res = this.baseMapper.selectList(configInfoQueryWrapper);
复杂查询 (场景太多了,我就用一个包含 and, or, in ,between ,order by 的sql来表示一下用法)
        // select *
        // from config_info
        // where app_name like '%app%'
        //  and id between 1 and 50
        //  or (src_ip in ('1.0.1.1', '196.123.1.1', '0.0.0.0') and effect is not null)
        LambdaQueryWrapper<ConfigInfo> configInfoQueryWrapper = new LambdaQueryWrapper<>();
        configInfoQueryWrapper.like(ConfigInfo::getAppName, "app")
                        .between(ConfigInfo::getId, 1, 50);
        configInfoQueryWrapper.or(w->w.in(ConfigInfo::getSrcIp,srcips).isNotNull(ConfigInfo::getEffect));
分组聚合(其实这个一般不会用,考虑性能和优化,聚合的东西一般自己写sql)
        LambdaQueryWrapper<ConfigInfo> configInfoQueryWrapper = new LambdaQueryWrapper<>();
        configInfoQueryWrapper.groupBy(ConfigInfo::getGroupId);

        Long res = this.baseMapper.selectCount(configInfoQueryWrapper);
分页查询
        Page page = new Page();
        page.setCurrent(1);
        page.setSize(10);

        LambdaQueryWrapper<ConfigInfo> configInfoQueryWrapper = new LambdaQueryWrapper<>();
        configInfoQueryWrapper.eq(ConfigInfo::getGroupId, "5001");
        IPage<ConfigInfo> pageData = this.page(page, configInfoQueryWrapper);
3.自定义sql查询
3.1.使用自定义sql
和使用mybatis完全一样,这里不赘述了
3.2.对自定义sql分页
interface层
IPage<ConfigRation> selectUserPage(Page page, @Param("configration") ConfigRation configrationVo);同mybatis的正常使用,但是在第一个参数加上一个Page入参
4.字段映射及一些注解使用技巧
普通映射
默认不需要注解,只要把数据库的字段的_去掉,换成小驼峰就行了
如果需要对象属性名和数据库字段名称不同,可以用如下注解:
@TableField(value = "data_Source")
private String dataType;
java对象的属性在数据库中不存在
@TableField(exist = false)
@Schema(description = "是否绑定告警通知规则,true是。false否")
private Boolean isBindNoticeRule;
枚举映射
枚举注解@EnumValue,需要在枚举对象和java的实体类上都加:
public enum GenderEnum {

    MALE(0, "男"),
    FEMALE(1, "女");

    @EnumValue
    private final int code;
    private final String desc;

    GenderEnum(int code, String desc) {

        this.code = code;
        this.desc = desc;
    }
}

@TableName("user")
public class User {

    @TableId
    private Long id;

    @TableField("gender")
    @EnumValue
    private GenderEnum gender;

    // 省略其他属性和方法
}
逻辑删除注解
逻辑删除需要进行一些配置:
step1:增加配置
mybatis-plus:
  global-config:
    db-config:
      logic-delete-field: deleted # 全局逻辑删除字段名
      logic-delete-value: 1 # 逻辑已删除值
      logic-not-delete-value: 0 # 逻辑未删除值
step2:在实体类中使用 @TableLogic 注解
public class User {
    // 其他字段...

    @TableLogic
    private Integer deleted;
}
多数据源注解
多数据源支持需要一个包 dynamic-datasource
step1:maven增加依赖
<dependency>
  <groupId>com.baomidou</groupId>
  <artifactId>dynamic-datasource-spring-boot-starter</artifactId>
  <version>${version}</version>
</dependency>
step2:数据源配置:
spring:
  datasource:
    dynamic:
      primary: master
      strict: false
      datasource:
        master:
          url: jdbc:mysql://xx.xx.xx.xx:3306/dynamic
          username: root
          password: 123456
          driver-class-name: com.mysql.jdbc.Driver
        slave_1:
          url: jdbc:mysql://xx.xx.xx.xx:3307/dynamic
          username: root
          password: 123456
          driver-class-name: com.mysql.jdbc.Driver
        slave_2:
          url: ENC(xxxxx)
          username: ENC(xxxxx)
          password: ENC(xxxxx)
driver-class-name: com.mysql.jdbc.Driverstep3:使用 @DS 切换数据源
@Service
@DS("slave")
public class UserServiceImpl implements UserService {

  @Autowired
  private JdbcTemplate jdbcTemplate;

  @Override
  @DS("slave_1")
  public List selectByCondition() {
    return jdbcTemplate.queryForList("select * from user where age >10");
  }
}
字段忽略注解
@TableField(exist = false)
private String companyname;
四.常用插件
1.插件介绍
介绍两个插件DataPermissionInterceptor, PaginationInnerInterceptor
DataPermissionInterceptor:
我们在开发中,很多项目有多租户,多组织的需求,不同租户和组织能看到的数据内容不同。假如业务数据我们用一个字段tenent_id区分不同租户的数据,那么我们希望开发者在编码时候,不需要刻意关注这个字段,正常写业务逻辑就好,有一个统一的拦截器能帮助我们在调用数据库时候把 tenent_id = {user_tenent_id} 这段sql加到查询语句中,DataPermissionInterceptor就是帮我们做这个事情的。
实际开发中,基本涉及到多组织,多租户的项目都会使用这个插件。如果大家在开发中发现使用了mybatis-plus的项目默认拼接了一些sql,可以尝试搜索DataPermissionInterceptor来找一下加的地方。
PaginationInnerInterceptor
分页插件, 对于单一数据库类型来说,都建议配置该值,避免每次分页都去抓取数据库类型,使用方法很简单,直接new PaginationInnerInterceptor(dataType就好)
2.实战使用
step1: 注册拦截器,加入了上面介绍的俩插件
@Configuration
public class MybatisAutoConfiguration implements WebMvcConfigurer {

	@Bean
	public MybatisPlusInterceptor mybatisPlusInterceptor(@Autowired(required = false) DataPermissionHandler dataPermissionHandler) {
		MybatisPlusInterceptor interceptor = new MybatisPlusInterceptor();
		if (dataPermissionHandler != null) {
			interceptor.addInnerInterceptor(new DataPermissionInterceptor(dataPermissionHandler));
		}
		interceptor.addInnerInterceptor(new PaginationInnerInterceptor(DbType.POSTGRE_SQL));
		return interceptor;
	}
}
step2:DataPermissionHandler编码
public class DataPermissionHandler extends MultiDataPermissionHandler {
    @Override
    public Expression getSqlSegment(Table table, Expression where, String mappedStatementId) {
        // 在此处编写自定义数据权限逻辑
        try {
            String sqlSegment = "..."; // 数据权限相关的 SQL 片段
            return CCJSqlParserUtil.parseCondExpression(sqlSegment);
        } catch (JSQLParserException e) {
            e.printStackTrace();
            return null;
        }
    }
}
五.使用代码生成器
关于代码生成器
代码生成器在工作中其实很常用,所以我觉得不了解的道友还是需要了解一下。
1.代码生成器配置
我使用的mybatis-plus是3.5.7,低于3.5版本的话,可能略有不同
step1:引入两个依赖包:
        <dependency>
            <groupId>com.baomidou</groupId>
            <artifactId>mybatis-plus-generator</artifactId>
            <version>3.5.7</version>
        </dependency>

        <!-- freemarker模板 -->
        <dependency>
            <groupId>org.springframework.boot</groupId>
            <artifactId>spring-boot-starter-freemarker</artifactId>
            <version>3.1.2</version>
        </dependency>
step2:创建一个java类,用来生成代码,我一般喜欢在项目中建一个dev文件夹,放一些开发工具
结构如图:
代码:
java
public class CodeGenerator {

    public static void main(String[] args) {
        FastAutoGenerator.create("jdbc:mysql://192.168.**.**:3306/rui",
                        "root",
                        "******")
                .globalConfig(builder -> builder
                        .author("rui")
                        .outputDir(Paths.get(System.getProperty("user.dir")) +
                                "/services/admin-server" +
                                "/src/main/java")
                        .commentDate("yyyy-MM-dd")
                )
                .packageConfig(builder -> builder
                        .parent("com.rui")
                        .entity("entity")
                        .mapper("mapper")
                        .service("service")
                        .serviceImpl("service.impl")
                        .xml("mapper.xml")
                )
                .strategyConfig(builder -> builder
                        // 要生成代码的表名称,不加下面这行就是全库生成
                        .addInclude("config_info")
                        .entityBuilder()
                        .enableLombok()
                )
                .templateEngine(new FreemarkerTemplateEngine())
                .execute();
    }

}
2.代码生成器使用
直接右键执行即可,执行后就会在项目中生成对应文件。默认的模板controller,service中是没有方法的,可以自己配置一下模板,放一些和前端交互的CRUD。