安装说明
系统版本为 Centos7.9
内核版本为 6.3.5-1.el7
K8S版本为 v1.26.14
ES官网
开始安装
本次安装使用官方ECK方式部署 EFK,部署的是当前的最新版本。
在 Kubernetes 集群中部署 ECK
安装自定义资源
如果能打开这个网址的话直接用这个命令安装,打不开的话可能需要挂梯子。
bash
kubectl create -f https://download.elastic.co/downloads/eck/2.13.0/crds.yaml安装operator 和 RBAC 规则
bash
kubectl apply -f https://download.elastic.co/downloads/eck/2.13.0/operator.yaml安装好以后查看
bash
[root@master01 ~]# kubectl get po -n elastic-system
NAME                 READY   STATUS    RESTARTS   AGE
elastic-operator-0   1/1     Running   0          2d18h
安装ES集群
yaml
apiVersion: elasticsearch.k8s.elastic.co/v1
kind: Elasticsearch
metadata:
  name: quickstart
  namespace: elastic-system
spec:
  version: 8.14.1
  nodeSets:
  - name: masters
    count: 1
    config:
      node.roles: ["master"]
      xpack.ml.enabled: true
    podTemplate:
      spec:
        initContainers:
        - name: sysctl
          securityContext:
            privileged: true
            runAsUser: 0
          command: ['sh', '-c', 'sysctl -w vm.max_map_count=262144']
    volumeClaimTemplates:
    - metadata:
        name: elasticsearch-data
      spec:
        storageClassName: rook-ceph-rbd
        accessModes:
        - ReadWriteOnce
        resources:
          requests:
            storage: 50Gi
  - name: data
    count: 1
    config:
      node.roles: ["data", "ingest", "ml", "transform"]
    podTemplate:
      spec:
        initContainers:
        - name: sysctl
          securityContext:
            privileged: true
            runAsUser: 0
          command: ['sh', '-c', 'sysctl -w vm.max_map_count=262144']
    volumeClaimTemplates:
    - metadata:
        name: elasticsearch-data
      spec:
        storageClassName: rook-ceph-rbd
        accessModes:
        - ReadWriteOnce
        resources:
          requests:
            storage: 50Gi
保存好以后开始创建,更多详细的设置可以在官网查看。
bash
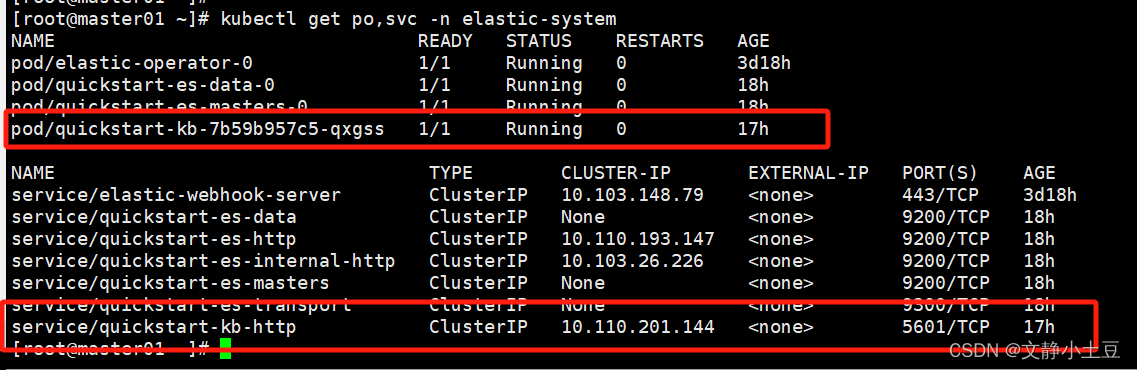
[root@master01 ~]# kubectl get po,svc -n elastic-system
NAME                                 READY   STATUS    RESTARTS   AGE
pod/elastic-operator-0               1/1     Running   0          3d18h
pod/quickstart-es-data-0             1/1     Running   0          18h
pod/quickstart-es-masters-0          1/1     Running   0          18h

NAME                                  TYPE        CLUSTER-IP       EXTERNAL-IP   PORT(S)    AGE
service/elastic-webhook-server        ClusterIP   10.103.148.79    <none>        443/TCP    3d18h
service/quickstart-es-data            ClusterIP   None             <none>        9200/TCP   18h
service/quickstart-es-http            ClusterIP   10.110.193.147   <none>        9200/TCP   18h
service/quickstart-es-internal-http   ClusterIP   10.103.26.226    <none>        9200/TCP   18h
service/quickstart-es-masters         ClusterIP   None             <none>        9200/TCP   18h
service/quickstart-es-transport       ClusterIP   None             <none>        9300/TCP   18h
安装好以后测试ES运行是否正常
bash
## 打开两个终端测试或者后台运行一个命令。
kubectl port-forward -n elastic-system services/quickstart-es-http 9200

## 获取密码
PASSWORD=$(kubectl get secret -n elastic-system quickstart-es-elastic-user -o go-template='{{.data.elastic | base64decode}}')

## 访问一下测试
curl -u "elastic:$PASSWORD" -k "https://localhost:9200"
bash
{
  "name" : "quickstart-es-masters-0",
  "cluster_name" : "quickstart",
  "cluster_uuid" : "BDraWsuUQS6z83H0L-cYHA",
  "version" : {
    "number" : "8.14.1",
    "build_flavor" : "default",
    "build_type" : "docker",
    "build_hash" : "93a57a1a76f556d8aee6a90d1a95b06187501310",
    "build_date" : "2024-06-10T23:35:17.114581191Z",
    "build_snapshot" : false,
    "lucene_version" : "9.10.0",
    "minimum_wire_compatibility_version" : "7.17.0",
    "minimum_index_compatibility_version" : "7.0.0"
  },
  "tagline" : "You Know, for Search"
}
安装 Filebeat
yaml
apiVersion: beat.k8s.elastic.co/v1beta1
kind: Beat
metadata:
  name: quickstart
  namespace: elastic-system
spec:
  type: filebeat
  version: 8.14.1
  elasticsearchRef:
    name: quickstart
    namespace: elastic-system
  config:
    filebeat.inputs:
    - type: container
      paths:
      - /var/log/containers/*.log
  daemonSet:
    podTemplate:
      spec:
        dnsPolicy: ClusterFirstWithHostNet
        hostNetwork: true
        securityContext:
          runAsUser: 0
        containers:
        - name: filebeat
          volumeMounts:
          - name: varlogcontainers
            mountPath: /var/log/containers
          - name: varlogpods
            mountPath: /var/log/pods
          - name: varlibdockercontainers
            mountPath: /var/lib/containerd
        volumes:
        - name: varlogcontainers
          hostPath:
            path: /var/log/containers
        - name: varlogpods
          hostPath:
            path: /var/log/pods
        - name: varlibdockercontainers
          hostPath:
            path: /var/lib/containerd
部署成功以后查看
bash
[root@master01 ~]# kubectl get po -n elastic-system
NAME                             READY   STATUS    RESTARTS   AGE
elastic-operator-0               1/1     Running   0          3d23h
quickstart-beat-filebeat-bwr7n   1/1     Running   0          9m9s
quickstart-beat-filebeat-ccw7b   1/1     Running   0          33m
quickstart-beat-filebeat-pwsmg   1/1     Running   0          33m
quickstart-es-data-0             1/1     Running   0          24h
quickstart-es-masters-0          1/1     Running   0          24h
quickstart-kb-7b59b957c5-qxgss   1/1     Running   0          22h
测试
bash
PASSWORD=$(kubectl get secret -n elastic-system quickstart-es-elastic-user -o go-template='{{.data.elastic | base64decode}}')
curl -u "elastic:$PASSWORD" -k "https://localhost:9200/filebeat-*/_search"
安装 kibana
yaml
apiVersion: kibana.k8s.elastic.co/v1
kind: Kibana
metadata:
  name: quickstart
  namespace: elastic-system
spec:
  version: 8.14.1
  count: 1
  elasticsearchRef:
    name: quickstart
    namespace: elastic-system
  http:
    tls:
      selfSignedCertificate:
        disabled: true
  podTemplate:
    spec:
      containers:
      - name: kibana
        env:
          - name: NODE_OPTIONS
            value: "--max-old-space-size=2048"
        resources:
          requests:
            memory: 1Gi
            cpu: 0.5
          limits:
            memory: 2.5Gi
            cpu: 2
部署成功后查看
根据svc 创建ingress方式的服务暴露
yaml
apiVersion: networking.k8s.io/v1
kind: Ingress
metadata:
  name: kibana-ingress
  namespace: elastic-system
spec:
  ingressClassName: nginx
  rules:
  - host: kibana.exp.cn
    http:
      paths:
      - backend:
          service:
            name: quickstart-kb-http
            port:
              name: http
        path: /
        pathType: Prefix
  tls:
  - hosts:
    - kibana.exp.cn
    secretName: kibana.exp.cn
创建Ingress
bash
[root@master01 ~]# kubectl get ing -n elastic-system
NAME             CLASS   HOSTS                 ADDRESS          PORTS     AGE
kibana-ingress   nginx   kibana.exp.cn   10.102.233.134   80, 443   17h
获取账号密码,账号是:elastic
bash
## 获取密码
kubectl get secret -n elastic-system quickstart-es-elastic-user -o=jsonpath='{.data.elastic}' | base64 --decode; echo
配置host 登陆即可!
