注意:本文演示所使用的 Spring Cloud、Spring Cloud Alibaba 的版本分为为
2023.0.0和2023.0.1.0。不兼容的版本可能会导致配置不生效等问题。
1、什么是 OpenFeign
Feign 是一个声明式的 Web service 客户端。
它使编写 Web service 客户端更加容易。只需使用 Feign 创建一个Java 接口并对其进行注释就能发起远程 Http 调用。它支持可插拔的注解,包括 Feign 注解和 JAX-RS 注解。Feign 还支持可插拔式编码器和解码器来对请求体和响应体进行编解码。SpringCloud OpenFeign 增加了对 SpringMVC 注解的支持(例如 @GetMapping、@PostMapping等),并支持使用与 SpringWeb 中默认使用的 HttpMessageConverters 相同的 HttpMessageConverters。Spring Cloud OpenFeign 能配合 Nacos(或Eureka) 、Spring Cloud CircuitBreaker 以及 Spring Cloud LoadBalancer,达到服务负载均衡的机制。
2、如何引入 Spring cloud OpenFeign
引入 spring-cloud-starter-openfeign 和 spring-cloud-starter-loadbalancer 依赖。
spring-cloud-starter-loadbalancer 依赖用于提供复杂均衡能力。
xml
<dependency>
     <groupId>org.springframework.cloud</groupId>
     <artifactId>spring-cloud-starter-openfeign</artifactId>
 </dependency>
 <dependency>
     <groupId>org.springframework.cloud</groupId>
     <artifactId>spring-cloud-starter-loadbalancer</artifactId>
 </dependency>
3、启用 OpenFeign
在 Spring Boot 的主启动类上加上 @EnableFeignClients 注解,使 OpenFeign 生效。
java
@SpringBootApplication
@EnableFeignClients
public class Application {
	public static void main(String[] args) {
		SpringApplication.run(Application.class, args);
	}
}
3.1 @EnableFeignClients 注解详解:
java
package org.springframework.cloud.openfeign;
import org.springframework.context.annotation.Import;
/**
 * 扫描 Feign 客户端接口(被 @FeignClient注解的 Java 接口)
 */
@Retention(RetentionPolicy.RUNTIME)
@Target(ElementType.TYPE)
@Documented
@Import(FeignClientsRegistrar.class)
public @interface EnableFeignClients {

	/**
	 * basePackages 属性的别名。
	 */
	String[] value() default {};

	/**
	 * 扫描的基础包。
	 * 如果 feign 客户端接口不在Spring Boot 所在的启动类的包(或子包)中
	 * 则需要配置 feign 客户端接口所在的基础包。
	 */
	String[] basePackages() default {};

	/**
	 * 类型安全替代 basePackages () ,也是用于指定要扫描带 @FeignClient 注释组件的包。
	 * 将扫描该类所在包及其子包下的 Feign 客户端。
	 * 可以在需要扫描的每个包中创建一个特殊的非操作标记类或接口,
	 * 该类或接口除了被此属性引用之外没有其他用途。
	 *
	 */
	Class<?>[] basePackageClasses() default {};

	/**
	 * 指定全局 Feign 客户端配置类(@Configuration的Spring 配置类)。
	 * 能够覆盖默认配置,例如 Decoder 和 Encoder 以及 Contract。
	 * 默认配置类为 FeignClientsConfiguration。
	 */
	Class<?>[] defaultConfiguration() default {};

	/**
	 * 带有@FeignClient注释的类列表。如果不为空,则禁用类路径扫描。
	 */
	Class<?>[] clients() default {};
}
4、使用 OpenFeign 客户端
4.1 一个例子
java
@FeignClient("stores")
public interface StoreClient {
	@RequestMapping(method = RequestMethod.GET, value = "/stores")
	List<Store> getStores();

	@GetMapping("/stores")
	Page<Store> getStores(Pageable pageable);

	@PostMapping(value = "/stores/{storeId}", consumes = "application/json",
				params = "mode=upsert")
	Store update(@PathVariable("storeId") Long storeId, Store store);

	@DeleteMapping("/stores/{storeId:\\d+}")
	void delete(@PathVariable Long storeId);
}
创建一个接口并使用 @FeignClient 标注使其能够被扫描到。
4.2 @FeignClient 注解详解
@FeignClient 是 Spring Cloud OpenFeign 中的一个核心注解,用于声明一个接口为 Feign 客户端,使得开发者可以通过简单的接口调用来实现微服务之间的 HTTP 请求。通过使用 @FeignClient,Spring Cloud 可以帮助开发者轻松地将 HTTP 客户端的调用封装成服务调用的形式,从而简化了服务之间的通信。
java
package org.springframework.cloud.openfeign;

import java.lang.annotation.Documented;
import java.lang.annotation.ElementType;
import java.lang.annotation.Inherited;
import java.lang.annotation.Retention;
import java.lang.annotation.RetentionPolicy;
import java.lang.annotation.Target;

import org.springframework.core.annotation.AliasFor;

/**
 * Annotation for interfaces declaring that a REST client with that interface should be
 * created (e.g. for autowiring into another component). If SC LoadBalancer is available
 * it will be used to load balance the backend requests, and the load balancer can be
 * configured using the same name (i.e. value) as the feign client.
 *
 * @author Spencer Gibb
 * @author Venil Noronha
 * @author Olga Maciaszek-Sharma
 */
@Target(ElementType.TYPE)
@Retention(RetentionPolicy.RUNTIME)
@Documented
@Inherited
public @interface FeignClient {
	@AliasFor("name")
	String value() default "";
	String contextId() default "";
	@AliasFor("value")
	String name() default "";
	String[] qualifiers() default {};
	String url() default "";
	boolean dismiss404() default false;
	Class<?>[] configuration() default {};
	Class<?> fallback() default void.class;
	Class<?> fallbackFactory() default void.class;
	String path() default "";
	boolean primary() default true;
}
@FeignClient 注解包含多个属性,用于配置 Feign 客户端的行为:
- value: 下面 name 属性的别名,作用同 name属性。
- name:指定 Feign 客户端的名称,如果配置了服务发现(如 Eureka,Nacos等),Spring Cloud 会通过这个名字来查找服务的实例。
- url:直接指定服务的基础 URL。如果指定了这个属性,Feign 客户端将不会通过服务发现来解析服务地址。
- configuration:指定 Feign 客户端的配置类,这个类可以定义一些自定义的 Feign 配置,如日志级别、编码器、解码器等。
- fallback:指定一个类,用于定义服务调用失败时的回退逻辑。这个类需要实现被 @FeignClient 注解的接口。
- fallbackFactory:与 fallback 类似,但提供了更灵活的回退机制,允许在回退方法中访问抛出的异常。
- path:定义全局的路径前缀,所有通过该 Feign 客户端发起的请求都会自动加上这个前缀。
- decode404:当服务返回 404 时,是否应该解码响应体。默认为 false。
- primary:标记该 Feign 客户端是否为主要的,当有多个相同名称的 Feign 客户端时,可以使用这个属性来指定。
5、开启 OpenFeign 请求响应日志
5.1 配置 application.properties
properties
logging.level.com.github.cloudgyb.springcloud.testservice=debug上边的配置开启了 com.github.cloudgyb.springcloud.testservice 包的 debug 级别日志。
5.2 配置 OpenFeign 日志级别
通过下面的配置类来开启。
java
package com.github.cloudgyb.springcloud.testservice;

import feign.Logger;
import org.springframework.context.annotation.Bean;
import org.springframework.context.annotation.Configuration;

@Configuration
public class FeignConfig {
    @Bean
    public Logger.Level feignLoggerLevel() {
        return Logger.Level.FULL;
    }
}
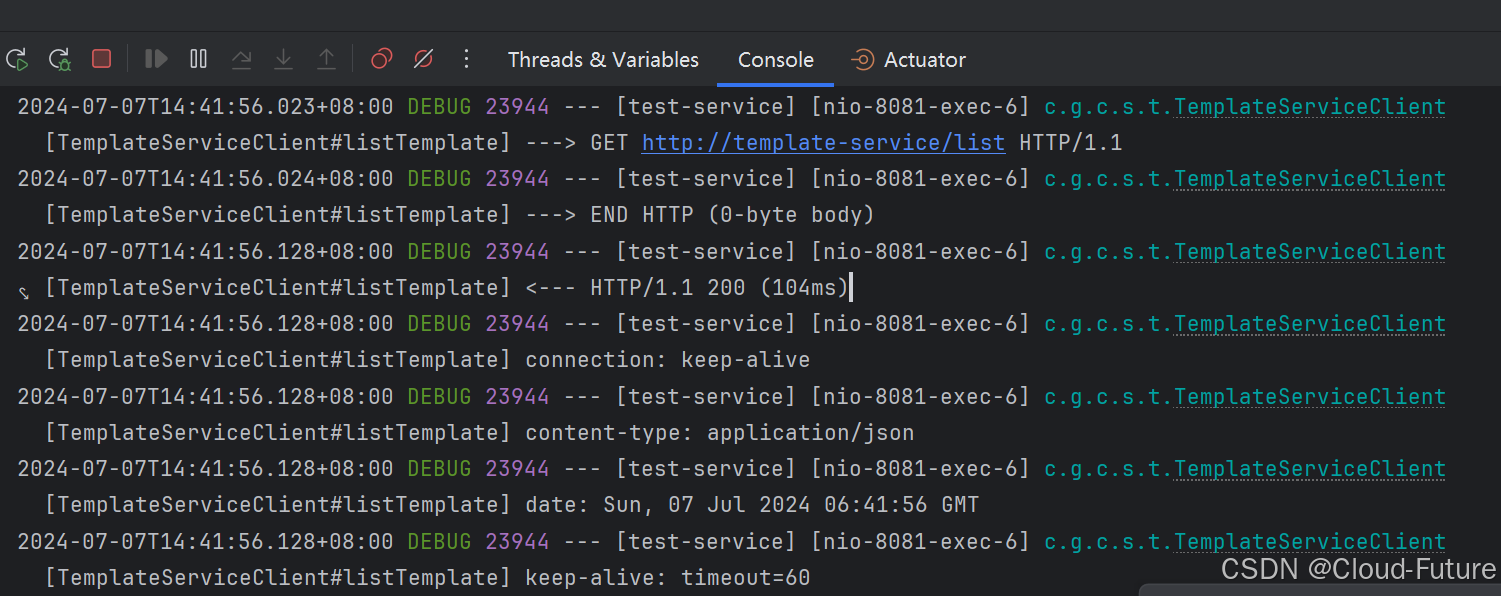
然后重启项目,将会看到下面的日志输出,这对于调试很有帮助,但在生产环环境不建议打印这些日志。

6、使用 OkHttp 作为底层 http 客户端
OpenFeign 底层默认使用 JDK 自带的 HttpURLConnection 执行 Http 请求,它不支持线程池所以效率不高。OKHttp 支持线程池,是一个不错的选择。

6.1 引入依赖 OKHttp
xml
<dependency>
    <groupId>com.squareup.okhttp3</groupId>
    <artifactId>okhttp</artifactId>
</dependency>
<dependency>
    <groupId>io.github.openfeign</groupId>
    <artifactId>feign-okhttp</artifactId>
</dependency>
6.2 配置 application.properties
properties
spring.cloud.openfeign.okhttp.enabled=true6.3 验证 OKHttp 是否生效
重启项目,debug 代码,发现 OKHTTP 已经生效。

6.4 其他HTTP客户端选择
OpenFeign 除了支持 OKHTTP 作为底层的 Http 通信客户端,还支持 Apache HttpComponents Client 5、JDK 11 HttpClient。
下面是一个使用 Apache HttpComponents Client 5的例子:
- 引入依赖
xml
<dependency>
    <groupId>io.github.openfeign</groupId>
    <artifactId>feign-hc5</artifactId>
</dependency>- 配置 application.proerties
properties
spring.cloud.openfeign.httpclient.hc5.enabled=true- 重启项目即可。