最近看了下Luban导出Excel数据的方式,来记录下
【Unity】关于Luban的简单使用
安装Luban
Luban文档:https://luban.doc.code-philosophy.com/docs/beginner/quickstart
1.安装dotnet sdk 8.0或更高版本sdk
2.github上把luban_examples项目下载下来,有些文件配置可以直接使用示例项目里的
3.安装git,后续在unity安装插件时会用到
开始使用
Unity
1.新建Unity工程,这里我用的2021.3.19f1版本
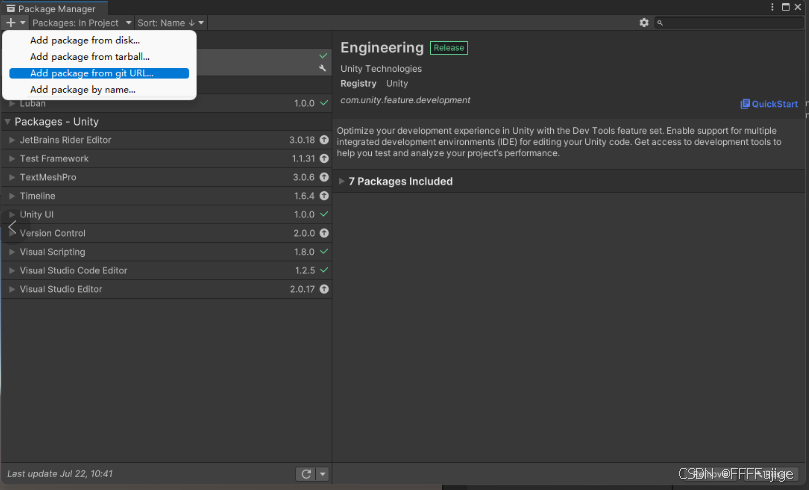
2.打开Package Manger,在Window->Package Manager,使用url地址进行插件安装


url地址:https://github.com/focus-creative-games/luban_unity.git

在Unity的PlayerSettings里开启unsafe选项

Luban
创建gen.bat文件,位置无所谓,只要路径能写对就行,这个文件可以从上面下的实例项目里找到,也可以自己创建
-
LUBAN_DLL Luban.dll文件的路径。 指向 luban_examples/Tools/Luban/Luban.dll
-
CONF_ROOT 配置项目的路径。指向 luban_examples/DataTables
-
'-t' 生成目标。可以为 client、server、all之类的值
-
'-c' 生成的代码类型。 cs-simple-json为生成使用SimpleJSON加载json数据的c#代码
-
'-d' 生成的数据类型
-
'outputCodeDir' c#代码的输出目录
-
'outputDataDir' json数据的输出目录
set WORKSPACE=....
set LUBAN_DLL=%WORKSPACE%\Tools\Luban\Luban.dll
set CONF_ROOT=..\dotnet %LUBAN_DLL% ^
-t client ^
-c cs-simple-json ^
-d json ^
--conf %CONF_ROOT%\luban.conf ^
-x outputCodeDir=%WORKSPACE%\LubanTest\Assets\Script\Template ^
-x outputDataDir=%CONF_ROOT%\outputpause
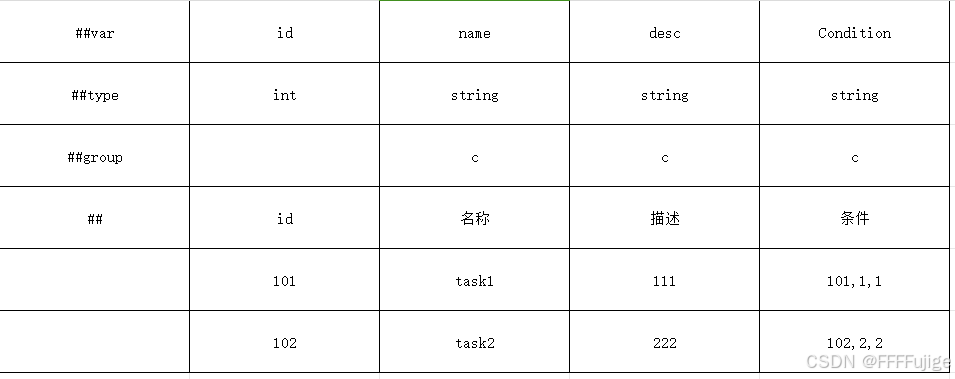
新建Task表
- 第1行是字段名行。单元格 A1 必须以##开头。表示这是一个有效数据表。
- 第2行是字段类型行。第1个单元格必须为 ##type。
- 第3行是分组行。c表示字段属于客户端,s表示属于属于服务器,c,s表示同时属于所有,留空也表示属于所有。
- 第4行是注释行。 以##开头。 可以有0-N个注释行,而且可以出现在任何位置
- 第5行起是数据行。

在__tables__.xlsx里添加导出类,这里我试了四个表

运行gen.bat文件,成功的话最后会出现bye

也可以在unity中看到导出的c#文件

C#
csharp
using System;
using System.IO;
using SimpleJSON;
using UnityEngine;

namespace Script
{
    public class Main : MonoBehaviour
    {
        private void Start()
        {
            var tables = new cfg.Tables(readConfig);
            Debug.Log(tables.TbReward.Get(1001).Name);
            Debug.Log(tables.TbActivity.Get(1001).StartTime);
        }

        private JSONNode readConfig(string file)
        {
            return JSON.Parse(File.ReadAllText(Application.dataPath + "/../../MiniTemplate/output/" + file + ".json",
                System.Text.Encoding.UTF8));
        }
    }
}
运行后打印结果

扩展
目前简单使用感受,每次新建一个表就要在__tables__.xlsx里手动添加一行,比较麻烦,写了一个py自动处理
xlrd库记得用1.2.0版本的,最新版无法读取xlsx文件
python
# -*- coding: utf-8 -*-
import lxml.etree as etree
import os

import xlrd
import xlwt
import pandas
import subprocess

execlDataTitle = []
fileList = []


def read_excel_xls(path):
    workbook = xlrd.open_workbook(path)  # 打开工作簿
    sheets = workbook.sheet_names()  # 获取工作簿中的所有表格
    worksheet = workbook.sheet_by_name(sheets[0])  # 获取工作簿中所有表格中的的第一个表格
    for i in range(0, 3):
        data = []
        for j in range(0, worksheet.ncols):
            data.append(worksheet.cell_value(i, j))
        execlDataTitle.append(data)

def write_excel_xls(path):
    if os.path.exists(path):
        os.remove(path)
    index = len(execlDataTitle)  # 获取需要写入数据的行数
    workbook = xlwt.Workbook()  # 新建一个工作簿
    sheet = workbook.add_sheet("Sheet1")  # 在工作簿中新建一个表格
    ##设置边框实线
    borders = xlwt.Borders()
    borders.left = xlwt.Borders.THIN
    borders.right = xlwt.Borders.THIN
    borders.top = xlwt.Borders.THIN
    borders.bottom = xlwt.Borders.THIN
    ##设置居中
    alignment = xlwt.Alignment()
    alignment.horz = xlwt.Alignment.HORZ_CENTER
    alignment.vert = xlwt.Alignment.VERT_CENTER
    for i in range(0, index + len(fileList)):
        ##行高度
        tall_style = xlwt.easyxf('font:height 500')
        sheet.row(i).set_style(tall_style)
        for j in range(0, len(execlDataTitle[0])):
            ##列宽度
            sheet.col(j).width = 5000
            ##单元格样式
            style = xlwt.XFStyle()
            style.alignment = alignment
            ##自动换行
            style.alignment.wrap = 1
            if i <= 2:
                pattern = xlwt.Pattern()
                pattern.pattern = xlwt.Pattern.SOLID_PATTERN
                pattern.pattern_fore_colour = 17
                style.pattern = pattern
                style.borders = borders
                sheet.write(i, j, execlDataTitle[i][j], style)  # 像表格中写入数据(对应的行和列)
            else:
                style.borders = borders
                fileName = fileList[i - 3]
                fileClass = fileList[i - 3].replace(".xlsx", "")
                if execlDataTitle[0][j] == "full_name":
                    sheet.write(i, j, fileClass.lower() + ".Tb" + fileClass.capitalize(), style)
                elif execlDataTitle[0][j] == "value_type":
                    sheet.write(i, j, fileClass.capitalize(), style)
                elif execlDataTitle[0][j] == "read_schema_from_file":
                    sheet.write(i, j, "TRUE", style)
                elif execlDataTitle[0][j] == "input":
                    sheet.write(i, j, fileName, style)
                elif execlDataTitle[0][j] == "comment":
                    sheet.write(i, j, fileClass + "表", style)
                else:
                    sheet.write(i, j, "", style)
    workbook.save(path)  # 保存工作簿
    print("xls格式表格写入数据成功!")

if __name__ == "__main__":
    tableName = ""
    baseFileName = os.path.basename(__file__)
    for root, dirs, files in os.walk("../Datas"):
        for file in files:
            # name = os.path.join(root, file).split("\\")[-1].replace("-", "==").replace(".tar.gz", "").replace(".tar", "")
            firstName = file[1]
            if file != baseFileName and firstName != "_" and firstName != "$":
                print(file)
                fileList.append(file)
            if file.find("__tables__") != -1:
                tableName = os.path.join(root, file)
    if tableName == "":
        print("tableName为空")
    read_excel_xls(tableName)
    write_excel_xls(tableName)
    print("complete!!!")
    subprocess.run(['___Gen.bat'])
再用pyinstaller命令打包成exe文件就可以直接运行了
pyinstaller -F ___GenExcelData.py
copy /Y dist\___GenExcelData.exe .
rd /S /Q build
rd /S /Q dist
rd /S /Q __pycache__
del /Q ___GenExcelData.spec
我的是和表放在同一个目录下
