你好,我是Qiuner. 为帮助别人少走弯路和记录自己编程学习过程而写博客
这是我的 github https://github.com/Qiuner ⭐️
gitee https://gitee.com/Qiuner 🌹
如果本篇文章帮到了你 不妨点个赞吧~ 我会很高兴的 😄 (^ ~ ^)
想看更多 那就点个关注吧 我会尽力带来有趣的内容 😎
- 这篇有不少bug记录与方便您复制的代码,相信一定能节省学习时间同时达到更好的效果
- 本博客要与原文档搭配使用 day05 - 飞书云文档 (feishu.cn)
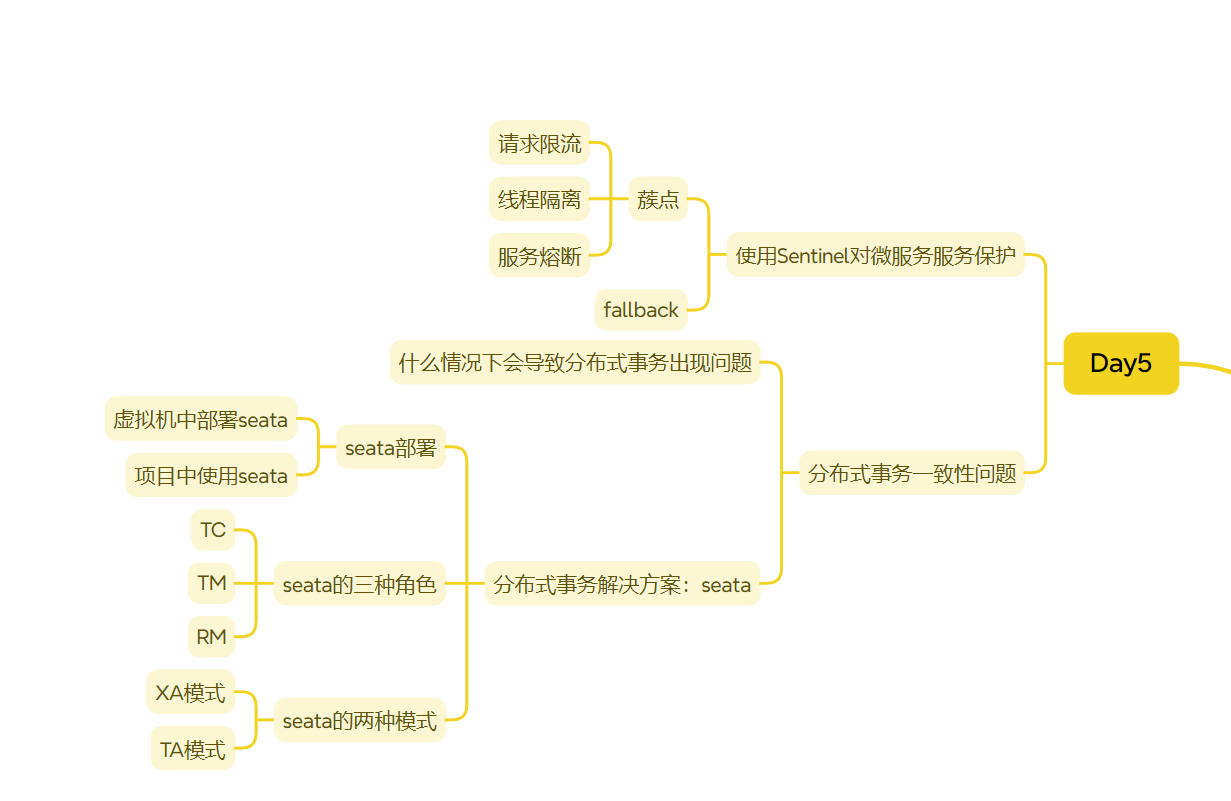
- 介绍了使用Sentinel进行请求限流、线程隔离、服务熔断等操作和分布式事务一致性处理方案 seata
背景色是愧花黄绿- 解决了多个经常出现的bug,对于余下的作业 笔墨不多 本章作业算是比较简单的
- 这一章,官方文档弄得很详细了,因此我没有很多可以拓展的地方
2024最新SpringCloud微服务开发与实战,java黑马商城项目微服务实战开发(涵盖MybatisPlus、Docker、MQ、ES、Redis高级等)Day 5 包含作业
文章目录
- [2024最新SpringCloud微服务开发与实战,java黑马商城项目微服务实战开发(涵盖MybatisPlus、Docker、MQ、ES、Redis高级等)Day 5 包含作业](#2024最新SpringCloud微服务开发与实战,java黑马商城项目微服务实战开发(涵盖MybatisPlus、Docker、MQ、ES、Redis高级等)Day 5 包含作业)
- 雪崩问题描述
- 微服务单个服务保护思路
- Sentinel
- 分布式事务面对的问题
- Seata
-
- Seata的三种角色
- seata部署
- seata依赖下载很慢的问题
- [org.springframework.beans.factory.BeanCreationException: Error creating bean with name 'globalTransactionScanner' defined in class path resource [](#org.springframework.beans.factory.BeanCreationException: Error creating bean with name 'globalTransactionScanner' defined in class path resource [)
- [报错 io.seata.common.exception.FrameworkException: can not register RM,err:can not connect to services-server.](#报错 io.seata.common.exception.FrameworkException: can not register RM,err:can not connect to services-server.)
- 网络链接
- 微服务中引入seata步骤总结:
- XA模式
- AT模式
-
- At模式具体实现
-
- 第一步:导入log数据表
- [第二步:修改配置 改成使用at模式](#第二步:修改配置 改成使用at模式)
- [JDK11使用反射时候报错java.lang.ExceptionInInitializerError: Exception java.lang.reflect.InaccessibleObjectException: Unable to make field private final java.lang.Class java.lang.invoke.SerializedLambda.capturingClass accessible: module java.base does not "opens java.lang.invoke" to unnamed module @4c583ecf in thread "http-nio-8084-exec-1"](#JDK11使用反射时候报错java.lang.ExceptionInInitializerError: Exception java.lang.reflect.InaccessibleObjectException: Unable to make field private final java.lang.Class java.lang.invoke.SerializedLambda.capturingClass accessible: module java.base does not "opens java.lang.invoke" to unnamed module @4c583ecf [in thread "http-nio-8084-exec-1"])
- 作业
-
- 作业一:3.1.编写降级逻辑
-
- 解题思路
- 开始解题
-
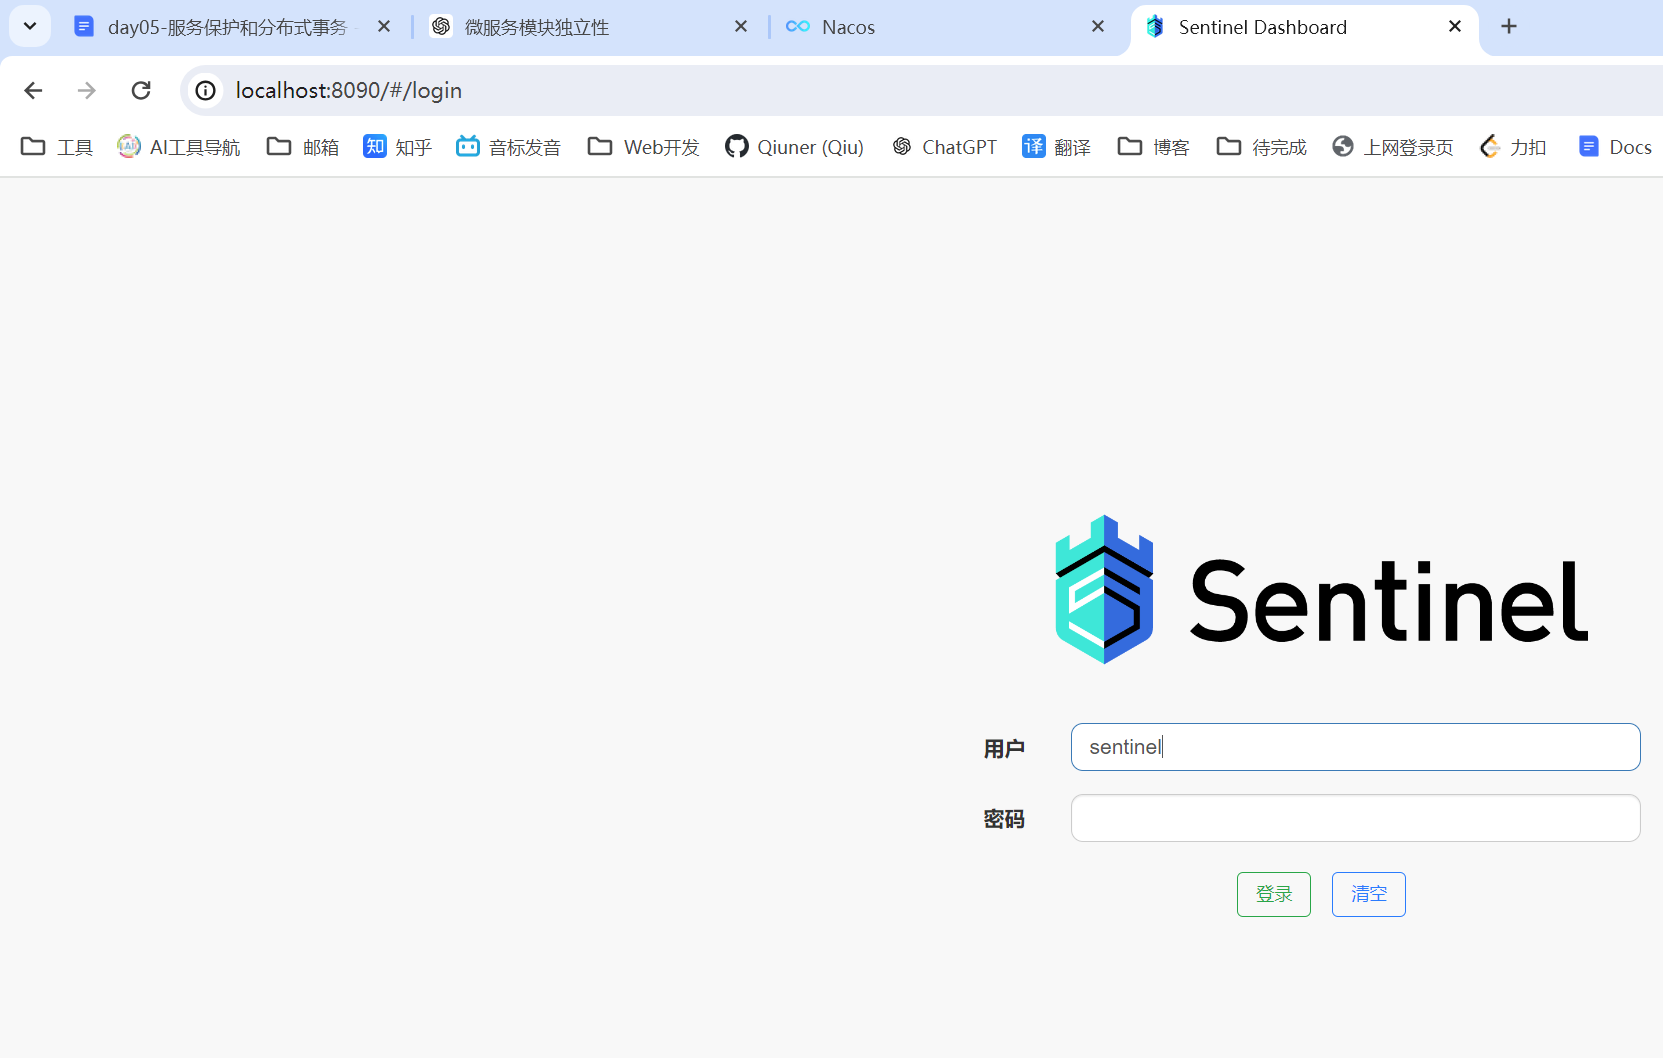
- 第一步:启动Sentinel
- [第二步:给相应模块添加 Sentinel](#第二步:给相应模块添加 Sentinel)
- fallback的处理逻辑
- 作业二:3.2.解决分布式事务
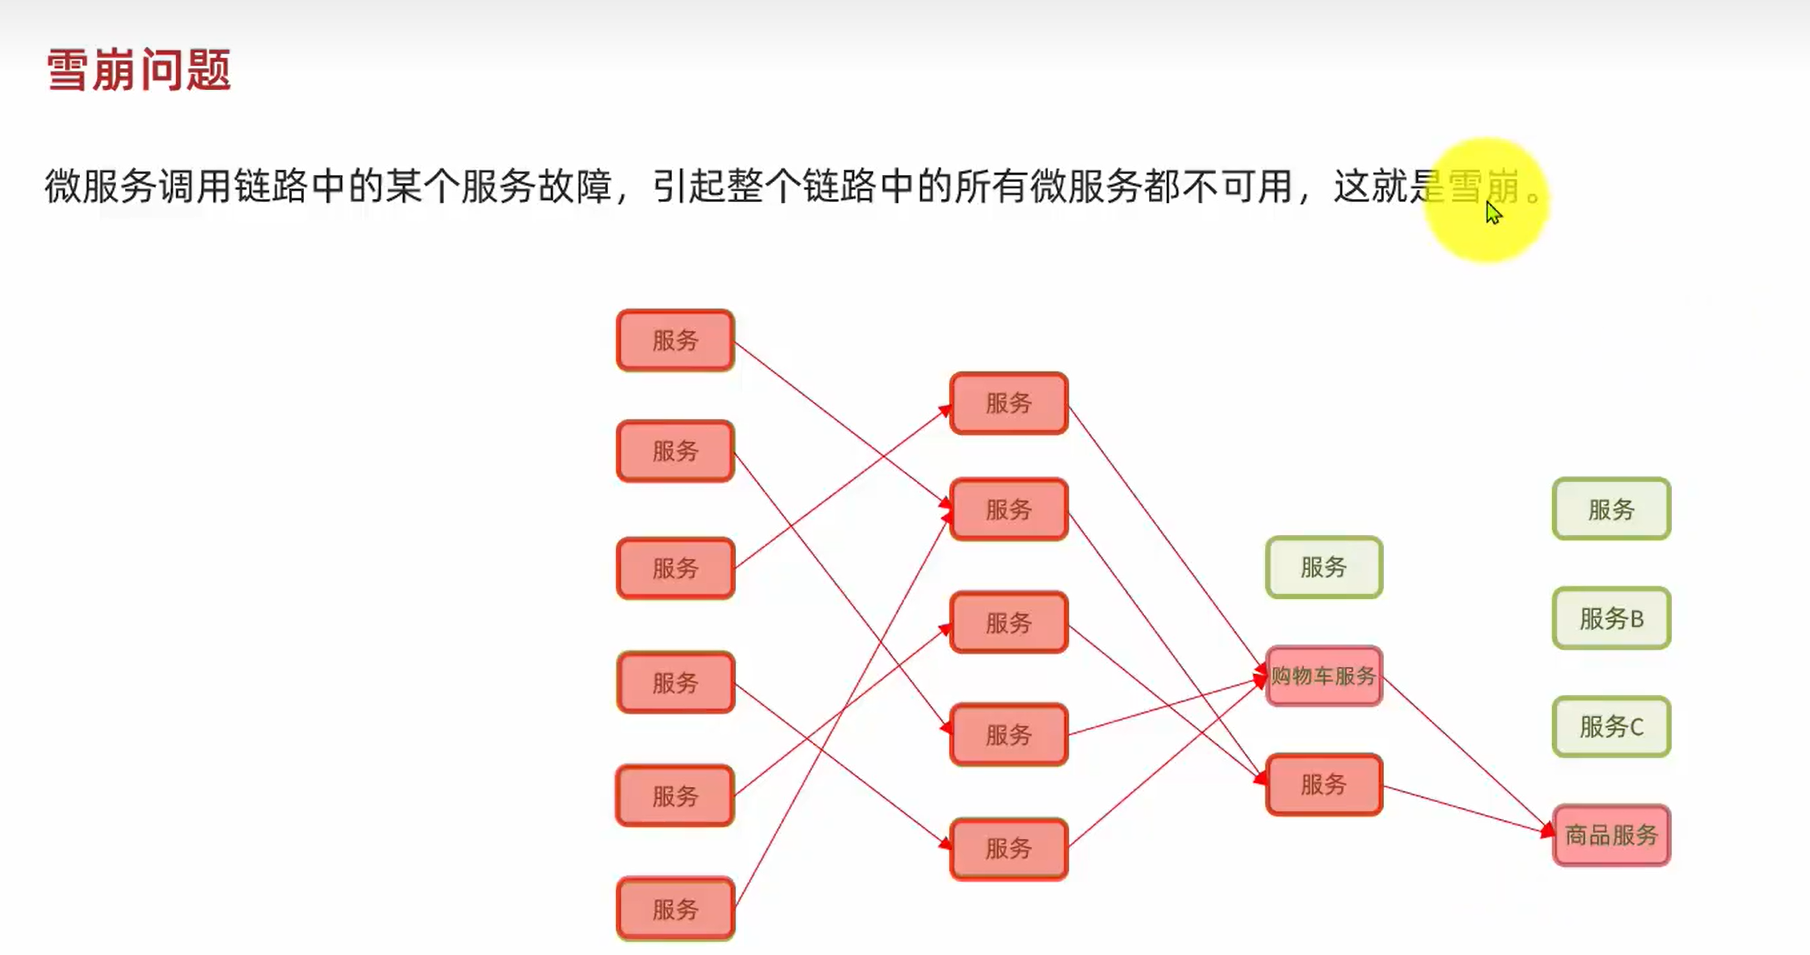
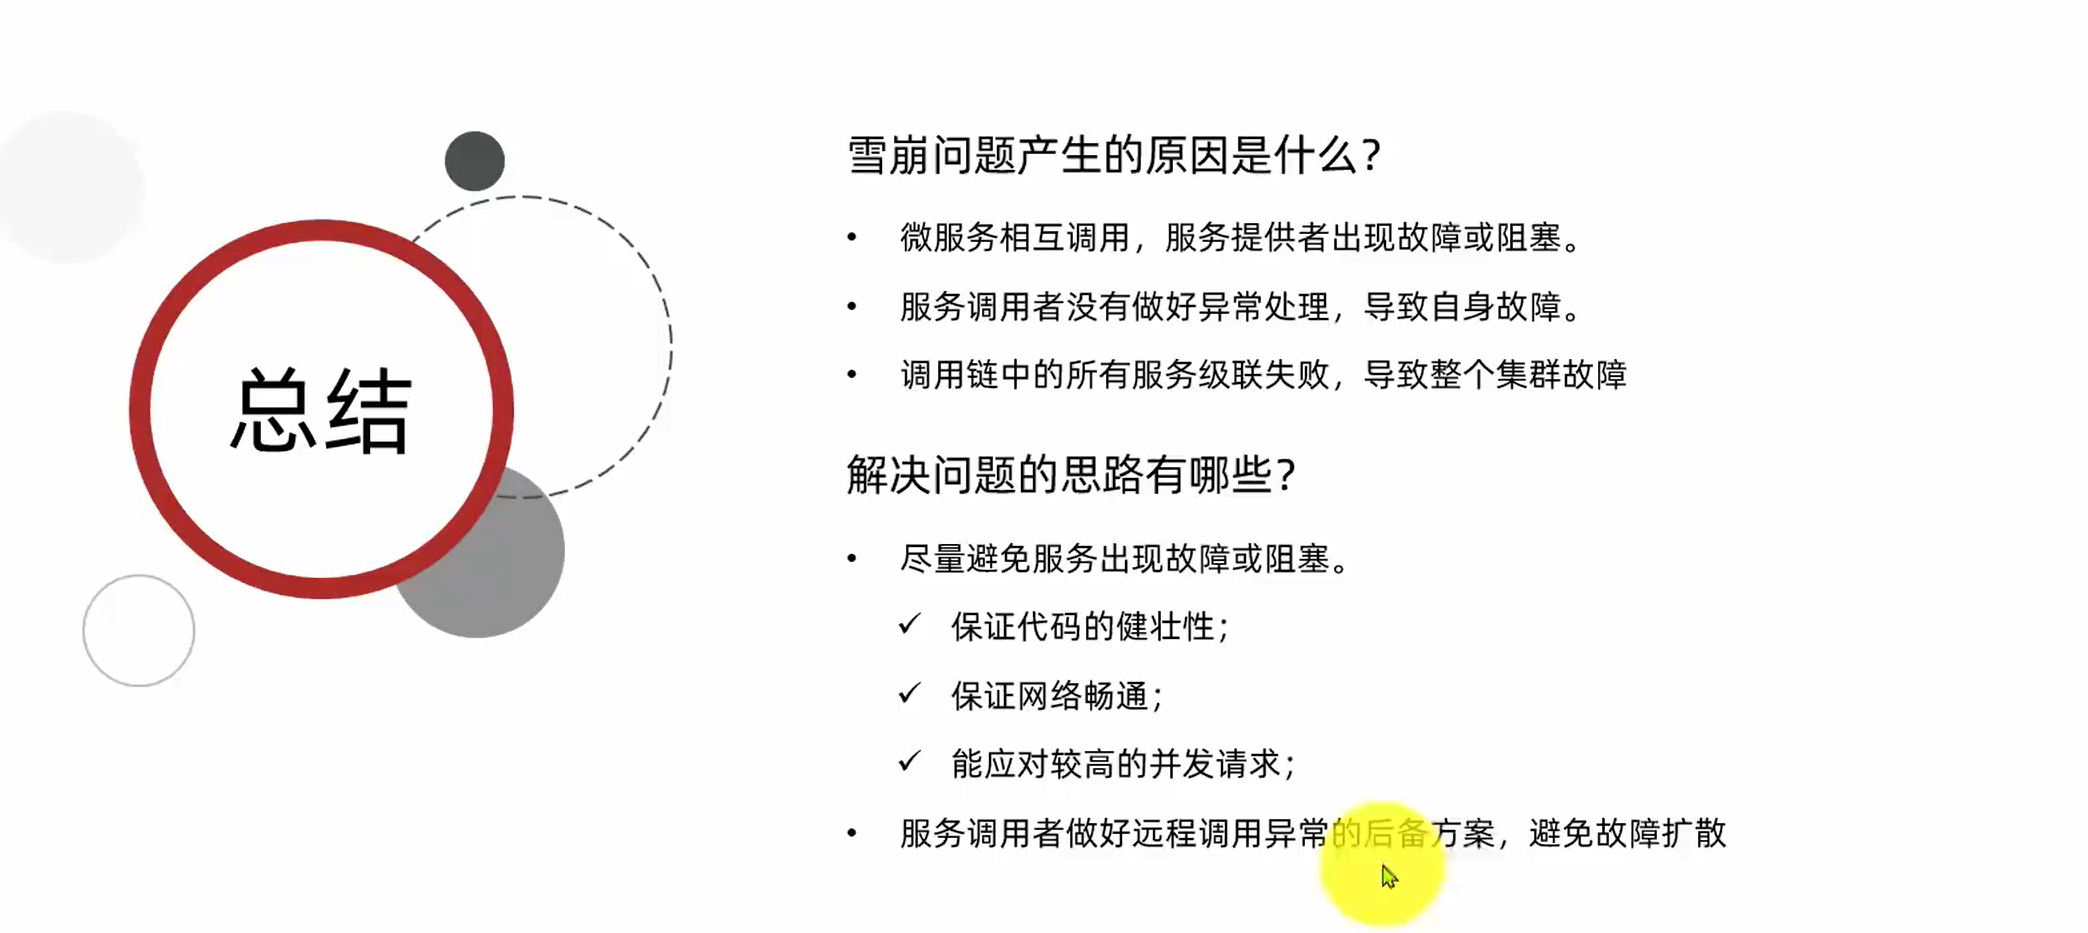
雪崩问题描述
- 刚开始的介绍很好 推荐听一听微服务保护和分布式事务-01.雪崩问题-原因分析_哔哩哔哩_bilibili
微服务单个服务保护思路
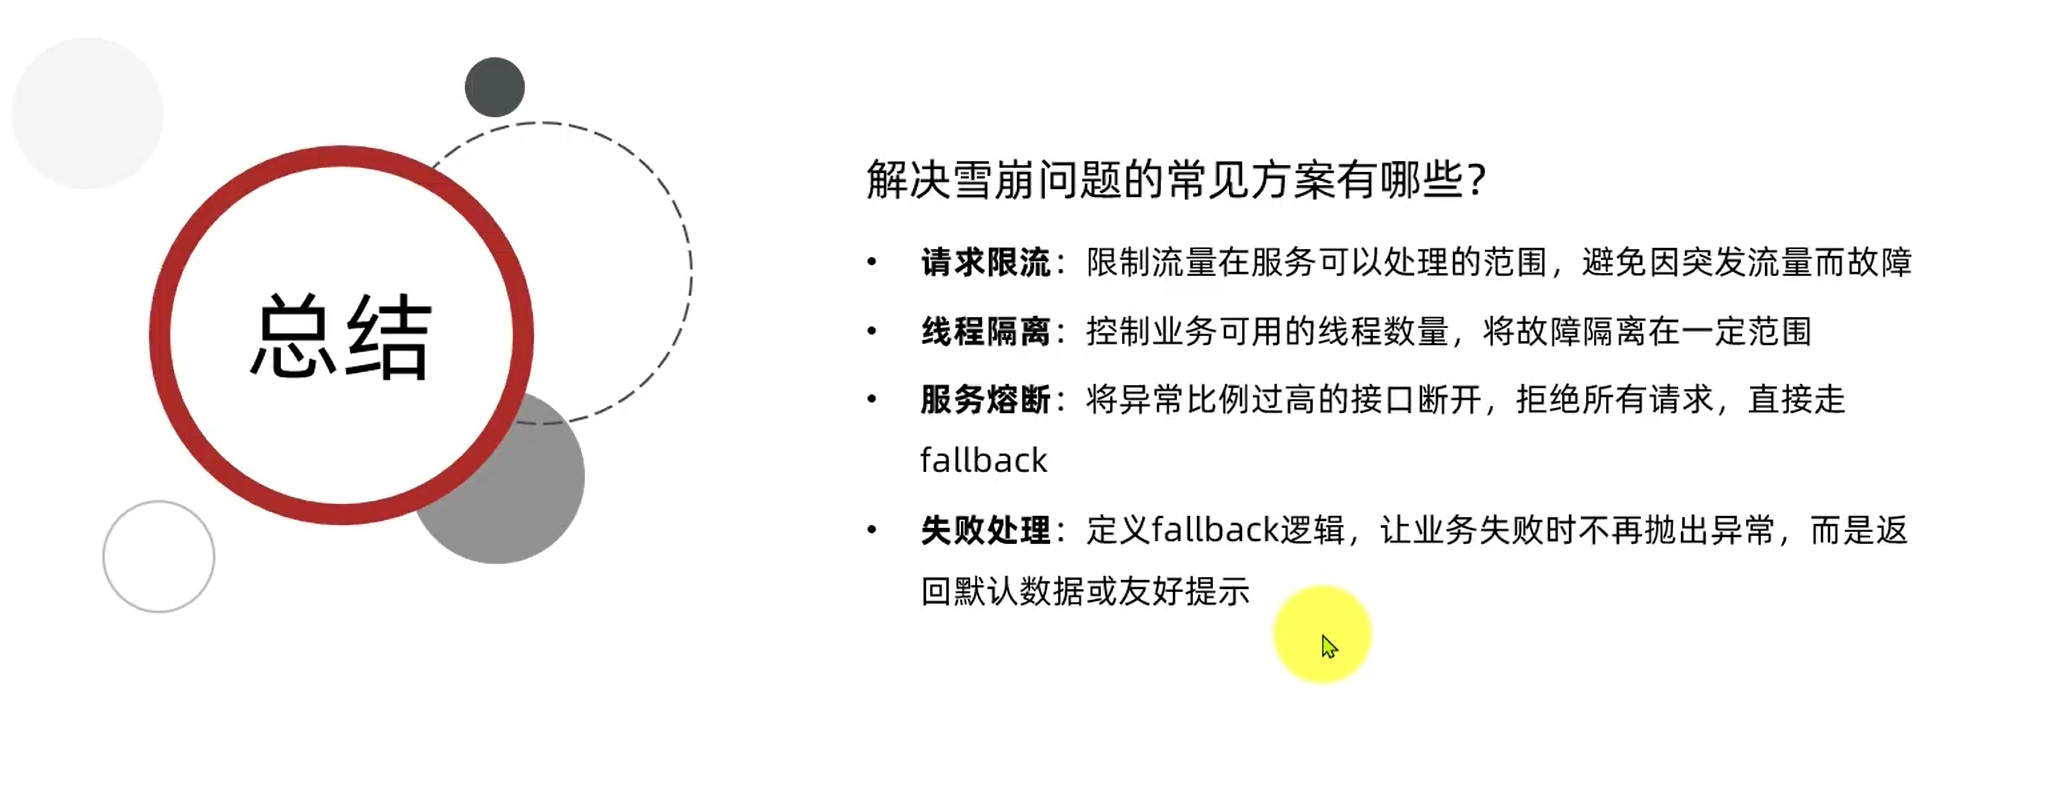
一:对请求流量进行限制

二:线程隔离
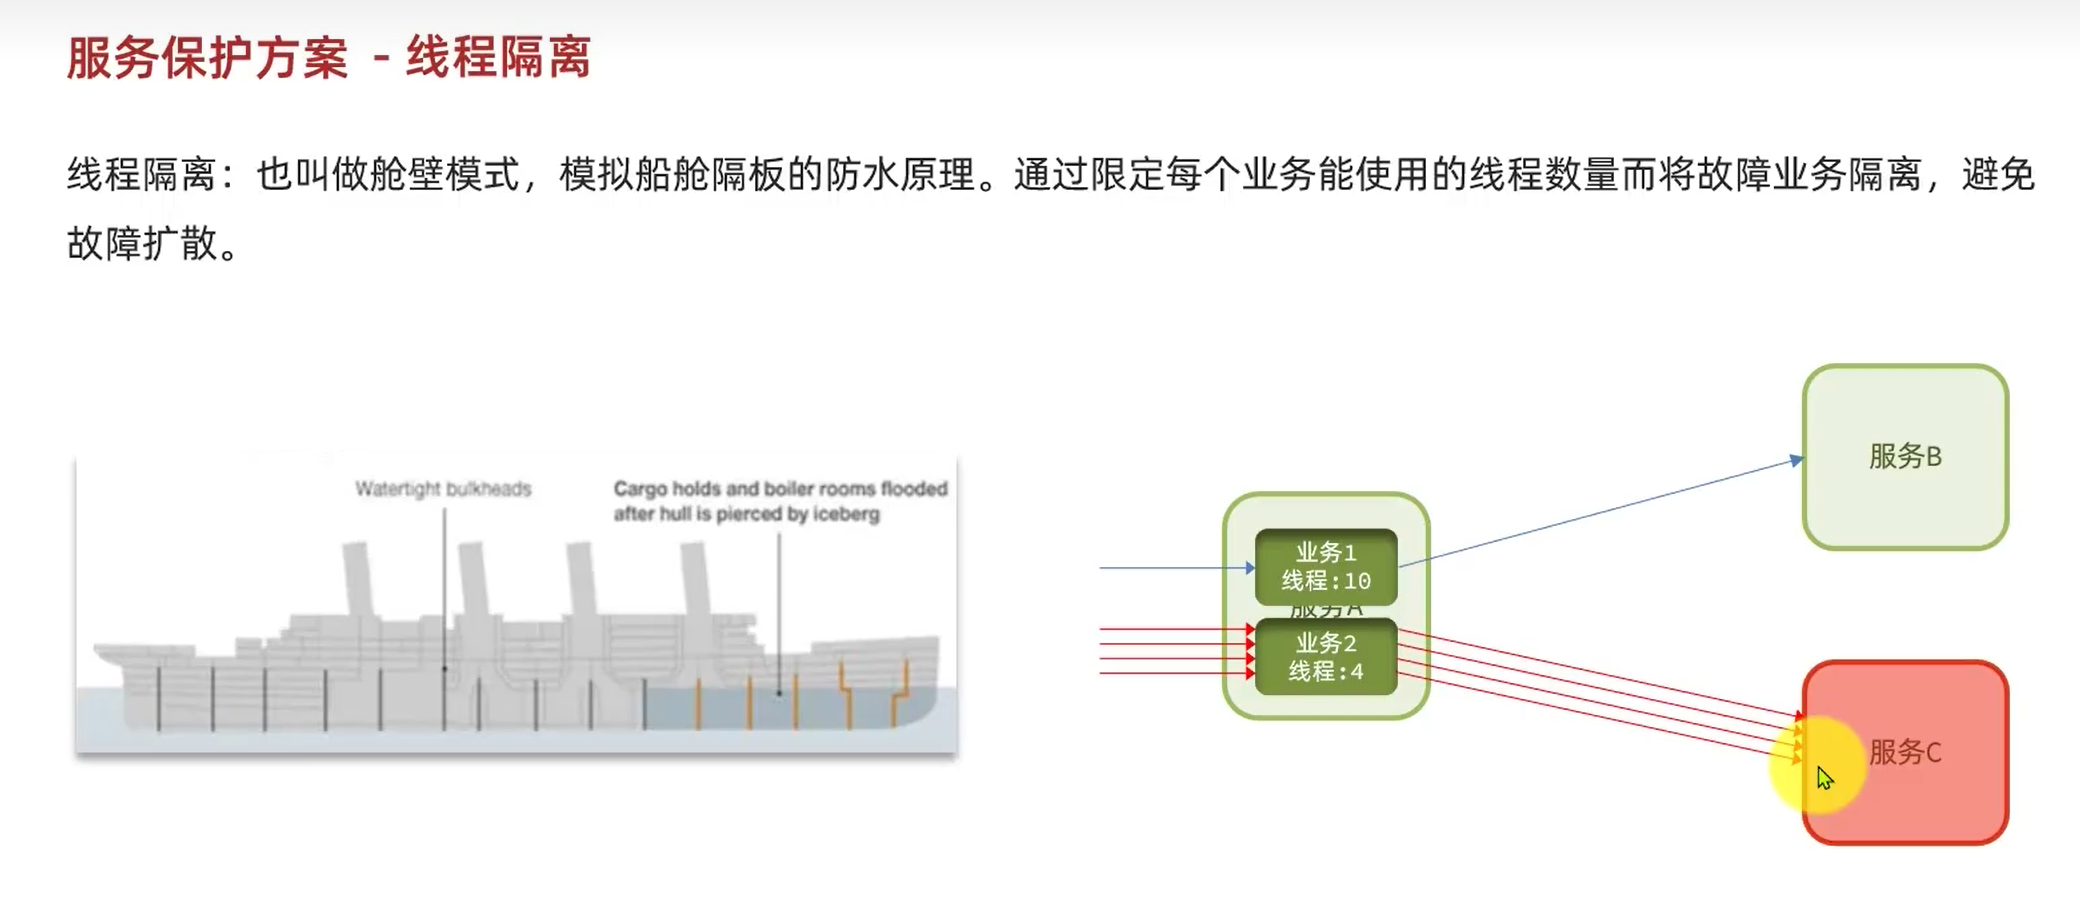
- 限制每个服务的线程上线数,但一个服务开始奔溃的时候,不会影响到其他线程
三:服务熔断
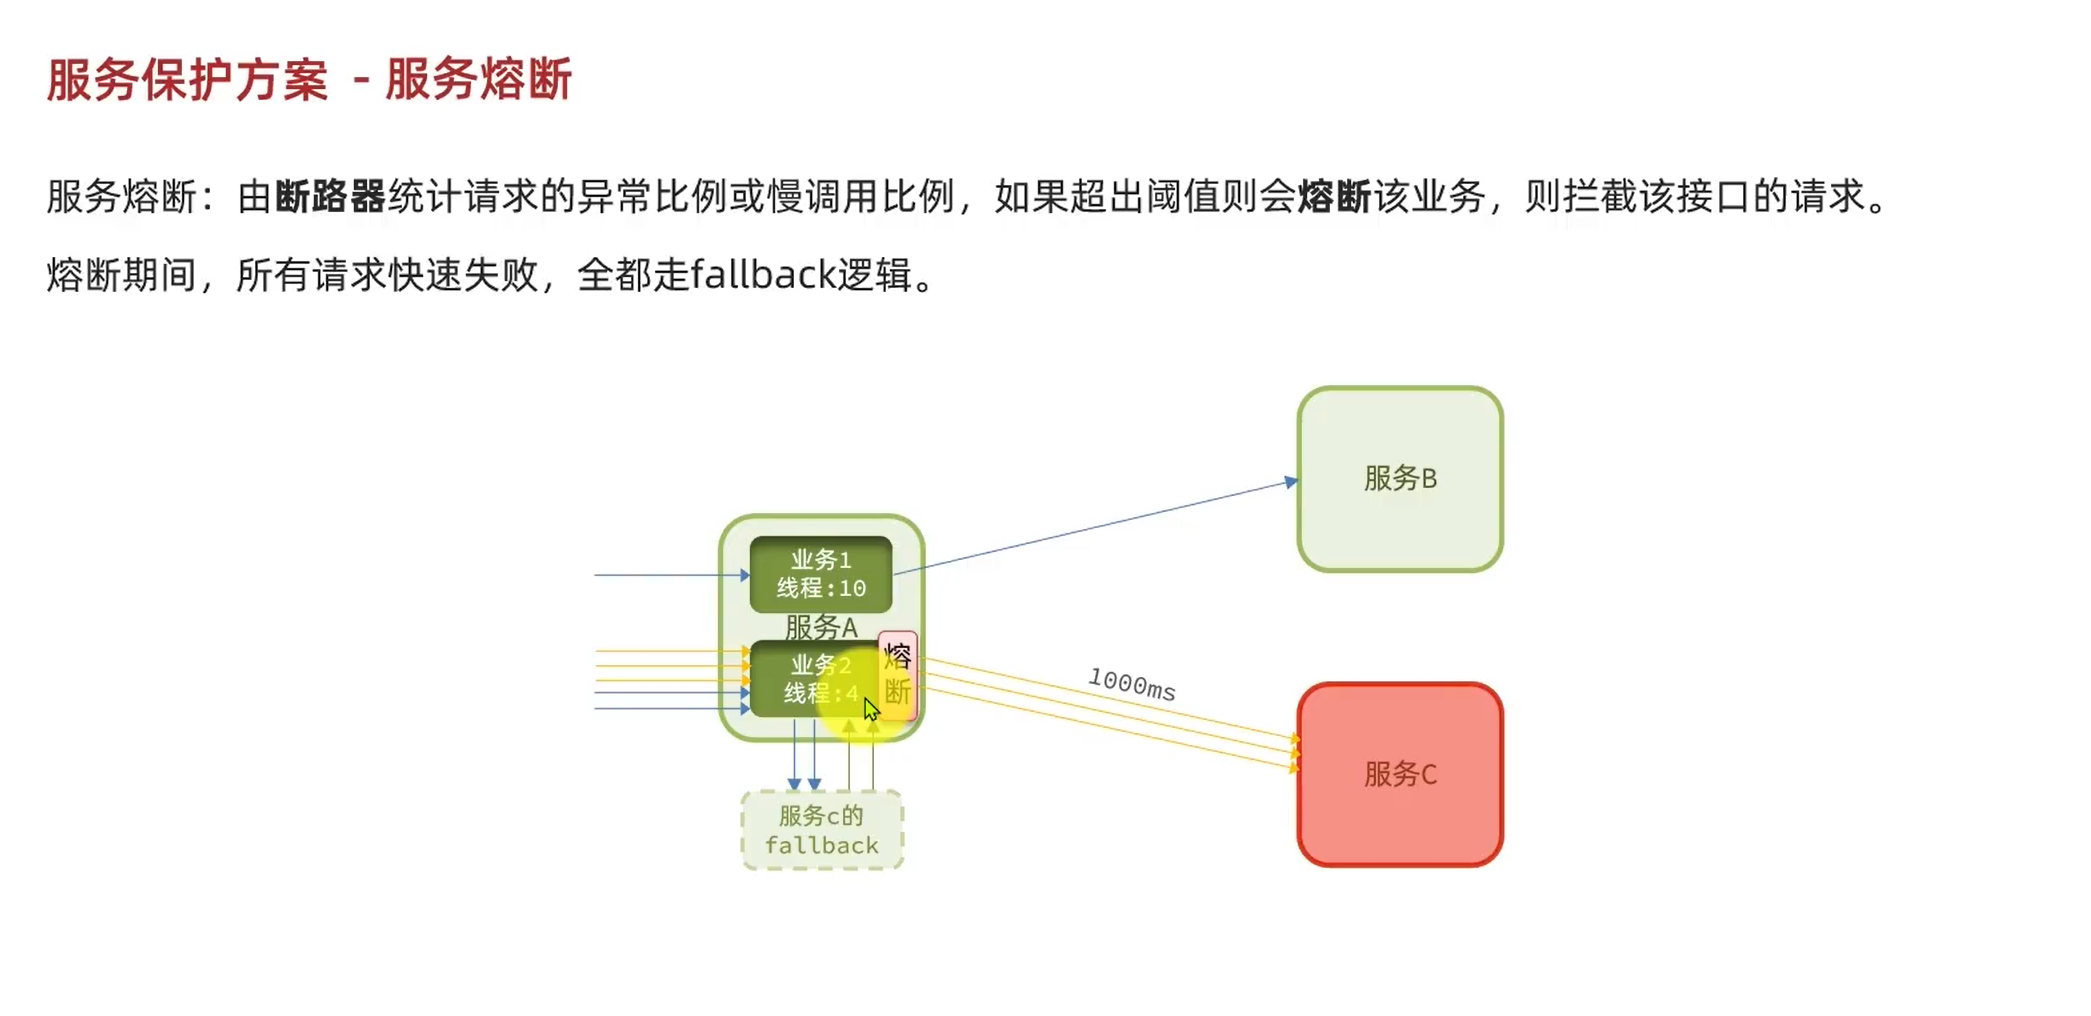
- 添加一个服务失败的处理逻辑
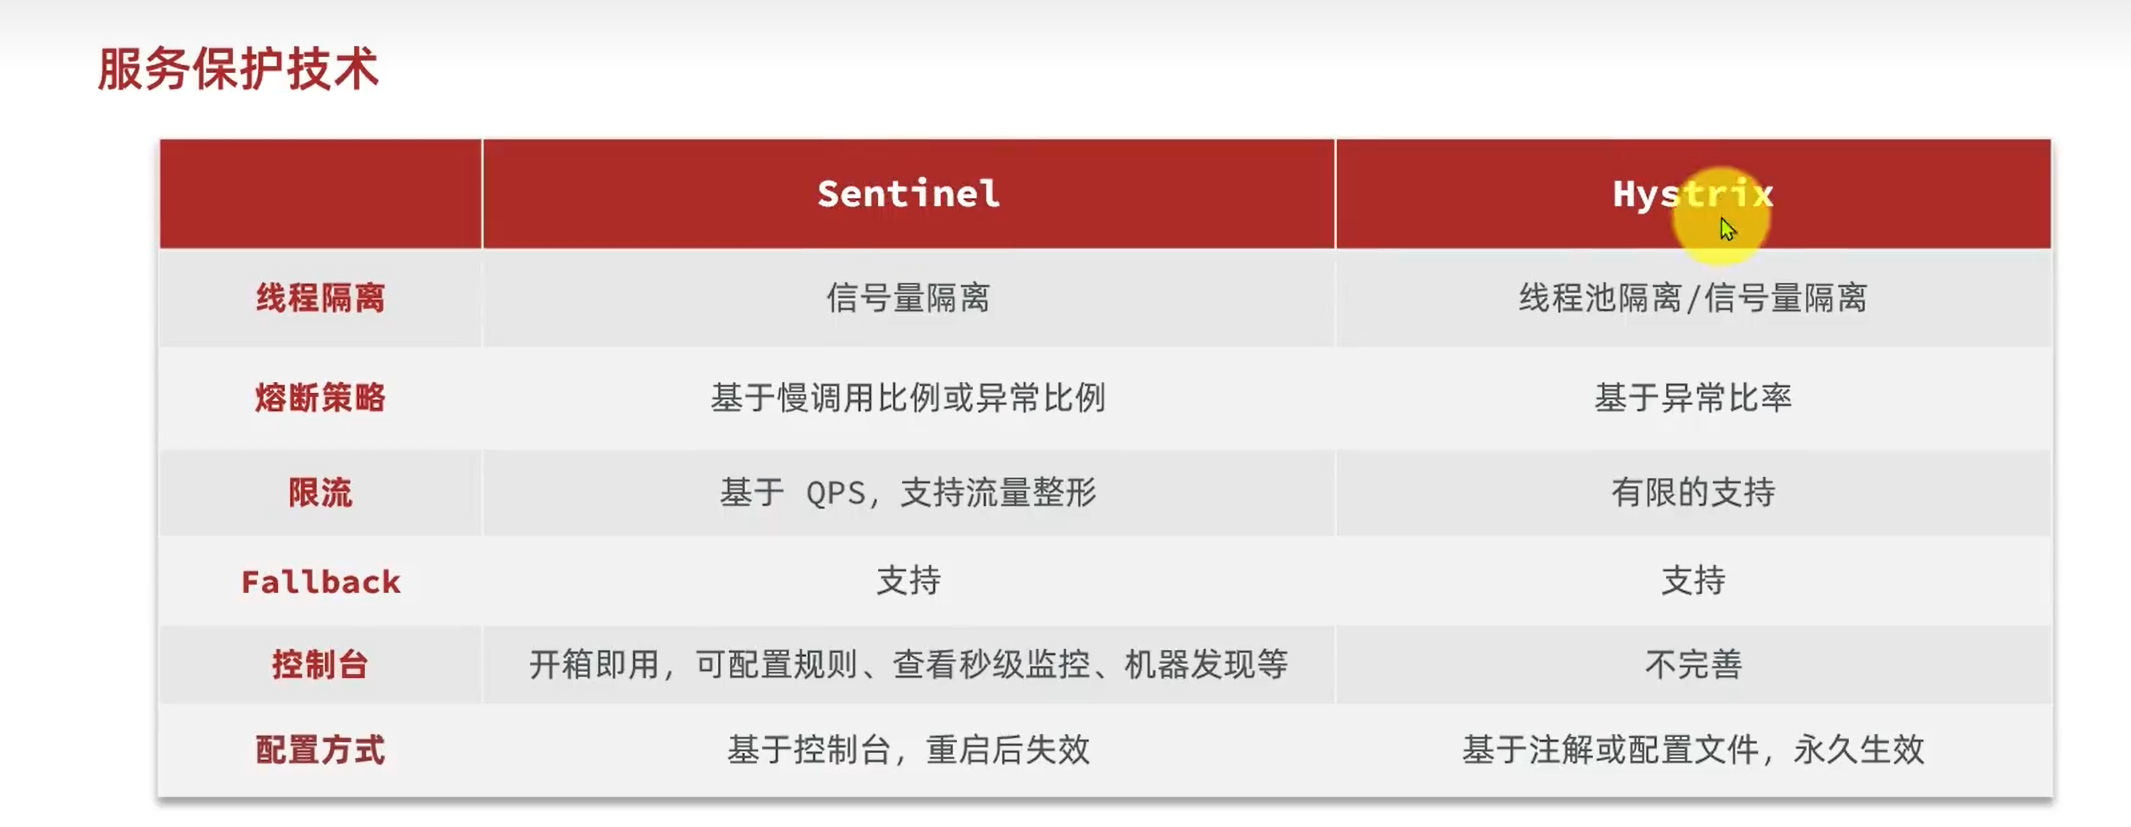
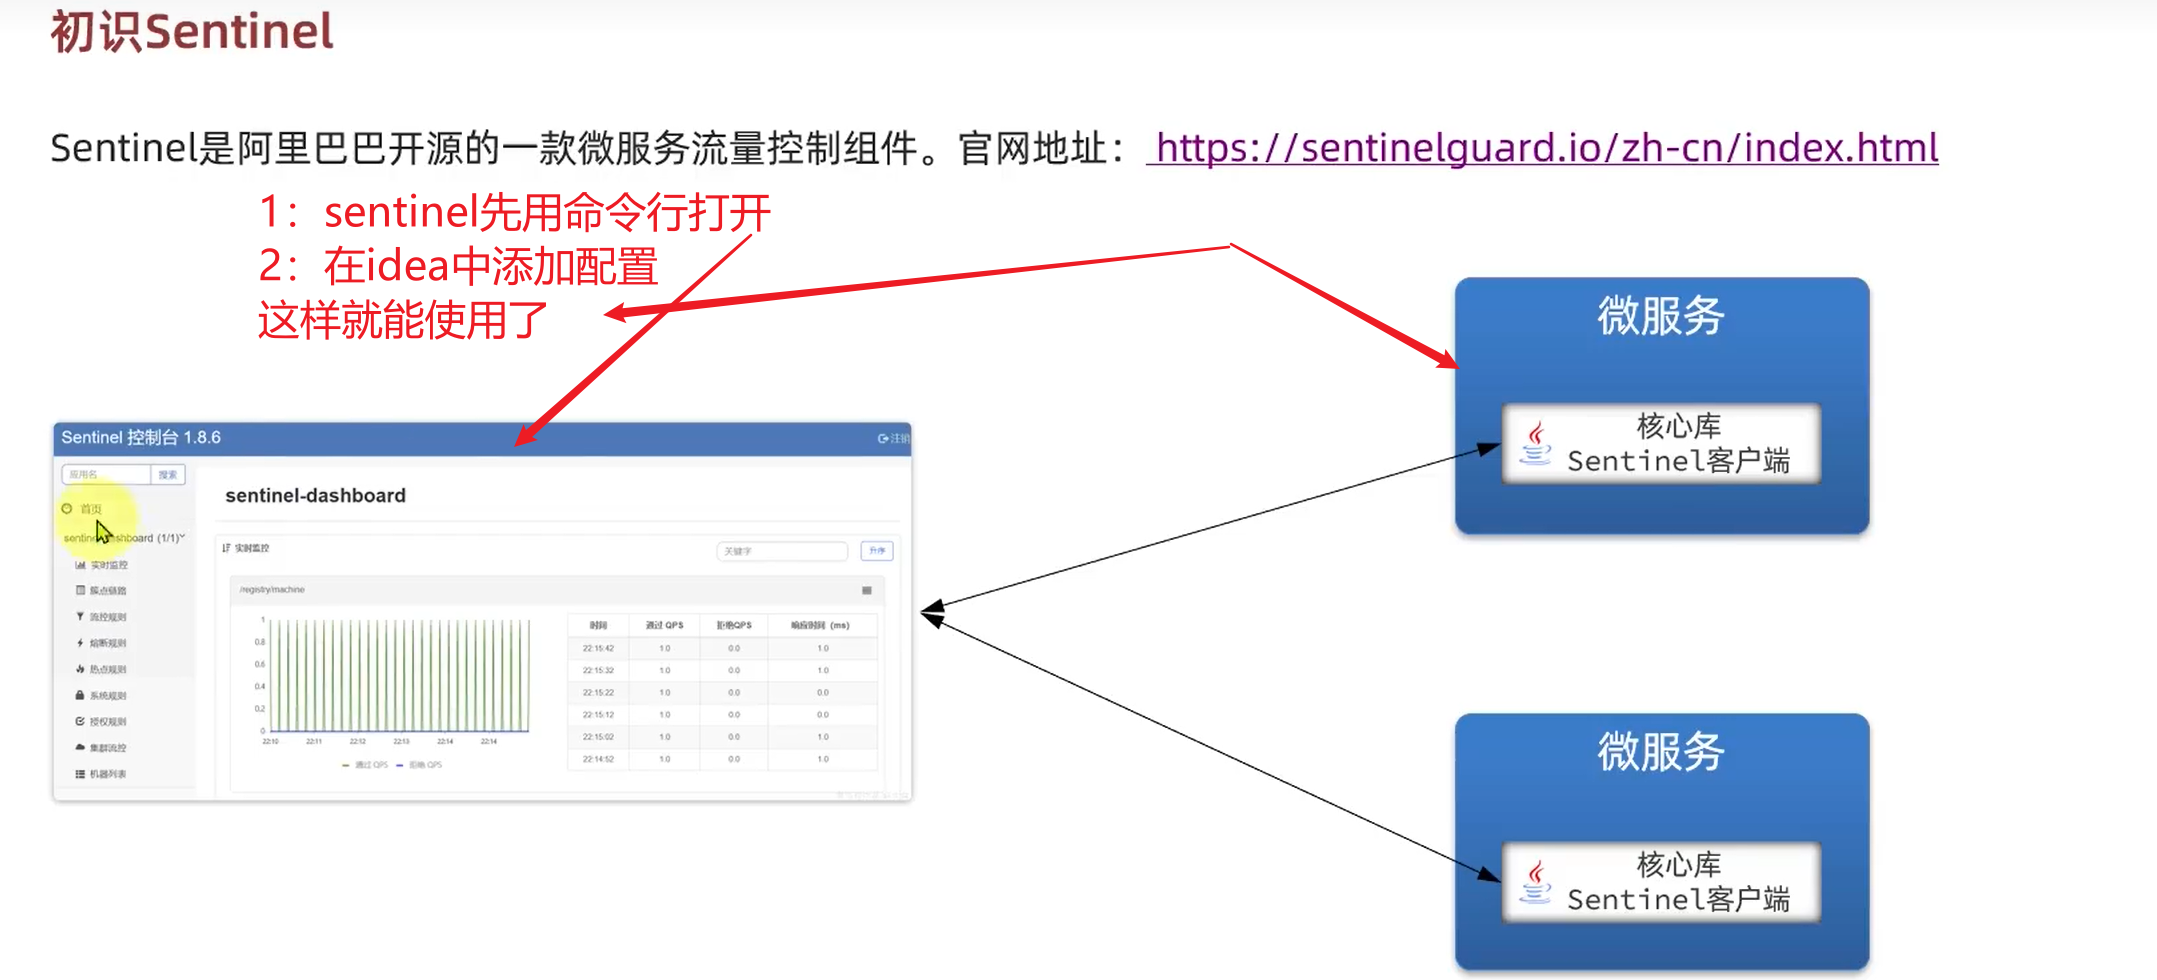
Sentinel
Sentinel的配置
-
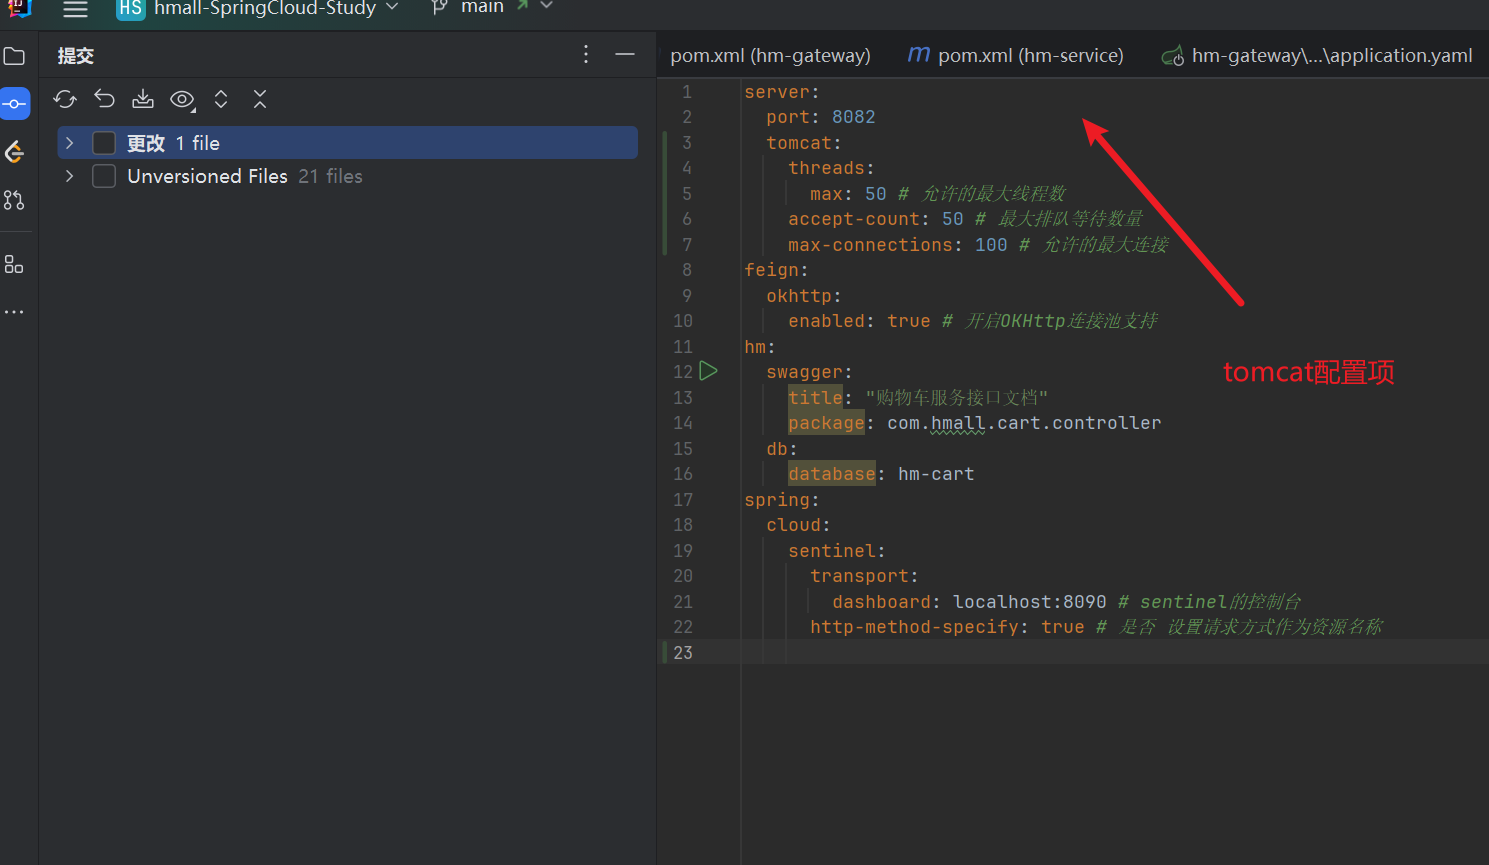
步骤为:1、先在命令行中使用以下命令打开jar包 2、在idea中配置相关依赖 3、在application文件中指定运行的端口
java -Dserver.port=8090 -Dcsp.sentinel.dashboard.server=localhost:8090 -Dproject.name=sentinel-dashboard -jar sentinel-dashboard.jar
-
在官方文档里有详细的,就不写了
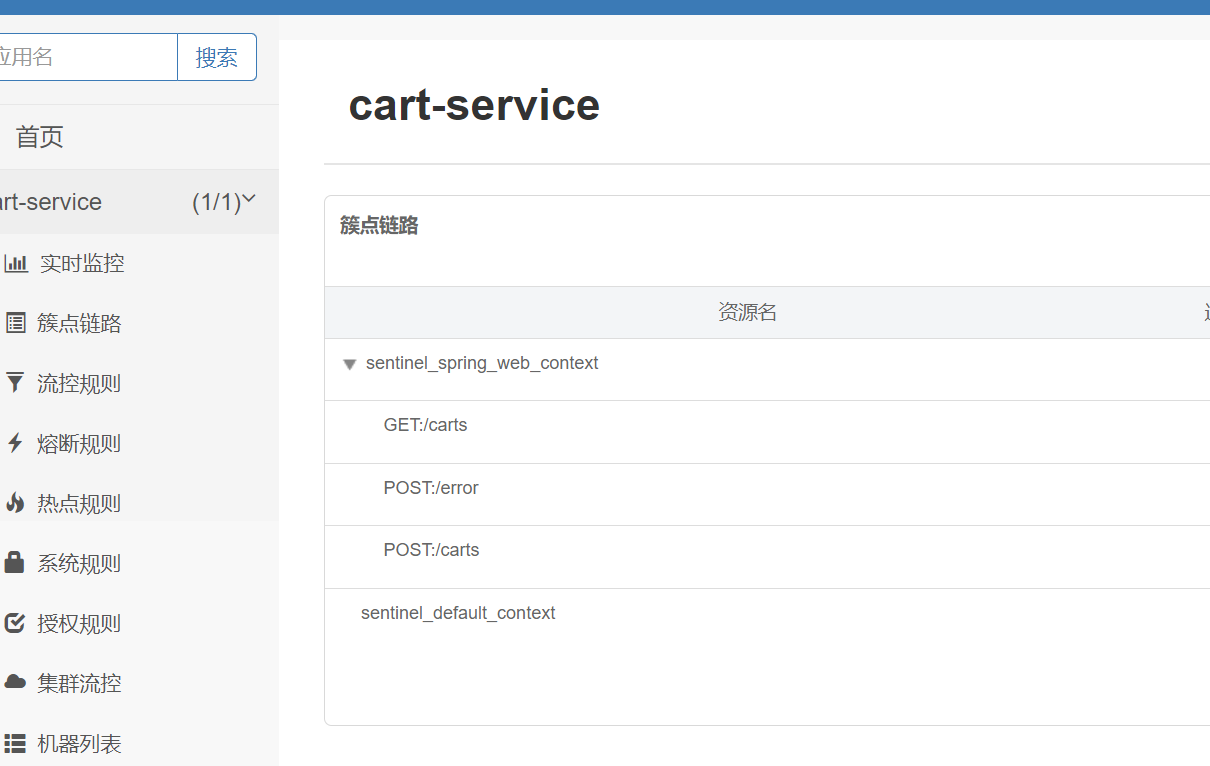
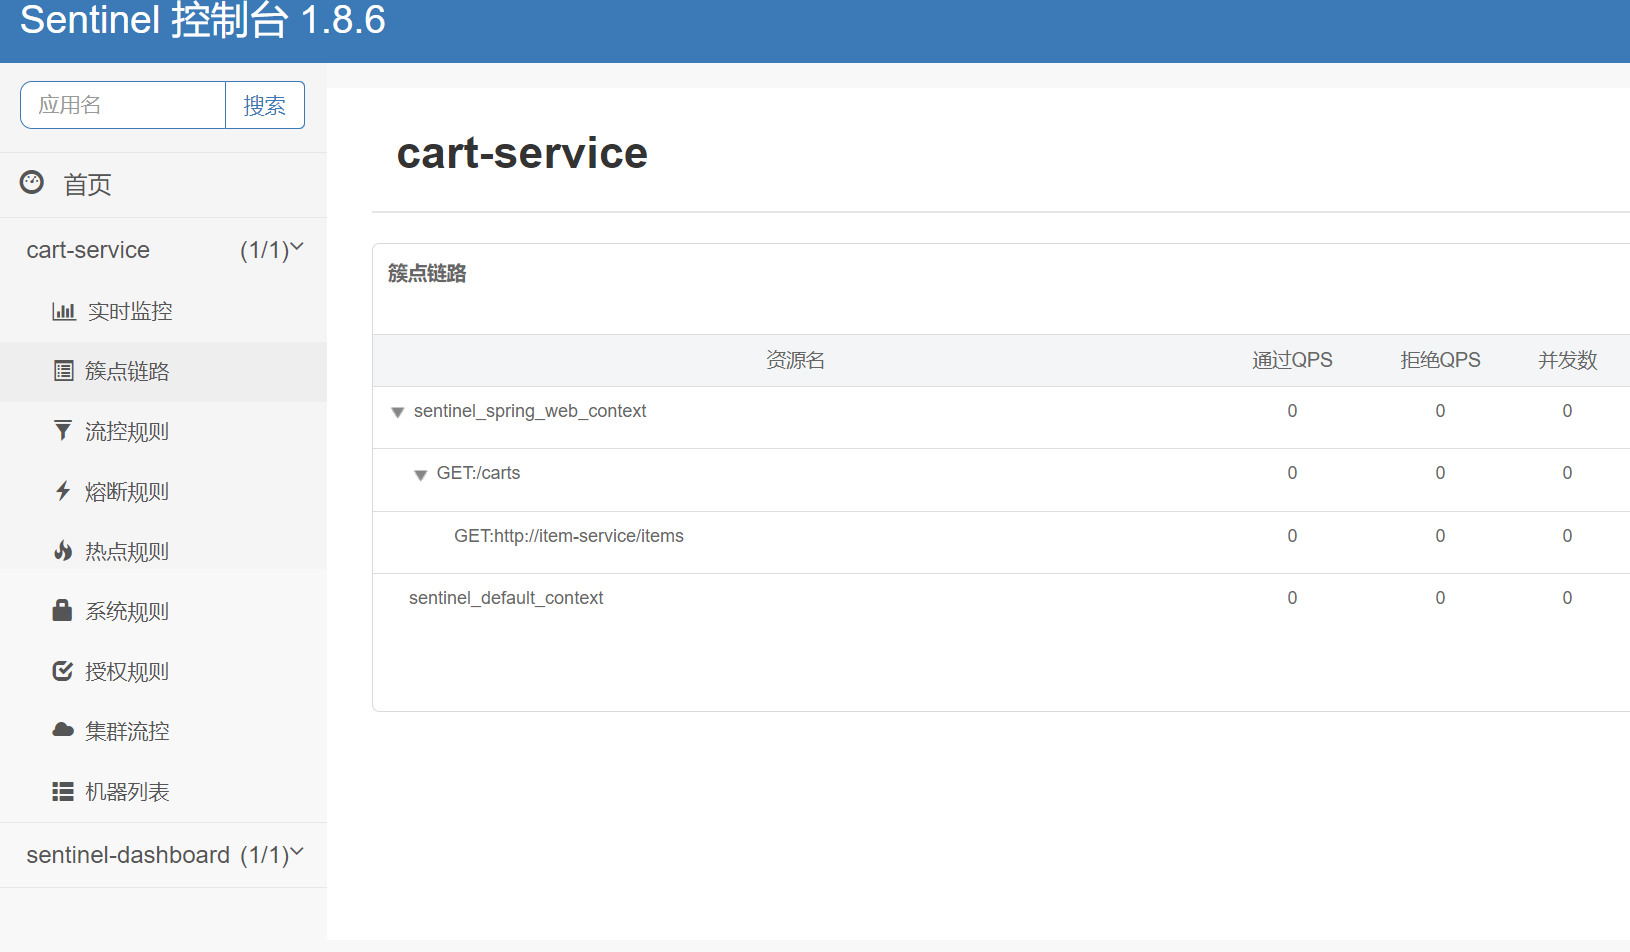
簇点链路
- 在这里,每个请求都是一个蔟点,每个请求进入服务后就被监控,

spring:
  cloud:
    sentinel:
      transport:
        dashboard: localhost:8090 # sentinel的控制台
http-method-specify: true # 是否 设置请求方式作为资源名称- 这样就能实现在sentinel中看到同请求不同请求名
请求限流

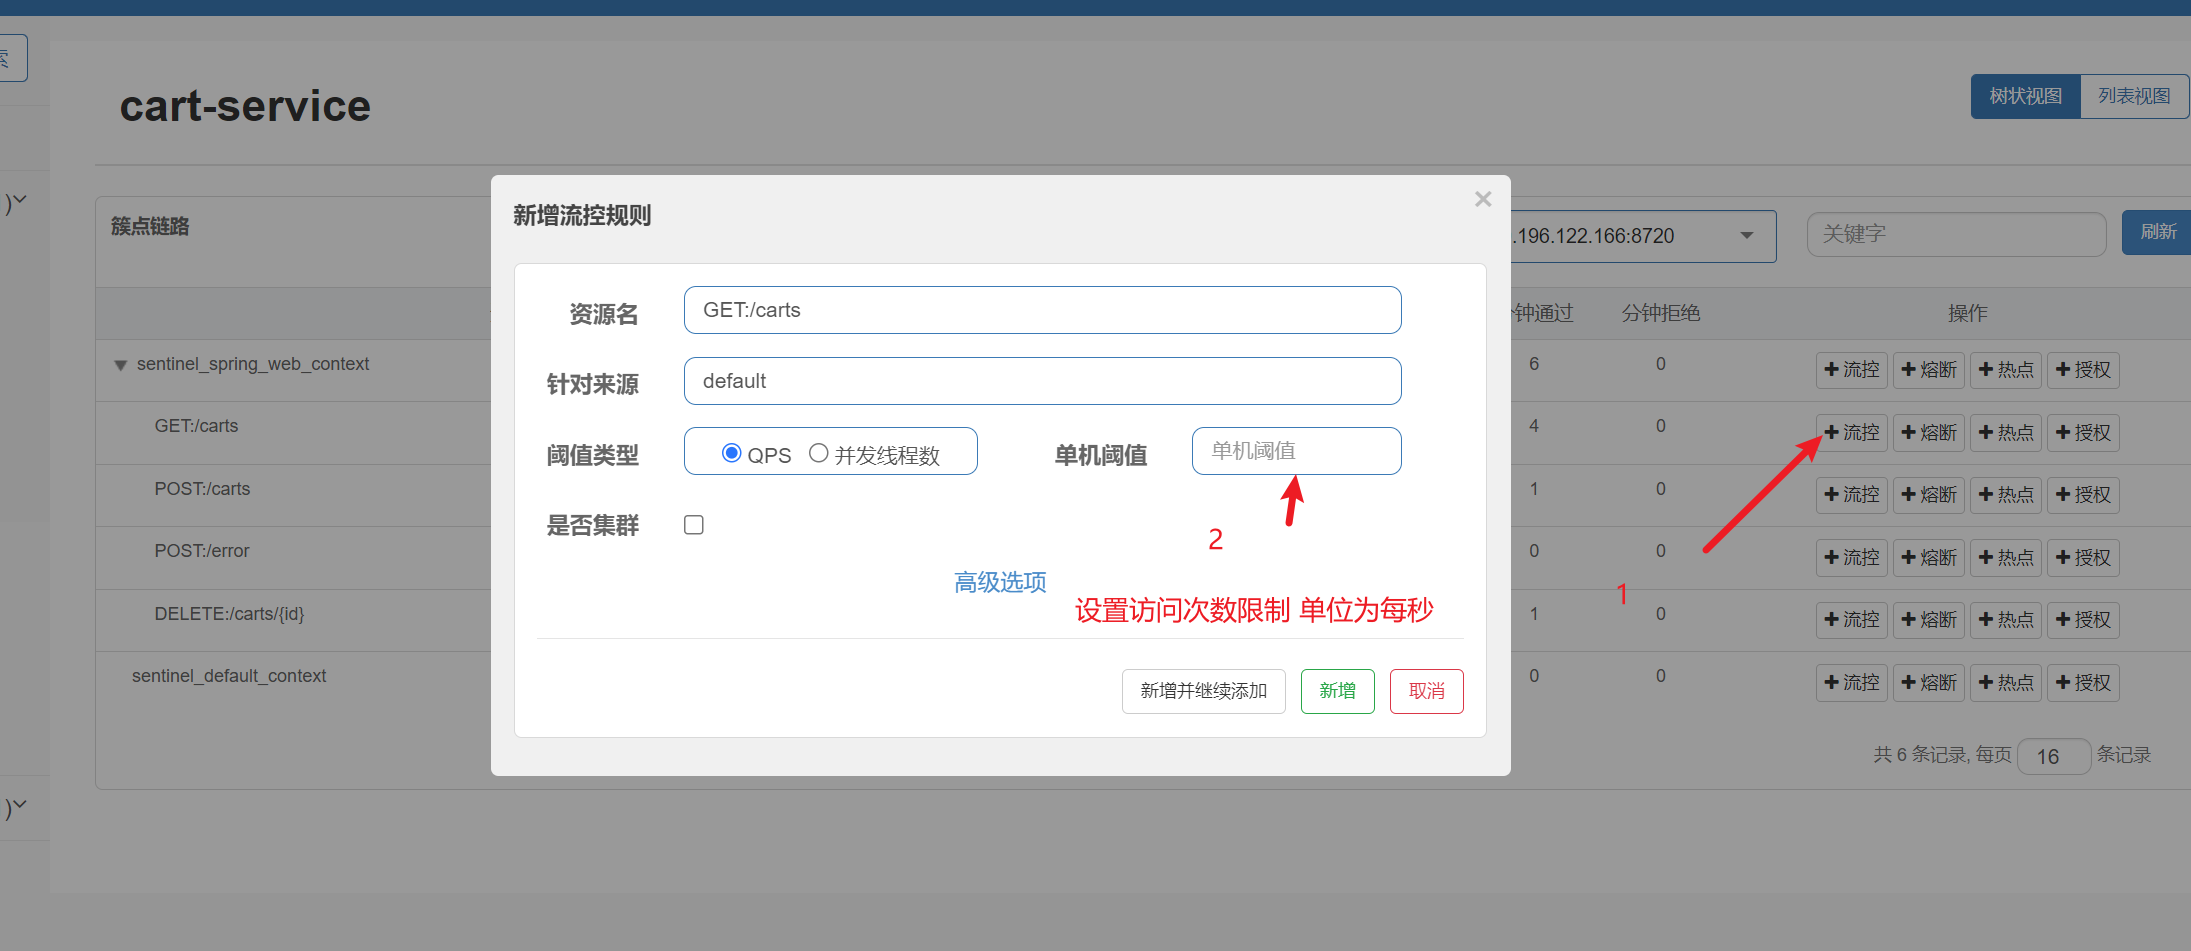
线程隔离
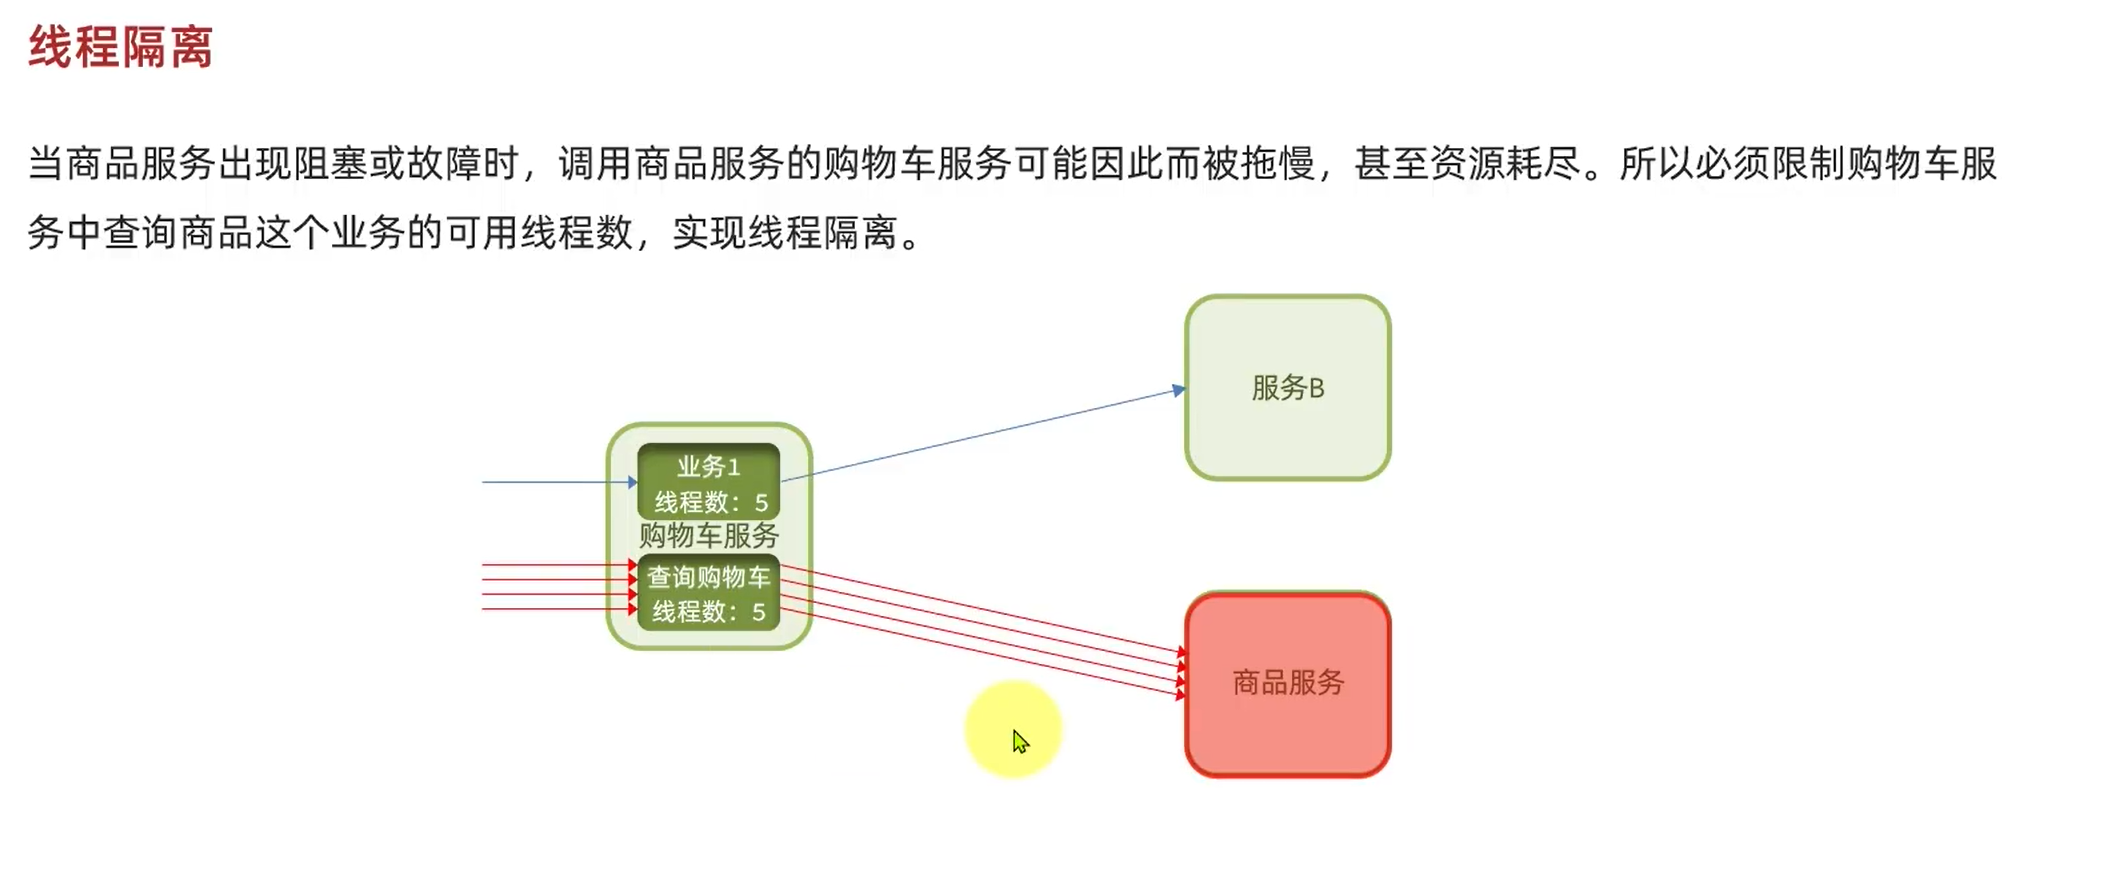
- 给每个业务限定线程数,这样当一个服务用完了属于自己的资源的时候,就无法去侵占别人的线程资源

Fallback
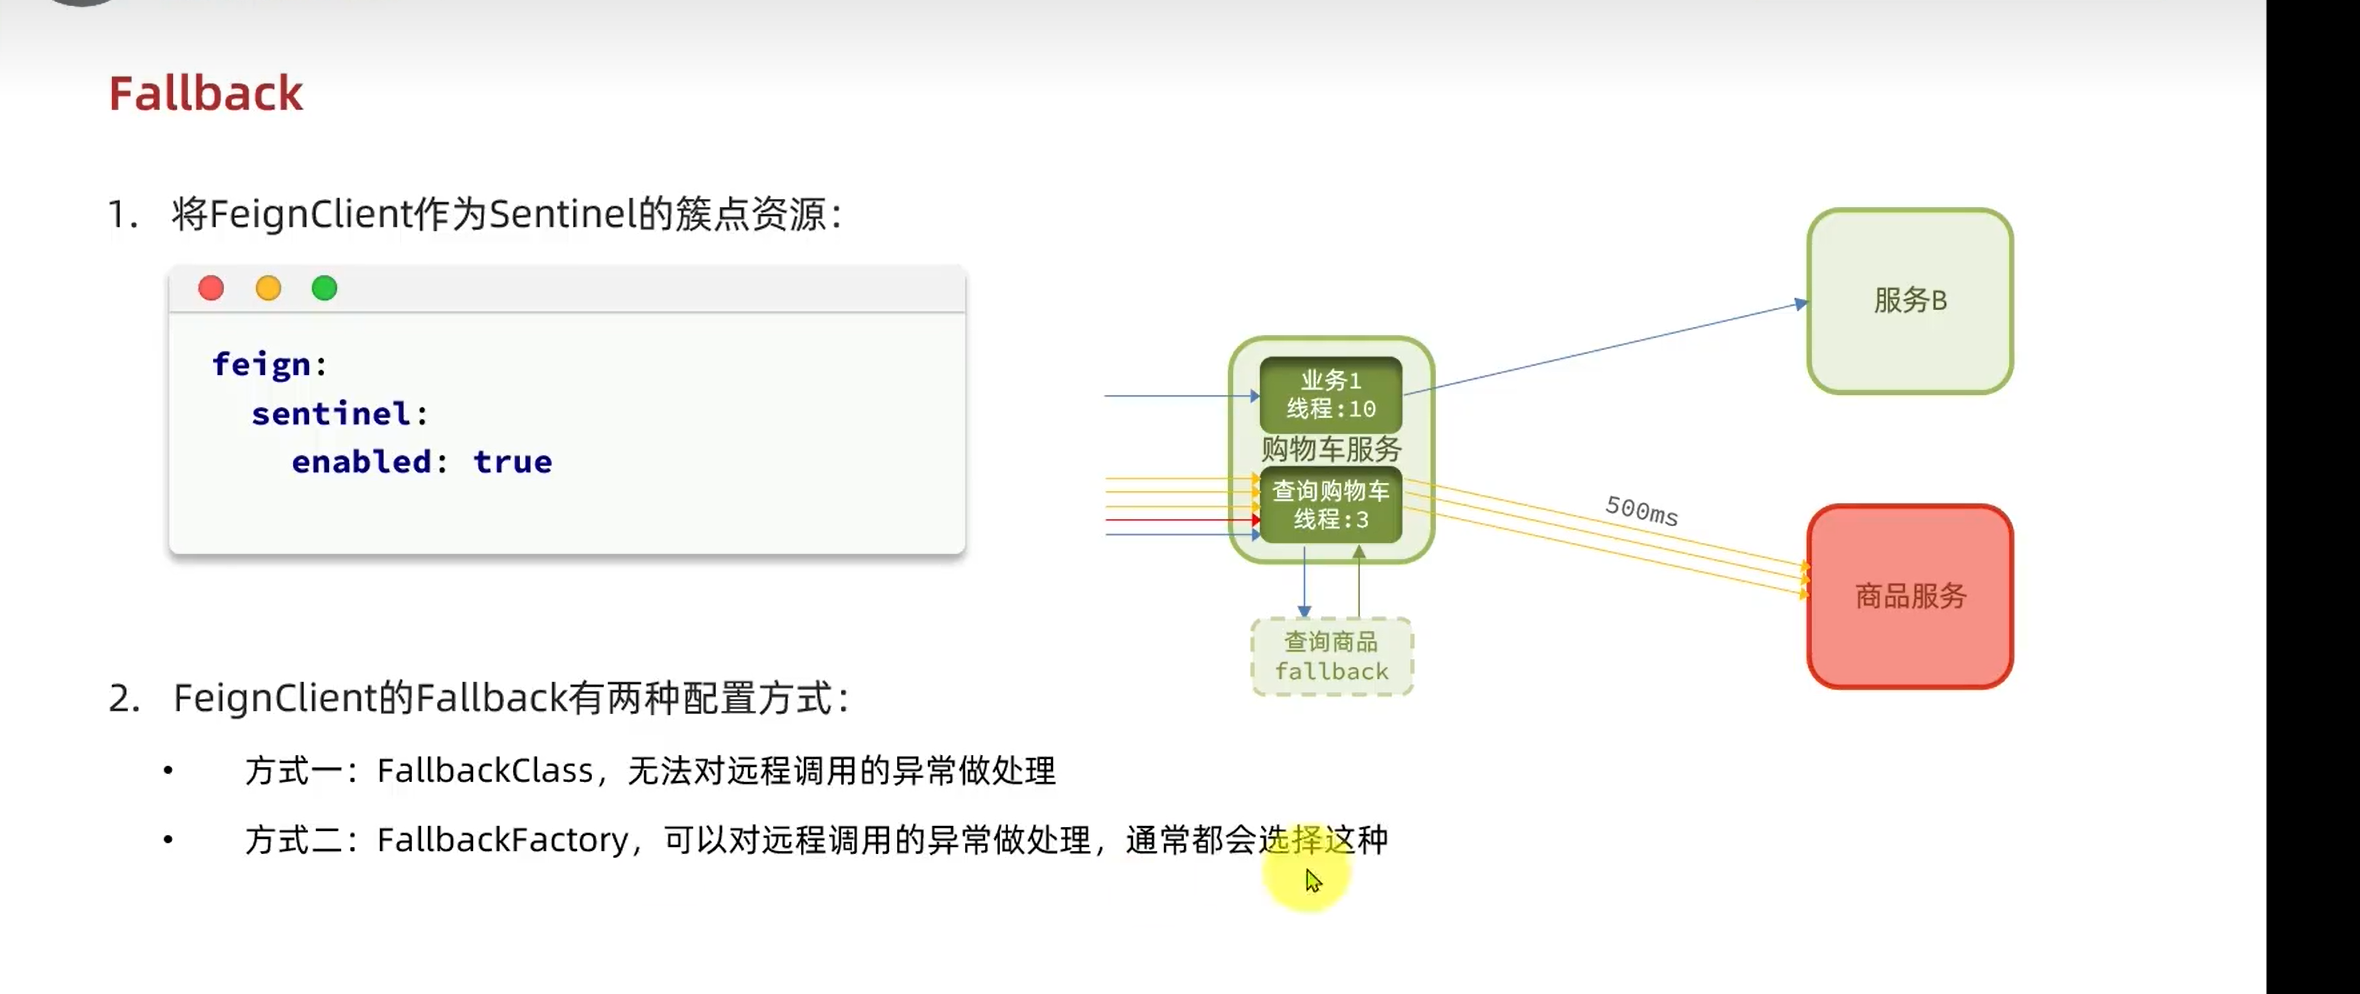
Fallback(回退机制)是一种应对服务故障的策略。当某个服务不可用或调用失败时,可以通过回退机制提供一个默认的响应或执行替代逻辑,以避免整个系统的崩溃并提升系统的容错能力。像异常,当请求失败了,不报错,给另外设定好的处理逻辑
使用Fallback
第一步:在依赖中添加相关支持
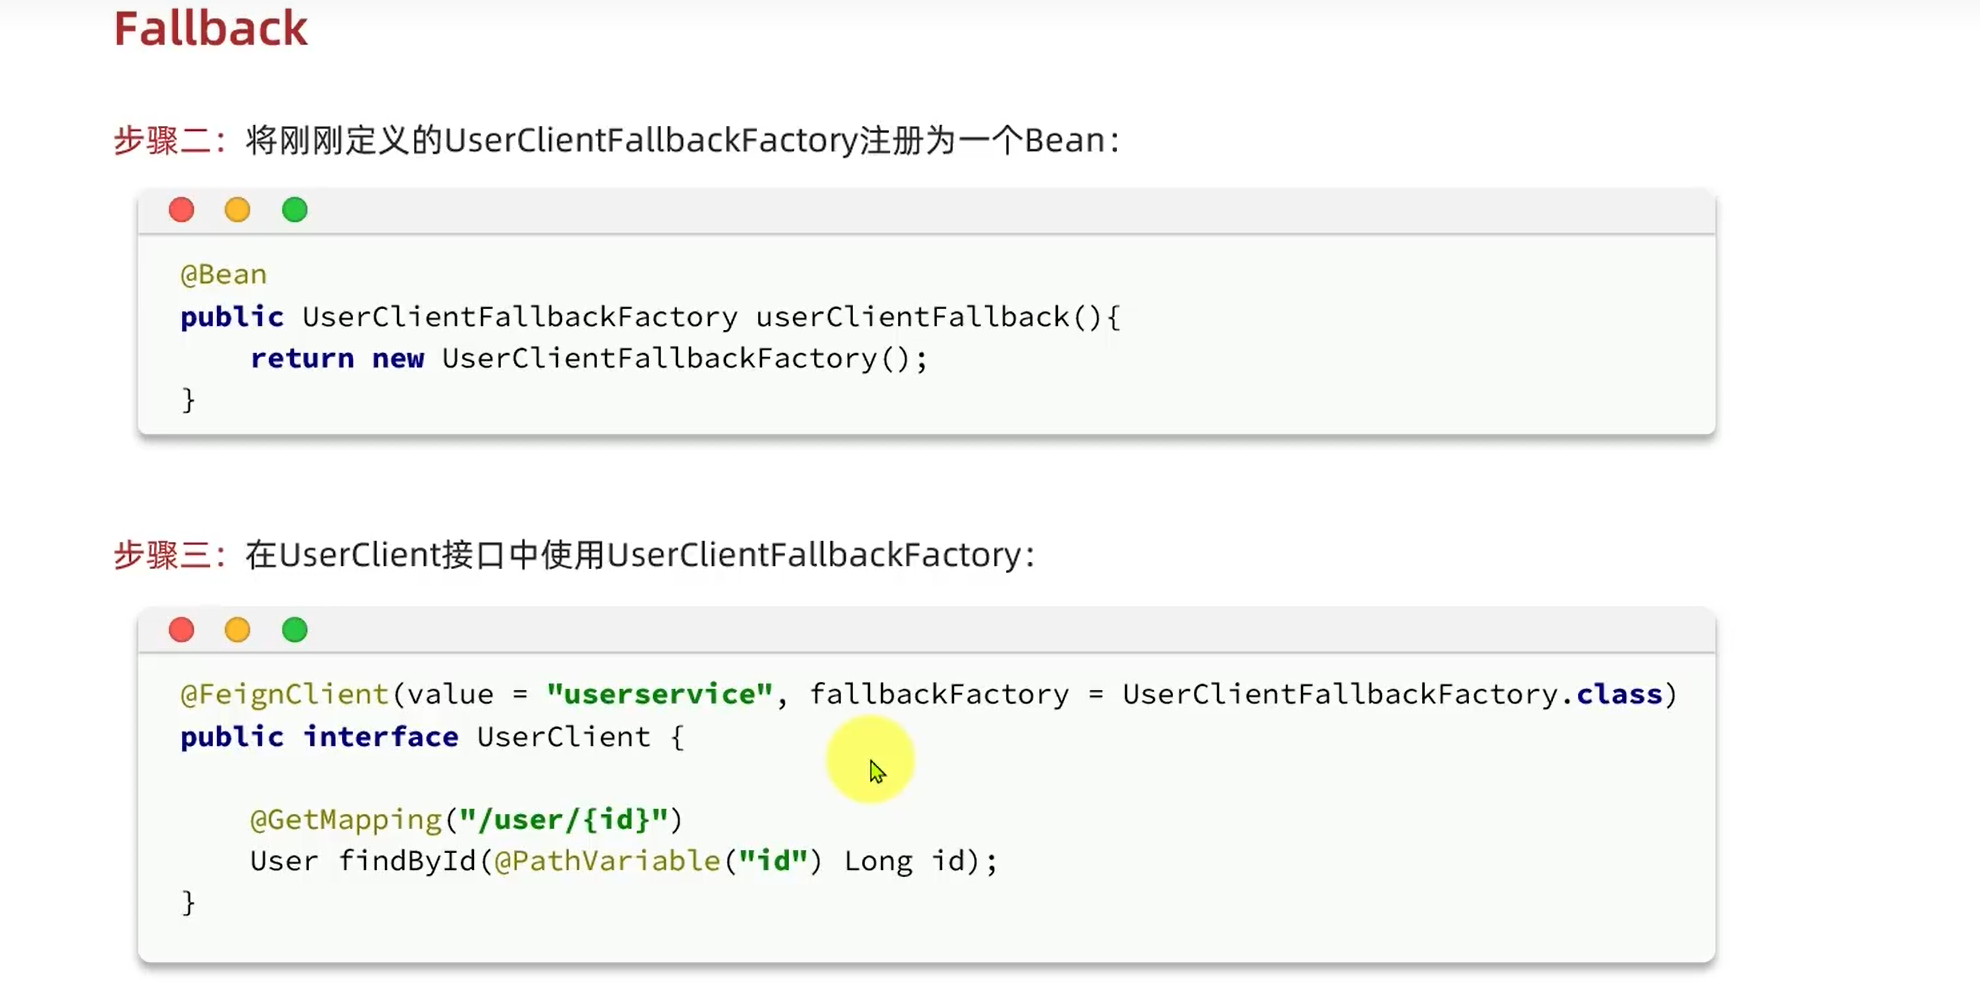
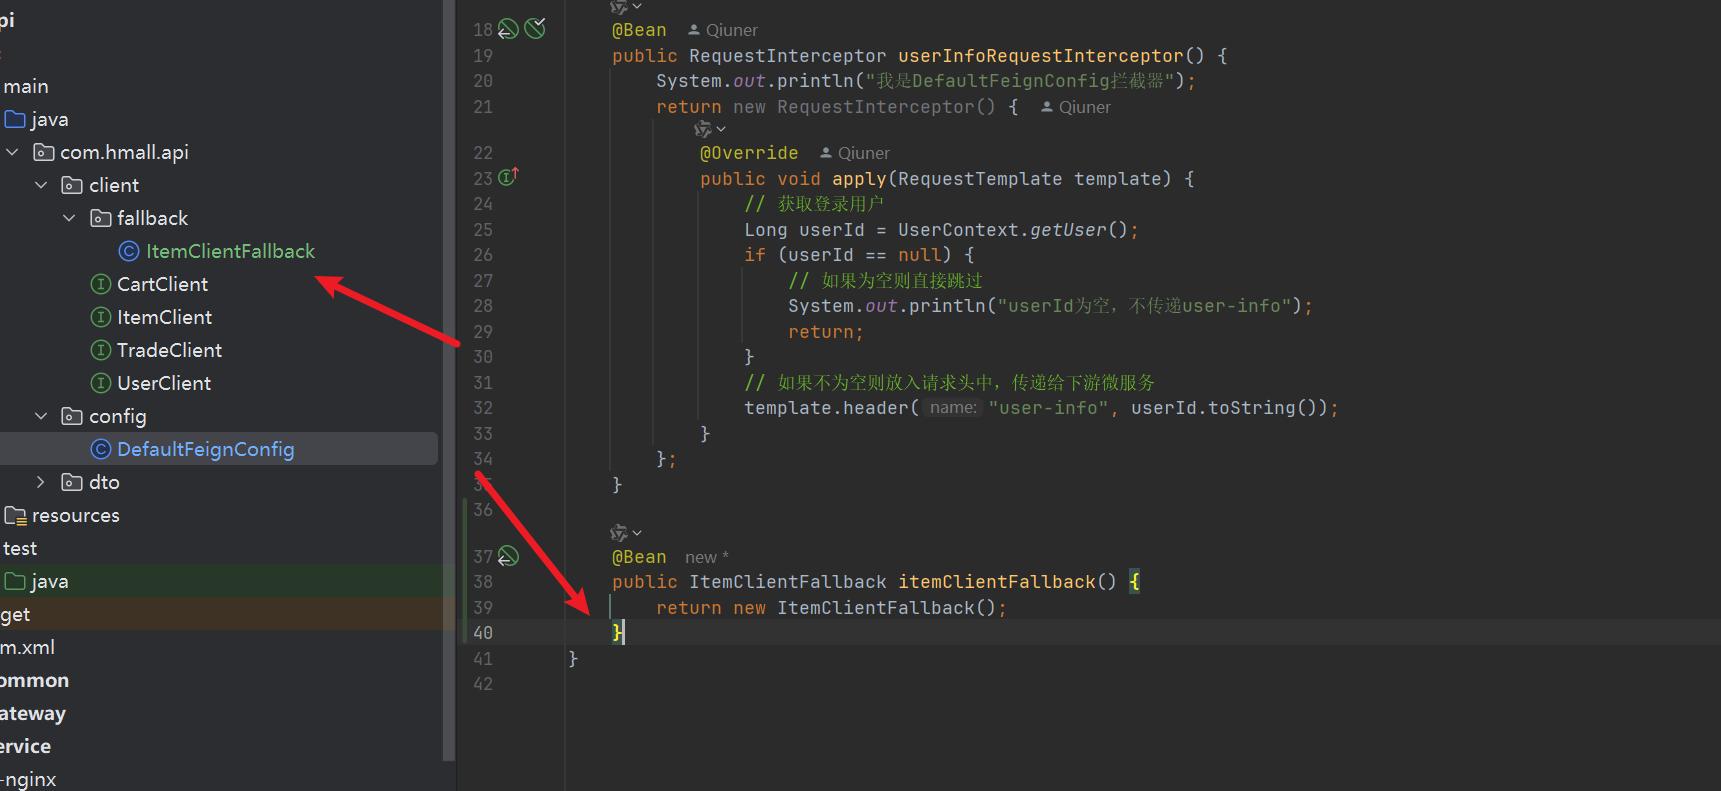
第二步:创建Fallback类
第三步:声明一个bean
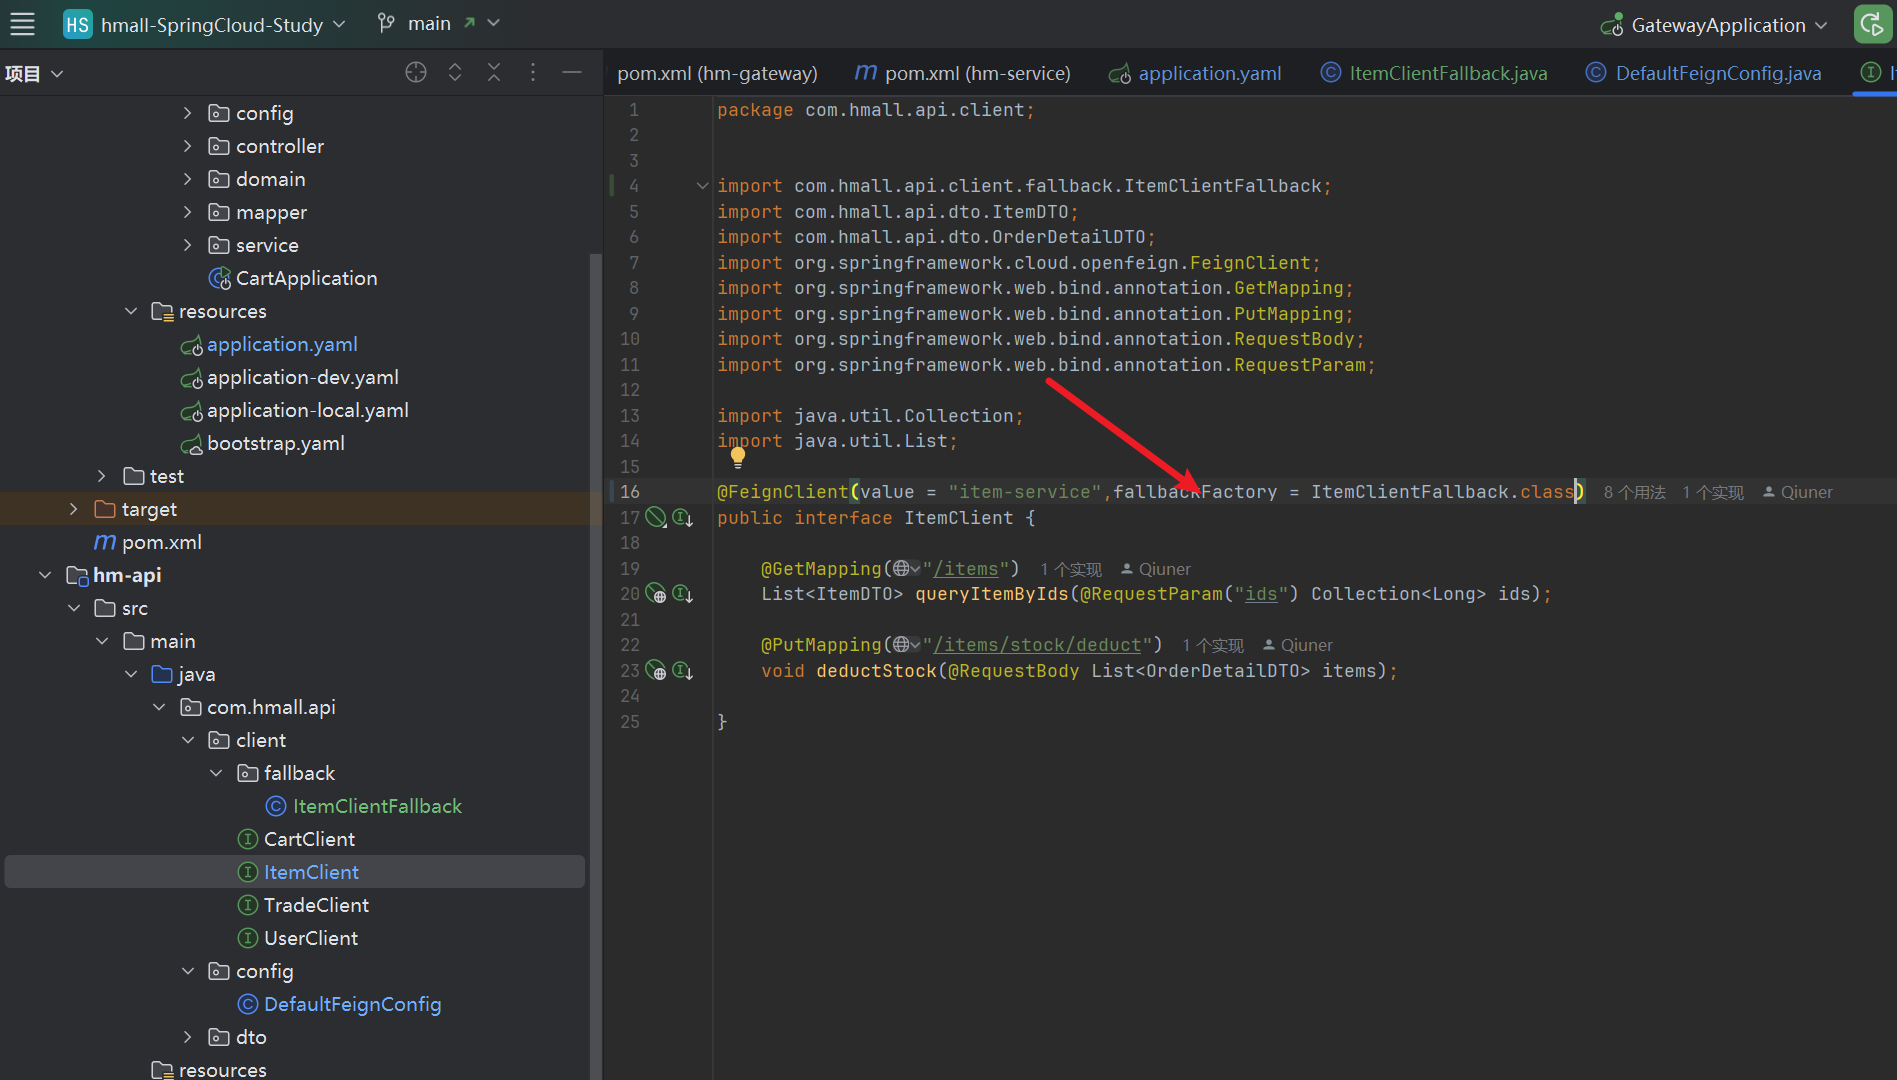
第四步:应用在客户端
服务熔断
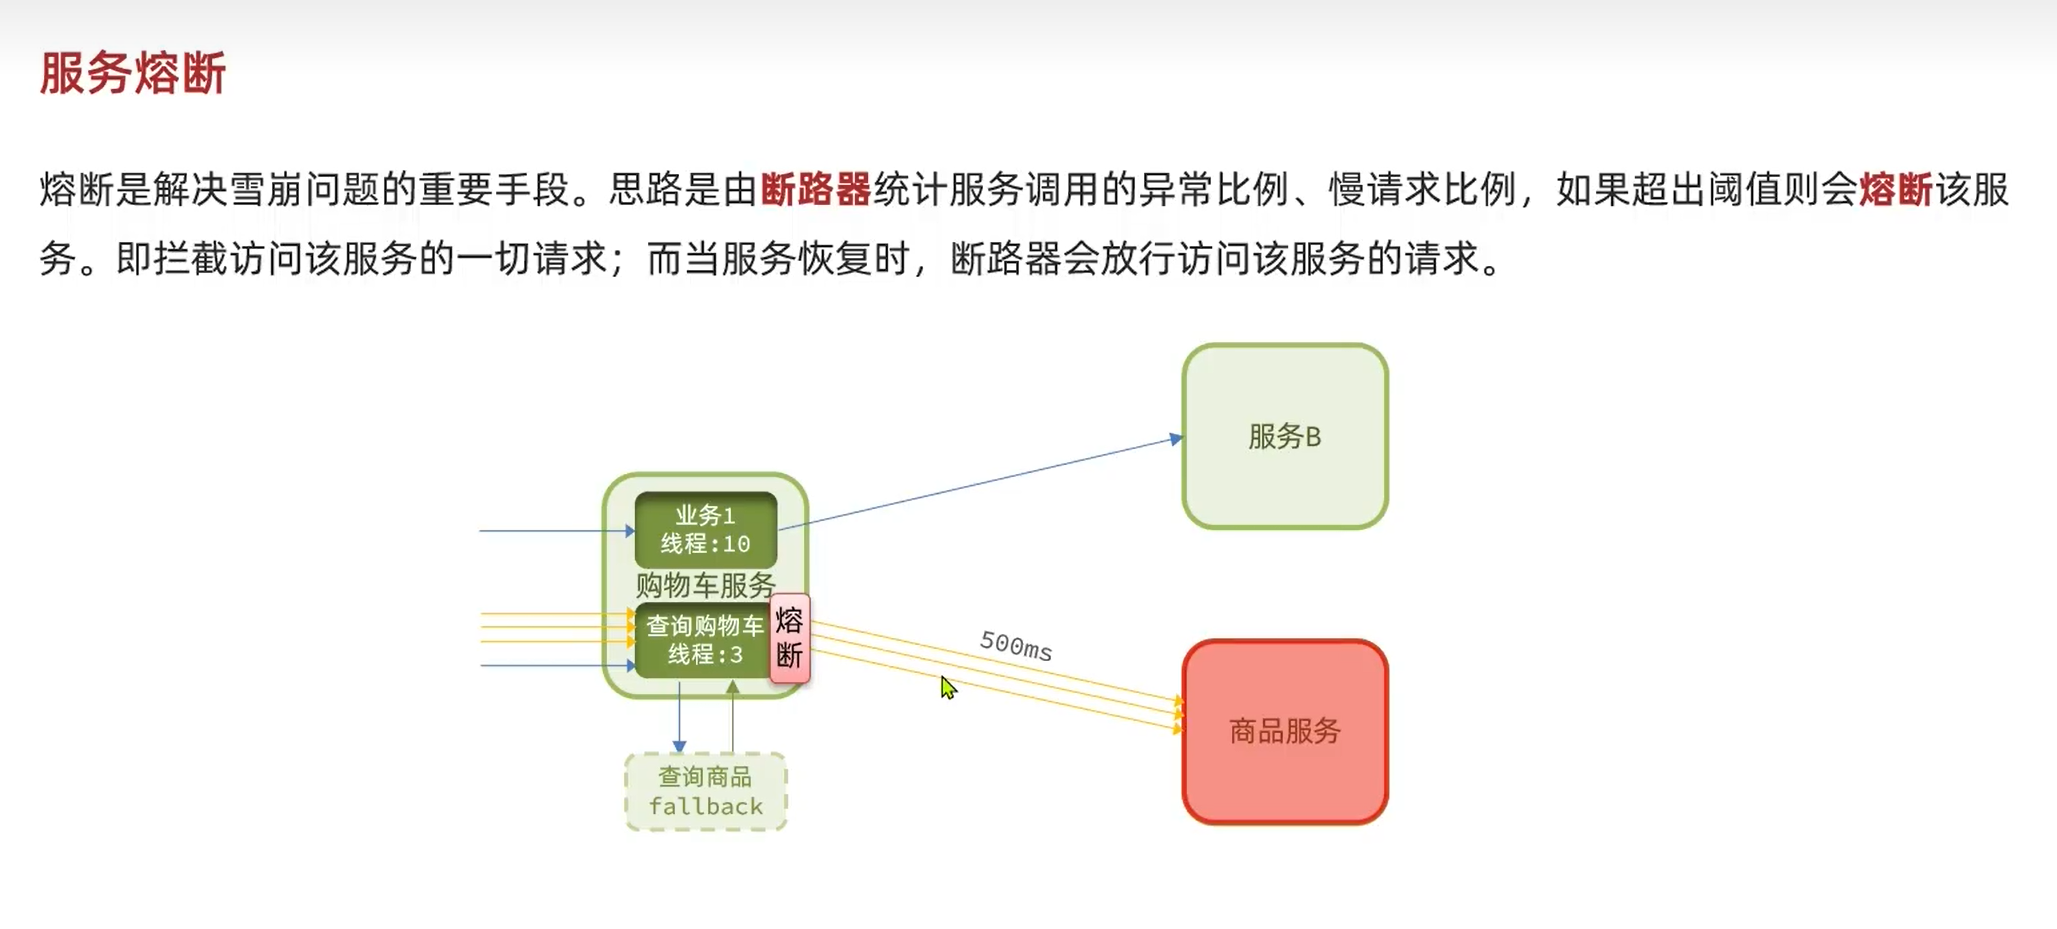
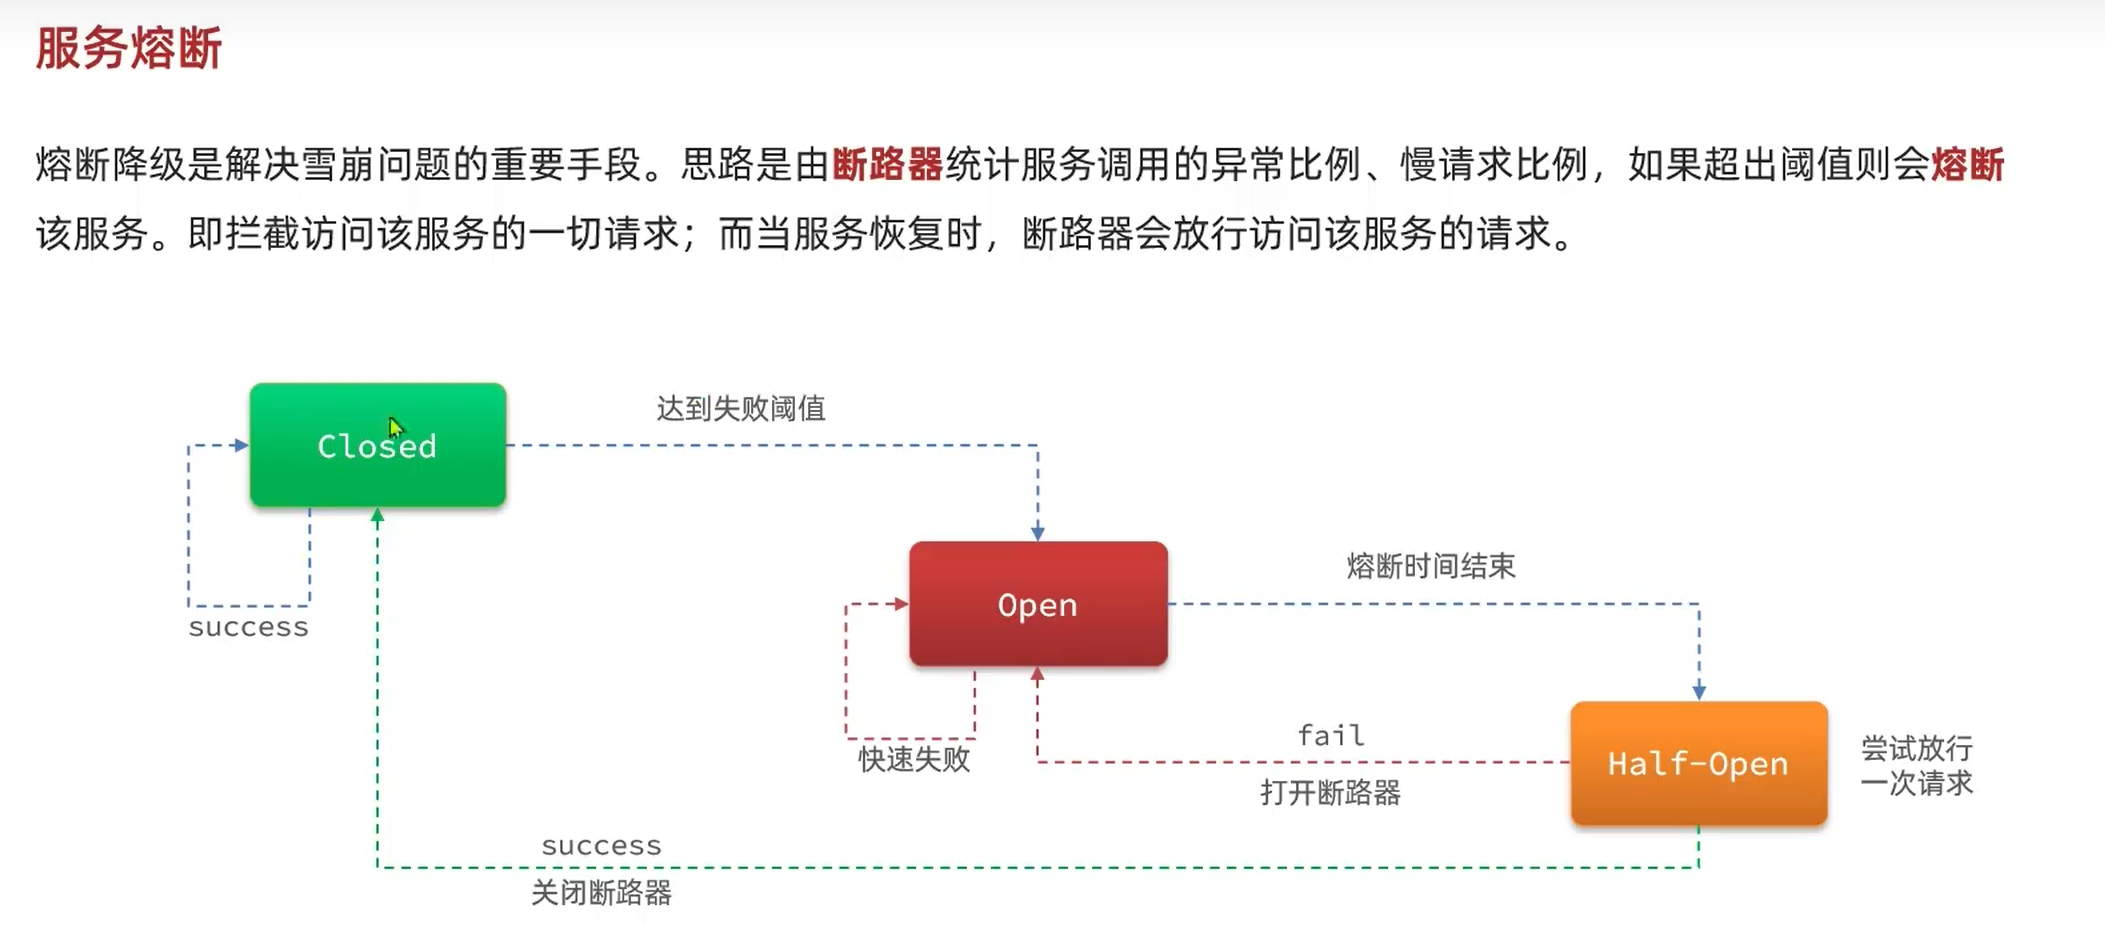
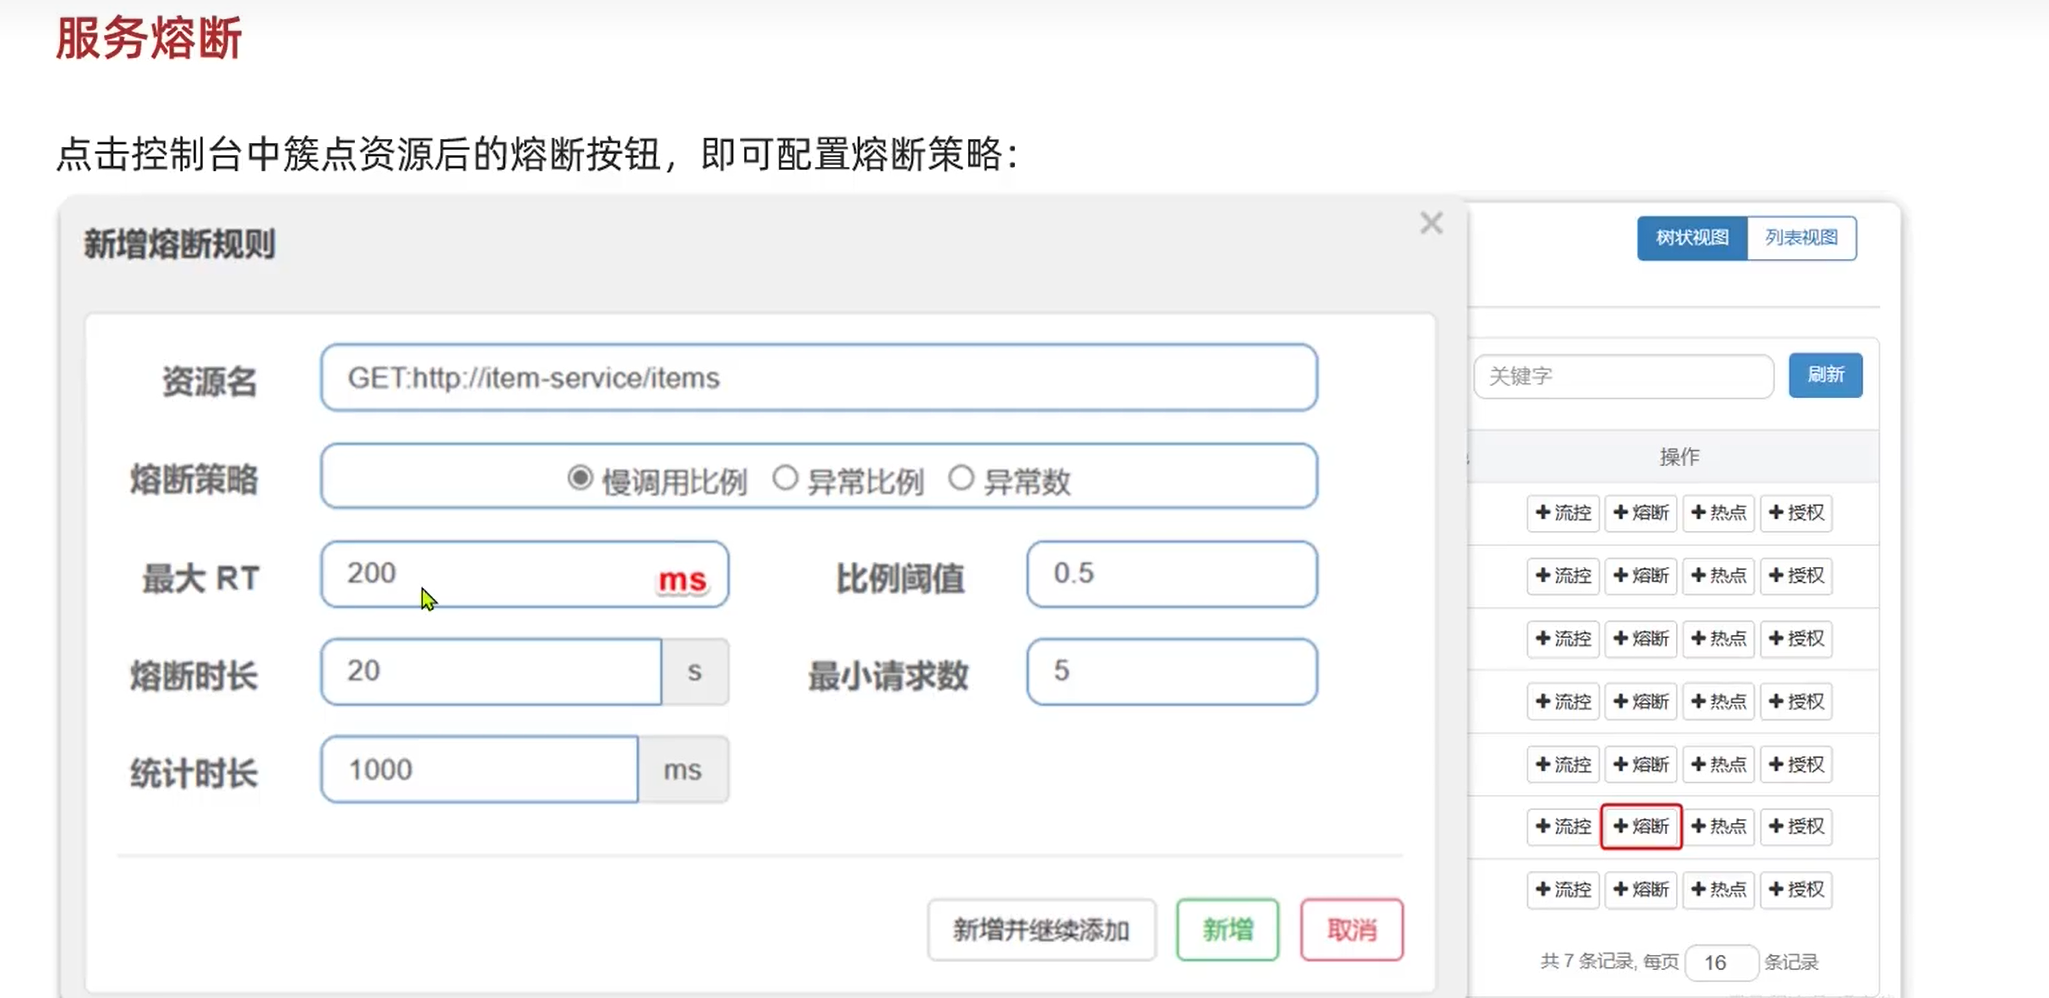
- 这里熔断策略什么的官方文档介绍的很详细了,所以就不写了
分布式事务面对的问题
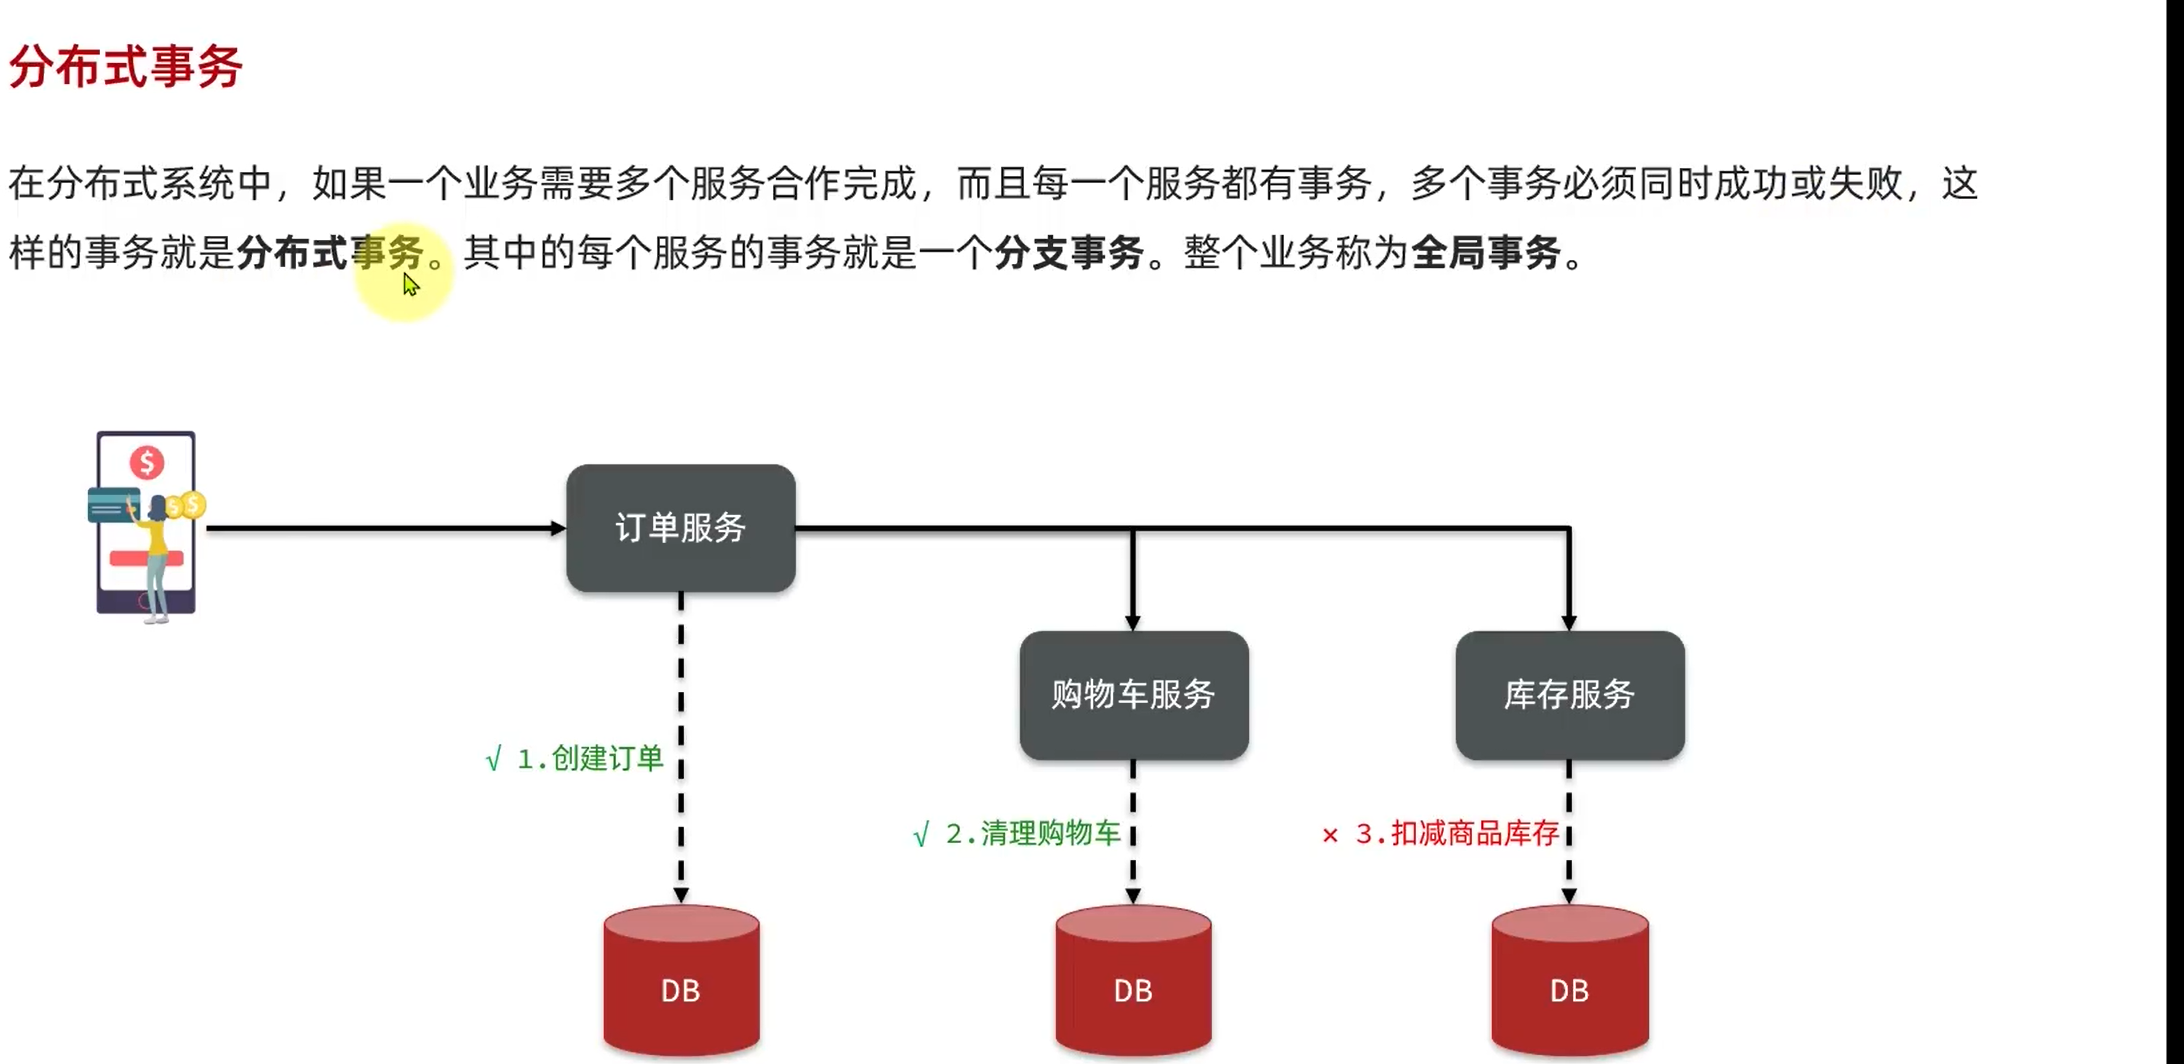
- 订单服务在库存服务失败后能够感知到,因此可以进行事务回滚,但是购物车服务做不到。因为它是被调用的
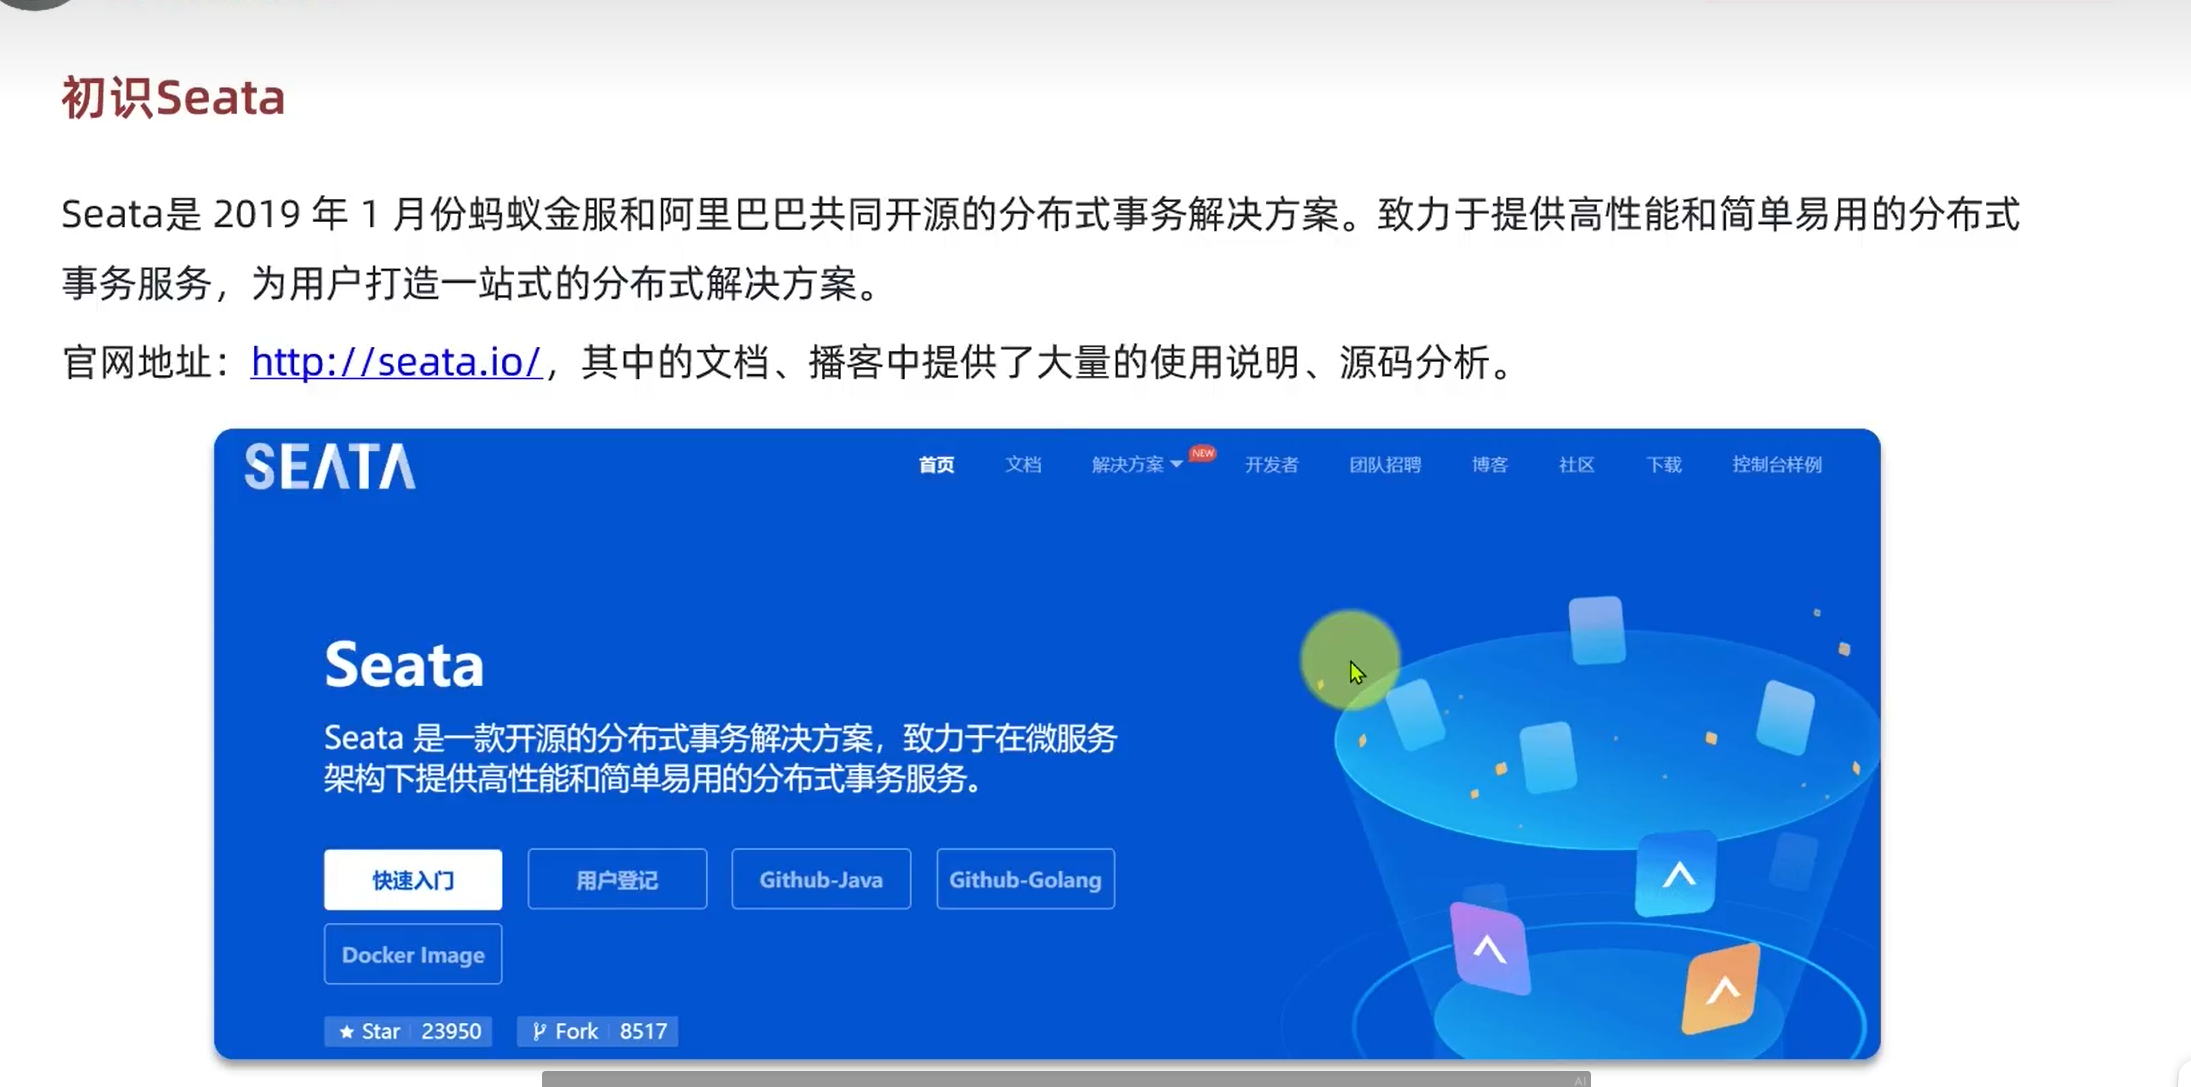
Seata
Seata的三种角色
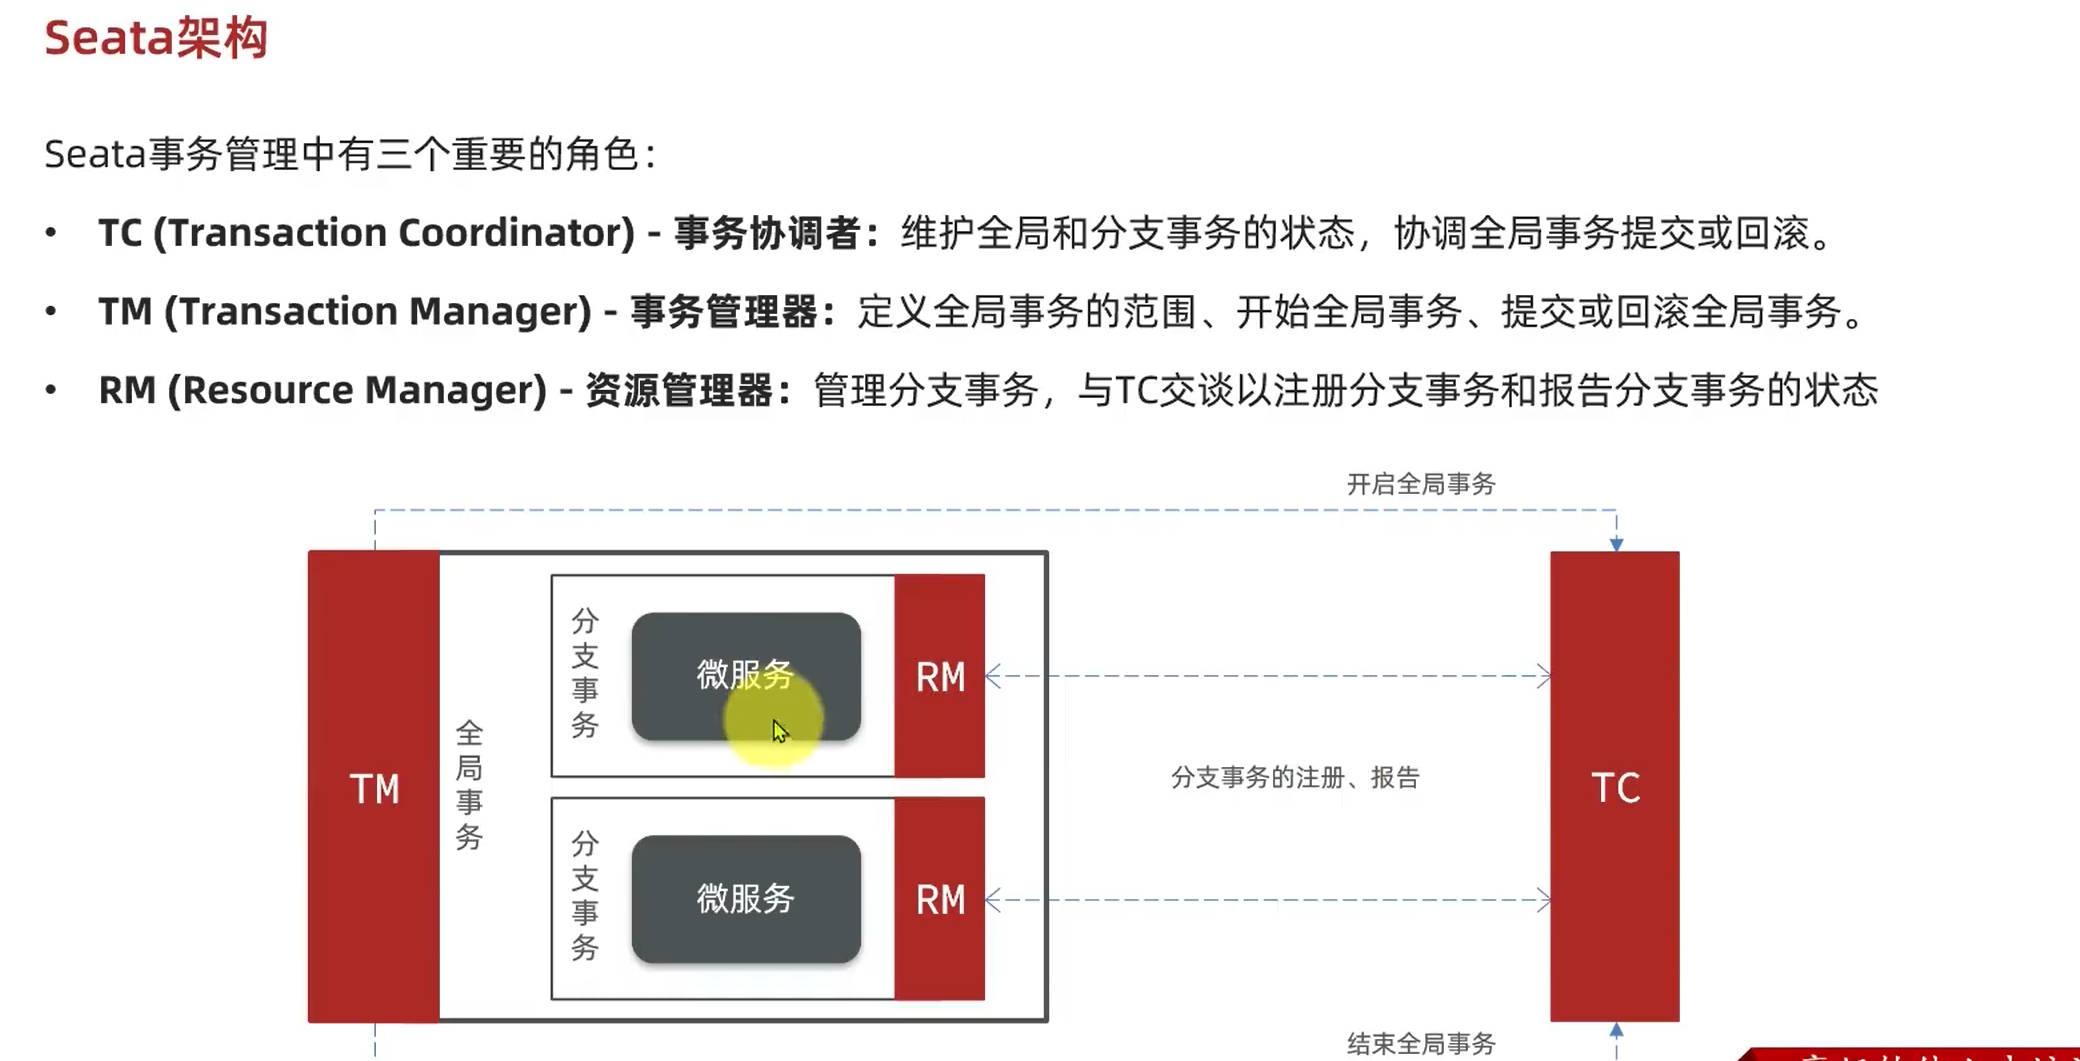
- tc是一个总经理,它不管具体服务内容的实现,也不用去落实谁今天上班了,谁今天没上班,底下的人会告诉它。tc要做的就是发现事务失败了,那就进行全部回滚
- tm是一个小组组长,它知道小组的总体情况,知道小组成员什么时候开始上班,什么时候下班,然后告诉tc
- rm是组员,组员只要告诉tc自己做没做成功,是的,不是向tm报告做没做成功
seata部署
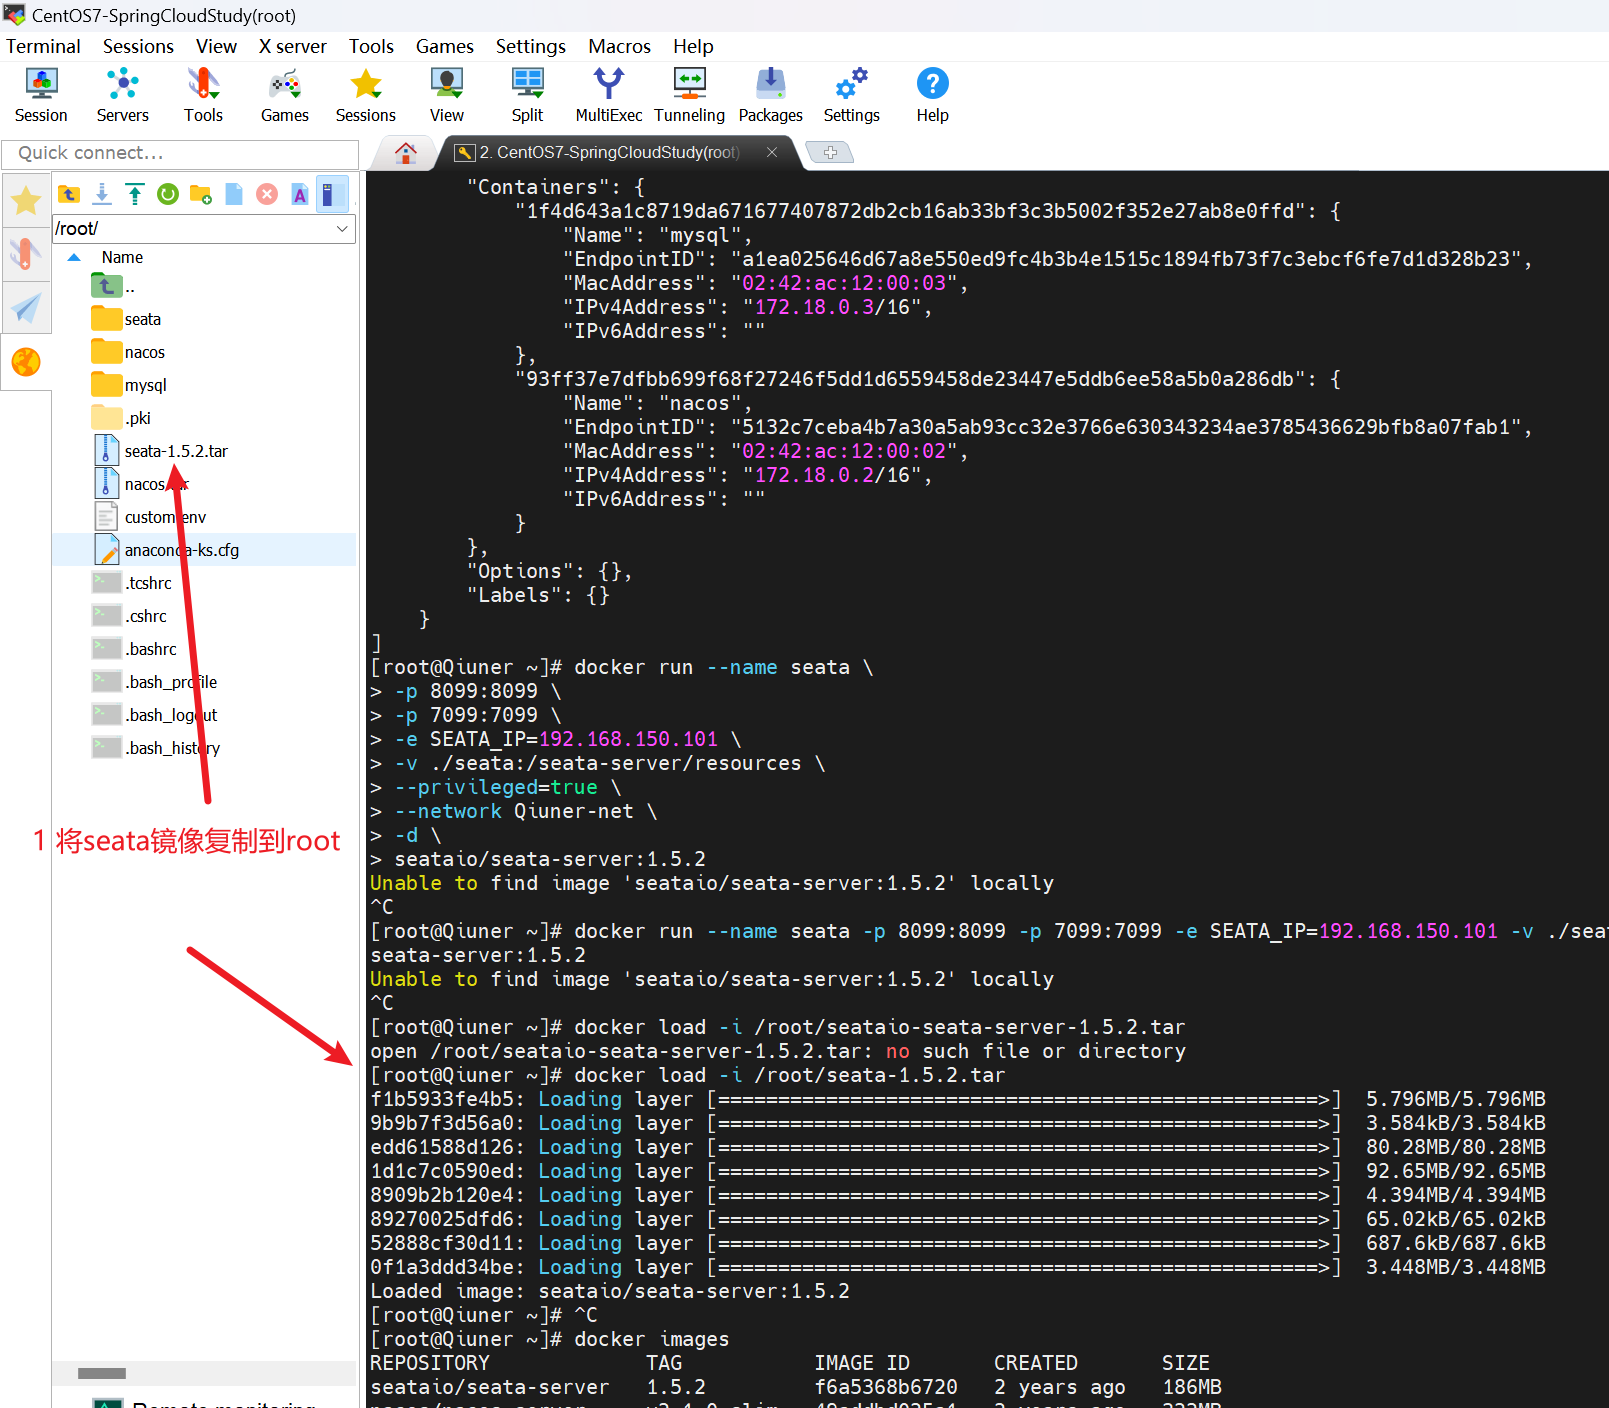
docker load -i /root/seata-1.5.2.tar-
然后
docker run --name seata
-p 8099:8099
-p 7099:7099
-e SEATA_IP=192.168.200.128
-v /root/seata:/seata-server/resources
--privileged=true
--network Qiuner-net
-d
seataio/seata-server:1.5.2 -
注意变更网络
seata依赖下载很慢的问题
org.springframework.beans.factory.BeanCreationException: Error creating bean with name 'globalTransactionScanner' defined in class path resource [
- 这个报错,查看自己配置的

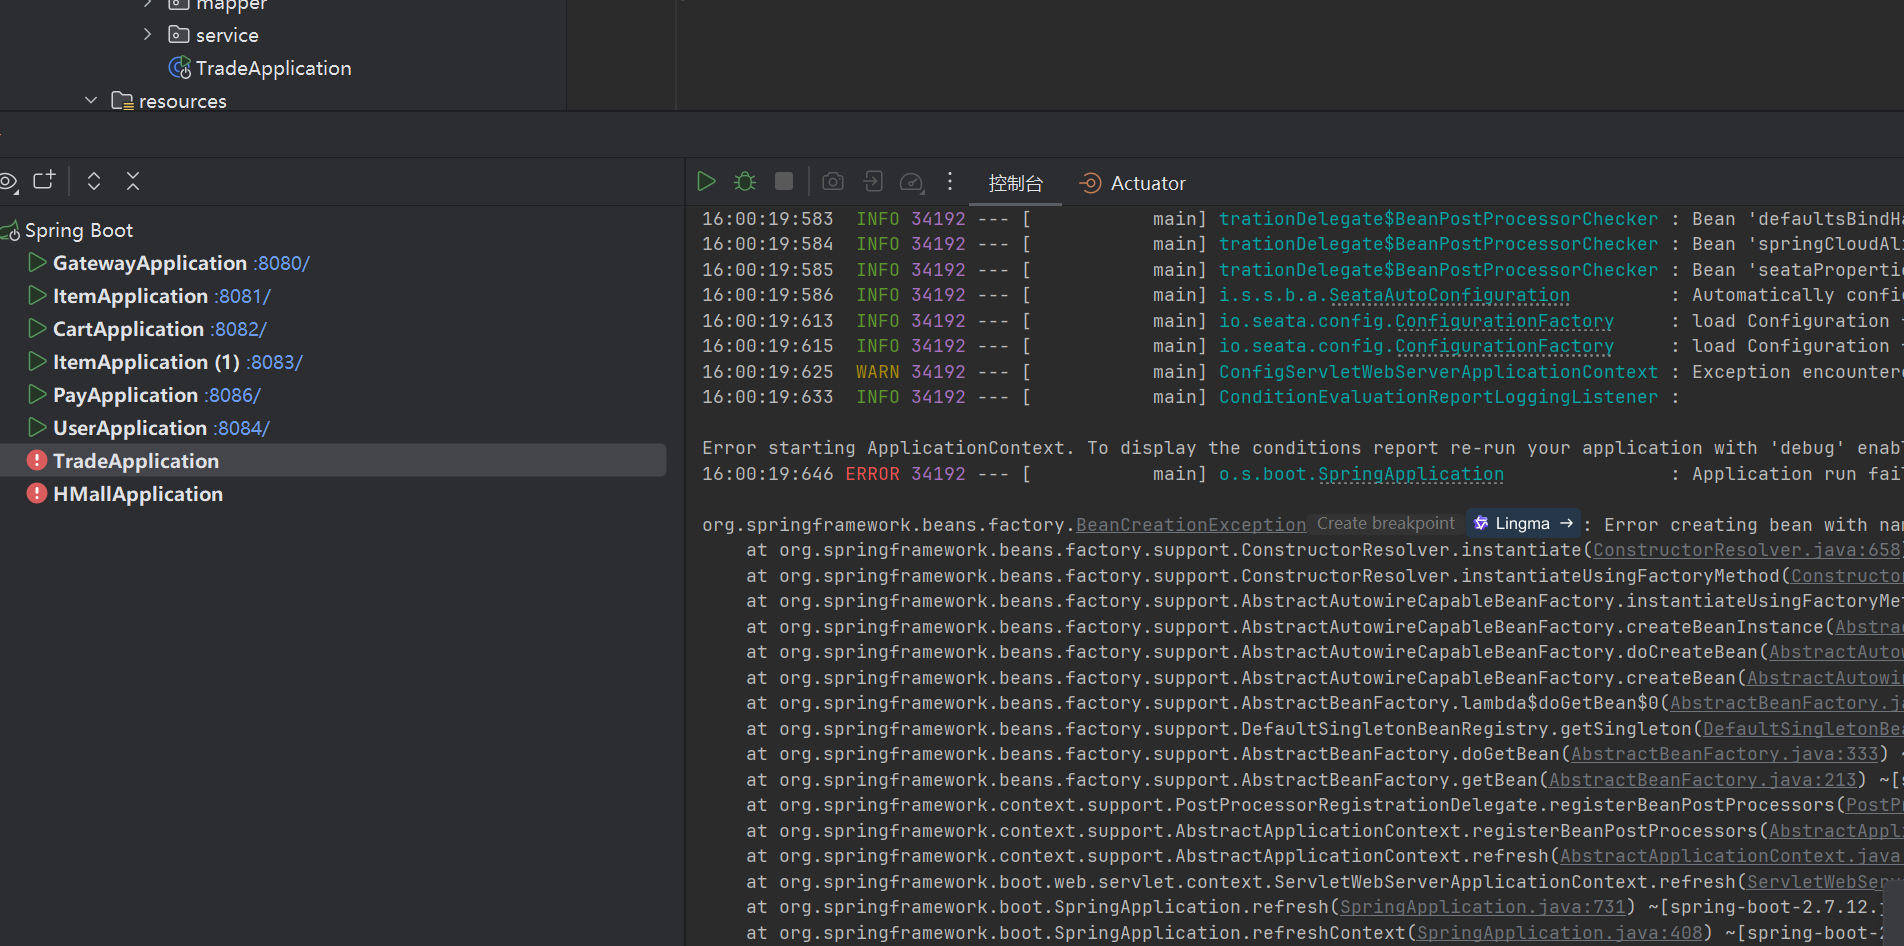
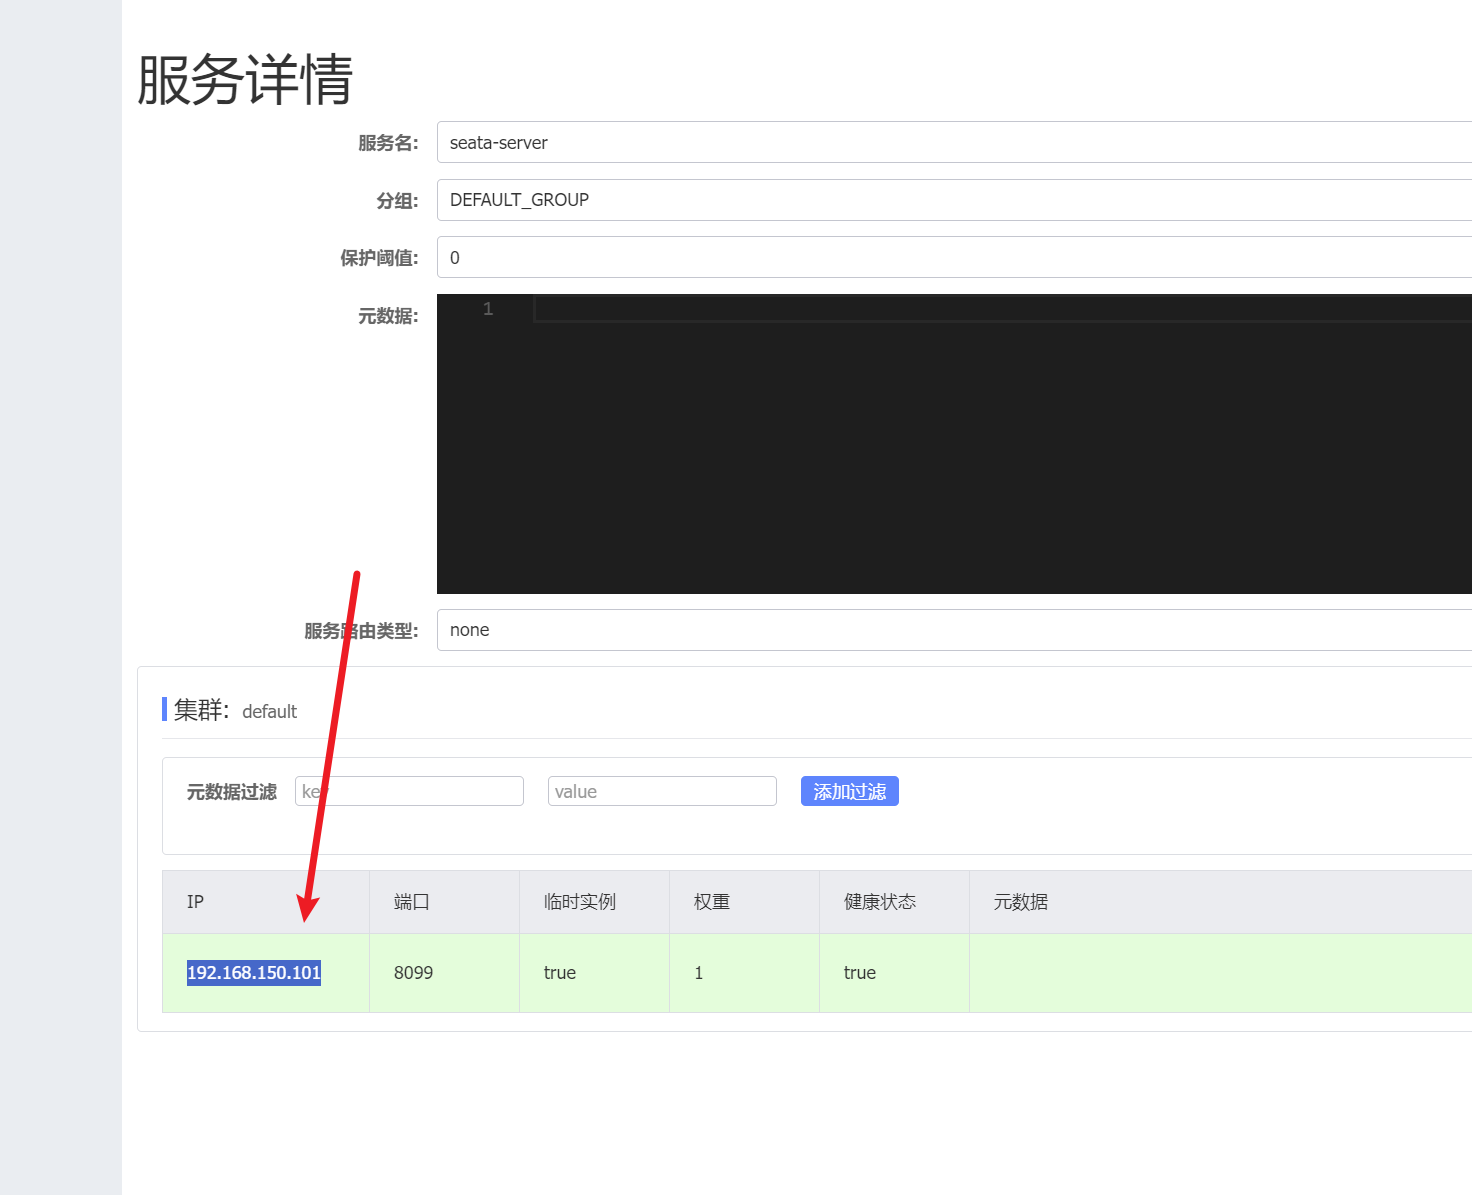
报错 io.seata.common.exception.FrameworkException: can not register RM,err:can not connect to services-server.
- 你的seata地址错了
Shell
docker run --name seata \
-p 8099:8099 \
-p 7099:7099 \
-e SEATA_IP=192.168.150.101 \
-v /root/seata:/seata-server/resources \
--privileged=true \
--network Qiuner-net \
-d \
seataio/seata-server:1.5.2- 你在创建seata的时候,这里的ip地址写错了,直接照抄了
网络链接
docker network connect Qiuner-net seata- 直接都加一遍就好了,加过了不会再加,不用担心
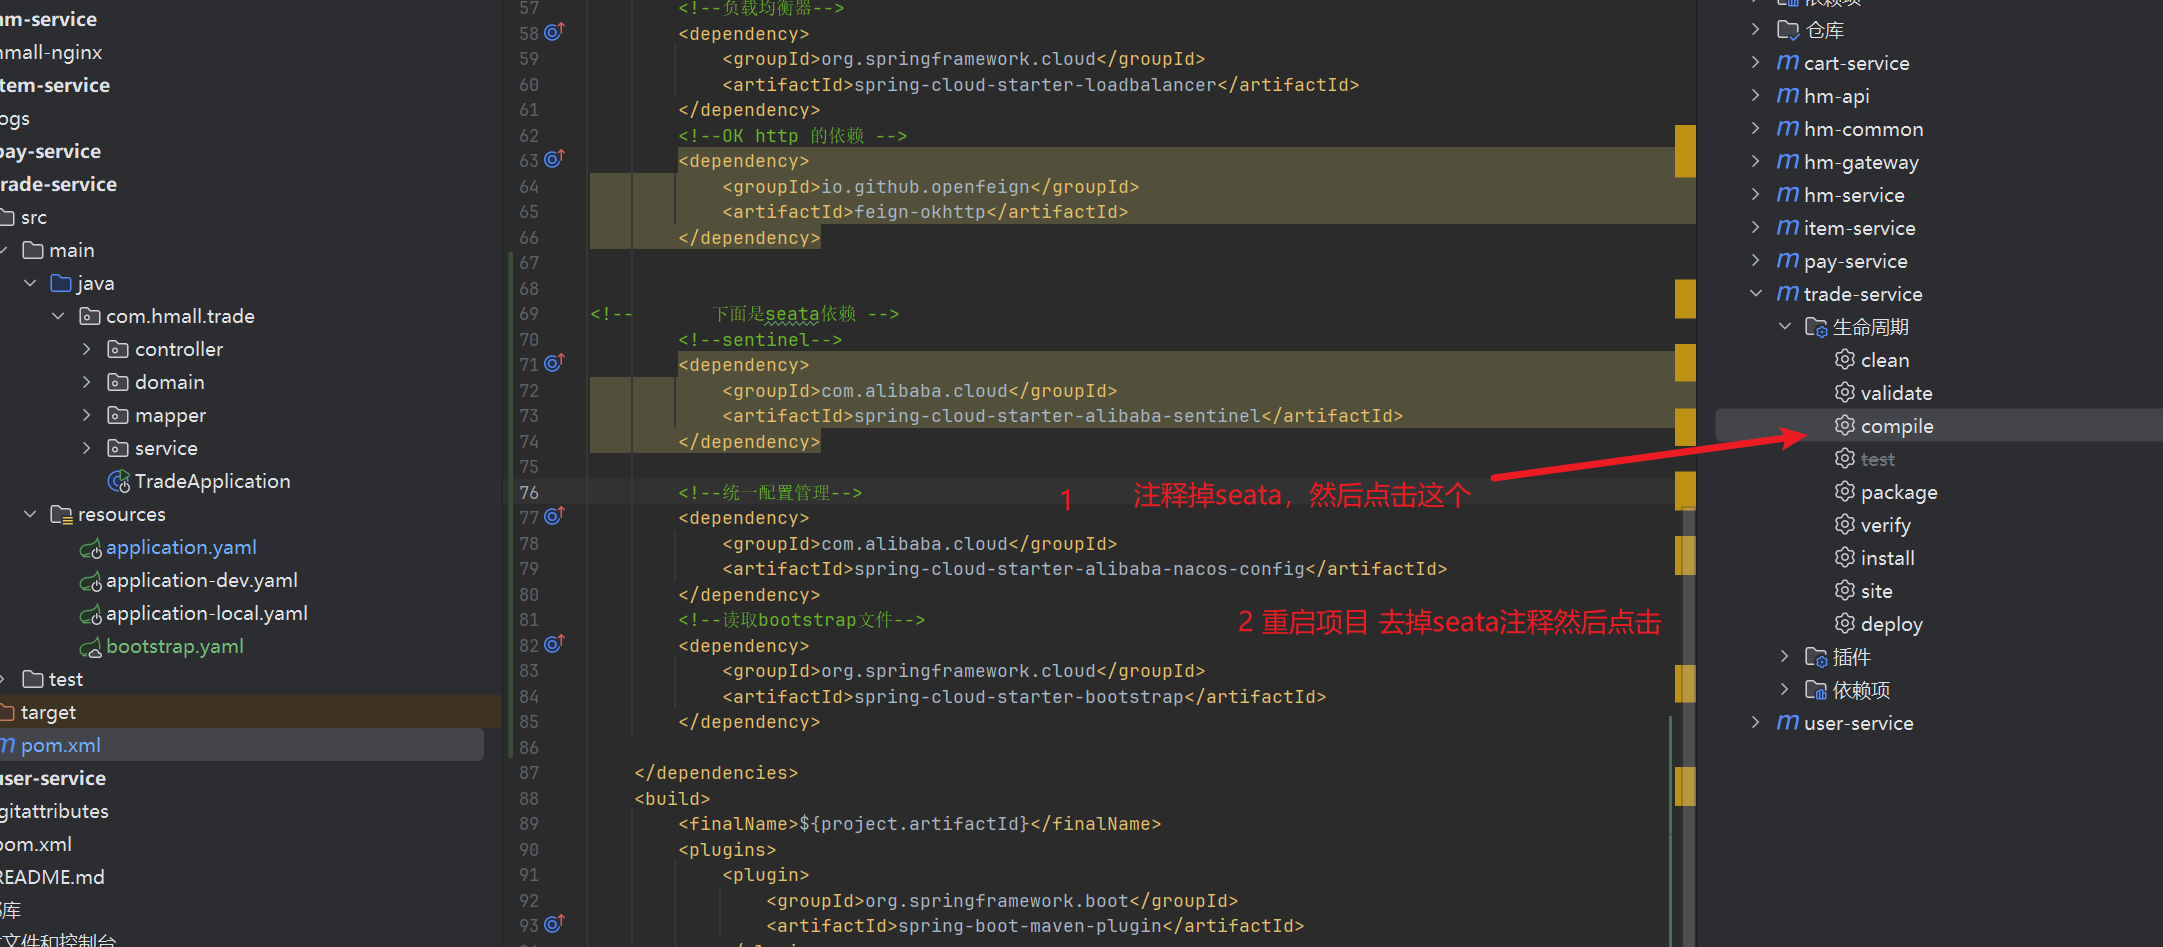
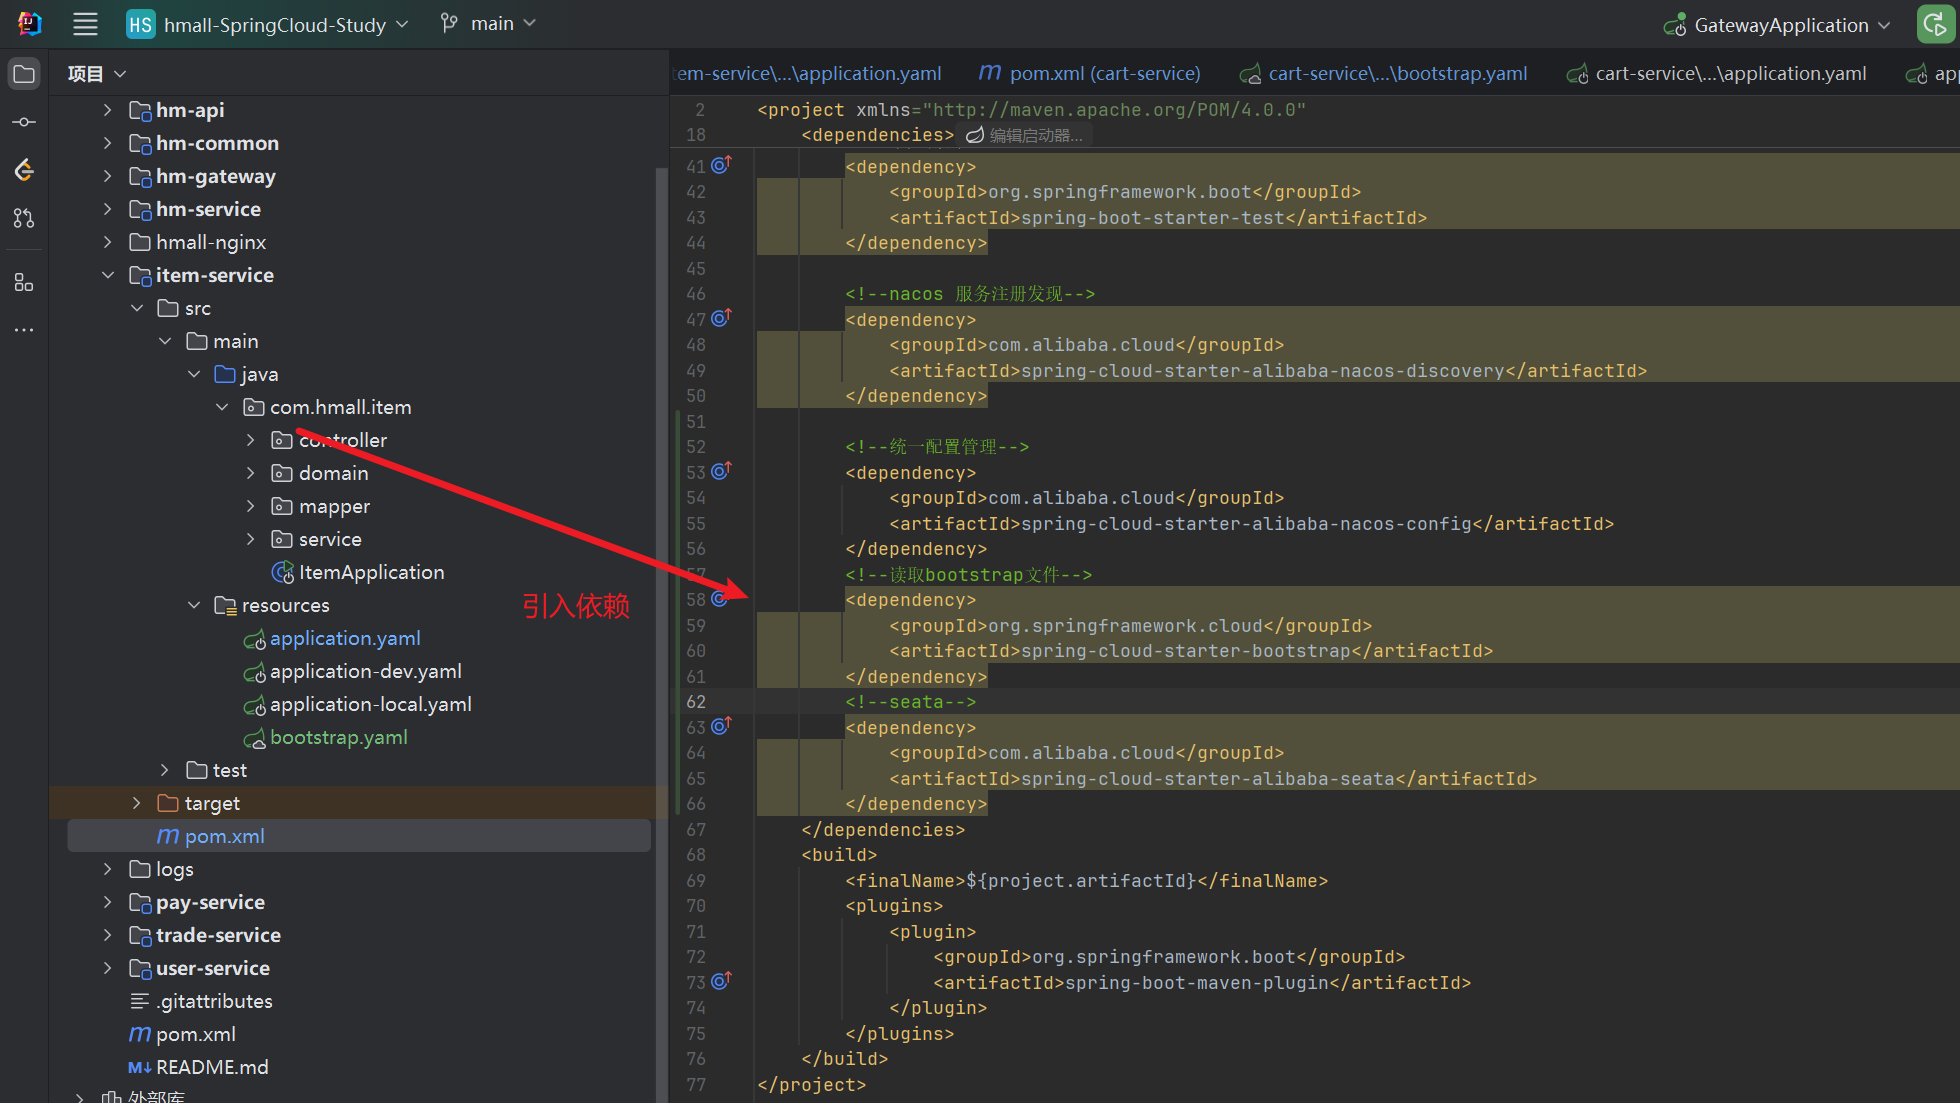
微服务中引入seata步骤总结:
第一步:引入依赖
<!--统一配置管理-->
<dependency>
<groupId>com.alibaba.cloud</groupId>
<artifactId>spring-cloud-starter-alibaba-nacos-config</artifactId>
</dependency>
<!--读取bootstrap文件-->
<dependency>
<groupId>org.springframework.cloud</groupId>
<artifactId>spring-cloud-starter-bootstrap</artifactId>
</dependency>
<!--seata-->
<dependency>
<groupId>com.alibaba.cloud</groupId>
<artifactId>spring-cloud-starter-alibaba-seata</artifactId>
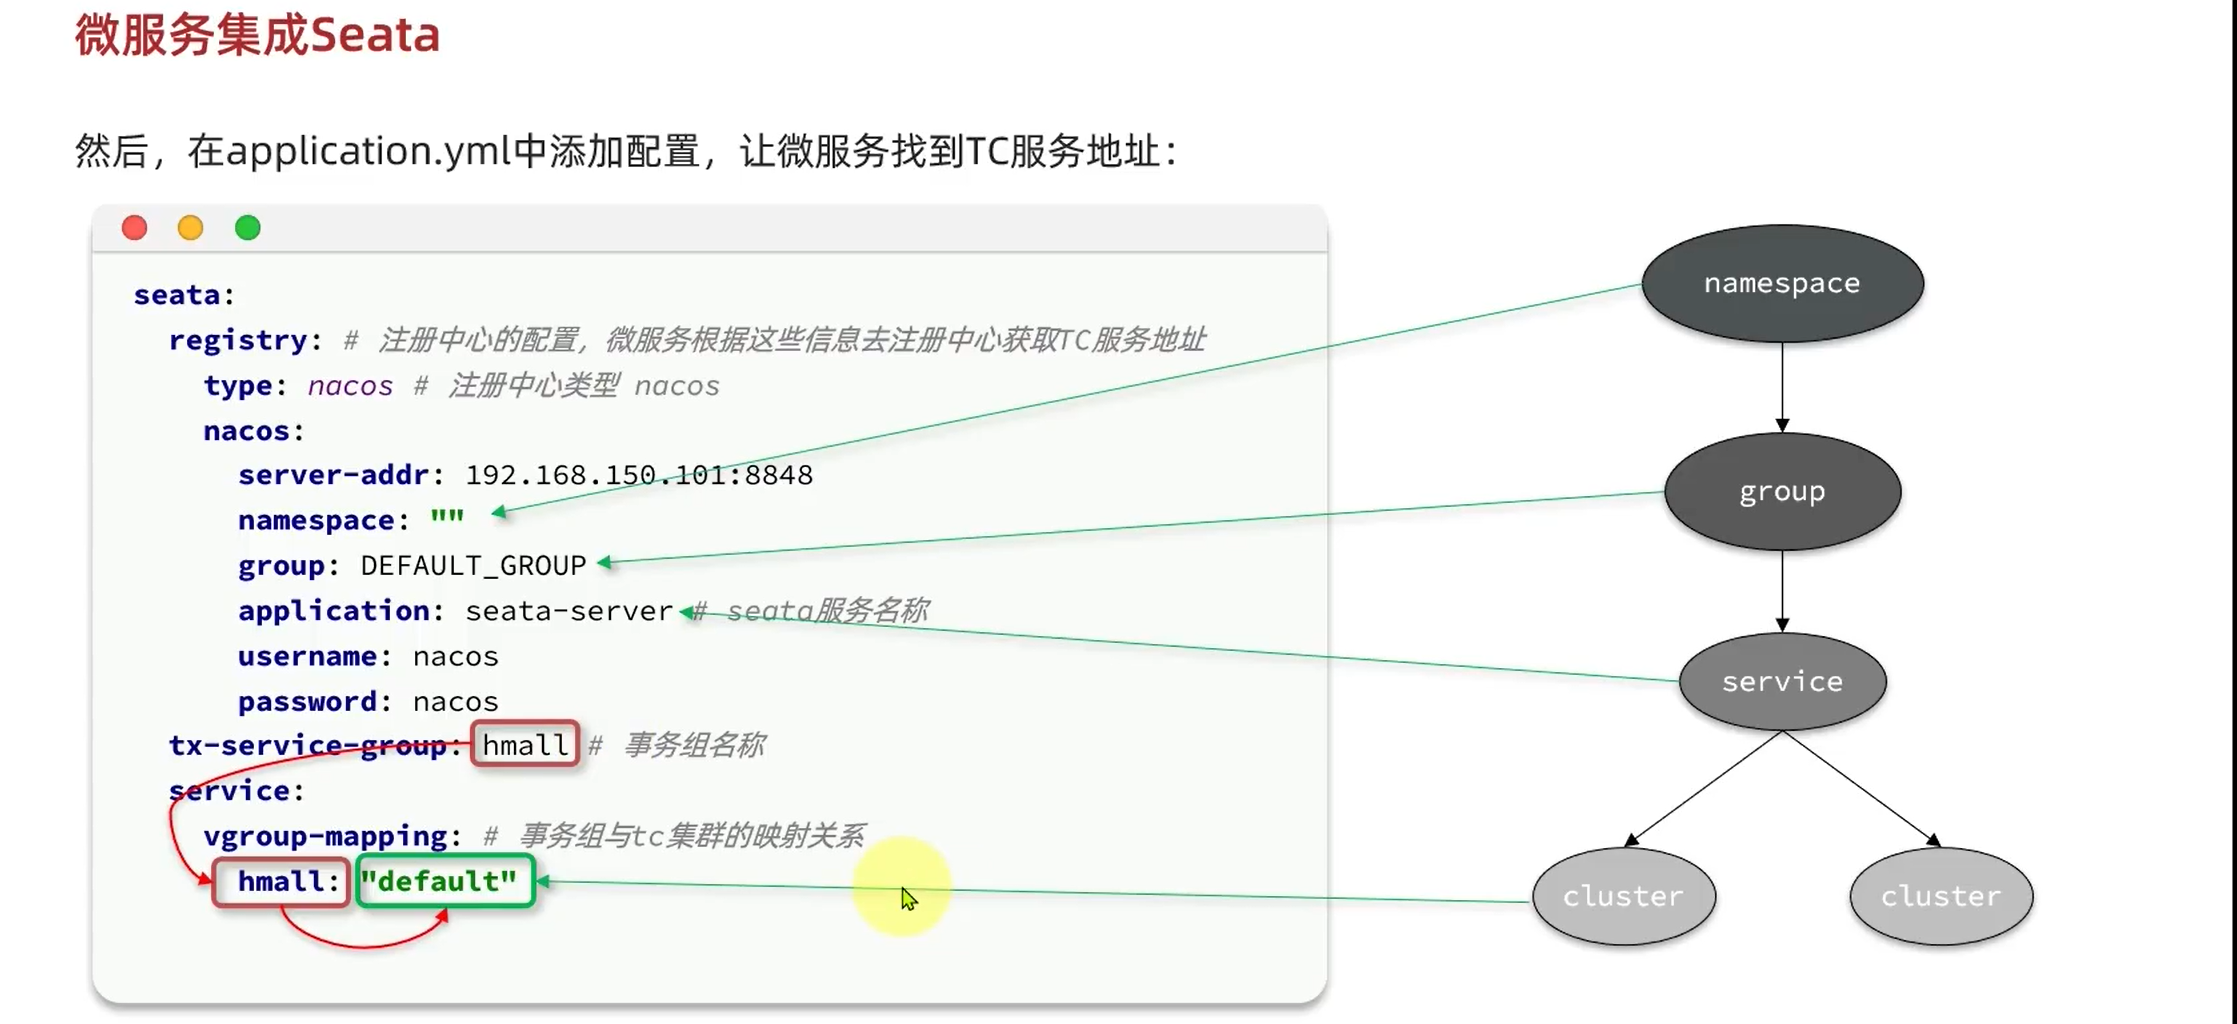
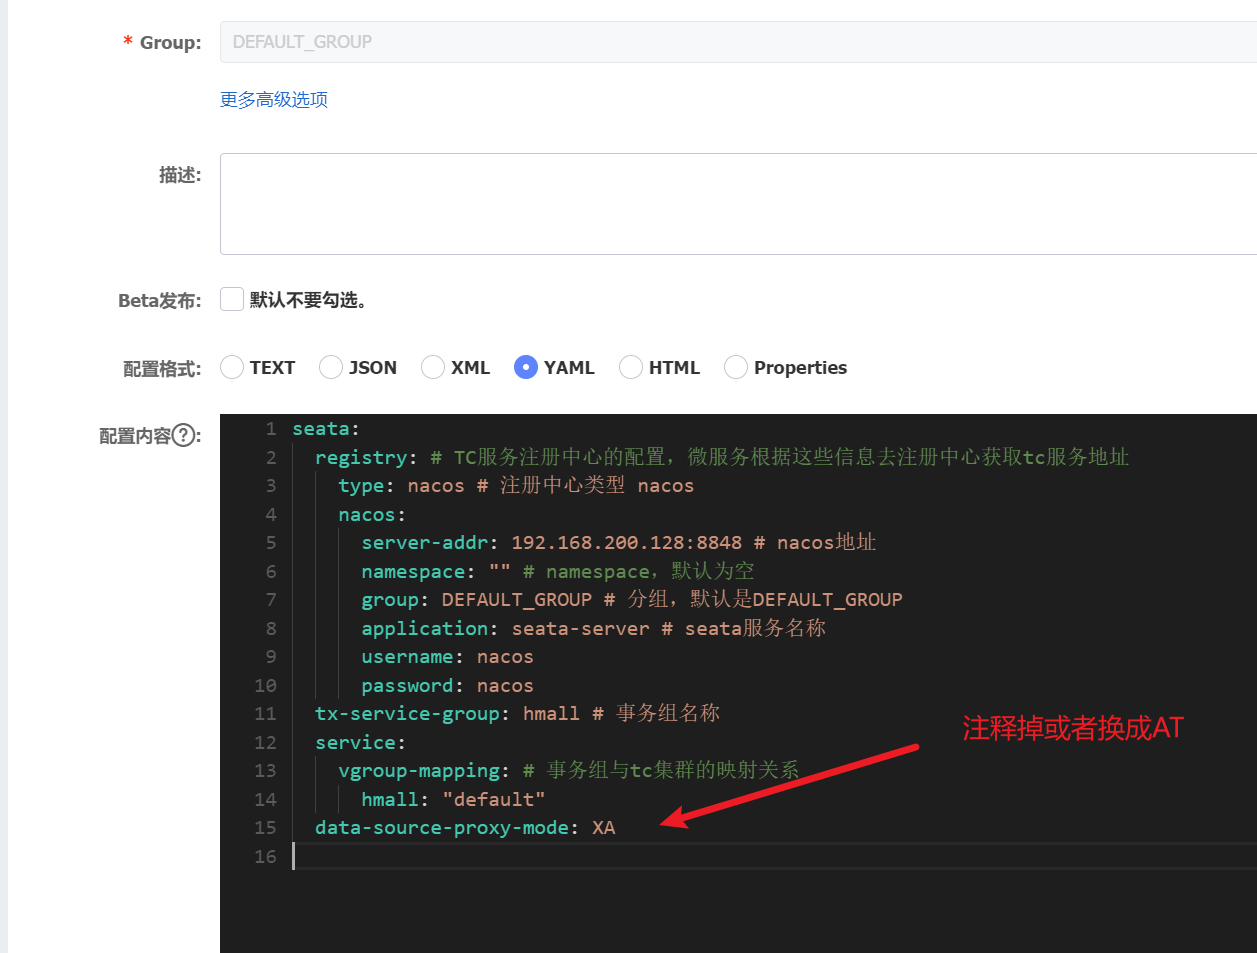
</dependency>第二步:再nacos添加seata依赖设置

seata:
  registry: # TC服务注册中心的配置,微服务根据这些信息去注册中心获取tc服务地址
    type: nacos # 注册中心类型 nacos
    nacos:
      server-addr: 192.168.200.128:8848 # nacos地址
      namespace: "" # namespace,默认为空
      group: DEFAULT_GROUP # 分组,默认是DEFAULT_GROUP
      application: seata-server # seata服务名称
      username: nacos
      password: nacos
  tx-service-group: hmall # 事务组名称
  service:
    vgroup-mapping: # 事务组与tc集群的映射关系
      hmall: "default"
第三步:添加bootstrap配置
spring:
  application:
    name: item-service # 服务名称
  profiles:
    active: dev
  cloud:
    nacos:
      server-addr: 192.168.200.128:8848 # nacos地址
      config:
        file-extension: yaml # 文件后缀名
        shared-configs: # 共享配置
          - dataId: shared-jdbc.yaml # 共享mybatis配置
          - dataId: shared-log.yaml # 共享日志配置
          - dataId: shared-swagger.yaml # 共享日志配置
          - dataId: shared-seata.yaml # 共享seata配置
第四步:简化原本配置
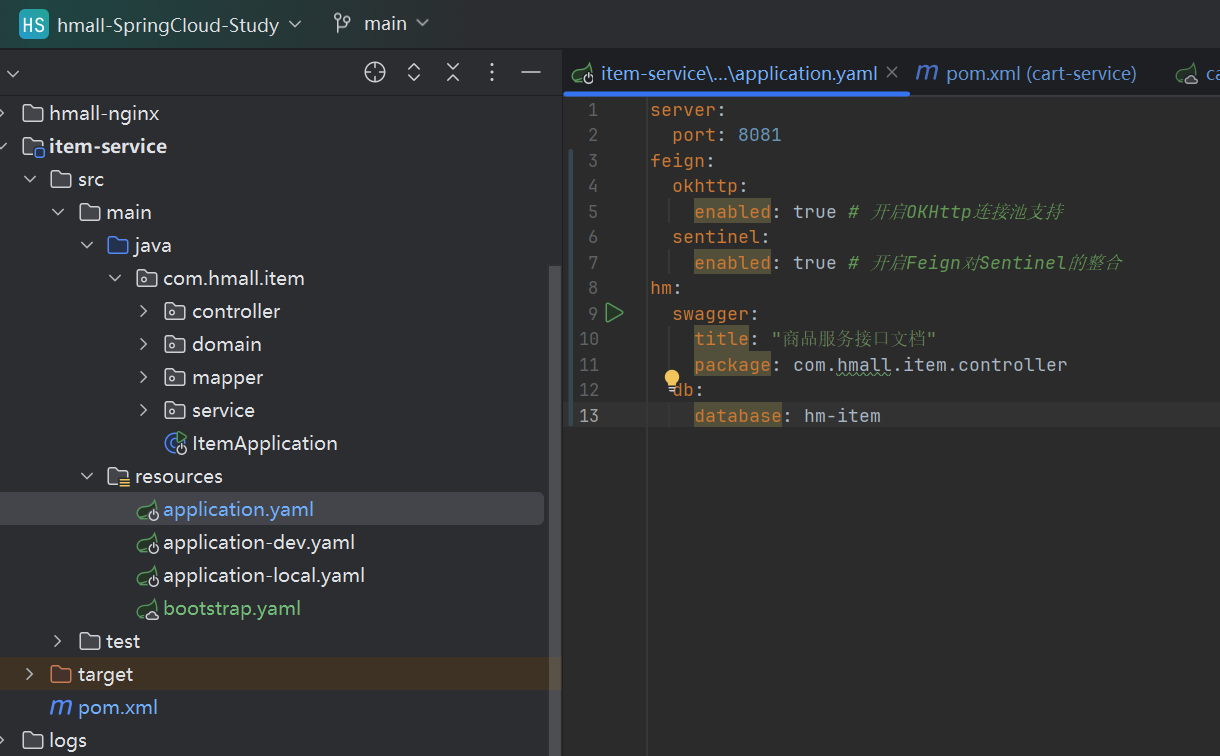
server:
port: 8081
feign:
okhttp:
enabled: true # 开启OKHttp连接池支持
sentinel:
enabled: true # 开启Feign对Sentinel的整合
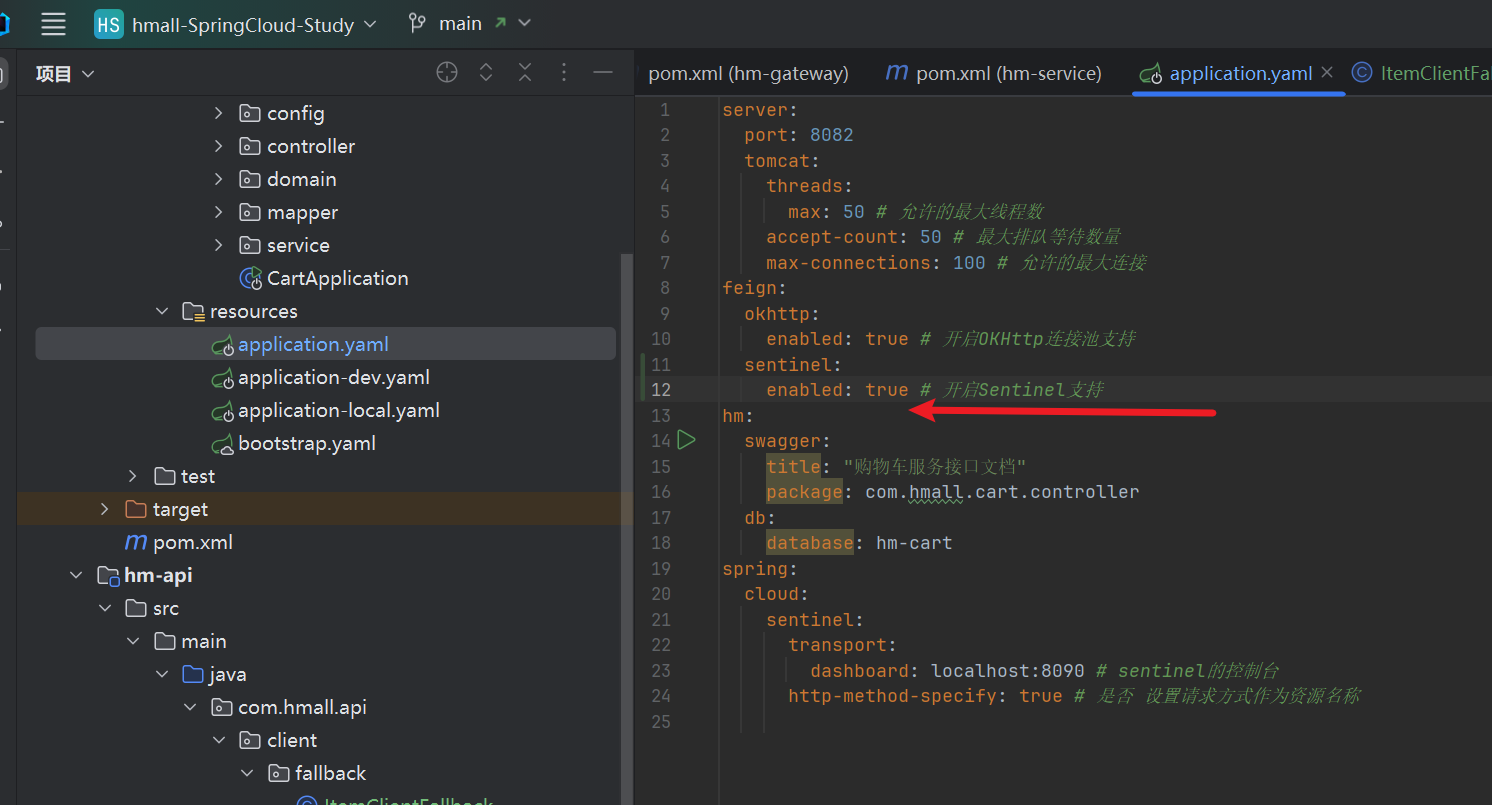
hm:
swagger:
title: "商品服务接口文档"
package: com.hmall.item.controller
db:
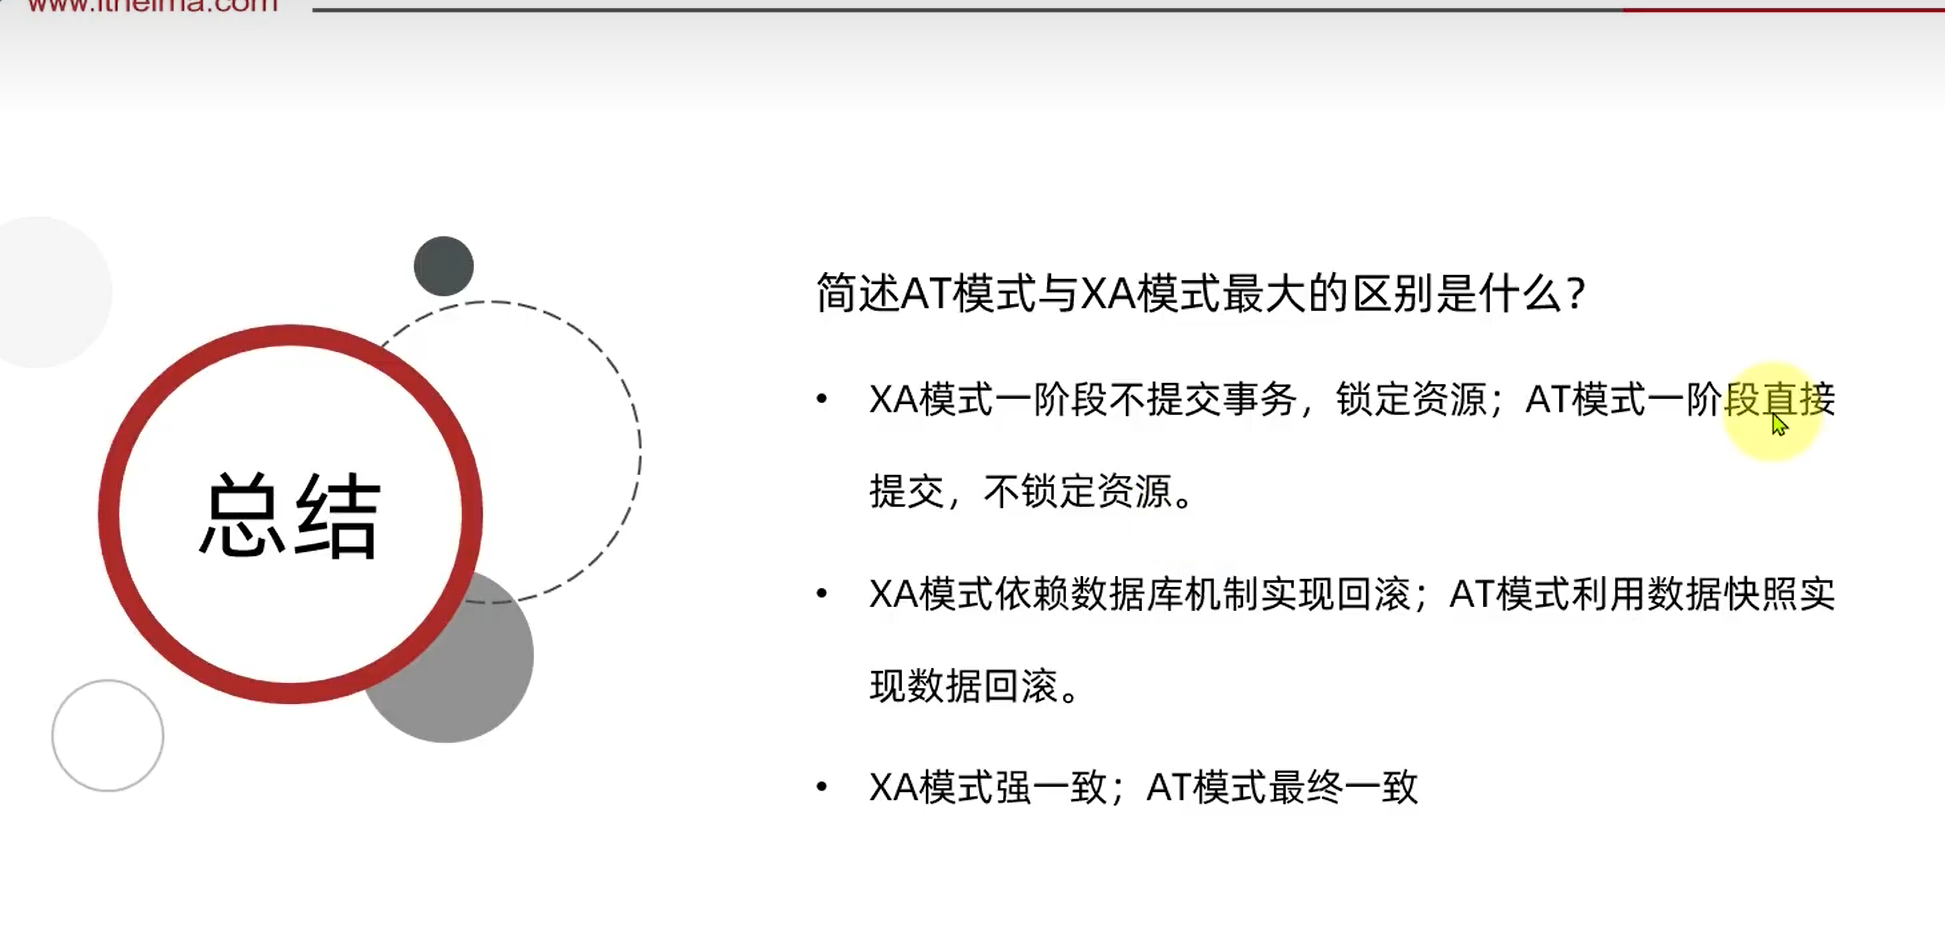
database: hm-itemXA模式
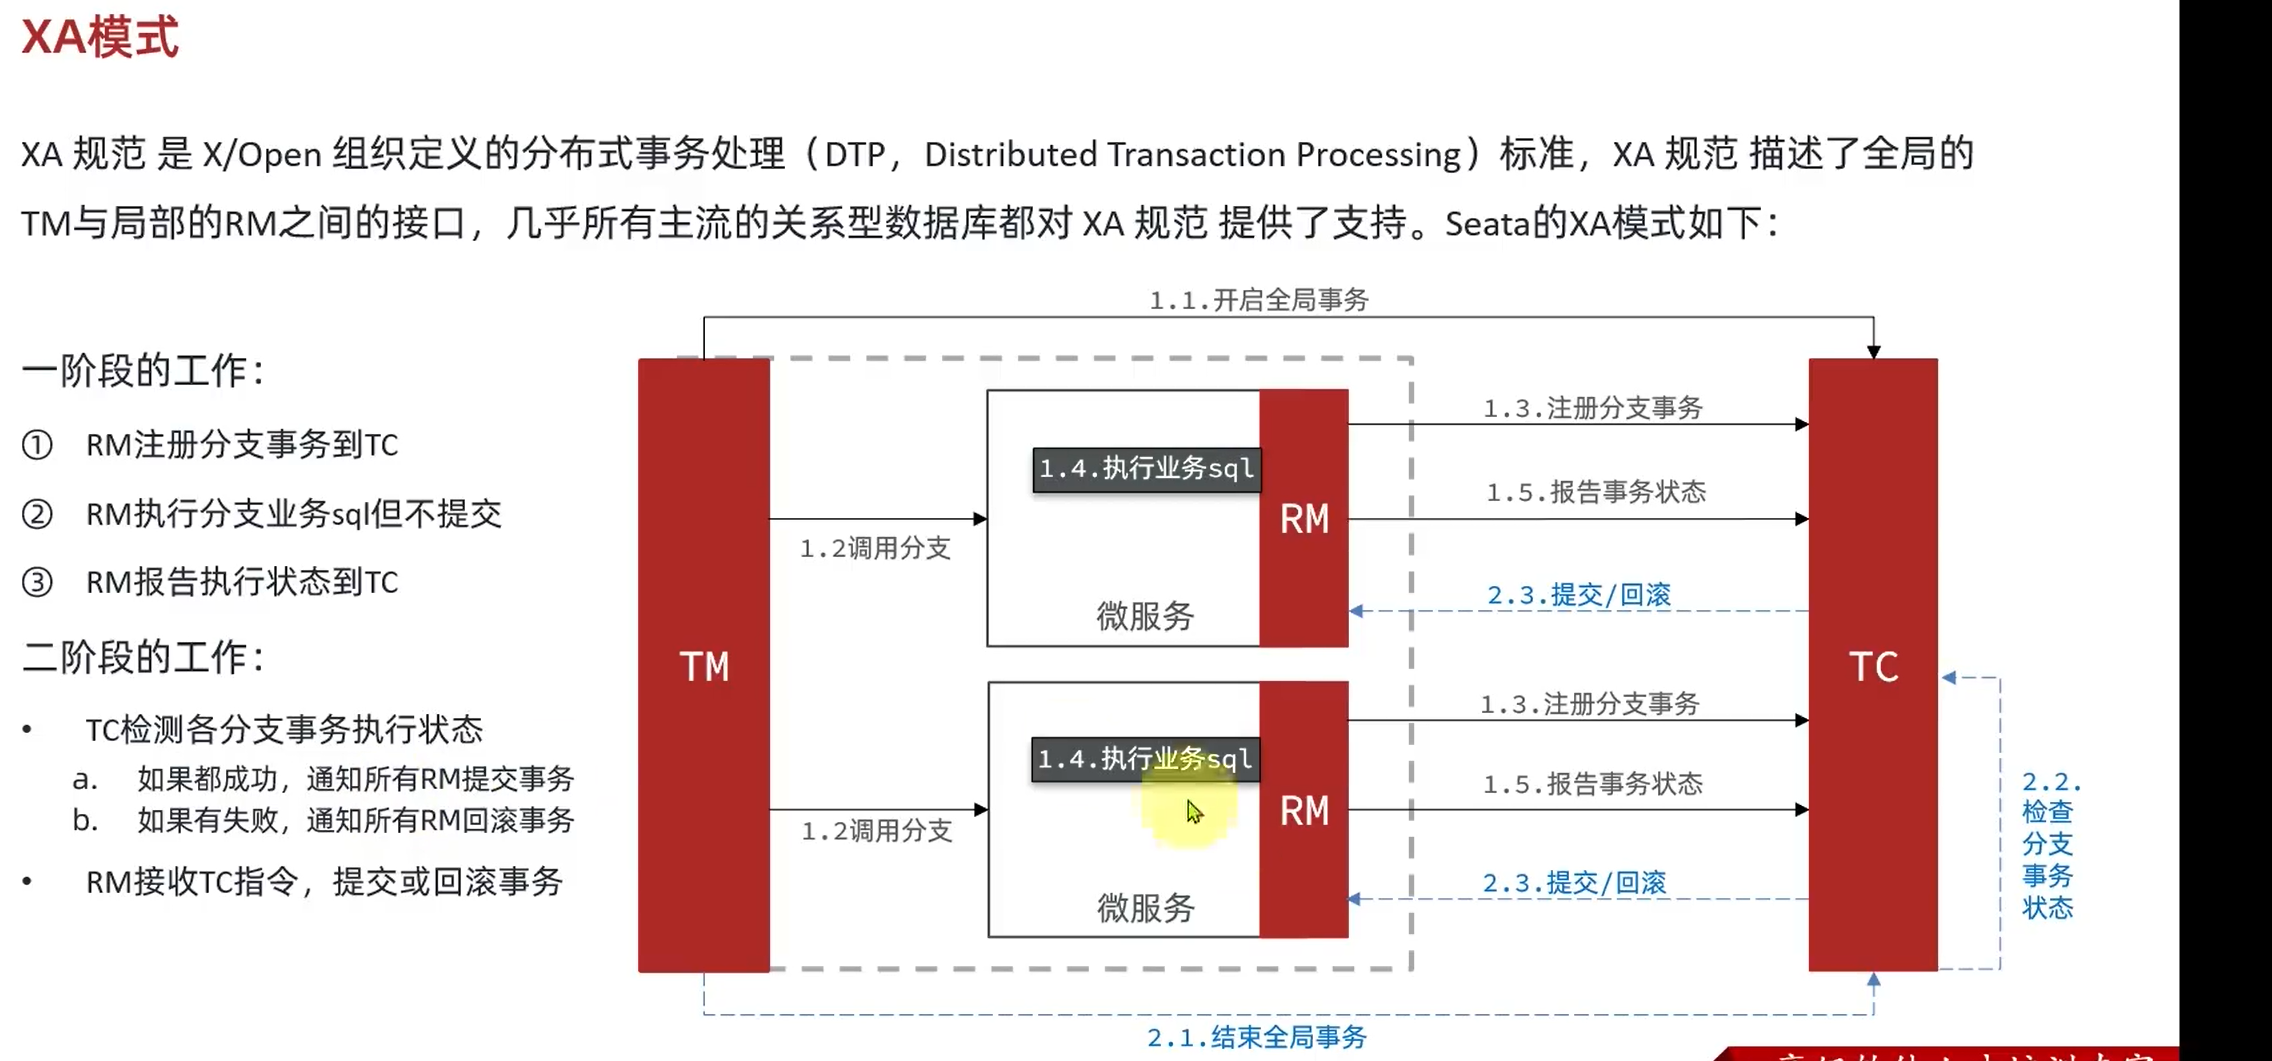
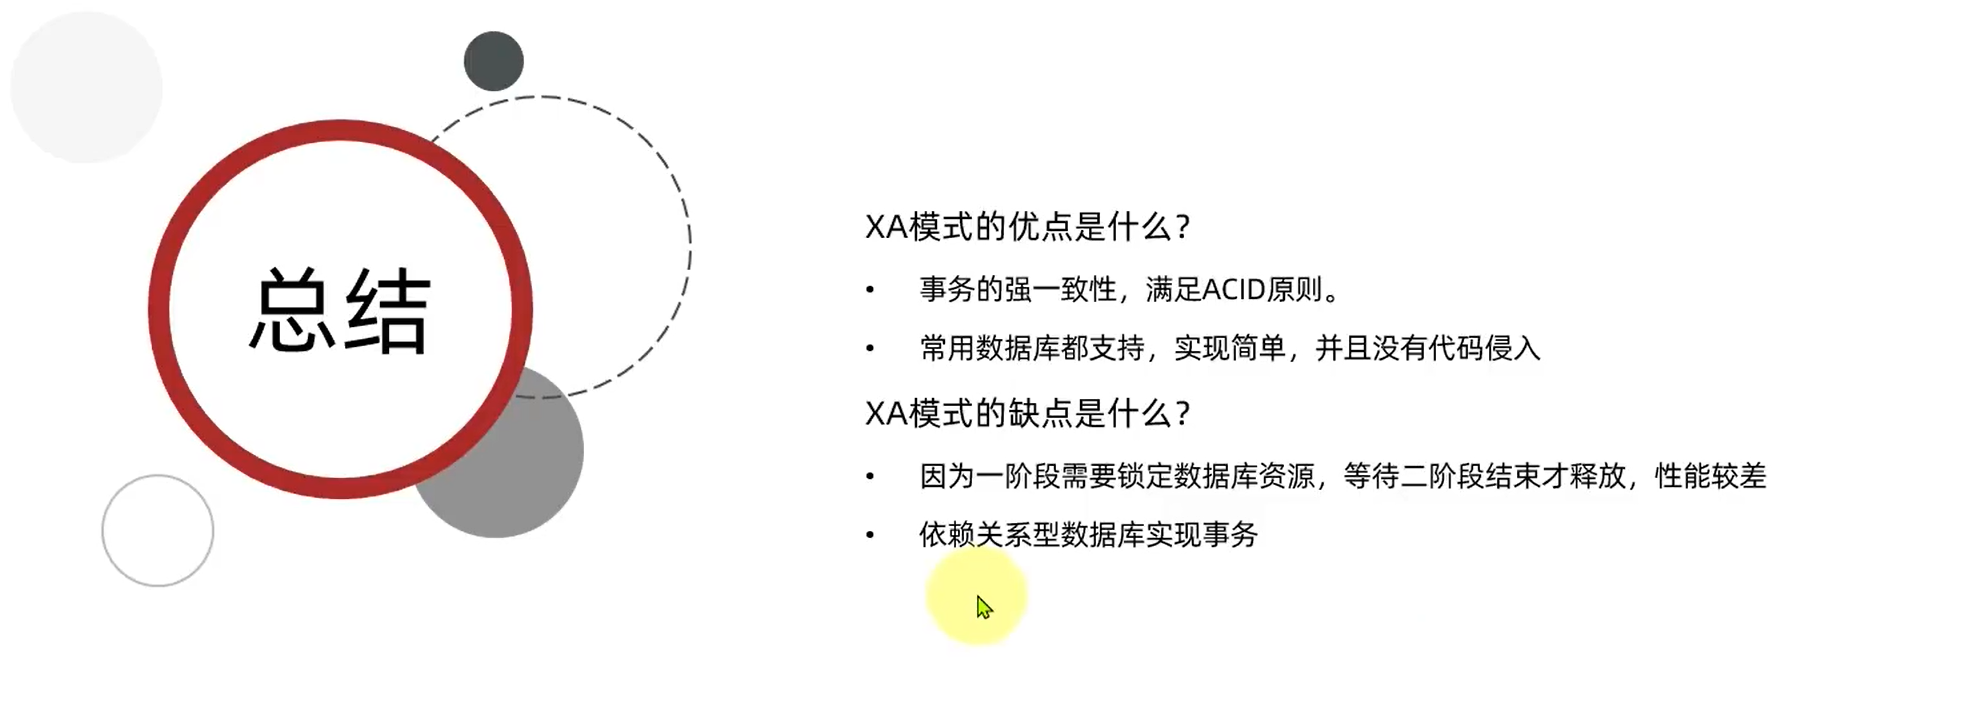
- 实现全局事务的关键就是等待,事务等待不提交,所有事务都执行好了再一起提交
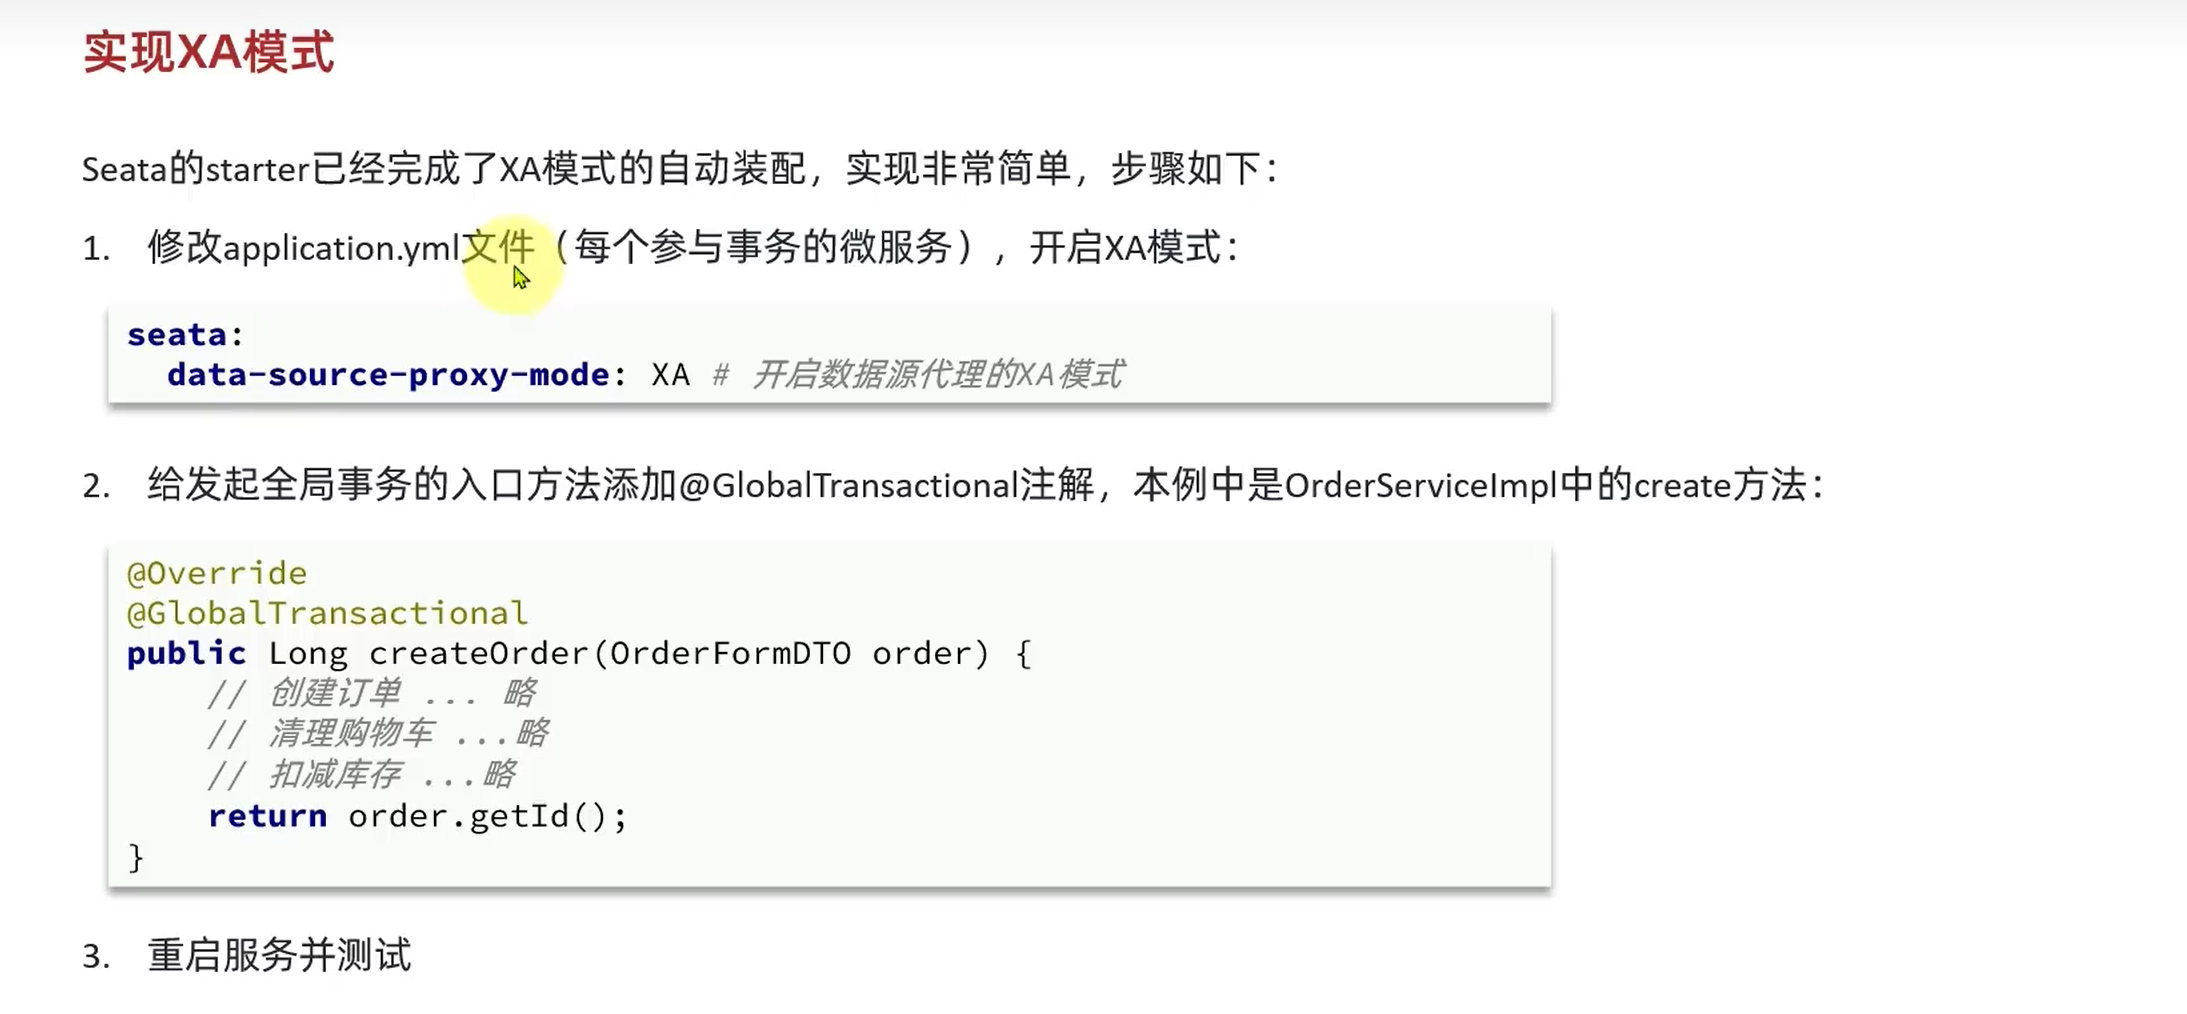
实现XA模式
AT模式
- at模式是默认的,使用的多

- AT和XA模式在这部分前面的逻辑是完全一致的
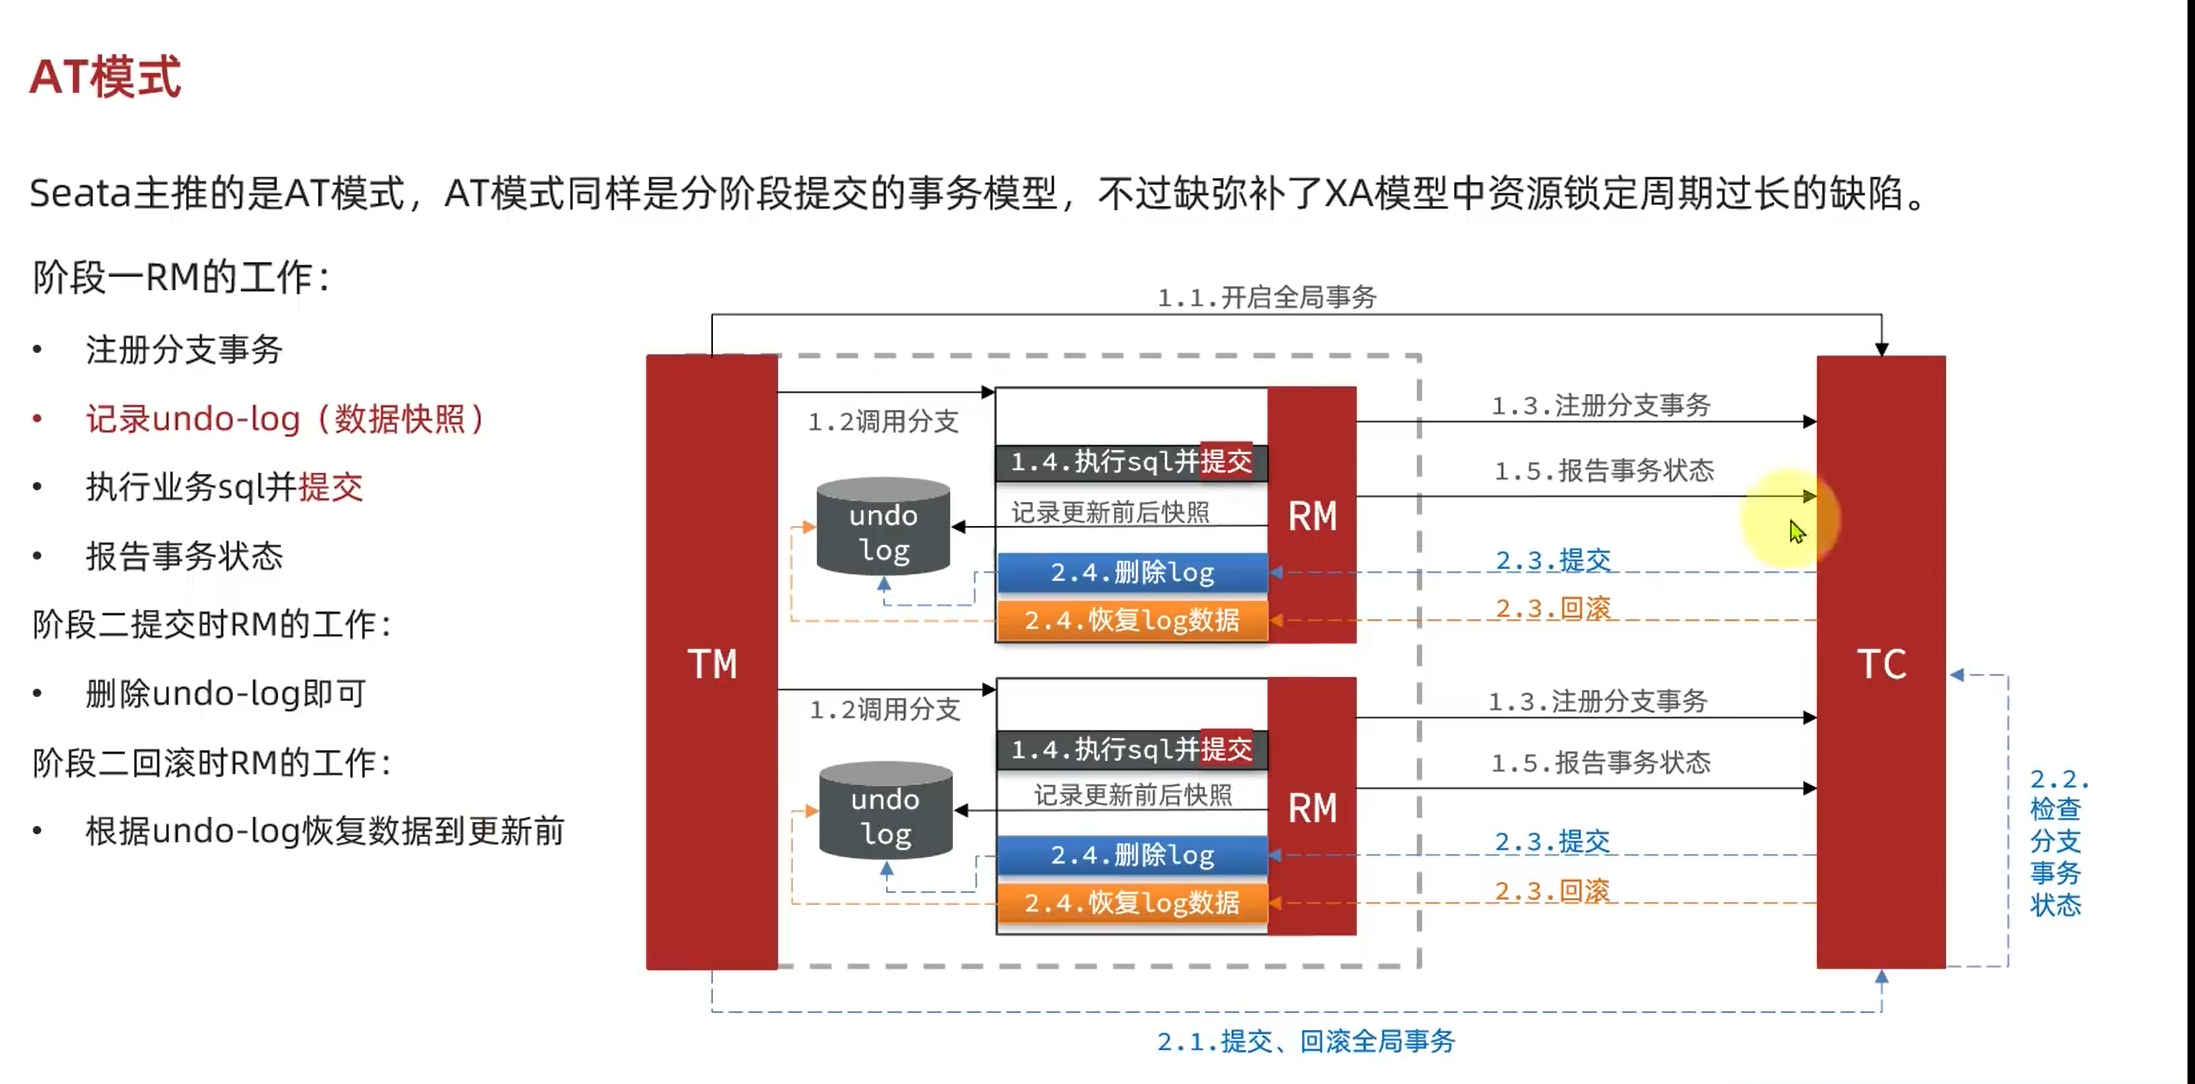
- 可能会出现短暂的数据不一致问题。
At模式具体实现
第一步:导入log数据表

第二步:修改配置 改成使用at模式
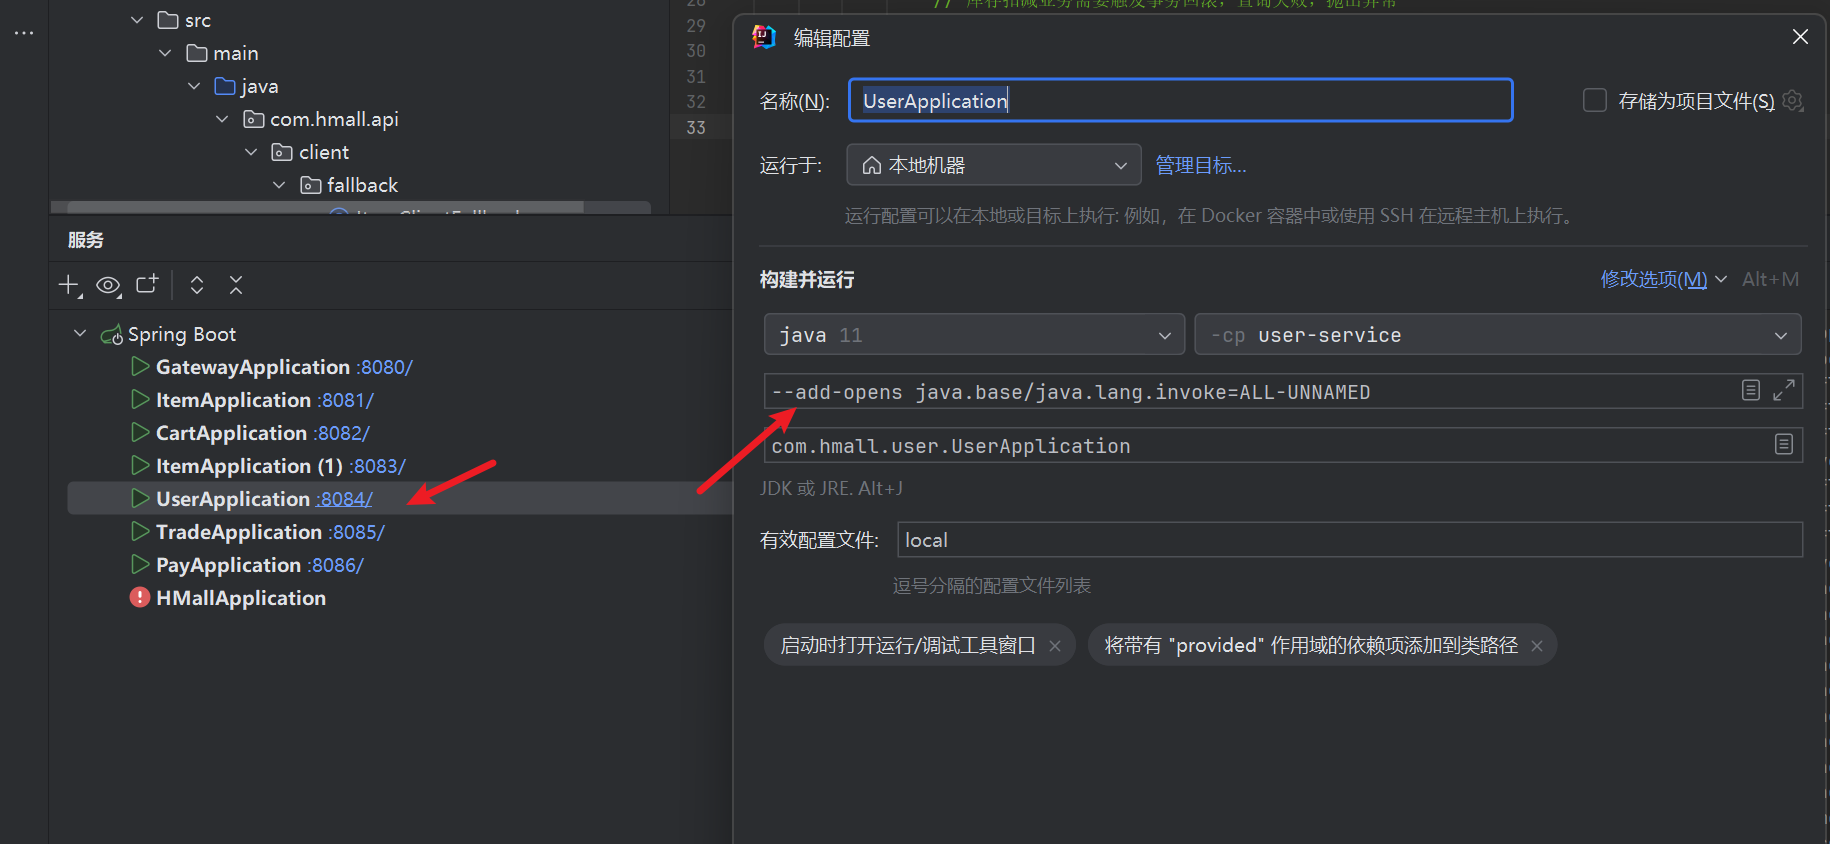
JDK11使用反射时候报错java.lang.ExceptionInInitializerError: Exception java.lang.reflect.InaccessibleObjectException: Unable to make field private final java.lang.Class java.lang.invoke.SerializedLambda.capturingClass accessible: module java.base does not "opens java.lang.invoke" to unnamed module @4c583ecf in thread "http-nio-8084-exec-1"
--add-opens java.base/java.lang.invoke=ALL-UNNAMED - 虚拟机选项中添加以上代码即可
作业
作业一:3.1.编写降级逻辑
解题思路
-
首先明白题目要让我们做什么?
-
编写降级逻辑,就是写sentinel中的fallback
-
明白了要做什么之后,来想怎么做:fallback是Sentinel中的一个东西,因此想要编写fallback,就得想将Sentinel引入进来,在Sentinel中的控制台能够看到要编写fallback逻辑的模块
开始解题
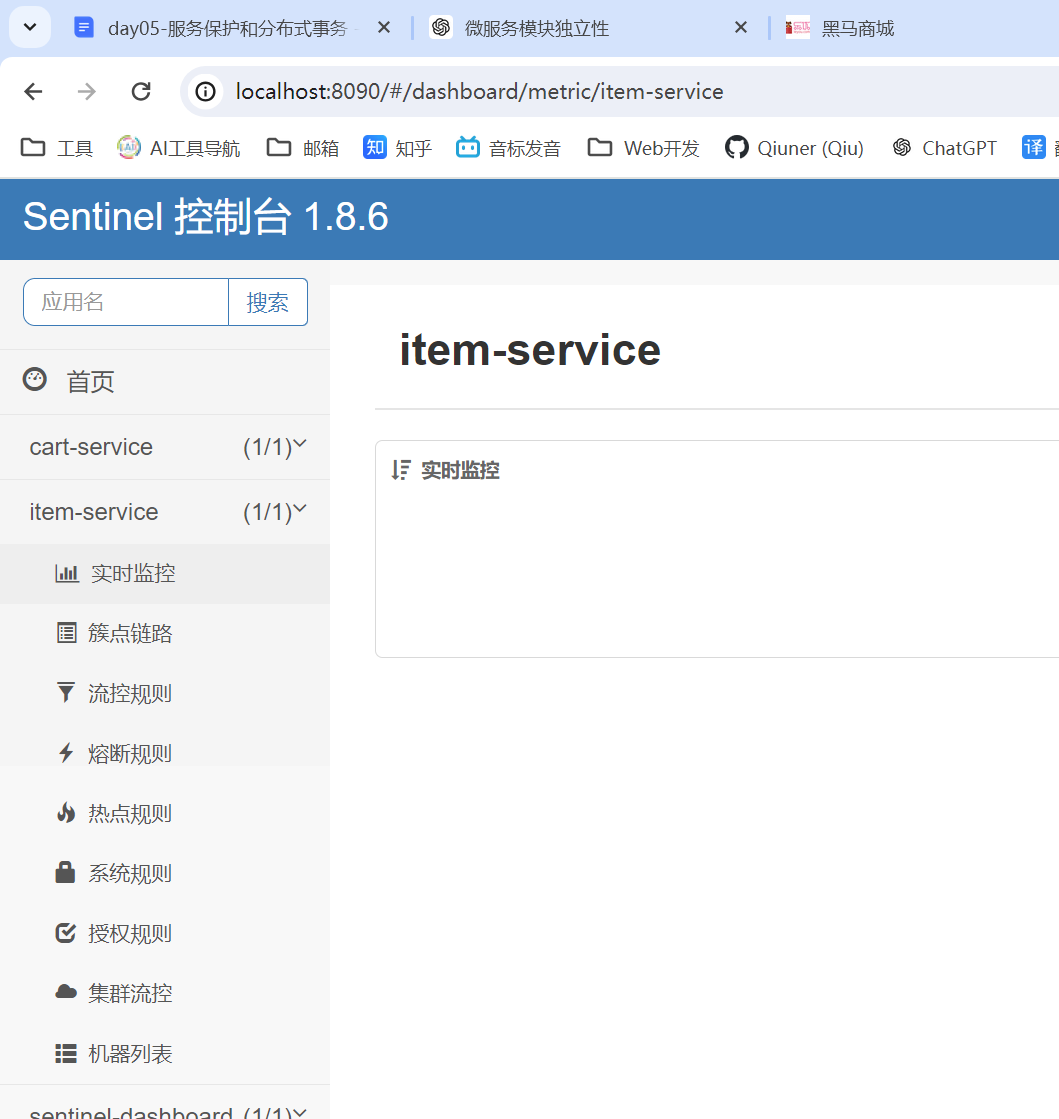
第一步:启动Sentinel
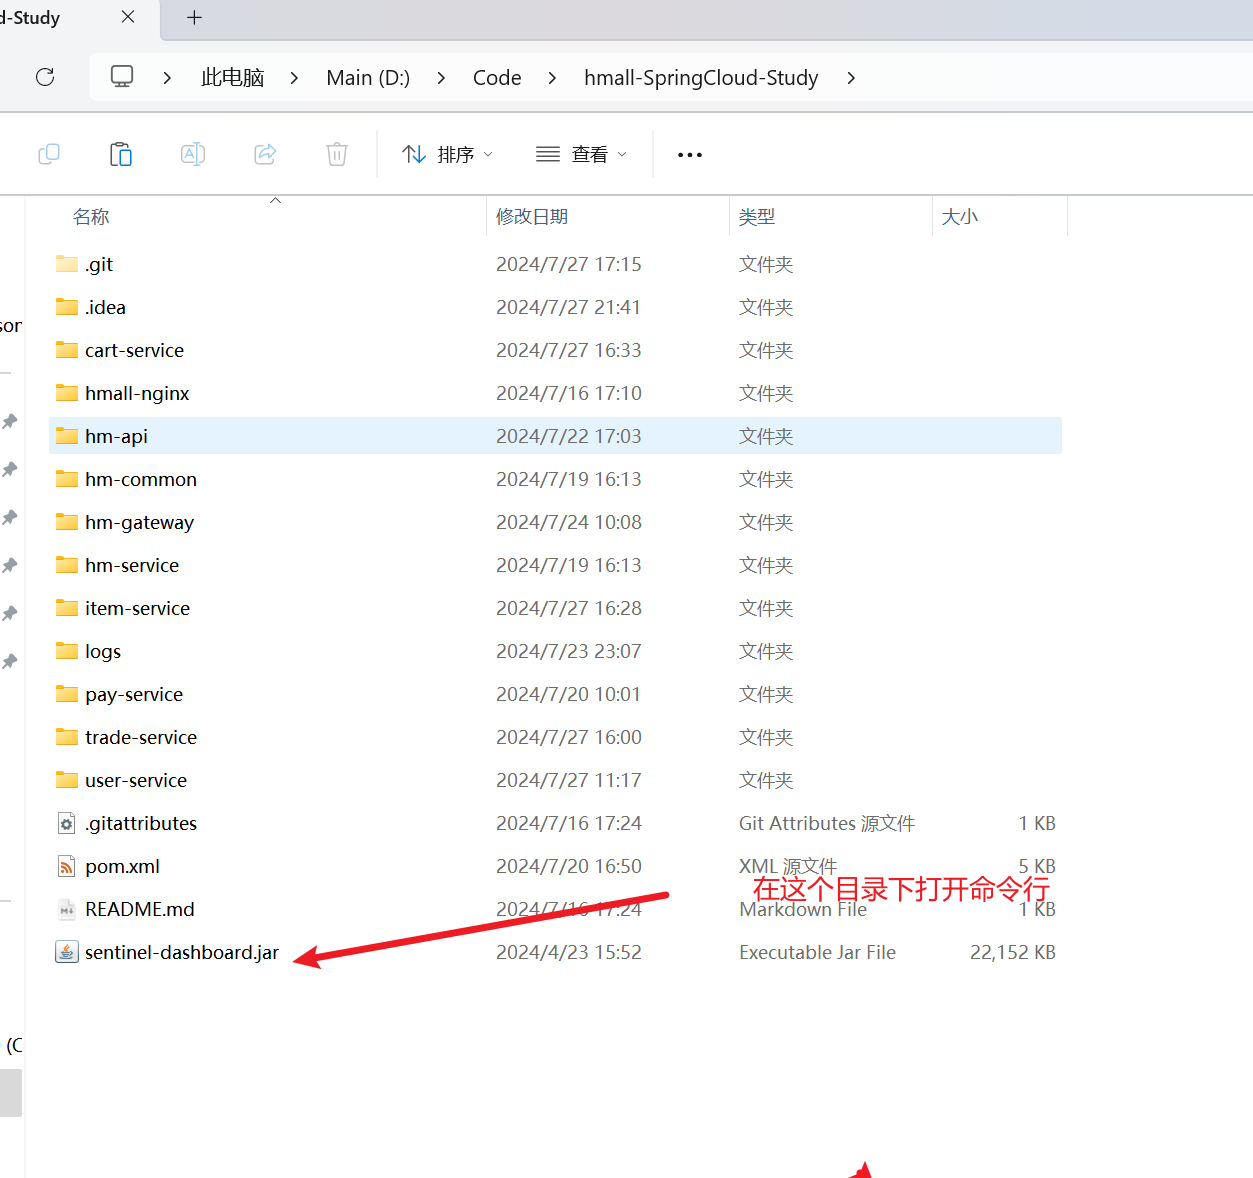
java -Dserver.port=8090 -Dcsp.sentinel.dashboard.server=localhost:8090 -Dproject.name=sentinel-dashboard -jar sentinel-dashboard.jar- 输入以上命令打开sentinel
一开始你可能看不到你之前配置的东西
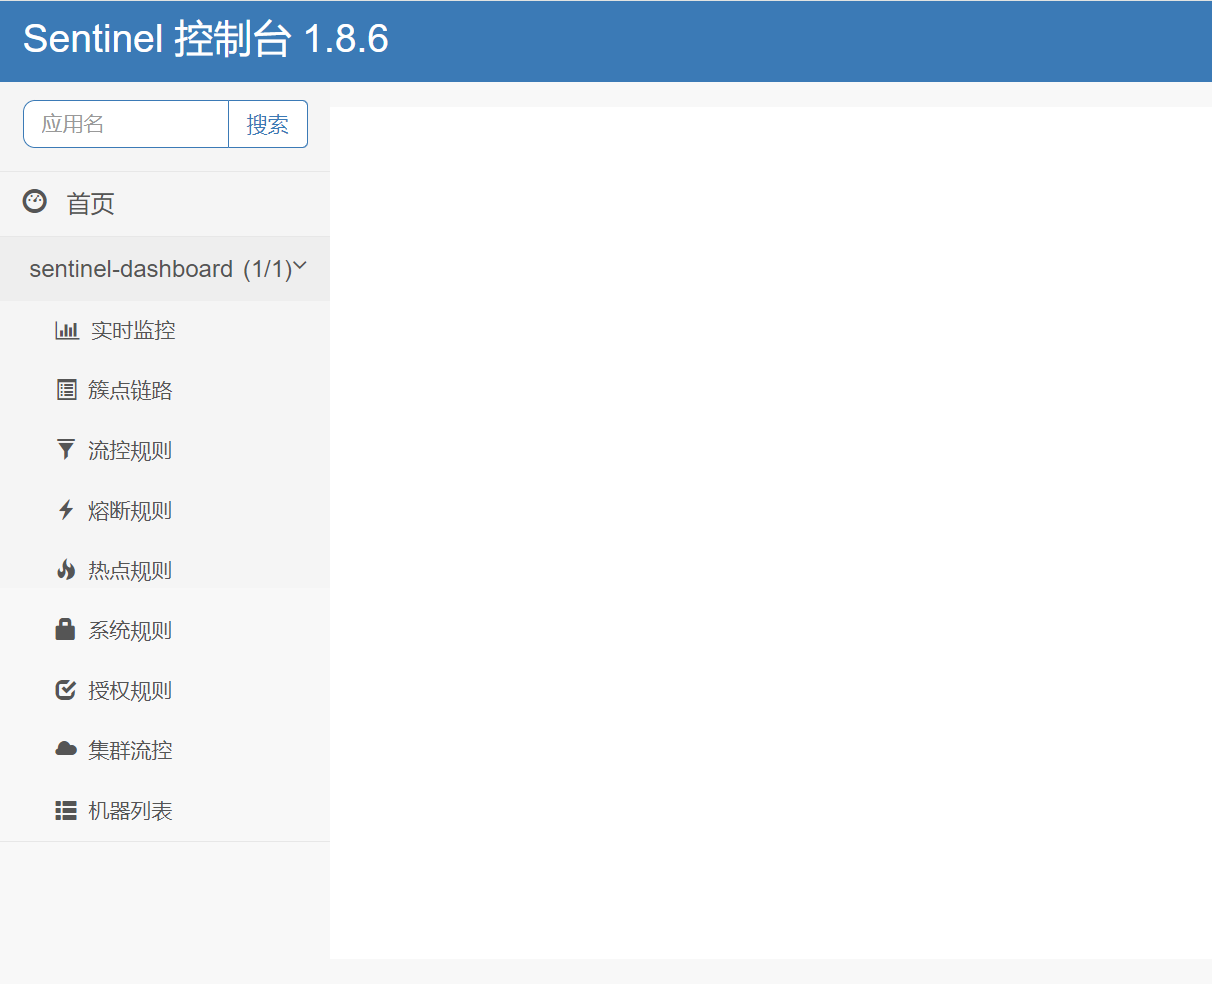
- 点开商城,进行几次查询,加购等操作,就可以看到了
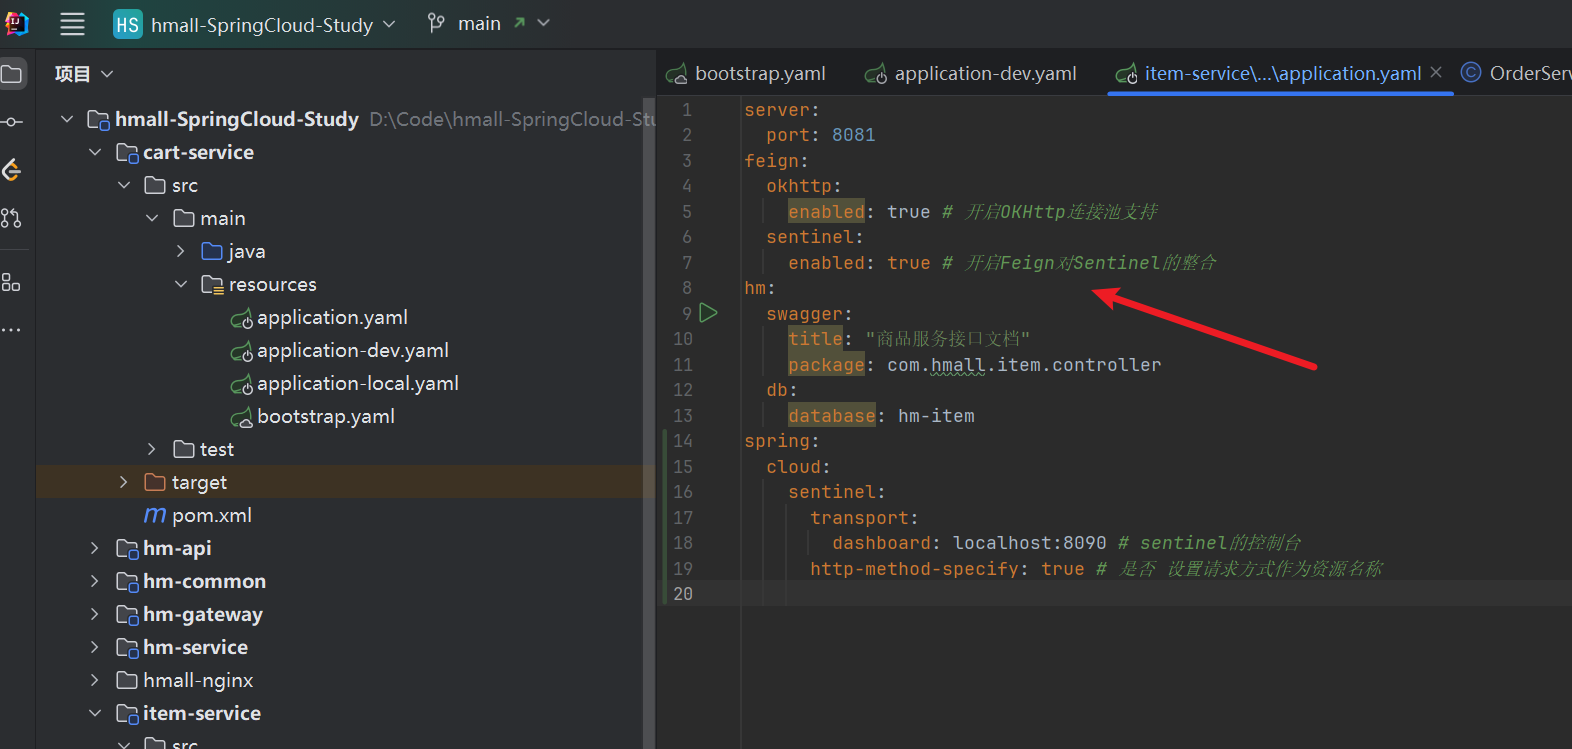
第二步:给相应模块添加 Sentinel
添加依赖
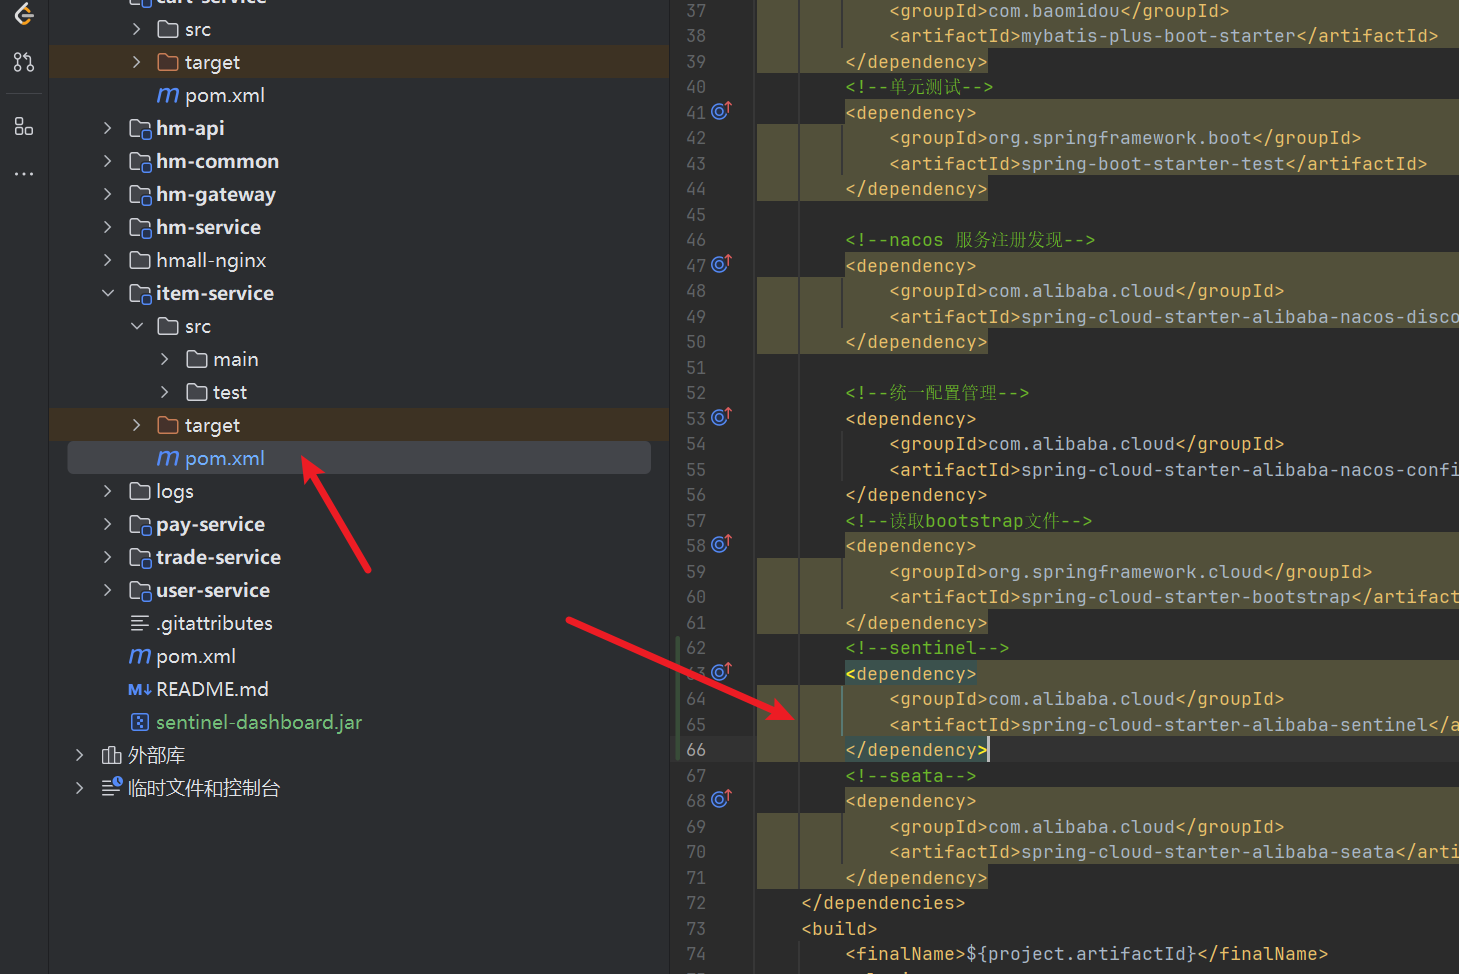
       <!--sentinel-->
        <dependency>
            <groupId>com.alibaba.cloud</groupId>
            <artifactId>spring-cloud-starter-alibaba-sentinel</artifactId>
        </dependency>
添加配置
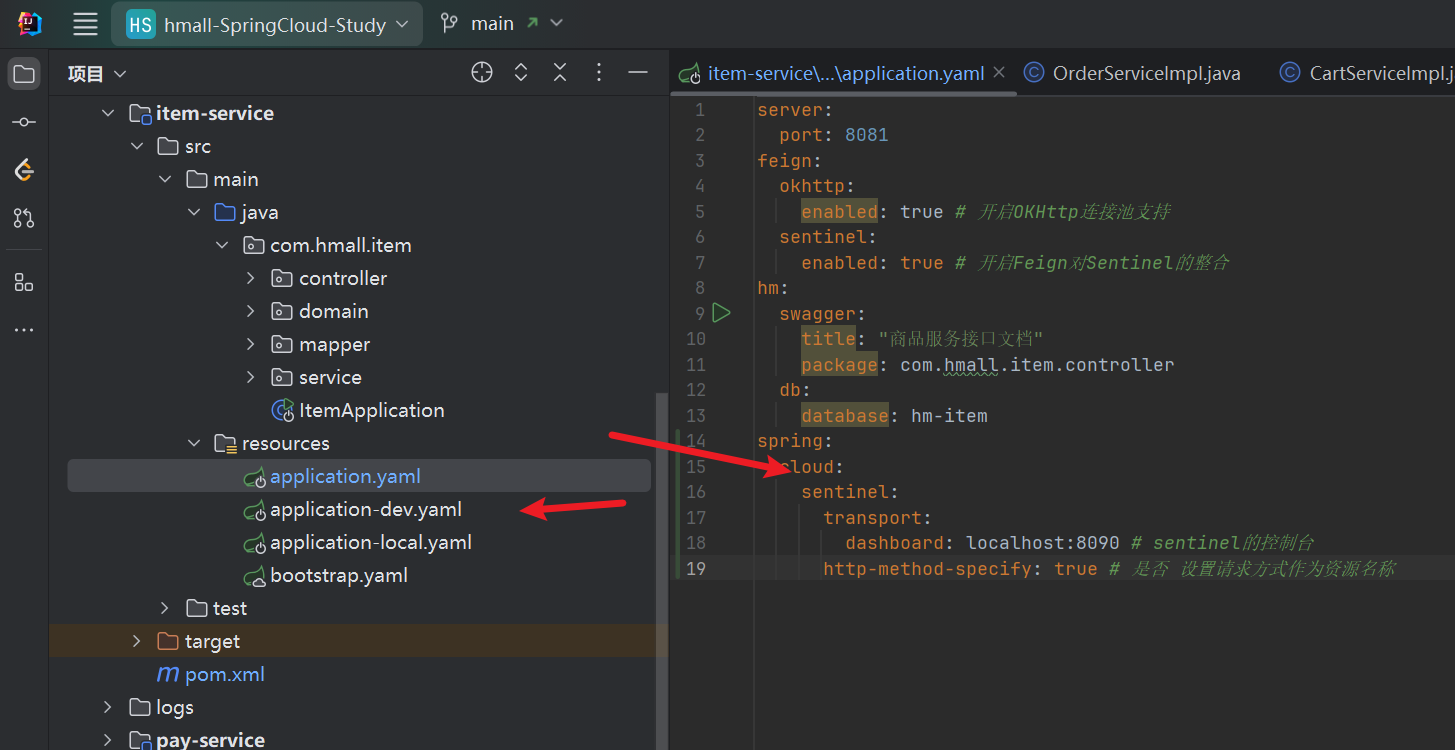
- 重启服务,发现多了这个
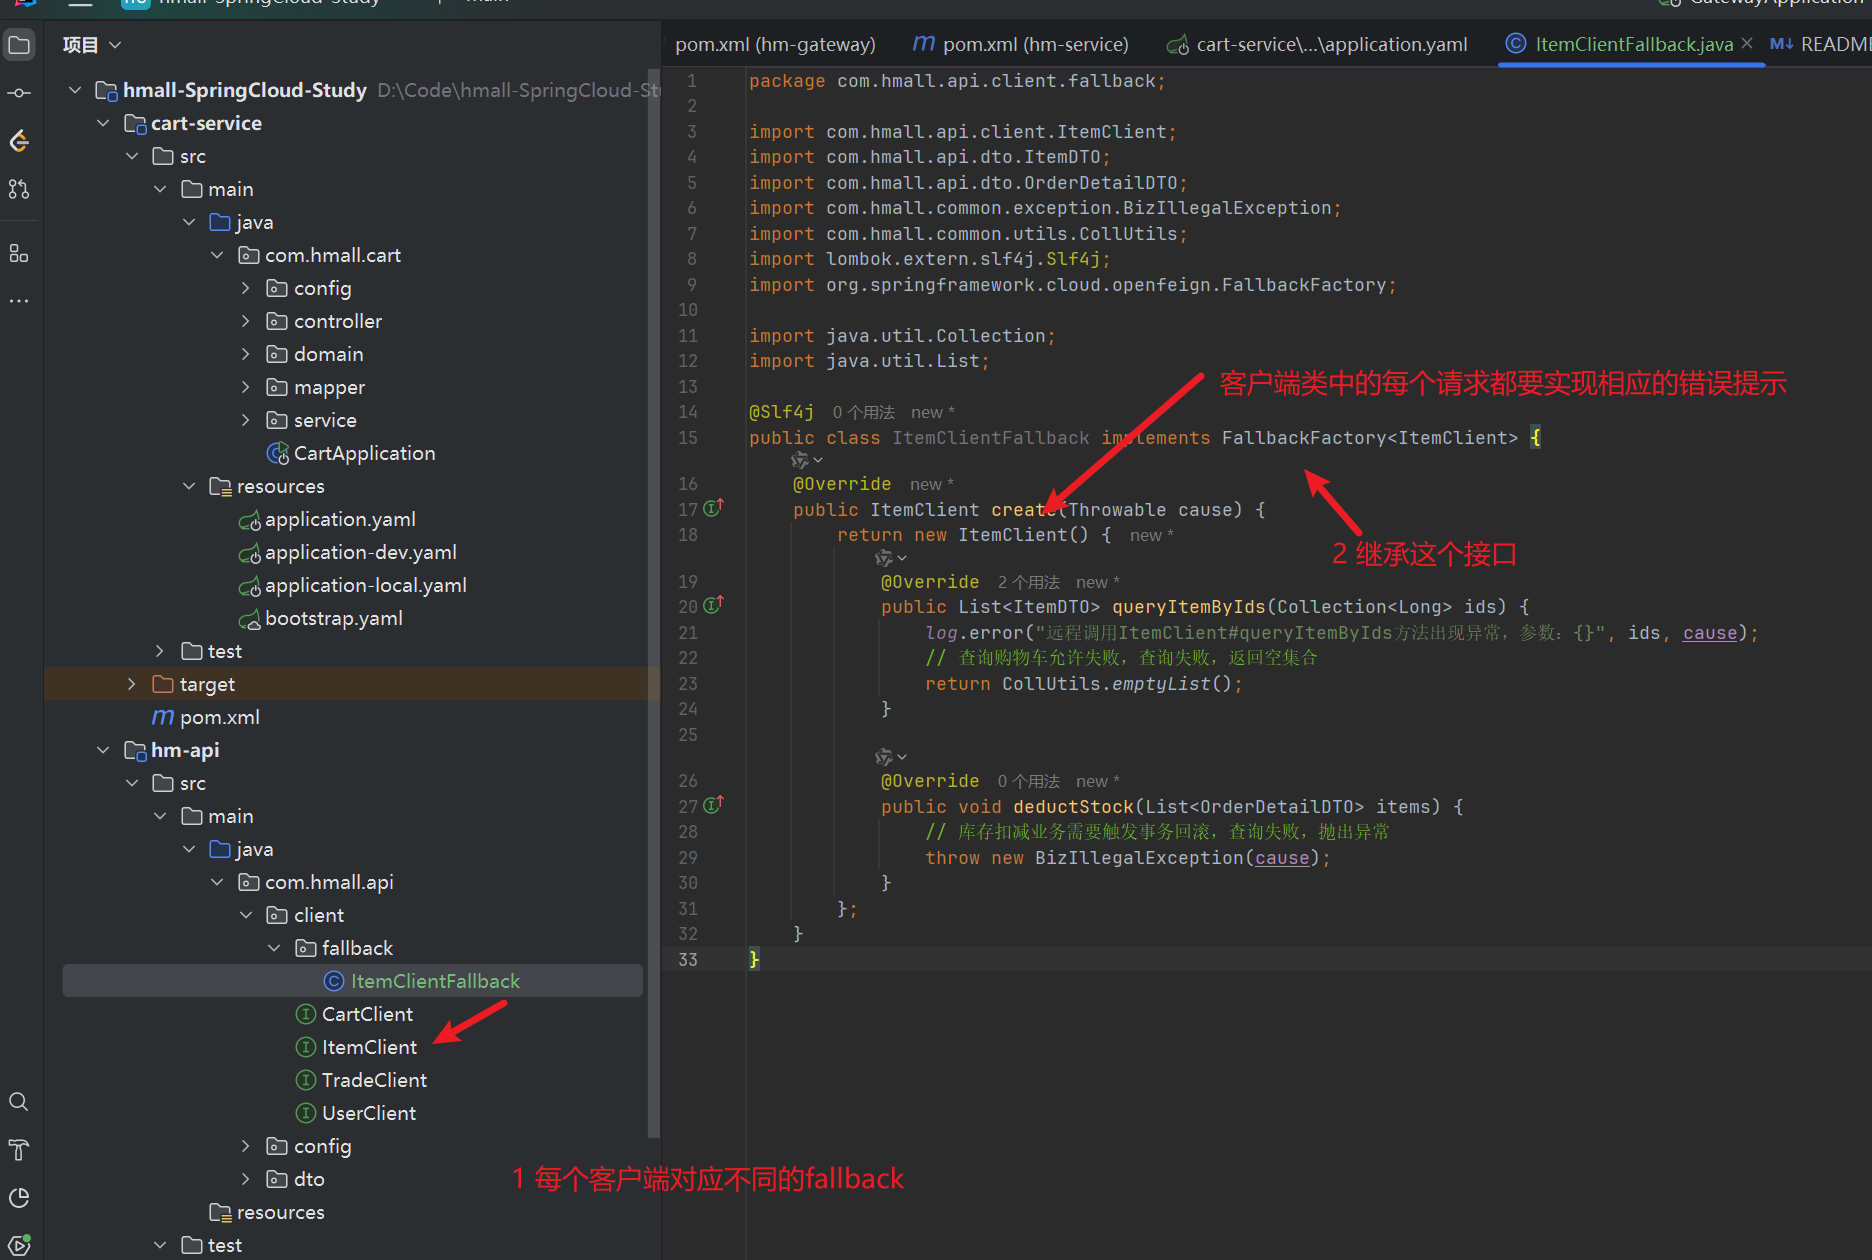
fallback的处理逻辑
第一步:添加fallback逻辑
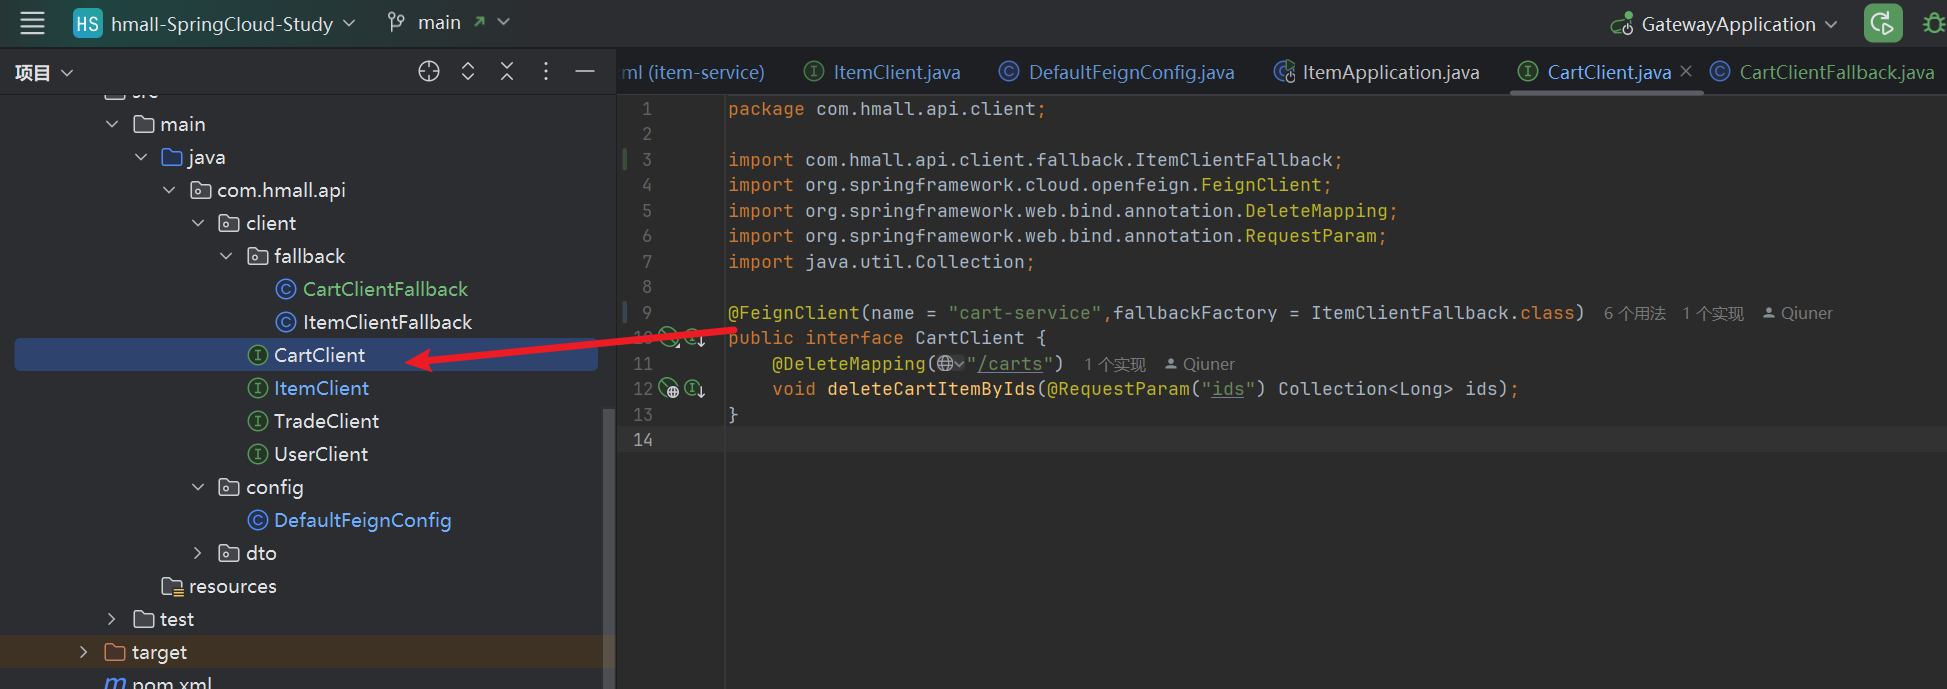
- 前面已经对商品做了fallback的处理,这次我们给cart-service进行添加fallback逻辑处理
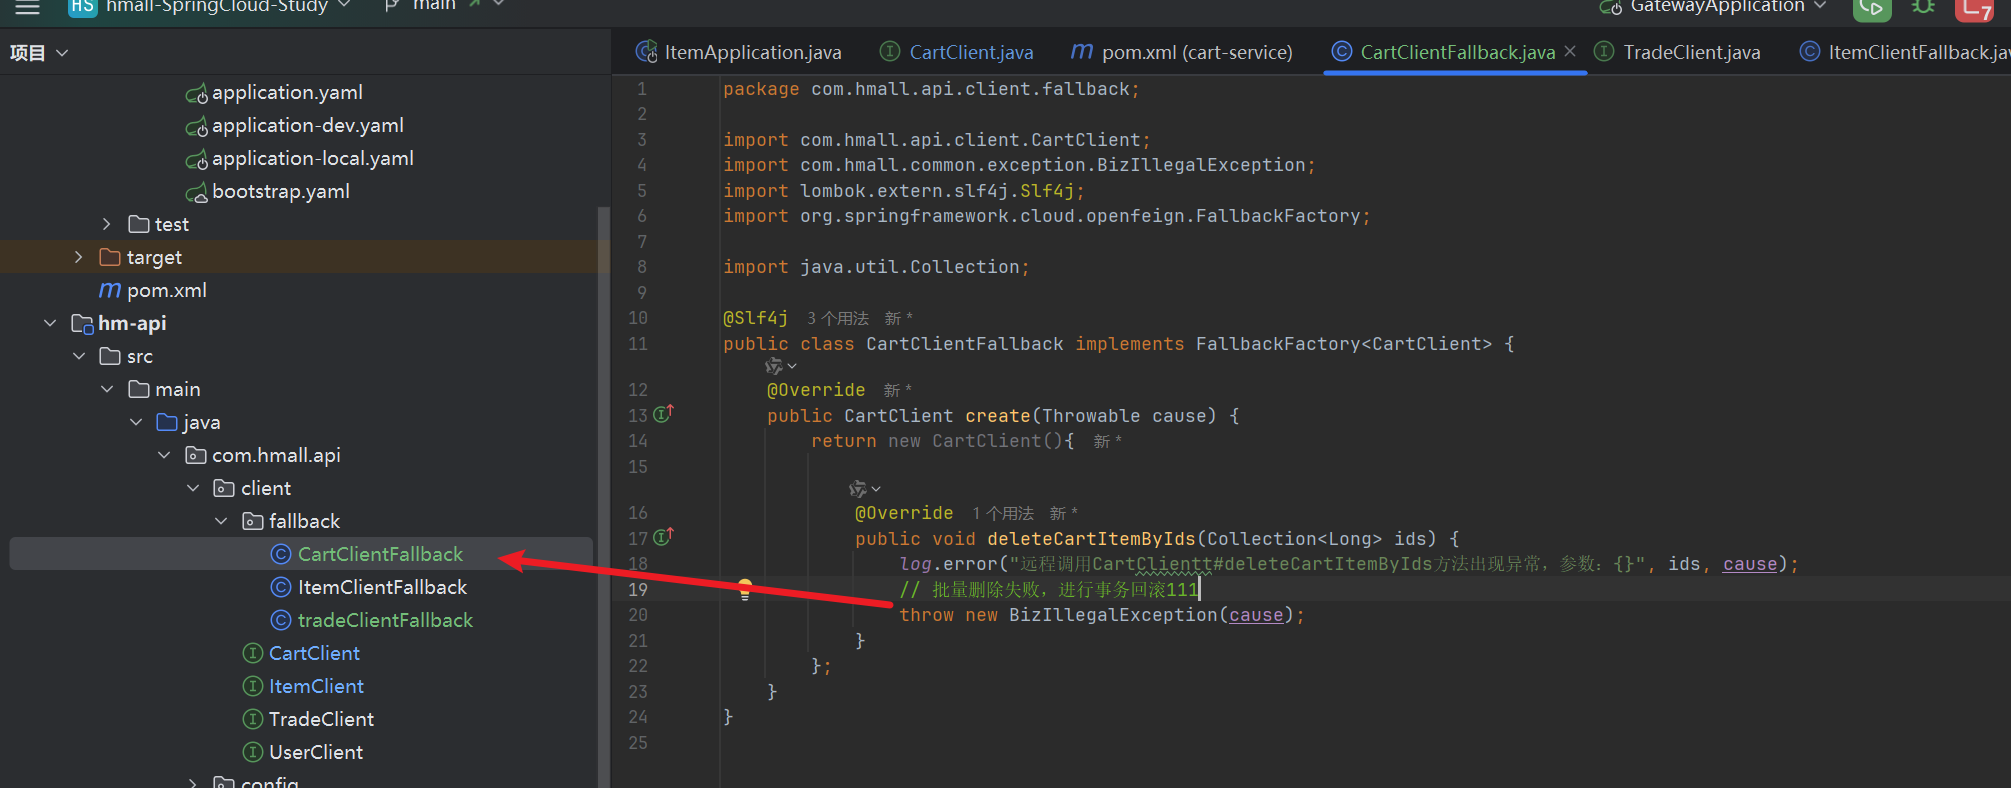
package com.hmall.api.client.fallback;

import com.hmall.api.client.CartClient;
import com.hmall.common.exception.BizIllegalException;
import lombok.extern.slf4j.Slf4j;
import org.springframework.cloud.openfeign.FallbackFactory;

import java.util.Collection;

@Slf4j
public class CartClientFallback implements FallbackFactory<CartClient> {
    @Override
    public CartClient create(Throwable cause) {
        return new CartClient(){

            @Override
            public void deleteCartItemByIds(Collection<Long> ids) {
                log.error("远程调用CartClientt#deleteCartItemByIds方法出现异常,参数:{}", ids, cause);
                // 批量删除失败,进行事务回滚111
                throw new BizIllegalException(cause);
            }
        };
    }
}
第二步:注册bean
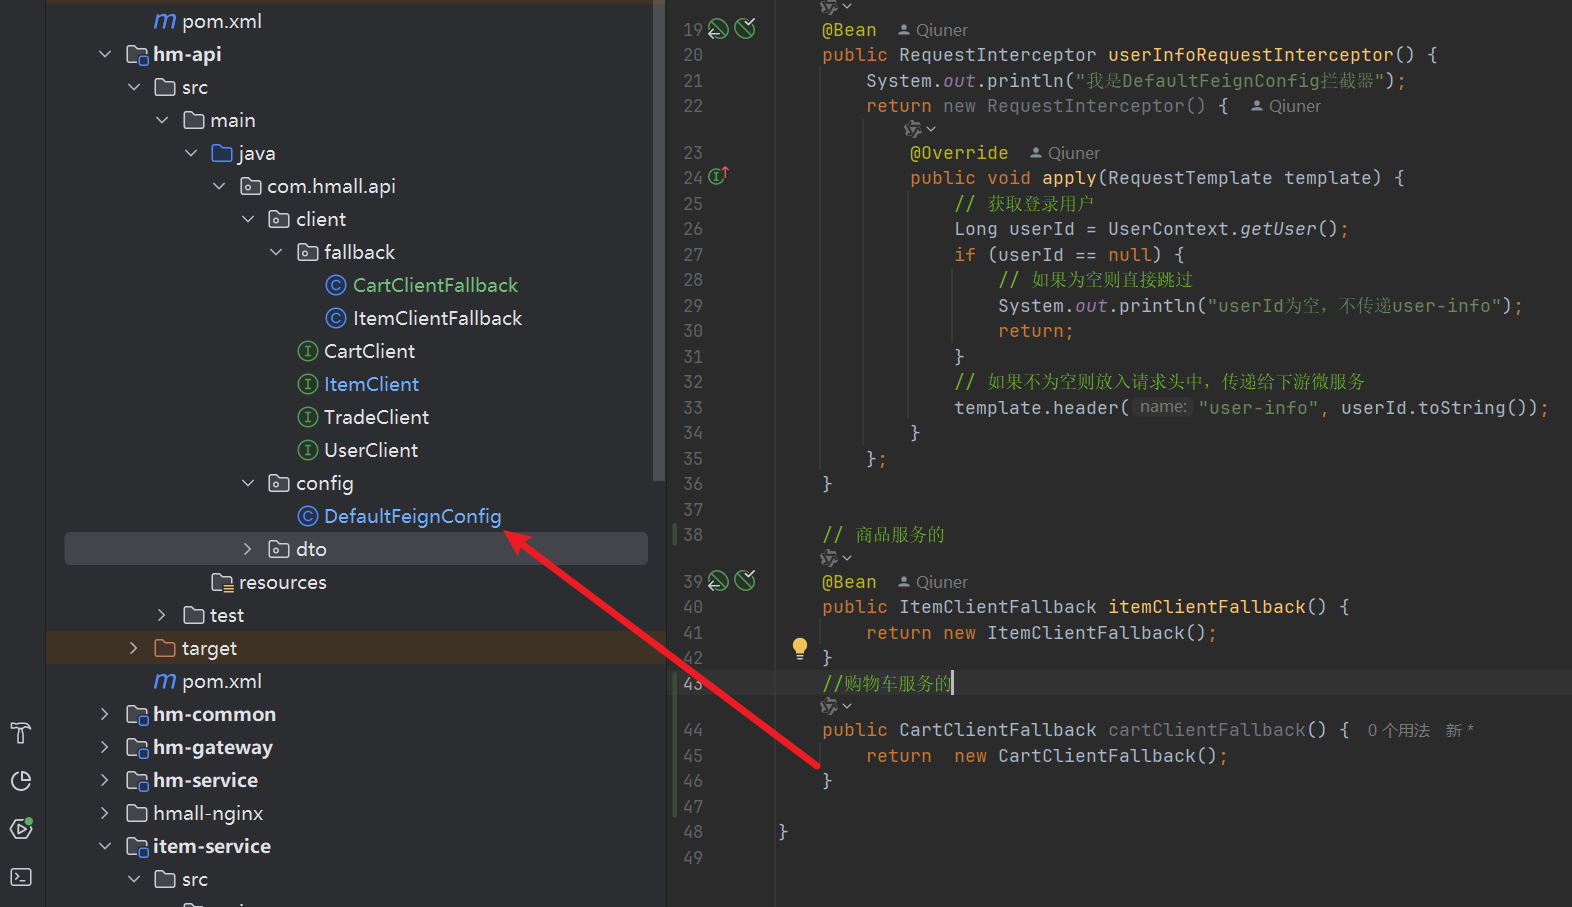
第三步:使用相应bean
- 现在你就可以打开测试啦,不过因为这是删除,所以建议使用别的进行测试。其他的配置方法也是一样的
作业二:3.2.解决分布式事务
作业描述
除了下单业务以外,用户如果选择余额支付,前端会将请求发送到pay-service模块。而这个模块要做三件事情:
- 直接从user-service模块调用接口,扣除余额付款
- 更新本地(pay-service)交易流水表状态
- 通知交易服务(trade-service)更新其中的业务订单状态
- 这里其实也很简单,在需要的模块加上相关注解、引入依赖就可以了
更多专栏订阅:
感谢宝子的订阅