1、效果图:
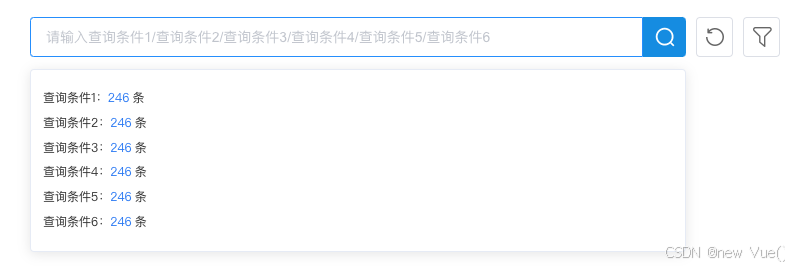

2、需求&实现:
输入条件 下面匹配查询到的数据有多少个 需要调用后端接口展示,后端查询到之后返回条数 前端展示
3、具体代码实现:
html: 图片需要自己根据实际情况增加 // 查询 重置 筛选 本文章只写查询 重置和更多筛选逻辑自行添加
html
<div
          class="topSearch"
          ref="topSearch"
        >
          <div class="top-search-group">
            <el-popover
              placement="bottom"
              width="500px"
              trigger="manual"
              v-model="visible"
              ref="popover"
              popper-class="peopleSelectPopper"
            >
              <div
                class="linkageDiv"
                v-for="(item,index) in queryList"
                :key="index"
              >
                <div @click="linkageDivClick(item)">{{item.queryType}}:<span :class="{spanData:Number(item.number)>0,spanNoData:Number(item.number)==0}">{{item.number}}</span>条</div>
              </div>
              <div
                style="display:flex;"
                slot="reference"
              >
                <el-input
                  width="500px"
                  placeholder="请输入查询条件1/查询条件2/查询条件3/查询条件4/查询条件5/查询条件6"
                  size="medium"
                  @input="debouncedInput"
                  @click.native="openPopover"
                  v-model="queryDataLabel"
                  ref="input"
                >
                </el-input>
                <div
                  class="searchBtn"
                  style="font-size:20px;width: 46px;height: 40px;padding:0px"
                  @click="getGridDataEvt('search', true)"
                >
                  <img
                    src="../../assets/images/search.png"
                    alt=""
                  >
                </div>
              </div>

            </el-popover>
            <div
              class="iconBtn"
              @click="getGridDataEvt('reset')"
            >
              <el-tooltip
                class="item"
                effect="dark"
                content="重置"
                placement="top"
              >
                <img
                  src="../../assets/images/chongzhi.png"
                  alt=""
                ></el-tooltip>
            </div>

            <el-tooltip
              class="item"
              effect="dark"
              content="筛选"
              placement="top"
            >
              <div
                class="iconBtnShaixuan"
                :class="{active:!searchFilterFlag}"
                @click="searchFilterFlagClick()"
              >
                <img
                  v-if="!searchFilterFlag"
                  src="../../assets/images/shaixuanClick.png"
                  alt=""
                >
              </div>
            </el-tooltip>
          </div>
        </div>
js代码逻辑
javascript
//接口需要自己引入
import { selectNum } from "@/api/xxxx"
export default {
    data() {
      return {
       searchFilterFlag: false,
       visible: false,
        //初始的一些查询条件
       searchData: {
        queryData: "",
        orderByKeyWord: "",
        ascOrDesc: "",
        orderByRule: "",
      },
       queryDataLabel: "",
       queryList: [
        {
          queryType: `查询条件1`,
          queryParam: "workNo",
          number: 0,
        },
        {
          queryType: `查询条件2`,
          queryParam: "personName",
          number: 0,
        },
        {
          queryType: `查询条件3`,
          queryParam: "pmpName",
          number: 0,
        },
        {
          queryType: `查询条件4`,
          queryParam: "phone",
          number: 0,
        },
        {
          queryType: `查询条件5`,
          queryParam: "graduationInstitution",
          number: 0,
        },
        {
          queryType: `查询条件6`,
          queryParam: "insurancesPlace",
          number: 0,
        },
      ],
      timer: null,
      queryParam: "",
      }
    },
    mounted() {
        //增加一个全局监听 方便点击其他位置可以关闭el-popover
        document.addEventListener('click', this.handleDocumentClick);
    },
    methods: {
    //点击查询条件的每一条数据
     linkageDivClick(item) {
      this.visible = false;
        // 我们需要把这个值给后端传过去
      this.queryParam = item.queryParam;
        // 原本的查询条件中 searchData 所有值需要置空
      for (let key in this.searchData) {
          this.searchData[key] = ""
      }
      this.searchData[item.queryParam] = this.queryDataLabel;
        //去调用查询接口
      this.getGridDataEvt('search', false)
    },
    openPopover() {
      this.visible = true;
      this.debouncedInput(this.queryDataLabel)
    },
    // 下拉框查询接口
    debouncedInputApi(val) {
      selectNum({ queryData: val }).then(res => {
        if (res.code == 200) {
          let data = res.data
          this.queryList.forEach(item => {
            for (let key in data) {
              if (item.queryParam == key) {
                item.number = data[key]
              }
            }
          })
        } else {
          this.$message.error('数据获取失败');
        }
      }).catch(err => {
        this.$message.error(err.msg);
      })
    },
    // 输入框触发
    debouncedInput(val) {
      clearTimeout(this.timer);
      //   防抖
      this.timer = setTimeout(() => {
        this.debouncedInputApi(val)
      }, 500);
    },
    },
    beforeDestroy() {
        //清除定时
      clearTimeout(this.timer);
        // 移除监听
      document.removeEventListener('click', this.handleDocumentClick);
    },

}
样式style 具体效果还是需要自己微调
javascript
.topSearch {
        height: 80px;
        width: calc(100% - 20px);
        display: flex;
        align-items: center;
        justify-content: center;
        .top-search-group {
          height: 40px;
          width: 750px;
          display: flex;
          align-items: center;
          span {
            width: 100%;
          }
          ::v-deep .el-input__inner {
            height: 40px;
            border-radius: 4px 0 0 4px;
          }
          ::v-deep .el-input-group__append {
            background: #0096f1;
            color: #fff;
          }
          .searchBtn {
            cursor: pointer;
            background: #008ee4;
            display: flex;
            align-items: center;
            justify-content: center;
            border-radius: 0 4px 4px 0;
          }
          .iconBtn {
            margin-left: 10px;
            width: 42px;
            height: 40px;
            cursor: pointer;
            background: #ffffff;
            border-radius: 4px;
            border: 1px solid #dcdfe6;
            display: flex;
            align-items: center;
            justify-content: center;
          }
          .iconBtnShaixuan {
            margin-left: 10px;
            width: 42px;
            height: 40px;
            cursor: pointer;
            background: #ffffff;
            border-radius: 4px;
            border: 1px solid #dcdfe6;
            background: url("../../assets/images/shaixuan.png");
            background-repeat: no-repeat;
            background-position: center center;
            &:hover {
              background: url("../../assets/images/shaixuanClick.png");
              background-repeat: no-repeat;
              background-position: center center;
            }
          }
          .active {
            background: #ebf7ff;
            border-radius: 4px;
            border: 1px solid #cbebff;
            display: flex;
            align-items: center;
            justify-content: center;
            &:hover {
              background: #ebf7ff;
            }
          }
        }
      }