天气预报
前言
本周完成了暑假最后一个项目天气预报,这个项目界面的布局并不是很难,主要是学习了简单的网络请求,通过请求的数据更新展示的内容,这是一个新学的知识,还是有许多的知识点需要学习,理解。
简单的网络请求
简单的网络请求主要有以下几个步骤:
1.创建请求地址
2.创建请求类
3.创建会话
4.根据会话创建任务
5.启动任务
下面我先给我的网络请求代码,根据代码进行讲解:
objectivec
-(void) pleaseURL:(NSString*)cityID
{
    NSLog(@"现在的时间");
    //使用GCD来解决网络异步的问题,但是这里本人还没有系统性学习,这里先不做讲解
    dispatch_group_t group = dispatch_group_create();
    dispatch_queue_t queue = dispatch_get_global_queue(DISPATCH_QUEUE_PRIORITY_DEFAULT, 0);
    NSString* urlString = [NSString stringWithFormat:@"https://devapi.qweather.com/v7/weather/now?location=%@&key=b0e66b20297d457898b69ea7b94ee119",cityID];
    //创建一个NSURL对象
    NSURL* url = [NSURL URLWithString:urlString];
    //创建一个NSURLRequest对象
    NSURLRequest* request = [NSURLRequest requestWithURL:url];
    //创建一个NSURLSession对象,用于管理和执行网络请求。
    NSURLSession* session = [NSURLSession sessionWithConfiguration:[NSURLSessionConfiguration defaultSessionConfiguration] delegate:self delegateQueue:[NSOperationQueue mainQueue]];
    dispatch_group_enter(group);
    dispatch_group_async(group, queue, ^{
    //创建一个NSURLSessionTask对象,用于执行特定的网络请求并且使用complotionHander回调来获取请求到的数据和处理错误
    NSURLSessionTask* task = [session dataTaskWithRequest:request completionHandler:^(NSData* data, NSURLResponse* response, NSError* error) {
        if(error) {

        }else {
            //JSON格式的内容转化成为OC中的字典,便于我们使用其中的内容。
            NSDictionary *weatherData = [NSJSONSerialization JSONObjectWithData:data options:kNilOptions error:&error];
            if(error) {

            } else {

                NSDictionary* dic = weatherData[@"now"];
                NSString* str1 = dic[@"obsTime"];
                NSLog(@"%@", str1);
                NSString* str2 = [str1 substringWithRange:NSMakeRange(11, 5)];
                [self.cityobsTime addObject:str2];
                [self.citytext addObject:dic[@"text"]];
                self.icon = dic[@"icon"];
                NSString* str3 = [NSString stringWithFormat:@"%@°", dic[@"temp"]];
                [self.citytemp addObject:str3];
                NSLog(@"OK");
            }
        }
        dispatch_group_leave(group);
    }];
    [task resume];

   });
   dispatch_group_notify(group, dispatch_get_main_queue(), ^{
    [self pleaseURL1:cityID];
   });
}
下面介绍几个网络请求中使用的函数 :
+ (nullable instancetype)URLWithString:(NSString *)URLString 是NSURL类的一个类方法,用于根据给定的URL字符串创建一个NSURL对象。这里的字符串可以是一个有效的URL地址,也可以是一个相对路径(就是在同一个网站下,不同文件之间的的位置定位)。
+ (instancetype)requestWithURL:(NSURL *)URL 是NSURLRequest类的一个类方法,用于根据给定的NSURL对象创建一个NSURLRequest对象。这个步骤的结果主要使用于去进行指定URL地址的特定的网络请求。
+ (NSURLSession *)sessionWithConfiguration:(NSURLSessionConfiguration *)configuration delegate:(nullable id <NSURLSessionDelegate>)delegate delegateQueue:(nullable NSOperationQueue *)queue这个方法中创建了一个NSURLSession对象,它可以用于发送多个网络请求,并使用指定的代理处理会话的回调和事件。在我的代码中,我使用一个默认的会话配置,将这个视图控制器作为代理对象,在主队列中执行网络请求,使用主线程来处理回调。这个函数可以执行多个网络请求。
- (NSURLSessionDataTask *)dataTaskWithRequest:(NSURLRequest *)request completionHandler:(void (NS_SWIFT_SENDABLE ^)(NSData * _Nullable data, NSURLResponse * _Nullable response, NSError * _Nullable error))completionHandler;: 是NSURLSession类的一个方法,用于创建一个NSURLSessionDataTask对象,并发送指定的请求。这个函数中NSURLRequest用于指定特定的网络请求。请求完成后,会调用后面的completionHandler回调块。
下面这个是网络请求返回的JSON格式的内容,这是是使用和风天气进行网络请求返回的JSON格式的数据。
xml
{
  "code": "200",
  "updateTime": "2020-06-30T22:00+08:00",
  "fxLink": "http://hfx.link/2ax1",
  "now": {
    "obsTime": "2020-06-30T21:40+08:00",
    "temp": "24",
    "feelsLike": "26",
    "icon": "101",
    "text": "多云",
    "wind360": "123",
    "windDir": "东南风",
    "windScale": "1",
    "windSpeed": "3",
    "humidity": "72",
    "precip": "0.0",
    "pressure": "1003",
    "vis": "16",
    "cloud": "10",
    "dew": "21"
  },
  "refer": {
    "sources": [
      "QWeather",
      "NMC",
      "ECMWF"
    ],
    "license": [
      "QWeather Developers License"
    ]
  }
}
code 请参考状态码在网络请求返回的JSON格式的数据通常是以NSData的形式返回的。**NSData是一个用于表示二进制数据的类,在网络请求中用于接收和传输数据。**而后再使用JSONObjectWithData:options:error:方法将NSData转化为字典的数据,便于我们使用。通过上面的JSON格式的数据我们看可以出来,在JSON格式中,数据的内容和名称可以理解成字典中键对值一样的东西,一一对应的关系。
进行网络请求的数据来源:和风天气
首页
展示

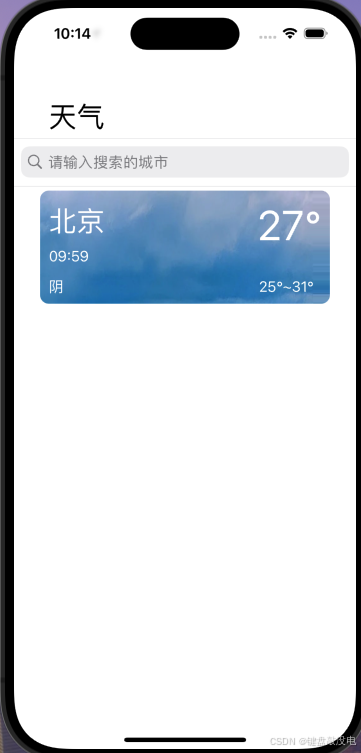
这个页面中,总体来说布局比较简单,我使用了一个tableview和一个UISearchCOntroller控件来进行布局,通过每次添加后网络请求到的数据对tableview进行刷新,来增加首页显示的cell数量。
搜索

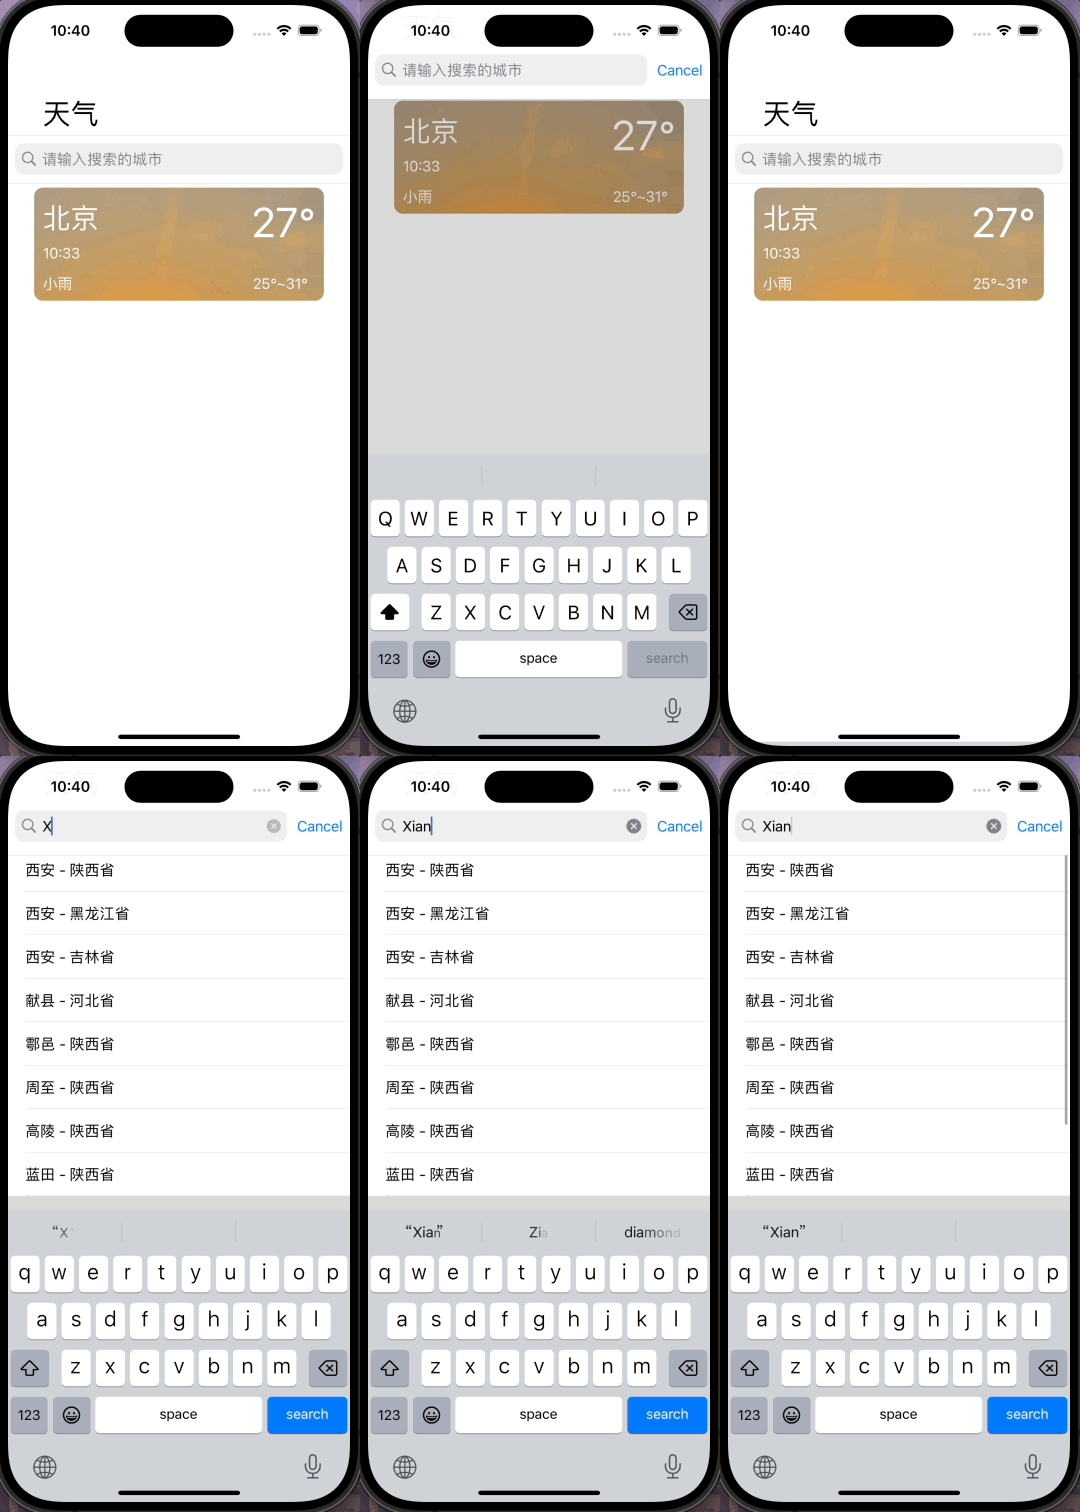
在搜索时,这里我使用了一个UISearchCOntroller控件:UISearchController提供了一个搜索栏和搜索结果视图的管理器,使得在应用中集成搜索功能变得简单。它可以用于在单个视图控制器中添加搜索功能,也可以与其他视图控制器(如UITableViewController)一起使用。 但是这里本人并没有完全掌握,这里仅给出我现在学习运用的内容, 后期学习后会另写一篇博客来进行总结。这里我们要实现UISearchControllerDelegate, UISearchResultsUpdatig两个协议
objectivec
    self.search = [[UISearchController alloc] initWithSearchResultsController:nil];
    self.search.delegate = self;
    self.search.searchResultsUpdater = self;
    //设置searchbar的尺寸
    [self.search.searchBar sizeToFit];
    //在搜索时将背景模糊化,因为模糊背景的目的是将焦点集中在搜索结果上,而不是与背景内容进行交互。
    self.search.obscuresBackgroundDuringPresentation = YES;
    //隐藏导航控制栏
    self.search.hidesNavigationBarDuringPresentation = YES;
    //设置未编辑状态的searchbar的位置
    self.search.searchBar.frame = CGRectMake(0, 150, [UIScreen mainScreen].bounds.size.width, 55);
//    _tableview.tableHeaderView = self.search.searchBar;
    [self.view addSubview:self.search.searchBar];
    self.search.searchBar.searchBarStyle = UISearchBarStyleDefault;
    UISearchBar* searchbar = self.search.searchBar;
    searchbar.placeholder = @"请输入搜索的城市";
- (void)updateSearchResultsForSearchController:(UISearchController *)searchController;这个协议方法是UISearchControllerDelegate协议中必须实现的一个方法,在天气预报中实现模糊搜索就是在这个方法中进行网络请求进行实现的。
对于UISeaerchCOntrollery掌握的并不是很熟练,可以看到,在我开始搜索上移搜索框和我的view上移有一个时间差,这里我是使用在将view上移时执行动画效果来实现,但是现在我并没有解决这个两个上移中延迟的问题,做到同步上移, 后期找到解决方法后会再回来进行补充。个人认为,这个控件在执行搜索时是一个实用性较高控件。
参考博客:
iOS开发 -UISearchController的使用和改善方法
【iOS】------ 浅谈UISearchController
详情界面

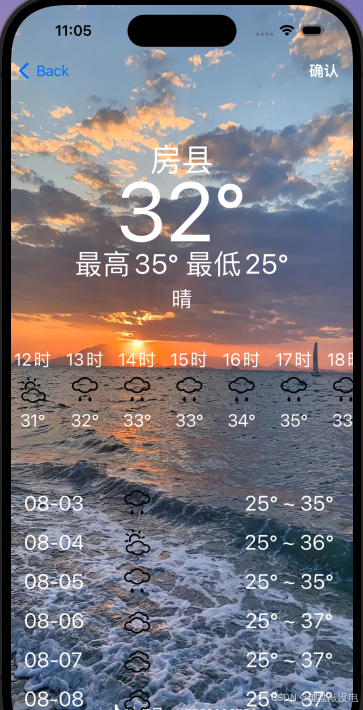
详情界面我使用了两个滚动视图和一个tableview,先时候一个滚动视图用来添加这些控件,另一个滚动视图用于展示24小时天气预报,再使用tableview来展示7天的天气,这个页面没有什么比较难的内容,主要还是进行简单的网络请求。然后要注意对于添加城市的判重,不能重复添加城市id一样的城市到主页去。
objectivec
-(void) press
{
    NSLog(@"离开城市");
    for(NSString* str in self.hadCity) {
        if([self.CityID isEqual:str]) {
            UIAlertController *alert = [UIAlertController alertControllerWithTitle:@"警告" message:@"该城市天气已添加" preferredStyle:UIAlertControllerStyleAlert];
            UIAlertAction *cofirm = [UIAlertAction actionWithTitle:@"确认" style:UIAlertActionStyleDefault handler:^(UIAlertAction* action){
//               [self.delegate cityID:self.CityID andName:self.name];
//                [self dismissViewControllerAnimated:YES completion:nil];
                [self.navigationController popViewControllerAnimated:YES];
            }];
            [alert addAction:cofirm];
            [self presentViewController:alert animated:YES completion:nil];
            break;
        }
    }
    UIAlertController *alert = [UIAlertController alertControllerWithTitle:@"提示" message:@"已经添加该城市天气至首页" preferredStyle:UIAlertControllerStyleAlert];
    UIAlertAction *cofirm = [UIAlertAction actionWithTitle:@"确认" style:UIAlertActionStyleDefault handler:^(UIAlertAction* action){
        [self.delegate cityID:self.CityID andName:self.name];

        [self.navigationController popViewControllerAnimated:YES];
    }];
    [alert addAction:cofirm];
    [self presentViewController:alert animated:YES completion:nil];

}同时在详情页我使用的图片都是SVG图片,这里我能使用的是第三方库SVGKit库来添加svg图片,怎么添加第三方库,可以去看看这篇文章------最新cocoapods安装流程。在配置时遇到了一些里面没有的问题,可以去谷歌上搜索问题,个人认为他经常能解决问题。
在使用cocoaPods从github上下载SVGKit的时候,网页可以打开github。但是无法下载,说明命令行在拉取/推送代码时并没有使用vpn进行代理。可以看看这篇博客来解决问题: Git报错: Failed to connect to github.com port 443 解决方案
浏览界面

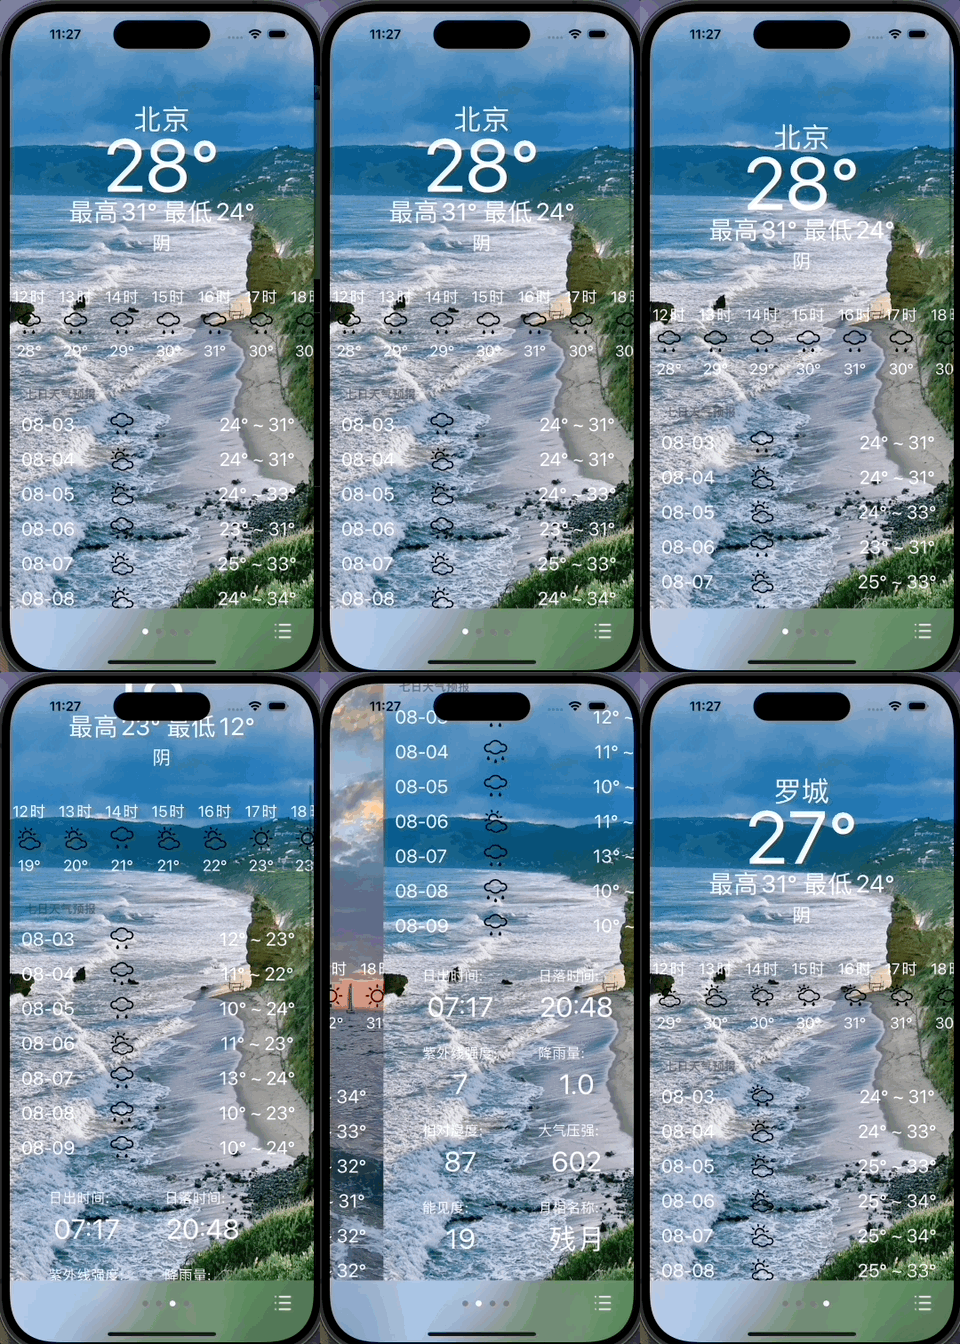
这个页面中是使用一个滚动视图,将详情页的view和图片一样添加到滚动视图中,设置好他的偏移位置即可,下面给出代码说明。
objectivec
-(void) creatScroll
{
    _scrollview = [[UIScrollView alloc] initWithFrame:CGRectMake(0, 0, [UIScreen mainScreen].bounds.size.width, [UIScreen mainScreen].bounds.size.height)];
    _scrollview.contentSize = CGSizeMake(self.view.bounds.size.width*self.cityID.count, self.view.bounds.size.height);
    _scrollview.delegate = self;
    _scrollview.pagingEnabled = YES;
    [self.view addSubview:self.scrollview];
    for(int i = 0; i < _cityID.count; i++) {
        CGFloat xOffset = i * self.view.bounds.size.width;
        VCxiangqing* vc = [[VCxiangqing alloc] init];
        vc.CityID = self.cityID[i];
        vc.name = self.cityName[i];
        vc.view.frame = CGRectMake(xOffset, 0, self.view.bounds.size.width, self.view.bounds.size.height);
        vc.btn.hidden = YES;
        [self addChildViewController:vc];
        [self.scrollview addSubview:vc.view];
    }
    //根据点击cell传入的page的值来确定偏移量,从而确定刚开始显示的view
    [self.scrollview setContentOffset:CGPointMake(self.view.bounds.size.width*self.page, 0) animated: YES];
}
在页面下方,我使用了一个UIVisualEffectView, UIVisualEffectView 是 iOS 中一个非常有用的 UI 组件,它可以为视图添加各种视觉效果,如模糊、色调调整等,从而实现一些酷炫的界面效果。 将view最下方变成模糊效果,再在上面添加UIPageControll和返回按钮,注意要直接将它添加到self.view上,不能添加到滚动视图中,会导致跟随滚动视图滚动而同时滚动。
代码实现:
objectivec
-(void) creatvisual
{
    //[UIBlurEffect effectWithStyle:UIBlurEffectStyleLight]生成一个带有 UIBlurEffectStyleLight 效果的模糊视觉效果。
    //UIBlurEffect: 为视图添加模糊效果,可以设置模糊半径大小。
    //UIVibrancyEffect: 为模糊区域添加饱和度和对比度的增强效果。
    //UIColorEffect: 为视图添加色调调整效果。
    self.visual = [[UIVisualEffectView alloc] initWithEffect:[UIBlurEffect effectWithStyle:UIBlurEffectStyleLight]];
    [self.view addSubview:self.visual];
    self.visual.frame = CGRectMake(0, 772, self.view.bounds.size.width, 80);

    UIButton* btn = [UIButton buttonWithType:UIButtonTypeCustom];
    btn.frame = CGRectMake(323, 0, 60, 60);
    [btn setImage:[UIImage imageNamed:@"目录.png"] forState:UIControlStateNormal];
    [btn addTarget:self action:@selector(press) forControlEvents:UIControlEventTouchUpInside];
    [self.visual.contentView addSubview:btn];
    NSLog(@"%ld" ,self.page);
    NSLog(@"当前页");
    self.pageO = [[UIPageControl alloc] initWithFrame:CGRectMake(80, 0, 243, 60)];
    self.pageO.numberOfPages = self.cityID.count;
    self.pageO.currentPage = self.page;
    self.pageO.pageIndicatorTintColor = [UIColor grayColor];
    self.pageO.currentPageIndicatorTintColor = [UIColor whiteColor];
    self.pageO.userInteractionEnabled = NO;
    [self.visual.contentView addSubview:self.pageO];

}