前言
SpringBoot 版本 2.6.13,相关链接 Core Features
- Default properties (specified by setting SpringApplication.setDefaultProperties).
- @PropertySource annotations on your @Configuration classes. Please note that such property sources are not added to the Environment until the application context is being refreshed. This is too late to configure certain properties such as logging.* and spring.main.* which are read before refresh begins.
- Config data (such as application.properties files).
- A RandomValuePropertySource that has properties only in random.*.
- OS environment variables.
- Java System properties (System.getProperties()).
- JNDI attributes from java:comp/env.
- ServletContext init parameters.
- ServletConfig init parameters.
- Properties from SPRING_APPLICATION_JSON (inline JSON embedded in an environment variable or system property).
- Command line arguments.
- properties attribute on your tests. Available on @SpringBootTest and the test annotations for testing a particular slice of your application.
- @TestPropertySource annotations on your tests.
- Devtools global settings properties in the $HOME/.config/spring-boot directory when devtools is active.
Default properties
默认情况下的启动类
@SpringBootApplication
public class BlogApplication {

    public static void main(String[] args) {
        SpringApplication.run(BlogApplication.class, args);
    }
}
添加 defaultProperties
@SpringBootApplication
@Slf4j
public class BlogApplication {

    public static void main(String[] args) {
        Map<String, Object> map = new HashMap<>();
        map.put("hello", "world");

        SpringApplication springApplication = new SpringApplication(BlogApplication.class);
        springApplication.setDefaultProperties(map);
        ConfigurableApplicationContext context = springApplication.run(args);
        String property = context.getEnvironment().getProperty("hello");
        log.info(property);
    }
}
启动项目,查看运行结果

@PropertySource
创建 key.properties
name=Anna运行 Main 方法,查看运行结果
@Slf4j
@SpringBootApplication
@PropertySource("classpath:key.properties")
public class BlogApplication {

    public static void main(String[] args) {
        ConfigurableApplicationContext context = SpringApplication.run(BlogApplication.class, args);
        String property = context.getEnvironment().getProperty("name");
        log.info(property);
    }
}
Config data
默认配置文件位置(ConfigDataEnvironment#DEFAULT_SEARCH_LOCATIONS)
- optional:classpath:/
- optional:classpath:/config/
- optional:file:./
- optional:file:./config/
- optional:file:./config/*/
默认配置文件前缀(StandardConfigDataLocationResolver#DEFAULT_CONFIG_NAMES)
- application
默认配置文件后缀(YamlPropertySourceLoader & PropertiesPropertySourceLoader)
- yml
- yaml
- properties
- xml
所以默认情况下,以下文件(文件在指定位置)都可以认为是配置文件:
- application.yml
- application.yaml
- application.properties
- application.xml
前三个文件我们经常遇到,主要演示一下第四个配置文件
演示 application.xml
创建 application.xml
<?xml version="1.0" encoding="UTF-8"?>
<!DOCTYPE properties SYSTEM "http://java.sun.com/dtd/properties.dtd">

<properties>
  <entry key="config.xml.name">application.xml</entry>
</properties>
运行 Main 方法,查看运行结果
@Slf4j
@SpringBootApplication
@PropertySource("classpath:key.properties")
public class BlogApplication {

    public static void main(String[] args) {
        ConfigurableApplicationContext context = SpringApplication.run(BlogApplication.class, args);
        String property = context.getEnvironment().getProperty("config.xml.name");
        log.info(property);
    }
}
分隔符 ---
如果配置文件里面存在分隔符 --- ,则可以将文件看出多个配置文件,分隔符下方的配置优先级更高
server:
  port: 8080
---
server:
  port: 8081
spring.config.location
覆盖默认配置文件位置
在 idea 中添加参数 --spring.config.location=classpath:/custom/
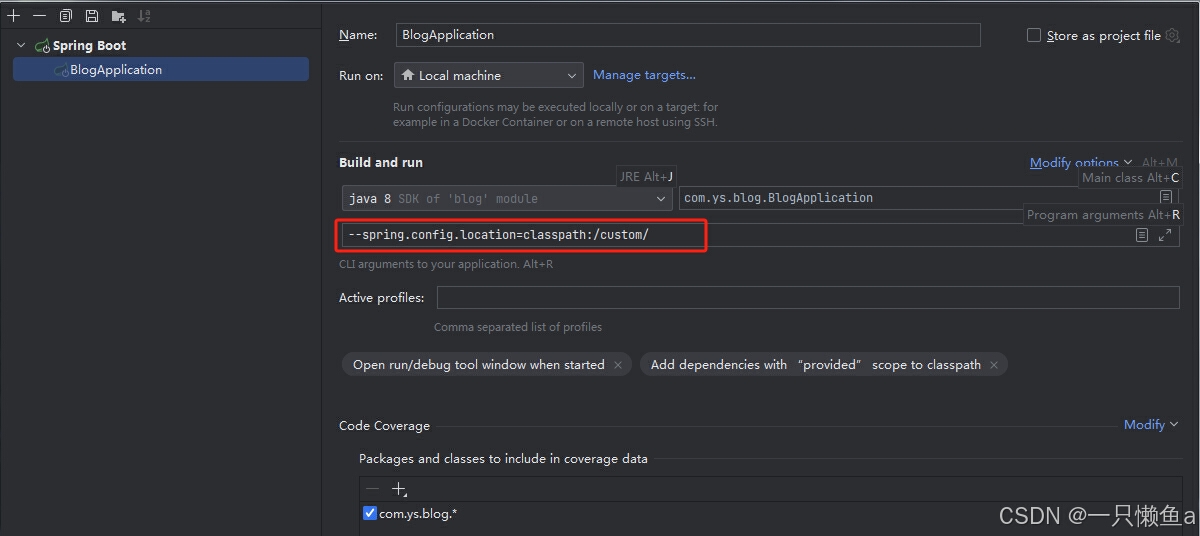
或者在启动类添加参数 --spring.config.location=classpath:/custom/
创建文件夹 custom,并创建文件 application.yaml,明细如下:
prop:
  sign:
    custom: custom-application-yaml
运行 Main 方法,查看运行结果
@Slf4j
@SpringBootApplication
@PropertySource("classpath:key.properties")
public class BlogApplication {
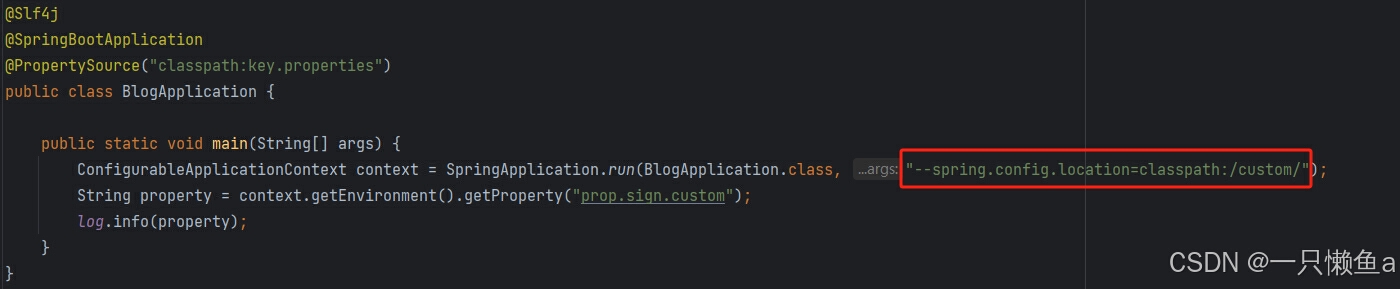
public static void main(String[] args) {
ConfigurableApplicationContext context = SpringApplication.run(BlogApplication.class, "--spring.config.location=classpath:/custom/");
String property = context.getEnvironment().getProperty("prop.sign.custom");
log.info(property);
}
}
- tomcat启动端口8080:在上文中默认配置文件配置的 server.port = 8081,所以默认配置未加载
- 属性 prop.sign 不为 null:自定义文件夹下的配置文件生效
spring.config.additional-location
配置附加位置
在 idea 中添加参数 --spring.config.location=classpath:/custom/ --spring.config.additional-location=classpath:/additional/
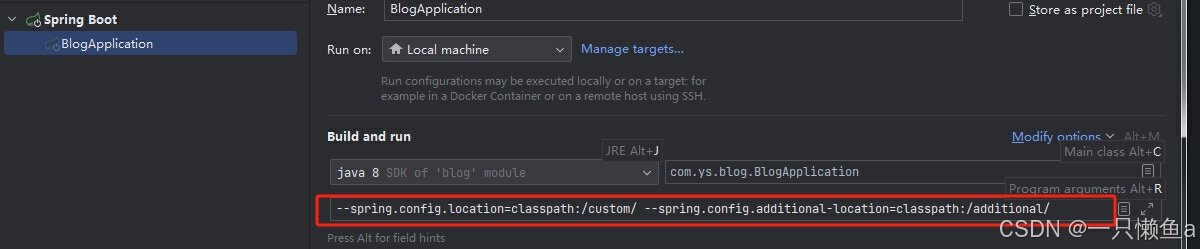
创建文件夹 additional,并创建文件 application.yaml,明细如下:
prop:
  sign:
    additional: additional-application-yaml
运行 Main 方法,查看运行结果
@Slf4j
@SpringBootApplication
@PropertySource("classpath:key.properties")
public class BlogApplication {

    public static void main(String[] args) {
        ConfigurableApplicationContext context = SpringApplication.run(BlogApplication.class, args);
        String property1 = context.getEnvironment().getProperty("prop.sign.custom");
        String property2 = context.getEnvironment().getProperty("prop.sign.additional");
        log.info(property1);
        log.info(property2);
    }
}
spring.config.import
1.在配置文件中配置
修改 application.yaml
server:
  port: 8080

spring:
  config:
    import: classpath:import/a.yaml
创建文件夹 import,并创建文件 a.yaml、b.yaml、c.yaml,明细如下:
a.yaml
server:
  port: 8082

spring:
  config:
    import: classpath:import/b.yaml
b.yaml
server:
  port: 8083

spring:
  config:
    import: classpath:import/c.yaml
c.yaml
server:
  port: 8084
运行 Main 方法,查看运行结果
@Slf4j
@SpringBootApplication
@PropertySource("classpath:key.properties")
public class BlogApplication {

    public static void main(String[] args) {
        SpringApplication.run(BlogApplication.class, args);
    }
}
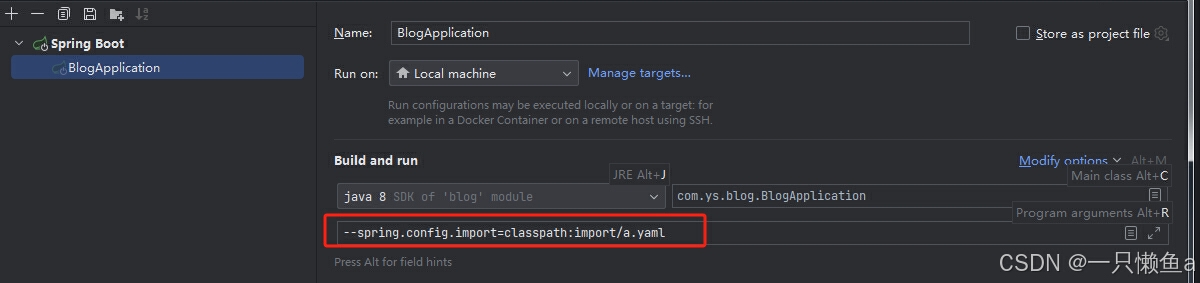
2.在 idea 中添加参数 --spring.config.import=classpath:import/a.yaml
修改 application.yaml
server:
  port: 8080
添加参数
运行 Main 方法,查看运行结果
@Slf4j
@SpringBootApplication
@PropertySource("classpath:key.properties")
public class BlogApplication {

    public static void main(String[] args) {
        SpringApplication.run(BlogApplication.class, args);
    }
}
spring.profiles.active
SpringBoot 的解析分为两个阶段(BEFORE_PROFILE_ACTIVATION & AFTER_PROFILE_ACTIVATION),spring.config.location、spring.config.additional-location、spring.config.import 的解析阶段是 BEFORE_PROFILE_ACTIVATION,spring.profiles.active 的解析阶段是 AFTER_PROFILE_ACTIVATION ,与其相关的的配置如下:
- spring.profiles.default
- spring.profiles.include
- spring.profiles.group
- spring.config.activate.on-profile
spring.profiles.default
默认值为 default,如果 spring.config.location、spring.config.additional-location、spring.config.import 解析出来的配置文件里面没有配置 spring.profiles.active、spring.profiles.include,则默认激活 application-default.yaml (yml | properties | xml)
spring.profiles.active
会激活配置文件 application-{profiles}.yaml (yml | properties | xml)
spring.profiles.include
spring.profiles.active 的集合形式,用逗号分割
spring.profiles.group
如果 spring.profiles.active、spring.profiles.include 指定的值中与 spring.profiles.group 的某个组名一致,则激活组名及组内元素对应的配置。比如以下配置,则会激活 g1、e1、e2
spring:
  profiles:
    active: g1
    group:
      g1:
        - e1
        - e2
      g2:
        - e3
        - e4
spring.config.activate.on-profile
spring.config.location、spring.config.additional-location、spring.config.import 解析出来的配置文件,只有在某个配置文件激活的状态下才生效
PS :待激活的配置文件 application-{profiles}.yaml (yml | properties | xml) 里不可存在以下配置:
- spring.profiles.include
- spring.profiles.include0
- spring.profiles.active
- spring.profiles.active0
- spring.profiles.default
- spring.profiles.default0
Configuring Random Values
- ${random.value}:加密数据
- ${random.int}:随机数(int)
- ${random.long}:随机数(long)
- ${random.uuid}:uuid
- ${random.int(10)}:[ 0,10)
- ${random.int1024,65536}:[ 1024,65536)
@EnableConfigurationProperties + @ConfigurationProperties 使用案例
配置文件
my:
  secret: ${random.value}
  number: ${random.int}
  bignumber: ${random.long}
  uuid: ${random.uuid}
  number-less-than-ten: ${random.int(10)}
  number-in-range: ${random.int[1024,65536]}
创建实体类 RandomEntity
@Data
@ConfigurationProperties(prefix = "my")
public class RandomEntity {

    private String secret;

    private Integer number;

    private Long bignumber;

    private String uuid;

    private String numberLessThanTen;

    private Integer numberInRange;

    @Override
    public String toString() {
        return "RandomEntity{" +
                "secret='" + secret + '\'' +
                ", number=" + number +
                ", bignumber=" + bignumber +
                ", uuid='" + uuid + '\'' +
                ", numberLessThanTen='" + numberLessThanTen + '\'' +
                ", numberInRange=" + numberInRange +
                '}';
    }
}
运行 Main 方法,查看运行结果
@Slf4j
@SpringBootApplication
@EnableConfigurationProperties(RandomEntity.class)
public class BlogApplication {

    public static void main(String[] args) {
        ConfigurableApplicationContext context = SpringApplication.run(BlogApplication.class, args);
        RandomEntity randomEntity = context.getBean(RandomEntity.class);
        System.out.println(randomEntity);
    }
}
System properties & System environment
可以获取系统属性以及系统环境变量
使用案例
@Slf4j
@SpringBootApplication
@EnableConfigurationProperties(RandomEntity.class)
public class BlogApplication {

    public static void main(String[] args) {
        ConfigurableApplicationContext context = SpringApplication.run(BlogApplication.class, args);
        ConfigurableEnvironment environment = context.getEnvironment();
        String javaRuntimeName = environment.getProperty("java.runtime.name");
        String javaHome = environment.getProperty("JAVA_HOME");
        System.out.println(javaRuntimeName);
        System.out.println(javaHome);
    }
}