软件和硬件环境
- ubuntu server 24.04,并已配置好ipv6公网地址,已安装好docker和docker-compose。
- 一块单独的硬盘,用于单独存储nextcloud数据。(非必需)
- 有一个能够正常解析的域名,并已配置好AAAA记录解析。
- 免费SSL证书可以通过Let's Encrypt (letsencrypt.org)获取。
格式化用于存储nextcloud数据的硬盘(若无需求可跳过)
创建分区表
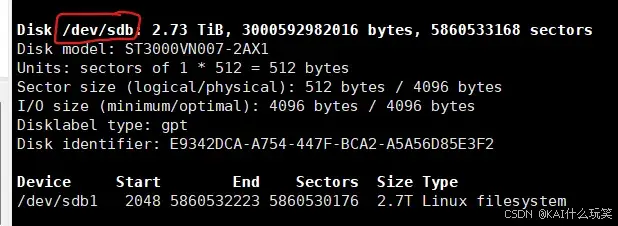
使用sudo fdisk -l查看系统中的所有硬盘信息,并从中找到想用于存储nextcloud数据的硬盘,我这里的是/dev/sdb。
使用sudo parted /dev/sdb命令,进入分区编辑,使用如下命令进行分区(因为我的硬盘大于2TB,需要使用GPT类型分区表),其他分区方式请自行百度。
bash
mache@mache:~$ sudo parted /dev/sdb
GNU Parted 3.6
Using /dev/sdb
Welcome to GNU Parted! Type 'help' to view a list of commands.
(parted) mklabel gpt
# 设置分区表类型为gpt
Warning: The existing disk label on /dev/sdb will be destroyed and all data on this disk will be lost. Do you want to
continue?
Yes/No? yes
(parted) mkpart primary 0% 100%
# 将硬盘的所有空间设置为一个主分区,parted工具会自动为分区表留出空间
(parted) print
# 查看分区结果
Model: ATA ST3000VN007-2AX1 (scsi)
Disk /dev/sdb: 3001GB
Sector size (logical/physical): 512B/4096B
Partition Table: gpt
Disk Flags:

Number  Start   End     Size    File system  Name     Flags
 1      1049kB  3001GB  3001GB               primary

(parted) ^C
# 退出编辑

Information: You may need to update /etc/fstab.也可使用fdisk(2TB以下硬盘)或gdisk命令(2T以上硬盘)进行分区,请自行百度。
输入d可以删除原有分区,输入n可以新建分区,输入w可以将分区表写入并保存退出。
若硬盘容量大于2TB,必须改用gdisk命令进行分区。
因为是安装完成后写的这篇记录,这里就不放具体操作流程了(命令使用方法可以自行百度),我自己只为硬盘创建了一个分区,就如上图所示。
格式化分区
分区完成后,使用mkfs格式化分区为ext4格式(nextcloud官方建议格式)。
bash
mache@mache:~$ sudo mkfs.ext4 /dev/sdb1
mke2fs 1.47.0 (5-Feb-2023)
Creating filesystem with 732566272 4k blocks and 183148544 inodes
Filesystem UUID: e8c2956e-b1ae-4f30-8ab7-e0c5f3108de9
Superblock backups stored on blocks:
	32768, 98304, 163840, 229376, 294912, 819200, 884736, 1605632, 2654208,
	4096000, 7962624, 11239424, 20480000, 23887872, 71663616, 78675968,
	102400000, 214990848, 512000000, 550731776, 644972544

Allocating group tables: done
# 使用默认设置
Writing inode tables: done
# 使用默认设置
Creating journal (262144 blocks): done
# 使用默认设置
Writing superblocks and filesystem accounting information: done
# 使用默认设置格式化完成后,再次使用sudo fdisk -l查看是否分区成功。
挂载硬盘
使用sudo mkdir /data创建用于挂载硬盘的目录。(请根据个人实际需求进行修改)
临时挂载
注:此种方式挂载只是暂时挂载,系统重启之后需要重新挂载。
使用sudo mount /dev/sdb1 /data将格式化完成的新分区挂载到/data目录。可以使用sudo lsblk -f查看是否挂载成功。
永久挂载
通过绑定UUID的形式进行挂载,其他方式请自行百度。
使用sudo blkid命令查看所有硬盘的信息,找到需要挂载的分区的UUID(我这里是/dev/sdb1)。
bash
unn@unn:/$ sudo blkid
# 其他信息省略
/dev/sdb1: UUID="e8c2956e-xxxx-xxxx-xxxx-xxxxxxxxxxxx" BLOCK_SIZE="4096" TYPE="ext4" PARTLABEL="primary" PARTUUID="46f4705d-xxxx-xxxx-xxxx-xxxxxxxxxxxx"使用sudo vim /etc/fstab打开fstab文件,在文末插入如下一行:
bash
UUID=e8c2956e-xxxx-xxxx-xxxx-xxxxxxxxxxxx       /data   ext4 defaults 0 2
#需要挂载的分区的UUID 挂载点 分区文件类型 挂载参数 是否使用dump工具备份文件系统(按需修改) fsck检查文件系统的优先级(按需修改) 最后保存并退出,使用sudo mount -a命令进行挂载。
安装NginxProxyManager
项目官方地址:NginxProxyManager
使用mkdir nginxproxymanager新建文件夹用于存放NginxProxyManager配置和数据文件。
进入刚才新建的目录,使用以下docker-compose.yaml文件进行安装(docker-compose up -d),其中network_mode参数根据实际需求,可修改为host:
yaml
version: '3.8'
services:
  app:
    image: 'jc21/nginx-proxy-manager:latest'
    restart: unless-stopped
    network_mode: bridge
    # 网络模式根据实际需求,可修改为host
    ports:
      # These ports are in format <host-port>:<container-port>
      - '80:80' # Public HTTP Port
      - '443:443' # Public HTTPS Port
      - '81:81' # Admin Web Port
      # Add any other Stream port you want to expose
      # - '21:21' # FTP

    # Uncomment the next line if you uncomment anything in the section
    # environment:
      # Uncomment this if you want to change the location of
      # the SQLite DB file within the container
      # DB_SQLITE_FILE: "/data/database.sqlite"

      # Uncomment this if IPv6 is not enabled on your host
      # DISABLE_IPV6: 'true'

    volumes:
      - ./data:/data
      - ./letsencrypt:/etc/letsencrypt
安装nextcloud AIO
官方文档: Nextcloud All-in-One
官方Nextcloud All-in-One反向代理文档: Reverse Proxy Documentation
使用mkdir nextcloud新建文件夹用于存放NginxProxyManager配置文件,数据文件存放于刚才格式化并挂载好的硬盘中。
使用如下docker-compose.yaml文件,安装Nextcloud All-in-One(docker-compose up -d):
yaml
services:
  nextcloud-aio-mastercontainer:
    image: nextcloud/all-in-one:latest
    init: true
    restart: always
    container_name: nextcloud-aio-mastercontainer # 不要修改! This line is not allowed to be changed as otherwise AIO will not work correctly
    dns:
    # 设置常用的dns
      - 223.5.5.5
      - 119.29.29.29
      - 123.125.81.6
      - 180.76.76.76
      - 114.114.114.114
    volumes:
      - nextcloud_aio_mastercontainer:/mnt/docker-aio-config # This line is not allowed to be changed as otherwise the built-in backup solution will not work
      - /var/run/docker.sock:/var/run/docker.sock:ro # May be changed on macOS, Windows or docker rootless. See the applicable documentation. If adjusting, don't forget to also set 'WATCHTOWER_DOCKER_SOCKET_PATH'!
    network_mode: bridge # add to the same network as docker run would do
    ports:
      # - 80:80 # Can be removed when running behind a web server or reverse proxy (like Apache, Nginx, Caddy, Cloudflare Tunnel and else). See https://github.com/nextcloud/all-in-one/blob/main/reverse-proxy.md
      - 8080:8080
      # - 8443:8443 # Can be removed when running behind a web server or reverse proxy (like Apache, Nginx, Caddy, Cloudflare Tunnel and else). See https://github.com/nextcloud/all-in-one/blob/main/reverse-proxy.md
    environment:
      APACHE_PORT: 11000 # aio代理服务器的监听端口
      APACHE_IP_BINDING: 0.0.0.0  # 监听所有可用的ipv4地址,按需修改。未测试过修改为,是否可以。
      NEXTCLOUD_DATADIR: /data # 自定义nextcloud的数据目录,按需修改,如果不需要修改,请注释掉这条。⚠️⚠️⚠️不要在nextcloud安装完成后调整。

volumes: # If you want to store the data on a different drive, see https://github.com/nextcloud/all-in-one#how-to-store-the-filesinstallation-on-a-separate-drive
  nextcloud_aio_mastercontainer:
    name: nextcloud_aio_mastercontainer # 不要修改! This line is not allowed to be changed as otherwise the built-in backup solution will not work
    driver: local
    driver_opts:
      type: 'none'
      o: 'bind'
      device: '/home/mache/nextcloud/config'  # 自定义配置文件存放在刚才创建好的目录中

# 如果不需要自定义配置文件的存放目录,请使用以下配置进行代替
# volumes: # If you want to store the data on a different drive, see https://github.com/nextcloud/all-in-one#how-to-store-the-filesinstallation-on-a-separate-drive
#   nextcloud_aio_mastercontainer:
#     name: nextcloud_aio_mastercontainer # This line is not allowed to be changed as otherwise the built-in backup solution will not work
安装完成后,使用查看容器是否已成功启动:

请注意此时只有一个nextcloud相关的容器在运行。
在电脑上打开浏览器,使用https://ubuntu_server的ip:8080连接nextcloud aio容器。
以下以edge浏览器为例,若提示你的连接不是专用连接 ,依次点击"高级""继续访问xxx.xxx.xxx.xxx(不安全)"。

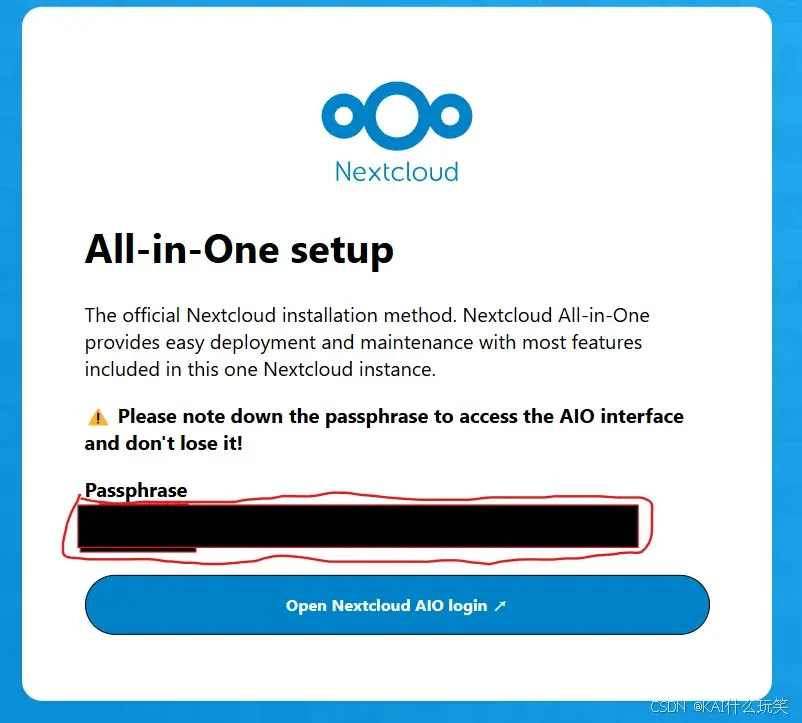
进入页面后,若是第一次登录,记下AIO配置的密码(红框中圈出的部分,只会显示这一次),然后点击open nextcloud aio login。
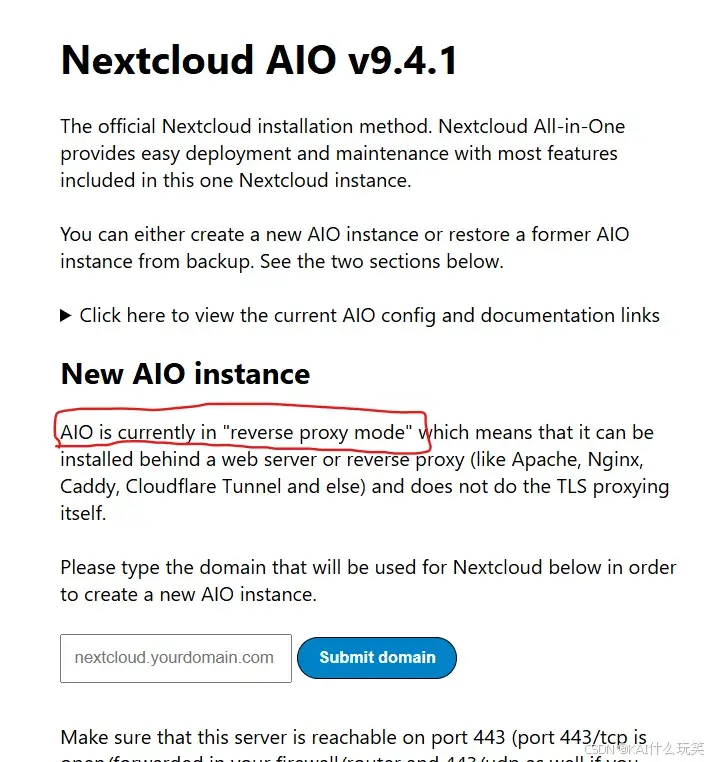
输入刚才记录的密码,登录配置页面,若页面中有AIO is currently in "reverse proxy mode" ,则可以进入下一步骤:
配置NginxProxyManager
查看nginx配置所需要的反向代理ip地址
使用sudo docker container ls查看,此时能看见有2个nextcloud容器:

其中使用nextcloud/all-in-one:latest镜像的容器,是上一步通过docker-compose安装的。而另一个使用nextcloud/aio-domaincheck:latest镜像的容器,据我推测,是在进入https://192.168.5.125:8080/containers页面后,由nextcloud所启动的,从镜像名称、容器绑定的端口与上一步docker-compose.yaml中的`APACHE_PORT`匹配来看,是用于校验反向代理域名。
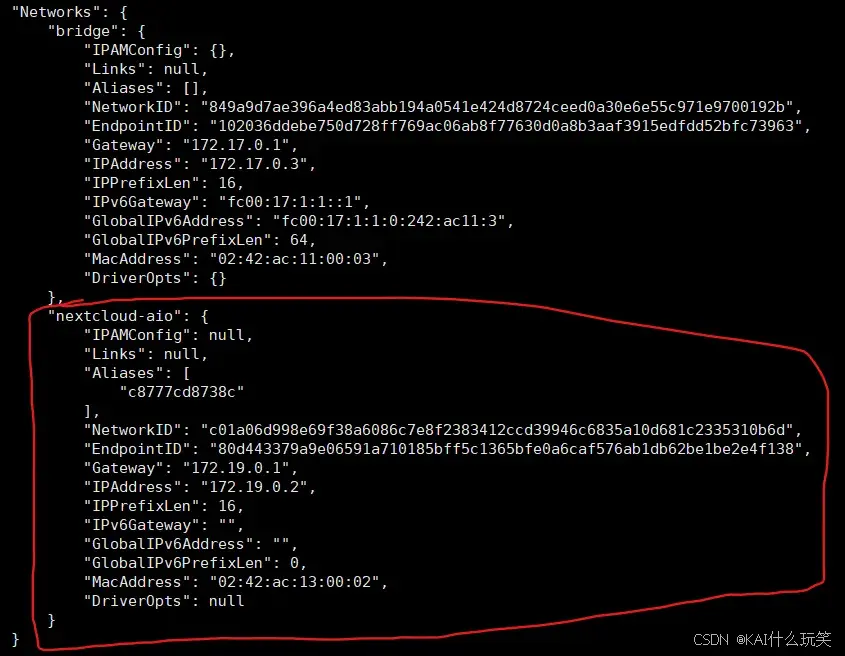
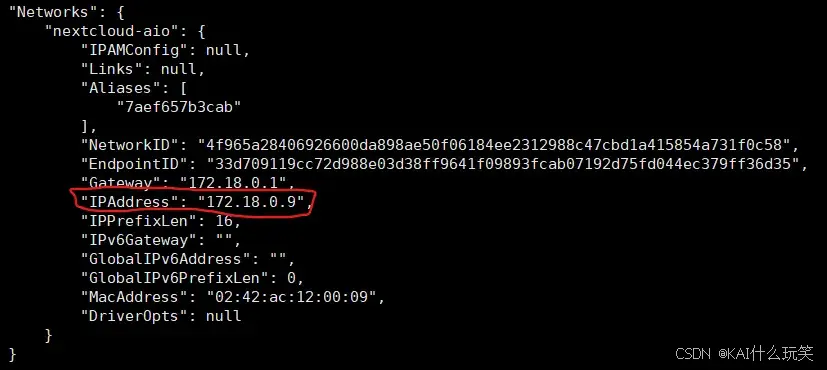
这时还需要注意一点,虽然上一步的docker-compose.yaml中指定的网络为docker自带的bridge网络,但是此时通过sudo docker inspect nextcloud-aio-mastercontainer和sudo docker inspect nextcloud-aio-domaincheck查看Network配置,能看出此时两个容器均绑定了一个新的nextcloud-aio网络:
nextcloud-aio-mastercontainer容器网络情况如下:
nextcloud-aio-domaincheck容器网络情况如下:
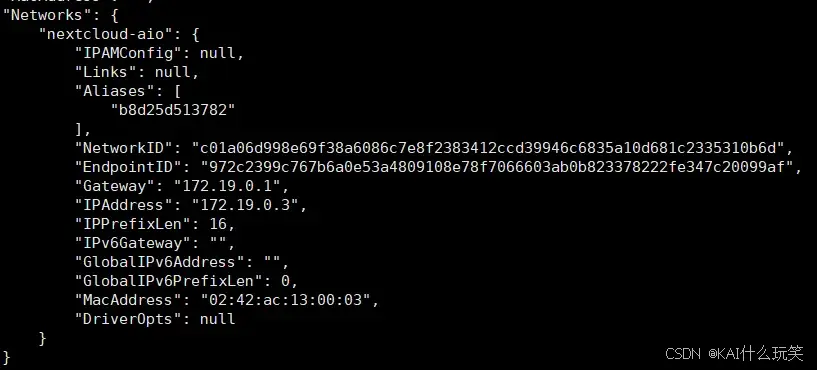
此时,记下nextcloud-aio网络的前12位前缀:c01a06d998e6,以及nextcloud-aio-domaincheck容器的IP地址:172.19.0.3。
使用NginxProxyManager配置反向代理
在主机上打开浏览器,使用http://ubuntu_server的ip:81打开NginxProxyManager配置页面,登录使用的默认邮箱为admin@example.com,默认密码为changeme:

导入SSL证书(若已有)
首先将SSL证书下载到电脑上,证书格式为PEM_NGINX格式。
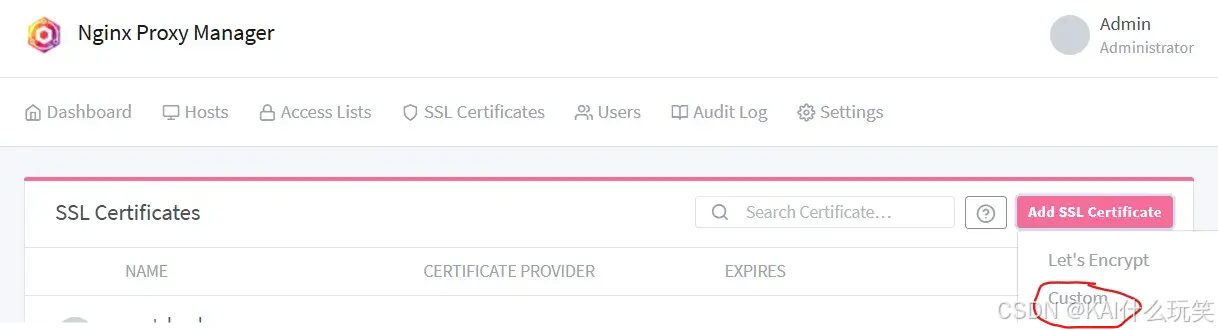
点击NginxProxyManager主页的SSL Certificates,进入SSL配置页面,点击Add SSL Certificates,证书来源选择Custom(或者Let's Encrypt,这会尝试通过Let's Encrypt申请一个免费SSL证书,能否成功看网络情况)。
Name填写nextcloud(按需修改),Certificate Key选择已经下载好的公钥,Certificate选择已经下载好的私钥,然后点击保存。

配置Nextcloud反向代理
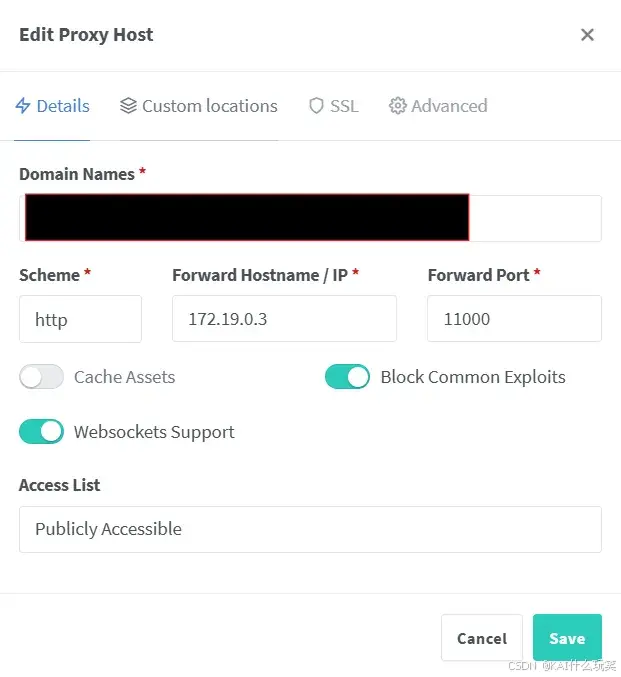
点击最右侧的Proxy Hosts,再点击中间的绿色按钮添加代理服务:
Details选项卡配置:Domain Names填写已经配置好解析的域名,Schme设为http,Forward Hostnam/IP填写上一步中查到的nextcloud-aio-domaincheck容器的IP地址,Forward Port填写第4步中yaml文件里的APACHE_PORT的值,并勾选Block Common Exploits和Webscokets Support。
注意:若第3步中,通过docker安装NginxProxyManager时,选择的网络模式为host,则**Forward Hostnam/IP**填写为**localhost**。
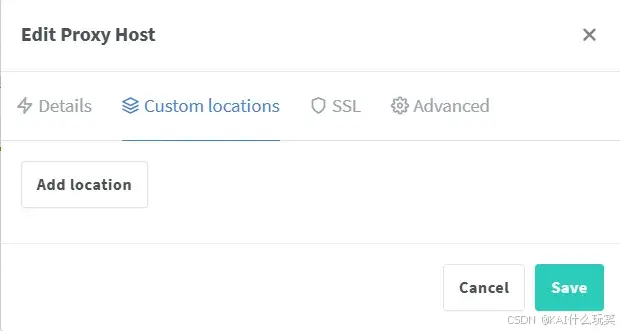
Custom locations选项卡可以不配置。
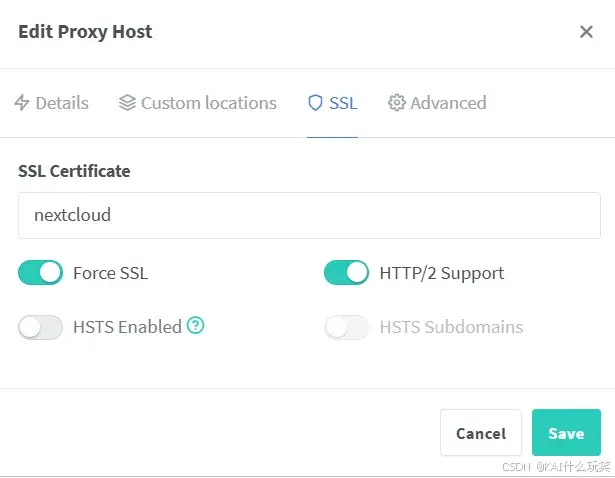
SSL选项卡配置:SSL证书选择刚才自行导入的证书,并勾选Force SSL和HTTP/2 Support。若需要免费证书,可以选择Request a new SSL Certificate,with Let's Encrypt,这会尝试通过Let's Encrypt申请一个免费证书,但能不能申请成功就看网络情况了。
-
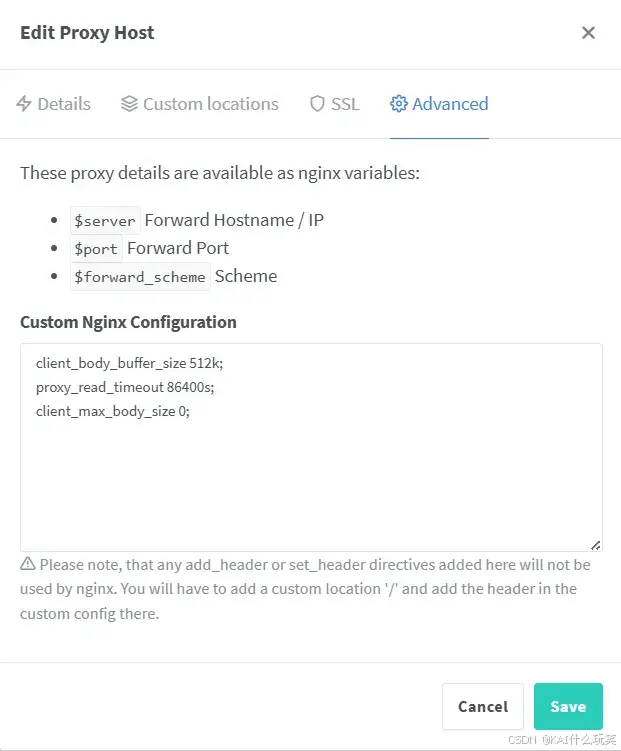
Advanced选项卡配置:填写以下三行内容,最后点击保保存。client_body_buffer_size 512k;
proxy_read_timeout 86400s;
client_max_body_size 0;
配置防火墙(若以host网络模式安装NginxProxyManager,则无需配置)
由于docker默认的策略,现在nextcloud-aio-domaincheck容器绑定的nextcloud-aio网络和NginxProxyManager容器的bridge网络之间是互相隔离的,这会导致NginxProxyManager与nextcloud-aio的容器之间无法建立连接,因此需要修改iptables策略。
使用以下命令,其中的br-c01a06d998e6的后缀要与第5.1步中查看的后缀匹配:
bash
sudo iptables -I DOCKER-USER -i docker0  -o br-c01a06d998e6 -j ACCEPT
sudo iptables -I DOCKER-USER -i br-c01a06d998e6 -o docker0 -j ACCEPT
配置nextcloud AIO
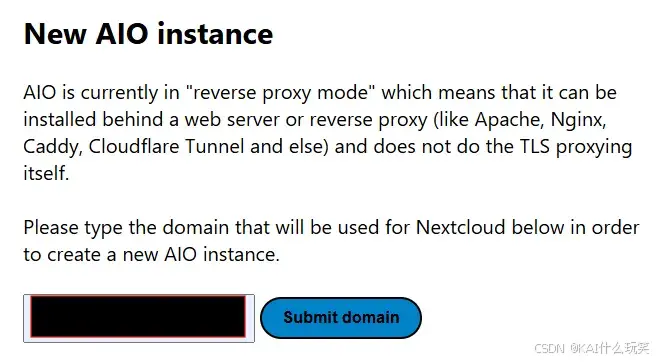
验证域名及网络通信情况。
在New AIO instance中填写已设置好反向代理的域名,然后点击Submit domain进行验证(记得在路由器防火墙上放行公网流量,允许连接80和443端口)。
设置时区(按需)
翻到页面最下方的Timezone change部分可以设置时区。

配置备份(按需)
使用以下命令创建用于备份的卷。
bash
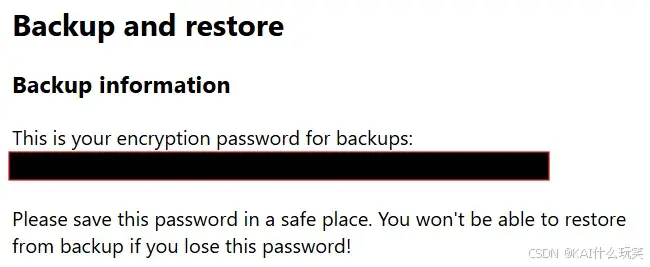
sudo docker volume create --driver local --name nextcloud_aio_backupdir -o device="/自定义的backup文件夹路径" -o type="none" -o o="bind"在Backup and restore部分中填写备份卷名称,点击submit后记下密码。

选择额外功能(按需)
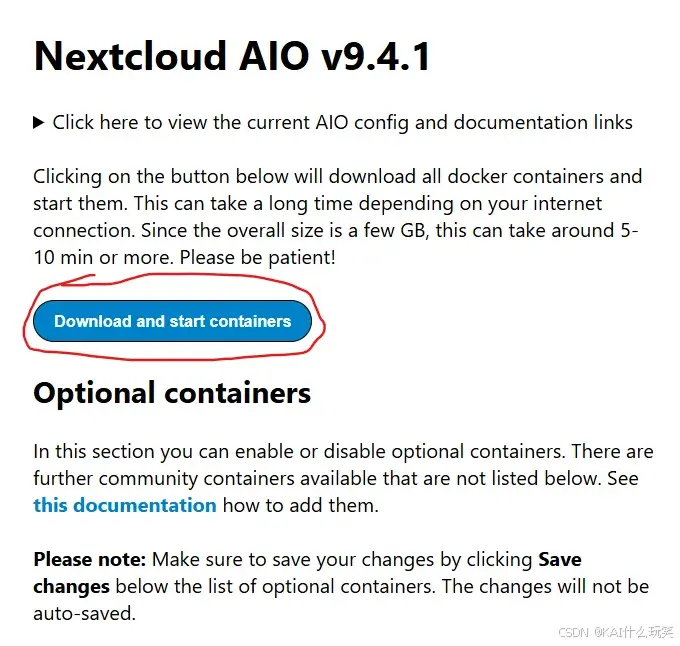
在Optional containers下方,可以选择需要额外安装的功能,注意选择功能时,需要确保电脑配置能满足后面标注的需求。
下载并启动nextcloud
现在选择完毕需要的额外功能后(也可以都不选),点击Download and start containers,下载启动并配置nextcloud所有的容器。下载速度看网速。
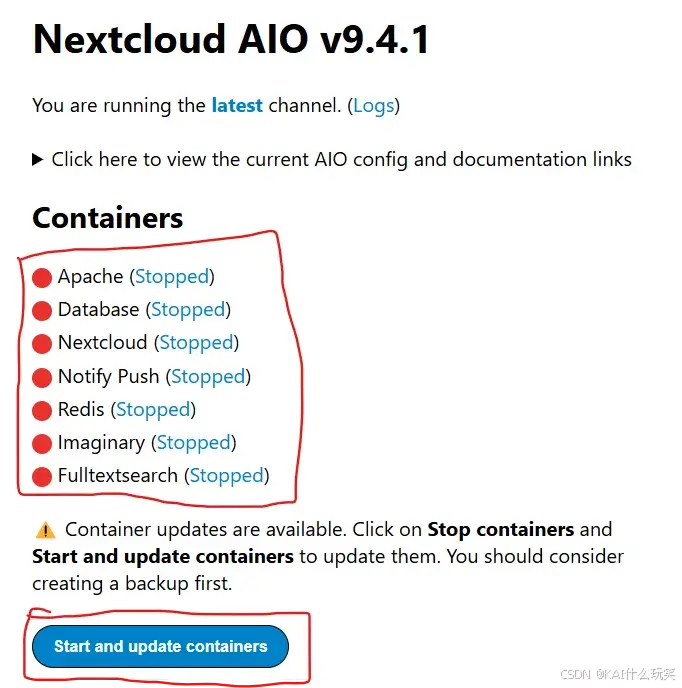
下载完成后,确保页面显示的所有相关容器都已处于stopped状态,然后点击start and update containers更新配置,并启动所有容器。
等待,需要较长时间,直到所有容器的状态显示绿色的Running,中途可点击Reload刷新页面。如果有容器显示红色的Stopped,先点击下方的Stop containers,然后再点击start and update containers。
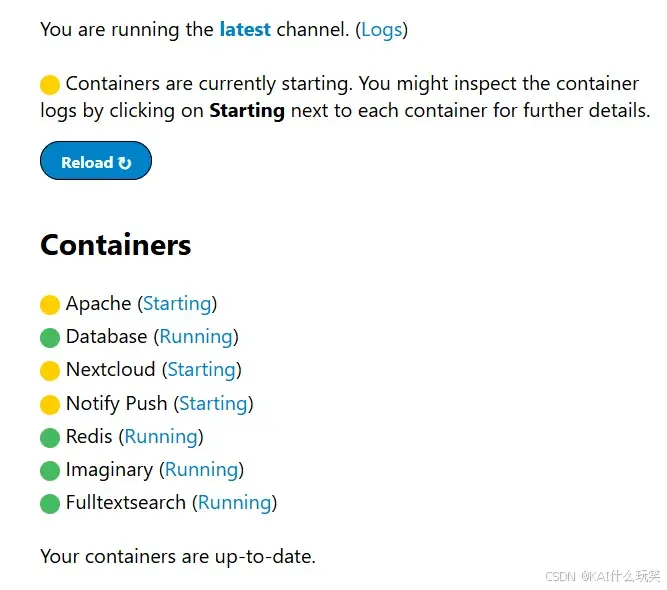
安装完毕如下,这里我选择了Imaginary和Fulltextsearch功能,所以会多两个容器:

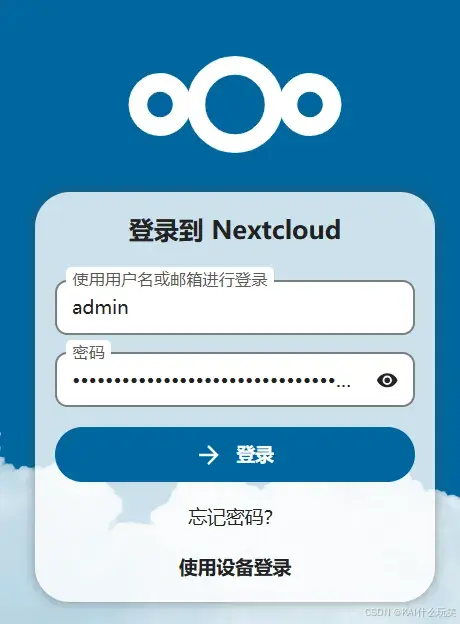
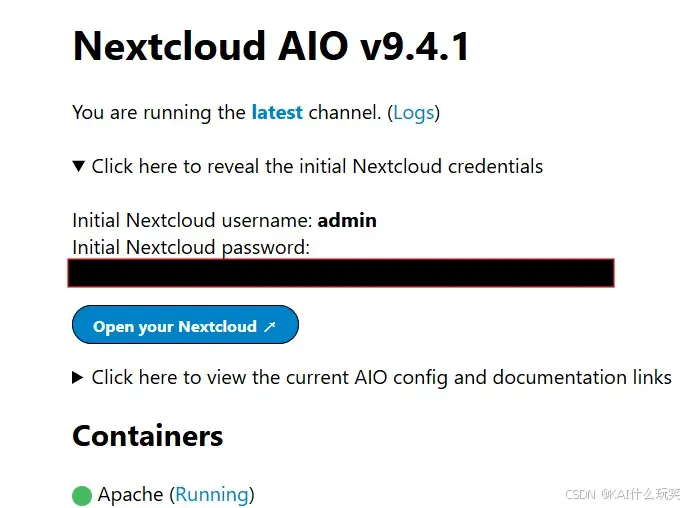
点击Click here to reveal the initial Nextcloud credentials查看并记录初始用户名、密码。
修改NginxProxyManager(若以host网络模式安装NginxProxyManager,则无需配置)
使用sudo docker inspect nextcloud-aio-apache查看Apache容器的IP地址:
打开浏览器,进入NginxProxyManager的配置页面,修改已配置好的代理的Forward Hostname / IP为Apache容器的IP,并保存:

开始使用nextcloud
在浏览器中使用已配置好的域名进入nextcloud的首页,使用第6.5步中记录的初始用户名和密码,开始使用。