目录
[2.修改 nginx.conf 配置文件](#2.修改 nginx.conf 配置文件)
[四.基于域名的 Nginx 虚拟主机](#四.基于域名的 Nginx 虚拟主机)
[五.基于IP 的 Nginx 虚拟主机](#五.基于IP 的 Nginx 虚拟主机)
[六.基于端口的 Nginx 虚拟主机](#六.基于端口的 Nginx 虚拟主机)
前言:
上次和读者们分享了关于web的相关知识点以及nginx服务器安装的具体步骤,今天我想对nginx虚拟主机做一个详细的描述。
一.访问状态统计配置
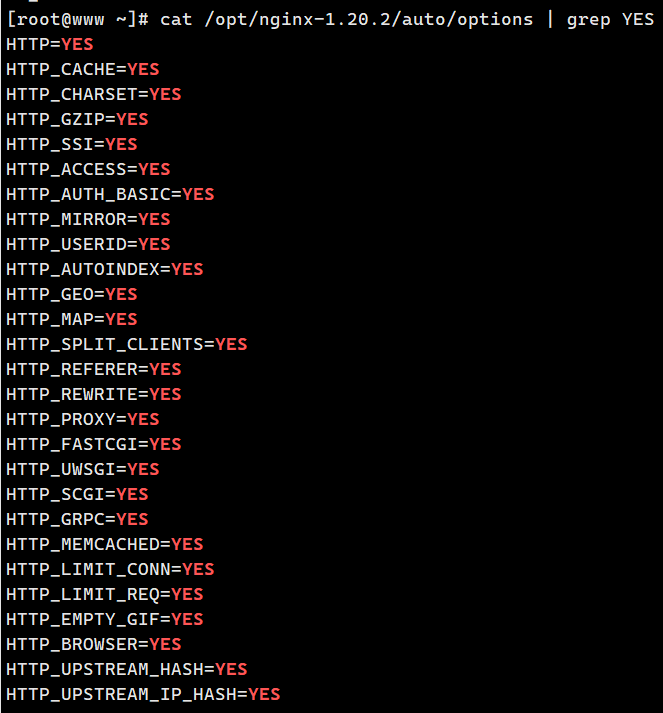
1.查看已安装的所有模块
/usr/local/nginx/sbin/nginx -V: 查看已安装的 Nginx 是否包含 HTTP_STUB_STATUS 模块
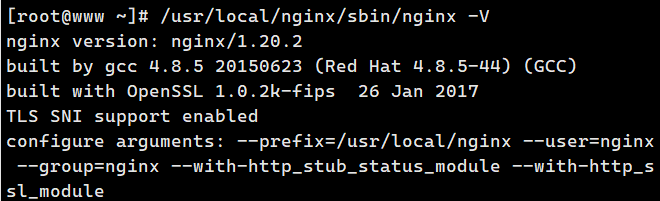
cat /opt/nginx-1.20.2/auto/options | grep YES:可查看 nginx 已安装的所有模块
2.修改nginx.conf配置文件
修改 nginx.conf 配置文件,指定访问位置并添加 stub_status 配置
cd /usr/local/nginx/conf
cp nginx.conf nginx.conf.bak
vim /usr/local/nginx/conf/nginx.conf
......
http {
......
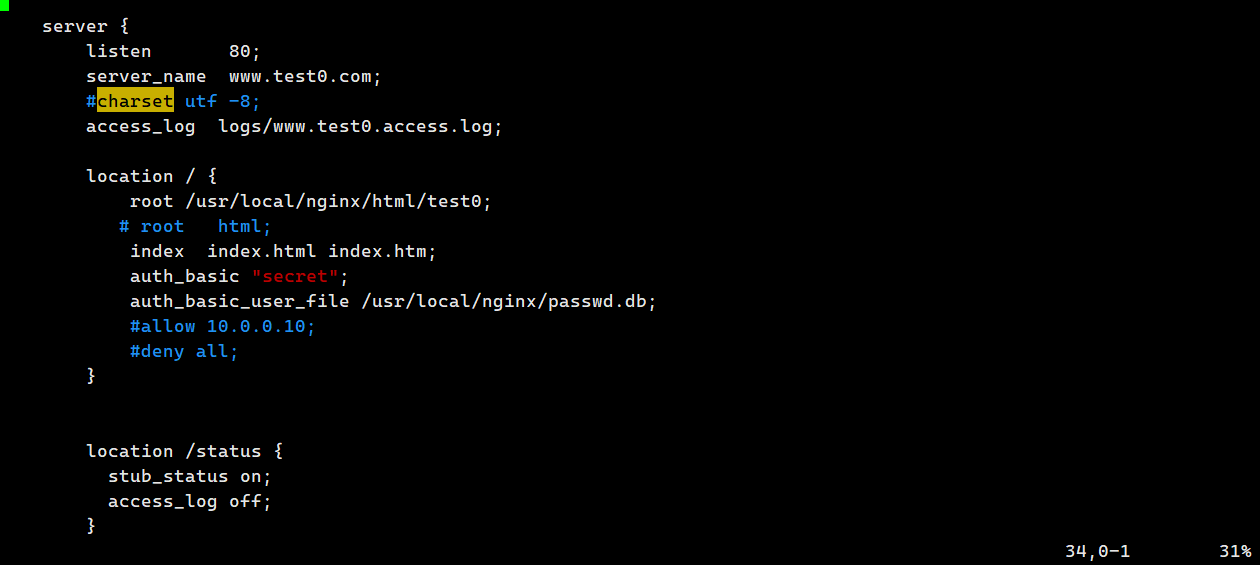
server {
listen 80;
server_name www.benet.com;
charset utf-8;
location / {
root html;
index index.html index.php;
}
添加 stub_status 配置
location /status {
stub_status on; # 打开状态统计功能
access_log off; # 关闭此位置的日志记录
}
}
}

3.重启服务,访问测试
nginx -t
systemctl restart nginx
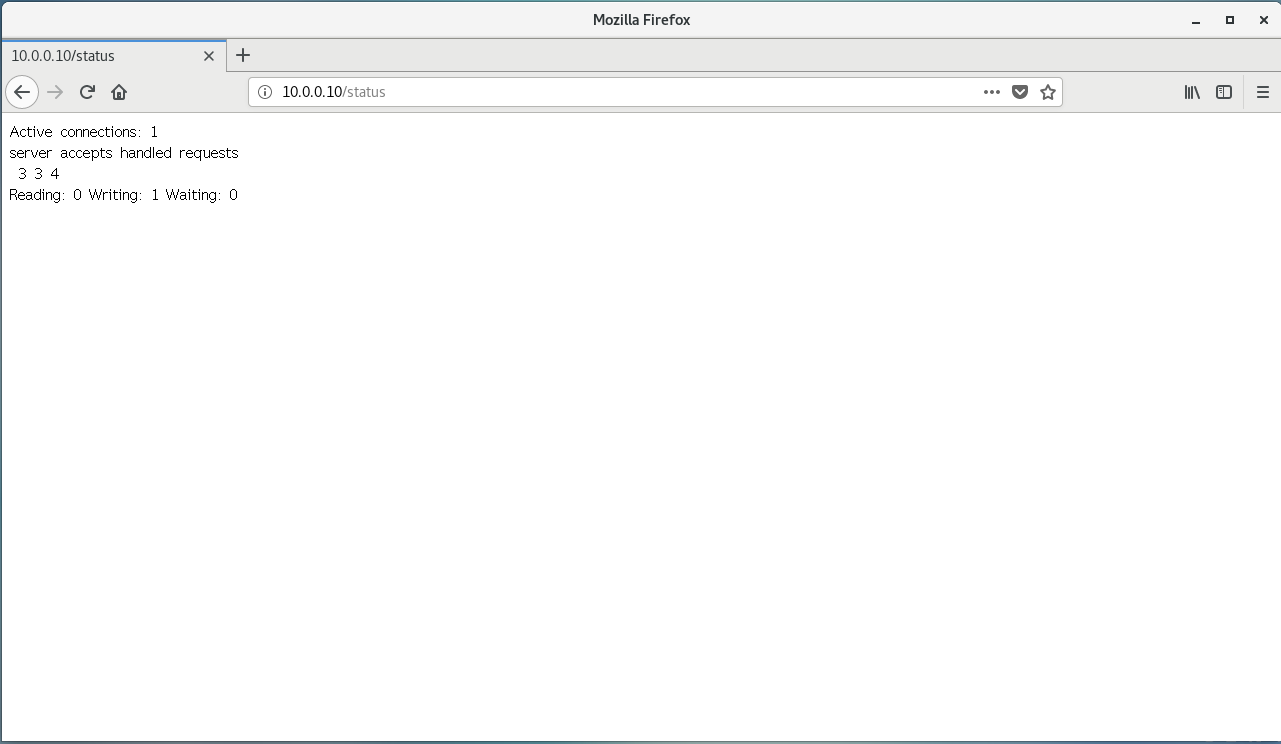
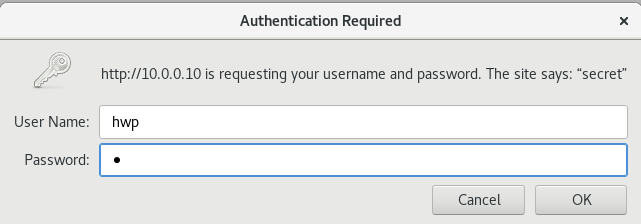
浏览器访问 http://10.0.0.10/status
Active connections :表示当前的活动连接数;
server accepts handled requests :表示已经处理的连接信息,三个数字依次表示已处理的连接数、成功的TCP 握手次数、 已处理的请求数。
二.基于授权的访问控制
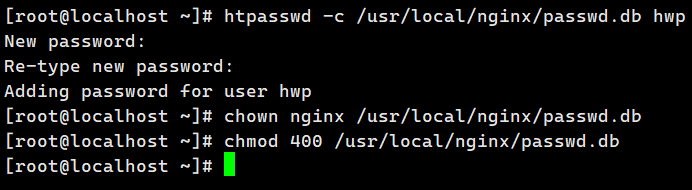
1.生成用户密码认证文件
yum install -y httpd-tools
htpasswd -c /usr/local/nginx/passwd.db zhangsan
chown nginx /usr/local/nginx/passwd.db
chmod 400 /usr/local/nginx/passwd.db
2.修改主配置文件相对应目录,添加认证配置项
vim /usr/local/nginx/conf/nginx.conf
......
server {
location / {
......
添加认证配置
auth_basic "secret"; # 设置密码提示框文字信息
auth_basic_user_file /usr/local/nginx/passwd.db;
}
}

3.重启服务,访问测试
nginx -t
systemctl restart nginx
浏览器访问 http://192.168.10.21
三.基于客户端的访问控制
deny IP/IP 段:拒绝某个 IP 或 IP 段的客户端访问
allow IP/IP 段:允许某个 IP 或 IP 段的客户端访问
规则从上往下执行,如匹配则停止,不再往下匹配
vim /usr/local/nginx/conf/nginx.conf
......
server {
location / {
......
添加控制规则
allow 192.168.10.20; # 允许访问的客户端 IP
deny all; # 拒绝其它 IP 客户端访问
}
}
systemctl restart nginx


四.基于域名的Nginx虚拟主机
1.为虚拟主机提供域名解析
echo "192.168.10.21 www.yjs.com www.benet.com" >> /etc/hosts
2.为虚拟主机准备网页文档
mkdir -p /usr/local/nginx/html/benet
mkdir -p /usr/local/nginx/html/yjs

echo "<h1>www.yjs.com</h1>" > /usr/local/nginx/html/yjs/index.html
echo "<h1>www.benet.com</h1>" > /usr/local/nginx/html/benet/index.html
3.修改nginx配置文件
vim /usr/local/nginx/conf/nginx.conf
......
http {
......
server {
listen 80;
server_name www.yjs.com; # 设置域名 www.yjs.com
charset utf-8;
access_log logs/www.yjs.access.log; # 设置日志名
location / {
root /usr/local/nginx/html/yjs; # 设置 www.yjs.com 的工作目录
index index.html index.php;
}
error_page 500 502 503 504 /50x.html;
location = 50x.html{
root html;
}
}
server {
listen 80;
server_name www.benet.com; # 设置域名 www.benet.com
charset utf-8;
access_log logs/www.benet.access.log;
location / {
root /usr/local/nginx/html/benet;
index index.html index.php;
}
error_page 500 502 503 504 /50x.html;
location = 50x.html{
root html;
}
}
}
4.重启服务,访问测试
systemctl restart nginx
浏览器访问
http://www.test0.com

这里有一个小细节 :这里使用的域名并未在公共 DNS 服务器上注册,Windows 系统无法通过常规 DNS 解析找到该域名对应的服务器 IP,而修改 hosts 文件是手动建立这个域名与 IP 的映射关系的方法。
五.基于IP的Nginx虚拟主机
1.配置****server
ifconfig ens33:0 192.168.10.40 netmask 255.255.255.0
创建 一个 ens36 或者 37 的网卡 192.168.10.40
vim /usr/local/nginx/conf/nginx.conf
......
http {
......
server {
listen 10.0.0.52:80; # 设置监听地址 10.0.0.52
server_name www.yjs.com;
charset utf-8;
access_log logs/www.yjs.access.log;
location / {
root /usr/local/nginx/html/yjs;
index index.html index.php;
}
error_page 500 502 503 504 /50x.html;
location = 50x.html{
root html;
}1
}

2.刷新检验
systemctl restart nginx
浏览器访问
http://10.0.0.52

六.基于端口的Nginx虚拟主机
1.基于端口
vim /usr/local/nginx/conf/nginx.conf
......
http {
......
server {
listen 192.168.10.22:8080; # 设置监听 8080 端口
server_name www.yjs.com;
charset utf-8;
access_log logs/www.yjs.access.log;
location / {
root /var/www/html/yjs;
index index.html index.php;
}
error_page 500 502 503 504 /50x.html;
location = 50x.html{
root html;
}
}

2.刷新检验
systemctl restart nginx
浏览器访问
http://10.0.0.10:8080

总结:
今天主要是讲解了基于不同情况下的nginx虚拟主机,对他们的参数设置进行了详细的描述,希望对读者们有所帮助!