RabbitMQ入门与进阶
-
- 基础篇
-
- [1. 为什么需要消息队列?](#1. 为什么需要消息队列?)
- [2. 什么是消息队列?](#2. 什么是消息队列?)
- [3. RabbitMQ体系结构介绍](#3. RabbitMQ体系结构介绍)
- [4. RabbitMQ安装](#4. RabbitMQ安装)
- [5. HelloWorld](#5. HelloWorld)
- [6. RabbitMQ经典用法(工作模式)](#6. RabbitMQ经典用法(工作模式))
- [7. Work Queues](#7. Work Queues)
- [8. Publish/Subscribe](#8. Publish/Subscribe)
- [9. Routing](#9. Routing)
- [10. Topics](#10. Topics)
- 进阶篇
-
- [1. RabbitMQ整合SpringBoot](#1. RabbitMQ整合SpringBoot)
- [2. 消息可靠性投递](#2. 消息可靠性投递)
- [3. 消费端限流](#3. 消费端限流)
- [4. 消息超时](#4. 消息超时)
- [5. 死信和死信队列](#5. 死信和死信队列)
- [6. 延迟队列](#6. 延迟队列)
- [7. 事务消息](#7. 事务消息)
- [8. 惰性队列](#8. 惰性队列)
- [9. 优先级队列](#9. 优先级队列)
- 集群篇
-
- [1. 工作机制](#1. 工作机制)
- [2. 集群搭建](#2. 集群搭建)
- [3. 负载均衡](#3. 负载均衡)
- [4. 仲裁队列](#4. 仲裁队列)
- [5. 流式队列](#5. 流式队列)
- [6. 异地容灾](#6. 异地容灾)
基础篇
1. 为什么需要消息队列?

2. 什么是消息队列?

3. RabbitMQ体系结构介绍

4. RabbitMQ安装
操作001:RabbitMQ安装
一、安装
shell
  拉取镜像
docker pull rabbitmq:3.13-management

  -d 参数:后台运行 Docker 容器
  --name 参数:设置容器名称
  -p 参数:映射端口号,格式是"宿主机端口号:容器内端口号"。5672供客户端程序访问,15672供后台管理界面访问
  -v 参数:卷映射目录
  -e 参数:设置容器内的环境变量,这里我们设置了登录RabbitMQ管理后台的默认用户和密码
docker run -d \
--name rabbitmq \
-p 5672:5672 \
-p 15672:15672 \
-v rabbitmq-plugin:/plugins \
-e RABBITMQ_DEFAULT_USER=guest \
-e RABBITMQ_DEFAULT_PASS=123456 \
rabbitmq:3.13-management
二、验证
访问后台管理界面:http://192.168.200.100:15672
使用上面创建Docker容器时指定的默认用户名、密码登录:

三、可能的问题
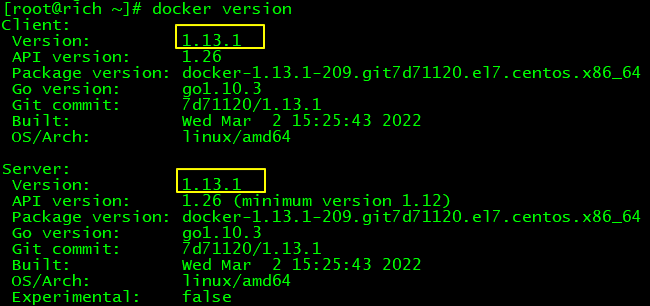
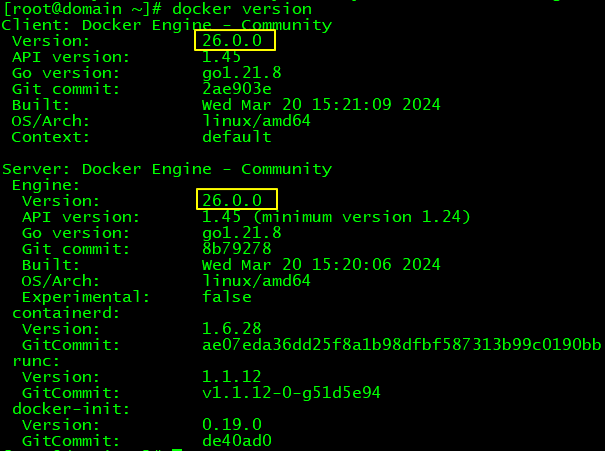
1、问题现象
在使用Docker拉取RabbitMQ镜像的时候,如果遇到提示:missing signature key,那就说明Docker版本太低了,需要升级
比如我目前的Docker版本如下图所示:
2、解决办法
基于CentOS7
①卸载当前Docker更好的办法是安装Docker前曾经给服务器拍摄了快照,此时恢复快照;
如果不曾拍摄快照,那只能执行卸载操作了
shell
yum erase -y docker \
	docker-client \
	docker-client-latest \
	docker-common \
	docker-latest \
	docker-latest-logrotate \
	docker-logrotate \
	docker-selinux \
	docker-engine-selinux \
	docker-engine \
docker-ce②升级yum库
shell
yum update -y③安装Docker最新版
shell
yum install -y docker-ce docker-ce-cli containerd.io docker-buildx-plugin docker-compose-plugin如果这一步看到提示:没有可用软件包 docker-ce,那就添加Docker的yum源:
shell
yum install -y yum-utils
yum-config-manager --add-repo https://download.docker.com/linux/centos/docker-ce.repo④设置Docker服务
shell
systemctl start docker
systemctl enable docker
3、验证
上述操作执行完成后,再次查看Docker版本:
5. HelloWorld
操作002:HelloWorld
一、目标
生产者发送消息,消费者接收消息,用最简单的方式实现
官网说明参见下面超链接:
RabbitMQ tutorial - "Hello World!" --- RabbitMQ

二、具体操作
1、创建Java工程
①消息发送端(生产者)
②消息接收端(消费者)
③添加依赖
xml
<dependencies>
    <dependency>
        <groupId>com.rabbitmq</groupId>
        <artifactId>amqp-client</artifactId>
        <version>5.20.0</version>
    </dependency>
</dependencies>
2、发送消息
①Java代码
不用客气,整个代码全部复制------当然,连接信息改成你自己的:
java
package com.atguigu.rabbitmq.simple;
import com.rabbitmq.client.Channel;
import com.rabbitmq.client.Connection;
import com.rabbitmq.client.ConnectionFactory;
public class Producer {
public static void main(String[] args) throws Exception {
// 创建连接工厂
ConnectionFactory connectionFactory = new ConnectionFactory();
// 设置主机地址
connectionFactory.setHost("192.168.200.100");
// 设置连接端口号:默认为 5672
connectionFactory.setPort(5672);
// 虚拟主机名称:默认为 /
connectionFactory.setVirtualHost("/");
// 设置连接用户名;默认为guest
connectionFactory.setUsername("guest");
// 设置连接密码;默认为guest
connectionFactory.setPassword("123456");
// 创建连接
Connection connection = connectionFactory.newConnection();
// 创建频道
Channel channel = connection.createChannel();
// 声明(创建)队列
// queue 参数1:队列名称
// durable 参数2:是否定义持久化队列,当 MQ 重启之后还在
// exclusive 参数3:是否独占本次连接。若独占,只能有一个消费者监听这个队列且 Connection 关闭时删除这个队列
// autoDelete 参数4:是否在不使用的时候自动删除队列,也就是在没有Consumer时自动删除
// arguments 参数5:队列其它参数
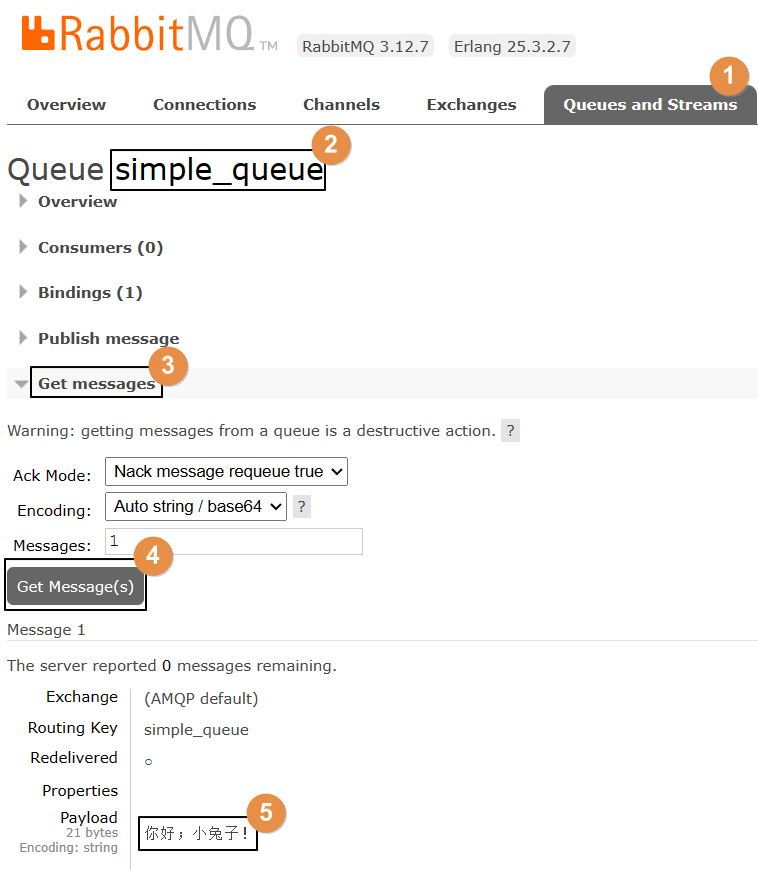
channel.queueDeclare("simple_queue", true, false, false, null);
// 要发送的信息
String message = "你好;小兔子!";
// 参数1:交换机名称,如果没有指定则使用默认Default Exchange
// 参数2:路由key,简单模式可以传递队列名称
// 参数3:配置信息
// 参数4:消息内容
channel.basicPublish("", "simple_queue", null, message.getBytes());
System.out.println("已发送消息:" + message);
// 关闭资源
channel.close();
connection.close();
}
}②查看效果
3、接收消息
①Java代码
不用客气,整个代码全部复制------当然,连接信息改成你自己的:
java
package com.atguigu.rabbitmq.simple;

import com.rabbitmq.client.*;

import java.io.IOException;

public class Consumer {

    public static void main(String[] args) throws Exception {

        // 1.创建连接工厂
        ConnectionFactory factory = new ConnectionFactory();

        // 2. 设置参数
        factory.setHost("192.168.200.100");
        factory.setPort(5672);
        factory.setVirtualHost("/");
        factory.setUsername("guest");
        factory.setPassword("123456");

        // 3. 创建连接 Connection
        Connection connection = factory.newConnection();

        // 4. 创建Channel
        Channel channel = connection.createChannel();

        // 5. 创建队列
        // 如果没有一个名字叫simple_queue的队列,则会创建该队列,如果有则不会创建
        // 参数1. queue:队列名称
        // 参数2. durable:是否持久化。如果持久化,则当MQ重启之后还在
        // 参数3. exclusive:是否独占。
        // 参数4. autoDelete:是否自动删除。当没有Consumer时,自动删除掉
        // 参数5. arguments:其它参数。
        channel.queueDeclare("simple_queue",true,false,false,null);

        // 接收消息
        DefaultConsumer consumer = new DefaultConsumer(channel){

            // 回调方法,当收到消息后,会自动执行该方法
            // 参数1. consumerTag:标识
            // 参数2. envelope:获取一些信息,交换机,路由key...
            // 参数3. properties:配置信息
            // 参数4. body:数据
            @Override
            public void handleDelivery(String consumerTag, Envelope envelope, AMQP.BasicProperties properties, byte[] body) throws IOException {

                System.out.println("consumerTag:"+consumerTag);
                System.out.println("Exchange:"+envelope.getExchange());
                System.out.println("RoutingKey:"+envelope.getRoutingKey());
                System.out.println("properties:"+properties);
                System.out.println("body:"+new String(body));

            }

        };

        // 参数1. queue:队列名称
        // 参数2. autoAck:是否自动确认,类似咱们发短信,发送成功会收到一个确认消息
        // 参数3. callback:回调对象
        // 消费者类似一个监听程序,主要是用来监听消息
        channel.basicConsume("simple_queue",true,consumer);

    }

}
②控制台打印
consumerTag:amq.ctag-8EB87GaZFP52LKSMcj98UA
Exchange:
RoutingKey:simple_queue
properties:contentHeader(content-type=null, content-encoding=null, headers=null, delivery-mode=null, priority=null, correlation-id=null, reply-to=null, expiration=null, message-id=null, timestamp=null, type=null, user-id=null, app-id=null, cluster-id=null)
body:你好;小兔子!
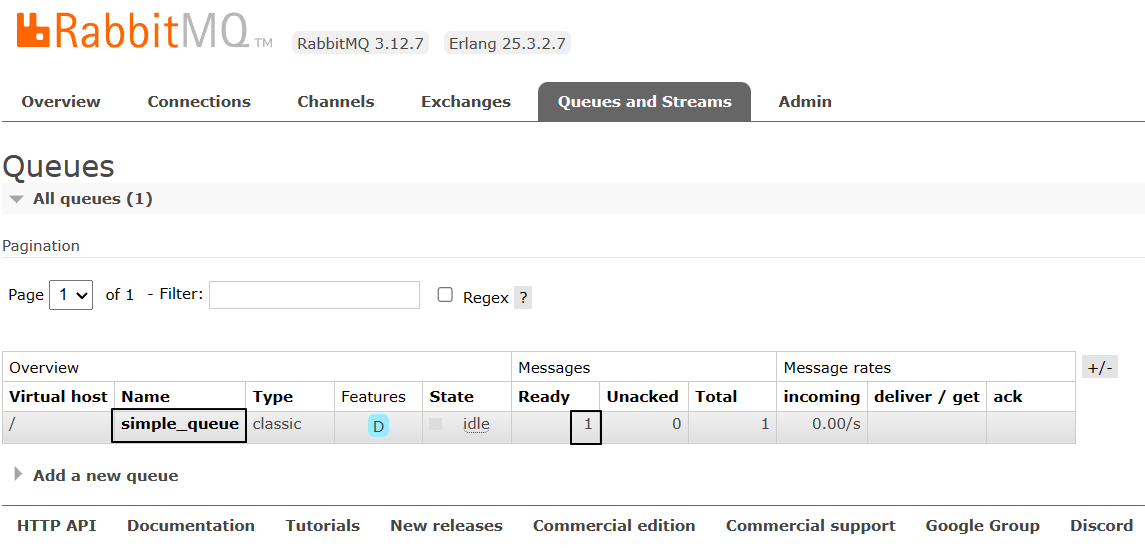
③查看后台管理界面
因为消息被消费掉了,所以RabbitMQ服务器上没有了:

6. RabbitMQ经典用法(工作模式)

7. Work Queues

操作003:工作队列模式
一、生产者代码
1、封装工具类
java
package com.atguigu.rabbitmq.util;

import com.rabbitmq.client.Connection;
import com.rabbitmq.client.ConnectionFactory;

public class ConnectionUtil {

    public static final String HOST_ADDRESS = "192.168.200.100";

    public static Connection getConnection() throws Exception {

        // 定义连接工厂
        ConnectionFactory factory = new ConnectionFactory();

        // 设置服务地址
        factory.setHost(HOST_ADDRESS);

        // 端口
        factory.setPort(5672);

        //设置账号信息,用户名、密码、vhost
        factory.setVirtualHost("/");
        factory.setUsername("guest");
        factory.setPassword("123456");

        // 通过工程获取连接
        Connection connection = factory.newConnection();

        return connection;
    }


    public static void main(String[] args) throws Exception {

        Connection con = ConnectionUtil.getConnection();

        // amqp://guest@192.168.200.100:5672/
        System.out.println(con);

        con.close();

    }

}
2、编写代码
java
package com.atguigu.rabbitmq.work;
import com.atguigu.rabbitmq.util.ConnectionUtil;
import com.rabbitmq.client.Channel;
import com.rabbitmq.client.Connection;
public class Producer {
public static final String QUEUE_NAME = "work_queue";
public static void main(String[] args) throws Exception {
Connection connection = ConnectionUtil.getConnection();
Channel channel = connection.createChannel();
channel.queueDeclare(QUEUE_NAME,true,false,false,null);
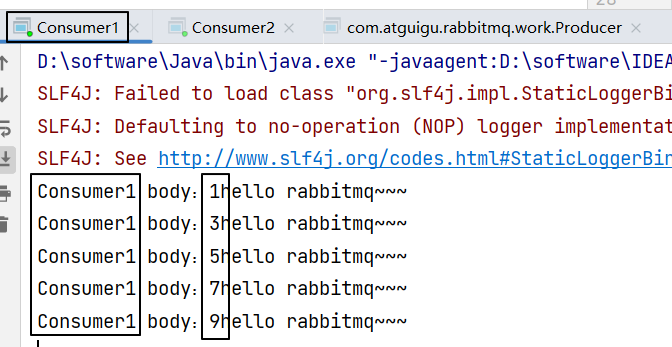
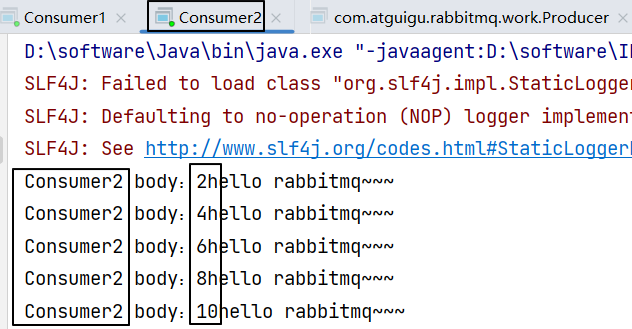
for (int i = 1; i <= 10; i++) {
String body = i+"hello rabbitmq~~~";
channel.basicPublish("",QUEUE_NAME,null,body.getBytes());
}
channel.close();
connection.close();
}
}3、发送消息效果

二、消费者代码
1、编写代码
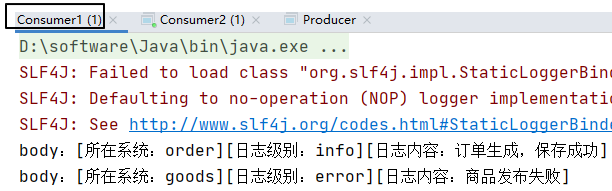
创建Consumer1和Consumer2。Consumer2只是类名和打印提示不同,代码完全一样。
java
package com.atguigu.rabbitmq.work;

import com.atguigu.rabbitmq.util.ConnectionUtil;
import com.rabbitmq.client.*;

import java.io.IOException;

public class Consumer1 {

    static final String QUEUE_NAME = "work_queue";

    public static void main(String[] args) throws Exception {

        Connection connection = ConnectionUtil.getConnection();

        Channel channel = connection.createChannel();

        channel.queueDeclare(QUEUE_NAME,true,false,false,null);

        Consumer consumer = new DefaultConsumer(channel){

            @Override
            public void handleDelivery(String consumerTag, Envelope envelope, AMQP.BasicProperties properties, byte[] body) throws IOException {

                System.out.println("Consumer1 body:"+new String(body));

            }

        };

        channel.basicConsume(QUEUE_NAME,true,consumer);

    }

}
注意 :运行的时候先启动两个消费端程序,然后再启动生产者端程序。
如果已经运行过生产者程序,则手动把work_queue队列删掉。
2、运行效果
最终两个消费端程序竞争结果如下:
8. Publish/Subscribe

操作004:发布订阅模式
一、生产者代码
java
package com.atguigu.rabbitmq.fanout;
import com.atguigu.rabbitmq.util.ConnectionUtil;
import com.rabbitmq.client.BuiltinExchangeType;
import com.rabbitmq.client.Channel;
import com.rabbitmq.client.Connection;
import com.rabbitmq.client.ConnectionFactory;
public class Producer {
public static void main(String[] args) throws Exception {
// 1、获取连接
Connection connection = ConnectionUtil.getConnection();
// 2、创建频道
Channel channel = connection.createChannel();
// 参数1. exchange:交换机名称
// 参数2. type:交换机类型
// DIRECT("direct"):定向
// FANOUT("fanout"):扇形(广播),发送消息到每一个与之绑定队列。
// TOPIC("topic"):通配符的方式
// HEADERS("headers"):参数匹配
// 参数3. durable:是否持久化
// 参数4. autoDelete:自动删除
// 参数5. internal:内部使用。一般false
// 参数6. arguments:其它参数
String exchangeName = "test_fanout";
// 3、创建交换机
channel.exchangeDeclare(exchangeName, BuiltinExchangeType.FANOUT,true,false,false,null);
// 4、创建队列
String queue1Name = "test_fanout_queue1";
String queue2Name = "test_fanout_queue2";
channel.queueDeclare(queue1Name,true,false,false,null);
channel.queueDeclare(queue2Name,true,false,false,null);
// 5、绑定队列和交换机
// 参数1. queue:队列名称
// 参数2. exchange:交换机名称
// 参数3. routingKey:路由键,绑定规则
// 如果交换机的类型为fanout,routingKey设置为""
channel.queueBind(queue1Name,exchangeName,"");
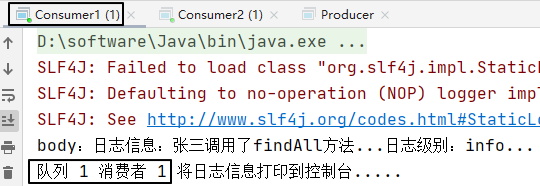
channel.queueBind(queue2Name,exchangeName,"");
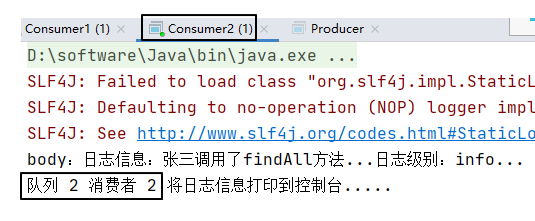
String body = "日志信息:张三调用了findAll方法...日志级别:info...";
// 6、发送消息
channel.basicPublish(exchangeName,"",null,body.getBytes());
// 7、释放资源
channel.close();
connection.close();
}
}二、消费者代码
1、消费者1号
java
package com.atguigu.rabbitmq.fanout;

import com.atguigu.rabbitmq.util.ConnectionUtil;
import com.rabbitmq.client.*;
import java.io.IOException;

public class Consumer1 {

    public static void main(String[] args) throws Exception {

        Connection connection = ConnectionUtil.getConnection();

        Channel channel = connection.createChannel();

        String queue1Name = "test_fanout_queue1";

        channel.queueDeclare(queue1Name,true,false,false,null);

        Consumer consumer = new DefaultConsumer(channel){

            @Override
            public void handleDelivery(String consumerTag, Envelope envelope, AMQP.BasicProperties properties, byte[] body) throws IOException {

                System.out.println("body:"+new String(body));
                System.out.println("队列 1 消费者 1 将日志信息打印到控制台.....");

            }

        };

        channel.basicConsume(queue1Name,true,consumer);

    }

}
2、消费者2号
java
package com.atguigu.rabbitmq.fanout;

import com.atguigu.rabbitmq.util.ConnectionUtil;
import com.rabbitmq.client.*;
import java.io.IOException;

public class Consumer2 {

    public static void main(String[] args) throws Exception {

        Connection connection = ConnectionUtil.getConnection();

        Channel channel = connection.createChannel();

        String queue2Name = "test_fanout_queue2";

        channel.queueDeclare(queue2Name,true,false,false,null);

        Consumer consumer = new DefaultConsumer(channel){

            @Override
            public void handleDelivery(String consumerTag, Envelope envelope, AMQP.BasicProperties properties, byte[] body) throws IOException {

                System.out.println("body:"+new String(body));
                System.out.println("队列 2 消费者 2 将日志信息打印到控制台.....");

            }

        };

        channel.basicConsume(queue2Name,true,consumer);

    }

}
三、运行效果
还是先启动消费者,然后再运行生产者程序发送消息:
四、小结
交换机和队列的绑定关系如下图所示:
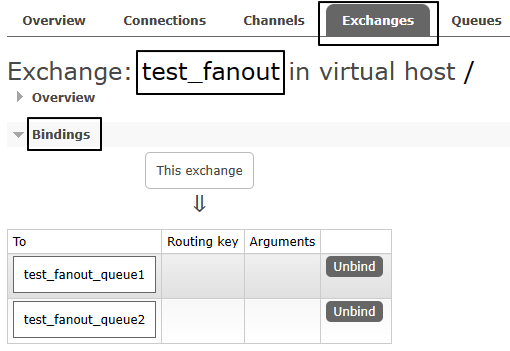
交换机需要与队列进行绑定,绑定之后;一个消息可以被多个消费者都收到。
发布订阅模式与工作队列模式的区别:
- 工作队列模式本质上是绑定默认交换机
- 发布订阅模式绑定指定交换机
- 监听同一个队列的消费端程序彼此之间是竞争关系
- 绑定同一个交换机的多个队列在发布订阅模式下,消息是广播的,每个队列都能接收到消息
9. Routing


操作006-路由模式
一、生产者代码
java
package com.atguigu.rabbitmq.routing;
import com.atguigu.rabbitmq.util.ConnectionUtil;
import com.rabbitmq.client.BuiltinExchangeType;
import com.rabbitmq.client.Channel;
import com.rabbitmq.client.Connection;
import com.rabbitmq.client.ConnectionFactory;
public class Producer {
public static void main(String[] args) throws Exception {
Connection connection = ConnectionUtil.getConnection();
Channel channel = connection.createChannel();
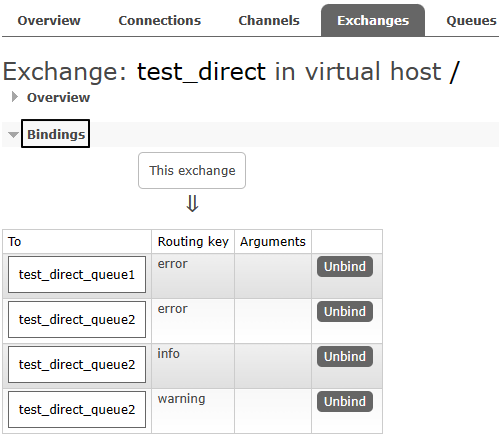
String exchangeName = "test_direct";
// 创建交换机
channel.exchangeDeclare(exchangeName,BuiltinExchangeType.DIRECT,true,false,false,null);
// 创建队列
String queue1Name = "test_direct_queue1";
String queue2Name = "test_direct_queue2";
// 声明(创建)队列
channel.queueDeclare(queue1Name,true,false,false,null);
channel.queueDeclare(queue2Name,true,false,false,null);
// 队列绑定交换机
// 队列1绑定error
channel.queueBind(queue1Name,exchangeName,"error");
// 队列2绑定info error warning
channel.queueBind(queue2Name,exchangeName,"info");
channel.queueBind(queue2Name,exchangeName,"error");
channel.queueBind(queue2Name,exchangeName,"warning");
String message = "日志信息:张三调用了delete方法.错误了,日志级别warning";
// 发送消息
channel.basicPublish(exchangeName,"warning",null,message.getBytes());
System.out.println(message);
// 释放资源
channel.close();
connection.close();
}
}二、消费者代码
1、消费者1号
java
package com.atguigu.rabbitmq.routing;

import com.atguigu.rabbitmq.util.ConnectionUtil;
import com.rabbitmq.client.*;
import java.io.IOException;

public class Consumer1 {

    public static void main(String[] args) throws Exception {

        Connection connection = ConnectionUtil.getConnection();

        Channel channel = connection.createChannel();

        String queue1Name = "test_direct_queue1";

        channel.queueDeclare(queue1Name,true,false,false,null);

        Consumer consumer = new DefaultConsumer(channel){

            @Override
            public void handleDelivery(String consumerTag, Envelope envelope, AMQP.BasicProperties properties, byte[] body) throws IOException {

                System.out.println("body:"+new String(body));
                System.out.println("Consumer1 将日志信息打印到控制台.....");

            }

        };

        channel.basicConsume(queue1Name,true,consumer);

    }

}
2、消费者2号
java
package com.atguigu.rabbitmq.routing;

import com.atguigu.rabbitmq.util.ConnectionUtil;
import com.rabbitmq.client.*;
import java.io.IOException;

public class Consumer2 {

    public static void main(String[] args) throws Exception {

        Connection connection = ConnectionUtil.getConnection();

        Channel channel = connection.createChannel();

        String queue2Name = "test_direct_queue2";

        channel.queueDeclare(queue2Name,true,false,false,null);

        Consumer consumer = new DefaultConsumer(channel){

            @Override
            public void handleDelivery(String consumerTag, Envelope envelope, AMQP.BasicProperties properties, byte[] body) throws IOException {

                System.out.println("body:"+new String(body));
                System.out.println("Consumer2 将日志信息存储到数据库.....");

            }

        };

        channel.basicConsume(queue2Name,true,consumer);

    }

}
三、运行结果
1、绑定关系
2、消费消息

10. Topics

操作006:主题模式
一、生产者代码
java
package com.atguigu.rabbitmq.topic;
import com.atguigu.rabbitmq.util.ConnectionUtil;
import com.rabbitmq.client.BuiltinExchangeType;
import com.rabbitmq.client.Channel;
import com.rabbitmq.client.Connection;
import com.rabbitmq.client.ConnectionFactory;
public class Producer {
public static void main(String[] args) throws Exception {
Connection connection = ConnectionUtil.getConnection();
Channel channel = connection.createChannel();
String exchangeName = "test_topic";
channel.exchangeDeclare(exchangeName, BuiltinExchangeType.TOPIC,true,false,false,null);
String queue1Name = "test_topic_queue1";
String queue2Name = "test_topic_queue2";
channel.queueDeclare(queue1Name,true,false,false,null);
channel.queueDeclare(queue2Name,true,false,false,null);
// 绑定队列和交换机
// 参数1. queue:队列名称
// 参数2. exchange:交换机名称
// 参数3. routingKey:路由键,绑定规则
// 如果交换机的类型为fanout ,routingKey设置为""
// routing key 常用格式:系统的名称.日志的级别。
// 需求: 所有error级别的日志存入数据库,所有order系统的日志存入数据库
channel.queueBind(queue1Name,exchangeName,".error");
channel.queueBind(queue1Name,exchangeName,"order.*");
channel.queueBind(queue2Name,exchangeName,"*.*");
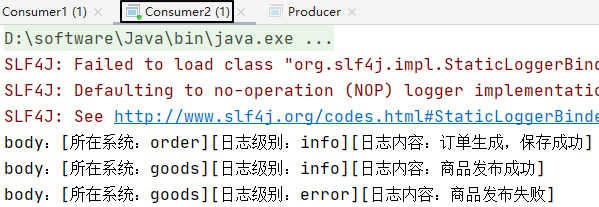
// 分别发送消息到队列:order.info、goods.info、goods.error
String body = "[所在系统:order][日志级别:info][日志内容:订单生成,保存成功]";
channel.basicPublish(exchangeName,"order.info",null,body.getBytes());
body = "[所在系统:goods][日志级别:info][日志内容:商品发布成功]";
channel.basicPublish(exchangeName,"goods.info",null,body.getBytes());
body = "[所在系统:goods][日志级别:error][日志内容:商品发布失败]";
channel.basicPublish(exchangeName,"goods.error",null,body.getBytes());
channel.close();
connection.close();
}
}二、消费者代码
1、消费者1号
消费者1监听队列1:
java
package com.atguigu.rabbitmq.topic;

import com.atguigu.rabbitmq.util.ConnectionUtil;
import com.rabbitmq.client.*;
import java.io.IOException;

public class Consumer1 {

    public static void main(String[] args) throws Exception {

        Connection connection = ConnectionUtil.getConnection();

        Channel channel = connection.createChannel();

        String QUEUE_NAME = "test_topic_queue1";

        channel.queueDeclare(QUEUE_NAME,true,false,false,null);

        Consumer consumer = new DefaultConsumer(channel){

            @Override
            public void handleDelivery(String consumerTag, Envelope envelope, AMQP.BasicProperties properties, byte[] body) throws IOException {

                System.out.println("body:"+new String(body));

            }

        };

        channel.basicConsume(QUEUE_NAME,true,consumer);

    }

}
2、消费者2号
消费者2监听队列2:
java
package com.atguigu.rabbitmq.topic;

import com.atguigu.rabbitmq.util.ConnectionUtil;
import com.rabbitmq.client.*;
import java.io.IOException;

public class Consumer2 {

    public static void main(String[] args) throws Exception {

        Connection connection = ConnectionUtil.getConnection();

        Channel channel = connection.createChannel();

        String QUEUE_NAME = "test_topic_queue2";

        channel.queueDeclare(QUEUE_NAME,true,false,false,null);

        Consumer consumer = new DefaultConsumer(channel){

            @Override
            public void handleDelivery(String consumerTag, Envelope envelope, AMQP.BasicProperties properties, byte[] body) throws IOException {

                System.out.println("body:"+new String(body));

            }

        };

        channel.basicConsume(QUEUE_NAME,true,consumer);

    }

}
三、运行效果
队列1:
队列2:
进阶篇
1. RabbitMQ整合SpringBoot


操作007:整合SpringBoot
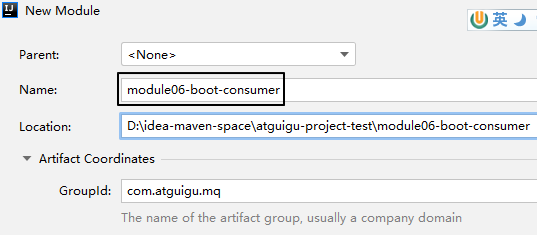
1、消费者工程
①创建module
②配置POM
xml
<parent>
    <groupId>org.springframework.boot</groupId>
    <artifactId>spring-boot-starter-parent</artifactId>
    <version>3.1.5</version>
</parent>

<dependencies>
    <dependency>
        <groupId>org.springframework.boot</groupId>
        <artifactId>spring-boot-starter-amqp</artifactId>
    </dependency>
    <dependency>
        <groupId>org.springframework.boot</groupId>
        <artifactId>spring-boot-starter-web</artifactId>
    </dependency>
    <dependency>
        <groupId>org.projectlombok</groupId>
        <artifactId>lombok</artifactId>
    </dependency>
</dependencies>
③YAML
增加日志打印的配置:
yaml
spring:
  rabbitmq:
    host: 192.168.200.100
    port: 5672
    username: guest
    password: 123456
    virtual-host: /
logging:
  level:
    com.atguigu.mq.listener.MyMessageListener: info
④主启动类
仿照生产者工程的主启动类,改一下类名即可
java
package com.atguigu.mq;

import org.springframework.boot.SpringApplication;
import org.springframework.boot.autoconfigure.SpringBootApplication;

@SpringBootApplication
public class RabbitMQConsumerMainType {

    public static void main(String[] args) {
        SpringApplication.run(RabbitMQConsumerMainType.class, args);
    }

}
⑤监听器
java
package com.atguigu.mq.listener;

import lombok.extern.slf4j.Slf4j;
import com.rabbitmq.client.Channel;
import org.springframework.amqp.core.Message;
import org.springframework.amqp.rabbit.annotation.Exchange;
import org.springframework.amqp.rabbit.annotation.Queue;
import org.springframework.amqp.rabbit.annotation.QueueBinding;
import org.springframework.amqp.rabbit.annotation.RabbitListener;
import org.springframework.stereotype.Component;

@Component
@Slf4j
public class MyMessageListener {

    public static final String EXCHANGE_DIRECT = "exchange.direct.order";
    public static final String ROUTING_KEY = "order";
    public static final String QUEUE_NAME  = "queue.order";

    @RabbitListener(bindings = @QueueBinding(
            value = @Queue(value = QUEUE_NAME, durable = "true"),
            exchange = @Exchange(value = EXCHANGE_DIRECT),
            key = {ROUTING_KEY}
    ))
    public void processMessage(String dateString,
                               Message message,
                               Channel channel) {
        log.info(dateString);
    }

}
2、@RabbitListener注解属性对比
①bindings属性
- 表面作用:
- 指定交换机和队列之间的绑定关系
- 指定当前方法要监听的队列
- 隐藏效果:如果RabbitMQ服务器上没有这里指定的交换机和队列,那么框架底层的代码会创建它们
②queues属性
java
@RabbitListener(queues = {QUEUE_ATGUIGU})- 作用:指定当前方法要监听的队列
- 注意:此时框架不会创建相关交换机和队列,必须提前创建好
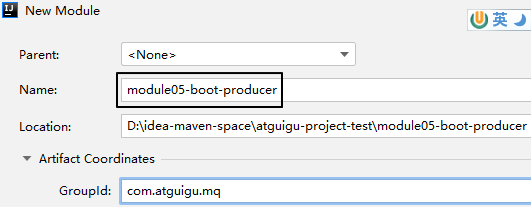
3、生产者工程
①创建module
②配置POM
xml
<parent>
    <groupId>org.springframework.boot</groupId>
    <artifactId>spring-boot-starter-parent</artifactId>
    <version>3.1.5</version>
</parent>

<dependencies>
    <dependency>
        <groupId>org.springframework.boot</groupId>
        <artifactId>spring-boot-starter-amqp</artifactId>
    </dependency>
    <dependency>
        <groupId>org.springframework.boot</groupId>
        <artifactId>spring-boot-starter-test</artifactId>
    </dependency>
</dependencies>
③YAML
yaml
spring:
  rabbitmq:
    host: 192.168.200.100
    port: 5672
    username: guest
    password: 123456
    virtual-host: /
④主启动类
java
package com.atguigu.mq;

import org.springframework.boot.SpringApplication;
import org.springframework.boot.autoconfigure.SpringBootApplication;

@SpringBootApplication
public class RabbitMQProducerMainType {

    public static void main(String[] args) {
        SpringApplication.run(RabbitMQProducerMainType.class, args);
    }

}
⑤测试程序
java
package com.atguigu.mq.test;

import org.junit.jupiter.api.Test;
import org.springframework.amqp.rabbit.core.RabbitTemplate;
import org.springframework.beans.factory.annotation.Autowired;
import org.springframework.boot.test.context.SpringBootTest;

@SpringBootTest
public class RabbitMQTest {

    public static final String EXCHANGE_DIRECT = "exchange.direct.order";
    public static final String ROUTING_KEY = "order";

    @Autowired
    private RabbitTemplate rabbitTemplate;

    @Test
    public void testSendMessage() {
        rabbitTemplate.convertAndSend(
                EXCHANGE_DIRECT,
                ROUTING_KEY,
                "Hello atguigu");
    }

}
2. 消息可靠性投递

故障情况1:消息没有发送到消息队列
解决思路A:在生产者端进行确认,具体操作中我们会分别针对交换机和队列来确认如果没有成功发送到消息队列服务器上,那就可以尝试重新发送
操作008-01-A:生产者端消息确认机制
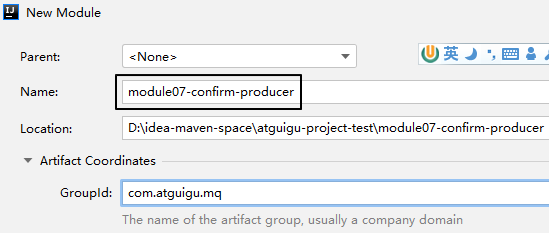
一、创建module
二、搭建环境
1、配置POM
xml
<parent>
    <groupId>org.springframework.boot</groupId>
    <artifactId>spring-boot-starter-parent</artifactId>
    <version>3.1.5</version>
</parent>

<dependencies>
    <dependency>
        <groupId>org.springframework.boot</groupId>
        <artifactId>spring-boot-starter-amqp</artifactId>
    </dependency>
    <dependency>
        <groupId>org.springframework.boot</groupId>
        <artifactId>spring-boot-starter-test</artifactId>
    </dependency>
    <dependency>
        <groupId>org.projectlombok</groupId>
        <artifactId>lombok</artifactId>
    </dependency>
</dependencies>
2、主启动类
没有特殊设定:
java
package com.atguigu.mq;

import org.springframework.boot.SpringApplication;
import org.springframework.boot.autoconfigure.SpringBootApplication;

@SpringBootApplication
public class RabbitMQProducerMainType {

    public static void main(String[] args) {
        SpringApplication.run(RabbitMQProducerMainType.class, args);
    }

}
3、YAML
注意:publisher-confirm-type和publisher-returns是两个必须要增加的配置,如果没有则本节功能不生效
yaml
spring:
  rabbitmq:
    host: 192.168.200.100
    port: 5672
    username: guest
    password: 123456
    virtual-host: /
    publisher-confirm-type: CORRELATED  交换机的确认
    publisher-returns: true  队列的确认
logging:
  level:
    com.atguigu.mq.config.MQProducerAckConfig: info
三、创建配置类
1、目标
在这里我们为什么要创建这个配置类呢?首先,我们需要声明回调函数来接收RabbitMQ服务器返回的确认信息:
| 方法名 | 方法功能 | 所属接口 | 接口所属类 |
|---|---|---|---|
| confirm() | 确认消息是否发送到交换机 | ConfirmCallback | RabbitTemplate |
| returnedMessage() | 确认消息是否发送到队列 | ReturnsCallback | RabbitTemplate |
然后,就是对RabbitTemplate的功能进行增强,因为回调函数所在对象必须设置到RabbitTemplate对象中才能生效。
原本RabbitTemplate对象并没有生产者端消息确认的功能,要给它设置对应的组件才可以。
而设置对应的组件,需要调用RabbitTemplate对象下面两个方法:
| 设置组件调用的方法 | 所需对象类型 |
|---|---|
| setConfirmCallback() | ConfirmCallback接口类型 |
| setReturnCallback() | ReturnCallback接口类型 |
2、API说明
①ConfirmCallback接口
这是RabbitTemplate内部的一个接口,源代码如下:
java
	/**
	 * A callback for publisher confirmations.
	 *
	 */
	@FunctionalInterface
	public interface ConfirmCallback {

		/**
		 * Confirmation callback.
		 * @param correlationData correlation data for the callback.
		 * @param ack true for ack, false for nack
		 * @param cause An optional cause, for nack, when available, otherwise null.
		 */
		void confirm(@Nullable CorrelationData correlationData, boolean ack, @Nullable String cause);

	}
生产者端发送消息之后,回调confirm()方法
- ack参数值为true:表示消息成功发送到了交换机
- ack参数值为false:表示消息没有发送到交换机
②ReturnCallback接口
同样也RabbitTemplate内部的一个接口,源代码如下:
java
	/**
	 * A callback for returned messages.
	 *
	 * @since 2.3
	 */
	@FunctionalInterface
	public interface ReturnsCallback {

		/**
		 * Returned message callback.
		 * @param returned the returned message and metadata.
		 */
		void returnedMessage(ReturnedMessage returned);

	}
注意:接口中的returnedMessage()方法仅在消息没有发送到队列时调用
ReturnedMessage类中主要属性含义如下:
| 属性名 | 类型 | 含义 |
|---|---|---|
| message | org.springframework.amqp.core.Message | 消息以及消息相关数据 |
| replyCode | int | 应答码,类似于HTTP响应状态码 |
| replyText | String | 应答码说明 |
| exchange | String | 交换机名称 |
| routingKey | String | 路由键名称 |
3、配置类代码
①要点1
加@Component注解,加入IOC容器
②要点2
配置类自身实现ConfirmCallback、ReturnCallback这两个接口,然后通过this指针把配置类的对象设置到RabbitTemplate对象中。
操作封装到了一个专门的void init()方法中。
为了保证这个void init()方法在应用启动时被调用,我们使用@PostConstruct注解来修饰这个方法。
关于@PostConstruct注解大家可以参照以下说明:
@PostConstruct注解是Java中的一个标准注解,它用于指定在对象创建之后立即执行的方法。当使用依赖注入(如Spring框架)或者其他方式创建对象时,@PostConstruct注解可以确保在对象完全初始化之后,执行相应的方法。
使用@PostConstruct注解的方法必须满足以下条件:
- 方法不能有任何参数。
- 方法必须是非静态的。
- 方法不能返回任何值。
当容器实例化一个带有@PostConstruct注解的Bean时,它会在调用构造函数之后,并在依赖注入完成之前调用被@PostConstruct注解标记的方法。这样,我们可以在该方法中进行一些初始化操作,比如读取配置文件、建立数据库连接等。
③代码
有了以上说明,下面我们就可以展示配置类的整体代码:
java
package com.atguigu.mq.config;

import jakarta.annotation.PostConstruct;
import lombok.extern.slf4j.Slf4j;
import org.springframework.amqp.core.ReturnedMessage;
import org.springframework.amqp.rabbit.connection.CorrelationData;
import org.springframework.amqp.rabbit.core.RabbitTemplate;
import org.springframework.beans.factory.annotation.Autowired;
import org.springframework.stereotype.Component;

@Component
@Slf4j
public class MQProducerAckConfig implements RabbitTemplate.ConfirmCallback, RabbitTemplate.ReturnsCallback{

    @Autowired
    private RabbitTemplate rabbitTemplate;

    @PostConstruct
    public void init() {
        rabbitTemplate.setConfirmCallback(this);
        rabbitTemplate.setReturnsCallback(this);
    }

    @Override
    public void confirm(CorrelationData correlationData, boolean ack, String cause) {
        if (ack) {
            log.info("消息发送到交换机成功!数据:" + correlationData);
        } else {
            log.info("消息发送到交换机失败!数据:" + correlationData + " 原因:" + cause);
        }
    }

    @Override
    public void returnedMessage(ReturnedMessage returned) {
        log.info("消息主体: " + new String(returned.getMessage().getBody()));
        log.info("应答码: " + returned.getReplyCode());
        log.info("描述:" + returned.getReplyText());
        log.info("消息使用的交换器 exchange : " + returned.getExchange());
        log.info("消息使用的路由键 routing : " + returned.getRoutingKey());
    }
}
四、发送消息
java
package com.atguigu.mq.test;

import org.junit.jupiter.api.Test;
import org.springframework.amqp.rabbit.core.RabbitTemplate;
import org.springframework.beans.factory.annotation.Autowired;
import org.springframework.boot.test.context.SpringBootTest;

@SpringBootTest
public class RabbitMQTest {

    public static final String EXCHANGE_DIRECT = "exchange.direct.order";
    public static final String ROUTING_KEY = "order";

    @Autowired
    private RabbitTemplate rabbitTemplate;

    @Test
    public void testSendMessage() {
        rabbitTemplate.convertAndSend(
                EXCHANGE_DIRECT,
                ROUTING_KEY,
                "Hello atguigu");
    }

}
通过调整代码,测试如下三种情况:
- 交换机正确、路由键正确
- 交换机正确、路由键不正确,无法发送到队列
- 交换机不正确,无法发送到交换机
解决思路B:为目标交换机指定备份交换机,当目标交换机投递失败时,把消息投递至备份交换机

操作008-01-B:备份交换机
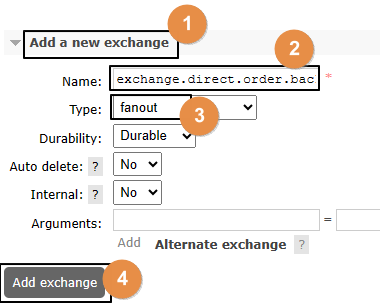
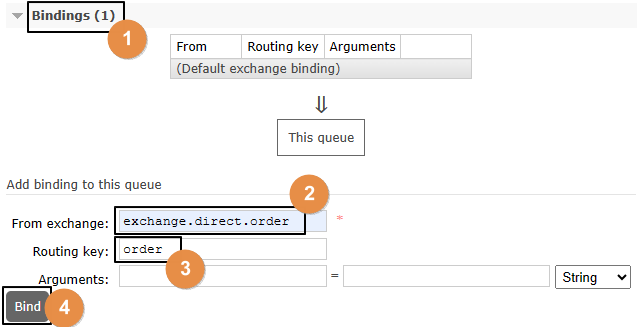
一、创建备份交换机
1、创建备份交换机
注意:备份交换机一定要选择fanout类型,因为原交换机转入备份交换机时并不会指定路由键
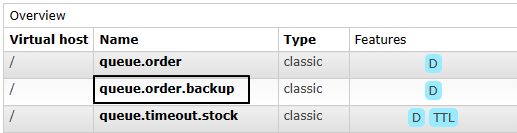
2、创建备份交换机要绑定的队列
①创建队列
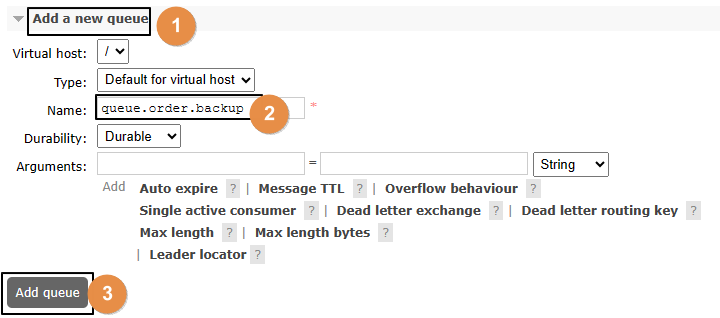
②绑定交换机
注意:这里是要和备份交换机绑定
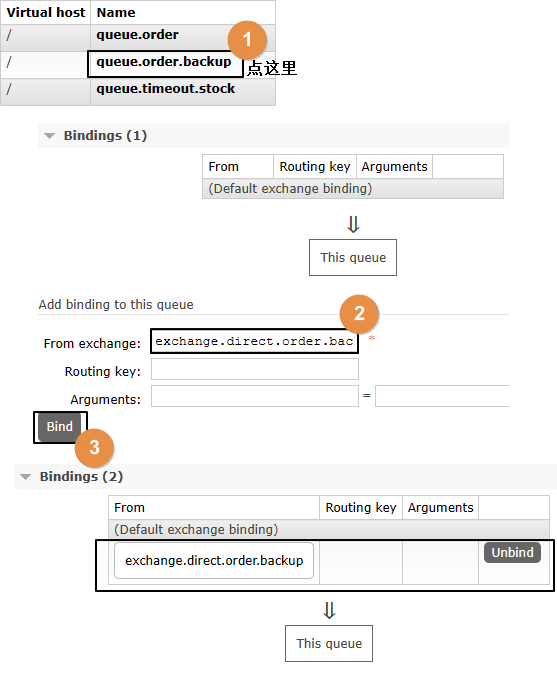
3、针对备份队列创建消费端监听器
java
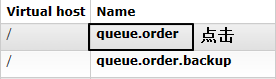
    public static final String EXCHANGE_DIRECT_BACKUP = "exchange.direct.order.backup";
    public static final String QUEUE_NAME_BACKUP  = "queue.order.backup";

    @RabbitListener(bindings = @QueueBinding(
            value = @Queue(value = QUEUE_NAME_BACKUP, durable = "true"),
            exchange = @Exchange(value = EXCHANGE_DIRECT_BACKUP),
            key = {""}
    ))
    public void processMessageBackup(String dateString,
                                     Message message,
                                     Channel channel) {
        log.info("BackUp: " + dateString);
    }
二、设定备份关系
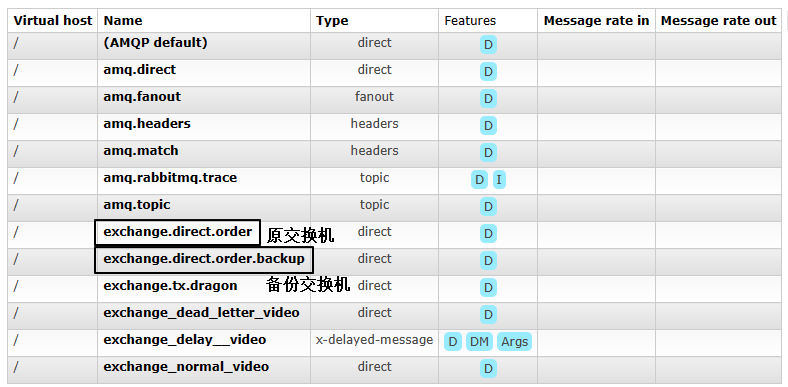
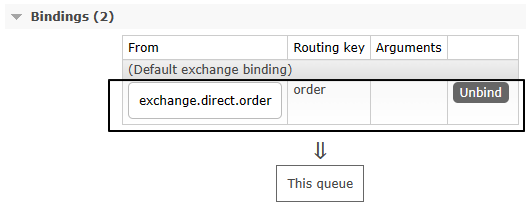
1、原交换机删除
·
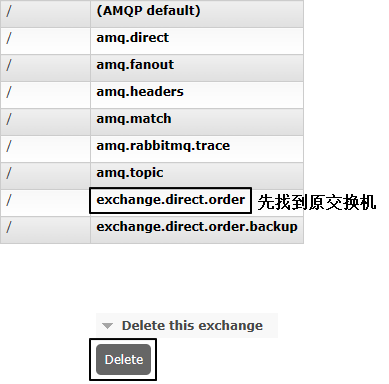
2、重新创建原交换机
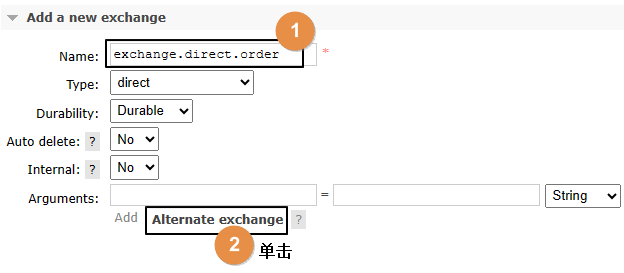
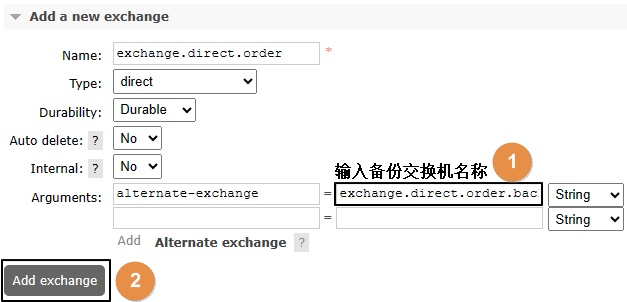
3、原交换机重新绑定原队列
三、测试
- 启动消费者端
- 发送消息,但是路由键不对,于是转入备份交换机
故障情况2:消息队列服务器宕机导致内存中消息丢失
解决思路:消息持久化到硬盘上,哪怕服务器重启也不会导致消息丢失
操作008-02:交换机和队列持久化
一、测试非持久化交换机和队列
1、创建非持久化交换机
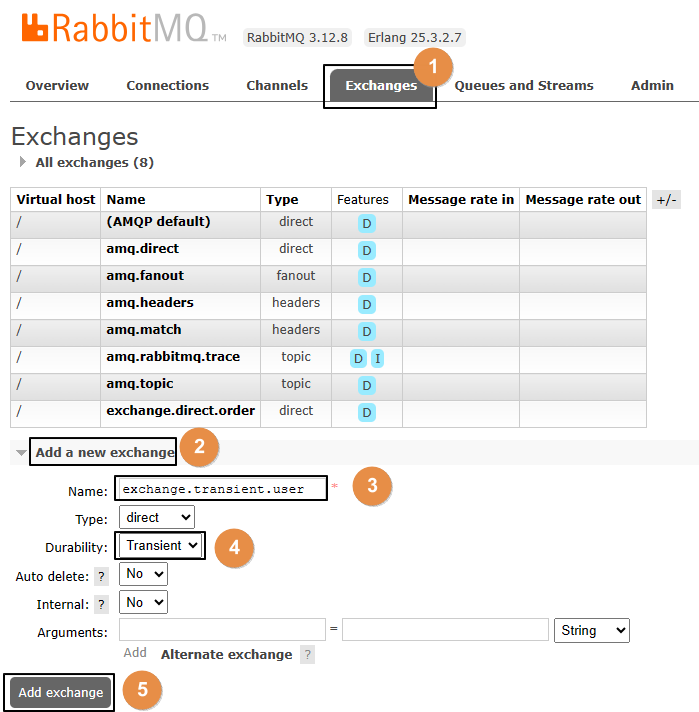
创建之后,可以在列表中看到:
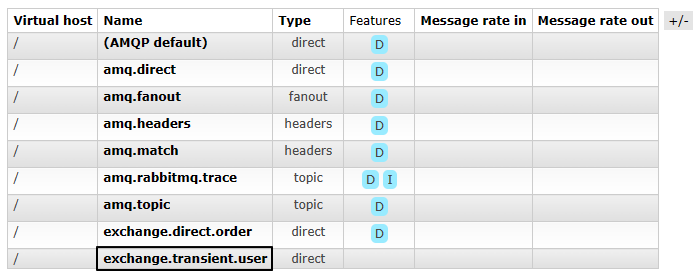
2、创建非持久化队列
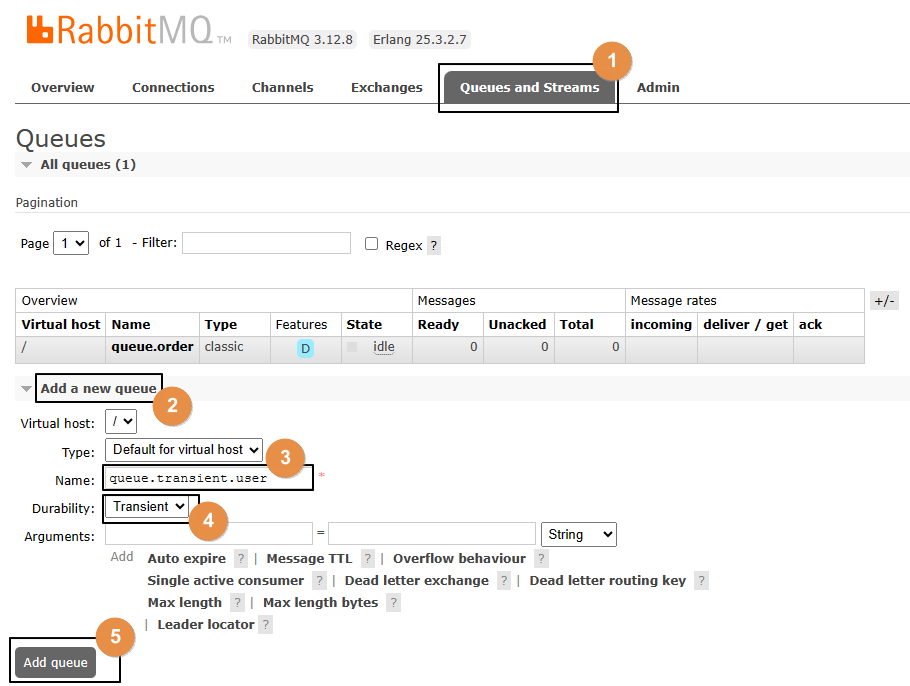
创建之后,可以在列表中看到:

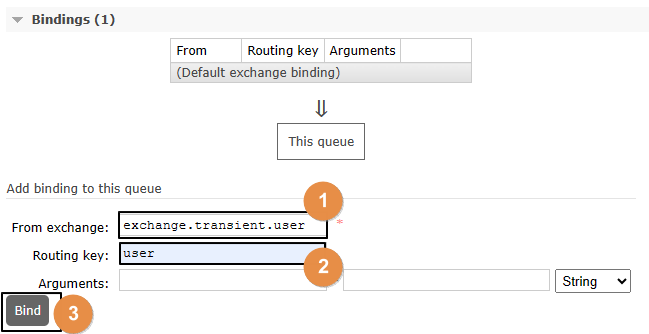
3、绑定
4、发送消息
java
    public static final String EXCHANGE_TRANSIENT = "exchange.transient.user";
    public static final String ROUTING_KEY_TRANSIENT = "user";

    @Test
    public void testSendMessageTransient() {
        rabbitTemplate.convertAndSend(
                EXCHANGE_TRANSIENT,
                ROUTING_KEY_TRANSIENT,
                "Hello atguigu user~~~");
    }
5、查看已发送消息
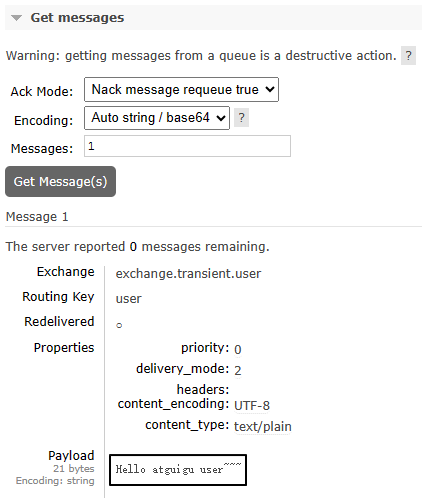
结论:临时性的交换机和队列也能够接收消息,但如果RabbitMQ服务器重启之后会怎么样呢?
6、重启RabbitMQ服务器
shell
docker restart rabbitmq重启之后,刚才临时性的交换机和队列都没了。在交换机和队列这二者中,队列是消息存储的容器,队列没了,消息就也跟着没了。
二、持久化的交换机和队列
我们其实不必专门创建持久化的交换机和队列,因为它们默认就是持久化的。接下来我们只需要确认一下:存放到队列中,尚未被消费端取走的消息,是否会随着RabbitMQ服务器重启而丢失?
1、发送消息
运行以前的发送消息方法即可,不过要关掉消费端程序
2、在管理界面查看消息
3、重启RabbitMQ服务器
shell
docker restart rabbitmq4、再次查看消息
仍然还在:
三、结论
在后台管理界面创建交换机和队列时,默认就是持久化的模式。
此时消息也是持久化的,不需要额外设置。
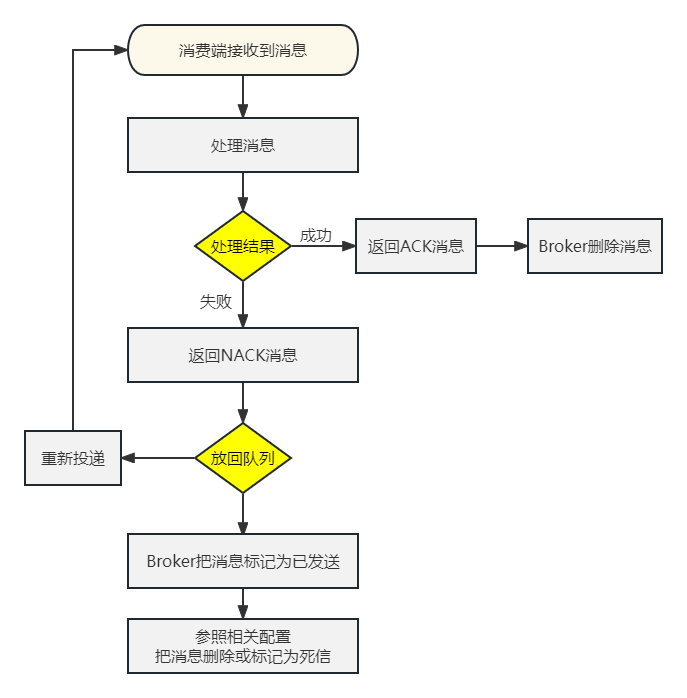
故障情况3:消费端宕机或抛异常导致消息没有成功被消费
消费端消费消息成功,给服务器返回ACK信息,然后消息队列删除该消息
消费端消费消息失败,给服务器端返回ACK信息,同时把消息恢复为待消费的状态这样就可以再次取回消息,重试一次(当然,这就需要消费端接口支持幂等性)
操作008-03:消费端消息确认
一、ACK
ACK是acknowledge的缩写,表示已确认
二、默认情况
默认情况下,消费端取回消息后,默认会自动返回ACK确认消息,所以在前面的测试中消息被消费端消费之后,RabbitMQ得到ACK确认信息就会删除消息
但实际开发中,消费端根据消息队列投递的消息执行对应的业务,未必都能执行成功,如果希望能够多次重试,那么默认设定就不满足要求了
所以还是要修改成手动确认
三、创建消费端module
1、配置POM
xml
<parent>
    <groupId>org.springframework.boot</groupId>
    <artifactId>spring-boot-starter-parent</artifactId>
    <version>3.1.5</version>
</parent>

<dependencies>
    <dependency>
        <groupId>org.springframework.boot</groupId>
        <artifactId>spring-boot-starter-amqp</artifactId>
    </dependency>
    <dependency>
        <groupId>org.springframework.boot</groupId>
        <artifactId>spring-boot-starter-web</artifactId>
    </dependency>
    <dependency>
        <groupId>org.projectlombok</groupId>
        <artifactId>lombok</artifactId>
    </dependency>
</dependencies>
2、YAML
增加针对监听器的设置:
yaml
spring:
  rabbitmq:
    host: 192.168.200.100
    port: 5672
    username: guest
    password: 123456
    virtual-host: /
    listener:
      simple:
        acknowledge-mode: manual  把消息确认模式改为手动确认
3、主启动类
没有特殊设定:
java
package com.atguigu.mq;

import org.springframework.boot.SpringApplication;
import org.springframework.boot.autoconfigure.SpringBootApplication;

@SpringBootApplication
public class RabbitMQConsumerMainType {

    public static void main(String[] args) {
        SpringApplication.run(RabbitMQConsumerMainType.class, args);
    }

}
四、消费端监听器
1、创建监听器类
java
package com.atguigu.mq.listener;

import com.rabbitmq.client.Channel;
import org.springframework.amqp.core.Message;
import org.springframework.stereotype.Component;

@Component
public class MyMessageListener {

    public static final String EXCHANGE_DIRECT = "exchange.direct.order";
    public static final String ROUTING_KEY = "order";
    public static final String QUEUE_NAME  = "queue.order";

    public void processMessage(String dataString, Message message, Channel channel) {

    }

}
2、在接收消息的方法上应用注解
java
// 修饰监听方法
@RabbitListener(
// 设置绑定关系
bindings = @QueueBinding(
// 配置队列信息:durable 设置为 true 表示队列持久化;autoDelete 设置为 false 表示关闭自动删除
value = @Queue(value = QUEUE_NAME, durable = "true", autoDelete = "false"),
// 配置交换机信息:durable 设置为 true 表示队列持久化;autoDelete 设置为 false 表示关闭自动删除
exchange = @Exchange(value = EXCHANGE_DIRECT, durable = "true", autoDelete = "false"),
// 配置路由键信息
key = {ROUTING_KEY}
))
public void processMessage(String dataString, Message message, Channel channel) {
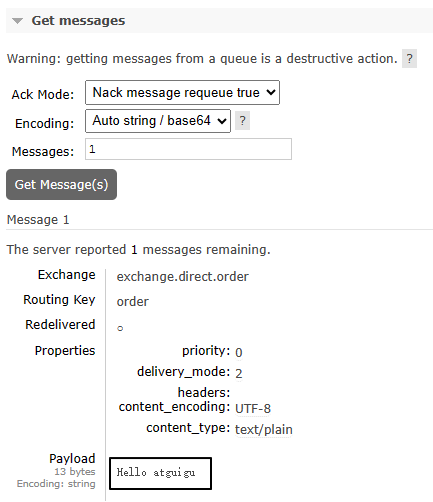
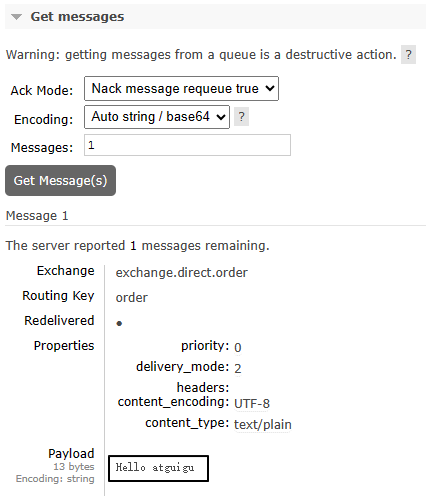
}3、接收消息方法内部逻辑
- 业务处理成功:手动返回ACK信息,表示消息成功消费
- 业务处理失败:手动返回NACK信息,表示消息消费失败。此时有两种后续操作供选择:
- 把消息重新放回消息队列,RabbitMQ会重新投递这条消息,那么消费端将重新消费这条消息------从而让业务代码再执行一遍
- 不把消息放回消息队列,返回reject信息表示拒绝,那么这条消息的处理就到此为止
4、相关API
先回到PPT理解"deliveryTag:交付标签机制"
下面我们探讨的三个方法都是来自于com.rabbitmq.client.Channel接口
①basicAck()方法
- 方法功能:给Broker返回ACK确认信息,表示消息已经在消费端成功消费,这样Broker就可以把消息删除了
- 参数列表:
| 参数名称 | 含义 |
|---|---|
| long deliveryTag | Broker给每一条进入队列的消息都设定一个唯一标识 |
| boolean multiple | 取值为true:为小于、等于deliveryTag的消息批量返回ACK信息 取值为false:仅为指定的deliveryTag返回ACK信息 |
②basicNack()方法
- 方法功能:给Broker返回NACK信息,表示消息在消费端消费失败,此时Broker的后续操作取决于参数requeue的值
- 参数列表:
| 参数名称 | 含义 |
|---|---|
| long deliveryTag | Broker给每一条进入队列的消息都设定一个唯一标识 |
| boolean multiple | 取值为true:为小于、等于deliveryTag的消息批量返回ACK信息 取值为false:仅为指定的deliveryTag返回ACK信息 |
| boolean requeue | 取值为true:Broker将消息重新放回队列,接下来会重新投递给消费端 取值为false:Broker将消息标记为已消费,不会放回队列 |
③basicReject()方法
- 方法功能:根据指定的deliveryTag,对该消息表示拒绝
- 参数列表:
| 参数名称 | 含义 |
|---|---|
| long deliveryTag | Broker给每一条进入队列的消息都设定一个唯一标识 |
| boolean requeue | 取值为true:Broker将消息重新放回队列,接下来会重新投递给消费端 取值为false:Broker将消息标记为已消费,不会放回队列 |
- basicNack()和basicReject()有啥区别?
- basicNack()有批量操作
- basicReject()没有批量操作
5、完整代码示例
java
package com.atguigu.mq.listener;

import com.rabbitmq.client.Channel;
import lombok.extern.slf4j.Slf4j;
import org.springframework.amqp.core.Message;
import org.springframework.amqp.rabbit.annotation.Exchange;
import org.springframework.amqp.rabbit.annotation.Queue;
import org.springframework.amqp.rabbit.annotation.QueueBinding;
import org.springframework.amqp.rabbit.annotation.RabbitListener;
import org.springframework.stereotype.Component;

import java.io.IOException;

@Component
@Slf4j
public class MyMessageListener {

    public static final String EXCHANGE_DIRECT = "exchange.direct.order";
    public static final String ROUTING_KEY = "order";
    public static final String QUEUE_NAME  = "queue.order";

    // 修饰监听方法
    @RabbitListener(
            // 设置绑定关系
            bindings = @QueueBinding(

                // 配置队列信息:durable 设置为 true 表示队列持久化;autoDelete 设置为 false 表示关闭自动删除
                value = @Queue(value = QUEUE_NAME, durable = "true", autoDelete = "false"),

                // 配置交换机信息:durable 设置为 true 表示队列持久化;autoDelete 设置为 false 表示关闭自动删除
                exchange = @Exchange(value = EXCHANGE_DIRECT, durable = "true", autoDelete = "false"),

                // 配置路由键信息
                key = {ROUTING_KEY}
    ))
    public void processMessage(String dataString, Message message, Channel channel) throws IOException {

        // 1、获取当前消息的 deliveryTag 值备用
        long deliveryTag = message.getMessageProperties().getDeliveryTag();

        try {
            // 2、正常业务操作
            log.info("消费端接收到消息内容:" + dataString);

            // System.out.println(10 / 0);

            // 3、给 RabbitMQ 服务器返回 ACK 确认信息
            channel.basicAck(deliveryTag, false);
        } catch (Exception e) {

            // 4、获取信息,看当前消息是否曾经被投递过
            Boolean redelivered = message.getMessageProperties().getRedelivered();

            if (!redelivered) {
                // 5、如果没有被投递过,那就重新放回队列,重新投递,再试一次
                channel.basicNack(deliveryTag, false, true);
            } else {
                // 6、如果已经被投递过,且这一次仍然进入了 catch 块,那么返回拒绝且不再放回队列
                channel.basicReject(deliveryTag, false);
            }

        }
    }

}
五、要点总结
- 要点1:把消息确认模式改为手动确认
- 要点2:调用Channel对象的方法返回信息
- ACK:Acknowledgement,表示消息处理成功
- NACK:Negative Acknowledgement,表示消息处理失败
- Reject:拒绝,同样表示消息处理失败
- 要点3:后续操作
- requeue为true:重新放回队列,重新投递,再次尝试
- requeue为false:不放回队列,不重新投递
- 要点4:deliveryTag 消息的唯一标识,查找具体某一条消息的依据
六、流程梳理
七、多啰嗦一句
消费端如果设定消息重新放回队列,Broker重新投递消息,那么消费端就可以再次消费消息,这是一种"重试"机制,这需要消费端代码支持"幂等性"------这属于前置知识,不展开了。
3. 消费端限流

操作009:Prefetch
一、思路
- 生产者发送100个消息
- 对照两种情况:
- 消费端没有设置prefetch参数:100个消息被全部取回
- 消费端设置prefetch参数为1:100个消息慢慢取回
二、生产者端代码
java
@Test
public void testSendMessage() {
    for (int i = 0; i < 100; i++) {
        rabbitTemplate.convertAndSend(
                EXCHANGE_DIRECT,
                ROUTING_KEY,
                "Hello atguigu" + i);
    }
}
三、消费者端代码
java
// 2、正常业务操作
log.info("消费端接收到消息内容:" + dataString);

// System.out.println(10 / 0);
TimeUnit.SECONDS.sleep(1);

// 3、给 RabbitMQ 服务器返回 ACK 确认信息
channel.basicAck(deliveryTag, false);
四、测试
1、未使用prefetch
- 不要启动消费端程序,如果正在运行就把它停了
- 运行生产者端程序发送100条消息
- 查看队列中消息的情况:
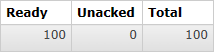
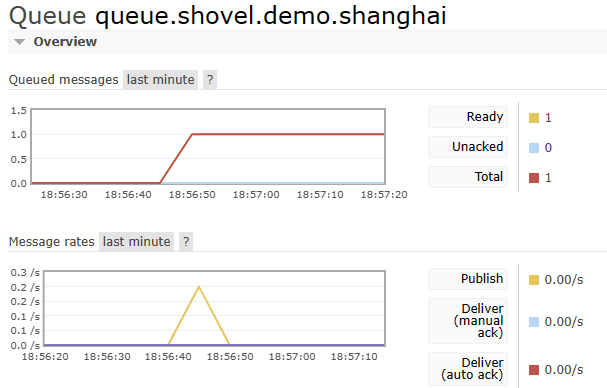
-
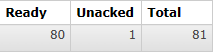
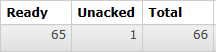
说明:
- Ready表示已经发送到队列的消息数量
- Unacked表示已经发送到消费端但是消费端尚未返回ACK信息的消息数量
- Total未被删除的消息总数
-
接下来启动消费端程序,再查看队列情况:
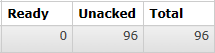
- 能看到消息全部被消费端取走了,正在逐个处理、确认,说明有多少消息消费端就并发处理多少
2、设定prefetch
①YAML配置
yaml
spring:
  rabbitmq:
    host: 192.168.200.100
    port: 5672
    username: guest
    password: 123456
    virtual-host: /
    listener:
      simple:
        acknowledge-mode: manual
        prefetch: 1  设置每次最多从消息队列服务器取回多少消息
②测试流程
- 停止消费端程序
- 运行生产者端程序发送100条消息
- 查看队列中消息的情况:
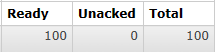
- 接下来启动消费端程序,持续观察队列情况:

- 能看到消息不是一次性全部取回的,而是有个过程
4. 消息超时

操作010:消息超时
一、队列层面设置
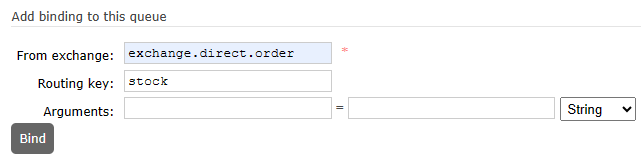
1、设置
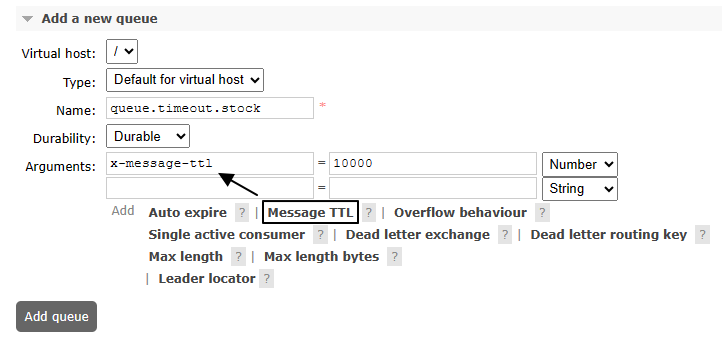
别忘了设置绑定关系:
2、测试
- 不启动消费端程序
- 向设置了过期时间的队列中发送100条消息
- 等10秒后,看是否全部被过期删除

二、消息层面设置
1、设置
java
import org.springframework.amqp.core.Message;
import org.springframework.amqp.core.MessagePostProcessor;

@Test
public void testSendMessageTTL() {

    // 1、创建消息后置处理器对象
    MessagePostProcessor messagePostProcessor = (Message message) -> {

        // 设定 TTL 时间,以毫秒为单位
        message.getMessageProperties().setExpiration("5000");

        return message;
    };

    // 2、发送消息
    rabbitTemplate.convertAndSend(
            EXCHANGE_DIRECT,
            ROUTING_KEY,
            "Hello atguigu", messagePostProcessor);
}
2、查看效果
这次我们是发送到普通队列上:

5. 死信和死信队列

操作011:死信
一、测试相关准备
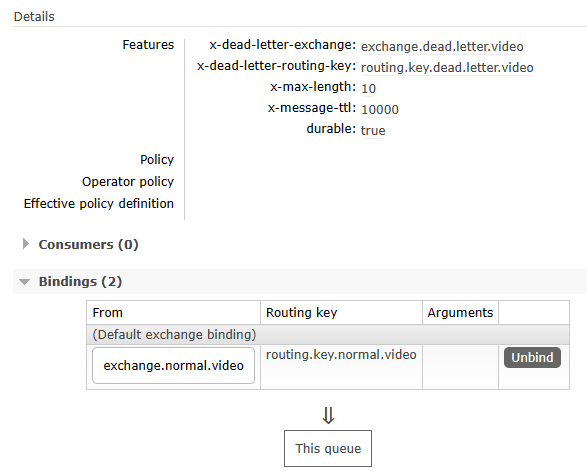
1、创建死信交换机和死信队列
常规设定即可,没有特殊设置:
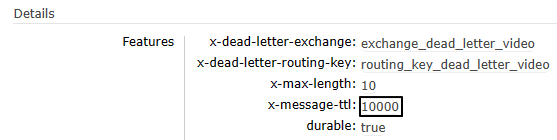
- 死信交换机:exchange.dead.letter.video
- 死信队列:queue.dead.letter.video
- 死信路由键:routing.key.dead.letter.video
2、创建正常交换机和正常队列
注意:一定要注意正常队列有诸多限定和设置,这样才能让无法处理的消息进入死信交换机

- 正常交换机:exchange.normal.video
- 正常队列:queue.normal.video
- 正常路由键:routing.key.normal.video
全部设置完成后参照如下细节:
3、Java代码中的相关常量声明
java
public static final String EXCHANGE_NORMAL = "exchange.normal.video";
public static final String EXCHANGE_DEAD_LETTER = "exchange.dead.letter.video";

public static final String ROUTING_KEY_NORMAL = "routing.key.normal.video";
public static final String ROUTING_KEY_DEAD_LETTER = "routing.key.dead.letter.video";

public static final String QUEUE_NORMAL = "queue.normal.video";
public static final String QUEUE_DEAD_LETTER = "queue.dead.letter.video";
二、消费端拒收消息
1、发送消息的代码
java
@Test
public void testSendMessageButReject() {
    rabbitTemplate
            .convertAndSend(
                    EXCHANGE_NORMAL,
                    ROUTING_KEY_NORMAL,
                    "测试死信情况1:消息被拒绝");
}
2、接收消息的代码
①监听正常队列
java
@RabbitListener(queues = {QUEUE_NORMAL})
public void processMessageNormal(Message message, Channel channel) throws IOException {
    // 监听正常队列,但是拒绝消息
    log.info("★[normal]消息接收到,但我拒绝。");
    channel.basicReject(message.getMessageProperties().getDeliveryTag(), false);
}
②监听死信队列
java
@RabbitListener(queues = {QUEUE_DEAD_LETTER})
public void processMessageDead(String dataString, Message message, Channel channel) throws IOException {
    // 监听死信队列
    log.info("★[dead letter]dataString = " + dataString);
    log.info("★[dead letter]我是死信监听方法,我接收到了死信消息");
    channel.basicAck(message.getMessageProperties().getDeliveryTag(), false);
}
3、执行结果

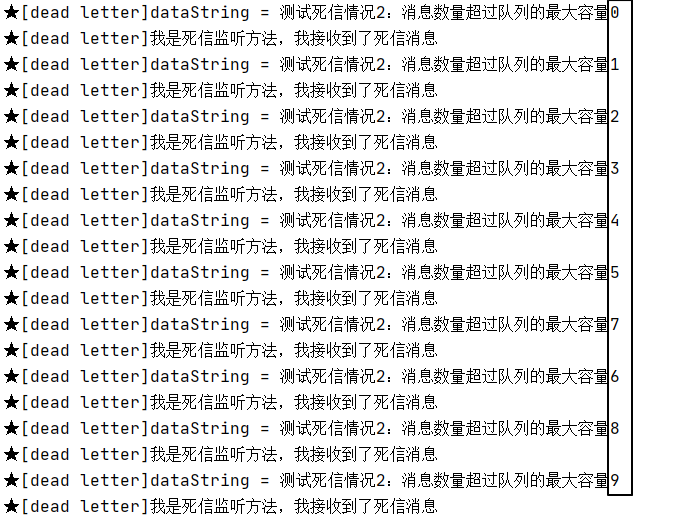
三、消息数量超过队列容纳极限
1、发送消息的代码
java
@Test
public void testSendMultiMessage() {
    for (int i = 0; i < 20; i++) {
        rabbitTemplate.convertAndSend(
                EXCHANGE_NORMAL,
                ROUTING_KEY_NORMAL,
                "测试死信情况2:消息数量超过队列的最大容量" + i);
    }
}
2、接收消息的代码
消息接收代码不再拒绝消息:
java
@RabbitListener(queues = {QUEUE_NORMAL})
public void processMessageNormal(Message message, Channel channel) throws IOException {
    // 监听正常队列
    log.info("★[normal]消息接收到。");
    channel.basicAck(message.getMessageProperties().getDeliveryTag(), false);
}
重启微服务使代码修改生效。
3、执行效果
正常队列的参数如下图所示:

生产者发送20条消息之后,消费端死信队列接收到前10条消息:
四、消息超时未消费
1、发送消息的代码
正常发送一条消息即可,所以使用第一个例子的代码。
java
@Test
public void testSendMessageTimeout() {
    rabbitTemplate
            .convertAndSend(
                    EXCHANGE_NORMAL,
                    ROUTING_KEY_NORMAL,
                    "测试死信情况3:消息超时");
}
2、执行效果
队列参数生效:
因为没有消费端监听程序,所以消息未超时前滞留在队列中:

消息超时后,进入死信队列:

6. 延迟队列


操作012:延迟插件
一、插件简介
二、插件安装
1、确定卷映射目录
shell
docker inspect rabbitmq运行结果:
json
        "Mounts": [
            {
                "Type": "volume",
                "Name": "rabbitmq-plugin",
                "Source": "/var/lib/docker/volumes/rabbitmq-plugin/_data",
                "Destination": "/plugins",
                "Driver": "local",
                "Mode": "z",
                "RW": true,
                "Propagation": ""
            },
            {
                "Type": "volume",
                "Name": "cca7bc3012f5b76bd6c47a49ca6911184f9076f5f6263b41f4b9434a7f269b11",
                "Source": "/var/lib/docker/volumes/cca7bc3012f5b76bd6c47a49ca6911184f9076f5f6263b41f4b9434a7f269b11/_data",
                "Destination": "/var/lib/rabbitmq",
                "Driver": "local",
                "Mode": "",
                "RW": true,
                "Propagation": ""
            }
        ]
和容器内/plugins目录对应的宿主机目录是:/var/lib/docker/volumes/rabbitmq-plugin/_data
2、下载延迟插件
官方文档说明页地址:https://www.rabbitmq.com/community-plugins.html
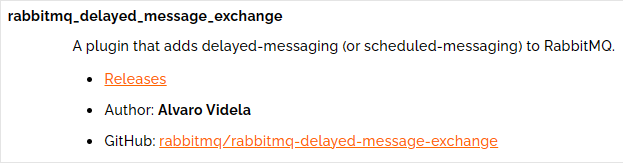
下载插件安装文件:
shell
wget https://github.com/rabbitmq/rabbitmq-delayed-message-exchange/releases/download/v3.13.0/rabbitmq_delayed_message_exchange-3.13.0.ez
mv rabbitmq_delayed_message_exchange-3.13.0.ez /var/lib/docker/volumes/rabbitmq-plugin/_data
3、启用插件
shell
 登录进入容器内部
docker exec -it rabbitmq /bin/bash

 rabbitmq-plugins命令所在目录已经配置到$PATH环境变量中了,可以直接调用
rabbitmq-plugins enable rabbitmq_delayed_message_exchange

 退出Docker容器
exit

 重启Docker容器
docker restart rabbitmq
4、确认
确认点1:查看当前节点已启用插件的列表:
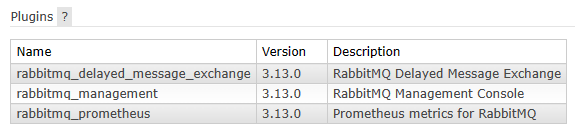
确认点2:如果创建新交换机时可以在type中看到x-delayed-message选项,那就说明插件安装好了
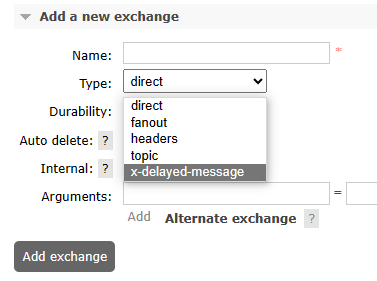
三、创建交换机
rabbitmq_delayed_message_exchange插件在工作时要求交换机是x-delayed-message类型才可以,创建方式如下:
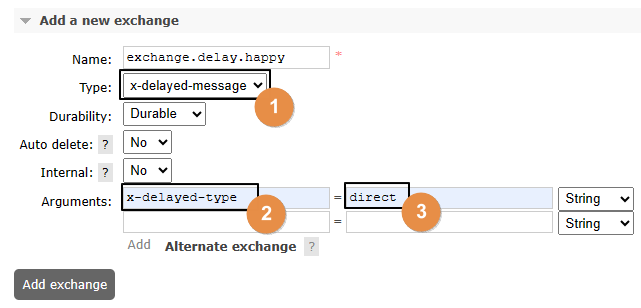
关于x-delayed-type参数的理解:
原本指定交换机类型的地方使用了x-delayed-message这个值,那么这个交换机除了支持延迟消息之外,到底是direct、fanout、topic这些类型中的哪一个呢?
这里就额外使用x-delayed-type来指定交换机本身的类型
四、代码测试
1、生产者端代码
java
@Test
public void testSendDelayMessage() {
    rabbitTemplate.convertAndSend(
            EXCHANGE_DELAY,
            ROUTING_KEY_DELAY,
            "测试基于插件的延迟消息 [" + new SimpleDateFormat("hh:mm:ss").format(new Date()) + "]",
            messageProcessor -> {

                // 设置延迟时间:以毫秒为单位
                messageProcessor.getMessageProperties().setHeader("x-delay", "10000");

                return messageProcessor;
            });
}
2、消费者端代码
①情况A:资源已创建
java
package com.atguigu.mq.listener;

import com.rabbitmq.client.Channel;
import lombok.extern.slf4j.Slf4j;
import org.springframework.amqp.core.Message;
import org.springframework.amqp.rabbit.annotation.RabbitListener;
import org.springframework.stereotype.Component;

import java.io.IOException;
import java.text.SimpleDateFormat;
import java.util.Date;

@Component
@Slf4j
public class MyDelayMessageListener {

    public static final String QUEUE_DELAY = "queue.delay.video";

    @RabbitListener(queues = {QUEUE_DELAY})
    public void process(String dataString, Message message, Channel channel) throws IOException {
        log.info("[生产者]" + dataString);
        log.info("[消费者]" + new SimpleDateFormat("hh:mm:ss").format(new Date()));
        channel.basicAck(message.getMessageProperties().getDeliveryTag(), false);
    }

}
②情况B:资源未创建
java
package com.atguigu.mq.listener;

import com.rabbitmq.client.Channel;
import lombok.extern.slf4j.Slf4j;
import org.springframework.amqp.core.Message;
import org.springframework.amqp.rabbit.annotation.*;
import org.springframework.stereotype.Component;

import java.io.IOException;
import java.text.SimpleDateFormat;
import java.util.Date;

@Component
@Slf4j
public class MyDelayMessageListener {

    public static final String EXCHANGE_DELAY = "exchange.delay.video";
    public static final String ROUTING_KEY_DELAY = "routing.key.delay.video";
    public static final String QUEUE_DELAY = "queue.delay.video";

    @RabbitListener(bindings = @QueueBinding(
        value = @Queue(value = QUEUE_DELAY, durable = "true", autoDelete = "false"),
        exchange = @Exchange(
                value = EXCHANGE_DELAY,
                durable = "true",
                autoDelete = "false",
                type = "x-delayed-message",
                arguments = @Argument(name = "x-delayed-type", value = "direct")),
        key = {ROUTING_KEY_DELAY}
    ))
    public void process(String dataString, Message message, Channel channel) throws IOException {
        log.info("[生产者]" + dataString);
        log.info("[消费者]" + new SimpleDateFormat("hh:mm:ss").format(new Date()));
        channel.basicAck(message.getMessageProperties().getDeliveryTag(), false);
    }

}
3、执行效果
①交换机类型

②生产者端效果
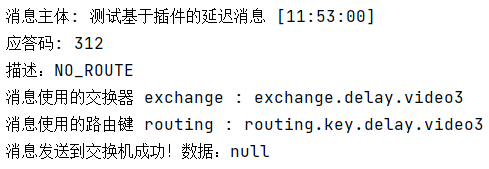
注意:使用rabbitmq_delayed_message_exchange插件后,即使消息成功发送到队列上,也会导致returnedMessage()方法执行
③消费者端效果

7. 事务消息


操作013:事务消息之生产者端
一、测试代码
1、引入依赖
xml
<parent>
    <groupId>org.springframework.boot</groupId>
    <artifactId>spring-boot-starter-parent</artifactId>
    <version>3.1.5</version>
</parent>

<dependencies>
    <dependency>
        <groupId>org.springframework.boot</groupId>
        <artifactId>spring-boot-starter-amqp</artifactId>
    </dependency>
    <dependency>
        <groupId>org.springframework.boot</groupId>
        <artifactId>spring-boot-starter-test</artifactId>
    </dependency>
    <dependency>
        <groupId>org.projectlombok</groupId>
        <artifactId>lombok</artifactId>
    </dependency>
</dependencies>
2、yaml配置
yaml
spring:
  rabbitmq:
    host: 192.168.200.100
    port: 5672
    username: guest
    password: 123456
    virtual-host: /
3、主启动类
java
package com.atguigu.mq;

import org.springframework.boot.SpringApplication;
import org.springframework.boot.autoconfigure.SpringBootApplication;

@SpringBootApplication
public class RabbitMQProducerMainType {

    public static void main(String[] args) {
        SpringApplication.run(RabbitMQProducerMainType.class, args);
    }

}
4、相关配置
java
package com.atguigu.mq.config;

import lombok.Data;
import org.springframework.amqp.rabbit.connection.CachingConnectionFactory;
import org.springframework.amqp.rabbit.core.RabbitTemplate;
import org.springframework.amqp.rabbit.transaction.RabbitTransactionManager;
import org.springframework.context.annotation.Bean;
import org.springframework.context.annotation.Configuration;

@Configuration
@Data
public class RabbitConfig {

    @Bean
    public RabbitTransactionManager transactionManager(CachingConnectionFactory connectionFactory) {
        return new RabbitTransactionManager(connectionFactory);
    }

    @Bean
    public RabbitTemplate rabbitTemplate(CachingConnectionFactory connectionFactory) {
        RabbitTemplate rabbitTemplate = new RabbitTemplate(connectionFactory);
        rabbitTemplate.setChannelTransacted(true);
        return rabbitTemplate;
    }
}
5、测试代码
java
package com.atguigu.mq.test;

import jakarta.annotation.Resource;
import lombok.extern.slf4j.Slf4j;
import org.junit.jupiter.api.Test;
import org.springframework.amqp.rabbit.core.RabbitTemplate;
import org.springframework.boot.test.context.SpringBootTest;

@SpringBootTest
@Slf4j
public class RabbitMQTest {

    public static final String EXCHANGE_NAME = "exchange.tx.dragon";
    public static final String ROUTING_KEY = "routing.key.tx.dragon";

    @Resource
    private RabbitTemplate rabbitTemplate;

    @Test
    public void testSendMessageInTx() {
        // 1、发送第一条消息
        rabbitTemplate.convertAndSend(EXCHANGE_NAME, ROUTING_KEY, "I am a dragon(tx msg ~~~01)");

        // 2、抛出异常
        log.info("do bad:" + 10 / 0);

        // 3、发送第二条消息
        rabbitTemplate.convertAndSend(EXCHANGE_NAME, ROUTING_KEY, "I am a dragon(tx msg ~~~02)");
    }

}
二、执行测试
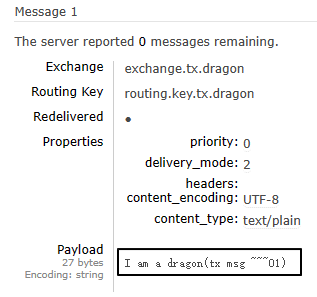
1、未使用事务
抛出异常前的消息发送了,抛异常后的消息没有发送:

为了不影响后续操作,我们直接在管理界面这里把这条消息消费掉:


2、使用事务
①说明
因为在junit中给测试方法使用@Transactional注解默认就会回滚,所以回滚操作需要使用@RollBack注解操控
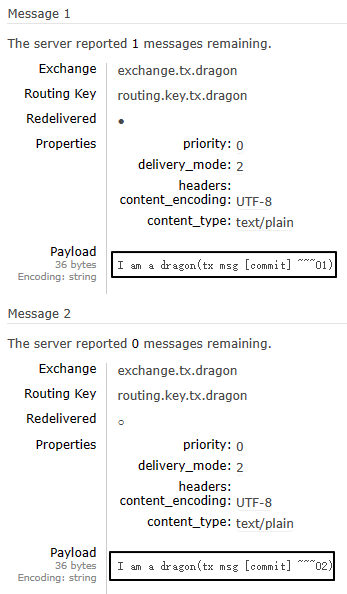
②测试提交事务的情况
java
@Test
@Transactional
@Rollback(value = false)
public void testSendMessageInTx() {
    // 1、发送第一条消息
    rabbitTemplate.convertAndSend(EXCHANGE_NAME, ROUTING_KEY, "I am a dragon(tx msg [commit] ~~~01)");

    // 2、发送第二条消息
    rabbitTemplate.convertAndSend(EXCHANGE_NAME, ROUTING_KEY, "I am a dragon(tx msg [commit] ~~~02)");
}
③测试回滚事务的情况
java
@Test
@Transactional
@Rollback(value = true)
public void testSendMessageInTx() {
    // 1、发送第一条消息
    rabbitTemplate.convertAndSend(EXCHANGE_NAME, ROUTING_KEY, "I am a dragon(tx msg [rollback] ~~~01)");

    // 2、发送第二条消息
    rabbitTemplate.convertAndSend(EXCHANGE_NAME, ROUTING_KEY, "I am a dragon(tx msg [rollback] ~~~02)");
}
8. 惰性队列
操作014:惰性队列
一、创建惰性队列
1、官网说明
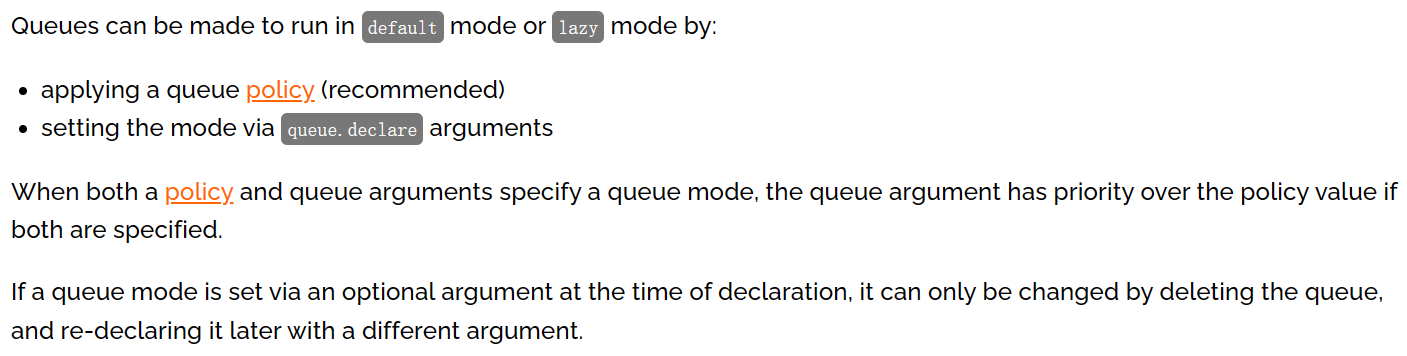
队列可以创建为默认或惰性模式,模式指定方式是:
- 使用队列策略(建议)
- 设置
queue.declare参数
如果策略和队列参数同时指定,那么队列参数有更高优先级。如果队列模式是在声明时通过可选参数指定的,那么只能通过删除队列再重新创建来修改。
2、基于策略方式设定
shell
 登录Docker容器
docker exec -it rabbitmq /bin/bash

 运行rabbitmqctl命令
rabbitmqctl set_policy Lazy "^lazy-queue$" '{"queue-mode":"lazy"}' --apply-to queues
命令解读:
-
rabbitmqctl命令所在目录是:/opt/rabbitmq/sbin,该目录已配置到Path环境变量
-
set_policy是子命令,表示设置策略
-
Lazy是当前要设置的策略名称,是我们自己自定义的,不是系统定义的
-
"^lazy-queue$"是用正则表达式限定的队列名称,凡是名称符合这个正则表达式的队列都会应用这里的设置
-
'{"queue-mode":"lazy"}'是一个JSON格式的参数设置指定了队列的模式为"lazy"
-
---apply-to参数指定该策略将应用于队列(queues)级别
-
命令执行后,所有名称符合正则表达式的队列都会应用指定策略,包括未来新创建的队列
如果需要修改队列模式可以执行如下命令(不必删除队列再重建):
shell
rabbitmqctl set_policy Lazy "^lazy-queue$" '{"queue-mode":"default"}' --apply-to queues3、在声明队列时使用参数设定
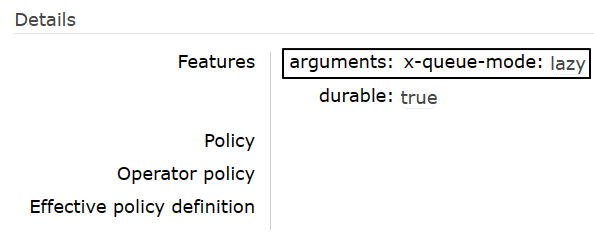
- 参数名称:x-queue-mode
- 可用参数值:
- default
- lazy
- 不设置就是取值为default
Java代码原生API设置方式:
java
Map<String, Object> args = new HashMap<String, Object>();
args.put("x-queue-mode", "lazy");
channel.queueDeclare("myqueue", false, false, false, args);
Java代码注解设置方式:
java
@Queue(value = QUEUE_NAME, durable = "true", autoDelete = "false", arguments = {
	@Argument(name = "x-queue-mode", value = "lazy")
})
二、实操演练
1、生产者端代码
①配置POM
xml
    <parent>
        <groupId>org.springframework.boot</groupId>
        <artifactId>spring-boot-starter-parent</artifactId>
        <version>3.1.5</version>
    </parent>

    <dependencies>
        <dependency>
            <groupId>org.springframework.boot</groupId>
            <artifactId>spring-boot-starter-amqp</artifactId>
        </dependency>
        <dependency>
            <groupId>org.springframework.boot</groupId>
            <artifactId>spring-boot-starter-test</artifactId>
        </dependency>
        <dependency>
            <groupId>org.projectlombok</groupId>
            <artifactId>lombok</artifactId>
        </dependency>
    </dependencies>
②配置YAML
yaml
spring:
  rabbitmq:
    host: 192.168.200.100
    port: 5672
    username: guest
    password: 123456
    virtual-host: /
③主启动类
java
package com.atguigu.mq;

import org.springframework.boot.SpringApplication;
import org.springframework.boot.autoconfigure.SpringBootApplication;

@SpringBootApplication
public class RabbitMQLazyProducer {

    public static void main(String[] args) {
        SpringApplication.run(RabbitMQLazyProducer.class, args);
    }

}
④发送消息
java
package com.atguigu.mq.test;

import jakarta.annotation.Resource;
import org.junit.jupiter.api.Test;
import org.springframework.amqp.rabbit.core.RabbitTemplate;
import org.springframework.boot.test.context.SpringBootTest;

@SpringBootTest
public class RabbitMQTest {

    public static final String EXCHANGE_LAZY_NAME = "exchange.atguigu.lazy";
    public static final String ROUTING_LAZY_KEY = "routing.key.atguigu.lazy";

    @Resource
    private RabbitTemplate rabbitTemplate;

    @Test
    public void testSendMessage() {
        rabbitTemplate.convertAndSend(EXCHANGE_LAZY_NAME, ROUTING_LAZY_KEY, "I am a message for test lazy queue.");
    }

}
2、消费者端代码
①配置POM
xml
    <parent>
        <groupId>org.springframework.boot</groupId>
        <artifactId>spring-boot-starter-parent</artifactId>
        <version>3.1.5</version>
    </parent>

    <dependencies>
        <dependency>
            <groupId>org.springframework.boot</groupId>
            <artifactId>spring-boot-starter-amqp</artifactId>
        </dependency>
        <dependency>
            <groupId>org.springframework.boot</groupId>
            <artifactId>spring-boot-starter-web</artifactId>
        </dependency>
        <dependency>
            <groupId>org.projectlombok</groupId>
            <artifactId>lombok</artifactId>
        </dependency>
    </dependencies>
②配置YAML
yaml
spring:
  rabbitmq:
    host: 192.168.200.100
    port: 5672
    username: guest
    password: 123456
    virtual-host: /
③主启动类
java
package com.atguigu.mq;

import org.springframework.boot.SpringApplication;
import org.springframework.boot.autoconfigure.SpringBootApplication;

@SpringBootApplication
public class RabbitMQLazyConsumerMainType {

    public static void main(String[] args) {
        SpringApplication.run(RabbitMQLazyConsumerMainType.class, args);
    }

}
④监听器
java
package com.atguigu.mq.listener;

import com.rabbitmq.client.Channel;
import lombok.extern.slf4j.Slf4j;
import org.springframework.amqp.core.Message;
import org.springframework.amqp.rabbit.annotation.*;
import org.springframework.stereotype.Component;

@Component
@Slf4j
public class MyLazyMessageProcessor {

    public static final String EXCHANGE_LAZY_NAME = "exchange.atguigu.lazy";
    public static final String ROUTING_LAZY_KEY = "routing.key.atguigu.lazy";
    public static final String QUEUE_LAZY_NAME = "queue.atguigu.lazy";

    @RabbitListener(bindings = @QueueBinding(
        value = @Queue(value = QUEUE_LAZY_NAME, durable = "true", autoDelete = "false", arguments = {
            @Argument(name = "x-queue-mode", value = "lazy")
        }),
        exchange = @Exchange(value = EXCHANGE_LAZY_NAME, durable = "true", autoDelete = "false"),
        key = {ROUTING_LAZY_KEY}
    ))
    public void processMessageLazy(String data, Message message, Channel channel) {
        log.info("消费端接收到消息:" + data);
    }

}
三、测试
-
先启动消费端
-
基于消费端@RabbitListener注解中的配置,自动创建了队列
- 发送消息
9. 优先级队列
操作015:优先级队列
一、创建相关资源
1、创建交换机
exchange.test.priority

2、创建队列
queue.test.priority
x-max-priority
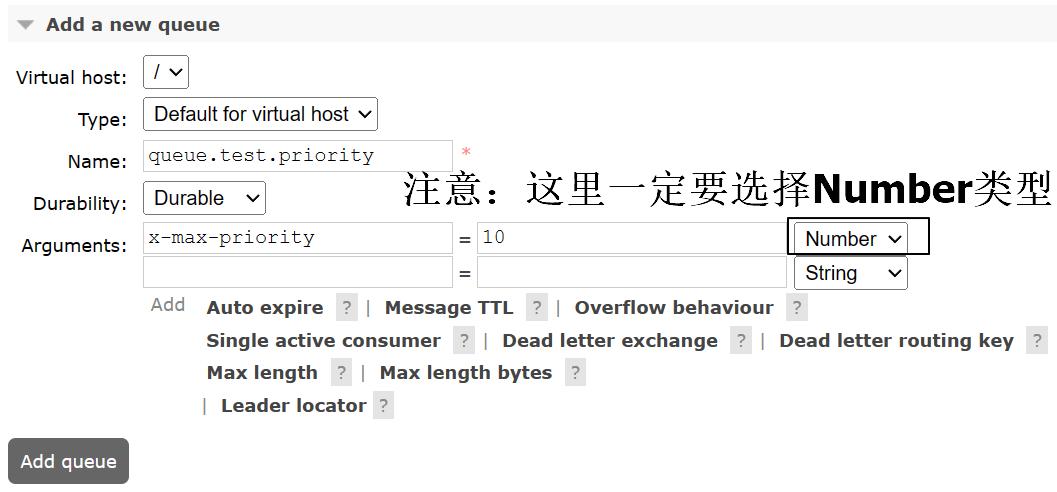
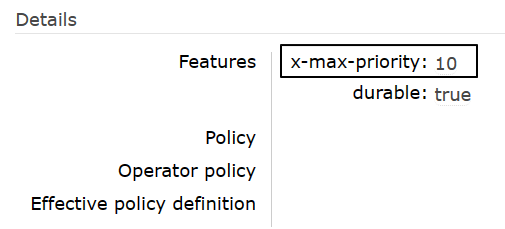
3、队列绑定交换机
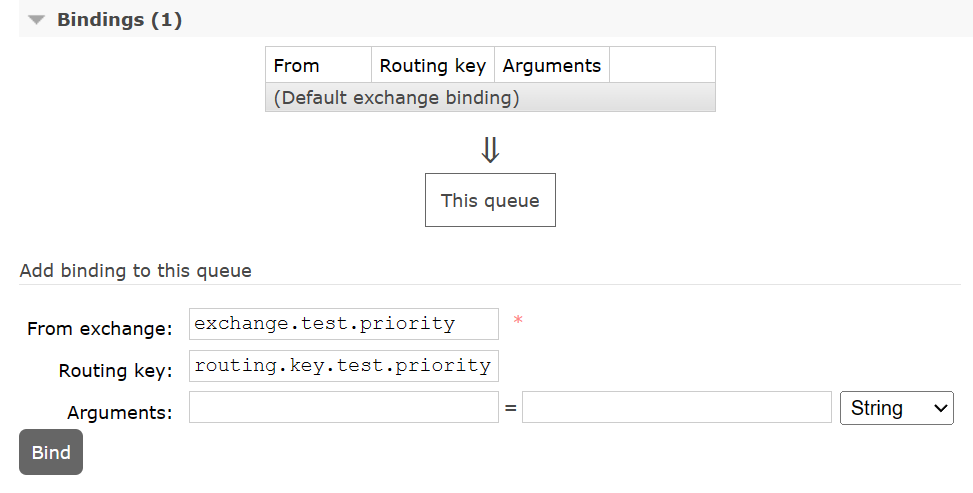
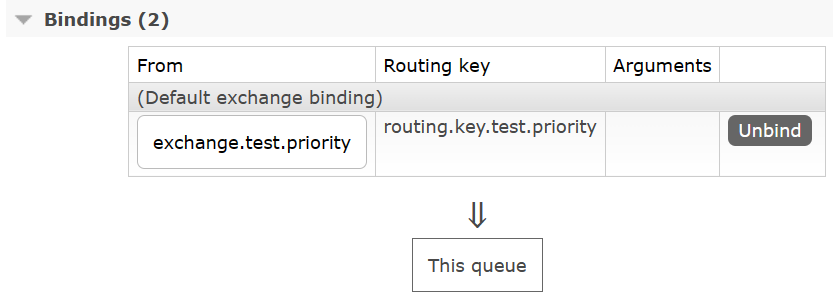
二、生产者发送消息
1、配置POM
xml
<parent>
    <groupId>org.springframework.boot</groupId>
    <artifactId>spring-boot-starter-parent</artifactId>
    <version>3.1.5</version>
</parent>

<dependencies>
    <dependency>
        <groupId>org.springframework.boot</groupId>
        <artifactId>spring-boot-starter-amqp</artifactId>
    </dependency>
    <dependency>
        <groupId>org.springframework.boot</groupId>
        <artifactId>spring-boot-starter-test</artifactId>
    </dependency>
    <dependency>
        <groupId>org.projectlombok</groupId>
        <artifactId>lombok</artifactId>
    </dependency>
</dependencies>
2、配置YAML
yaml
spring:
  rabbitmq:
    host: 192.168.200.100
    port: 5672
    username: guest
    password: 123456
    virtual-host: /
3、主启动类
java
package com.atguigu.mq;

import org.springframework.boot.SpringApplication;
import org.springframework.boot.autoconfigure.SpringBootApplication;

@SpringBootApplication
public class RabbitMQPriorityProducer {

    public static void main(String[] args) {
        SpringApplication.run(RabbitMQPriorityProducer.class, args);
    }

}
4、发送消息
- 不要启动消费者程序,让多条不同优先级的消息滞留在队列中
- 第一次发送优先级为1的消息
- 第二次发送优先级为2的消息
- 第三次发送优先级为3的消息
- 先发送的消息优先级低,后发送的消息优先级高,将来看看消费端是不是先收到优先级高的消息
①第一次发送优先级为1的消息
java
package com.atguigu.mq.test;

import jakarta.annotation.Resource;
import org.junit.jupiter.api.Test;
import org.springframework.amqp.rabbit.core.RabbitTemplate;
import org.springframework.boot.test.context.SpringBootTest;

@SpringBootTest
public class RabbitMQTest {

    public static final String EXCHANGE_PRIORITY = "exchange.test.priority";
    public static final String ROUTING_KEY_PRIORITY = "routing.key.test.priority";

    @Resource
    private RabbitTemplate rabbitTemplate;

    @Test
    public void testSendMessage() {
        rabbitTemplate.convertAndSend(EXCHANGE_PRIORITY, ROUTING_KEY_PRIORITY, "I am a message with priority 1.", message->{
            message.getMessageProperties().setPriority(1);
            return message;
        });
    }

}
②第二次发送优先级为2的消息
java
@Test
public void testSendMessage() {
    rabbitTemplate.convertAndSend(EXCHANGE_PRIORITY, ROUTING_KEY_PRIORITY, "I am a message with priority 2.", message->{
        message.getMessageProperties().setPriority(2);
        return message;
    });
}
③第三次发送优先级为3的消息
java
@Test
public void testSendMessage() {
    rabbitTemplate.convertAndSend(EXCHANGE_PRIORITY, ROUTING_KEY_PRIORITY, "I am a message with priority 3.", message->{
        message.getMessageProperties().setPriority(3);
        return message;
    });
}
三、消费端接收消息
1、配置POM
xml
<parent>
    <groupId>org.springframework.boot</groupId>
    <artifactId>spring-boot-starter-parent</artifactId>
    <version>3.1.5</version>
</parent>

<dependencies>
    <dependency>
        <groupId>org.springframework.boot</groupId>
        <artifactId>spring-boot-starter-amqp</artifactId>
    </dependency>
    <dependency>
        <groupId>org.springframework.boot</groupId>
        <artifactId>spring-boot-starter-web</artifactId>
    </dependency>
    <dependency>
        <groupId>org.projectlombok</groupId>
        <artifactId>lombok</artifactId>
    </dependency>
</dependencies>
2、配置YAML
yaml
spring:
  rabbitmq:
    host: 192.168.200.100
    port: 5672
    username: guest
    password: 123456
    virtual-host: /
3、主启动类
java
package com.atguigu.mq;

import org.springframework.boot.SpringApplication;
import org.springframework.boot.autoconfigure.SpringBootApplication;

@SpringBootApplication
public class RabbitMQPriorityConsumer {

    public static void main(String[] args) {
        SpringApplication.run(RabbitMQPriorityConsumer.class, args);
    }

}
4、监听器
java
package com.atguigu.mq.listener;

import com.rabbitmq.client.Channel;
import lombok.extern.slf4j.Slf4j;
import org.springframework.amqp.core.Message;
import org.springframework.amqp.rabbit.annotation.*;
import org.springframework.stereotype.Component;

@Slf4j
@Component
public class MyMessageProcessor {

    public static final String QUEUE_PRIORITY = "queue.test.priority";

    @RabbitListener(queues = {QUEUE_PRIORITY})
    public void processPriorityMessage(String data, Message message, Channel channel) throws IOException {
        log.info(data);

        channel.basicAck(message.getMessageProperties().getDeliveryTag(), false);
    }

}
5、测试效果
对于已经滞留服务器的消息,只要消费端一启动,就能够收到消息队列的投递,打印效果如下:

集群篇
1. 工作机制

2. 集群搭建
操作016:集群搭建
一、安装RabbitMQ
1、前置要求
CentOS发行版的版本≥CentOS 8 Stream
镜像下载地址:https://mirrors.163.com/centos/8-stream/isos/x86_64/CentOS-Stream-8-20240318.0-x86_64-dvd1.iso
RabbitMQ安装方式官方指南:
2、安装Erlang环境
①创建yum库配置文件
shell
vim /etc/yum.repos.d/rabbitmq.repo②加入配置内容
以下内容来自官方文档:https://www.rabbitmq.com/docs/install-rpm
properties
 In /etc/yum.repos.d/rabbitmq.repo


 Zero dependency Erlang RPM


[modern-erlang]
name=modern-erlang-el8
 uses a Cloudsmith mirror @ yum.novemberain.com in addition to its Cloudsmith upstream.
 Unlike Cloudsmith, the mirror does not have any traffic quotas
baseurl=https://yum1.novemberain.com/erlang/el/8/$basearch
        https://yum2.novemberain.com/erlang/el/8/$basearch
        https://dl.cloudsmith.io/public/rabbitmq/rabbitmq-erlang/rpm/el/8/$basearch
repo_gpgcheck=1
enabled=1
gpgkey=https://github.com/rabbitmq/signing-keys/releases/download/3.0/cloudsmith.rabbitmq-erlang.E495BB49CC4BBE5B.key
gpgcheck=1
sslverify=1
sslcacert=/etc/pki/tls/certs/ca-bundle.crt
metadata_expire=300
pkg_gpgcheck=1
autorefresh=1
type=rpm-md

[modern-erlang-noarch]
name=modern-erlang-el8-noarch
 uses a Cloudsmith mirror @ yum.novemberain.com.
 Unlike Cloudsmith, it does not have any traffic quotas
baseurl=https://yum1.novemberain.com/erlang/el/8/noarch
        https://yum2.novemberain.com/erlang/el/8/noarch
        https://dl.cloudsmith.io/public/rabbitmq/rabbitmq-erlang/rpm/el/8/noarch
repo_gpgcheck=1
enabled=1
gpgkey=https://github.com/rabbitmq/signing-keys/releases/download/3.0/cloudsmith.rabbitmq-erlang.E495BB49CC4BBE5B.key
       https://github.com/rabbitmq/signing-keys/releases/download/3.0/rabbitmq-release-signing-key.asc
gpgcheck=1
sslverify=1
sslcacert=/etc/pki/tls/certs/ca-bundle.crt
metadata_expire=300
pkg_gpgcheck=1
autorefresh=1
type=rpm-md

[modern-erlang-source]
name=modern-erlang-el8-source
 uses a Cloudsmith mirror @ yum.novemberain.com.
 Unlike Cloudsmith, it does not have any traffic quotas
baseurl=https://yum1.novemberain.com/erlang/el/8/SRPMS
        https://yum2.novemberain.com/erlang/el/8/SRPMS
        https://dl.cloudsmith.io/public/rabbitmq/rabbitmq-erlang/rpm/el/8/SRPMS
repo_gpgcheck=1
enabled=1
gpgkey=https://github.com/rabbitmq/signing-keys/releases/download/3.0/cloudsmith.rabbitmq-erlang.E495BB49CC4BBE5B.key
       https://github.com/rabbitmq/signing-keys/releases/download/3.0/rabbitmq-release-signing-key.asc
gpgcheck=1
sslverify=1
sslcacert=/etc/pki/tls/certs/ca-bundle.crt
metadata_expire=300
pkg_gpgcheck=1
autorefresh=1


 RabbitMQ Server


[rabbitmq-el8]
name=rabbitmq-el8
baseurl=https://yum2.novemberain.com/rabbitmq/el/8/$basearch
        https://yum1.novemberain.com/rabbitmq/el/8/$basearch
        https://dl.cloudsmith.io/public/rabbitmq/rabbitmq-server/rpm/el/8/$basearch
repo_gpgcheck=1
enabled=1
 Cloudsmith's repository key and RabbitMQ package signing key
gpgkey=https://github.com/rabbitmq/signing-keys/releases/download/3.0/cloudsmith.rabbitmq-server.9F4587F226208342.key
       https://github.com/rabbitmq/signing-keys/releases/download/3.0/rabbitmq-release-signing-key.asc
gpgcheck=1
sslverify=1
sslcacert=/etc/pki/tls/certs/ca-bundle.crt
metadata_expire=300
pkg_gpgcheck=1
autorefresh=1
type=rpm-md

[rabbitmq-el8-noarch]
name=rabbitmq-el8-noarch
baseurl=https://yum2.novemberain.com/rabbitmq/el/8/noarch
        https://yum1.novemberain.com/rabbitmq/el/8/noarch
        https://dl.cloudsmith.io/public/rabbitmq/rabbitmq-server/rpm/el/8/noarch
repo_gpgcheck=1
enabled=1
 Cloudsmith's repository key and RabbitMQ package signing key
gpgkey=https://github.com/rabbitmq/signing-keys/releases/download/3.0/cloudsmith.rabbitmq-server.9F4587F226208342.key
       https://github.com/rabbitmq/signing-keys/releases/download/3.0/rabbitmq-release-signing-key.asc
gpgcheck=1
sslverify=1
sslcacert=/etc/pki/tls/certs/ca-bundle.crt
metadata_expire=300
pkg_gpgcheck=1
autorefresh=1
type=rpm-md

[rabbitmq-el8-source]
name=rabbitmq-el8-source
baseurl=https://yum2.novemberain.com/rabbitmq/el/8/SRPMS
        https://yum1.novemberain.com/rabbitmq/el/8/SRPMS
        https://dl.cloudsmith.io/public/rabbitmq/rabbitmq-server/rpm/el/8/SRPMS
repo_gpgcheck=1
enabled=1
gpgkey=https://github.com/rabbitmq/signing-keys/releases/download/3.0/cloudsmith.rabbitmq-server.9F4587F226208342.key
gpgcheck=0
sslverify=1
sslcacert=/etc/pki/tls/certs/ca-bundle.crt
metadata_expire=300
pkg_gpgcheck=1
autorefresh=1
type=rpm-md
③更新yum库
--nobest表示所需安装包即使不是最佳选择也接受
shell
yum update -y --nobest④正式安装Erlang
shell
yum install -y erlang3、安装RabbitMQ
shell
 导入GPG密钥
rpm --import 'https://github.com/rabbitmq/signing-keys/releases/download/3.0/rabbitmq-release-signing-key.asc'
rpm --import 'https://github.com/rabbitmq/signing-keys/releases/download/3.0/cloudsmith.rabbitmq-erlang.E495BB49CC4BBE5B.key'
rpm --import 'https://github.com/rabbitmq/signing-keys/releases/download/3.0/cloudsmith.rabbitmq-server.9F4587F226208342.key'

 下载 RPM 包
wget https://github.com/rabbitmq/rabbitmq-server/releases/download/v3.13.0/rabbitmq-server-3.13.0-1.el8.noarch.rpm

 安装
rpm -ivh rabbitmq-server-3.13.0-1.el8.noarch.rpm
4、RabbitMQ基础配置
shell
 启用管理界面插件
rabbitmq-plugins enable rabbitmq_management

 启动 RabbitMQ 服务:
systemctl start rabbitmq-server

 将 RabbitMQ 服务设置为开机自动启动
systemctl enable rabbitmq-server

 新增登录账号密码
rabbitmqctl add_user atguigu 123456

 设置登录账号权限
rabbitmqctl set_user_tags atguigu administrator
rabbitmqctl set_permissions -p / atguigu ".*" ".*" ".*"

 配置所有稳定功能 flag 启用
rabbitmqctl enable_feature_flag all

 重启RabbitMQ服务生效
systemctl restart rabbitmq-server
5、收尾工作
shell
rm -rf /etc/yum.repos.d/rabbitmq.repo二、克隆VMWare虚拟机
1、目标
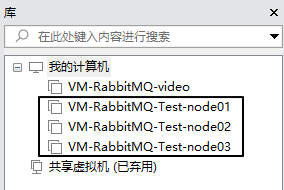
通过克隆操作,一共准备三台VMWare虚拟机
| 集群节点名称 | 虚拟机 IP 地址 |
|---|---|
| node01 | 192.168.200.100 |
| node02 | 192.168.200.150 |
| node03 | 192.168.200.200 |
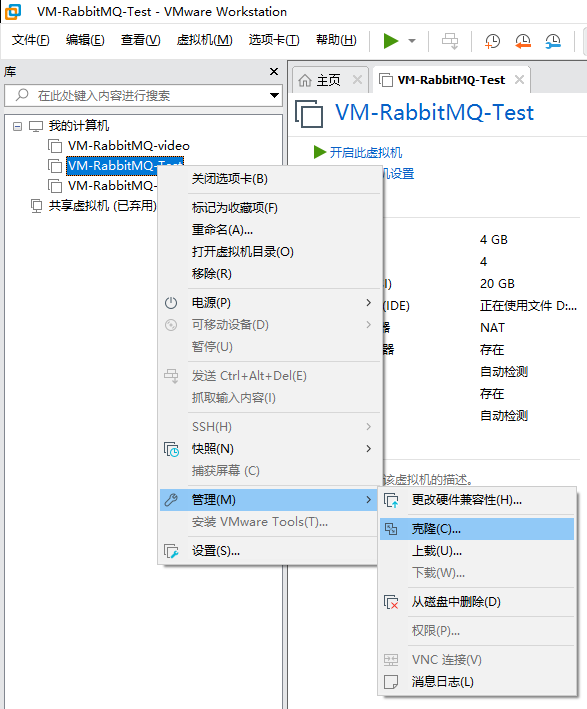
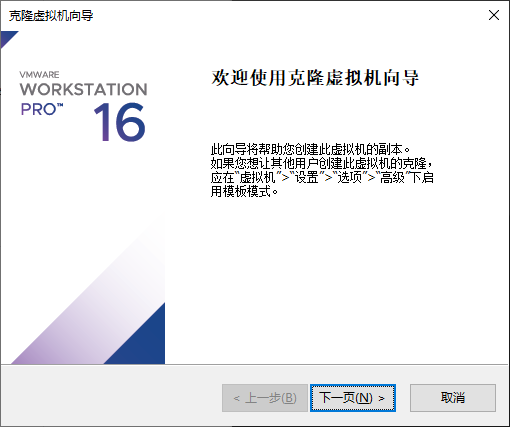
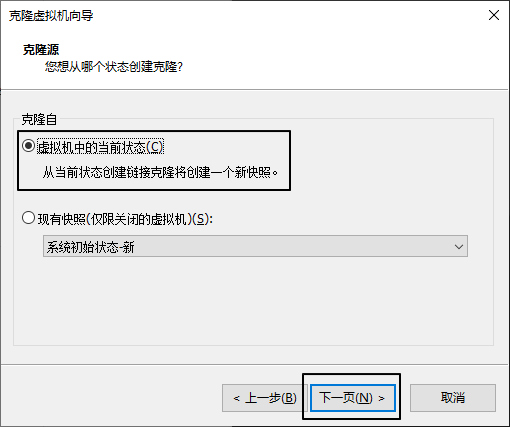
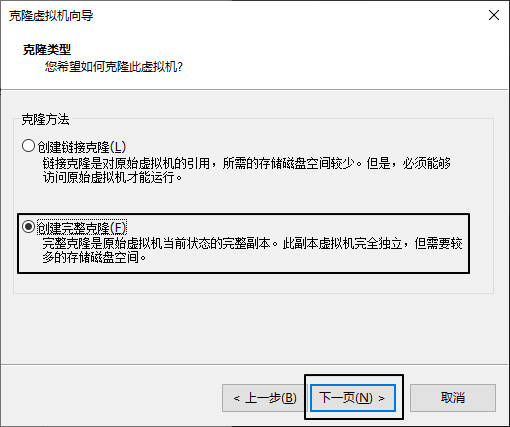
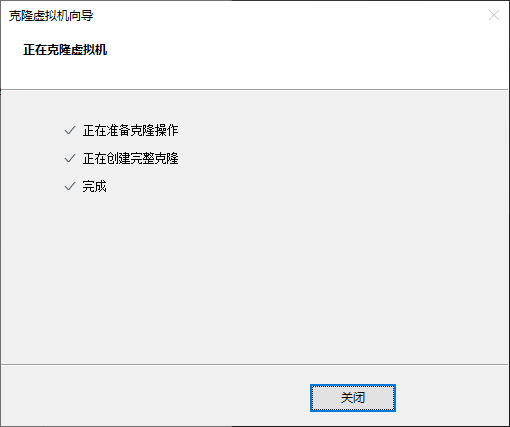
2、克隆虚拟机

3、给新机设置 IP 地址
在CentOS 7中,可以使用nmcli命令行工具修改IP地址。以下是具体步骤:
- 查看网络连接信息:
shell
nmcli con show- 停止指定的网络连接(将
<connection_name>替换为实际的网络连接名称):
shell
nmcli con down <connection_name>- 修改IP地址(将
<connection_name>替换为实际的网络连接名称,将<new_ip_address>替换为新的IP地址,将<subnet_mask>替换为子网掩码,将<gateway>替换为网关):
shell
 <new_ip_address>/<subnet_mask>这里是 CIDR 表示法
nmcli con mod <connection_name> ipv4.addresses <new_ip_address>/<subnet_mask>
nmcli con mod <connection_name> ipv4.gateway <gateway>
nmcli con mod <connection_name> ipv4.method manual- 启动网络连接:
shell
nmcli con up <connection_name>- 验证新的IP地址是否生效:
shell
ip addr show4、修改主机名称
主机名称会被RabbitMQ作为集群中的节点名称,后面会用到,所以需要设置一下。
修改方式如下:
shell
vim /etc/hostname5、保险措施
为了在后续操作过程中,万一遇到操作失误,友情建议拍摄快照。
三、集群节点彼此发现
1、node01设置
①设置 IP 地址到主机名称的映射
修改文件/etc/hosts,追加如下内容:
text
192.168.200.100 node01
192.168.200.150 node02
192.168.200.200 node03
②查看当前RabbitMQ节点的Cookie值并记录
shell
[root@node01 ~] cat /var/lib/rabbitmq/.erlang.cookie
NOTUPTIZIJONXDWWQPOJ
③重置节点应用
shell
rabbitmqctl stop_app
rabbitmqctl reset
rabbitmqctl start_app
2、node02设置
①设置 IP 地址到主机名称的映射
修改文件/etc/hosts,追加如下内容:
text
192.168.200.100 node01
192.168.200.150 node02
192.168.200.200 node03
②修改当前RabbitMQ节点的Cookie值
node02和node03都改成和node01一样:
shell
vim /var/lib/rabbitmq/.erlang.cookie③重置节点应用并加入集群
shell
rabbitmqctl stop_app
rabbitmqctl reset
rabbitmqctl join_cluster rabbit@node01
rabbitmqctl start_app
3、node03设置
①设置 IP 地址到主机名称的映射
修改文件/etc/hosts,追加如下内容:
text
192.168.200.100 node01
192.168.200.150 node02
192.168.200.200 node03
②修改当前RabbitMQ节点的Cookie值
node02和node03都改成和node01一样:
shell
vim /var/lib/rabbitmq/.erlang.cookie③重置节点应用并加入集群
shell
rabbitmqctl stop_app
rabbitmqctl reset
rabbitmqctl join_cluster rabbit@node01
rabbitmqctl start_app
④查看集群状态
shell
rabbitmqctl cluster_status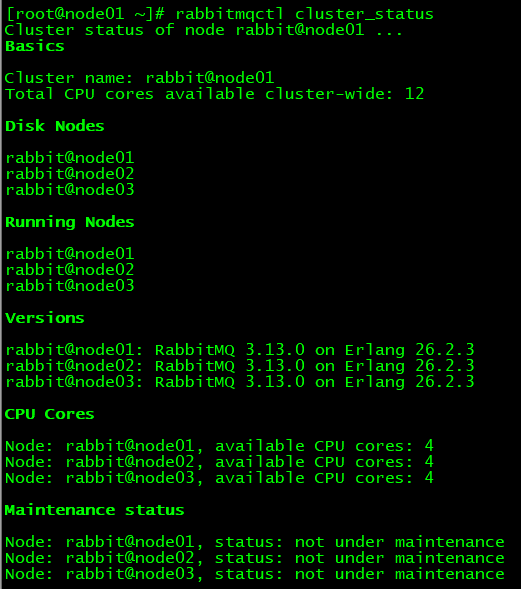
4、附录
如有需要踢出某个节点,则按下面操作执行:
shell
 被踢出的节点:
rabbitmqctl stop_app
rabbitmqctl reset
rabbitmqctl start_app

 节点1
rabbitmqctl forget_cluster_node rabbit@node02
四、负载均衡:Management UI
1、说明
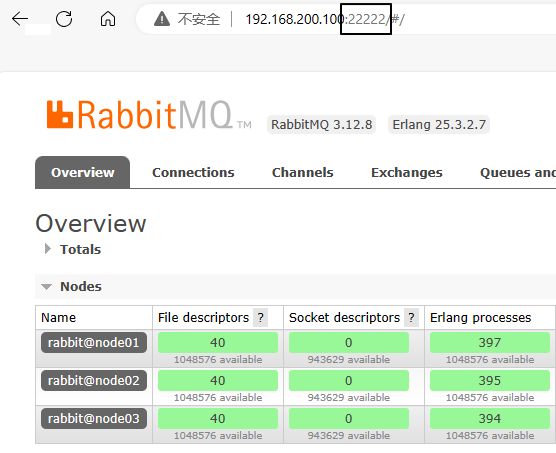
- 其实访问任何一个RabbitMQ实例的管理界面都是对集群操作,所以配置负载均衡通过统一入口访问在我们学习期间就是锦上添花
- 先给管理界面做负载均衡,然后方便我们在管理界面上创建交换机、队列等操作
2、安装HAProxy
shell
yum install -y haproxy
haproxy -v
systemctl start haproxy
systemctl enable haproxy
3、修改配置文件
配置文件位置:
/etc/haproxy/haproxy.cfg
在配置文件末尾增加如下内容:
frontend rabbitmq_ui_frontend
bind 192.168.200.100:22222
mode http
default_backend rabbitmq_ui_backend
backend rabbitmq_ui_backend
mode http
balance roundrobin
option httpchk GET /
server rabbitmq_ui1 192.168.200.100:15672 check
server rabbitmq_ui2 192.168.200.150:15672 check
server rabbitmq_ui3 192.168.200.200:15672 check
设置SELinux策略,允许HAProxy拥有权限连接任意端口:
shell
setsebool -P haproxy_connect_any=1SELinux是Linux系统中的安全模块,它可以限制进程的权限以提高系统的安全性。在某些情况下,SELinux可能会阻止HAProxy绑定指定的端口,这就需要通过设置域(domain)的安全策略来解决此问题。
通过执行
setsebool -P haproxy_connect_any=1命令,您已经为HAProxy设置了一个布尔值,允许HAProxy连接到任意端口。这样,HAProxy就可以成功绑定指定的socket,并正常工作。
重启HAProxy:
shell
systemctl restart haproxy4、测试效果
五、负载均衡:核心功能
1、增加配置
frontend rabbitmq_frontend
bind 192.168.200.100:11111
mode tcp
default_backend rabbitmq_backend
backend rabbitmq_backend
mode tcp
balance roundrobin
server rabbitmq1 192.168.200.100:5672 check
server rabbitmq2 192.168.200.150:5672 check
server rabbitmq3 192.168.200.200:5672 check
重启HAProxy服务:
shell
systemctl restart haproxy3、测试
①创建组件
- 交换机:exchange.cluster.test
- 队列:queue.cluster.test
- 路由键:routing.key.cluster.test
②创建生产者端程序
1配置POM
xml
<parent>
    <groupId>org.springframework.boot</groupId>
    <artifactId>spring-boot-starter-parent</artifactId>
    <version>3.1.5</version>
</parent>

<dependencies>
    <dependency>
        <groupId>org.springframework.boot</groupId>
        <artifactId>spring-boot-starter-amqp</artifactId>
    </dependency>
    <dependency>
        <groupId>org.springframework.boot</groupId>
        <artifactId>spring-boot-starter-test</artifactId>
    </dependency>
    <dependency>
        <groupId>org.projectlombok</groupId>
        <artifactId>lombok</artifactId>
    </dependency>
</dependencies>2主启动类
java
package com.atguigu.mq;

import org.springframework.boot.SpringApplication;
import org.springframework.boot.autoconfigure.SpringBootApplication;

@SpringBootApplication
public class RabbitMQProducerMainType {

    public static void main(String[] args) {
        SpringApplication.run(RabbitMQProducerMainType.class, args);
    }

}3配置YAML
yaml
spring:
  rabbitmq:
    host: 192.168.200.100
    port: 11111
    username: atguigu
    password: 123456
    virtual-host: /
    publisher-confirm-type: CORRELATED  交换机的确认
    publisher-returns: true  队列的确认
logging:
  level:
com.atguigu.mq.config.MQProducerAckConfig: info4配置类
java
package com.atguigu.mq.config;

import jakarta.annotation.PostConstruct;
import lombok.extern.slf4j.Slf4j;
import org.springframework.amqp.core.ReturnedMessage;
import org.springframework.amqp.rabbit.connection.CorrelationData;
import org.springframework.amqp.rabbit.core.RabbitTemplate;
import org.springframework.beans.factory.annotation.Autowired;
import org.springframework.context.annotation.Configuration;

@Configuration
@Slf4j
public class MQProducerAckConfig implements RabbitTemplate.ConfirmCallback, RabbitTemplate.ReturnsCallback{

    @Autowired
    private RabbitTemplate rabbitTemplate;

    @PostConstruct
    public void init() {
        rabbitTemplate.setConfirmCallback(this);
        rabbitTemplate.setReturnsCallback(this);
    }

    @Override
    public void confirm(CorrelationData correlationData, boolean ack, String cause) {
        if (ack) {
            log.info("消息发送到交换机成功!数据:" + correlationData);
        } else {
            log.info("消息发送到交换机失败!数据:" + correlationData + " 原因:" + cause);
        }
    }

    @Override
    public void returnedMessage(ReturnedMessage returned) {
        log.info("消息主体: " + new String(returned.getMessage().getBody()));
        log.info("应答码: " + returned.getReplyCode());
        log.info("描述:" + returned.getReplyText());
        log.info("消息使用的交换器 exchange : " + returned.getExchange());
        log.info("消息使用的路由键 routing : " + returned.getRoutingKey());
    }
}
5 Junit测试类
java
package com.atguigu.mq.test;

import jakarta.annotation.Resource;
import org.junit.jupiter.api.Test;
import org.springframework.amqp.rabbit.core.RabbitTemplate;
import org.springframework.boot.test.context.SpringBootTest;

@SpringBootTest
public class RabbitMQTest {

    @Resource
    private RabbitTemplate rabbitTemplate;

    public static final String EXCHANGE_CLUSTER_TEST = "exchange.cluster.test";
    public static final String ROUTING_KEY_CLUSTER_TEST = "routing.key.cluster.test";

    @Test
    public void testSendMessage() {
        rabbitTemplate.convertAndSend(EXCHANGE_CLUSTER_TEST, ROUTING_KEY_CLUSTER_TEST, "message test cluster~~~");
    }

}
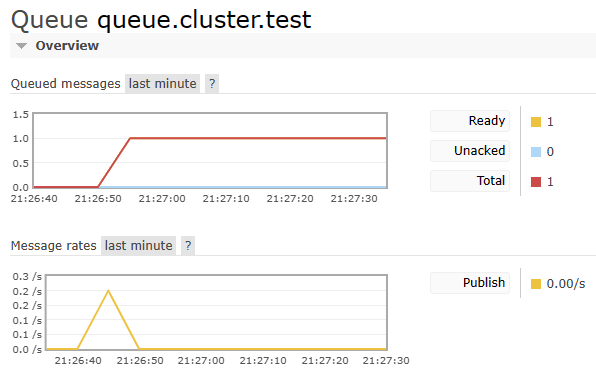
③创建消费端程序
1配置POM
xml
<parent>
    <groupId>org.springframework.boot</groupId>
    <artifactId>spring-boot-starter-parent</artifactId>
    <version>3.1.5</version>
</parent>

<dependencies>
    <dependency>
        <groupId>org.springframework.boot</groupId>
        <artifactId>spring-boot-starter-amqp</artifactId>
    </dependency>
    <dependency>
        <groupId>org.springframework.boot</groupId>
        <artifactId>spring-boot-starter-web</artifactId>
    </dependency>
    <dependency>
        <groupId>org.projectlombok</groupId>
        <artifactId>lombok</artifactId>
    </dependency>
</dependencies>2主启动类
java
package com.atguigu.mq;

import org.springframework.boot.SpringApplication;
import org.springframework.boot.autoconfigure.SpringBootApplication;

@SpringBootApplication
public class RabbitMQProducerMainType {

    public static void main(String[] args) {
        SpringApplication.run(RabbitMQProducerMainType.class, args);
    }

}3配置YAML
yaml
spring:
  rabbitmq:
    host: 192.168.200.100
    port: 11111
    username: atguigu
    password: 123456
    virtual-host: /
    listener:
      simple:
        acknowledge-mode: manual
logging:
  level:
com.atguigu.mq.listener.MyProcessor: info4监听器
java
package com.atguigu.mq.listener;

import com.rabbitmq.client.Channel;
import lombok.extern.slf4j.Slf4j;
import org.springframework.amqp.core.Message;
import org.springframework.amqp.rabbit.annotation.RabbitListener;
import org.springframework.stereotype.Component;

import java.io.IOException;

@Component
@Slf4j
public class MyProcessor {

    @RabbitListener(queues = {"queue.cluster.test"})
    public void processNormalQueueMessage(String data, Message message, Channel channel)
        throws IOException {

        log.info("消费端:" + data);

        channel.basicAck(message.getMessageProperties().getDeliveryTag(), false);
    }

}5运行效果

六、镜像队列
1、提出问题
现在我们创建过的队列,它是属于节点1的:
现在我们停掉节点1的rabbit应用:
shell
 停止rabbit应用
rabbitmqctl stop_app
再次发送消息:

为了后续操作,再重新启动rabbit应用
shell
rabbitmqctl start_app2、创建策略使队列镜像化


3、创建新的队列
要求:队列名称必须符合策略中指定的正则表达式


绑定交换机:
4、测试
节点1关闭rabbit应用

然后就发现两个镜像队列自动分布到了节点2和节点3上:
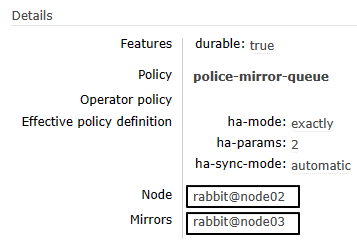
调整Java代码中的组件名称:
java
public static final String EXCHANGE_CLUSTER_TEST = "exchange.cluster.test";
public static final String ROUTING_KEY_MIRROR_TEST = "routing.key.mirror.test";
public static final String QUEUE_MIRROR_TEST = "mirror.queue.test";

3. 负载均衡


4. 仲裁队列
操作017:仲裁队列
一、创建仲裁队列
说明:鉴于仲裁队列的功能,肯定是需要在前面集群的基础上操作!
1、创建交换机
和仲裁队列绑定的交换机没有特殊,我们还是创建一个direct交换机即可
交换机名称:exchange.quorum.test
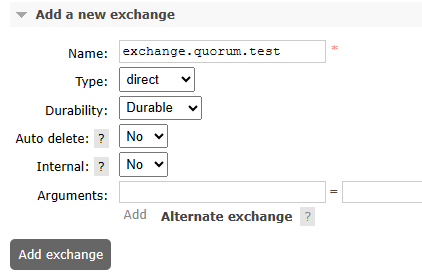
2、创建仲裁队列
队列名称:queue.quorum.test
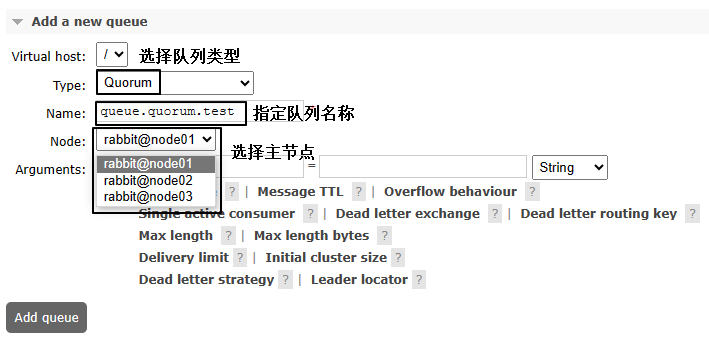
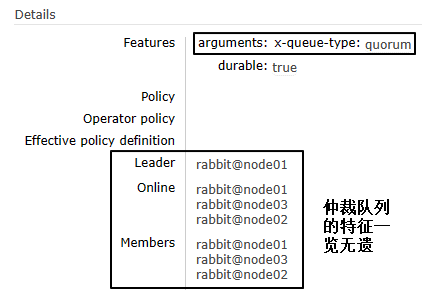
3、绑定交换机
路由键:routing.key.quorum.test
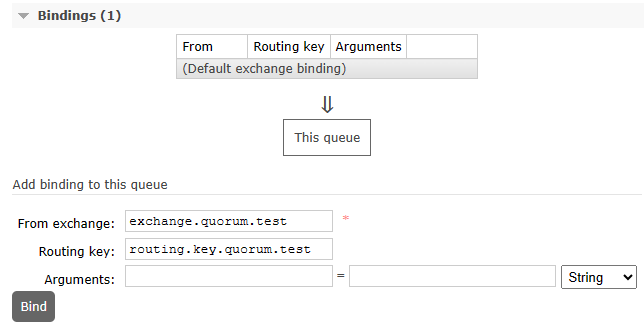
二、测试仲裁队列
1、常规测试
像使用经典队列一样发送消息、消费消息
①生产者端
java
public static final String EXCHANGE_QUORUM_TEST = "exchange.quorum.test";
public static final String ROUTING_KEY_QUORUM_TEST = "routing.key.quorum.test";

@Test
public void testSendMessageToQuorum() {
    rabbitTemplate.convertAndSend(EXCHANGE_QUORUM_TEST, ROUTING_KEY_QUORUM_TEST, "message test quorum ~~~");
}
②消费者端
java
public static final String QUEUE_QUORUM_TEST = "queue.quorum.test";

@RabbitListener(queues = {QUEUE_QUORUM_TEST})
public void quorumMessageProcess(String data, Message message, Channel channel) throws IOException {
    log.info("消费端:" + data);
    channel.basicAck(message.getMessageProperties().getDeliveryTag(), false);
}
2、高可用测试
①停止某个节点的rabbit应用
shell
 停止rabbit应用
rabbitmqctl stop_app
②查看仲裁队列对应的节点情况
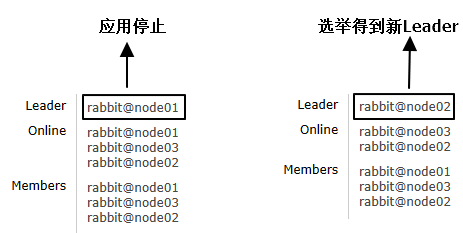
③再次发送消息
收发消息仍然正常
5. 流式队列

操作018:Stream Queue
一、启用插件
说明:只有启用了Stream插件,才能使用流式队列的完整功能
在集群每个节点中依次执行如下操作:
shell
 启用Stream插件
rabbitmq-plugins enable rabbitmq_stream

 重启rabbit应用
rabbitmqctl stop_app
rabbitmqctl start_app

 查看插件状态
rabbitmq-plugins list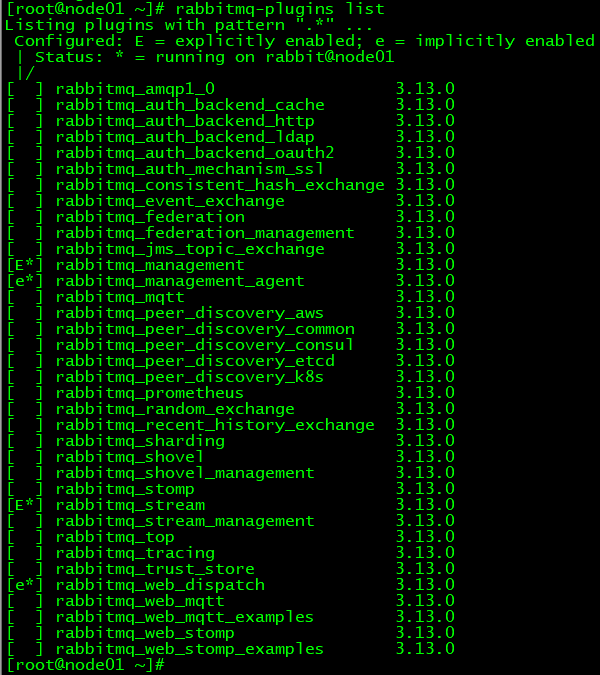
二、负载均衡
在文件/etc/haproxy/haproxy.cfg末尾追加:
text
frontend rabbitmq_stream_frontend
bind 192.168.200.100:33333
mode tcp
default_backend rabbitmq_stream_backend

backend rabbitmq_stream_backend
mode tcp
balance roundrobin
server rabbitmq1 192.168.200.100:5552 check
server rabbitmq2 192.168.200.150:5552 check
server rabbitmq3 192.168.200.200:5552 check
三、Java代码
1、引入依赖
Stream 专属 Java 客户端官方网址:https://github.com/rabbitmq/rabbitmq-stream-java-client
Stream 专属 Java 客户端官方文档网址:https://rabbitmq.github.io/rabbitmq-stream-java-client/stable/htmlsingle/
xml
<dependencies>
    <dependency>
        <groupId>com.rabbitmq</groupId>
        <artifactId>stream-client</artifactId>
        <version>0.15.0</version>
    </dependency>

    <dependency>
        <groupId>org.slf4j</groupId>
        <artifactId>slf4j-api</artifactId>
        <version>1.7.30</version>
    </dependency>
    <dependency>
        <groupId>ch.qos.logback</groupId>
        <artifactId>logback-classic</artifactId>
        <version>1.2.3</version>
    </dependency>
</dependencies>
2、创建Stream
说明:不需要创建交换机
①代码方式创建
java
Environment environment = Environment.builder()
        .host("192.168.200.100")
        .port(33333)
        .username("atguigu")
        .password("123456")
        .build();

environment.streamCreator().stream("stream.atguigu.test2").create();

environment.close();
②ManagementUI创建
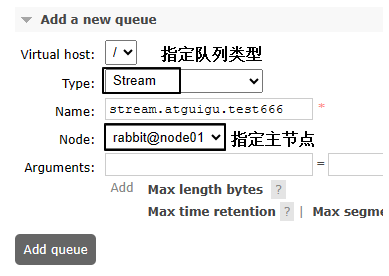
3、生产者端程序
①内部机制说明
1官方文档
Internally, the
Environmentwill query the broker to find out about the topology of the stream and will create or re-use a connection to publish to the leader node of the stream.
翻译:
在内部,Environment将查询broker以了解流的拓扑结构,并将创建或重用连接以发布到流的 leader 节点。
2解析
- 在 Environment 中封装的连接信息仅负责连接到 broker
- Producer 在构建对象时会访问 broker 拉取集群中 Leader 的连接信息
- 将来实际访问的是集群中的 Leader 节点
- Leader 的连接信息格式是:节点名称:端口号
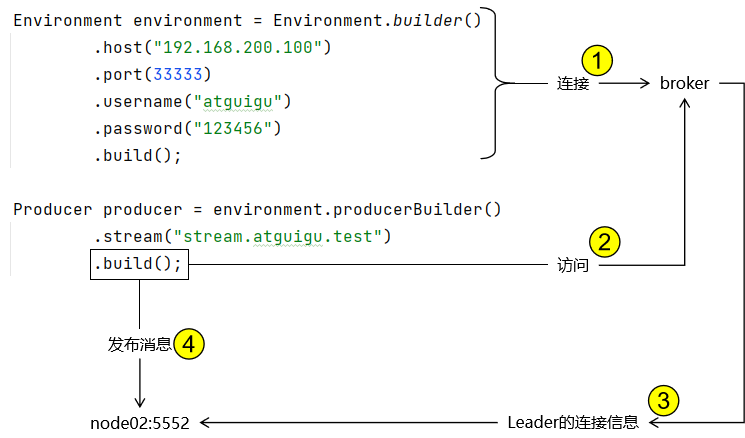
3配置
为了让本机的应用程序知道 Leader 节点名称对应的 IP 地址,我们需要在本地配置 hosts 文件,建立从节点名称到 IP 地址的映射关系

②示例代码
java
Environment environment = Environment.builder()
        .host("192.168.200.100")
        .port(33333)
        .username("atguigu")
        .password("123456")
        .build();

Producer producer = environment.producerBuilder()
        .stream("stream.atguigu.test")
        .build();

byte[] messagePayload = "hello rabbit stream".getBytes(StandardCharsets.UTF_8);

CountDownLatch countDownLatch = new CountDownLatch(1);

producer.send(
        producer.messageBuilder().addData(messagePayload).build(),
        confirmationStatus -> {
            if (confirmationStatus.isConfirmed()) {
                System.out.println("[生产者端]the message made it to the broker");
            } else {
                System.out.println("[生产者端]the message did not make it to the broker");
            }

            countDownLatch.countDown();
        });

countDownLatch.await();

producer.close();

environment.close();
4、消费端程序
java
Environment environment = Environment.builder()
        .host("192.168.200.100")
        .port(33333)
        .username("atguigu")
        .password("123456")
        .build();

environment.consumerBuilder()
        .stream("stream.atguigu.test")
        .name("stream.atguigu.test.consumer")
        .autoTrackingStrategy()
        .builder()
        .messageHandler((offset, message) -> {
            byte[] bodyAsBinary = message.getBodyAsBinary();
            String messageContent = new String(bodyAsBinary);
            System.out.println("[消费者端]messageContent = " + messageContent + " Offset=" + offset.offset());
        })
        .build();
四、指定偏移量消费
1、偏移量
2、官方文档说明
The offset is the place in the stream where the consumer starts consuming from. The possible values for the offset parameter are the following:
- OffsetSpecification.first(): starting from the first available offset. If the stream has not been truncated, this means the beginning of the stream (offset 0).
- OffsetSpecification.last(): starting from the end of the stream and returning the last chunk of messages immediately (if the stream is not empty).
- OffsetSpecification.next(): starting from the next offset to be written. Contrary to
OffsetSpecification.last(), consuming withOffsetSpecification.next()will not return anything if no-one is publishing to the stream. The broker will start sending messages to the consumer when messages are published to the stream.- OffsetSpecification.offset(offset): starting from the specified offset. 0 means consuming from the beginning of the stream (first messages). The client can also specify any number, for example the offset where it left off in a previous incarnation of the application.
- OffsetSpecification.timestamp(timestamp): starting from the messages stored after the specified timestamp. Note consumers can receive messages published a bit before the specified timestamp. Application code can filter out those messages if necessary.
3、指定Offset消费
java
Environment environment = Environment.builder()
        .host("192.168.200.100")
        .port(33333)
        .username("atguigu")
        .password("123456")
        .build();

CountDownLatch countDownLatch = new CountDownLatch(1);

Consumer consumer = environment.consumerBuilder()
        .stream("stream.atguigu.test")
        .offset(OffsetSpecification.first())
        .messageHandler((offset, message) -> {
            byte[] bodyAsBinary = message.getBodyAsBinary();
            String messageContent = new String(bodyAsBinary);
            System.out.println("[消费者端]messageContent = " + messageContent);
            countDownLatch.countDown();
        })
        .build();

countDownLatch.await();

consumer.close();
4、对比
- autoTrackingStrategy 方式:始终监听Stream中的新消息(狗狗看家,忠于职守)
- 指定偏移量方式:针对指定偏移量的消息消费之后就停止(狗狗叼飞盘,叼回来就完)
6. 异地容灾
操作024:Federation插件
一、简介
Federation插件的设计目标是使RabbitMQ在不同的Broker节点之间进行消息传递而无须建立集群。
它可以在不同的管理域中的Broker或集群间传递消息,这些管理域可能设置了不同的用户和vhost,也可能运行在不同版本的RabbitMQ和Erlang上。Federation基于AMQP 0-9-1协议在不同的Broker之间进行通信,并且设计成能够容忍不稳定的网络连接情况。
二、Federation交换机
1、总体说明
- 各节点操作:启用联邦插件
- 下游操作:
- 添加上游连接端点
- 创建控制策略
2、准备工作
为了执行相关测试,我们使用Docker创建两个RabbitMQ实例。
特别提示 :由于Federation机制的最大特点就是跨集群同步数据,所以这两个Docker容器中的RabbitMQ实例不加入集群!!!是两个独立的broker实例。
shell
docker run -d \
--name rabbitmq-shenzhen \
-p 51000:5672 \
-p 52000:15672 \
-v rabbitmq-plugin:/plugins \
-e RABBITMQ_DEFAULT_USER=guest \
-e RABBITMQ_DEFAULT_PASS=123456 \
rabbitmq:3.13-management

docker run -d \
--name rabbitmq-shanghai \
-p 61000:5672 \
-p 62000:15672 \
-v rabbitmq-plugin:/plugins \
-e RABBITMQ_DEFAULT_USER=guest \
-e RABBITMQ_DEFAULT_PASS=123456 \
rabbitmq:3.13-management
3、启用联邦插件
在上游、下游节点中都需要开启。
Docker容器中的RabbitMQ已经开启了rabbitmq_federation,还需要开启rabbitmq_federation_management
shell
rabbitmq-plugins enable rabbitmq_federation
rabbitmq-plugins enable rabbitmq_federation_management
rabbitmq_federation_management插件启用后会在Management UI的Admin选项卡下看到:
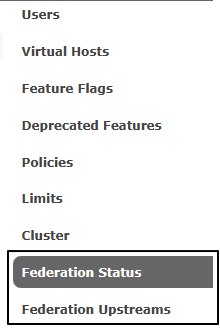
4、添加上游连接端点
在下游节点填写上游节点的连接信息:
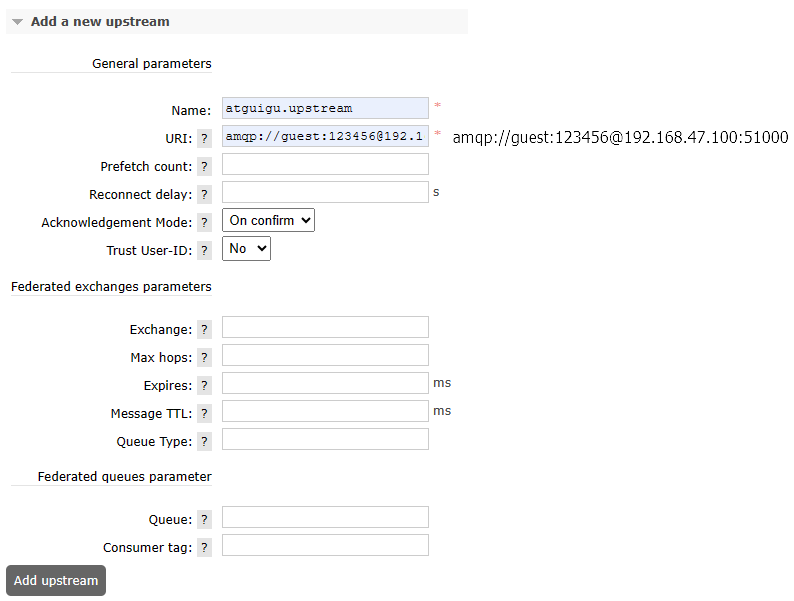
5、创建控制策略
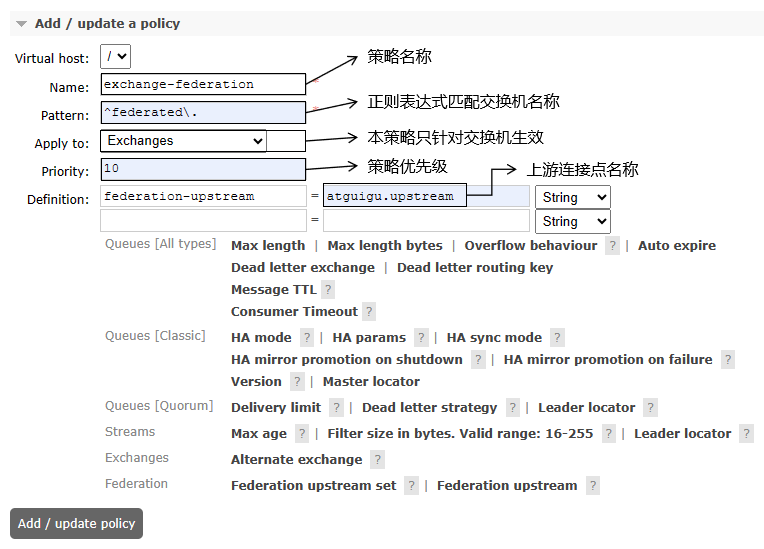
6、测试
①测试计划
特别提示:
- 普通交换机和联邦交换机名称要一致
- 交换机名称要能够和策略正则表达式匹配上
- 发送消息时,两边使用的路由键也要一致
- 队列名称不要求一致

②创建组件
| 所在机房 | 交换机名称 | 路由键 | 队列名称 |
|---|---|---|---|
| 深圳机房(上游) | federated.exchange.demo | routing.key.demo.test | queue.normal.shenzhen |
| 上海机房(下游) | federated.exchange.demo | routing.key.demo.test | queue.normal.shanghai |
创建组件后可以查看一下联邦状态,连接成功的联邦状态如下:

③发布消息执行测试
在上游节点向交换机发布消息:
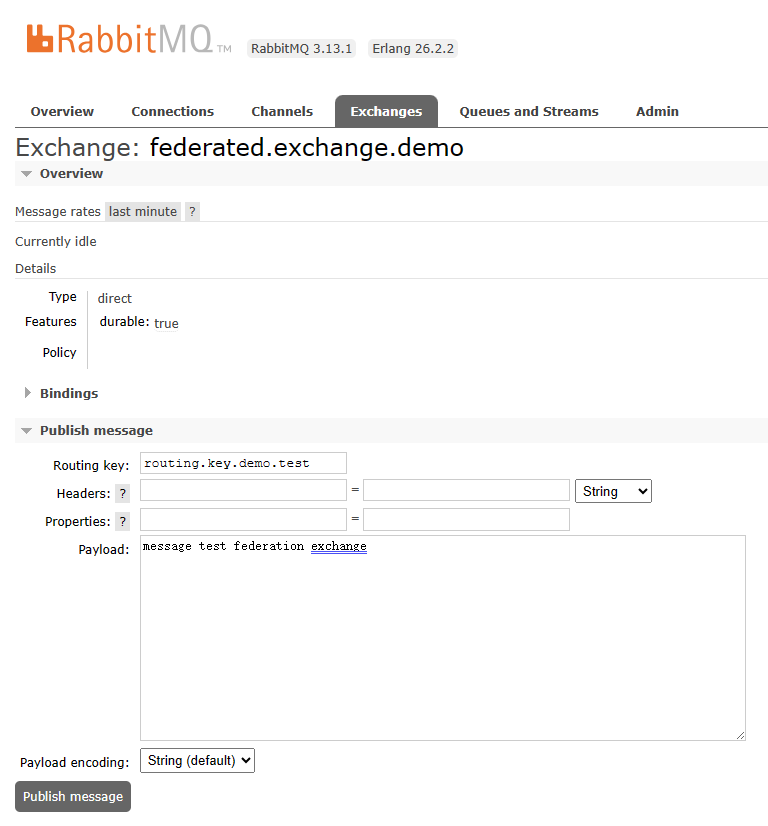
看到下游节点接收到了消息:
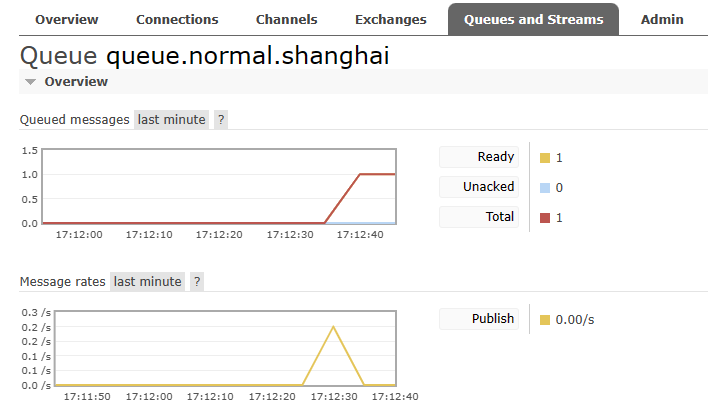
三、Federation队列
1、总体说明
Federation队列和Federation交换机的最核心区别就是:
- Federation Police作用在交换机上,就是Federation交换机
- Federation Police作用在队列上,就是Federation队列
2、创建控制策略
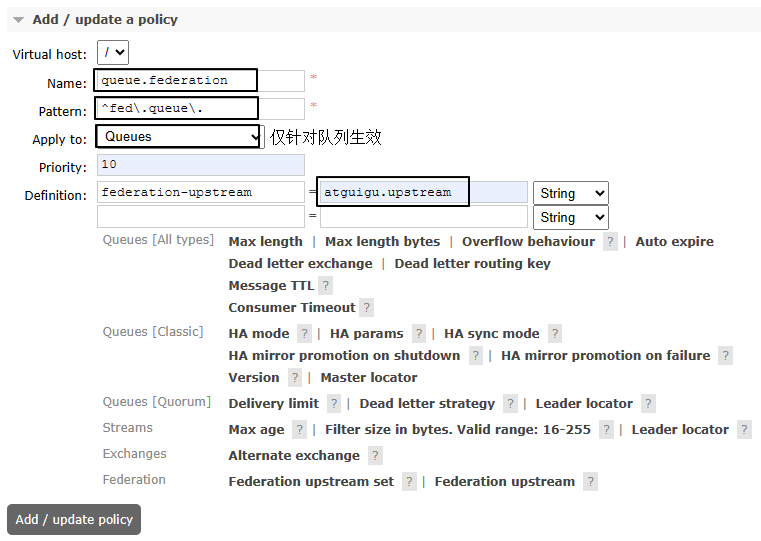
3、测试
①测试计划
上游节点和下游节点中队列名称是相同的,只是下游队列中的节点附加了联邦策略而已
| 所在机房 | 交换机 | 路由键 | 队列 |
|---|---|---|---|
| 深圳机房(上游) | exchange.normal.shenzhen | routing.key.normal.shenzhen | fed.queue.demo |
| 上海机房(下游) | ------ | ------ | fed.queue.demo |
②创建组件
上游节点都是常规操作,此处省略。重点需要关注的是下游节点的联邦队列创建时需要指定相关参数:
创建组件后可以查看一下联邦状态,连接成功的联邦状态如下:

③执行测试
在上游节点向交换机发布消息:
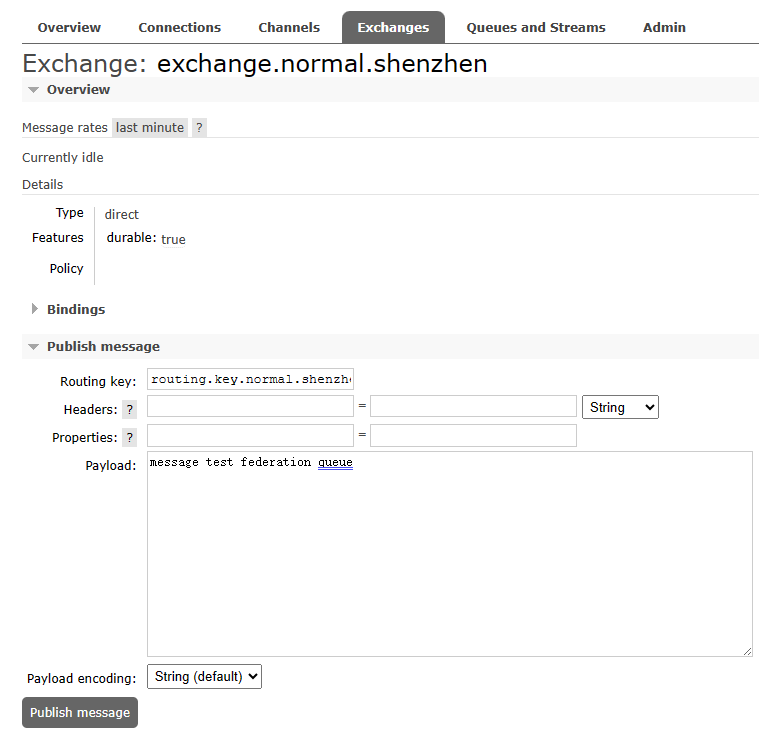
但此时发现下游节点中联邦队列并没有接收到消息,这是为什么呢?这里就体现出了联邦队列和联邦交换机工作逻辑的区别。
对联邦队列来说,如果没有监听联邦队列的消费端程序,它是不会到上游去拉取消息的!
如果有消费端监听联邦队列,那么首先消费联邦队列自身的消息;如果联邦队列为空,这时候才会到上游队列节点中拉取消息。
所以现在的测试效果需要消费端程序配合才能看到:

操作025:Shovel
一、启用Shovel插件
shell
rabbitmq-plugins enable rabbitmq_shovel
rabbitmq-plugins enable rabbitmq_shovel_management
二、配置Shovel
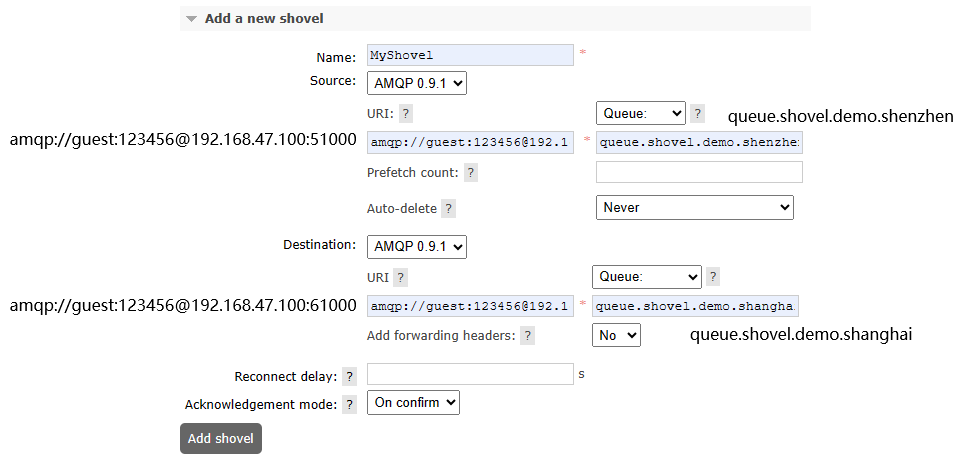
三、测试
1、测试计划
| 节点 | 交换机 | 路由键 | 队列 |
|---|---|---|---|
| 深圳节点 | exchange.shovel.test | exchange.shovel.test | queue.shovel.demo.shenzhen |
| 上海节点 | ------ | ------ | queue.shovel.demo.shanghai |
2、测试效果
①发布消息
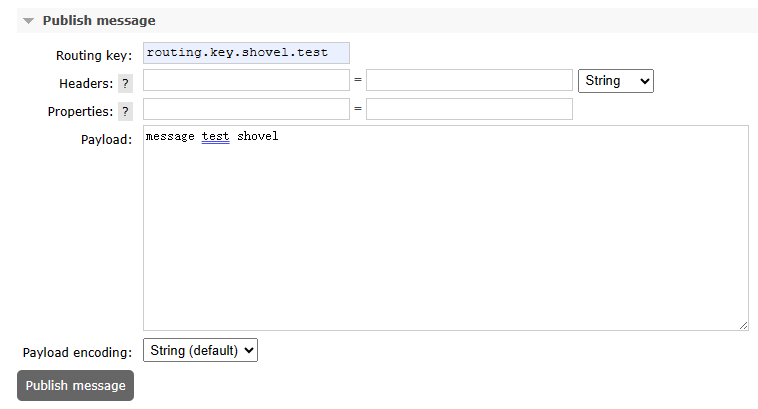
②源节点
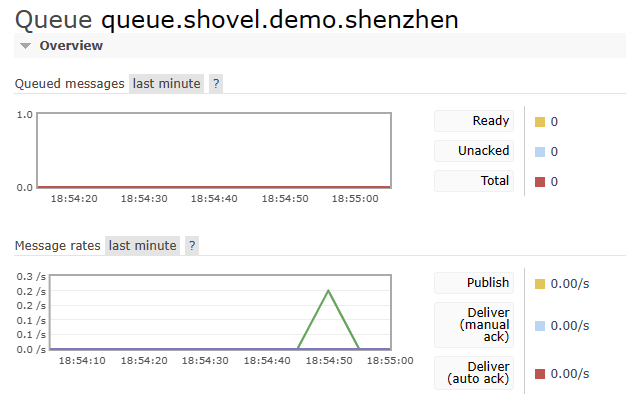
③目标节点