如果你还是使用HttpRequest的话,答案是否定的。但是,鸿蒙开发者很贴心的推出了远场通信服务,可以使用rcp模块的方法发起请求,并且在请求时指定服务端证书的验证方式,关键点就在SecurityConfiguration接口上,该接口的remoteValidation属性支持远程服务器证书的四种验证模式:
- 'system':使用系统CA,默认值
- 'skip':跳过验证
- CertificateAuthority:选定CA
- ValidationCallback:自定义证书校验
Talk is cheap, show you the code!
实现HTTPS服务端证书四种校验方式示例
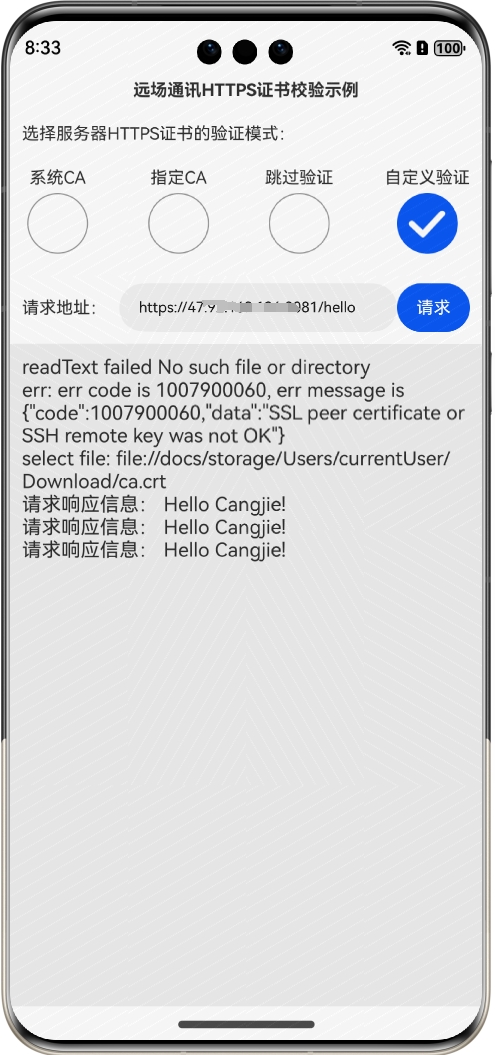
本示例运行后的界面如下所示:
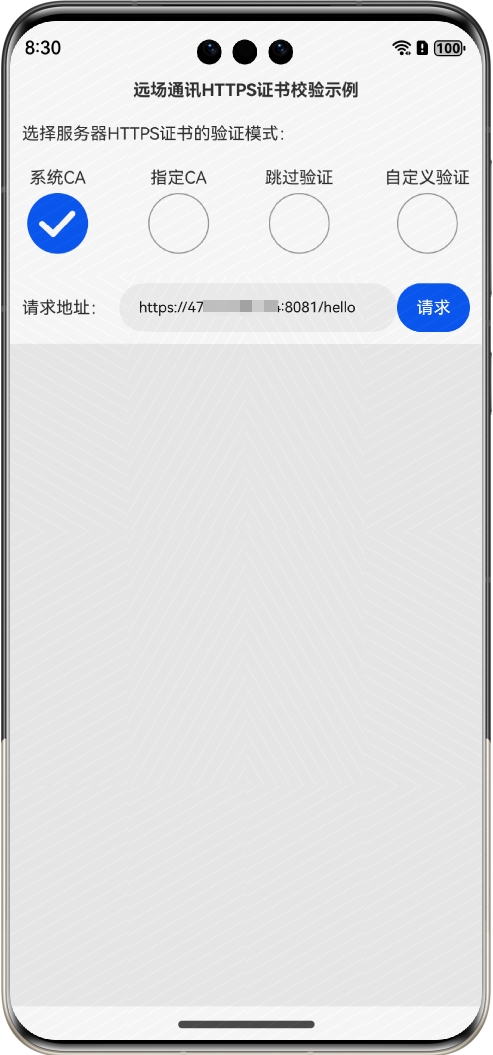
选择证书验证模式,在请求地址输入要访问的https网址,然后单击"请求"按钮,就可以在下面的日志区域显示请求结果。
下面详细介绍创建该应用的步骤。
步骤1:创建Empty Ability项目。
步骤2:在module.json5配置文件加上对权限的声明:
"requestPermissions": [
      {
        "name": "ohos.permission.INTERNET"
      }
    ]这里添加了获取互联网信息的权限。复制
步骤3:在Index.ets文件里添加如下的代码:
import util from '@ohos.util';
import picker from '@ohos.file.picker';
import fs from '@ohos.file.fs';
import { BusinessError } from '@kit.BasicServicesKit';
import { rcp } from '@kit.RemoteCommunicationKit';

@Entry
@Component
struct Index {
  //连接、通讯历史记录
  @State msgHistory: string = ''
  //请求的HTTPS地址
  @State httpsUrl: string = "https://47.**.**.***:8081/hello"
  //服务端证书验证模式,默认系统CA
  @State certVerifyType: number = 0
  //是否显示选择CA的组件
  @State selectCaShow: Visibility = Visibility.None
  //选择的ca文件
  @State caFileUri: string = ''
  scroller: Scroller = new Scroller()

  build() {
    Row() {
      Column() {
        Text("远场通讯HTTPS证书校验示例")
          .fontSize(14)
          .fontWeight(FontWeight.Bold)
          .width('100%')
          .textAlign(TextAlign.Center)
          .padding(10)

        Flex({ justifyContent: FlexAlign.Start, alignItems: ItemAlign.Center }) {
          Text("选择服务器HTTPS证书的验证模式:")
            .fontSize(14)
            .width(90)
            .flexGrow(1)
        }
        .width('100%')
        .padding(10)

        Flex({ justifyContent: FlexAlign.SpaceBetween, alignItems: ItemAlign.Center }) {
          Column() {
            Text('系统CA').fontSize(14)
            Radio({ value: '0', group: 'rgVerify' }).checked(true)
              .height(50)
              .width(50)
              .onChange((isChecked: boolean) => {
                if (isChecked) {
                  this.certVerifyType = 0
                }
              })
          }

          Column() {
            Text('指定CA').fontSize(14)
            Radio({ value: '1', group: 'rgVerify' }).checked(false)
              .height(50)
              .width(50)
              .onChange((isChecked: boolean) => {
                if (isChecked) {
                  this.certVerifyType = 1
                }
              })
          }

          Column() {
            Text('跳过验证').fontSize(14)
            Radio({ value: '2', group: 'rgVerify' }).checked(false)
              .height(50)
              .width(50)
              .onChange((isChecked: boolean) => {
                if (isChecked) {
                  this.certVerifyType = 2
                }
              })
          }

          Column() {
            Text('自定义验证').fontSize(14)
            Radio({ value: '3', group: 'rgVerify' }).checked(false)
              .height(50)
              .width(50)
              .onChange((isChecked: boolean) => {
                if (isChecked) {
                  this.certVerifyType = 3
                }
              })
          }
        }
        .width('100%')
        .padding(10)

        Flex({ justifyContent: FlexAlign.Start, alignItems: ItemAlign.Center }) {
          Text("服务端证书CA")
            .fontSize(14)
            .width(90)
            .flexGrow(1)

          Button("选择")
            .onClick(() => {
              this.selectCA()
            })
            .width(70)
            .fontSize(14)
        }
        .width('100%')
        .padding(10)
        .visibility(this.certVerifyType == 1 ? Visibility.Visible : Visibility.None)

        Flex({ justifyContent: FlexAlign.Start, alignItems: ItemAlign.Center }) {
          Text("请求地址:")
            .fontSize(14)
            .width(80)
          TextInput({ text: this.httpsUrl })
            .onChange((value) => {
              this.httpsUrl = value
            })
            .width(110)
            .fontSize(12)
            .flexGrow(1)
          Button("请求")
            .onClick(() => {
              this.doHttpRequest()
            })
            .width(60)
            .fontSize(14)
        }
        .width('100%')
        .padding(10)

        Scroll(this.scroller) {
          Text(this.msgHistory)
            .textAlign(TextAlign.Start)
            .padding(10)
            .width('100%')
            .backgroundColor(0xeeeeee)
        }
        .align(Alignment.Top)
        .backgroundColor(0xeeeeee)
        .height(300)
        .flexGrow(1)
        .scrollable(ScrollDirection.Vertical)
        .scrollBar(BarState.On)
        .scrollBarWidth(20)
      }
      .width('100%')
      .justifyContent(FlexAlign.Start)
      .height('100%')
    }
    .height('100%')
  }

  //自定义证书验证方式
  selfDefServerCertValidation: rcp.ValidationCallback = (context: rcp.ValidationContext) => {
    //此处编写证书有效性判断逻辑
    return true;
  }

  //生成rcp配置信息
  buildRcpCfg() {
    let caCert: rcp.CertificateAuthority = {
      content: this.getCAContent()
    }
    //服务器端证书验证模式
    let certVerify: 'system' | 'skip' | rcp.CertificateAuthority | rcp.ValidationCallback = "system"

    if (this.certVerifyType == 0) { //系统验证
      certVerify = 'system'
    } else if (this.certVerifyType == 1) { //选择CA证书验证
      certVerify =caCert
    } else if (this.certVerifyType == 2) { //跳过验证
      certVerify = 'skip'
    } else if (this.certVerifyType == 3) { //自定义证书验证
      certVerify = this.selfDefServerCertValidation
    }
    let secCfg: rcp.SecurityConfiguration = { remoteValidation: certVerify }
    let reqCfg: rcp.Configuration = { security: secCfg }
    let sessionCfg: rcp.SessionConfiguration = { requestConfiguration: reqCfg }
    return sessionCfg
  }

  //发起http请求
  doHttpRequest() {
    let rcpCfg = this.buildRcpCfg()
    let rcpSession: rcp.Session = rcp.createSession(rcpCfg)
    rcpSession.get(this.httpsUrl).then((response) => {
      if (response.body != undefined) {
        let result = buf2String(response.body)
        this.msgHistory += '请求响应信息: ' + result + "\r\n";
      }
    }).catch((err: BusinessError) => {
      this.msgHistory += `err: err code is ${err.code}, err message is ${JSON.stringify(err)}\r\n`;
    })
  }

  //选择CA证书文件
  selectCA() {
    let documentPicker = new picker.DocumentViewPicker();
    documentPicker.select().then((result) => {
      if (result.length > 0) {
        this.caFileUri = result[0]
        this.msgHistory += "select file: " + this.caFileUri + "\r\n";
      }
    }).catch((e: BusinessError) => {
      this.msgHistory += 'DocumentViewPicker.select failed ' + e.message + "\r\n";
    });
  }

  //加载CA文件内容
  getCAContent(): string {
    let caContent = ""
    try {
      let buf = new ArrayBuffer(1024 * 4);
      let file = fs.openSync(this.caFileUri, fs.OpenMode.READ_ONLY);
      let readLen = fs.readSync(file.fd, buf, { offset: 0 });
      caContent = buf2String(buf.slice(0, readLen))
      fs.closeSync(file);
    } catch (e) {
      this.msgHistory += 'readText failed ' + e.message + "\r\n";
    }
    return caContent
  }
}


//ArrayBuffer转utf8字符串
function buf2String(buf: ArrayBuffer) {
  let msgArray = new Uint8Array(buf);
  let textDecoder = util.TextDecoder.create("utf-8");
  return textDecoder.decodeWithStream(msgArray)
}
步骤4:编译运行,可以使用模拟器或者真机。
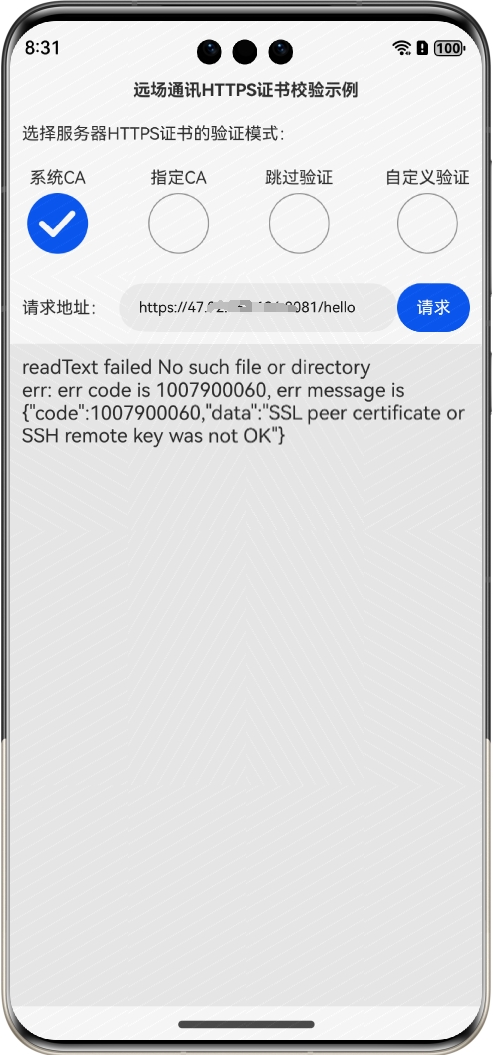
步骤5:选择默认"系统CA",输入请求网址(假设web服务端使用的是自签名证书),然后单击"请求"按钮,这时候会出现关于数字证书的错误信息,如图所示:
步骤6:选择"指定CA"类型,然后单击出现的"选择"按钮,可以在本机选择CA证书文件,然后单击"请求"按钮:
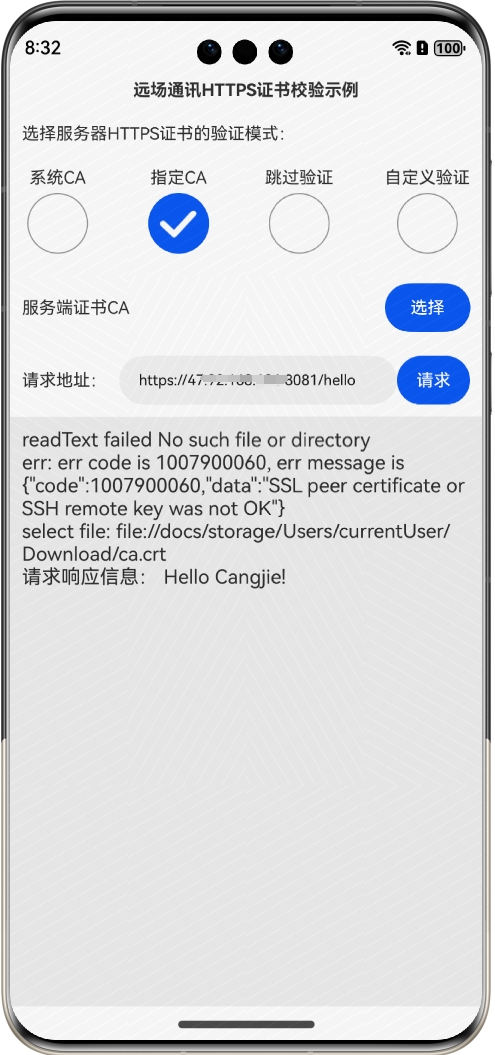
可以看到,得到了正确的请求结果。
步骤7:选择"跳过验证"类型,然后然后单击"请求"按钮:
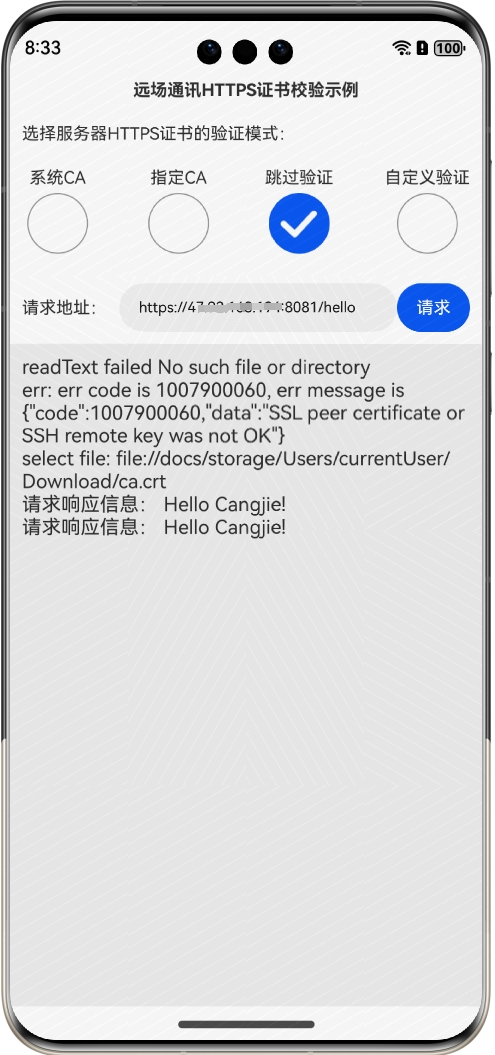
也得到了正确的请求结果。
步骤8:选择"自定义验证"类型,然后然后单击"请求"按钮:
也得到了正确的请求结果。
关键功能分析
关键点主要有两块,第一块是设置验证模式:
    //服务器端证书验证模式
    let certVerify: 'system' | 'skip' | rcp.CertificateAuthority | rcp.ValidationCallback = "system"

    if (this.certVerifyType == 0) { //系统验证
      certVerify = 'system'
    } else if (this.certVerifyType == 1) { //选择CA证书验证
      certVerify =caCert
    } else if (this.certVerifyType == 2) { //跳过验证
      certVerify = 'skip'
    } else if (this.certVerifyType == 3) { //自定义证书验证
      certVerify = this.selfDefServerCertValidation
    }
    let secCfg: rcp.SecurityConfiguration = { remoteValidation: certVerify }
    let reqCfg: rcp.Configuration = { security: secCfg }
    let sessionCfg: rcp.SessionConfiguration = { requestConfiguration: reqCfg }
    return sessionCfg
  }
这个比较好理解,第二块是自定义证书验证的方法:
  //自定义证书验证方式
  selfDefServerCertValidation: rcp.ValidationCallback = (context: rcp.ValidationContext) => {
    //此处编写证书有效性判断逻辑
    return true;
  }
这里为简单起见,自定义规则是所有的验证都通过,读者可以根据自己的需要来修改,比如不验证证书的有效期。
最后
小编在之前的鸿蒙系统扫盲中,有很多朋友给我留言,不同的角度的问了一些问题,我明显感觉到一点,那就是许多人参与鸿蒙开发,但是又不知道从哪里下手,因为资料太多,太杂,教授的人也多,无从选择。有很多小伙伴不知道学习哪些鸿蒙开发技术?不知道需要重点掌握哪些鸿蒙应用开发知识点?而且学习时频繁踩坑,最终浪费大量时间。所以有一份实用的鸿蒙(HarmonyOS NEXT)资料用来跟着学习是非常有必要的。
为了确保高效学习,建议规划清晰的学习路线,涵盖以下关键阶段:
希望这一份鸿蒙学习资料能够给大家带来帮助~
鸿蒙(HarmonyOS NEXT)最新学习路线

该路线图包含基础技能、就业必备技能、多媒体技术、六大电商APP、进阶高级技能、实战就业级设备开发,不仅补充了华为官网未涉及的解决方案
路线图适合人群:
IT开发人员: 想要拓展职业边界
零基础小白: 鸿蒙爱好者,希望从0到1学习,增加一项技能。
**技术提升/进阶跳槽:**发展瓶颈期,提升职场竞争力,快速掌握鸿蒙技术
2.视频学习资料+学习PDF文档
(鸿蒙语法ArkTS、TypeScript、ArkUI教程......)

纯血版鸿蒙全套学习资料(面试、文档、全套视频等)
鸿蒙APP开发必备
总结
参与鸿蒙开发,你要先认清适合你的方向,如果是想从事鸿蒙应用开发方向的话,可以参考本文的学习路径,简单来说就是:为了确保高效学习,建议规划清晰的学习路线