Flask是一个轻量级的可定制框架,使用Python语言编写,较其他同类型框架更为灵活、轻便、安全且容易上手。
目录
[4.1 外部可见的服务器](#4.1 外部可见的服务器)
[5.1读取 cookies:](#5.1读取 cookies:)
[5.2储存 cookies:](#5.2储存 cookies:)
[八、会话、消息、日志及 json](#八、会话、消息、日志及 json)
[8.1JSON 格式的 API](#8.1JSON 格式的 API)
[8.5集成 WSGI 中间件](#8.5集成 WSGI 中间件)
一、项目环境搭配以及安装运行
1.下载安装
pip install Flask
python
(venv) D:\CODE\VSCODE\python\myproject>pip install Flask
2.最小的应用
python
from flask import Flask #导入flask类 该类的实例将会成为我们的 WSGI 应用
app = Flask(__name__) #创建一个该类的实例 第一个参数是应用模块或者包的名称
@app.route('/') #然后我们使用 route() 装饰器来告诉 Flask 触发函数的 URL
def hello_world(): #函数名称被用于生成相关联的 URL
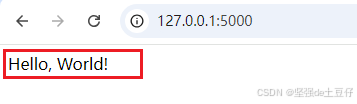
return 'Hello, World!' #返回需要在用户浏览器中显示的信息3.运行应用
该应用运行在windows系统中。
python
1.set FLASK_APP=hello.py
2. flask run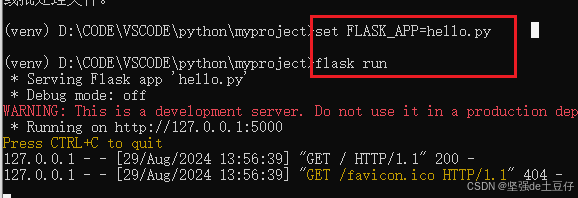
4.运行结果
根据提示运行结果可以在 http://127.0.0.1:5000 访问
这样就启动了一个非常简单的内建的服务器。
4.1 外部可见的服务器
运行服务器后,会发现只有你自己的电脑可以使用服务,而网络中的其他电脑却 不行。缺省设置就是这样的,因为在调试模式下该应用的用户可以执行你电脑中 的任意 Python 代码。
如果你关闭了调试器或信任你网络中的用户,那么可以让服务器被公开访问。只要在命令行上简单的加上 --host=0.0.0.0 即可:
python
$ flask run --host=0.0.0.0这行代码告诉你的操作系统监听所有公开的 IP 。
二、路由
使用 route() 装饰器来把函数绑定到 URL:
python
@app.route('/')
def index():
    return 'Index Page'

@app.route('/hello')
def hello():
    return 'Hello, World'
还可以动态变化 URL 的某些部分, 还可以为一个函数指定多个规则。
python
@app.route('/user/<username>')
def show_user_profile(username):
    # show the user profile for that user
    return 'User %s' % escape(username)

@app.route('/post/<int:post_id>')
def show_post(post_id):
    # show the post with the given id, the id is an integer
    return 'Post %d' % post_id

@app.route('/path/<path:subpath>')
def show_subpath(subpath):
    # show the subpath after /path/
    return 'Subpath %s' % escape(subpath)
转换器类型:

三、http请求
一个路由默认回应 GET 请求。 可以使用 route()装饰器的 methods 参数来处理不同的 HTTP 方法:
python
from flask import Flask,request
app = Flask(__name__)

@app.route('/login', methods=['GET', 'POST'])
def login():
    if request.method == 'POST':
        return do_the_login()
    else:
        return show_the_login_form()
3.1静态文件
静态文件位于应用的
/static中。使用特定的'static'端点就可以生成相应的 URL
python
url_for('static', filename='style.css')这个静态文件在文件系统中的位置应该是 static/style.css 。
3.2渲染模板
使用 render_template() 方法可以渲染模板,你只要提供模板名称和需要 作为参数传递给模板的变量就行了。下面是一个简单的模板渲染例子:
python
from flask import render_template

@app.route('/hello/')
@app.route('/hello/<name>')
def hello(name=None):
    return render_template('hello.html', name=name)
3.3操作请求数据
对于 web 应用来说对客户端向服务器发送的数据作出响应很重要。在 Flask 中由全局 对象 request 来提供请求信息。
python
from flask import request

with app.test_request_context('/hello', method='POST'):
    # now you can do something with the request until the
    # end of the with block, such as basic assertions:
    assert request.path == '/hello'
    assert request.method == 'POST'
python
from flask import request

with app.request_context(environ):
    assert request.method == 'POST'
通过使用 method 属性可以操作当前请求方法,通过使用 form 属性处理表单数据(在
POST或者PUT请求 中传输的数据)。以下是使用上述两个属性的例子:
python
from flask import request
@app.route('/login', methods=['POST', 'GET'])
def login():
    error = None
    if request.method == 'POST':
        if valid_login(request.form['username'],
                       request.form['password']):
            return log_the_user_in(request.form['username'])
        else:
            error = 'Invalid username/password'
    # the code below is executed if the request method
    # was GET or the credentials were invalid
    return render_template('login.html', error=error)
四、文件上传
用 Flask 处理文件上传很容易,只要确保不要忘记在你的 HTML 表单中设置
enctype="multipart/form-data"属性就可以了。否则浏览器将不会传送你的文件。
已上传的文件被储存在内存或文件系统的临时位置。你可以通过请求对象 files 属性来访问上传的文件。每个上传的文件都储存在这个 字典型属性中。这个属性基本和标准 Python file 对象一样,另外多出一个 用于把上传文件保存到服务器的文件系统中的 save() 方法。下例展示其如何运作:
python
from flask import request

@app.route('/upload', methods=['GET', 'POST'])
def upload_file():
    if request.method == 'POST':
        f = request.files['the_file']
        f.save('/var/www/uploads/uploaded_file.txt')
    ...
如果想要知道文件上传之前其在客户端系统中的名称,可以使用 filename 属性。但是请牢记这个值是 可以伪造的,永远不要信任这个值。如果想要把客户端的文件名作为服务器上的文件名, 可以通过 Werkzeug 提供的 secure_filename() 函数:
python
from flask import request
from werkzeug.utils import secure_filename

@app.route('/upload', methods=['GET', 'POST'])
def upload_file():
    if request.method == 'POST':
        f = request.files['the_file']
        f.save('/var/www/uploads/' + secure_filename(f.filename))
    ...
五、Cookies
要访问 cookies ,可以使用 cookies 属性。可以使用响应 对象 的 set_cookie 方法来设置 cookies 。请求对象的 cookies 属性是一个包含了客户端传输的所有 cookies 的字典。在 Flask 中,如果使用 会话 ,那么就不要直接使用 cookies ,因为 会话 比较安全一些。
5.1读取 cookies:
python
from flask import request

@app.route('/')
def index():
    username = request.cookies.get('username')
    # use cookies.get(key) instead of cookies[key] to not get a
    # KeyError if the cookie is missing.
5.2储存 cookies:
python
from flask import make_response

@app.route('/')
def index():
    resp = make_response(render_template(...))
    resp.set_cookie('username', 'the username')
    return resp
六、重定向和错误
使用 redirect() 函数可以重定向。使用 abort() 可以 更早退出请求,并返回错误代码:
python
from flask import abort, redirect, url_for

@app.route('/')
def index():
    return redirect(url_for('login'))

@app.route('/login')
def login():
    abort(401)
    this_is_never_executed()
6.1定制出错页面
缺省情况下每种出错代码都会对应显示一个黑白的出错页面。使用 errorhandler() 装饰器可以定制出错页面:
python
from flask import render_template

@app.errorhandler(404)
def page_not_found(error):
    return render_template('page_not_found.html'), 404
注意 render_template() 后面的
404,这表示页面对就的出错 代码是 404 ,即页面不存在。缺省情况下 200 表示:一切正常。
七、关于响应response
视图函数的返回值会自动转换为一个响应对象。如果返回值是一个字符串,那么会被 转换为一个包含作为响应体的字符串、一个
200 OK出错代码 和一个 text/html 类型的响应对象。如果返回值是一个字典,那么会调用jsonify()来产生一个响应。
以下是转换的规则:
-
如果视图返回的是一个响应对象,那么就直接返回它。
-
如果返回的是一个字符串,那么根据这个字符串和缺省参数生成一个用于返回的 响应对象。
-
如果返回的是一个字典,那么调用
jsonify创建一个响应对象。 -
如果返回的是一个元组,那么元组中的项目可以提供额外的信息。元组中必须至少 包含一个项目,且项目应当由
(response, status)、(response, headers)或者(response, status, headers)组成。status的值会重载状态代码,headers是一个由额外头部值组成的列表 或字典。 -
如果以上都不是,那么 Flask 会假定返回值是一个有效的 WSGI 应用并把它转换为 一个响应对象。
如果想要在视图内部掌控响应对象的结果,那么可以使用 make_response() 函数。
如下视图可以使用 make_response() 包裹返回表达式,获得响应对象,并对该对象 进行修改,然后再返回:
python
@app.errorhandler(404)
def not_found(error):
    resp = make_response(render_template('error.html'), 404)
    resp.headers['X-Something'] = 'A value'
    return resp
八、会话、消息、日志及 json
8.1JSON 格式的 API
JSON 格式的响应是常见的,用 Flask 写这样的 API 是很容易上手的。如果从视图 返回一个
dict,那么它会被转换为一个 JSON 响应。
python
@app.route("/me")
def me_api():
    user = get_current_user()
    return {
        "username": user.username,
        "theme": user.theme,
        "image": url_for("user_image", filename=user.image),
    }
如果 dict 还不能满足需求,还需要创建其他类型的 JSON 格式响应,可以使用 jsonify() 函数。该函数会序列化任何支持的 JSON 数据类型。
python
@app.route("/users")
def users_api():
    users = get_all_users()
    return jsonify([user.to_json() for user in users])
8.2会话
除了请求对象之外还有一种称为 session 的对象,允许你在不同请求 之间储存信息。这个对象相当于用密钥签名加密的 cookie ,即用户可以查看你的 cookie ,但是如果没有密钥就无法修改它。
使用会话之前你必须设置一个密钥。
python
from flask import Flask, session, redirect, url_for, escape, request

app = Flask(__name__)

# Set the secret key to some random bytes. Keep this really secret!
app.secret_key = b'_5#y2L"F4Q8z\n\xec]/'

@app.route('/')
def index():
    if 'username' in session:
        return 'Logged in as %s' % escape(session['username'])
    return 'You are not logged in'

@app.route('/login', methods=['GET', 'POST'])
def login():
    if request.method == 'POST':
        session['username'] = request.form['username']
        return redirect(url_for('index'))
    return '''
        <form method="post">
            <p><input type=text name=username>
            <p><input type=submit value=Login>
        </form>
    '''

@app.route('/logout')
def logout():
    # remove the username from the session if it's there
    session.pop('username', None)
    return redirect(url_for('index'))
这里用到的 escape() 是用来转义的。如果不使用模板引擎就可以像上例 一样使用这个函数来转义。
如何生成一个好的密钥
生成随机数的关键在于一个好的随机种子,因此一个好的密钥应当有足够的随机性。 操作系统可以有多种方式基于密码随机生成器来生成随机数据。使用下面的命令 可以快捷的为
Flask.secret_key( 或者 SECRET_KEY )生成值:
$ python -c 'import os; print(os.urandom(16))'
b'_5#y2L"F4Q8z\n\xec]/'
基于 cookie 的会话的说明: Flask 会取出会话对象中的值,把值序列化后储存到 cookie 中。在打开 cookie 的情况下,如果需要查找某个值,但是这个值在请求中 没有持续储存的话,那么不会得到一个清晰的出错信息。请检查页面响应中的 cookie 的大小是否与网络浏览器所支持的大小一致。
8.3消息闪现
一个好的应用和用户接口都有良好的反馈,否则到后来用户就会讨厌这个应用。 Flask 通过闪现系统来提供了一个易用的反馈方式。闪现系统的基本工作原理是在请求结束时 记录一个消息,提供且只提供给下一个请求使用。通常通过一个布局模板来展现闪现的 消息。
flash() 用于闪现一个消息。在模板中,使用 get_flashed_messages() 来操作消息。 完整的例子参见 消息闪现 。
8.4日志
python
app.logger.debug('A value for debugging')
app.logger.warning('A warning occurred (%d apples)', 42)
app.logger.error('An error occurred')
logger 是一个标准的 Logger Logger 类,更多信息详见官方的 logging 文档。
8.5集成 WSGI 中间件
如果想要在应用中添加一个 WSGI 中间件,那么可以包装内部的 WSGI 应用。假设为了 解决 lighttpd 的错误,你要使用一个来自 Werkzeug 包的中间件,那么可以这样做:
python
from werkzeug.contrib.fixers import LighttpdCGIRootFix
app.wsgi_app = LighttpdCGIRootFix(app.wsgi_app)