一、监听器模式图
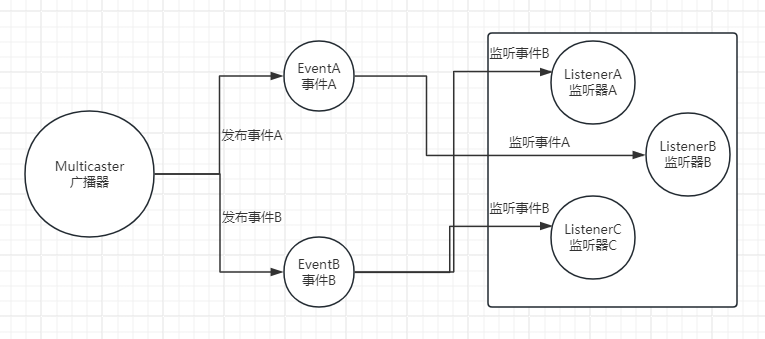
二、监听器三要素
-
广播器:用来发布事件
-
事件:需要被传播的消息
-
监听器:一个对象对一个事件的发生做出反应,这个对象就是事件监听器
三、监听器的实现方式
1、实现自定义事件
自定义事件需要继承ApplicationEvent类,并添加一个构造函数,用于接收事件源对象。该事件中添加了一个SysUser对象,用于传递用户信息。
package com.ruoyi.web.listener;

import com.ruoyi.common.core.domain.entity.SysUser;
import org.springframework.context.ApplicationEvent;

/**
 * @Description: 自定义事件
 * @Author: baiwen
 * @createTime: 2024年06月19日 13:10:07
 */
public class MyEvent extends ApplicationEvent {

    private SysUser sysUser;

    public MyEvent(Object source, SysUser sysUser) {
        super(source);
        this.sysUser = sysUser;
    }

    public SysUser getSysUser() {
        return sysUser;
    }
}
2、实现自定义监听器
自定义监听器需要实现ApplicationListener接口,并重写 onApplicationEvent方法。接口中的泛型参数为自定义事件类型,表示监听该类型的事件。可以从该事件中获取用户信息,并进行相应的处理。
package com.ruoyi.web.listener;

import com.ruoyi.common.core.domain.entity.SysUser;
import org.springframework.context.ApplicationListener;
import org.springframework.stereotype.Component;

/**
 * @Description: 自定义监听器
 * @Author: baiwen
 * @createTime: 2024年06月19日 13:12:39
 */
@Component
public class MyEventListener implements ApplicationListener<MyEvent> {
    @Override
    public void onApplicationEvent(MyEvent event) {
        SysUser sysUser = event.getSysUser();
        System.out.println("监听到了事件,用户名:" + sysUser.getUserName());
    }
}
3、发布自定义事件
在需要发布事件的地方,使用ApplicationEventPublisher的publishEvent方法来发布事件。这里使用Test类来模拟事件发布,实际应用中可以根据具体需求来选择合适的发布场景。
package com.ruoyi.test;

import com.ruoyi.common.core.domain.entity.SysUser;
import com.ruoyi.web.listener.MyEvent;
import org.junit.Test;
import org.junit.runner.RunWith;
import org.springframework.boot.test.context.SpringBootTest;
import org.springframework.context.ApplicationEventPublisher;
import org.springframework.test.context.junit4.SpringRunner;
import javax.annotation.Resource;

/**
 * @Description:
 * @Author: baiwen
 * @createTime: 2024年06月19日 13:16:33
 */
@SpringBootTest
@RunWith(SpringRunner.class)
public class MyEventPushTest {

    @Resource
    private ApplicationEventPublisher applicationEventPublisher;

    @Test
    public void testpublishEvent() throws InterruptedException
    {
        SysUser sysUser = new SysUser();
        sysUser.setUserName("zhangsan");

        System.out.println("发布MyEvent事件。。。");
        applicationEventPublisher.publishEvent(new MyEvent(this, sysUser));
    }
}
4、测试
运行MyEventPushTest类中的testpublishEvent方法,控制台会输出以下内容:
发布MyEvent事件。。。
监听到了事件,用户名:zhangsan
5、其他实现方案
主要是监听器的注册方式不同,目的只有一个,把监听器加入到spring容器中。
方式一,就是上面的MyEventListener类是通过@Component注解将该类注册为Spring的Bean,从而实现监听器的功能。
方式二,可以通过在启动类中添加监听器的方式,使监听器生效。
package com.ruoyi;

import com.ruoyi.web.listener.MyEventListener;
import org.springframework.boot.autoconfigure.SpringBootApplication;
import org.springframework.boot.autoconfigure.jdbc.DataSourceAutoConfiguration;
import org.springframework.boot.builder.SpringApplicationBuilder;

/**
 * 启动程序
 *
 * @author baiwen
 */
@SpringBootApplication(exclude = { DataSourceAutoConfiguration.class })
public class RuoYiApplication
{
    public static void main(String[] args)
    {
        new SpringApplicationBuilder(RuoYiApplication.class).listeners(new MyEventListener()).run(args);
    }
}方式三,可以通过配置spring.factories,使监听器生效。
在resource文件夹下创建META-INF/spring.factories文件。
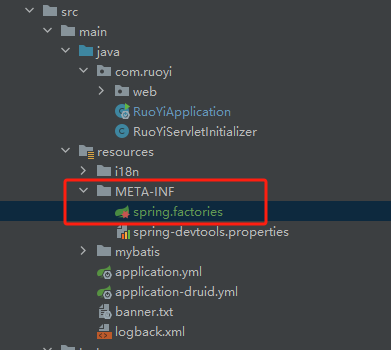
配置内容如下:
# 监听器
org.springframework.context.ApplicationListener=com.ruoyi.web.listener.MyEventListener除此之外,还有第四种方式,通过@EventListener注解实现监听器的功能。通过@EventListener注解的condition属性来指定监听的事件类型。
package com.ruoyi.web.listener;

import com.ruoyi.common.core.domain.entity.SysUser;
import org.springframework.context.event.EventListener;
import org.springframework.stereotype.Component;

/**
 * @Description: 自定义监听器2
 * @Author: baiwen
 * @createTime: 2024年06月19日 14:07:57
 */
@Component
public class MyEventListener2 {

    @EventListener(MyEvent.class)
    public void listenerApplicationStarted(MyEvent event) {
        SysUser sysUser = event.getSysUser();
        System.out.println("注解方式监听到了事件,用户名:" + sysUser.getUserName());
    }
}
发布事件后,可以看到能正常监听到事件。
发布MyEvent事件。。。
注解方式监听到了事件,用户名:zhangsan
总结
以上,就是SpringBoot中实现监听器的四种方式。
至于监听器的实现原理,后续再补充。
文章转载自: 树叶的一生啊