写在前面
源码 。
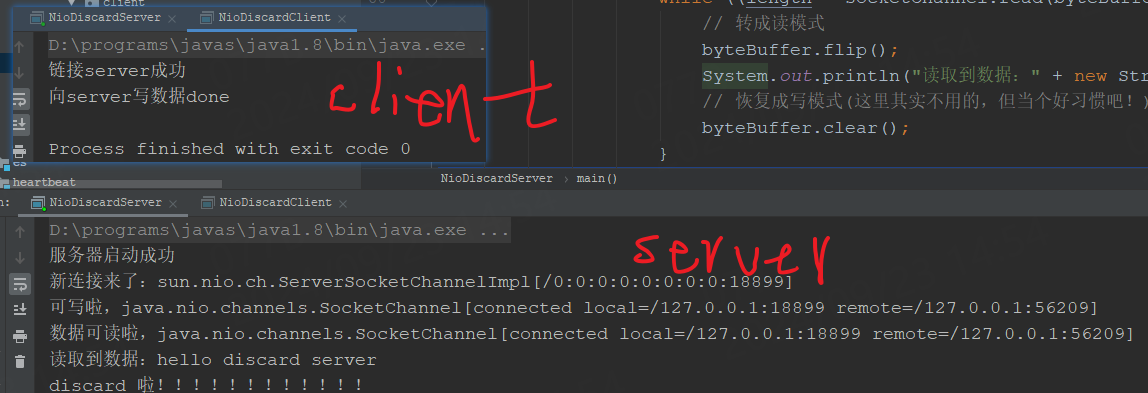
为了能够进一步的熟悉下nio相关的api操作,本文来实现一个基于nio的discard server。
discard server的意思是,server接收到来自client的一个消息之后,直接就将连接关闭,即discard。
1:正戏
1.1:server
java
package com.dahuyou.nio.discard.server.server;

import java.net.InetSocketAddress;
import java.nio.Buffer;
import java.nio.ByteBuffer;
import java.nio.channels.*;
import java.util.Iterator;

/**
 * nio discard server服务端
 */
public class NioDiscardServer {

    public static void main(String[] args) throws Exception {
        // 1:打开选择器
        Selector selector = Selector.open();
        // 2:获取通道
        ServerSocketChannel serverSocketChannel = ServerSocketChannel.open();
        // 3:设置为非阻塞(阻塞了也就失去了nio的意义了!并且只有非阻塞才支持绑定事件)
        serverSocketChannel.configureBlocking(false);
        // 4:绑定链接
        serverSocketChannel.bind(new InetSocketAddress(18899));
        // 5:注册io事件
        serverSocketChannel.register(selector, SelectionKey.OP_ACCEPT);
        System.out.println("服务器启动成功");

        // 6:阻塞方式轮询感兴趣的通道事件(IO就绪)
        while (selector.select() > 0) {
            // 7:获取封装事件+通道的选择键的集合
            Iterator<SelectionKey> iterator = selector.selectedKeys().iterator();
            while (iterator.hasNext()) {
                // 8:获取某个选择键进行处理
                SelectionKey selectionKey = iterator.next();
                // 9:判断具体的事件,并进行处理
                if (selectionKey.isAcceptable()) {
                    System.out.println("新连接来了:" + selectionKey.channel());
                    // 10:就绪事件,获取客户端的链接(一个个来建立链接???可能不是个问题!!!不太明白这里为什么
                    // 这么写???)
                    SocketChannel socketChannel = serverSocketChannel.accept();
                    // 11:设置为非阻塞
                    socketChannel.configureBlocking(false);
                    // 12:注册到选择器监听相关事件
//                    SelectionKey register = socketChannel.register(selector, SelectionKey.OP_READ | SelectionKey.OP_WRITE | SelectionKey.OP_CONNECT);
                    socketChannel.register(selector, SelectionKey.OP_READ | SelectionKey.OP_WRITE | SelectionKey.OP_CONNECT);
                }
                // 可写事件
                if (selectionKey.isWritable()) {
                    System.out.println("可写啦," + selectionKey.channel());
                }
                if (selectionKey.isConnectable()) {
                    System.out.println("连接成功啦," + selectionKey.channel());
                }
                if (selectionKey.isReadable()) {
                    System.out.println("数据可读啦," + selectionKey.channel());
                    // 13:获取通道,为读取数据做准备啦
                    SocketChannel socketChannel = (SocketChannel) selectionKey.channel();
                    // 14:读取数据啦
                    ByteBuffer byteBuffer = ByteBuffer.allocate(1024);
                    int length = 0;
                    while ((length = socketChannel.read(byteBuffer)) > 0) {
                        // 转成读模式
                        byteBuffer.flip();
                        System.out.println("读取到数据:" + new String(byteBuffer.array(), 0, length));
                        // 恢复成写模式(这里其实不用的,但当个好习惯吧!)
                        byteBuffer.clear();
                    }
                    // 读完消息了,就discard(discard server的体现指出)
                    socketChannel.close();
                }
                // 15:移出选择键,防止重复处理
                iterator.remove();
            }
        }
        System.out.println("discard 啦!!!!!!!!!!!!");
        // 关闭链接(这里应该是执行不到的,因为selector.select啦)
        serverSocketChannel.close();
    }

}代码socketChannel.close();在read消息后,就discard啦!另外,关键步骤的代码看带标号的。
1.2:client
java
package com.dahuyou.nio.discard.server.client;

import io.netty.buffer.ByteBuf;

import java.net.InetSocketAddress;
import java.nio.ByteBuffer;
import java.nio.channels.SocketChannel;

public class NioDiscardClient {

    public static void main(String[] args) throws Exception {
        InetSocketAddress inetSocketAddress
                = new InetSocketAddress("127.0.0.1", 18899);
        // 1:获取通道
        SocketChannel socketChannel = SocketChannel.open(inetSocketAddress);
        // 2:切换成非阻塞
        socketChannel.configureBlocking(false);
        // 不断自旋,等待连接完成
        while (!socketChannel.finishConnect()) {}
        System.out.println("链接server成功");
        // 3:创建缓冲区,填充数据,并向通道写入数据
        ByteBuffer byteBuffer = ByteBuffer.allocate(1024);
        byteBuffer.put("hello discard server".getBytes());
        // 转成读模式,开始读数据写出去
        byteBuffer.flip();
        socketChannel.write(byteBuffer);
        System.out.println("向server写数据done");

        // 关了,释放资源,好习惯
        socketChannel.shutdownOutput();
        socketChannel.close();
    }
}
1.3:运行测试