本节以一个"账本"为例,使用首选项的相关接口实现了对账单的增、删、改、查操作,并使用自动化测试框架arkxtest来对应用进行自动化测试。
为了演示该功能,创建一个名为"ArkTSPreferences"的应用。应用源码可以在文末《跟老卫学HarmonyOS开发》链接找到。
1. 操作Preferences
首先要获取一个Preferences来操作首选项。
在src/main/ets目录下创建名为"common"目录,用于存放常用的工具类。在该common目录创建工具类PreferencesUtil,代码如下:
// 导入preferences模块
import { preferences } from '@kit.ArkData';

import { BusinessError } from '@kit.BasicServicesKit';
import { common } from '@kit.AbilityKit';


let context = getContext(this) as common.UIAbilityContext;
let options: preferences.Options = { name: 'myStore' };

export default class PreferencesUtil {
  private dataPreferences: preferences.Preferences | null = null;

  // 调用getPreferences方法读取指定首选项持久化文件,
  // 将数据加载到Preferences实例,用于数据操作
  async getPreferencesFromStorage() {
    await preferences.getPreferences(context, options).then((data) => {
      this.dataPreferences = data;
      console.info(`Succeeded in getting preferences`);
    }).catch((err: BusinessError) => {
      console.error(`Failed to get preferences, Cause:` + err);
    });
  }
}
复制
为了对数据进行保存、查询、删除查操作,我们要封装对应接口。首选项接口提供的保存、查询、删除方法均有callback和Promise两种异步回调方式,本例子使用了Promise异步回调。代码如下:
// 将用户输入的数据,保存到缓存的Preference实例中
async putPreference(key: string, data: string) {
  if (this.dataPreferences === null) {
    await this.getPreferencesFromStorage();
  } else {
    await this.dataPreferences.put(key, data).then(() => {
      console.info(`Succeeded in putting value`);
    }).catch((err: BusinessError) => {
      console.error(`Failed to get preferences, Cause:` + err);
    });

    // 将Preference实例存储到首选项持久化文件中
    await this.dataPreferences.flush();
  }
}

// 使用Preferences的get方法读取数据
async getPreference(key: string) {
  let result: string= '';
  if (this.dataPreferences === null) {
    await this.getPreferencesFromStorage();
  } else {
    await this.dataPreferences.get(key, '').then((data) => {
      result = data.toString();
      console.info(`Succeeded in getting value`);
    }).catch((err: BusinessError) => {
      console.error(`Failed to get preferences, Cause:` + err);
    });
  }

  return result;
}

// 从内存中移除指定文件对应的Preferences单实例。
// 移除Preferences单实例时,应用不允许再使用该实例进行数据操作,否则会出现数据一致性问题。
async deletePreferences() {

  preferences.deletePreferences(context, options, (err: BusinessError) => {
    if (err) {
      console.error(`Failed to delete preferences. Code:${err.code}, message:${err.message}`);
      return;
    }

    this.dataPreferences = null;
    console.info('Succeeded in deleting preferences.');
  })
}
复制
2. 账目信息的表示
在src/main/ets目录下创建名为"database"目录,并在该database目录下创建类AccountData,代码如下:
export default interface AccountData {
  id: number;
  accountType: number;
  typeText: string;
  amount: number;
}
复制
AccountData各属性含义如下:
- id:主键。
- accountType:账目类型。0表示支出;1表示收入。
- typeText:账目的具体类别。
- amount:账目金额。
3. 设计界面
为了简化程序,突出核心逻辑,我们的界面设计的非常简单,只是一个Text组件和四个Button组件。四个Button组件用于触发增、删、改、查操作,而Text组件用于展示每次操作后的结果。修改Index代码如下:
// 导入PreferencesUtil
import PreferencesUtil from '../common/PreferencesUtil';
// 导入AccountData
import AccountData from '../database/AccountData';

const PREFERENCES_KEY = 'fruit';

@Entry
@Component
struct Index {
  @State message: string = 'Hello World'
  private preferencesUtil = new PreferencesUtil();

  async aboutToAppear() {
    // 初始化首选项
    await this.preferencesUtil.getPreferencesFromStorage();

    // 获取结果
    this.preferencesUtil.getPreference(PREFERENCES_KEY).then(resultData => {
      this.message = resultData;
    });
  }

  build() {
    Row() {
      Column() {
        Text(this.message)
          .id('text_result')
          .fontSize(50)
          .fontWeight(FontWeight.Bold)

        // 增加
        Button(('增加'), { type: ButtonType.Capsule })
          .width(140)
          .fontSize(40)
          .fontWeight(FontWeight.Medium)
          .margin({ top: 20, bottom: 20 })
          .onClick(() => {
            // 保存数据
            let newAccount: AccountData = { id: 1, accountType: 0, typeText: '苹果', amount: 0 };
            this.preferencesUtil.putPreference(PREFERENCES_KEY, JSON.stringify(newAccount));
          })

        // 查询
        Button(('查询'), { type: ButtonType.Capsule })
          .width(140)
          .fontSize(40)
          .fontWeight(FontWeight.Medium)
          .margin({ top: 20, bottom: 20 })
          .onClick(() => {
            // 获取结果
            this.preferencesUtil.getPreference(PREFERENCES_KEY).then(resultData => {
              this.message = resultData;
            });
          })

        // 修改
        Button(('修改'), { type: ButtonType.Capsule })
          .width(140)
          .fontSize(40)
          .fontWeight(FontWeight.Medium)
          .margin({ top: 20, bottom: 20 })
          .onClick(() => {
            // 修改数据
            let newAccount: AccountData = { id: 1, accountType: 1, typeText: '栗子', amount: 1 };
            this.preferencesUtil.putPreference(PREFERENCES_KEY, JSON.stringify(newAccount));
          })

        // 删除
        Button(('删除'), { type: ButtonType.Capsule })
          .width(140)
          .fontSize(40)
          .fontWeight(FontWeight.Medium)
          .margin({ top: 20, bottom: 20 })
          .onClick(() => {
            this.preferencesUtil.deletePreferences();
          })
      }
      .width('100%')
    }
    .height('100%')
  }
}
复制上述代码,在aboutToAppear生命周期阶段,初始化了Preferences。点击"新增"会将预设好的数据"{ id: 1, accountType: 0, typeText: '苹果', amount: 0 }"写入到Preferences。点击"修改"会将预设好的"{ id: 1, accountType: 1, typeText: '栗子', amount: 1 }"的数据更新到Preferences。点击"删除"则会从内存中移除指定文件对应的Preferences单实例。
4. 运行
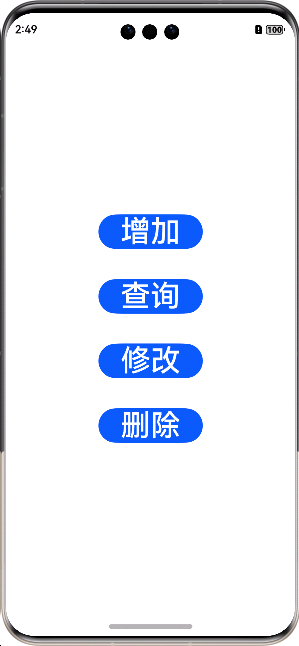
运行应用显示的界面效果如下图所示。

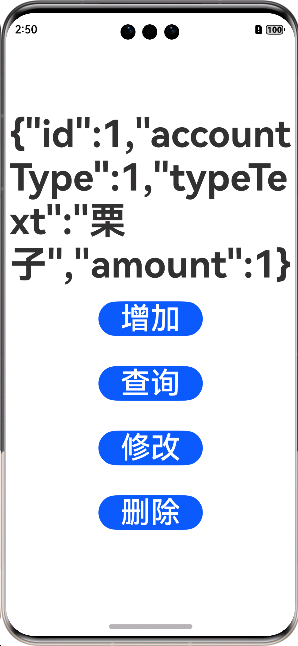
当用户点击"增加"后再点击"查询"时,界面如下图所示,证明数据已经成功写入Preferences。

当用户点击"修改"后再点击"查询"时,界面如下图所示,证明数据已经被修改并更新回Preferences。
当用户点击"删除"后再点击"查询"时,界面如下图所示,证明数据已经从Preferences删除。
5. 编写UI测试脚本
UI测试基于单元测试,UI测试脚本在单元测试脚本上增加了对UiTest接口,具体请参考API文档。
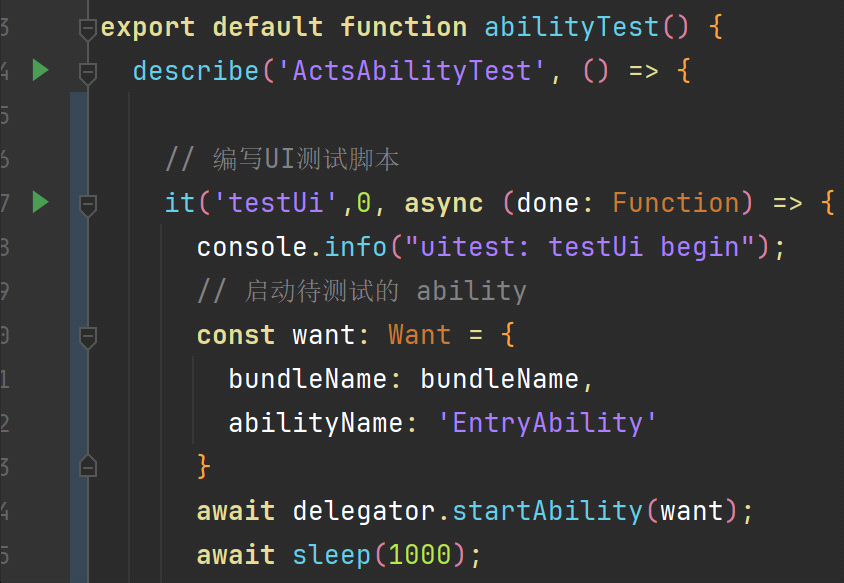
如下的示例代码是在上面的单元测试脚本基础上增量编写,实现的是在启动的应用页面上进行点击操作,然后检测当前页面变化是否为预期变化。
在"ohosTest/ets/test/"目录下,是专门用于存放具体测试代码的。在该目录下,已经存在了一个测试用例样板代码Ability.test.ets文件,基于该文件进行编写UI测试脚本。修改后,代码如下:
import { describe, it, expect } from '@ohos/hypium';
import { abilityDelegatorRegistry, Driver, ON } from '@kit.TestKit';
import { UIAbility, Want } from '@kit.AbilityKit';
import AccountData from '../../../main/ets/database/AccountData';

const delegator: abilityDelegatorRegistry.AbilityDelegator = abilityDelegatorRegistry.getAbilityDelegator()
const bundleName = abilityDelegatorRegistry.getArguments().bundleName;

function sleep(time: number) {
  return new Promise<void>((resolve: Function) => setTimeout(resolve, time));
}

export default function abilityTest() {
  describe('ActsAbilityTest', () => {

    // 编写UI测试脚本
    it('testUi',0, async (done: Function) => {
      console.info("uitest: testUi begin");
      // 启动待测试的 ability
      const want: Want = {
        bundleName: bundleName,
        abilityName: 'EntryAbility'
      }
      await delegator.startAbility(want);
      await sleep(1000);

      // 检查顶层显示的 ability
      await delegator.getCurrentTopAbility().then((Ability: UIAbility)=>{
        console.info("get top ability");
        expect(Ability.context.abilityInfo.name).assertEqual('EntryAbility');
      })

      // UI 测试代码
      // 初始化driver
      let driver = Driver.create();
      await driver.delayMs(1000);

      // 查找'增加'按钮
      let buttonAdd = await driver.findComponent(ON.text('增加'));

      // 点击按钮
      await buttonAdd.click();
      await driver.delayMs(1000);

      // 查找'查询'按钮
      let buttonQuery = await driver.findComponent(ON.text('查询'));

      // 点击按钮
      await buttonQuery.click();
      await driver.delayMs(1000);

      // 查找 id 为'text_result'的 Text 组件
      let text = await driver.findComponent(ON.id('text_result'));

      // 检查文本内容
      await text.getText().then(result => {
        let newAccount: AccountData = { id: 1, accountType: 0, typeText: '苹果', amount: 0 };

        expect(result).assertEqual(JSON.stringify(newAccount))
      });

      done();
    })

  })
}
复制
上述代码主要做了以下几件事:
- 查找增加按钮,并进行点击;
- 查找查询按钮,并进行点击;
- 查找Text组件,断言该Text组件文本内容是否与期望的值一致。
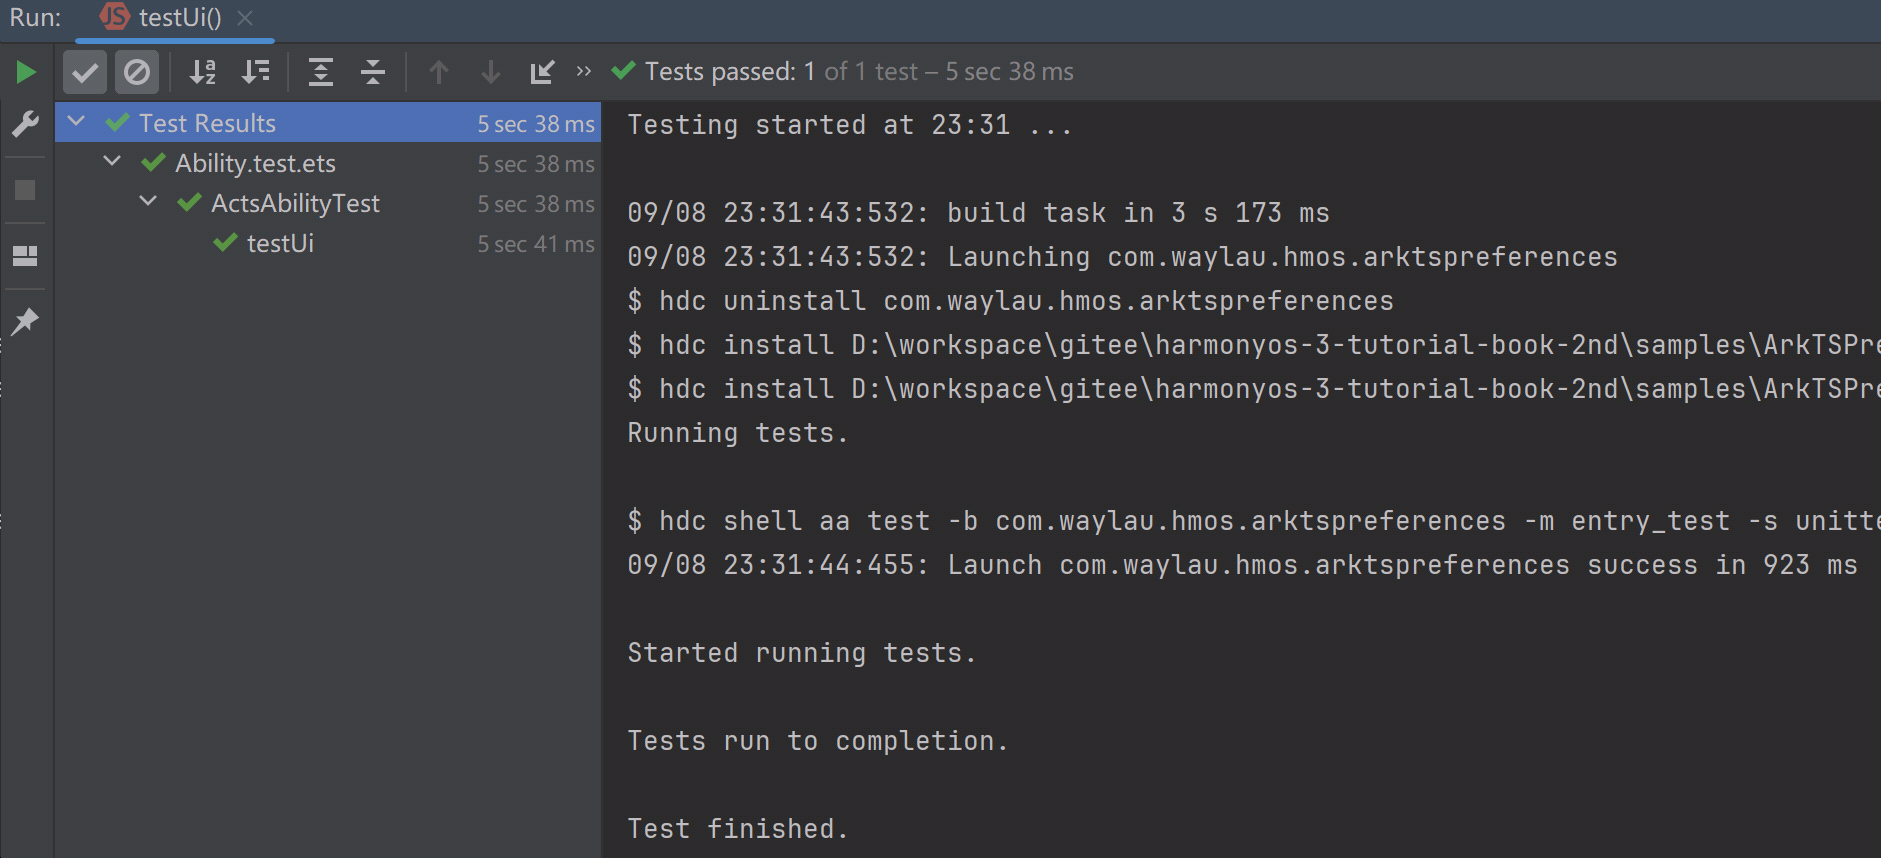
6. 运行UI测试脚本
首先,启动模拟器或者真机。在模拟器或者真机上安装应用。
其次,点击如下图13-1所示的测试用例的左侧三角按钮,以运行测试脚本。
如果断言成功,则说明测试通过,可以看到如下绿色打勾的标识。
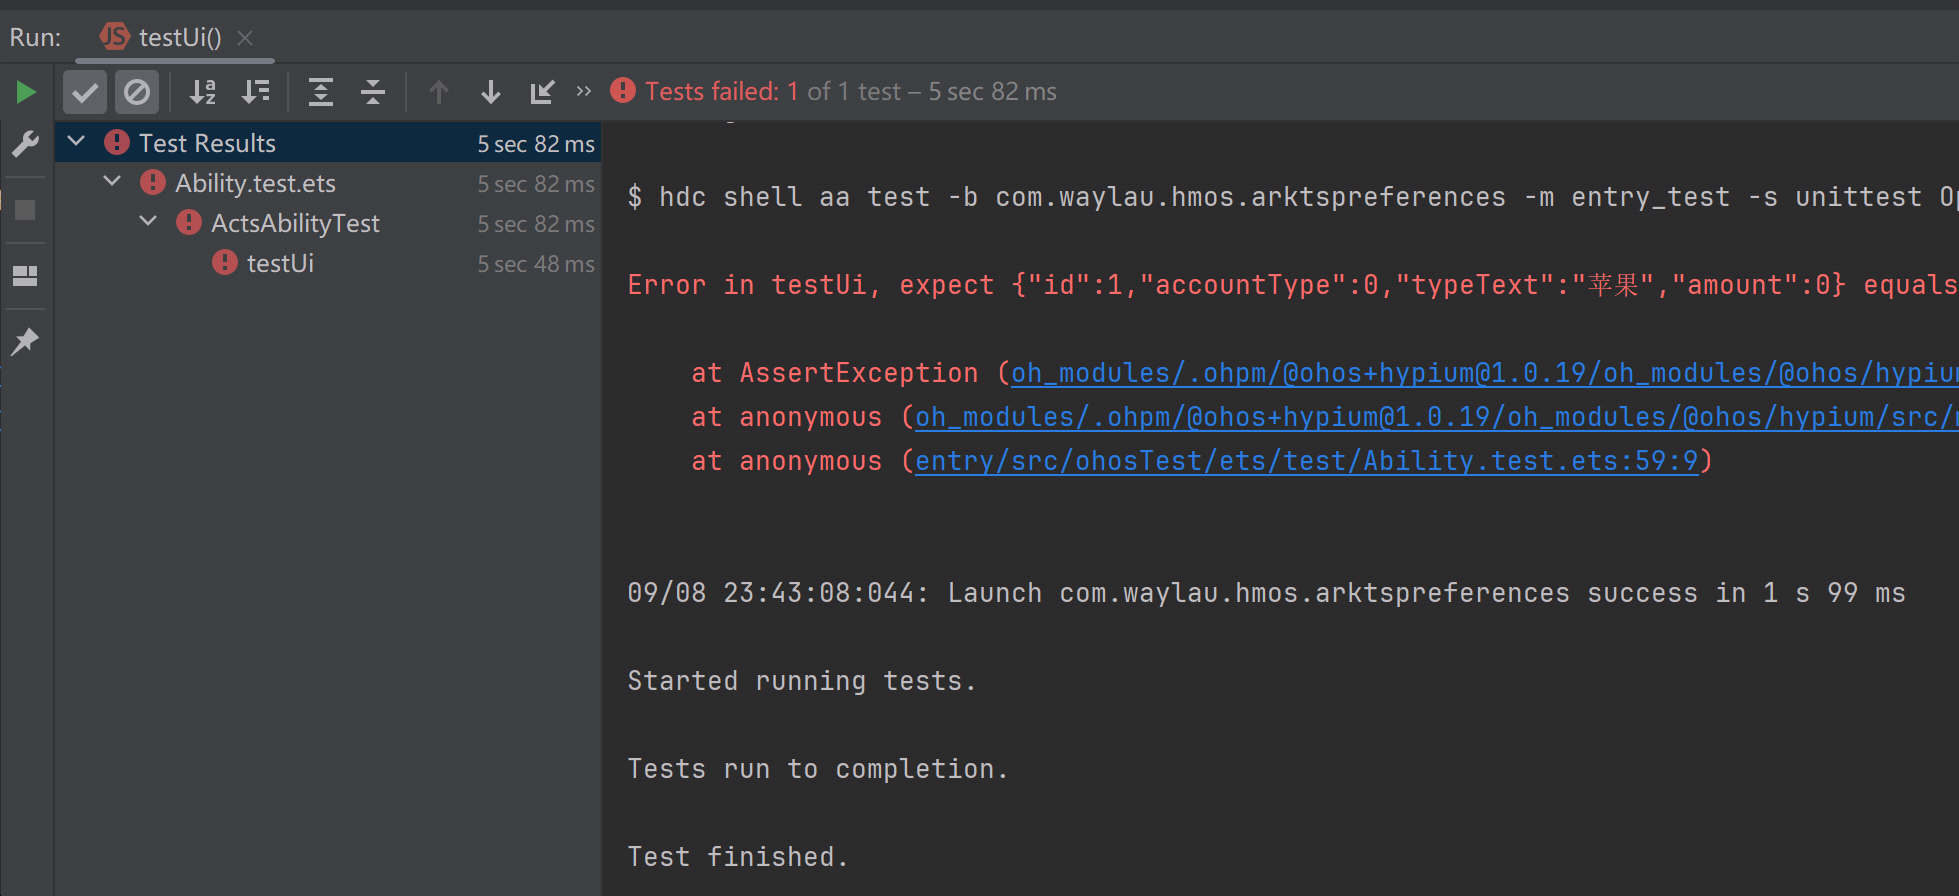
如果断言失败,则说明测试没有通过,可以看到如下红色告警标识,并会提示断言失败的原因。
7. 参考
- 《跟老卫学HarmonyOS开发》 开源免费教程,GitHub - waylau/harmonyos-tutorial: HarmonyOS Tutorial. 《跟老卫学HarmonyOS开发》
- 《鸿蒙HarmonyOS手机应用开发实战》(清华大学出版社)
- 《鸿蒙HarmonyOS应用开发从入门到精通战》(北京大学出版社)
- "鸿蒙系统实战短视频App 从0到1掌握HarmonyOS"(鸿蒙系统实战短视频App 从0到1掌握HarmonyOS_实战课程_慕课网)
- 《鸿蒙HarmonyOS应用开发入门》(清华大学出版社)
- "2024鸿蒙零基础快速实战-仿抖音App开发(ArkTS版)"(2024 鸿蒙零基础快速实战-仿抖音App开发( ArkTS版 )_实战课程_慕课网)