基于QPushButton实现自定义的圆形按键指示灯类tQCircularButton
-
- 基于QPushButton实现自定义的圆形按键指示灯类tQCircularButton
- 前言
- 正文
- 1、Qt样式表
-
- [1.1 Qt样式表](#1.1 Qt样式表)
- [1.2 样式属性](#1.2 样式属性)
- 2、设置Qt样式表
- 3、tQCircularButton类
- 4、使用示例
基于QPushButton实现自定义的圆形按键指示灯类tQCircularButton
前言
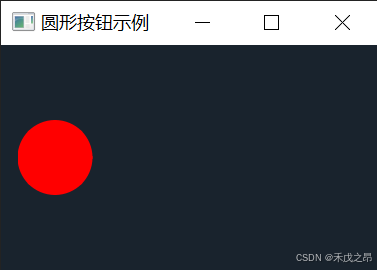
在 GUI 界面开发中,我们经常会用到圆形按键指示灯来做提示,在 PyQt 中没有这样的类可以直接使用,所以本文介绍一种方法,基于 QPushButton 实现自定义的圆形按键指示灯类,最终实现如下图所示:

正文
1、Qt样式表
1.1 Qt样式表
PySide 中的 Qt 样式表(Qt Style Sheets,简称 QSS)是一种强大的机制,允许开发者自定义 Qt 应用程序中窗口小部件(widgets)的外观。QSS 的概念和语法在很大程度上受到 HTML 级联样式表(CSS)的启发,但专为 Qt 应用程序中的小部件设计。
1.2 样式属性
QSS 支持多种样式属性,以下是一些常用的属性:
- 背景 :
background-color、background-image、background-repeat等,用于设置小部件的背景; - 边框 :
border、border-style、border-width、border-color等,用于设置小部件的边框样式; - 字体 :
font-family、font-size、color等,用于设置小部件中文本的字体和颜色; - 边距与填充 :
margin、padding等,用于设置小部件内容与其边框之间的空间。
2、设置Qt样式表
那想要实现圆形按键,就需要通过 Qt 样式表来对 QPushButton 对象进行设置,重点是 border-radius,这个关键属性,它决定了边框的圆角程度。
python
        # 设置形状为圆形 初始样式表,使用f-string来插入直径的一半作为border-radius
        self.setStyleSheet(f"""
            QPushButton {{
                border-radius: {self.diameter // 2}px;
                padding: 0;
            }}
        """)
3、tQCircularButton类
那基于以上介绍,就可以得到自定义的圆形按键指示灯
python
from tModels.tResource import *
import qdarkstyle
from qdarkstyle.dark.palette import DarkPalette  # noqa: E402
from qdarkstyle.light.palette import LightPalette  # noqa: E402


# 自定义圆形按钮指示灯,可以设置颜色;
class ctQCircularButton(QPushButton):
    # 构造函数
    def __init__(self, diameter=50, background_color="#8191B6", parent=None):
        super().__init__(parent)
        self.diameter = diameter
        self.background_color = background_color
        # 设置按钮的固定大小
        self.setFixedSize(self.diameter, self.diameter)
        # 设置按钮样式为圆形和深色模式
        self.f_recoverFunc()

    # 指示按键设置颜色函数
    def f_setColorFunc(self, is_active):
        """
        function:  指示按键设置颜色函数
              in:  is_active: 布尔值,True为绿色,False为红色
             out:  None
          return:  None
          others:  CircularButton Set Color Func
        """
        color = "#00FF7F" if is_active else 'red'
        # 更新样式表,使用f-string来插入新的颜色
        self.setStyleSheet(f"""
            QPushButton {{
                border: 2px solid {color};
                border-radius: {self.diameter // 2}px;
                color: black;
                background-color: {color};
                padding: 0;
            }}
        """)

    # 设置按钮样式为圆形和深色模式
    def f_recoverFunc(self):
        """
        function:  设置按钮样式为圆形和深色模式
              in:  None
             out:  None
          return:  None
          others:  Set Button Style Func
        """
        # 指示按键设置深色主题
        self.setStyleSheet(qdarkstyle.load_stylesheet(qt_api='pyside6', palette=DarkPalette))
        # 设置形状为圆形 初始样式表,使用f-string来插入直径的一半作为border-radius
        self.setStyleSheet(f"""
            QPushButton {{
                border-radius: {self.diameter // 2}px;
                padding: 0;
            }}
        """)
在以上代码中,引入了 qdarkstyle 的深色主题。
4、使用示例
python
from PySide6.QtWidgets import QPushButton, QApplication, QWidget, QVBoxLayout
import qdarkstyle
from qdarkstyle.dark.palette import DarkPalette  # noqa: E402
from qdarkstyle.light.palette import LightPalette  # noqa: E402


class ctQCircularButton(QPushButton):
    # 构造函数
    def __init__(self, diameter=50, background_color="#8191B6", parent=None):
        super().__init__(parent)
        self.diameter = diameter
        self.background_color = background_color
        # 设置按钮的固定大小
        self.setFixedSize(self.diameter, self.diameter)
        # 设置按钮样式为圆形和深色模式
        self.f_recoverFunc()

    # 指示按键设置颜色函数
    def f_setColorFunc(self, is_active):
        """
        function:  指示按键设置颜色函数
              in:  is_active: 布尔值,True为绿色,False为红色
             out:  None
          return:  None
          others:  CircularButton Set Color Func
        """
        color = "#00FF7F" if is_active else 'red'
        # 更新样式表,使用f-string来插入新的颜色
        self.setStyleSheet(f"""
            QPushButton {{
                border: 2px solid {color};
                border-radius: {self.diameter // 2}px;
                color: black;
                background-color: {color};
                padding: 0;
            }}
        """)

    # 设置按钮样式为圆形和深色模式
    def f_recoverFunc(self):
        """
        function:  设置按钮样式为圆形和深色模式
              in:  None
             out:  None
          return:  None
          others:  Set Button Style Func
        """
        # 指示按键设置深色主题
        self.setStyleSheet(qdarkstyle.load_stylesheet(qt_api='pyside6', palette=DarkPalette))
        # 设置形状为圆形 初始样式表,使用f-string来插入直径的一半作为border-radius
        self.setStyleSheet(f"""
            QPushButton {{
                border-radius: {self.diameter // 2}px;
                padding: 0;
            }}
        """)


class MainWindow(QWidget):
    def __init__(self):
        super().__init__()
        self.setStyleSheet(qdarkstyle.load_stylesheet(qt_api='pyside6', palette=DarkPalette))
        self.initUI()

    def initUI(self):
        layout = QVBoxLayout()

        # 创建圆形按钮
        btn = ctQCircularButton(50)
        layout.addWidget(btn)

        # 示例:改变颜色
        btn.f_setColorFunc(True)  # 变为绿色
        # btn.f_setColorFunc(False)  # 变为红色,取消上面这行的注释来查看效果

        self.setLayout(layout)
        self.setWindowTitle('圆形按钮示例')
        self.setGeometry(100, 100, 200, 150)


if __name__ == '__main__':
    app = QApplication([])
    ex = MainWindow()
    ex.show()
    app.exec()
也可以根据自己的需要进行其他设置,如边框的颜色、边框的粗细等。