一、什么是pytest
单元测试框架,unittest(python自带的),pytest(第三方库)。
用于编写测试用例、收集用例、执行用例、生成测试结果文件(html、xml)
1.1、安装pytest
pip install pytest1.2、导入
import pytest二、步骤
2.1、TestCase(测试用例)
2.1.1、创建测试类
1)类名要以Test开头
class TestData:2.1.2、测试用例函数
1)可以直接用函数、类的形式
2)函数名必须是test_开头
3)执行顺序,按照从上到下的代码顺序执行
def test_data():        #测试函数
    print("test_data")

class TestData:
    def test_hello(self):    #测试函数
        print("test_hello")
2.1.3、前置后置(fixture)
      前置:环境准备、数据准备
      后置:清理工作、数据清理
pytest的fixture有2种实现方式:
2.1.3.1、xunit-style
跟unittest框架的机制非常相似,即setup/teardown系列
1、测试函数/方法级别:每一个测试函数都会执行的前置和后置。
1)测试类内部的测试方法:
前置函数名称:setup_method
后置函数名称:teardown_method
2)模块下的测试函数:
前置函数名称:setup_function
后置函数名称:teardown_function
2、测试类级别:一个测试类只执行一次前置和后置。
前置函数名称:setup_class
后置函数名称:teardown_class
注意:用@classmethod装饰
3、测试模块级别:一个测试模块只执行一次前置和后置。
前置函数名称:setup_module
后置函数名称:teardown_module
from selenium import webdriver
from time import sleep
from random import randint

def setup_module():
    print("====  模块级的 setup 操作  ====")

def teardown_module():
    print("====  模块级的 teardown 操作  ====")

def test_random():
    assert randint(1, 5) == 3

class TestWeb:

    @classmethod
    def setup_class(cls):
        print("====  测试类级的 setup 操作  ====")

    @classmethod
    def teardown_class(cls):
        print("====  测试类级的 teardown 操作  ====")

    def setup_method(self):
        print("====  测试用例级的 setup 操作  ====")
        self.driver = webdriver.Chrome()

    def teardown_method(self):
        print("====  测试用例级的 teardown 操作  ====")
        self.driver.quit()

    def test_search(self):
        self.driver.get("https://www.baidu.com/")
        self.driver.find_element_by_id("kw").send_keys("柠檬班")
        self.driver.find_element_by_id("su").click()
        sleep(1)
2.1.3.2、fixture机制
** 通过@pytest.fixture装饰器来定义fixture**
1、fixture定义
1)fixture通过函数实现
2)使用**@pytest.fixture**进行装饰
3)前置和后置都放在同一个函数当中,通过yeild关键字区分前置和后置,yeild前面的为前置,yeild后面的为后置
import pytest

@pytest.fixture
def init():
    print("用例执行之前,执行的代码")  # 前置代码
    yield
    print("用例执行之后,执行的代码")  # 后置代码

@pytest.fixture
def init2():
    print("用例执行之前,执行的代码")  # 只有用例执行之前的前置准备代码

@pytest.fixture
def init3():
    yield
    print("用例执行之后,执行的代码")  # 只有用例执行之后的后置清理代码
4)fixture有4个作用域:测试会话(session)、测试模块(module)、测试类(class)、测试用例(function)
设置fixture的作用域,通过@pytest.fixture(scope=作用域)来设置。默认情况下,scope=function
import pytest

# 没有设置scope,默认为测试函数级别。即调用此fixture的测试类/模块/函数下,每个测试函数都会执行一次这个fixture
@pytest.fixture
def init():
    print("用例执行之前,执行的代码")  # 前置代码
    yield
    print("用例执行之后,执行的代码")  # 后置代码

# 设置scope为class。调用此fixture的测试类下,只执行一次这个fixture.
@pytest.fixture(scope="class")
def init2():
    print("用例执行之前,执行的代码")  # 只有用例执行之前的前置准备代码

# 设置scope为session。autouse表示自动使用。
# 那么在pytest收集用例后,开始执行用例之前会自动化执行这个fixture当中的前置代码,
# 当所有用例执行完成之后,自动化执行这个fixture的后置代码。
@pytest.fixture(scope="session",autouse=True)
def init3():
    yield
print("用例执行之后,执行的代码") # 只有用例执行之后的后置清理代5)fixture的返回值设置:yeild 返回值
如果前置准备工作当中,有变量要传递给测试用例去使用的话,那么就需要返回这个变量,可以有多个返回值,返回值是个元组。
yeild 返回值,返回值2,返回值3
yield mysql_obj,True,1232、fixture调用
2.1、自动调用:定义fixture有个参数:autouse,默认autouse=False
自动调用时,所有的测试函数都会调用一次,所以只有session作用域时才适用。
import pytest

@pytest.fixture(autouse=True)           #自动调用
def init():
    print("===我是前置准备工作===")
    yield
    print("***我是后置清理工作***")

@pytest.fixture(scope="class")
def init_class():
    print("===我是测试类  前置准备工作===")
    yield
    print("***我是测试类  后置清理工作***")

def test_hello():
    print("hello pytest!!")

class Test_demo:
    def test_bey(self):
        print("bey pytest!!")
2.2、主动调用:测试函数/测试类上加上:@pytest.mark.usefixtures("fixture的函数名称"),可以调用多个。
当调用两个同级别的fixture函数时,按就近原则调用
1)无需接收fixture返回值
import pytest
from random import randint

#测试类级别
@pytest.fixture(scope="class")
def init_class():
    print("===我是 测试类  前置准备工作===")
    mysql_obj = "fixture要返回出去的数据库对象"
    yield mysql_obj,True,123  # 返回一个变量/对象
    print("***我是 测试类  后置清理工作***")

# 测试函数级别
@pytest.fixture()
def init():
    print("===我是前置准备工作===")
    yield
    print("***我是后置清理工作***")

# 测试函数级别
@pytest.fixture()
def init2():
    print("===我是前置准备工作2===")
    yield
    print("***我是后置清理工作2***")

@pytest.mark.usefixtures("init")        #去执行名为init的fixture函数
@pytest.mark.usefixtures("init2")       #当调用两个同级别的fixture函数时,就近原则,先调用init2,再调用init
def test_hello():
    print("hello pytest!!")

def test_demo():                        #无前置后置
    print("hello world")

@pytest.mark.usefixtures("init_class")      #执行名为init_class测试类级别的前置后置
@pytest.mark.usefixtures("init")            #当调用两个不同级别的fixture函数时,先调用init_class,再每个函数调用init
class TestDemo:

    def test_random(self):
        assert randint(3, 3) == 3

    def test_abc(self):
        assert True

    @pytest.mark.usefixtures("init2")           #当类内部函数有调用时,就近原则,先调用init2,再调用init
    def test_bey(self):
        print("bey pytest!!")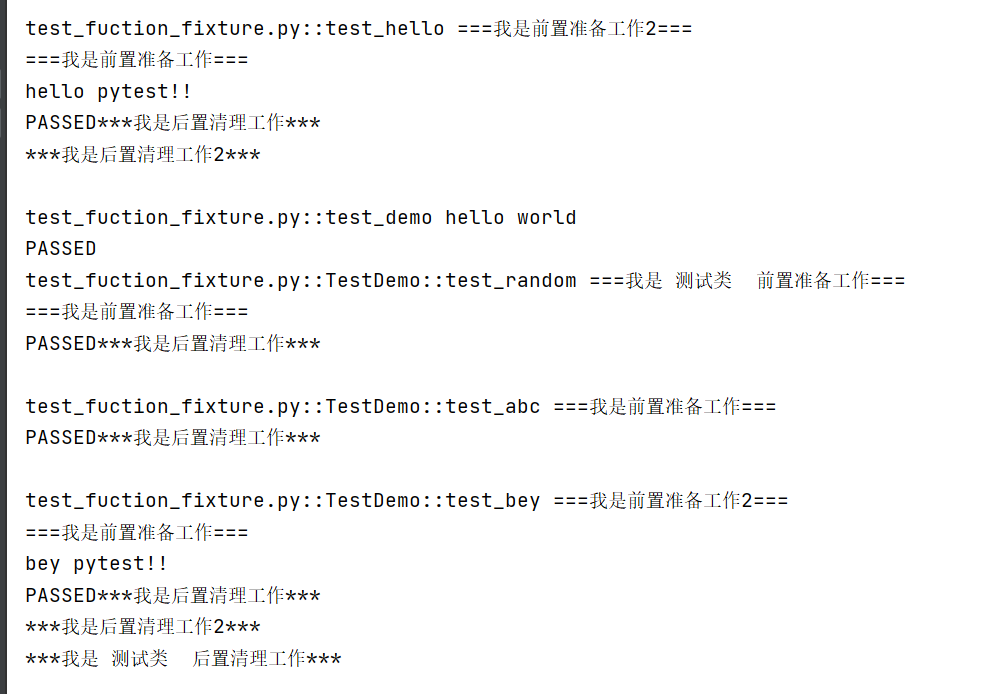
2)要接收fixture返回值:fixture的函数名作为用例的参数,相当于fixture函数名 = fixture调用的返回值
当fixture函数名作为测试用例参数时,在执行用例时,会自动寻找该函数的fixture,并执行。
ps:pytest当中的测试用例,如果有参数,分为2种:
1、fixture的名字
def test_random(self,init_class)
  pass
2、参数化要传的参数
@pytest.mark.parametrize("case",datas)
def test_read_datas(case):
passimport pytest
from random import randint
# 测试类级别
@pytest.fixture(scope="class")
def init_class():
print("===我是 测试类 前置准备工作===")
mysql_obj = "fixture要返回出去的数据库对象"
yield mysql_obj,True,123 # 返回一个变量/对象
print("***我是 测试类 后置清理工作***")
#@pytest.mark.usefixtures("init_class") # 当fixture函数名作为测试用例参数时,在执行用例时,会自动寻找该函数名并执行,所以这个可以不写
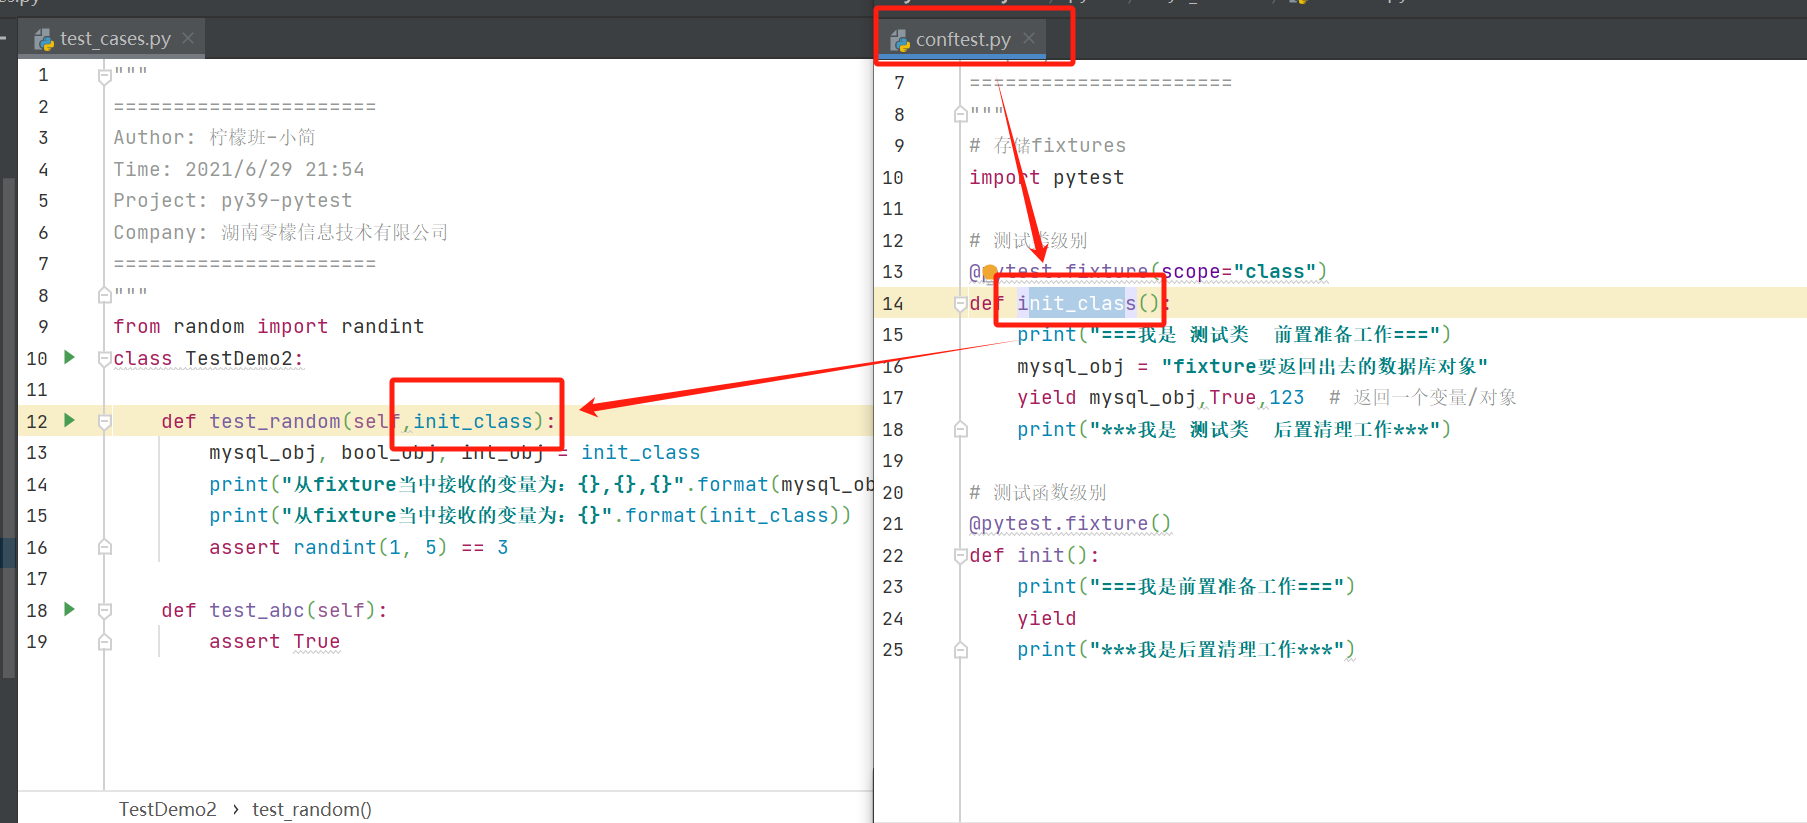
class TestDemo2:
def test_random(self,init_class): # fixture的名字作为用例的参数,相当于fixture名字 = fixture调用的返回值
mysql_obj, bool_obj, int_obj = init_class
print("从fixture当中接收的变量为:{}".format(init_class))
assert randint(1, 5) == 3
def test_abc(self):
assert True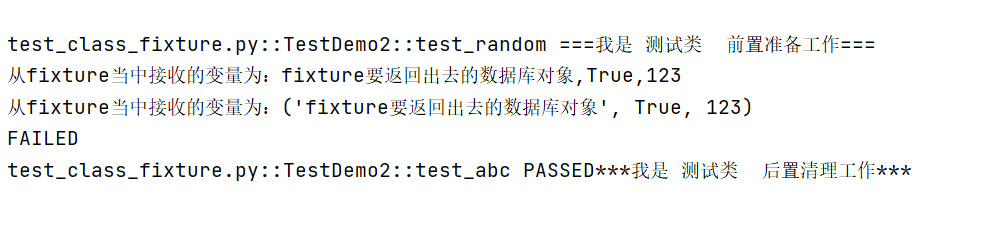
2.1.3.3、conftest.py共享机制
1、共享实现
1)在项目根目录下,创建一个conftest.py文件。
2)文件名必须是conftest.py,大小写敏感,不可改名字。
3)conftest.py当中,可以编写多个fixture
4)在测试用例文件当中,不需要引入conftest.py文件。直接调用fixture的函数名,会自动去conftest.py当中查找的。
2、conftest.py层级作用域
conftest.py在项目根目录下,则项目下的所有测试用例,均可使用conftest.py中定义的fixture。即项目根目录下的conftest.py,作用域是整个项目。
根目录下的conftest.py里的fixture,无论项目下的哪个用例,都可以使用。
子目录day3-login下的conftest.py里的fixture,只有day3-login下的用例可以使用。
子目录day3-register下的conftest.py里的fixture,只有day3-register下的用例可以使用。
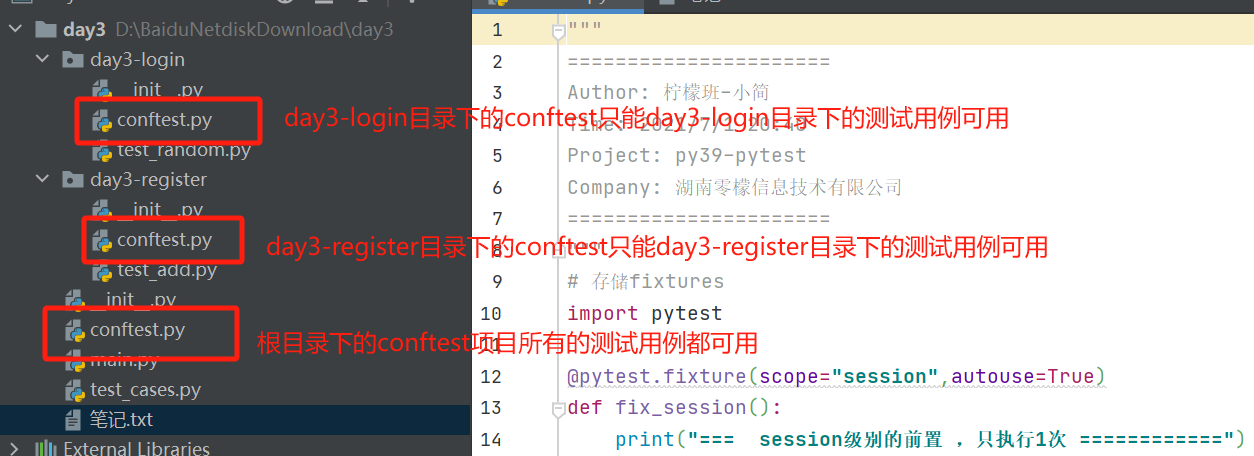
测试用例在执行时,调用fixture的顺序,按 就近原则 调用。
测试用例文件中的fixture > 当前目录中的fixture > 上级目录中的fixture > 根目录中的fixture
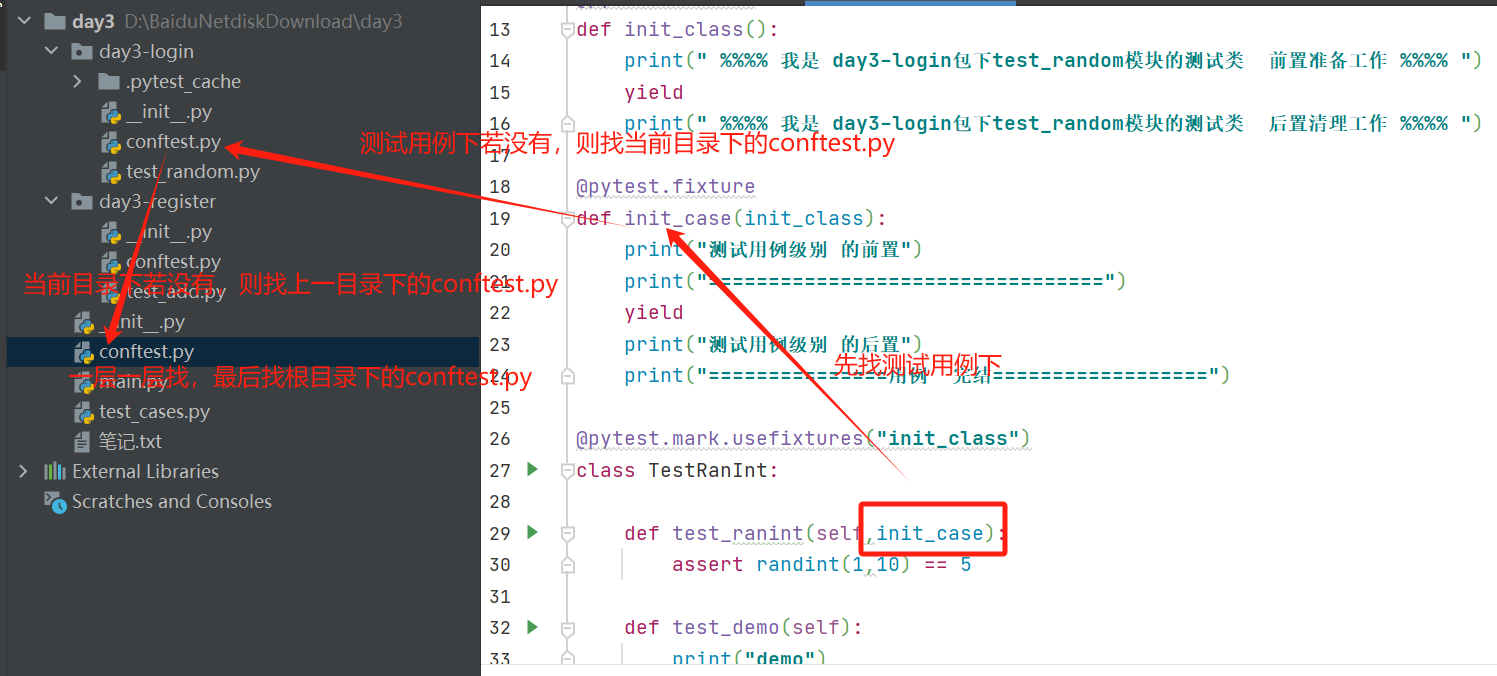
2.1.3.4、fixture嵌套
** 嵌套使用即:一个fixture,可以做另外一个fixture的参数,自动调用参数的fixture。**
注意:由于参数里的fixture要先执行,所以参数里的fixture的作用域 >= fixture的作用域。
@pytest.fixture
def init_class():
    print(" %%%% 我是 day3-login包下test_random模块的测试类  前置准备工作 %%%% ")
    yield
    print(" %%%% 我是 day3-login包下test_random模块的测试类  后置清理工作 %%%% ")

@pytest.fixture
def init_case(init_class):      #init_class作为init_case的参数,当用例调用init_case时,init_case会自动调用init_class
    print("测试用例级别 的前置")
    print("=================================")
    yield
    print("测试用例级别 的后置")
    print("===============用例  完结==================")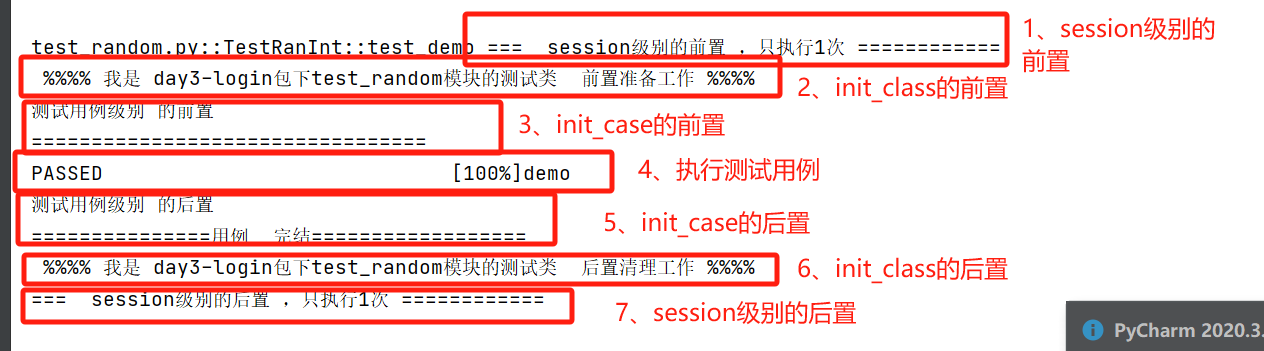
2.1.3.5、session 和 module 级别的 fixture
1)session 级别的 fixture
从 pytest 开始收集用例,到执行用例完成的整个过程,为一次会话,可以设置 autouse=True
import pytest

@pytest.fixture(scope="session",autouse=True)
def fix_session():
    print("===  session级别的前置 ,只执行1次 ============")
    yield True
    print("===  session级别的后置 ,只执行1次 ============")
2)module 级别的 fixture
module 是指测试 py 文件,夹具夹的是整个 test_*.py 文件里的测试用例。
在 test_*.py 里,哪一行代码调用了 module 级别的 fixture,那么夹的就是那行代码之后的所有测试用例。
import pytest

@pytest.fixture(scope="module")
def fix_module():
    print("===  module级别的 前置 ======")
    yield
    print("===  module级别的 后置 ======")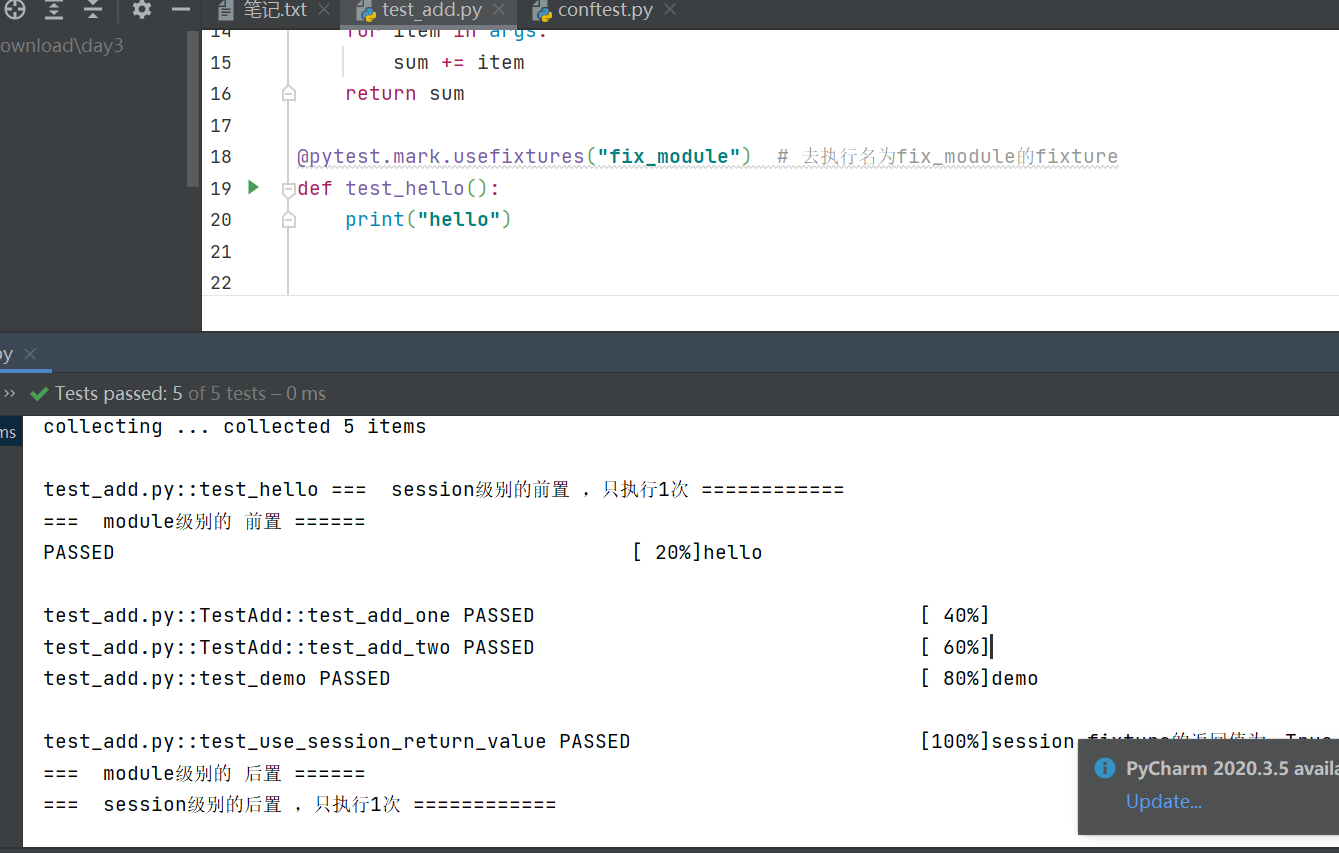
2.1.4、断言
将预期结果与实际结果进行对比
assert 表达式(True表示断言为真,False表示断言失败)
assert a==b2.2、用例收集:自动收集
1)pytest自动收集用例规则:在当前文件所在的目录下,收集文件名为test_*.py或*_test.py的测试文件中,以test_开头的测试用例或Test开头的测试类。
2)pytest.main():以当前文件所在的目录下,收集用例并执行。
pytest.main(["-s","-v"])3)用例分类执行
pytest.main(["day1/test_case1.py"]) #只执行day1目录下test_case1.py文件的测试用例2.3、TestRunner(用例执行)
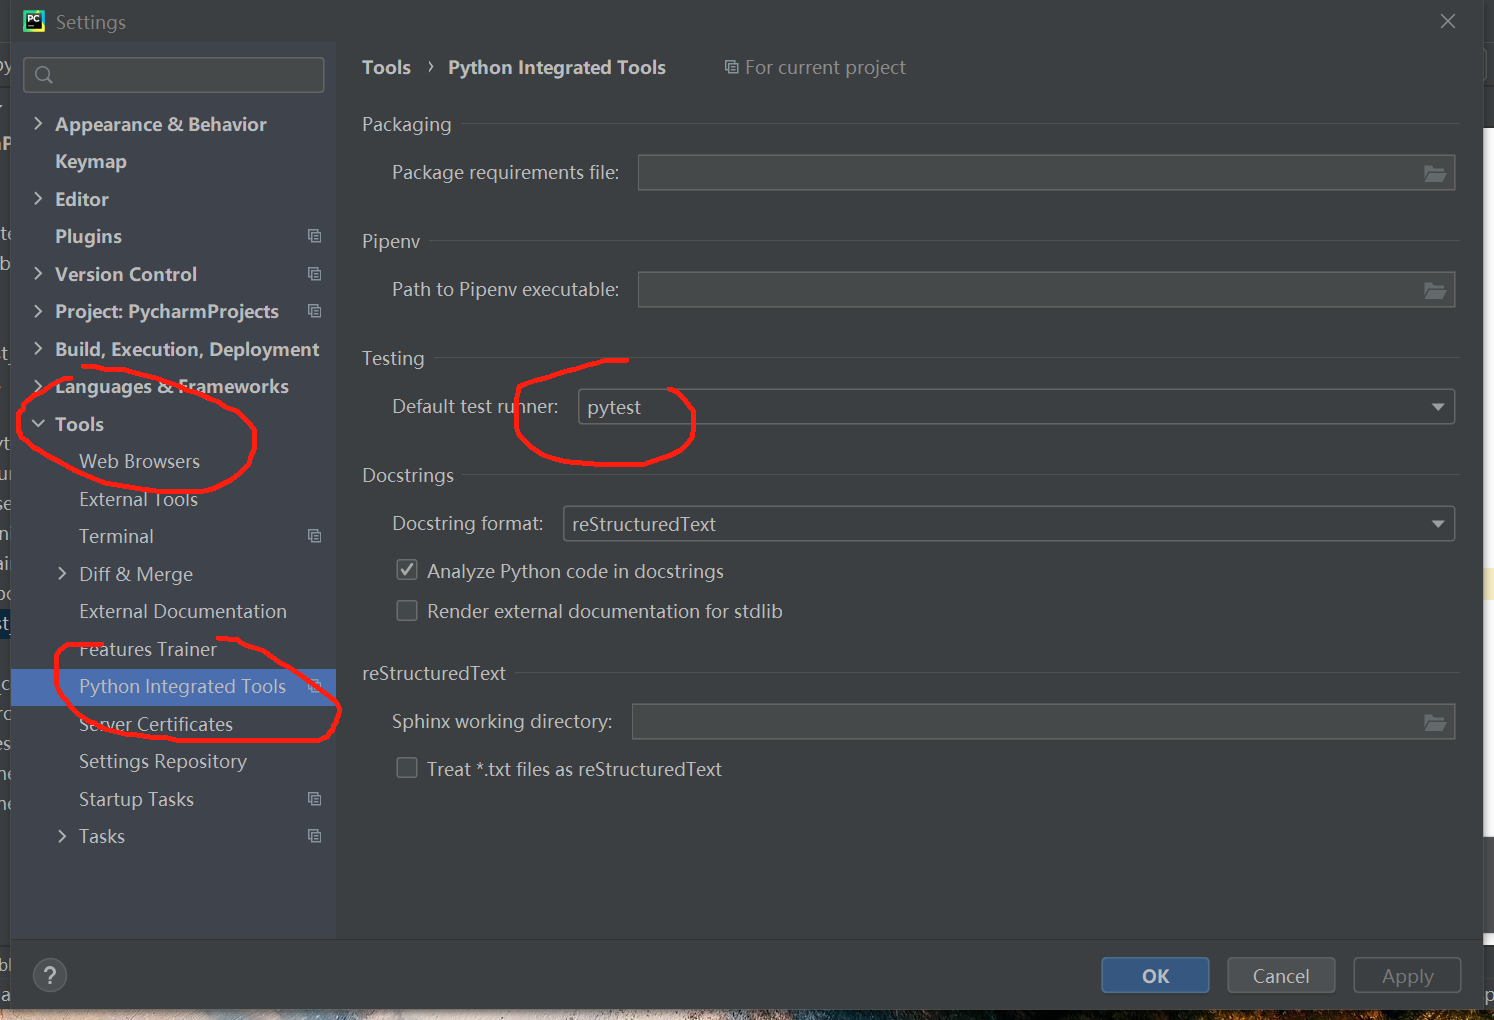
1)需要配置执行器:File>>>Settings>>>Tools>>>Python Integrated Tools>>>Default test runner:pytest
2)执行顺序:测试文件顺序按ASCII码,文件内部测试用例按代码顺序执行
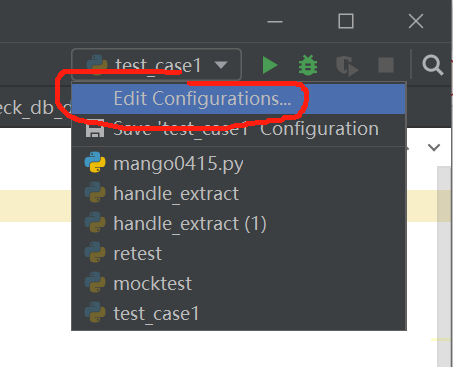
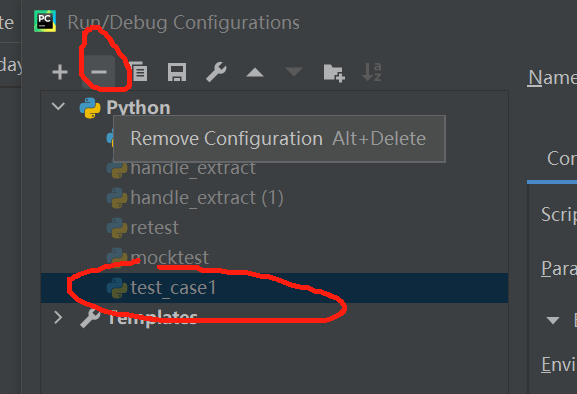
3)若py文件执行过一次后,会保留上一次执行的方式,需要清除上一次执行记录。右上角------Edit Configurations------Remove掉该py文件。
2.4、生成测试报告
2.4.1、生成JunitXML 格式的测试报告
命令:--junitxml=path
2.4.2、生成result log格式的测试报告
命令:--resultlog=report\log.txt
2.4.3、生成Html格式的测试报告
1)安装pytest-html插件
pip install pytest-html2)在pytest.main()的参数当中添加:--html=报告路径
pytest.main(["-s","-v","--html=report.html"]) #生成html格式的测试报告2.4.4、生成allure的测试文件
2.4.4.1、allure是依据测试结果文件,呈现更好看的更多维度的测试报告。
注意:它不执行用例也不生成测试结果文件。所以,要使用allure的时候,一定要先生成测试结果文件。allure需要依赖测试框架,执行测试用例后,根据测试结果再生成测试报告。
2.4.4.2、allure的使用
1、安装allure命令行工具
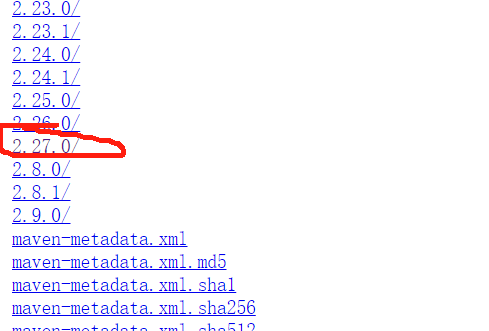
1)下载allure安装包。下载地址:https://repo.maven.apache.org/maven2/io/qameta/allure/allure-commandline/
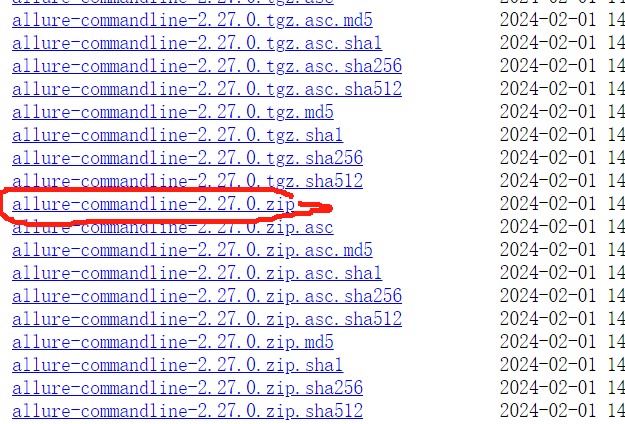
2)下载完成之后,解压到任意目录
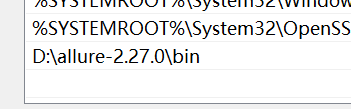
3)配置环境变量:allure的bin目录。比如D:\allure-2.12.1\bin
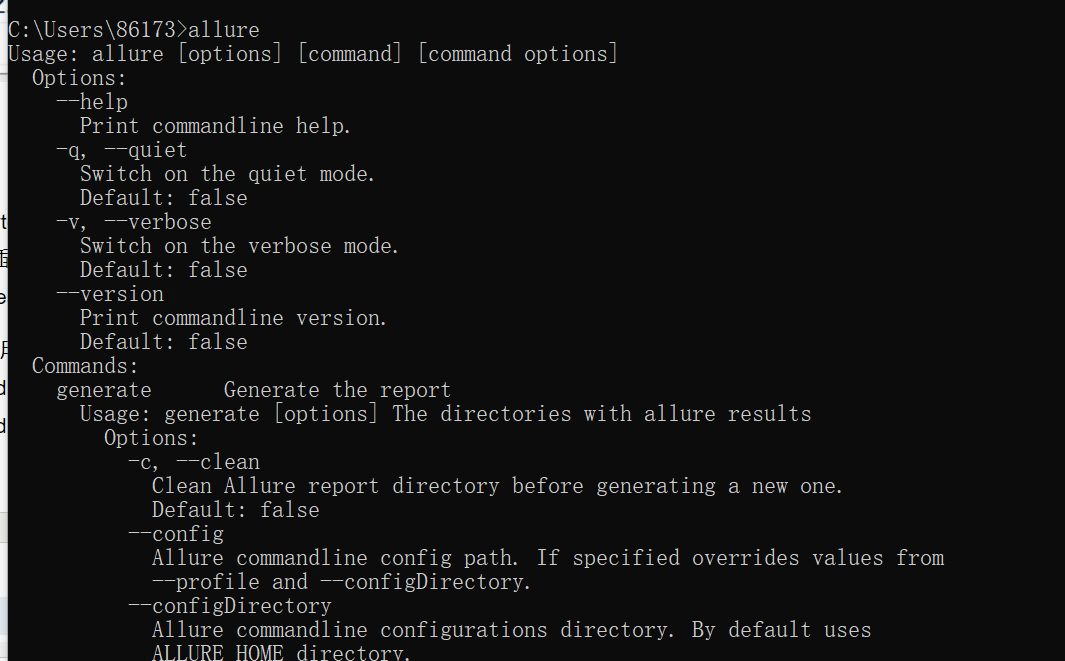
4)在cmd当中,执行allure命令,不报错即allure安装成功。
2、pytest在执行用例之后,要生成allure可以识别的测试结果文件。
1)安装插件
pip install allure-pytest2)在pytest.main()的参数当中添加:--alluredir=allure生成的文件目录(手动创建一个)
pytest.main(["-s","-v","--alluredir=allure_file"])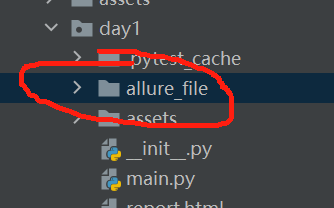
pytest.main(["--alluredir=allure_file","--clean-alluredir"]) #每次运行前清除allure_file中的文件,为防止数据重复3、使用allure去解析2中的测试结果文件,再呈现最终的测试报告
1)在cmd当中首先跳转到rootdir下面

2)在cmd当中执行命令:allure serve 2中的测试结果文件目录

2.5、参数化(数据驱动)
1、@pytest.mark.parametrize("参数名",列表数据)
datas={"api":"login","url":"http://api.lemoban.com/futureloan/login",
       "api":"register","url":"http://api.lemoban.com/futureloan/register",
       "api":"recharge","url":"http://api.lemoban.com/futureloan/recharge",
       "api":"withdraw","url":"http://api.lemoban.com/futureloan/withdraw"}

@pytest.mark.parametrize("case",datas)
def test_read_datas(case):
    pass
2、组合参数化:多组参数,依次组合。
使用多个@pytest.mark.parametrize
#示例:用例有4个:0,2/0,3/1,2/1,3 迪卡尔积
@pytest.mark.parametrize("x", [0, 1])
@pytest.mark.parametrize("y", [2, 3])
def test_foo(x, y):
    pass
2.6、重试机制(rerun)
1)安装插件:pytest-rerunfailures
pip install pytest-rerunfailures2)命令
pytest --reruns 次数
pytest --reruns-delay 重运行次数之间的间隔时间(以秒为单位)
pytest.main(["--reruns","2","--reruns-delay","5"])2.7、筛选用例,mark一下
当我们想只运行诸多py文件当中的部分用例,需要过滤用例时,可以使用pytest.mark一下。
1)注册标签名
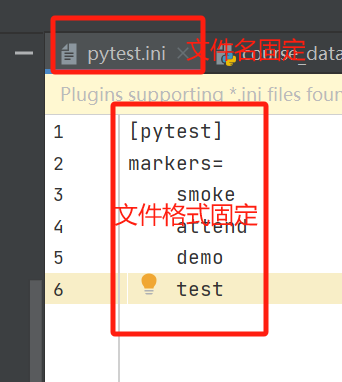
通过pytest.ini配置文件注册。在pytest.ini文件当中:
pytest # 固定的section名
markers= # 固定的option名称
标签名1: 标签名的说明内容。
标签名2
标签名N
2)在测试用例/测试类中给用例打标记(只能使用已注册的标记名)
在测试用例的前面加上:@pytest.mark.已注册标签名
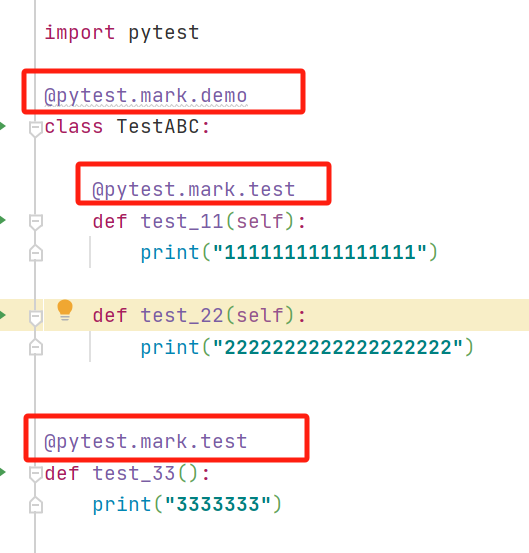
3)运行时,根据用例标签过滤(-m 标签名)
调用pytest.main()函数,将运行时的参数以列表传进去,同样也可以达到命令行运行的效果。可以使用逻辑运算符。
pytest.main(["-m","demo"])      #执行标签为demo的测试用例
pytest.main(["-m not demo"])    #执行标签不是demo的测试用例
pytest.main(["-m demo and test"])  #执行标签是demo又是test的测试用例
【已更新】B站讲的最详细的Python接口自动化测试实战教程全集(实战最新版)
》,以及配套的接口文档/项目实战【网盘资源】,需要的朋友可以下方视频的置顶评论获取。肯定会给你带来帮助和方向。
【已更新】B站讲的最详细的Python接口自动化测试实战教程全集(实战最新版)