sklearn机器学习实战------支持向量机四种核函数分类任务全过程(附完整代码和结果图)
关于作者
作者:小白熊
作者简介:精通python、matlab、c#语言,擅长机器学习,深度学习,机器视觉,目标检测,图像分类,姿态识别,语义分割,路径规划,智能优化算法,数据分析,各类创新融合等等。
联系邮箱 :xbx3144@163.com
科研辅导、知识付费答疑、个性化定制以及其他合作需求请联系作者~
1 引言
在机器学习分类任务中,支持向量机(SVM, Support Vector Machine) 是一种非常强大的算法。SVM模型通过找到决策边界(超平面),以最大化类别之间的间隔(margin)来进行分类。本文将探讨如何使用四种核函数的支持向量机实现分类任务,包括数据预处理、模型训练、交叉验证、性能评估和可视化的完整流程。附完整代码和结果图。
2 理论基础
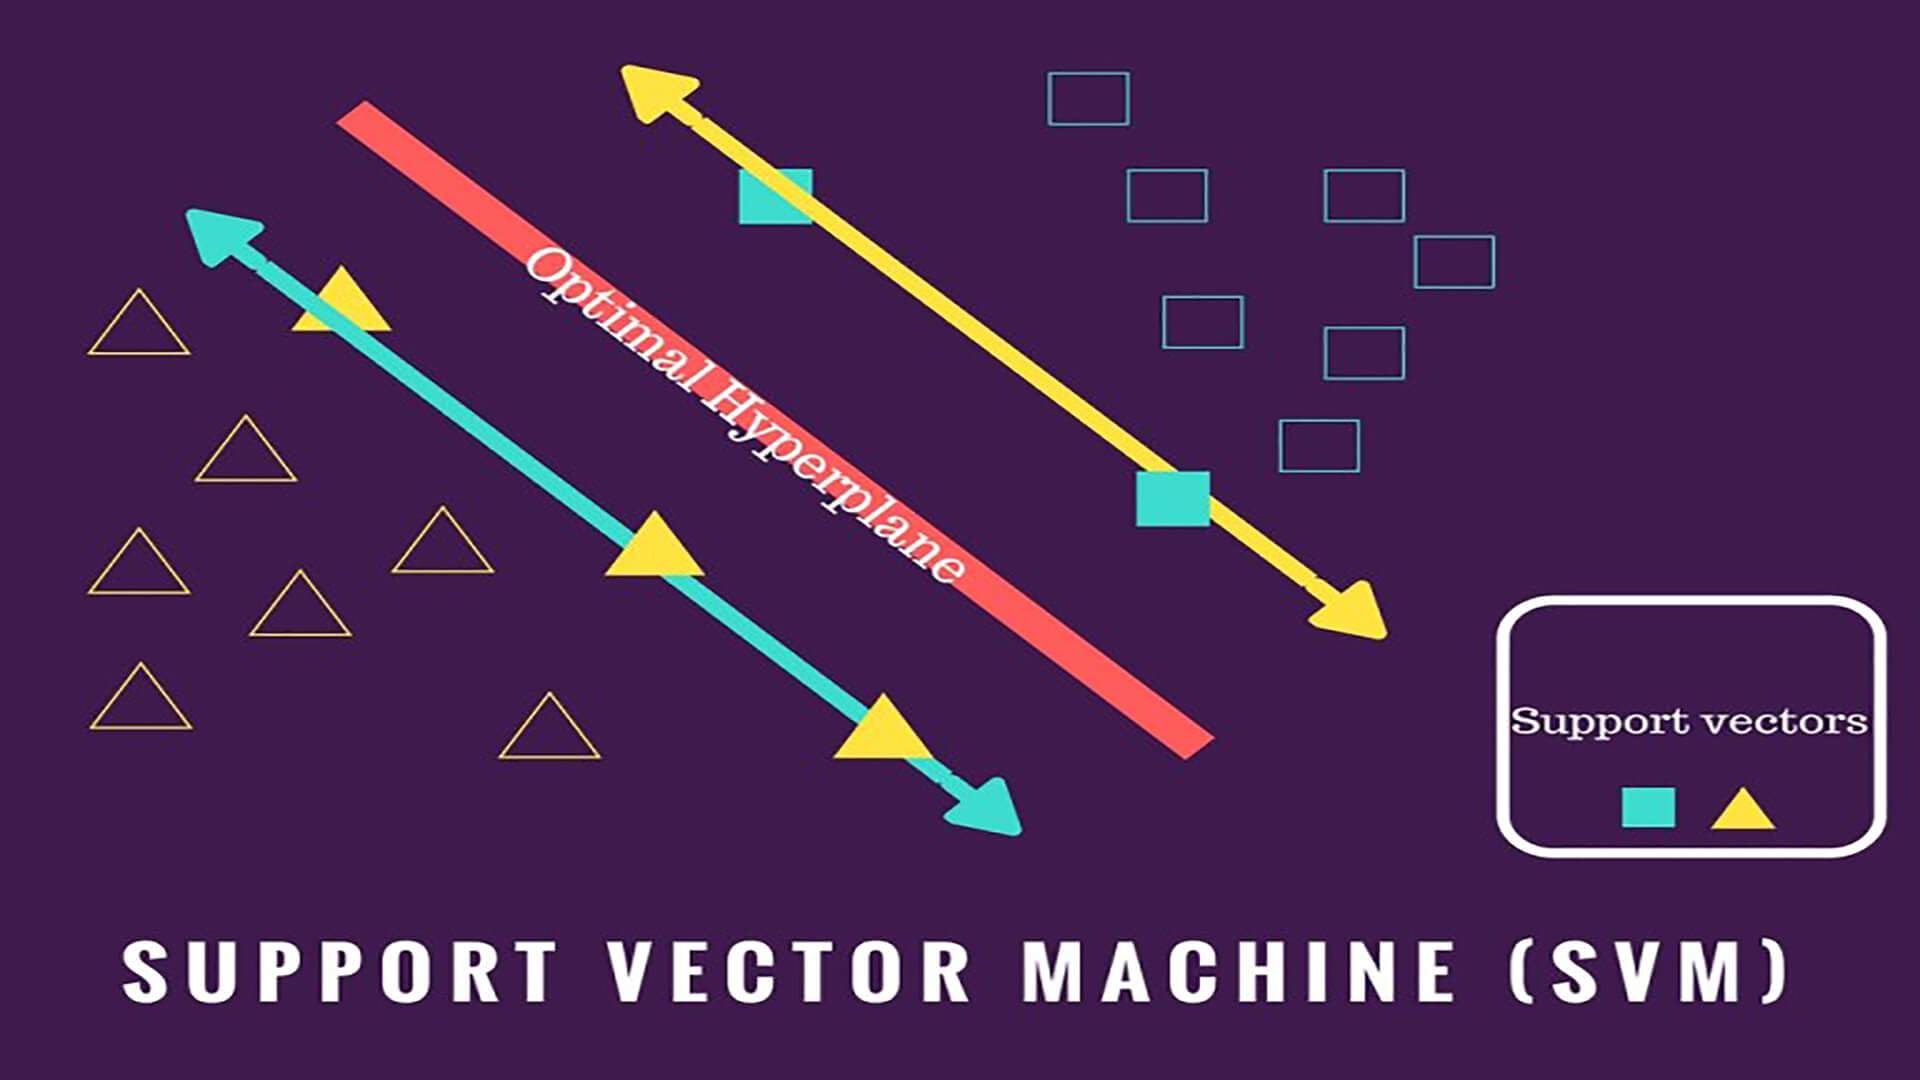
SVM的基本思想是:在一个n维空间中,找到一个能够将不同类别分开且具有最大间隔的超平面。换句话说,SVM试图找到一个使得数据点到分类边界的最小距离最大的超平面。
2.1 超平面和支持向量
-
超平面:在分类任务中,超平面是将数据分开的一条线(对于二维数据)或一个平面(对于三维数据)。它是用来对数据进行分类的边界。
-
支持向量:支持向量是距离超平面最近的点,这些点对超平面的位置和方向起到决定性作用。

2.2 核函数
由于许多问题无法通过线性超平面有效分割,因此SVM引入了核函数(kernel function),以在高维空间中处理数据。常见的核函数包括:
- 线性核(Linear Kernel):适用于线性可分的数据,即数据在原始空间中可以被一条直线分开。
- 多项式核(Polynomial Kernel):用于处理复杂的非线性数据。它将数据映射到更高维度的多项式空间中。
- 高斯核(RBF Kernel):也是常见的径向基函数核,适合处理复杂的非线性问题,通过将数据映射到无限维空间解决分类问题。
- Sigmoid核(Sigmoid Kernel):与神经网络中的激活函数类似,适用于某些特定的分类任务。
3 数据预处理
在机器学习任务中,数据的预处理是非常关键的一步。包括处理缺失值、数据标准化以及数据集划分等。
3.1 数据集介绍与加载
本文使用的是经典的鸢尾花数据集(Iris Dataset),它包含150个数据点,分为三类(Setosa、Versicolor、Virginica)。每个数据点有4个特征:花萼长度、花萼宽度、花瓣长度和花瓣宽度。加载数据并转换格式:
python
# 加载鸢尾花数据集
from sklearn.datasets import load_iris
import pandas as pd

# 转换格式
data = load_iris()
df = pd.DataFrame(data.data, columns=data.feature_names)
df['Target'] = data.target
3.2 缺失值检测
在机器学习任务中,处理缺失值至关重要。本文使用 isnull() 函数检测数据集中是否存在缺失值:
python
# 检测缺失值
missing_values = df.isnull().sum()
print("缺失值检测结果:\n", missing_values)
3.3 数据标准化与划分
SVM对数据尺度敏感,因此需要对特征进行标准化,将每个特征的均值归一到 0,标准差归一到 1。接着将数据集划分为训练集和验证集。
python
sklearn.preprocessing import StandardScaler
from sklearn.model_selection import train_test_split

# 数据标准化
scaler = StandardScaler()
X_scaled = scaler.fit_transform(df.drop('Target', axis=1))

# 数据集划分
X_train, X_val, y_train, y_val = train_test_split(X_scaled, df['Target'], test_size=0.2, random_state=42)
4 SVM模型训练(四种核函数)
本文将使用SVM的四种核函数在训练数据上训练模型:
python
from sklearn.svm import SVC

# 定义不同的核函数
kernels = ['linear', 'poly', 'rbf', 'sigmoid']
models = {}

for kernel in kernels:
    svm_model = SVC(kernel=kernel, random_state=42)
    svm_model.fit(X_train, y_train)
    models[kernel] = svm_model
5 十折交叉验证
为了评估模型的性能稳定性,本文使用十折交叉验证(K-fold cross-validation)。通过对数据集进行多次划分,可以减少模型对特定数据的依赖,获得更稳定的性能评估结果。
python
from sklearn.model_selection import KFold, cross_val_score

kf = KFold(n_splits=10, shuffle=True, random_state=42)

# 十折交叉验证
for kernel, model in models.items():
    cv_scores = cross_val_score(model, X_train, y_train, cv=kf, scoring='accuracy')
    print(f"{kernel}核函数------平均准确率: {np.mean(cv_scores)}")
6 性能评估
在验证集上进行预测并计算模型的分类性能指标,包括准确率(accuracy) 、精确率(precision) 、召回率(recall)和F1分数。
python
from sklearn.metrics import accuracy_score, precision_score, recall_score, f1_score

# 选择核函数(例如 'linear')
kernel = 'linear'
y_val_pred = models[kernel].predict(X_val)

# 计算分类评估指标
accuracy_val = accuracy_score(y_val, y_val_pred)
precision_val = precision_score(y_val, y_val_pred, average='weighted')
recall_val = recall_score(y_val, y_val_pred, average='weighted')
f1_val = f1_score(y_val, y_val_pred, average='weighted')

print(f"{kernel}核函数-准确率: {accuracy_val}")
print(f"{kernel}核函数-精确率: {precision_val}")
print(f"{kernel}核函数-召回率: {recall_val}")
print(f"{kernel}核函数-F1分数: {f1_val}")
结果如下:

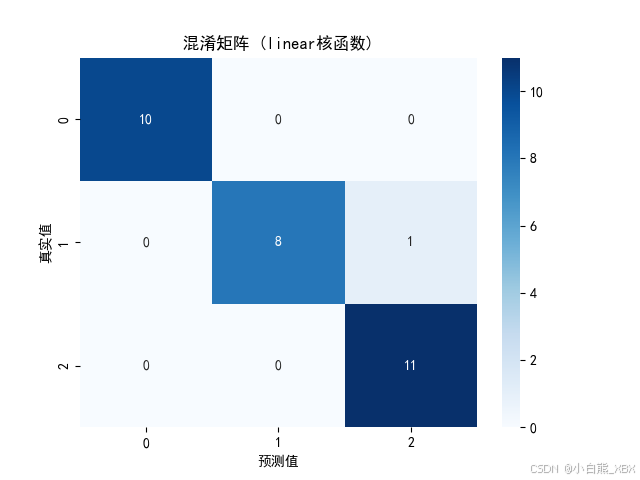
7 模型可视化------混淆矩阵
通过混淆矩阵,我们可以更直观地分析模型在分类任务中的预测情况。以下是混淆矩阵的可视化代码:
python
from sklearn.metrics import confusion_matrix
import seaborn as sns
import matplotlib.pyplot as plt

# 计算混淆矩阵
conf_matrix = confusion_matrix(y_val, y_val_pred)

# 可视化混淆矩阵
sns.heatmap(conf_matrix, annot=True, fmt='d', cmap='Blues')
plt.title(f'混淆矩阵 ({kernel}核函数)')
plt.xlabel("预测值")
plt.ylabel("真实值")
plt.show()
结果如下:

8 完整代码
python
import numpy as np
import pandas as pd
from sklearn.svm import SVC
from sklearn.model_selection import train_test_split, cross_val_score, KFold
from sklearn.preprocessing import StandardScaler
from sklearn.metrics import accuracy_score, precision_score, recall_score, f1_score, confusion_matrix
import seaborn as sns
import matplotlib.pyplot as plt
import warnings

warnings.filterwarnings("ignore")

# 设置中文字体为SimHei
plt.rcParams['font.sans-serif'] = ['SimHei']
plt.rcParams['axes.unicode_minus'] = False

# 加载数据集
from sklearn.datasets import load_iris
data = load_iris()

# 数据转换
df = pd.DataFrame(data.data, columns=data.feature_names)
df['Target'] = data.target

# 缺失值检测
missing_values = df.isnull().sum()
print("缺失值检测结果:\n", missing_values)

# 数据提取
X = df.drop('Target', axis=1)
y = df['Target']

# 数据标准化
scaler = StandardScaler()
X_scaled = scaler.fit_transform(X)

# 划分训练集和验证集
X_train, X_val, y_train, y_val = train_test_split(X_scaled, y, test_size=0.2, random_state=42)

# 构建支持向量机模型
kernels = ['linear', 'poly', 'rbf', 'sigmoid']  # 四种不同的核函数
models = {}

for kernel in kernels:
    svm_model = SVC(kernel=kernel, random_state=42)
    svm_model.fit(X_train, y_train)
    models[kernel] = svm_model

# 十折交叉验证
kf = KFold(n_splits=10, shuffle=True, random_state=42)

for kernel, model in models.items():
    cv_scores = cross_val_score(model, X_train, y_train, cv=kf, scoring='accuracy')
    print(f"{kernel}核函数------平均准确率: {np.mean(cv_scores)}")

# 评估模型
from sklearn.metrics import accuracy_score, precision_score, recall_score, f1_score

# 选择核函数(例如 'linear')
kernel = 'linear'
y_val_pred = models[kernel].predict(X_val)

# 计算混淆矩阵
conf_matrix = confusion_matrix(y_val, y_val_pred)

# 计算分类评估指标
accuracy_val = accuracy_score(y_val, y_val_pred)
precision_val = precision_score(y_val, y_val_pred, average='weighted')
recall_val = recall_score(y_val, y_val_pred, average='weighted')
f1_val = f1_score(y_val, y_val_pred, average='weighted')


print(f"{kernel}核函数-准确率: {accuracy_val}")
print(f"{kernel}核函数-精确率: {precision_val}")
print(f"{kernel}核函数-召回率: {recall_val}")
print(f"{kernel}核函数-F1分数: {f1_val}")

# 可视化混淆矩阵
sns.heatmap(conf_matrix, annot=True, fmt='d', cmap='Blues')
plt.title(f'混淆矩阵 ({kernel}核函数)')
plt.xlabel("预测值")
plt.ylabel("真实值")
plt.show()
9 总结
本文实现了使用支持向量机(SVM)不同核函数进行分类任务的完整流程。每个核函数在处理不同数据时具有各自的优势:
- 线性核函数适合线性可分的数据,计算效率高,易于解释。
- 多项式核函数可以处理复杂的非线性关系,但计算复杂度较高。
- RBF核函数常用于解决大多数非线性问题,因其能够将数据映射到高维空间,但需要合理选择超参数。
- Sigmoid核函数与神经网络中的激活函数类似,适合某些特定任务。
希望文章对你有所帮助!如果有任何疑问或建议,欢迎在评论区留言!