1. 训练自定义 Yolov10 数据集
利用物体检测增强 OCR 的第一步是在数据集上训练自定义 YOLO 模型。YOLO(只看一遍)是一种功能强大的实时对象检测模型,它将图像划分为网格,使其能够在一次前向传递中识别多个对象。这种方法非常适合检测图像中的文本,尤其是当你想通过隔离特定区域来改善 OCR 结果时。YOLOv10 针对较小的对象进行了优化,因此非常适合在视频或扫描文档等具有挑战性的环境中检测文本。
from ultralytics import YOLO
model = YOLO("yolov10n.pt")
# Train the model
model.train(data="datasets/data.yaml", epochs=50, imgsz=640)
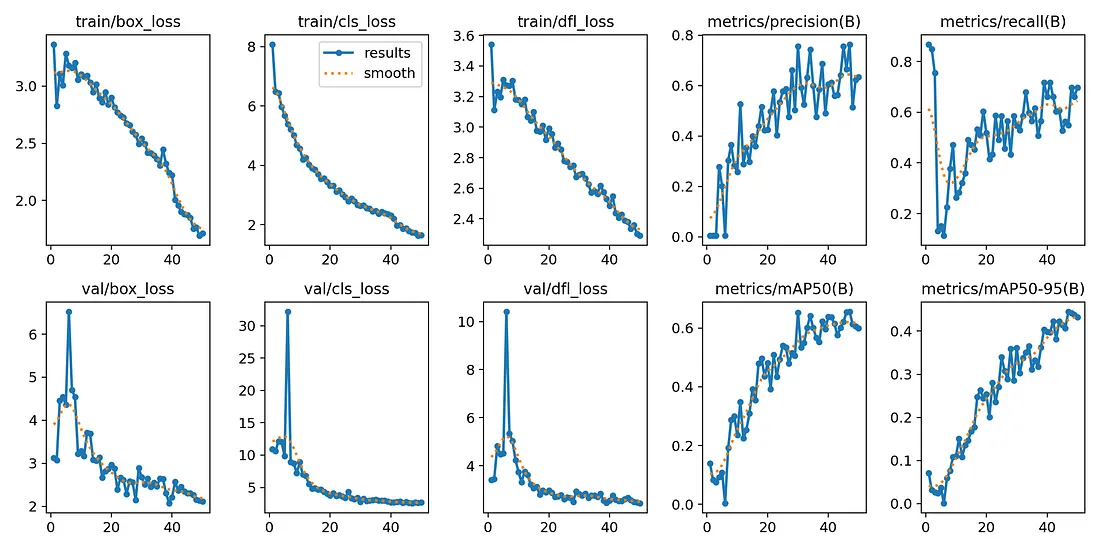
在 Google Colab 上训练这个模型用了大约 6 个小时,共 50 个历元。你可以调整epochs次数和数据集大小等参数,或者尝试使用超参数来提高模型的性能和准确性。

2. 在视频上运行自定义模型检测边框
训练好 YOLO 模型后,你就可以将其应用到视频中,检测文本区域周围的边框。这些边框可以隔离感兴趣的区域,确保 OCR 过程更加简洁:
import cv2
# Open video file
video_path = 'books.mov'
cap = cv2.VideoCapture(video_path)
# Load YOLO model
model = YOLO('model.pt')
# Function for object detection and drawing bounding boxes
def predict_and_detect(model, frame, conf=0.5):
    results = model.predict(frame, conf=conf)
    for result in results:
        for box in result.boxes:
            # Draw bounding box
            x1, y1, x2, y2 = map(int, box.xyxy[0].tolist())
            cv2.rectangle(frame, (x1, y1), (x2, y2), (255, 0, 0), 2)
    return frame, results
# Process video frames
while cap.isOpened():
    ret, frame = cap.read()
    if not ret:
        break
    # Run object detection
    processed_frame, results = predict_and_detect(model, frame)
    # Show video with bounding boxes
    cv2.imshow('YOLO + OCR Detection', processed_frame)
    if cv2.waitKey(1) & 0xFF == ord('q'):
        break
# Release video
cap.release()
cv2.destroyAllWindows()
这段代码会实时处理视频,在检测到的文本周围绘制边框,并隔离这些区域,为下一步--OCR--做好完美准备。
3. 在边框上运行 OCR
既然我们已经用 YOLO 隔离了文本区域,我们就可以在这些特定区域内应用 OCR,与在整个图像上运行 OCR 相比,大大提高了准确性:
import easyocr
# Initialize EasyOCR
reader = easyocr.Reader(['en'])
# Function to crop frames and perform OCR
def run_ocr_on_boxes(frame, boxes):
    ocr_results = []
    for box in boxes:
        x1, y1, x2, y2 = map(int, box.xyxy[0].tolist())
        cropped_frame = frame[y1:y2, x1:x2]
        ocr_result = reader.readtext(cropped_frame)
        ocr_results.append(ocr_result)
    return ocr_results
# Perform OCR on detected bounding boxes
for result in results:
    ocr_results = run_ocr_on_boxes(frame, result.boxes)
    # Extract and display the text from OCR results
    extracted_text = [detection[1] for ocr in ocr_results for detection in ocr]
    print(f"Extracted Text: {', '.join(extracted_text)}")

'THE, SECRET, HISTORY, DONNA, TARTT'
结果有了明显改善,因为 OCR 引擎现在只处理被明确识别为包含文本的区域,从而降低了无关图像元素造成误读的风险。
4. 使用 Ollama 改进文本
使用 easyocr 提取文本后,Llama 3 可以进一步完善往往不完美和杂乱无章的结果。OCR 功能强大,但仍有可能误读文本或返回不符合顺序的数据,尤其是书名或作者姓名。
LLM 可以对输出结果进行整理,将原始 OCR 结果转化为结构化、连贯的文本。通过用特定的提示引导 Llama 3 识别和组织内容,我们可以将不完美的 OCR 数据细化为格式整齐的书名和作者姓名。你可以使用 Ollama 在本地运行它!
import ollama
# Construct a prompt to clean up the OCR output
prompt = f"""
- Below is a text extracted from an OCR. The text contains mentions of famous books and their corresponding authors.
- Some words may be slightly misspelled or out of order.
- Your task is to identify the book titles and corresponding authors from the text.
- Output the text in the format: '<Name of the book> : <Name of the author>'.
- Do not generate any other text except the book title and the author.
TEXT:
{output_text}
"""
# Use Ollama to clean and structure the OCR output
response = ollama.chat(
    model="llama3",
    messages=[{"role": "user", "content": prompt}]
)
# Extract cleaned text
cleaned_text = response['message']['content'].strip()
print(cleaned_text)

The Secret History : Donna Tartt
这是正确的!一旦 LLM 对文本进行了清理,经过润色的输出结果就可以存储到数据库中,或在各种实际应用中发挥作用,例如:
- 数字图书馆或书店: 自动分类和显示书名及其作者。
- 档案系统: 将扫描的书籍封面或文档转换为可搜索的数字记录。
- 自动生成元数据: 根据提取的信息为图像、PDF 或其他数字资产生成元数据。
- 数据库输入: 将清理后的文本直接插入数据库,确保为大型系统提供结构化和一致的数据。
通过将对象检测、OCR 和 LLM 相结合,你就可以为更多结构化数据处理开启一个强大的管道,非常适合需要高精度的应用。
结论
通过将自定义训练的 YOLOv10 模型与 EasyOCR 相结合,并使用 LLM 增强结果,你可以大大改进文本识别工作流程。无论你是要处理棘手图像或视频中的文本,还是要清理 OCR 混乱,或者是要使一切都变得更加完美,这个管道都能为你提供实时、精确的文本提取和完善。