CNN 网络适用于图片识别,卷积神经网络主要用于图片的处理识别。卷积神经网络,包括一下几部分,输入层、卷积层、池化层、全链接层和输出层。

使用 CIFAR-10 进行训练, CIFAR-10 中图片尺寸为 32 * 32。卷积层通过卷积核移动进行计算最终生成特征图。

通过池化层进行降维度

卷积网络结构从输入到输出, 3* 32*32 --> 10:
| 类型 | Weight | BIAS |
|---|---|---|
| 卷积(3, 12, 5) | (12, 3, 5, 5) | 12 |
| 卷积(12, 12, 5) | (12, 12, 5, 5) | 12 |
| Norm | 12 | 12 |
| 卷积(12, 24, 5) | (24, 12, 5, 5) | 24 |
| 卷积(24 24, 5) | (24, 24, 5, 5) | 24 |
| Norm | 24 | 24 |
| Linear | (10, 2400) | 10 |
训练分类模型
准备数据
from torchvision.datasets import CIFAR10
from torchvision.transforms import transforms
from torch.utils.data import DataLoader

# Loading and normalizing the data.
# Define transformations for the training and test sets
transformations = transforms.Compose([
    transforms.ToTensor(),
    transforms.Normalize((0.5, 0.5, 0.5), (0.5, 0.5, 0.5))
])

# CIFAR10 dataset consists of 50K training images. We define the batch size of 10 to load 5,000 batches of images.
batch_size = 10
number_of_labels = 10

# Create an instance for training.
# When we run this code for the first time, the CIFAR10 train dataset will be downloaded locally.
train_set =CIFAR10(root="./data",train=True,transform=transformations,download=True)

# Create a loader for the training set which will read the data within batch size and put into memory.
train_loader = DataLoader(train_set, batch_size=batch_size, shuffle=True, num_workers=0)
print("The number of images in a training set is: ", len(train_loader)*batch_size)

# Create an instance for testing, note that train is set to False.
# When we run this code for the first time, the CIFAR10 test dataset will be downloaded locally.
test_set = CIFAR10(root="./data", train=False, transform=transformations, download=True)

# Create a loader for the test set which will read the data within batch size and put into memory.
# Note that each shuffle is set to false for the test loader.
test_loader = DataLoader(test_set, batch_size=batch_size, shuffle=False, num_workers=0)
print("The number of images in a test set is: ", len(test_loader)*batch_size)

print("The number of batches per epoch is: ", len(train_loader))
classes = ('plane', 'car', 'bird', 'cat', 'deer', 'dog', 'frog', 'horse', 'ship', 'truck')
创建网络
import torch
import torch.nn as nn
import torchvision
import torch.nn.functional as F

# Define a convolution neural network
class Network(nn.Module):
    def __init__(self):
        super(Network, self).__init__()

        self.conv1 = nn.Conv2d(in_channels=3, out_channels=12, kernel_size=5, stride=1, padding=1)
        self.bn1 = nn.BatchNorm2d(12)
        self.conv2 = nn.Conv2d(in_channels=12, out_channels=12, kernel_size=5, stride=1, padding=1)
        self.bn2 = nn.BatchNorm2d(12)
        self.pool = nn.MaxPool2d(2,2)
        self.conv4 = nn.Conv2d(in_channels=12, out_channels=24, kernel_size=5, stride=1, padding=1)
        self.bn4 = nn.BatchNorm2d(24)
        self.conv5 = nn.Conv2d(in_channels=24, out_channels=24, kernel_size=5, stride=1, padding=1)
        self.bn5 = nn.BatchNorm2d(24)
        self.fc1 = nn.Linear(24*10*10, 10)

    def forward(self, input):
        output = F.relu(self.bn1(self.conv1(input)))
        output = F.relu(self.bn2(self.conv2(output)))
        output = self.pool(output)
        output = F.relu(self.bn4(self.conv4(output)))
        output = F.relu(self.bn5(self.conv5(output)))
        output = output.view(-1, 24*10*10)
        output = self.fc1(output)

        return output

# Instantiate a neural network model
model = Network()
定义损失函数
使用交叉熵函数作为损失函数,交叉熵分为两种
-
二分类交叉熵函数

-
多分类交叉熵函数

loss_fn = nn.CrossEntropyLoss()
optimizer = Adam(model.parameters(), lr=0.001, weight_decay=0.0001)
模型训练
from torch.autograd import Variable

# Function to save the model
def saveModel():
    path = "./myFirstModel.pth"
    torch.save(model.state_dict(), path)

# Function to test the model with the test dataset and print the accuracy for the test images
def testAccuracy():

    model.eval()
    accuracy = 0.0
    total = 0.0
    device = torch.device("cuda:0" if torch.cuda.is_available() else "cpu")

    with torch.no_grad():
        for data in test_loader:
            images, labels = data
            # run the model on the test set to predict labels
            outputs = model(images.to(device))
            # the label with the highest energy will be our prediction
            _, predicted = torch.max(outputs.data, 1)
            total += labels.size(0)
            accuracy += (predicted == labels.to(device)).sum().item()

    # compute the accuracy over all test images
    accuracy = (100 * accuracy / total)
    return(accuracy)


# Training function. We simply have to loop over our data iterator and feed the inputs to the network and optimize.
def train(num_epochs):

    best_accuracy = 0.0

    # Define your execution device
    device = torch.device("cuda:0" if torch.cuda.is_available() else "cpu")
    print("The model will be running on", device, "device")
    # Convert model parameters and buffers to CPU or Cuda
    model.to(device)

    for epoch in range(num_epochs):  # loop over the dataset multiple times
        running_loss = 0.0
        running_acc = 0.0

        for i, (images, labels) in enumerate(train_loader, 0):

            # get the inputs
            images = Variable(images.to(device))
            labels = Variable(labels.to(device))

            # zero the parameter gradients
            optimizer.zero_grad()
            # predict classes using images from the training set
            outputs = model(images)
            # compute the loss based on model output and real labels
            loss = loss_fn(outputs, labels)
            # backpropagate the loss
            loss.backward()
            # adjust parameters based on the calculated gradients
            optimizer.step()

            # Let's print statistics for every 1,000 images
            running_loss += loss.item()     # extract the loss value
            if i % 1000 == 999:
                # print every 1000 (twice per epoch)
                print('[%d, %5d] loss: %.3f' %
                      (epoch + 1, i + 1, running_loss / 1000))
                # zero the loss
                running_loss = 0.0

        # Compute and print the average accuracy fo this epoch when tested over all 10000 test images
        accuracy = testAccuracy()
        print('For epoch', epoch+1,'the test accuracy over the whole test set is %d %%' % (accuracy))

        # we want to save the model if the accuracy is the best
        if accuracy > best_accuracy:
            saveModel()
            best_accuracy = accuracy
测试模型
import matplotlib.pyplot as plt
import numpy as np

# Function to show the images
def imageshow(img):
    img = img / 2 + 0.5     # unnormalize
    npimg = img.numpy()
    plt.imshow(np.transpose(npimg, (1, 2, 0)))
    plt.show()


# Function to test the model with a batch of images and show the labels predictions
def testBatch():
    # get batch of images from the test DataLoader
    images, labels = next(iter(test_loader))

    # show all images as one image grid
    imageshow(torchvision.utils.make_grid(images))

    # Show the real labels on the screen
    print('Real labels: ', ' '.join('%5s' % classes[labels[j]]
                               for j in range(batch_size)))

    # Let's see what if the model identifiers the  labels of those example
    outputs = model(images)

    # We got the probability for every 10 labels. The highest (max) probability should be correct label
    _, predicted = torch.max(outputs, 1)

    # Let's show the predicted labels on the screen to compare with the real ones
    print('Predicted: ', ' '.join('%5s' % classes[predicted[j]]
                              for j in range(batch_size)))
执行模型
if __name__ == "__main__":

    # Let's build our model
    train(5)
    print('Finished Training')

    # Test which classes performed well
    testAccuracy()

    # Let's load the model we just created and test the accuracy per label
    model = Network()
    path = "myFirstModel.pth"
    model.load_state_dict(torch.load(path))

    # Test with batch of images
    testBatch()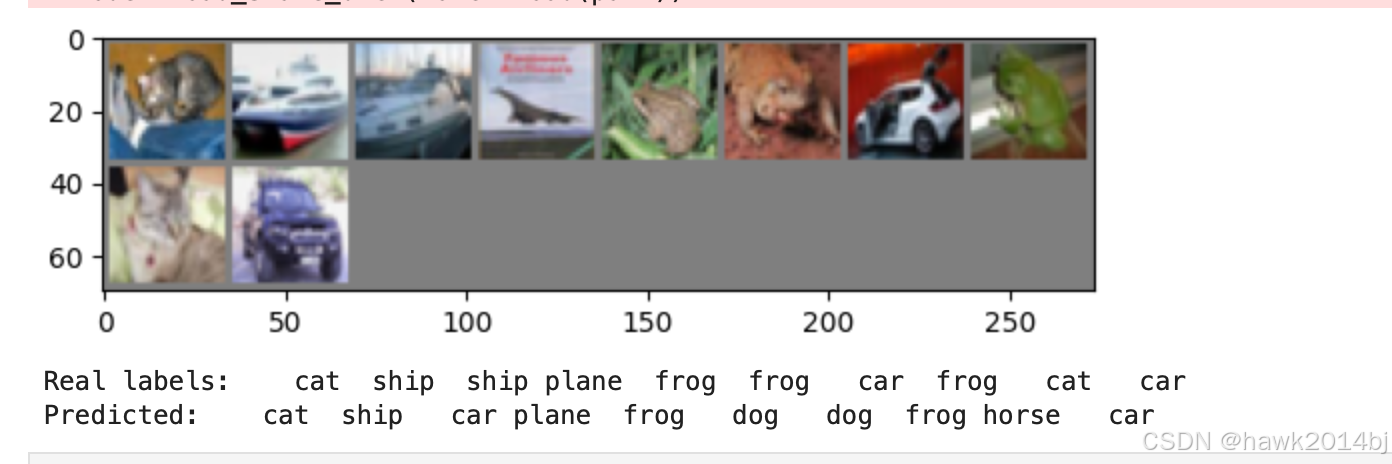
总结
pytorch 搭建一个 CNN 模型比较简单,5 轮训练之后,效果就可以达到 60%,10 张图片中预测对了 6 张。