系列文章目录
第一篇 基于SRS 的 WebRTC 环境搭建
第二篇 基于SRS 实现RTSP接入与WebRTC播放
第三篇 centos下基于ZLMediaKit 的WebRTC 环境搭建
第四篇 WebRTC学习一:获取音频和视频设备
第五篇 WebRTC学习二:WebRTC音视频数据采集
第六篇 WebRTC学习三:WebRTC音视频约束
第七篇 WebRTC学习四:WebRTC常规视觉滤镜
第八篇 WebRTC学习五:从视频中提取图片
第九篇 WebRTC学习六:MediaStream 常用API介绍
文章目录
前言
WebRTC(Web Real-Time Communication)是一个强大的技术,可以让网页应用程序和网站进行实时音频、视频和数据共享。通过使用 WebRTC,开发者可以实现高质量的音视频通话,构建实时多媒体应用,而无需用户安装任何插件。本文将在前面文章的基础上进一步介绍 WebRTC 中的 MediaStream API,这是一组用于处理音频和视频流的常用方法。我们将深入探讨这些方法的用法,并给出一个简单的示例,帮助大家更好地理解如何在实际应用中运用这些 API。
一、WebRTC MediaStream API 常用方法
1.getUserMedia()
getUserMedia() 方法是 WebRTC 的核心,用于请求访问用户的音频和视频设备。该方法接受一个约束对象,指定请求的音频和视频选项。
c
navigator.mediaDevices.getUserMedia({
    video: true,
    audio: true
}).then(function(stream) {
    // 处理成功获取的媒体流
}).catch(function(error) {
    // 处理错误
});
2.MediaStream.getTracks()
通过 getTracks() 方法,可以获取与媒体流相关的所有轨道。此方法返回一个包含所有轨道的数组。
c
const tracks = stream.getTracks();3.MediaStream.getAudioTracks()
getAudioTracks() 方法返回音频轨道的数组,便于单独操作或管理音频流。
c
const audioTracks = stream.getAudioTracks();4.MediaStream.getVideoTracks()
getVideoTracks() 方法返回视频轨道的数组,开发者可以使用该方法来处理视频相关的操作。
c
const videoTracks = stream.getVideoTracks();5.MediaStream.addTrack()
如果需要将新轨道添加到现有的媒体流,可以使用 addTrack() 方法。
c
stream.addTrack(newTrack);6.MediaStream.removeTrack()
该方法允许从媒体流中移除指定的轨道。使用时,将要移除的轨道作为参数传入。
c
stream.removeTrack(track);7.MediaStream.clone()
clone() 方法用于创建媒体流的副本,副本中的轨道是原轨道的副本,方便用于不同的目的。
c
const clonedStream = stream.clone();8.MediaStream.active
该属性为只读布尔值,指示媒体流是否包含至少一个活动的轨道。可以用来判断流的状态。
c
if (stream.active) {
    console.log("Stream is active");
}
2.MediaStream.getTracks()
通过 getTracks() 方法,可以获取与媒体流相关的所有轨道。此方法返回一个包含所有轨道的数组。
c
const tracks = stream.getTracks();9.事件处理
onactive 和 oninactive 事件可以用于跟踪轨道的活动状态。当轨道变为活动或非活动时,会触发相应的事件。
c
stream.onactive = function() {
    console.log("At least one track is active");
};

stream.oninactive = function() {
    console.log("All tracks are inactive");
};
二、示例
1.html代码
index.html文件内容如下:
c
<!DOCTYPE html>
<html lang="en">
<head>
    <meta charset="UTF-8">
    <meta name="viewport" content="width=device-width, initial-scale=1.0">
    <title>WebRTC获取视频约束</title>
    <link rel="stylesheet" href="./css/style.css"> <!-- 引入CSS文件 -->
</head>
<body>
    <div id="controls">
        <div>
            <label>Audio Source:</label>
            <select id="audioSource"></select>
        </div>

        <div>
            <label>Audio Output:</label>
            <select id="audioOutput"></select>
        </div>

        <div>
            <label>Video Source:</label>
            <select id="videoSource"></select>
        </div>

        <div>
            <label>Filter:</label>
            <select id="filter">
                <option value="none">None</option>
                <option value="blur">Blur</option>
                <option value="grayscale">Grayscale</option>
                <option value="invert">Invert</option>
                <option value="sepia">sepia</option>
            </select>
        </div>
    </div>

    <div id="videoContainer">
        <table>
            <tr>
                <td><video autoplay playsinline id="player"></video></td>
                <td><div id="video-tracks" class="Output"></div></td>
                <td><div id="audio-tracks" class="Output"></div></td>
            </tr>

        </table>
    </div>


    <script src="../adapter.js"></script>
    <script src="./js/client.js"></script>
</body>
</html>
2.css代码
style.css文件内容如下:
c
body {
    display: flex;
    flex-direction: column;
    align-items: center;
    font-family: Arial, sans-serif;
    margin: 0;
    padding: 20px;
}

#controls {
    display: flex;
    justify-content: space-between;
    width: 100%;
    max-width: 800px; /* 设置一个最大宽度 */
    margin-bottom: 20px; /* 控件与视频和画布的间距 */
}

#videoContainer {
    display: flex;
}

#player {
    width: 400px; /* 设置视频宽度 */
    height: auto; /* 自动高度 */
    border: 1px solid #ccc; /* 可选,给视频一个边框 */
}

.Output {
    font-family: Arial, sans-serif;
    font-size: 14px;
    line-height: 1.1;
    padding: 10px;
    border: 1px solid #7c6464;
    border-radius: 5px;
    background-color: #f9f9f9;
}

.Output div {
    margin-bottom: 2px;
}

button {
    margin-top: 10px; /* 按钮与其它元素之间的间距 */
}

select {
    margin-right: 10px; /* 下拉框之间的间距 */
}

.none {
    -webkit-filter:none;
}
.blur {
    -webkit-filter: blur(3px);
}
.grayscale {
    -webkit-filter: grayscale(1);
}
.invert {
    -webkit-filter: invert(1);
}
.sepia {
    -webkit-filter: sepia(1);
}
3.js代码
client.js文件内容如下:
c
'use strict';

const audioSource = document.querySelector('select#audioSource');
const audioOutput = document.querySelector('select#audioOutput');
const videoSource = document.querySelector('select#videoSource');
const filterSelect = document.querySelector('select#filter');

const snapshot = document.querySelector('button#snapshot');
const picture = document.querySelector('canvas#picture');

const videoplay = document.querySelector('video#player');
// const audioplay = document.querySelector('audio#audioplayer');
var videoTrackConstraints = document.querySelector('div#video-tracks');
var audioTrackContainer = document.querySelector('div#audio-tracks');


// 获取设备列表
function gotDevices(deviceInfos) {
    deviceInfos.forEach(deviceInfo => {
        const option = document.createElement('option');
        option.text = deviceInfo.label;
        option.value = deviceInfo.deviceId;

        switch (deviceInfo.kind) {
            case "audioinput":
                audioSource.appendChild(option);
                break;
            case "audiooutput":
                audioOutput.appendChild(option);
                break;
            case "videoinput":
                videoSource.appendChild(option);
                break;
        }
    });
}

// 获取媒体流
function gotMediaStream(stream) {
     videoplay.srcObject = stream;
    var videoTracks = stream.getVideoTracks()[0];
    var videoConstraints = videoTracks.getSettings();
    // 将 JSON 对象转换为 HTML 字符串
    let constraintsHTML = '';
    constraintsHTML = '<h2>视频轨道</h2>';
    for (const [key, value] of Object.entries(videoConstraints)) {
        constraintsHTML += `<div><strong>${key}:</strong> ${value}</div>`;
    }

    // 插入到 div 元素中
    videoTrackConstraints.innerHTML = constraintsHTML;

    // 显示音频轨道信息
    const audioTracks = stream.getAudioTracks()[0];
    var audioConstraints = audioTracks.getSettings();
    let audioconstraintsHTML = '';
    audioconstraintsHTML= '<h2>音频轨道</h2>';

    for (const [key, value] of Object.entries(audioConstraints)) {
        audioconstraintsHTML += `<div><strong>${key}:</strong> ${value}</div>`;
    }
    audioTrackContainer.innerHTML = audioconstraintsHTML;

    return navigator.mediaDevices.enumerateDevices();
}

// 处理错误
function handleError(err) {
    console.error('getUserMedia error:', err);
}

// 启动媒体流
function start() {
    if (!navigator.mediaDevices || !navigator.mediaDevices.getUserMedia) {
        console.error('getUserMedia is not supported!');
        return;
    }

    const constraints = {
        video: {
            width: 640,
            height: 480,
            frameRate: 30,
            facingMode: "environment",
            deviceId: videoSource.value ? { exact: videoSource.value } : undefined, // 确保使用确切的设备ID
        },

        audio: {
            noiseSuppression: true,
            echoCancellation: true
        }
    };

    navigator.mediaDevices.getUserMedia(constraints)
        .then(gotMediaStream)
        .then(gotDevices)
        .catch(handleError);
}

// 滤镜选择更改事件
filterSelect.onchange = function () {
    videoplay.className = filterSelect.value;
};


// 初始化
start();
videoSource.onchange = start;
二、演示效果
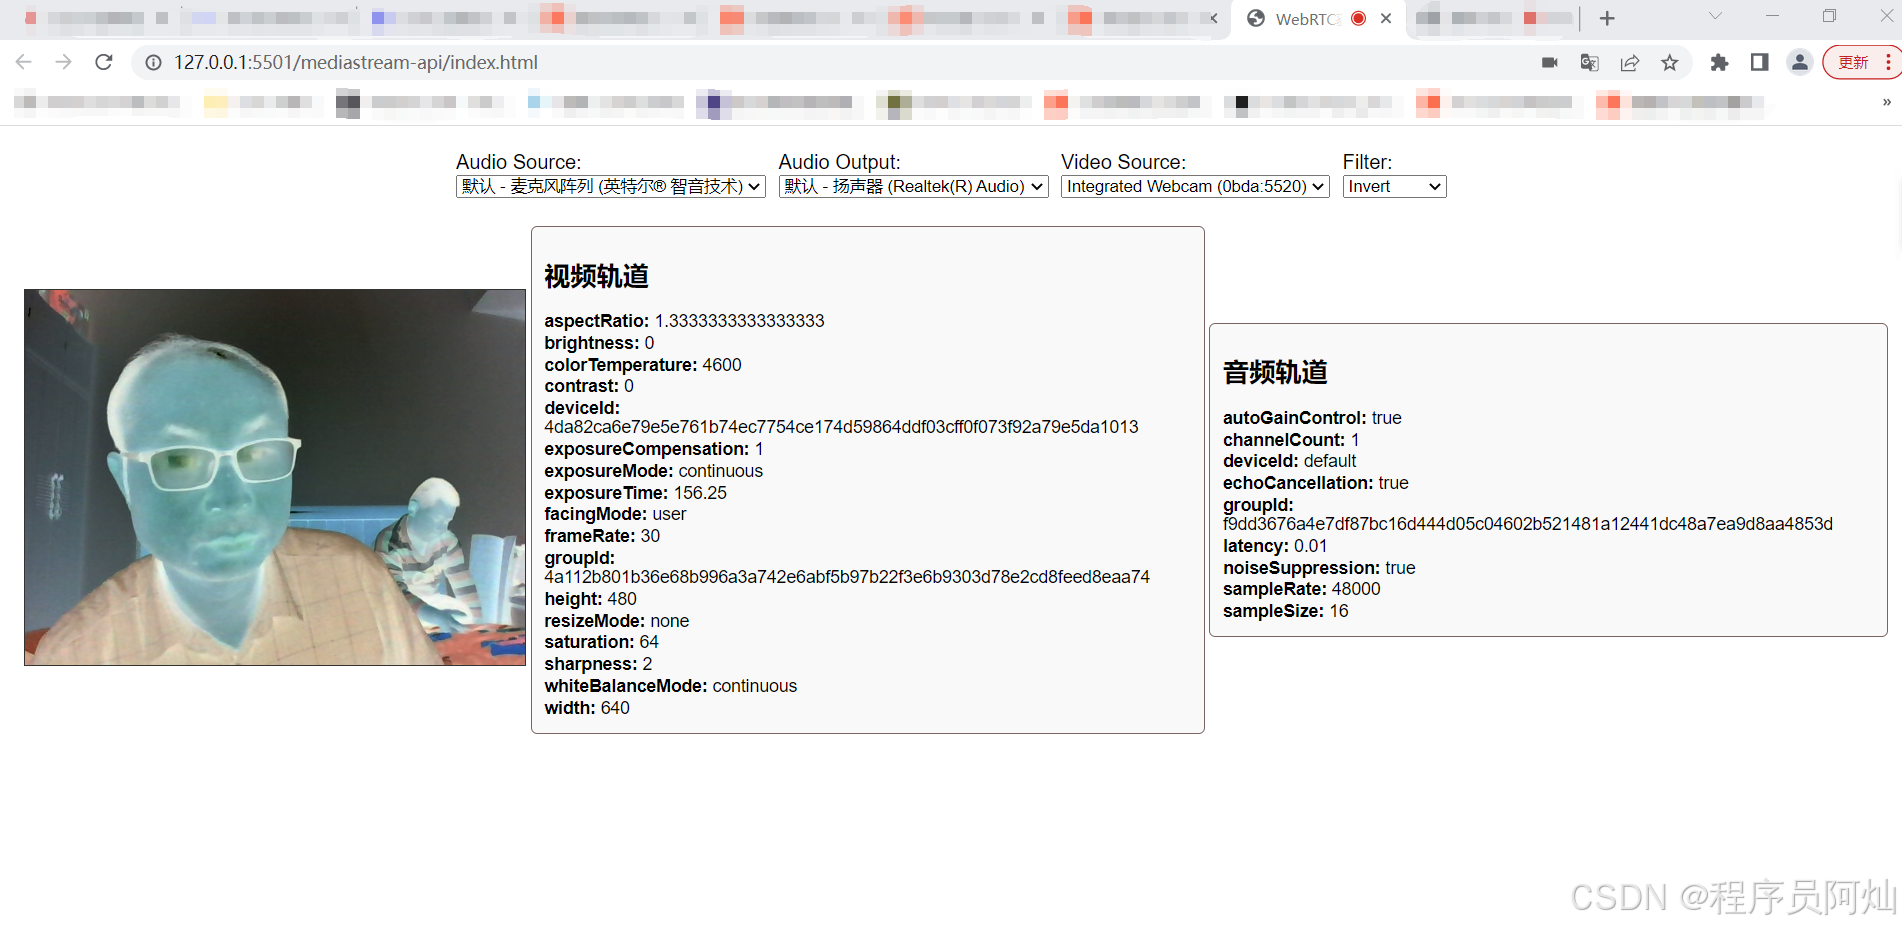
在浏览器中打开 index.html 文件,运行成功的话可以看到左边是视频画面,中间是获取的视频轨道信息,右边是音频轨道信息,下图是我的浏览器上显示的效果。

总结
WebRTC 的 MediaStream API 提供了一系列强大而灵活的方法,可以轻松访问和管理用户的音频与视频流。通过使用这些 API,开发者能够构建高质量的实时通信应用。本文介绍的常用 API 及其用法,结合示例代码,希望能帮助大家更好地理解如何使用这些接口。
如果你对 WebRTC 还有其他问题或希望了解更多内容,请随时留言或分享你的看法。
你好,我是阿灿,慢慢理解世界,慢慢更新自己。