基于milvus的多模态检索
- 1.Milvus简介(2019)
-
- [1.1 什么是向量检索](#1.1 什么是向量检索)
- [2 Milvus安装](#2 Milvus安装)
-
- [2.1 服务器配置](#2.1 服务器配置)
- [2.2 前提条件](#2.2 前提条件)
- [2.3 启动attu](#2.3 启动attu)
- [2.4 下载示例代码进行测试](#2.4 下载示例代码进行测试)
- [3 多模态搜索场景](#3 多模态搜索场景)
-
- [3.1 文搜图](#3.1 文搜图)
- [3.2 图搜图(相似图片搜索)](#3.2 图搜图(相似图片搜索))
- [3.3 使用 Milvus Python SDK 实现多模态搜索](#3.3 使用 Milvus Python SDK 实现多模态搜索)
本文包含milvus安装使用、attu 可视化,完整指南启动 Milvus 进行了向量相似度搜索,利用CLIP模型进行多模态检索,附完整代码。
1.Milvus简介(2019)
1.1 什么是向量检索
向量是具有一定大小和方向的量,可以简单理解为一串数字的集合,就像一行多列的矩阵,比如:2,0,1,9,0,6,3,0。每一行代表一个数据项,每一列代表一个该数据项的各个属性。特征向量是包含事物重要特征的向量。大家比较熟知的一个特征向量是RGB (红-绿-蓝)色彩。每种颜色都可以通过对红®、绿(G)、蓝(B)三种颜色的比例来得到。这样一个特征向量可以描述为:颜色 = 红,绿,蓝。向量检索是指从向量库中检索出距离目标向量最近的 K 个向量。一般我们用两个向量间的欧式距离,余弦距离等来衡量两个向量间的距离,一次来评估两个向量的相似度。
2 Milvus安装
2.1 服务器配置
(milvus) [root@ecs-86676-0005 suanfa_jingxiang]# docker --version
Docker version 19.03.9, build 9d988398e7
(milvus) [root@ecs-86676-0005 suanfa_jingxiang]# docker-compose --version
Docker Compose version v2.21.0
(milvus) [root@ecs-86676-0005 suanfa_jingxiang]# uname -a
Linux ecs-86676-0005 4.18.0-348.7.1.el8_5.x86_64 #1 SMP Wed Dec 22 13:25:12 UTC 2021 x86_64 x86_64 x86_64 GNU/Linux
使用Docker Compose安装 Milvus standalone(即单机版),进行一个快速milvus的体验。
2.2 前提条件
- 系统可以使用centos或者ubuntu
- 系统已经安装docker和docker-compose
- milvus版本这里选择2.3.1。由于milvus依赖etcd和minio,因此需要先启动这2个组件。同样也使用docker进行启动。
etcd:用来存储milvus的元数据。
minio:用来存储milvus的向量数据和索引数据。
下载milvus-standalone-docker-compose.yml 文件,保存为docker-compose.yml:
wget https://github.com/milvus-io/milvus/releases/download/v2.3.1/milvus-standalone-docker-compose.yml -O docker-compose.yml这里经过了一定修改,让其更加方便使用。
这个yml文件里面定义了etcd、minio、milvus的启动参数。
修改后的docker-compose.yml文件内容如下:
version: '3.5'

services:
  etcd:
    container_name: milvus-etcd
    image: quay.io/coreos/etcd:v3.5.5
    environment:
      - ETCD_AUTO_COMPACTION_MODE=revision
      - ETCD_AUTO_COMPACTION_RETENTION=1000
      - ETCD_QUOTA_BACKEND_BYTES=4294967296
      - ETCD_SNAPSHOT_COUNT=50000
    volumes:
      - ${DOCKER_VOLUME_DIRECTORY:-.}/volumes/etcd:/etcd
    ports:
      - "2379:2379"
    command: etcd -advertise-client-urls=http://127.0.0.1:2379 -listen-client-urls http://0.0.0.0:2379 --data-dir /etcd
    healthcheck:
      test: ["CMD", "etcdctl", "endpoint", "health"]
      interval: 5s
      timeout: 3s
      retries: 10

  minio:
    container_name: milvus-minio
    image: minio/minio:RELEASE.2023-03-20T20-16-18Z
    environment:
      MINIO_ACCESS_KEY: minioadmin
      MINIO_SECRET_KEY: minioadmin
    ports:
      - "9001:9001"
      - "9000:9000"
    volumes:
      - ${DOCKER_VOLUME_DIRECTORY:-.}/volumes/minio:/minio_data
    command: minio server /minio_data --console-address ":9001"
    healthcheck:
      test: ["CMD", "curl", "-f", "http://localhost:9000/minio/health/live"]
      interval: 5s
      timeout: 3s
      retries: 10

  standalone:
    container_name: milvus-standalone
    image: milvusdb/milvus:v2.3.1
    command: ["milvus", "run", "standalone"]
    environment:
      ETCD_ENDPOINTS: etcd:2379
      MINIO_ADDRESS: minio:9000
    volumes:
      - ${DOCKER_VOLUME_DIRECTORY:-.}/volumes/milvus:/var/lib/milvus
    healthcheck:
      test: ["CMD", "curl", "-f", "http://localhost:9091/healthz"]
      interval: 30s
      start_period: 90s
      timeout: 20s
      retries: 3
    ports:
      - "19530:19530"
      - "9091:9091"
    depends_on:
      - "etcd"
      - "minio"

networks:
  default:
    name: milvus
然后后台启动这些容器:
docker-compose up -d
-d 代表后台启动
使用ps命令查看容器:
如果看到healthy状态,说明容器内的服务可以正常使用了。

2.3 启动attu
attu为milvus的一款图形化管理工具,非常方便对milvus的一些管理。
启动attu:
docker pull zilliz/attu:v2.3.0l
docker run -d --name=attu -p 2099:3000 -e MILVUS_URL=your ip zilliz/attu:v2.3.0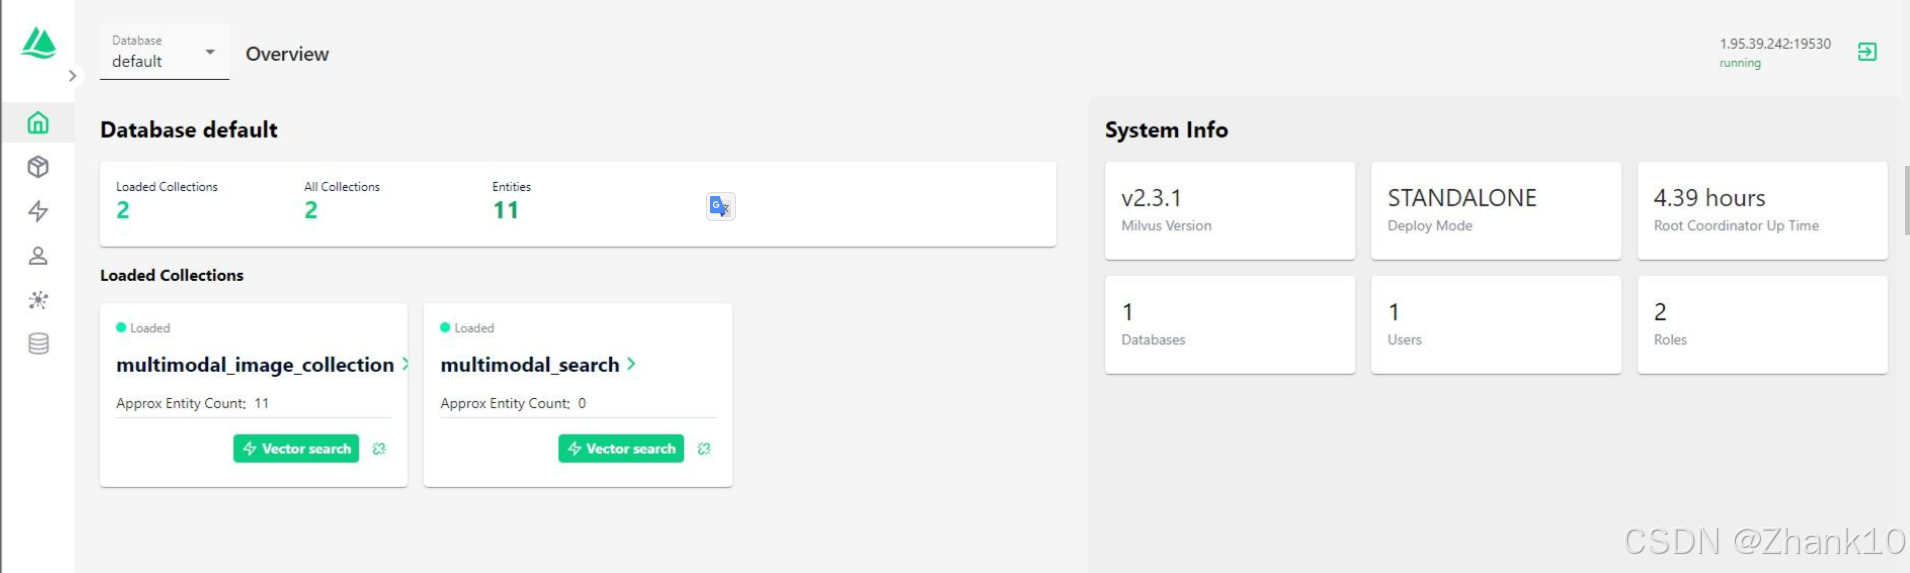
2.4 下载示例代码进行测试
下载 hello_milvus.py 直接或使用以下命令
wget https://raw.githubusercontent.com/milvus-io/pymilvus/v2.2.8/examples/hello_milvus.py
or
wget https://raw.githubusercontent.com/milvus-io/pymilvus/v2.2.x/examples/hello_milvus.py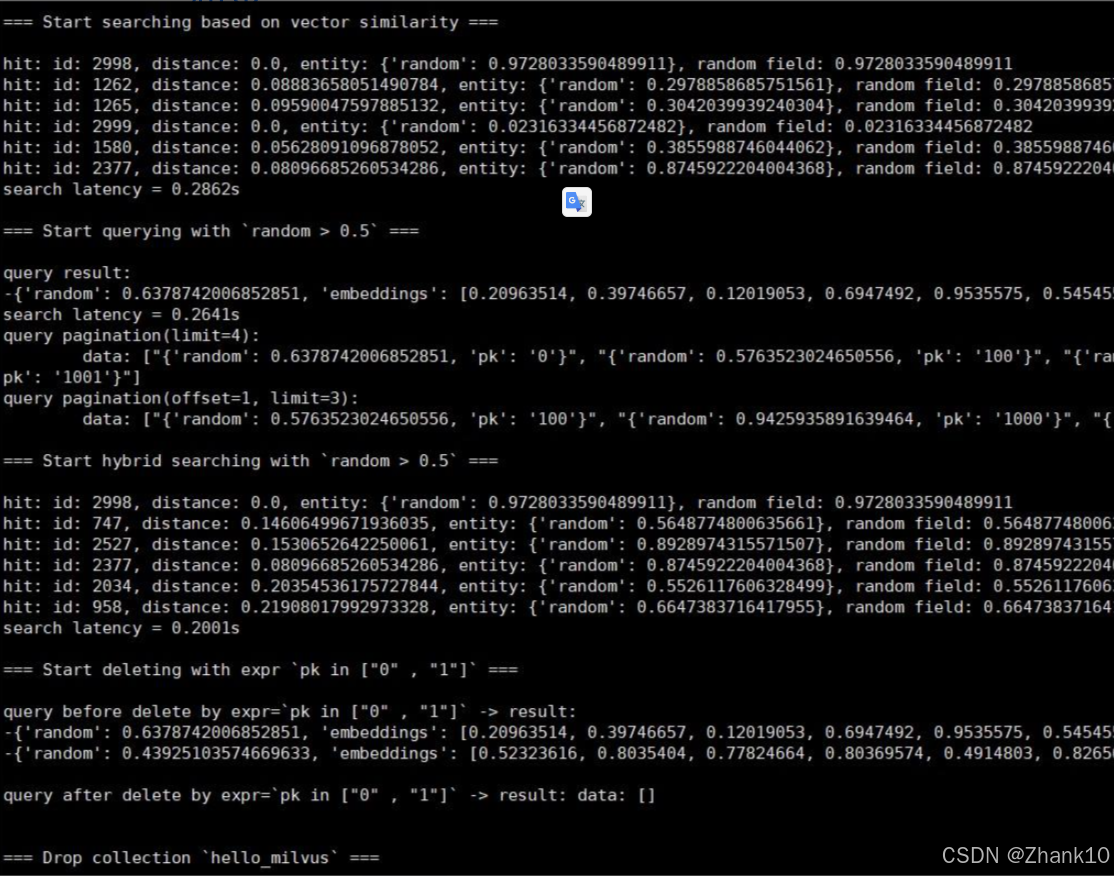
3 多模态搜索场景
3.1 文搜图
文搜图是指用自然语言描述来检索相关图片。这种搜索模式结合了文本理解和图像特征匹配。
- 实现步骤:
- 使用 Chinese CLIP 模型将查询文本转换为向量。
- 在 Milvus 中搜索与查询向量最相似的图片向量。
3.2 图搜图(相似图片搜索)
图搜图允许用户上传一张图片,然后找到数据库中与之相似的图片。
- 实现步骤:
- 使用 Chinese CLIP 模型提取查询图片的特征向量。
- 在 Milvus 中执行向量相似度搜索,找出最相似的图片。
3.3 使用 Milvus Python SDK 实现多模态搜索
下面我们将使用 Milvus Python SDK 来演示如何实现上述搜索场景的核心功能。Milvus 提供了多种 API 和 SDK,包括 RESTful API、Python SDK (PyMilvus)、Go SDK、Java SDK、Node.js SDK,以及由 Microsoft 贡献的 C# SDK。在本例中,我们将使用 PyMilvus 。
-
连接Milvus并创建集合
这里,我们使用了 IVF_FLAT 索引。Milvus 支持多种索引类型,包括 FLAT、IVF_FLAT、IVF_SQ8、IVF_PQ、HNSW、ANNOY 等,您可以根据具体需求选择合适的索引类型。
首先,安装必要的库:pip install pymilvus clip torch pillow
完整代码如下:
from pymilvus import connections, Collection, FieldSchema, CollectionSchema, DataType, utility
import os
import torch
from PIL import Image
import clip


class MilvusImageSearch:
    def __init__(self, host="0.0.0.0", port="19530", top_k=2, save_folder="output", image_folder_path="data"):
        self.top_k = top_k
        self.save_folder = save_folder
        self.image_folder_path = image_folder_path

        # 连接到 Milvus 服务器
        connections.connect("default", host=host, port=port)
        self.collection_name = "multimodal_image_collection"

        if utility.has_collection(self.collection_name):
            utility.drop_collection(self.collection_name)

        # 定义 Collection Schema
        fields = [
            FieldSchema(name="id", dtype=DataType.INT64, is_primary=True, auto_id=False),
            FieldSchema(name="embedding", dtype=DataType.FLOAT_VECTOR, dim=512),
            FieldSchema(name="image_path", dtype=DataType.VARCHAR, max_length=512)
        ]
        schema = CollectionSchema(fields, "多模态图片集合")
        self.collection = Collection(self.collection_name, schema)

        # 创建索引以加快搜索速度
        index_params = {"metric_type": "L2", "index_type": "IVF_FLAT", "params": {"nlist": 1024}}
        self.collection.create_index("embedding", index_params)

        # 加载 CLIP 模型
        self.device = "cuda" if torch.cuda.is_available() else "cpu"
        self.model, self.preprocess = clip.load("ViT-B/32", device=self.device)

    def image_to_vector(self, image_path):
        image = Image.open(image_path)
        image = self.preprocess(image).unsqueeze(0).to(self.device)
        with torch.no_grad():
            image_features = self.model.encode_image(image)
        return image_features.cpu().numpy()[0]

    def batch_insert_images(self, batch_size=10):
        image_files = [os.path.join(self.image_folder_path, img) for img in os.listdir(self.image_folder_path)
                       if img.lower().endswith(('.png', '.jpg', '.jpeg'))]

        ids, embeddings, image_paths = [], [], []
        for i, image_file in enumerate(image_files):
            try:
                vector = self.image_to_vector(image_file)
                ids.append(i + 1)
                embeddings.append(vector)
                image_paths.append(image_file)
            except Exception as e:
                print(f"处理图片 {image_file} 出错: {e}")
                continue

            if len(embeddings) == batch_size:
                try:
                    self.collection.insert([ids, embeddings, image_paths])
                    print(f"成功插入 {len(ids)} 条记录")
                    ids, embeddings, image_paths = [], [], []
                except Exception as e:
                    print(f"插入错误: {e}")

        if embeddings:
            try:
                self.collection.insert([ids, embeddings, image_paths])
                print(f"成功插入剩余的 {len(ids)} 条记录")
            except Exception as e:
                print(f"插入错误: {e}")

        self.collection.flush()
        self.collection.load()

    def search_images_by_text(self, query_text):
        try:
            text_inputs = clip.tokenize([query_text]).to(self.device)
            with torch.no_grad():
                text_features = self.model.encode_text(text_inputs)
            query_vector = text_features.cpu().numpy()[0]
            search_params = {"metric_type": "L2", "params": {"nprobe": 10}}
            results = self.collection.search([query_vector], "embedding", search_params, limit=self.top_k,
                                             output_fields=["id", "image_path"])
            return results
        except Exception as e:
            print(f"搜索错误: {e}")
            return []

    def search_similar_images(self, query_image_path):
        try:
            query_vector = self.image_to_vector(query_image_path)
            search_params = {"metric_type": "L2", "params": {"nprobe": 10}}
            results = self.collection.search([query_vector], "embedding", search_params, limit=self.top_k,
                                             output_fields=["id", "image_path"])
            return results
        except Exception as e:
            print(f"搜索错误: {e}")
            return []

    def display_results(self, results):
        os.makedirs(self.save_folder, exist_ok=True)  # 创建保存图片的目录
        for i, result in enumerate(results[0]):
            print(f"Top {i + 1} 匹配图片ID: {result.id}, 距离: {result.distance}")
            image_path = result.entity.get("image_path")
            print(f"图片路径: {image_path}")
            try:
                image = Image.open(image_path)
                image.show()
                # 保存图片到指定目录
                save_path = os.path.join(self.save_folder, f"result_{i + 1}.jpg")
                image.save(save_path)
                print(f"图片已保存到: {save_path}")
            except Exception as e:
                print(f"显示图片出错: {e}")


# 使用示例
search_system = MilvusImageSearch(top_k=3, save_folder="output", image_folder_path="data")

# 插入图片
search_system.batch_insert_images()

# 根据文本搜索图片
query = "dog"
results = search_system.search_images_by_text(query)
print(f"查询文本: '{query}'")
search_system.display_results(results)

# 根据图片搜索相似图片
query_image = "./data/4.jpeg"
results = search_system.search_similar_images(query_image)
print(f"查询图片: '{query_image}'")
search_system.display_results(results)
结果展示
