引言
随着互联网技术的发展,Web 应用越来越复杂,用户对在线办公的需求也日益增加。在许多业务场景中,能够直接在浏览器中预览 Word 文档是一个非常实用的功能。这不仅可以提高用户体验,还能减少用户操作步骤,提升效率。
实现原理
1. 后端服务
假设后端服务已经提供了两个 API 接口:
getFilesList: 获取文件列表。
previewFile: 获取指定文件的内容。
javascript
const express = require('express');
const multer = require('multer');
const fs = require('fs');
const path = require('path');

const app = express();

// 定义文件夹路径
const mergedDir = path.join(__dirname, 'merged');

// 获取文件列表
app.get('/getFilesList', (req, res) => {
    fs.readdir(mergedDir, (err, files) => {
        if (err) {
            return res.status(500).json({ error: '无法读取文件夹' });
        }

        // 获取每个文件的详细信息
        const fileInfos = files.map(file => {
            const filePath = path.join(mergedDir, file);
            const stats = fs.statSync(filePath);

            return {
                fileName: file,
                size: stats.size,
                upTime: stats.mtime,
                isFile: stats.isFile()
            };
        });
        let resContent = {
            code: 200,
            data: fileInfos || [],
            message: '查询成功'
        }

        res.json(resContent);
    });
});

// 文件预览接口
app.get('/download', (req, res) => {
    const { fileName } = req.query;
    const filePath = path.join(mergedDir, fileName);

    fs.access(filePath, fs.constants.F_OK, (err) => {
        if (err) {
            return res.status(404).json({ error: '文件不存在' });
        }

        const stats = fs.statSync(filePath);

        if (stats.isFile()) {
            const contentType = getContentType(fileName);
            res.setHeader('Content-Type', contentType);
            // 对 fileName 进行编码
            const encodedFileName = encodeURIComponent(fileName);
            res.setHeader('Content-Disposition', `inline; filename=${encodedFileName}`);
            fs.createReadStream(filePath).pipe(res);
        } else {
            res.status(400).json({ error: '不是一个文件' });
        }
    });
});

// 获取文件的 MIME 类型
function getContentType(fileName) {
    const ext = path.extname(fileName).toLowerCase();
    switch (ext) {
        case '.js':
            return 'application/javascript';
        case '.json':
            return 'application/json';
        case '.html':
            return 'text/html';
        case '.css':
            return 'text/css';
        case '.txt':
            return 'text/plain';
        case '.png':
            return 'image/png';
        case '.jpg':
        case '.jpeg':
            return 'image/jpeg';
        case '.gif':
            return 'image/gif';
        case '.pdf':
            return 'application/pdf';
        case '.doc':
            return 'application/msword';
        case '.docx':
            return 'application/vnd.openxmlformats-officedocument.wordprocessingml.document';
        case '.ppt':
            return 'application/vnd.ms-powerpoint';
        case '.pptx':
            return 'application/vnd.openxmlformats-officedocument.presentationml.presentation';
        case '.xlsx':
            return 'application/vnd.openxmlformats-officedocument.spreadsheetml.sheet';
        default:
            return 'application/octet-stream';
    }
}

// 启动服务器
const PORT = process.env.PORT || 3000;
app.listen(PORT, () => {
    console.log(`Server is running on port ${PORT}`);
});
2. 前端页面
前端页面使用 Vue.js 和 Element UI 组件库来实现文件列表展示和预览功能。
文件列表展示
-
在组件的
created生命周期钩子中调用getFileName方法,从后端获取文件列表。 -
使用
timeStampToString工具函数将时间戳转换为可读的日期格式。 -
将处理后的数据赋值给
tableData,并在表格中展示。
javascript
async getFileName() {
  const { code, data: resData } = await getFilesList(this.form);
  if (code === 200) {
    resData.forEach(item => {
      item.upTime = timeStampToString(item.upTime);
    });
    this.tableData = resData;
  }
}
预览 Word 文档
-
当用户点击"预览"按钮时,触发 previewDocx 方法。
-
该方法接收当前行的数据对象 { fileName },并调用 previewFile API 获取文件内容。
javascript
async previewDocx({ fileName }) {
  try {
    const response = await previewFile(fileName);
    const reader = new FileReader();

    reader.onload = async (event) => {
      const arrayBuffer = event.target.result;
      const result = await mammoth.convertToHtml({ arrayBuffer });
      const htmlContent = result.value;

      // 创建一个新的窗口
      const newWindow = window.open('', '_blank');

      // 在新窗口中写入 HTML 内容
      newWindow.document.write(`
        <!DOCTYPE html>
        <html>
        <head>
          <title>Word 文档预览</title>
          <meta charset="UTF-8">
          <style>
            /* 添加一些样式以改善预览效果 */
            body {
              font-family: Arial, sans-serif;
              margin: 20px;
            }
          </style>
        </head>
        <body>
          ${htmlContent}
        </body>
        </html>
      `);

      // 确保新窗口的内容加载完成
      newWindow.document.close();
    };
    reader.readAsArrayBuffer(response);
  } catch (err) {
    console.error('Failed to preview file', err);
  }
}
使用 Mammoth 库文件转换
mammoth是一个将 Word 文档(.docx)转换为 HTML 的库。- 在 reader.onload 回调中,使用
mammoth.convertToHtml方法将文件的二进制数据(ArrayBuffer)转换为 HTML 字符串。
javascript
const result = await mammoth.convertToHtml({ arrayBuffer });
const htmlContent = result.value;
创建新窗口预览 word 文档
-
使用 window.open 方法创建一个新的浏览器窗口。
-
在新窗口中写入转换后的 HTML 内容,并添加一些基本的样式以改善预览效果。
javascript
const newWindow = window.open('', '_blank');
newWindow.document.write(`
  <!DOCTYPE html>
  <html>
  <head>
    <title>Word 文档预览</title>
    <meta charset="UTF-8">
    <style>
      body {
        font-family: Arial, sans-serif;
        margin: 20px;
      }
    </style>
  </head>
  <body>
    ${htmlContent}
  </body>
  </html>
`);
newWindow.document.close();
缺点 :使用
mammoth将 Word 文档转换为 HTML 时,会丢失 Word 文档中的样式,导致渲染的页面与原 word 文档差异很大。
转换后的 HTML 与原 Word 文档对比如下

解决办法: 使用 docx-preview 预览 Word 文档
使用 docx-preview 预览 Word 文档
介绍
docx-preview 是一个用于在浏览器中预览 Word 文档(.docx)的 JavaScript 库。它提供了简单易用的 API 来渲染 Word 文档。
安装
bash
npm install docx-preview
# 或者
yarn add docx-preview
主要方法
1. renderAsync
参数:
-
document:Word 文档的二进制数据,可以是Blob、ArrayBuffer或string类型。 -
bodyContainer:DOM 元素,用于放置渲染后的文档内容。 -
styleContainer: DOM 元素,用于渲染文档的样式、编号、字体等。如果设置为 null,则使用bodyContainer。 -
options:一个对象,包含以下可选属性:-
className:string(默认值:"docx"),用于生成默认和文档样式的类名前缀。 -
inWrapper:boolean(默认值:true),是否启用围绕文档内容的包装器,如果启用,文档内容将被包裹在一个额外的容器中。 -
ignoreWidth:boolean(默认值:false),是否禁用页面宽度的渲染,如果启用,页面宽度将不会被应用到渲染的 HTML 中。 -
ignoreHeight:boolean(默认值:false),是否禁用页面高度的渲染,如果启用,页面高度将不会被应用到渲染的 HTML 中。 -
ignoreFonts:boolean(默认值:false),是否禁用字体的渲染,如果启用,文档中的自定义字体将不会被加载和应用。 -
breakPages:boolean(默认值:true),是否在页面中断处进行分页,如果启用,页面中断(如分页符)将被正确处理。 -
ignoreLastRenderedPageBreak:boolean(默认值:true),是否禁用最后一个渲染的页面中断,如果启用,最后一个页面中断将不会被处理。 -
experimental:boolean(默认值:false),是否启用实验性功能(如制表位计算),启用后,可以使用一些尚未完全稳定的高级功能。 -
trimXmlDeclaration:boolean(默认值:true),是否在解析 XML 文档之前移除 XML 声明,如果启用,XML 声明将被移除,以避免解析问题。 -
useBase64URL:boolean(默认值:false),是否将图像、字体等资源转换为 Base64 URL,如果启用,资源将被嵌入到 HTML 中,而不是使用 URL.createObjectURL。 -
renderChanges:boolean(默认值:false),是否启用实验性的文档更改渲染(如插入和删除),启用后,文档中的更改标记将被渲染。 -
renderHeaders:boolean(默认值:true),是否启用页眉的渲染,如果启用,文档中的页眉将被正确渲染。 -
renderFooters:boolean(默认值:true),是否启用页脚的渲染,如果启用,文档中的页脚将被正确渲染。 -
renderFootnotes:boolean(默认值:true),是否启用脚注的渲染,如果启用,文档中的脚注将被正确渲染。 -
renderEndnotes:boolean(默认值:true),是否启用尾注的渲染,如果启用,文档中的尾注将被正确渲染。 -
renderComments:boolean(默认值:false),是否启用实验性的评论渲染,启用后,文档中的评论将被渲染。 -
debug:boolean(默认值:false),是否启用额外的调试日志,启用后,将在控制台输出更多的调试信息,有助于问题排查。
-
示例
javascript
import { renderAsync } from 'your-render-library';

const documentBlob = /* 获取 Word 文档的 Blob 数据 */;
const bodyContainer = document.getElementById('body-container');
const styleContainer = document.getElementById('style-container');

const options = {
    className: 'docx',
    inWrapper: true,
    ignoreWidth: false,
    ignoreHeight: false,
    ignoreFonts: false,
    breakPages: true,
    ignoreLastRenderedPageBreak: true,
    experimental: false,
    trimXmlDeclaration: true,
    useBase64URL: false,
    renderChanges: false,
    renderHeaders: true,
    renderFooters: true,
    renderFootnotes: true,
    renderEndnotes: true,
    renderComments: false,
    debug: false
};

renderAsync(documentBlob, bodyContainer, styleContainer, options)
    .then((wordDocument) => {
        console.log('Document rendered successfully:', wordDocument);
    })
    .catch((error) => {
        console.error('Error rendering document:', error);
    });
预览 Word 文档示例代码
javascript
<template>
  <div class="table">
    <el-table :data="tableData" header-align="center" border style="width: 100%">
      <el-table-column align="center" type="index" width="60" label="序号">
      </el-table-column>
      <el-table-column align="center" prop="fileName" label="文件名" />
      <el-table-column align="center" prop="upTime" label="上传日期" width="200" />
      <el-table-column align="center" fixed="right" label="操作" width="120">
        <template slot-scope="scope">
          <el-button @click="previewDocx(scope.row)" type="text">预览</el-button>
        </template>
      </el-table-column>
    </el-table>

    <el-dialog width="68%" :visible.sync="isShow" :before-close="close" class="doxc_dialog" :show-close="false"
    :close-on-press-escape="true">
      <div class="doxc_con" ref="doxc_con"></div>
    </el-dialog>
  </div>
</template>

<script>
import { previewFile } from "@/api/file";
import { timeStampToString } from "@/utils/utils";
import { getFilesList } from "@/api/file";
import { renderAsync } from 'docx-preview';
export default {
  name: "fileTable",
  data() {
    return {
      pageSizes: [10, 20, 50, 100],
      form: {
        pageSize: 10,
        pageNum: 1,
      },
      total: 0,
      tableData: [],
      isShow: false,
    }
  },
  created() {
    this.getFileName();
  },
  methods: {
    // 获取文件列表
    async getFileName() {
      const { code, data: resData } = await getFilesList(this.form);
      console.log('code, data::: ', code, resData);
      if (code === 200) {
        resData.forEach(item => {
          item.upTime = timeStampToString(item.upTime);
        });
        this.tableData = resData;
      }
    },
    // 预览 DOCX 文件
    async previewDocx({ fileName }) {
      try {
        const response = await previewFile(fileName);
        console.log('response::: ', response);

        let blob = new Blob([response], { type: 'application/vnd.openxmlformats-officedocument.wordprocessingml.document' });

        this.isShow = true;

        // 使用 dialog 组件,需要弹窗完成后再渲染内容
        this.$nextTick(async () => {
          // 渲染预览
          await renderAsync(
            response,
            this.$refs.doxc_con,
          );
        });

      } catch (err) {
        console.error('Failed to preview file', err);
      }
    },
    close() {
      this.isShow = false;
    },

  }
}
</script>

<style lang="scss" scoped>
.table {
  width: 600px;
}

.pagination {
  float: right;
  margin-top: 20px;
}

::v-deep .doxc_dialog .el-dialog__body {
  padding: 0 !important;
}

::v-deep .doxc_dialog .el-dialog {
  margin-top: 5vh !important;
  width: 595.3pt !important;
}

::v-deep .doxc_dialog .el-dialog__header {
  display: none;
}

::v-deep .doxc_dialog .docx-wrapper {
  padding: 0 !important;
}
</style>
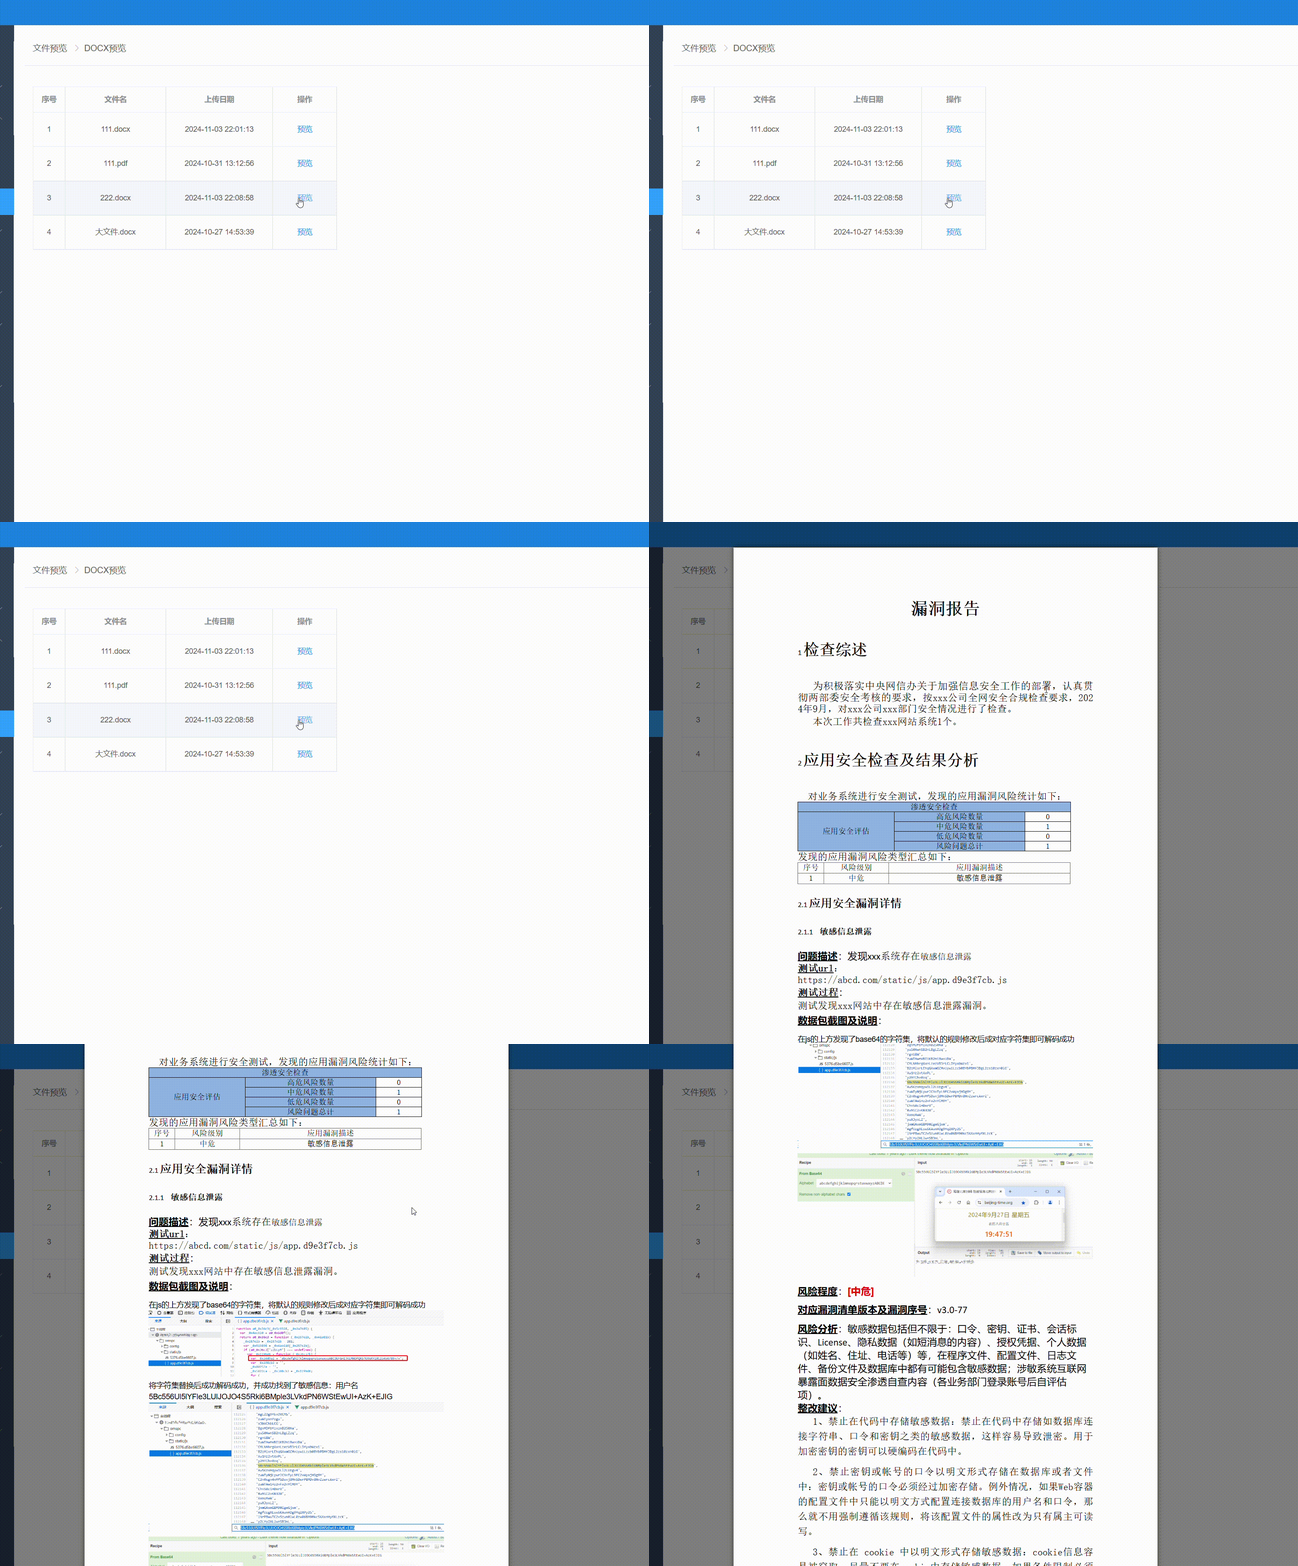
实现效果

总结
本文介绍了如何在 Web 应用中实现 Word 文档的预览功能。后端使用 Express 框架提供文件列表和文件内容的 API 接口,前端使用 Vue.js 和 Element UI 组件库展示文件列表并实现预览功能。通过 mammoth 和 docx-preview 库将 Word 文档转换为 HTML 并在新窗口或对话框中展示,确保了良好的用户体验和较高的预览质量。