RabbitMQ队列详细属性
- 1、队列的属性介绍
-
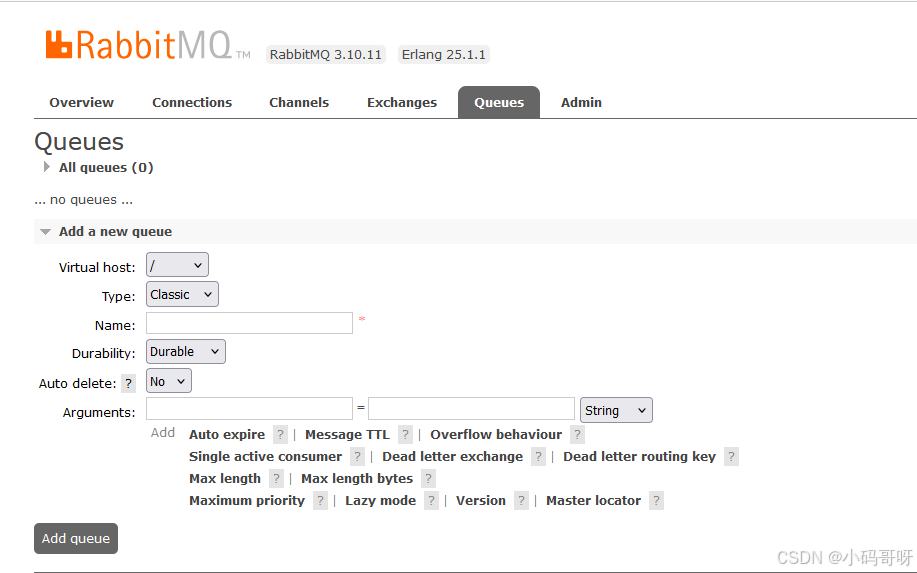
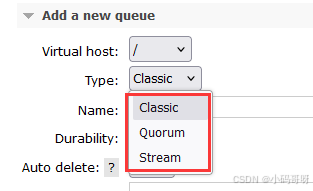
- 1.1、Type:队列类型
- 1.2、Name:队列名称
- 1.3、Durability:声明队列是否持久化
- [1.4、Auto delete: 是否自动删除](#1.4、Auto delete: 是否自动删除)
- 1.5、Exclusive:
- 1.6、Arguments:队列的其他属性,例如指定DLX(死信交换机等);
- 2、队列的属性代码验证
-
- [2.1、Auto delete](#2.1、Auto delete)
- 2.2、Arguments参数属性之x-overflow和x-max-length
- 2.3、Arguments参数属性之x-single-active-consumer
- 2.4、Arguments参数属性之x-max-length-bytes
- 2.5、Arguments参数属性之x-max-priority
1、队列的属性介绍
1.1、Type:队列类型
1.2、Name:队列名称
就是一个字符串,随便一个字符串就可以;
1.3、Durability:声明队列是否持久化
声明队列是否持久化,代表队列在服务器重启后是否还存在,默认值为true;
1.4、Auto delete: 是否自动删除
如果为true,当没有消费者连接到这个队列的时候,队列会自动删除;默认为false
1.5、Exclusive:
exclusive属性的队列只对首次声明它的连接可见,并且在连接断开时自动删除;
基本上不设置它,设置成false
1.6、Arguments:队列的其他属性,例如指定DLX(死信交换机等);
1、x-expires:Number
当Queue(队列)在指定的时间未被访问,则队列将被自动删除;
在指定时间内,队列未被使用(没有被消费者访问),就会自动删除该队列。

2、x-message-ttl:Number
发布的消息在队列中存在多长时间后被取消(单位毫秒);
消息发送到队列中后,在指定时间后会过期。

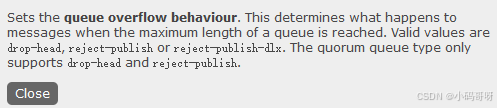
3、x-overflow:String
设置队列溢出行为,当达到队列的最大长度时,消息会发生什么,有效值为Drop Head或Reject Publish;
默认值是Drop Head,即如果队列满了,会从头部开始删除消息,继续接收新的消息
Reject Publish拒绝发布,如果队列满了,就不再接收新的消息了。
4、x-max-length:Number
队列所能容下消息的最大长度,当超出长度后,新消息将会覆盖最前面的消息,类似于Redis的LRU算法;

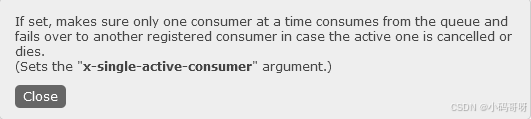
5、 x-single-active-consumer:默认为false
激活单一的消费者,也就是该队列只能有一个消息者消费消息;
如果设置该值为true,那么只能设置一个消费者接收消息。
6、x-max-length-bytes:Number
限定队列的最大占用空间,当超出后也使用类似于Redis的LRU算法;

7、x-dead-letter-exchange:String
指定队列关联的死信交换机,有时候我们希望当队列的消息达到上限后溢出的消息不会被删除掉,而是走到另一个队列中保存起来;
8.x-dead-letter-routing-key:String
指定死信交换机的路由键,一般和6一起定义;
9.x-max-priority:Number
如果将一个队列加上优先级参数,那么该队列为优先级队列;
(1)给队列加上优先级参数使其成为优先级队列
x-max-priority=10【0-255取值范围】
(2)给消息加上优先级属性
通过优先级特性,将一个队列实现插队消费;
MessageProperties messageProperties=new MessageProperties();
messageProperties.setPriority(8);
10、x-queue-mode:String(理解下即可)
队列类型x-queue-mode=lazy懒队列,在磁盘上尽可能多地保留消息以减少RAM使用,如果未设置,则队列将保留内存缓存以尽可能快地传递消息;

11、x-queue-master-locator:String(用的较少)
在集群模式下设置队列分配到的主节点位置信息;
每个queue都有一个master节点,所有对于queue的操作都是事先在master上完成,之后再slave上进行相同的操作;
每个不同的queue可以坐落在不同的集群节点上,这些queue如果配置了镜像队列,那么会有1个master和多个slave。
基本上所有的操作都落在master上,那么如果这些queues的master都落在个别的服务节点上,而其他的节点又很空闲,这样就无法做到负载均衡,那么势必会影响性能;
关于master queue host 的分配有几种策略,可以在queue声明的时候使用x-queue-master-locator参数,或者在policy上设置queue-master-locator,或者直接在rabbitmq的配置文件中定义queue_master_locator,有三种可供选择的策略:
(1)min-masters:选择master queue数最少的那个服务节点host;
(2)client-local:选择与client相连接的那个服务节点host;
(3)random:随机分配;
2、队列的属性代码验证
2.1、Auto delete
2.1.1、RabbitConfig配置类(关键代码)
java
package com.power.config;
import org.springframework.amqp.core.*;
import org.springframework.beans.factory.annotation.Value;
import org.springframework.context.annotation.Bean;
import org.springframework.context.annotation.Configuration;
@Configuration
public class RabbitConfig {
@Value("${my.exchangeName}")
private String exchangeName;
@Value("${my.queueName}")
private String queueName;
//创建交换机
@Bean
public DirectExchange directExchange(){
return ExchangeBuilder
.directExchange(exchangeName)
.build();
}
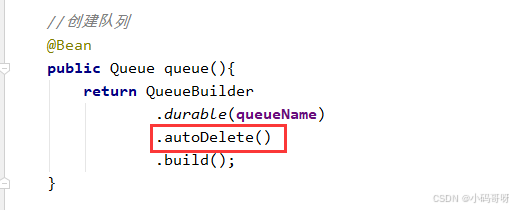
//创建队列
@Bean
public Queue queue(){
return QueueBuilder
.durable(queueName)
.autoDelete()
.build();
}
@Bean
public Binding binding(DirectExchange exchangeName,Queue queueName){
return BindingBuilder.bind(queueName).to(exchangeName).with("info");
}
}2.1.2、发送消息
java
package com.power.service;

import lombok.extern.slf4j.Slf4j;
import org.springframework.amqp.core.Message;
import org.springframework.amqp.core.MessageBuilder;
import org.springframework.amqp.rabbit.core.RabbitTemplate;
import org.springframework.beans.factory.annotation.Value;
import org.springframework.context.annotation.Bean;
import org.springframework.stereotype.Service;

import javax.annotation.Resource;
import java.util.Date;

@Service
@Slf4j
public class MessageService {

    @Resource
    private RabbitTemplate rabbitTemplate;

    @Value("${my.exchangeName}")
    private String exchangeName;

    @Bean
    public void sendMsg(){
        Message message = MessageBuilder.withBody("hello world".getBytes()).build();
        rabbitTemplate.convertAndSend(exchangeName,"info",message);
        log.info("消息发送完毕,发送时间是:"+new Date());
    }
}
2.1.3、接收消息
java
package com.power.message;

import lombok.extern.slf4j.Slf4j;
import org.springframework.amqp.core.Message;
import org.springframework.amqp.rabbit.annotation.RabbitListener;
import org.springframework.stereotype.Component;

@Component
@Slf4j
public class ReceiveMessage {

    private static final String queueName="queue.queueProperties.01";

    @RabbitListener(queues={queueName})
    public void receiveMsg(Message message){
        log.info("接收到队列的消息:{}",new String(message.getBody()));
    }
}
2.1.4、启动类
java
package com.power;

import com.power.service.MessageService;
import org.springframework.boot.ApplicationArguments;
import org.springframework.boot.ApplicationRunner;
import org.springframework.boot.SpringApplication;
import org.springframework.boot.autoconfigure.SpringBootApplication;

import javax.annotation.Resource;

@SpringBootApplication
public class Application implements ApplicationRunner {

    @Resource
    private MessageService messageService;

    public static void main(String[] args) {
        SpringApplication.run(Application.class);
    }

    @Override
    public void run(ApplicationArguments args) throws Exception {
        messageService.sendMsg();
    }
}
2.1.5、配置文件application.yml
java
server:
  port: 8080
spring:
  application:
    name: rabbit_11_quque_properties01_autoDelete

  rabbitmq:
    host: 你的服务器IP
    port: 5672
    username: 你的账号
    password: 你的密码
    virtual-host: power

my:
  exchangeName: exchange.queueProperties.01
  queueName: queue.queueProperties.01
2.1.6、配置文件pom.xml
java
<?xml version="1.0" encoding="UTF-8"?>
<project xmlns="http://maven.apache.org/POM/4.0.0" xmlns:xsi="http://www.w3.org/2001/XMLSchema-instance"
  xsi:schemaLocation="http://maven.apache.org/POM/4.0.0 http://maven.apache.org/xsd/maven-4.0.0.xsd">
  <modelVersion>4.0.0</modelVersion>

  <groupId>com.power</groupId>
  <artifactId>rabbit_11_quque_properties01_autoDelete</artifactId>
  <version>1.0-SNAPSHOT</version>

  <name>rabbit_11_quque_properties01_autoDelete</name>

  <properties>
    <maven.compiler.source>8</maven.compiler.source>
    <maven.compiler.target>8</maven.compiler.target>
    <project.build.sourceEncoding>UTF-8</project.build.sourceEncoding>
  </properties>

  <parent>
    <groupId>org.springframework.boot</groupId>
    <artifactId>spring-boot-starter-parent</artifactId>
    <version>2.6.13</version>
    <relativePath/>
  </parent>

  <dependencies>
    <dependency>
      <groupId>org.springframework.boot</groupId>
      <artifactId>spring-boot-starter-web</artifactId>
    </dependency>
    <dependency>
      <groupId>org.springframework.boot</groupId>
      <artifactId>spring-boot-starter-test</artifactId>
      <scope>test</scope>
    </dependency>
    <dependency>
      <groupId>org.projectlombok</groupId>
      <artifactId>lombok</artifactId>
      <version>1.18.24</version>
    </dependency>
    <dependency>
      <groupId>org.springframework.boot</groupId>
      <artifactId>spring-boot-starter-amqp</artifactId>
    </dependency>
  </dependencies>

  <build>
    <plugins>
      <plugin>
        <groupId>org.springframework.boot</groupId>
        <artifactId>spring-boot-maven-plugin</artifactId>
      </plugin>
    </plugins>
  </build>

</project>
2.1.7、测试
启动服务:消息发送成功,接收消息成功
 登录rabbitmq后台,查看到有一个队列
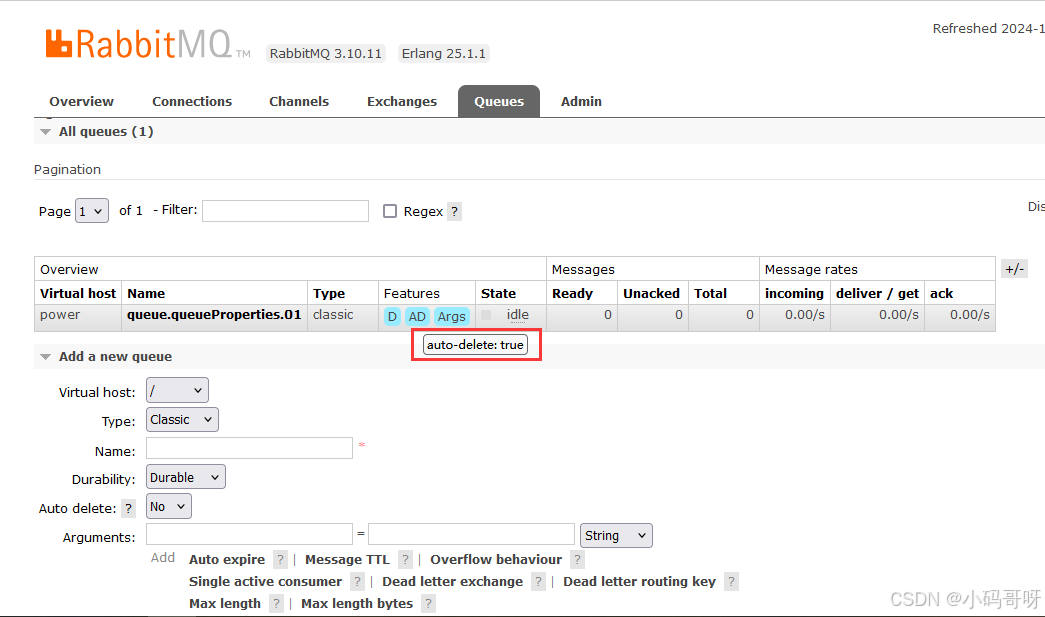
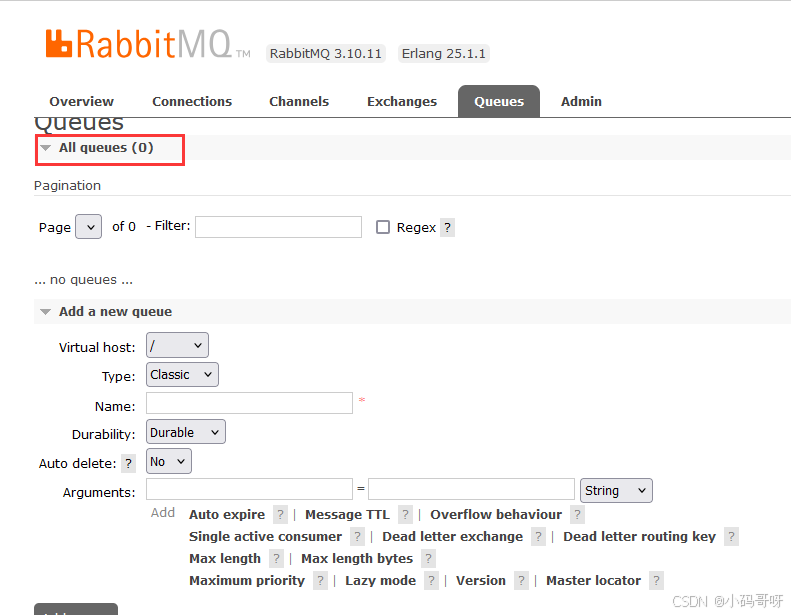
此时我们停止服务,即断掉消费者和队列的联系,队列会自动删除。
2.2、Arguments参数属性之x-overflow和x-max-length
2.2.1、RabbitConfig配置类

java
package com.power.config;

import org.springframework.amqp.core.*;
import org.springframework.beans.factory.annotation.Value;
import org.springframework.context.annotation.Bean;
import org.springframework.context.annotation.Configuration;

import java.util.HashMap;
import java.util.Map;

@Configuration
public class RabbitConfig {

    @Value("${my.exchangeName}")
    private String exchangeName;

    @Value("${my.queueName}")
    private String queueName;

    //创建交换机
    @Bean
    public DirectExchange directExchange(){
        return ExchangeBuilder.directExchange(exchangeName).build();
    }

    //创建队列
    @Bean
    public Queue queue(){
        Map<String,Object> arguments = new HashMap<>();
        arguments.put("x-overflow","reject-publish");//队列的溢出行为,默认是删除头部,此处设置未拒绝发布(当队列满了之后,不再接收消息)
        arguments.put("x-max-length",5);//队列的最大长度
        return new Queue(queueName,true,false,false,arguments);
    }

    @Bean
    public Binding binding(DirectExchange directExchange,Queue queue){
        return BindingBuilder.bind(queue).to(directExchange).with("info");
    }
}
2.2.2、其他代码同上
2.2.3、测试
启动服务,登录rabbitmq后台。
我们发现当设置为arguments.put("x-overflow","reject-publish");和arguments.put("x-max-length",5);时,我们发现队列里只存放了5条消息。后边的678三条消息并没有进入队列。

2.3、Arguments参数属性之x-single-active-consumer
2.3.1、消费者
我们设置多个消费者,接收生产者发送的消息
java
package com.power.message;

import lombok.extern.slf4j.Slf4j;
import org.springframework.amqp.core.Message;
import org.springframework.amqp.rabbit.annotation.RabbitListener;
import org.springframework.stereotype.Component;

import java.util.Date;

@Component
@Slf4j
public class ReceiveMessage {

    @RabbitListener(queues={"queue.properties.03"})
    public void receiveMsg1(Message message){
        byte[] body = message.getBody();
        String msg = new String(body);
        log.info("1监听到的消息是:"+msg+",接收的时间是:"+new Date());
    }

    @RabbitListener(queues={"queue.properties.03"})
    public void receiveMsg2(Message message){
        byte[] body = message.getBody();
        String msg = new String(body);
        log.info("2监听到的消息是:"+msg+",接收的时间是:"+new Date());
    }

    @RabbitListener(queues={"queue.properties.03"})
    public void receiveMsg3(Message message){
        byte[] body = message.getBody();
        String msg = new String(body);
        log.info("3监听到的消息是:"+msg+",接收的时间是:"+new Date());
    }

}
2.3.2、RabbitConfig配置类
java
package com.power.config;

import org.springframework.amqp.core.*;
import org.springframework.beans.factory.annotation.Value;
import org.springframework.context.annotation.Bean;
import org.springframework.context.annotation.Configuration;

import java.util.HashMap;
import java.util.Map;

@Configuration
public class RabbitConfig {

    @Value("${my.exchangeName}")
    private String exchangeName;

    @Value("${my.queueName}")
    private String queueName;

    //创建交换机
    @Bean
    public DirectExchange directExchange(){
        return ExchangeBuilder.directExchange(exchangeName).build();
    }

    //创建队列
    @Bean
    public Queue queue(){
        Map<String,Object> arguments = new HashMap<>();
        return new Queue(queueName,true,false,false,arguments);
    }

    @Bean
    public Binding binding(DirectExchange directExchange,Queue queue){
        return BindingBuilder.bind(queue).to(directExchange).with("info");
    }
}
2.3.3、测试
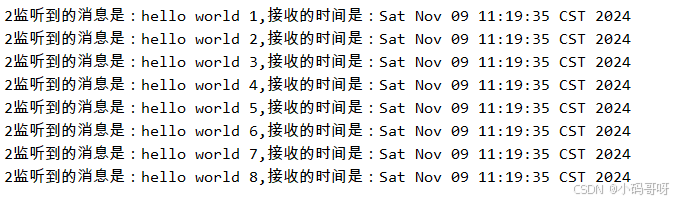
启动服务,我们发现,当不设置该参数时,3个消费者都可以接收到消息
当设置了该参数时:只有一个消费者可以接收到消息

2.4、Arguments参数属性之x-max-length-bytes
如下图所示,修改RabbitConfig类,设置队列的x-max-length-bytes属性值为100
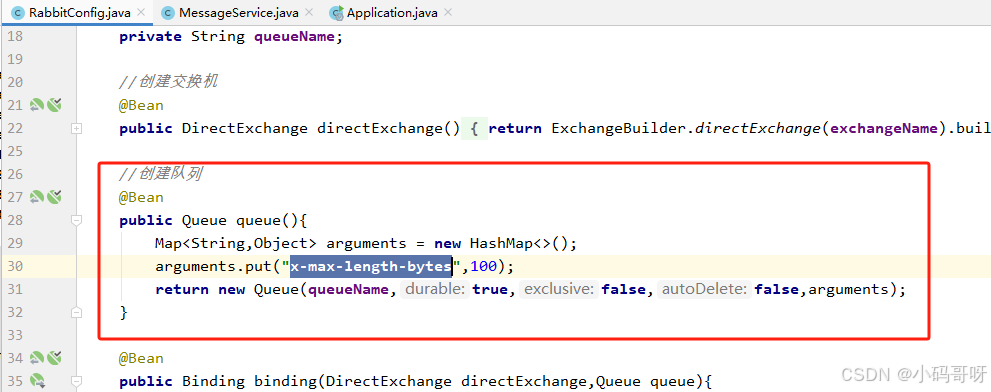
尝试发送100条消息

启动服务,登录rabbitmq后台:
可以看到队列中只有7条消息

2.5、Arguments参数属性之x-max-priority
2.5.1、设置优先级
给队列设置优先级

给队列中的消息设置优先级

2.5.2、测试
启动服务,登录rabbitmq后台


